
ChefYota4x4's 1987 4Runner Build-Up Thread
 10-30-2012, 07:51 PM
#5201
Hello RAD.. Missed your question. I tried the Permatex Rust converter and wasnt impressed with it. Havent tried the POR but know a few that have and really like it. It isnt cheap though. I recently found my clutch master cylinder is leaking a little and need to change mine as well. As far as auto paint, I am not sure how that would work.
Chef, Toyota reference site says our 4Runner red paint color code is 3D7, correct?
Last edited by RAD4Runner; 10-30-2012 at 08:01 PM.
 10-30-2012, 08:36 PM
#5202
Hey RAD, .... cool link.
Here's what I found on another page therein.........>>>>>>>>
http://www.automotivetouchup.com/paint-codes/toyota.htm
The diagram says it's on the C/TR section of the Door Jam Placard. I'ma look. I know in 84 they had a different one that was CLOSE, but more flat/less blue-more yellow in it(?) They also had a cool Brick Color, haha.
10-30-2012, 08:39 PM
#5203
It's made to wrap around Ducting and I'm sure resist condensation, etc., right?
 10-30-2012, 08:47 PM
#5204
10-31-2012, 01:09 AM
#5205
Registered User
yup last thing ya want is rusted out ducts in yer acttic dumping your AC into the heat
10-31-2012, 08:59 AM
#5206
Contributing Member
Join Date: Mar 2003
Location: COTKU,Ontario,Canada
Posts: 11,334
Likes: 0
Received 0 Likes
on
0 Posts
Another product to consider using is a heavy black cellular rubber mat... can't remember the trade name for it but it is about 0.5" thick and is used to insulate hot water tanks and such you get it from professional plumbing/heating suppliers... got a roll of it one time on a job when I was a contractor and glued it to the partition wall in the van and it quieted down and warmed up the cab significantly.
Relays fail when atmospheric moisture starts to cause corrosion on the contacts which leads to arcing causing carbon build-up which makes the contact worse leading to more arcing... more carbon eventually to the point where not enough current flows to pull the relay in or through the contacts to what ever is being controlled... in high current applications like a starter there is even a remote possibility of a fire starting in the relay if it gets hot enough... not usually a concern in auto applications but it can happen.
Cheap relays included in the box of some off road lights can fail in this way and melt.
I would say the issue with your window relay is age related degradation of the contacts... it may be time to replace it with a new one or a newer used one...
10-31-2012, 08:59 AM
#5207
Contributing Member
Join Date: Mar 2003
Location: COTKU,Ontario,Canada
Posts: 11,334
Likes: 0
Received 0 Likes
on
0 Posts
Another product to consider using is a heavy black cellular rubber mat... can't remember the trade name for it but it is about 0.5" thick and is used to insulate hot water tanks and such you get it from professional plumbing/heating suppliers... got a roll of it one time on a job when I was a contractor and glued it to the partition wall in the van and it quieted down and warmed up the cab significantly.
Relays fail when atmospheric moisture starts to cause corrosion on the contacts which leads to arcing causing carbon build-up which makes the contact worse leading to more arcing... more carbon eventually to the point where not enough current flows to pull the relay in or through the contacts to what ever is being controlled... in high current applications like a starter there is even a remote possibility of a fire starting in the relay if it gets hot enough... not usually a concern in auto applications but it can happen.
Cheap relays included in the box of some off road lights can fail in this way and melt.
I would say the issue with your window relay is age related degradation of the contacts... it may be time to replace it with a new one or a newer used one...
Relays fail when atmospheric moisture starts to cause corrosion on the contacts which leads to arcing causing carbon build-up which makes the contact worse leading to more arcing... more carbon eventually to the point where not enough current flows to pull the relay in or through the contacts to what ever is being controlled... in high current applications like a starter there is even a remote possibility of a fire starting in the relay if it gets hot enough... not usually a concern in auto applications but it can happen.
Cheap relays included in the box of some off road lights can fail in this way and melt.
I would say the issue with your window relay is age related degradation of the contacts... it may be time to replace it with a new one or a newer used one...
10-31-2012, 09:17 AM
#5208
Another product to consider using is a heavy black cellular rubber mat... can't remember the trade name for it but it is about 0.5" thick and is used to insulate hot water tanks and such you get it from professional plumbing/heating suppliers... got a roll of it one time on a job when I was a contractor and glued it to the partition wall in the van and it quieted down and warmed up the cab significantly.
Yeah. I found excercise mat from Big Lots. Similar dense very soft rubber foam, 3/8- inch thick. I think I'll use it for wheel well humps. Also got Peel and Stick Ensolite from RAAMAudio, altho this is only 1/8 inch thick. Will use inside body panels no top of P&S. Had I found Frost King Before this I wud have just used Frost King. My lesson learned, Chef's gain
 10-31-2012, 11:30 AM
#5210
 hahahhaa. In fact,
  .... Right on!
  hehehe. I was honestly concerned there for a minute. But yeah, I think this stuff is fantastic. It went from really hot for a couple days with the windows up in the driveway... to 42*F last night... back to 70*F today.... Of course, a drive to Havasu in July would be more trying a test... But I feel that with the U-Seal completely hermetically sealed-in to the panel with Aluminum tape..... then covered with Frost King Duct Foam-Aluminum backed insulation.... it should be TOIGHT!
  ALWAYS throw whatever is on your mind out there, Dragon.... Wouldn't be too troublesome to pull up in this case, ... but even if it was, I'd want to know and just get it over with NOW, not months of rot down the road, right?
  lol. Thanks, Dragon.
 Another product to consider using is a heavy black cellular rubber mat... can't remember the trade name for it but it is about 0.5" thick and is used to insulate hot water tanks and such you get it from professional plumbing/heating suppliers... got a roll of it one time on a job when I was a contractor and glued it to the partition wall in the van and it quieted down and warmed up the cab significantly. Yeah, I saw that a few times.... It would only be a lil thick at a couple spots, like behind the jack and then wiring in the corner/rear... but, it is nice stuff. I think the Aluminum is a good last barrier though, ya know? Seems to be helping a lot, with hot and cold(as it's supposed to, of course, hehe)
Relays fail when atmospheric moisture starts to cause corrosion on the contacts which leads to arcing causing carbon build-up which makes the contact worse leading to more arcing... more carbon eventually to the point where not enough current flows to pull the relay in or through the contacts to what ever is being controlled... in high current applications like a starter there is even a remote possibility of a fire starting in the relay if it gets hot enough... not usually a concern in auto applications but it can happen.
Cheap relays included in the box of some off road lights can fail in this way and melt.
I would say the issue with your window relay is age related degradation of the contacts... it may be time to replace it with a new one or a newer used one...
I went to Signal Electronics for my Relay... I did not have a relay with a kit type of situation as these lights are from another rig I used to have, held over. I used 10 and 14AWG wiring at the least, throughout the 8" Lights Wiring... A decent Quality Switch, and I believe a "Quake" Relay, which I guess is meant for sound systems(but obviously can be used for other things).
Paul, do you think there is any way to give this a cleaning? Or am I pretty much better off trying to use a cleaner one/best case-buy a NEW-NEW one? Guess it can't hurt to try this one... Not a huge deal to pull the panel for replacement if it doesn't last very long. I think those get quite the vibration festival going on there, too. I can see it on there, kinda dangling from a Tab(I'll try to remember to get more pics.... It's not mounted to both sides or a corner, so the tabs can vibrate I guess? I wouldn't think that's GREAT for them, right? PLUS, as I mentioned, it gets like an OVEN in there! ) Again, another good dude helping me with practical application experience! THANKS!
( PS> Does that stuff have 'sticky back', Paul? ) Choices, choices, now Chef's brain is spinning - LOL!
Yeah. I found excercise mat from Big Lots. Similar dense very soft rubber foam, 3/8- inch thick. I think I'll use it for wheel well humps. Also got Peel and Stick Ensolite from RAAMAudio, altho this is only 1/8 inch thick. Will use inside body panels no top of P&S. Had I found Frost King Before this I wud have just used Frost King. My lesson learned, Chef's gain
Yeah. I found excercise mat from Big Lots. Similar dense very soft rubber foam, 3/8- inch thick. I think I'll use it for wheel well humps. Also got Peel and Stick Ensolite from RAAMAudio, altho this is only 1/8 inch thick. Will use inside body panels no top of P&S. Had I found Frost King Before this I wud have just used Frost King. My lesson learned, Chef's gain
 But, far as 'choices, choices
 '.... I don't think so, hahaha. There is NO choices left to be made, not really, unless I really want to destroy what's left of my brain,
  BUT, that stuff Paul Mentioned would be GREAT for insulation of sound inside of a mock box, RAD, ... hint! lol.
 Wooot! Thanks for the kind words, man! BTW, ... I meant what I said... You have a beautiful wife and child, sir... Congratz! And, thanks for stopping in... And please, chime in any time with a 'OH HECK NOOOOOOOO!' OR 'Hmmm, I think this would be better'... or better yet, ... "AH HAHHHHHHHH, I know this one!
" hahahaha. Take care, man.  10-31-2012, 09:47 PM
#5212
 ... Was great to see you too.. The South Bay... the smallest/big community in the West! It is, isn't it? haha.
 MY BAD... that just proves how TERRIBLY overwhelmed my brain is on the short term memory angle! hahaha... I was in the Yota... then parked it at their house and took the Honda, because it was blocking me in
.... Totally forgot, I hardly drive anything but my rig... Just so happened that was one of those times, ... and I'd forgotten after 20 minutes of eating, Can't wait to see the RED BEASTY! Heck, I wanna have a drive in it, man. I've seen a couple Turbo Supras, CLEAN, over the last few months... Always Auto though. Meh! lol. I envy that lil cherry Supra you got, man.... that thing is SOOOOOO CLEAN! What's the son gonna drive/what's he driving?
Tell your sons it was great to see them too...And VERY nice to meet your wife, Anthony! You have a wonderful family!
11-01-2012, 04:44 AM
#5213
Super Moderator
Staff
iTrader: (1)
Join Date: Aug 2008
Location: Anderson Missouri
Posts: 11,788
Likes: 0
Received 25 Likes
on
22 Posts
One reason I do like PS is that it is thin. Never know that someday may need to add something that you would want out of sight and not taking up space and the side panels would be a great place for such items. It is kind of wasted space that could be used for something.
Here is a link to rebuild the relay box. >>>Link http://www.4crawler.com/4x4/CheapTri...arWindow.shtml
Supposedly you can get Relay # 275-005 at Radio Shack. It is on my list to try someday but will probably take mine not working before I get off of my backside to get it done.
Here is a link to rebuild the relay box. >>>Link http://www.4crawler.com/4x4/CheapTri...arWindow.shtml
Supposedly you can get Relay # 275-005 at Radio Shack. It is on my list to try someday but will probably take mine not working before I get off of my backside to get it done.
 hahahaha. jk... YEAH, that's another page I've never seen on there.... WTH? THANKS, Terry.... very cool to slap it here. I'm hoping for corrosion or a simple fix like that.
11-01-2012, 02:08 PM
hahahaha. jk... YEAH, that's another page I've never seen on there.... WTH? THANKS, Terry.... very cool to slap it here. I'm hoping for corrosion or a simple fix like that.
11-01-2012, 02:08 PM
#5215
11-02-2012, 01:29 AM
#5216
Well, ...... was overcome, AGAIN, today, with interruptions, brought about by happenstance, etc., etc., ....and then ended the day with FINALLY having opportunity to get the rest done, ....when suddenly, after 20 years, my soldering iron gives up the ghost.  haha.. I'll pick up another iron, tomorrow, and then I'LL TRY to get the rear dome wired up completely, along with the wiring, readied for the other 2 "ON/OFF/DOOR" type lights........
Thank GOODNESS that I at least finished this particular portion before wrapping it up and TRYING to move onto the rest of this section.....
Video of "DOOR" wiring into Tailgate/with diode installation and HOPEFULLY intelligible instructions therein...

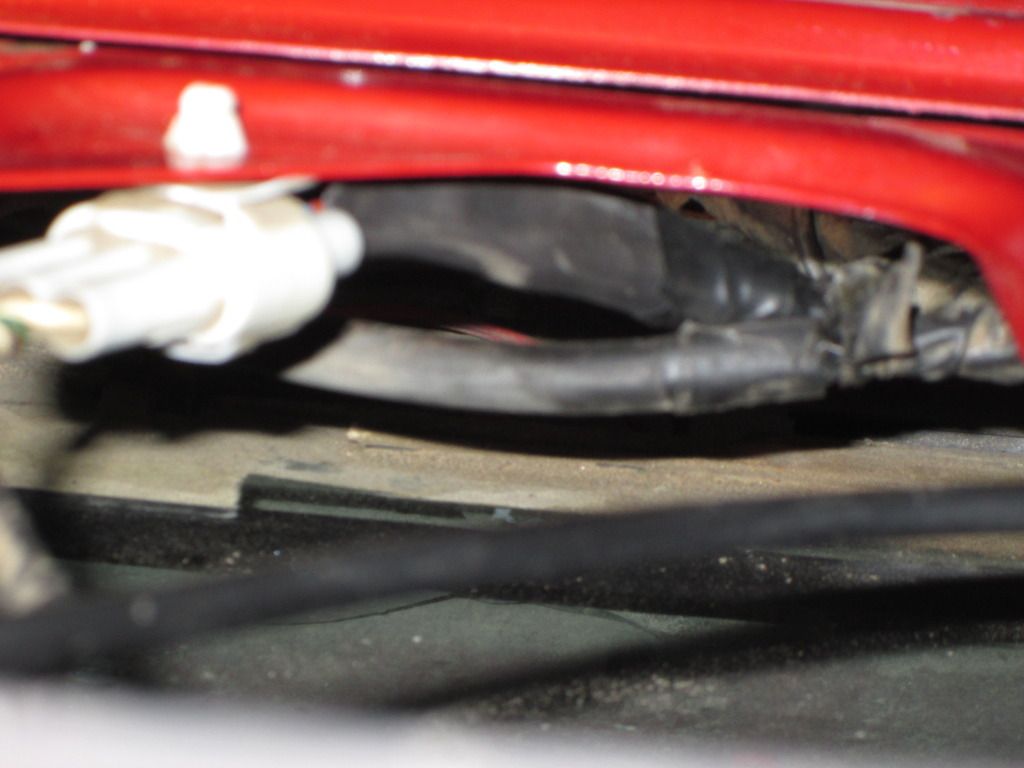
The final product(sorry bout the pic... I was having a HELL of a time getting it to focus on this stuff).....
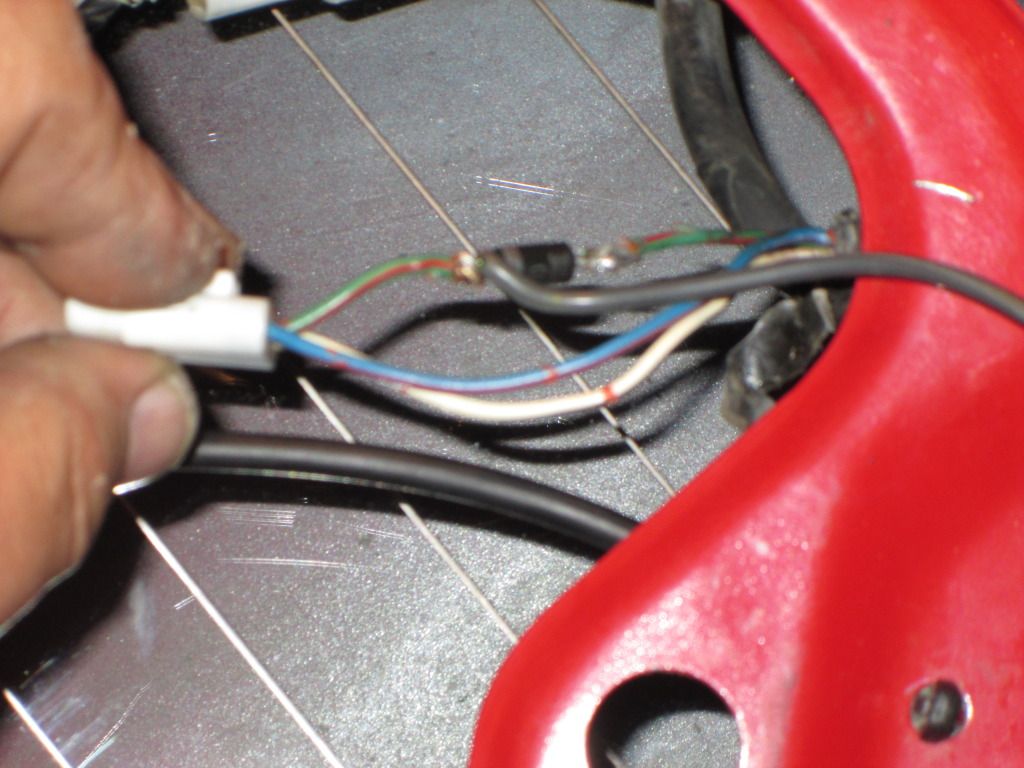
Then, contrary to the Video, I not only heat shrunk the green wire/red stripe with the diode and added "DOOR" wire therein the heat shrink.... I then took 3/4" Heat Shrink(fits perfectly over the switch's white connector on the diode side of the connector.. Heat shrunk that down over ALL of it.. So now I know it wont wind up getting buggered.(Again, it's blurry, SORRY, still figuring this new Camera out. ) The portion to the right/going back, away from the white connector is the 3/4" Heat Shrink Tubing... (then taped it off with super sticky electrical 3M tape so it's thoroughly sealed up)..>>>>
************************************************** *****************
I also finished trimming and adhering the carpet to the tailgate panel replacement.. And it's in place. So the "DOOR" portion of the light wiring is set up and ready to go.
************************************************** *****************
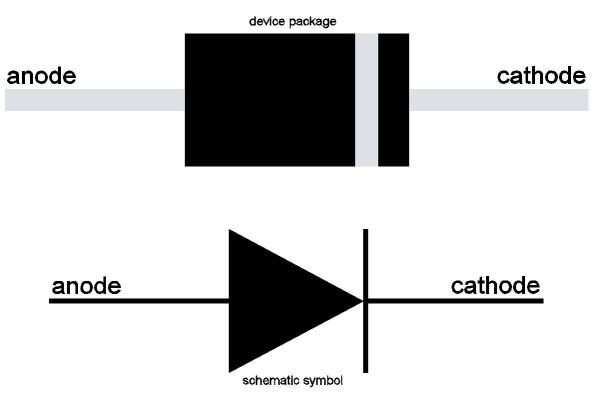
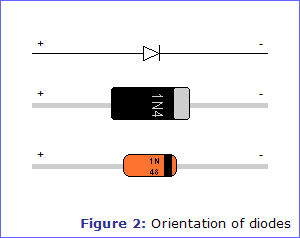
I thought it wise to try and TRULY glean the properties of a "DIODE"... So I went here. Was one of the simplest pages I found in order to do so.......
Diodes
Diodes are constructed from the same type of silicon as transistors, but they are simpler devices that have only two terminals. Called the anode and cathode, the two ends of the diode are constructed of positively doped silicon (the anode) joined directly to negatively doped silicon (the cathode). This pn-junction exhibits the unique characteristic of allowing current to flow in only one direction (from the anode to the cathode). Diodes have a minimum threshold voltage (or Vth, usually around 0.7V) that must be present between the anode and cathode in order for current to flow. If the anode voltage is not at least Vth greater than the cathode voltage, no current will flow. Likewise, if the cathode voltage is greater than the anode voltage, the diode is said to be reverse-biased and no current will flow. In an ideal diode, if the diode voltage equals the threshold voltage (plus a small amount), then unlimited current can flow without causing the voltage across the diode to increase. And, if the diode is reversed-biased, no current will flow regardless of reverse-voltage magnitude.
Diodes have many uses in electronic circuits. As examples, they are frequently employed in power supply circuits to turn alternating current (AC) into direct current (DC), they are used to limit the amount of over-voltage that can be applied to a given circuit node, and they are used to force given circuit nodes to remain at or below a certain voltage. On the Digilab board, three individual diodes are used to limit the voltages applied to the Red, Blue, and Green pins of the VGA connector (J6) to 0.7VDC or less (VGA colour signals must lie in that voltage range to meet relevant specifications - higher voltages would damage computer display electronics).
Note the identification methods used to mark a diode's cathode terminal: the schematic symbol has a line at the point of the triangle; the physical diode has a dark line on the plastic component housing; and the silk-screen pattern has both a line at the cathode end and a square pad for the cathode lead. When loading a diode into a circuit board, make sure that the dark line on the diode matches the line in the silk-screen pattern. Remember that since diodes allow current to flow in only one direction, a backwards diode will cause the circuit to malfunction.
Diodes locations on the circuit board are typically denoted with a "D__" reference designator.
haha.. I'll pick up another iron, tomorrow, and then I'LL TRY to get the rear dome wired up completely, along with the wiring, readied for the other 2 "ON/OFF/DOOR" type lights........Thank GOODNESS that I at least finished this particular portion before wrapping it up and TRYING to move onto the rest of this section.....
Video of "DOOR" wiring into Tailgate/with diode installation and HOPEFULLY intelligible instructions therein...
The final product(sorry bout the pic... I was having a HELL of a time getting it to focus on this stuff).....
Then, contrary to the Video, I not only heat shrunk the green wire/red stripe with the diode and added "DOOR" wire therein the heat shrink.... I then took 3/4" Heat Shrink(fits perfectly over the switch's white connector on the diode side of the connector.. Heat shrunk that down over ALL of it.. So now I know it wont wind up getting buggered.(Again, it's blurry, SORRY, still figuring this new Camera out. ) The portion to the right/going back, away from the white connector is the 3/4" Heat Shrink Tubing... (then taped it off with super sticky electrical 3M tape so it's thoroughly sealed up)..>>>>
************************************************** *****************
I also finished trimming and adhering the carpet to the tailgate panel replacement.. And it's in place. So the "DOOR" portion of the light wiring is set up and ready to go.
************************************************** *****************
I thought it wise to try and TRULY glean the properties of a "DIODE"... So I went here. Was one of the simplest pages I found in order to do so.......
Diodes
Diodes are constructed from the same type of silicon as transistors, but they are simpler devices that have only two terminals. Called the anode and cathode, the two ends of the diode are constructed of positively doped silicon (the anode) joined directly to negatively doped silicon (the cathode). This pn-junction exhibits the unique characteristic of allowing current to flow in only one direction (from the anode to the cathode). Diodes have a minimum threshold voltage (or Vth, usually around 0.7V) that must be present between the anode and cathode in order for current to flow. If the anode voltage is not at least Vth greater than the cathode voltage, no current will flow. Likewise, if the cathode voltage is greater than the anode voltage, the diode is said to be reverse-biased and no current will flow. In an ideal diode, if the diode voltage equals the threshold voltage (plus a small amount), then unlimited current can flow without causing the voltage across the diode to increase. And, if the diode is reversed-biased, no current will flow regardless of reverse-voltage magnitude.
Diodes have many uses in electronic circuits. As examples, they are frequently employed in power supply circuits to turn alternating current (AC) into direct current (DC), they are used to limit the amount of over-voltage that can be applied to a given circuit node, and they are used to force given circuit nodes to remain at or below a certain voltage. On the Digilab board, three individual diodes are used to limit the voltages applied to the Red, Blue, and Green pins of the VGA connector (J6) to 0.7VDC or less (VGA colour signals must lie in that voltage range to meet relevant specifications - higher voltages would damage computer display electronics).
Note the identification methods used to mark a diode's cathode terminal: the schematic symbol has a line at the point of the triangle; the physical diode has a dark line on the plastic component housing; and the silk-screen pattern has both a line at the cathode end and a square pad for the cathode lead. When loading a diode into a circuit board, make sure that the dark line on the diode matches the line in the silk-screen pattern. Remember that since diodes allow current to flow in only one direction, a backwards diode will cause the circuit to malfunction.
Diodes locations on the circuit board are typically denoted with a "D__" reference designator.
Last edited by ChefYota4x4; 11-02-2012 at 01:44 AM.
11-02-2012, 01:52 AM
#5217
Registered User
THANK YOU mark! great vid middle wire on that one
and my eyes did see on your drivers door latch (the U bolt) red paint overspray which confirms the replaced sides
they didnt mask it off
and my eyes did see on your drivers door latch (the U bolt) red paint overspray which confirms the replaced sides
they didnt mask it off
11-02-2012, 11:40 AM
#5219
I hope it helps in simplifying it for the 'VISUAL LEARNED', like myself. I would take more focused pictures... but I'll be honest... I don't wanna tear this apart again until I'm done and I know it's all working. Wow, see? hahaha. Cool man... I hope it helps to see EXACTLY where it's going. You understand E-schematics well... so along with the orientation of the schematics I and Bryan89 and RAD have posted up, you're golden.
OH, btw.... if you can get some 2nd Gen Cables like I have for the latches... why not do it now, right? Depends on whether your 88 is the same as my 87. If not, and if you instead have the 2nd Gen type with the removable rubber boot, instead of rubberized cables... YOU'RE GOOOOTEN! lol... But if you have rubberized cables, I'd go to the others... cuz it's only a matter of time before they lock up on ya like they did me(especially back east). When they go out/lock up... this not only makes it IMPOSSIBLE to latch one or WORSE, BOTH sides of the gate..., but it also is hard on the latches. OR, at the least, lube up the cables while you're in there. Just YOINK em out and shoot silicone lube in there.. It REALLY loosened up the working one I had(Orig.).. BUT, even that didn't free up the frozen up one. So I tried a lil WD40... that worked to free it up, but it's still pretty stiff compared to the other.


