
ChefYota4x4's 1987 4Runner Build-Up Thread
 10-24-2012, 09:36 PM
#5141
OOOPS! lol.....
Well, while walking around in Home Depot to get some stuff for unrelated things(home repairs)... I gave jason in TN a call.... We got chatting..... and figured out some things as to where I stand/what I want from this project, etc. Jason... you've been a HUGE help over the phone, etc... You too, RAD! I'm very grateful, guys... thank you so much ........
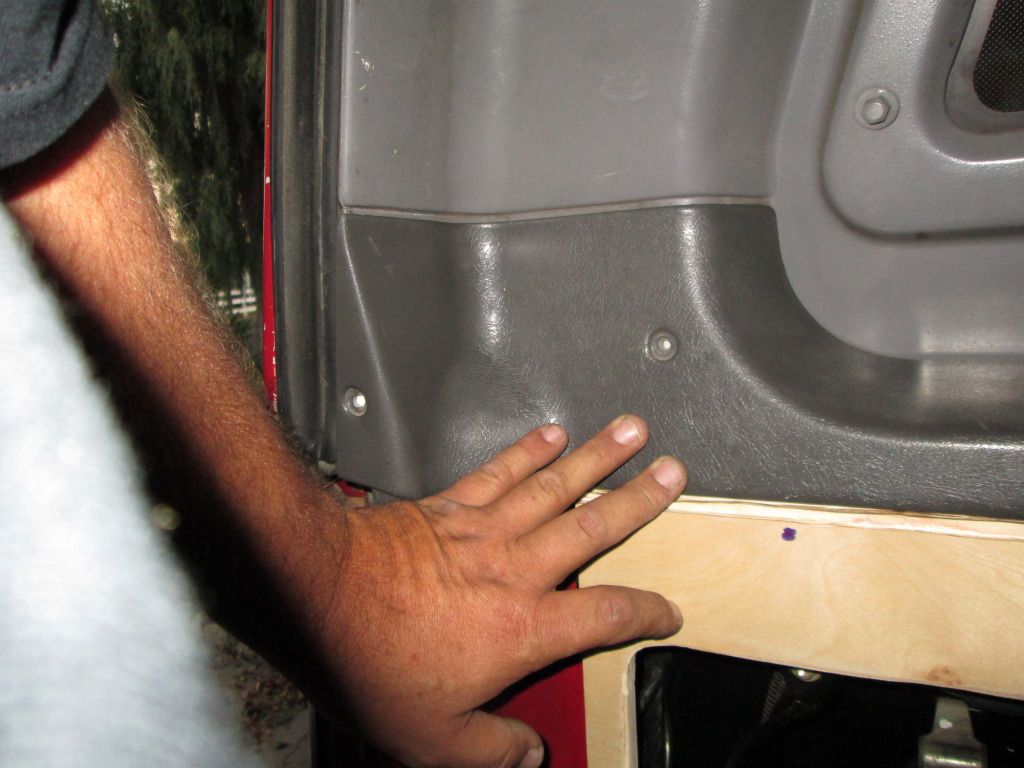
Speaking of RAD, I hit the lot and started talking to him about what I brought up to Jason..... >>>> "uhhhhhh, OOPS, I haven't even rehashed over the 'how to mount the panels' idea " hehehe...... Obviously, the factory lil push pin fasteners aren't gonna cut it... And those are round holes... I mentioned the Yellow Fender Expansion nuts... they are SUPER strong, but square. So RAD mentioned "we could file them square"... I'm just not up to that. And whether I would or not, I want to be able to put back my original panels if I chose to(or if I ever sold it... Yeah, not likely, but never know. lol)..... So I headed off to Lowes, whom have a MUCH better "auto hardware" dept... and otherwise as well. They simply have FAR more bolts and nuts, so to speak. .........
......... THEN, I opened this drawer, thought, "Hmmm, are those round on the back?".. SURE ENOUGH, they were! They can only use up to #8 Metal Screws.. But I installed one and screwed the screw in just a lil ways... IT WILL NOT BUDGE, no chance! ........ I will have to do a lil coaxing in a couple holes, as they're A TINY bit smaller... But I did get one in. So, that means 8 mounting points on each side. I might add one or two more along the bottom....... but I took them all, 16 of them... So I'll have to wait for any more if I want to use more.
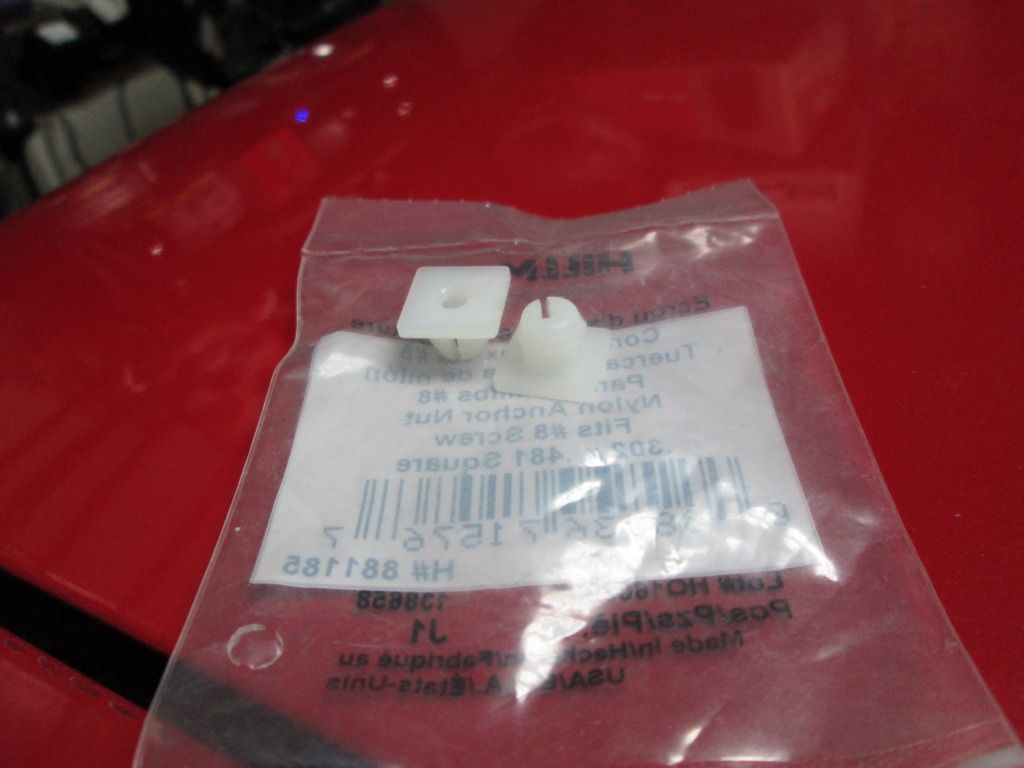
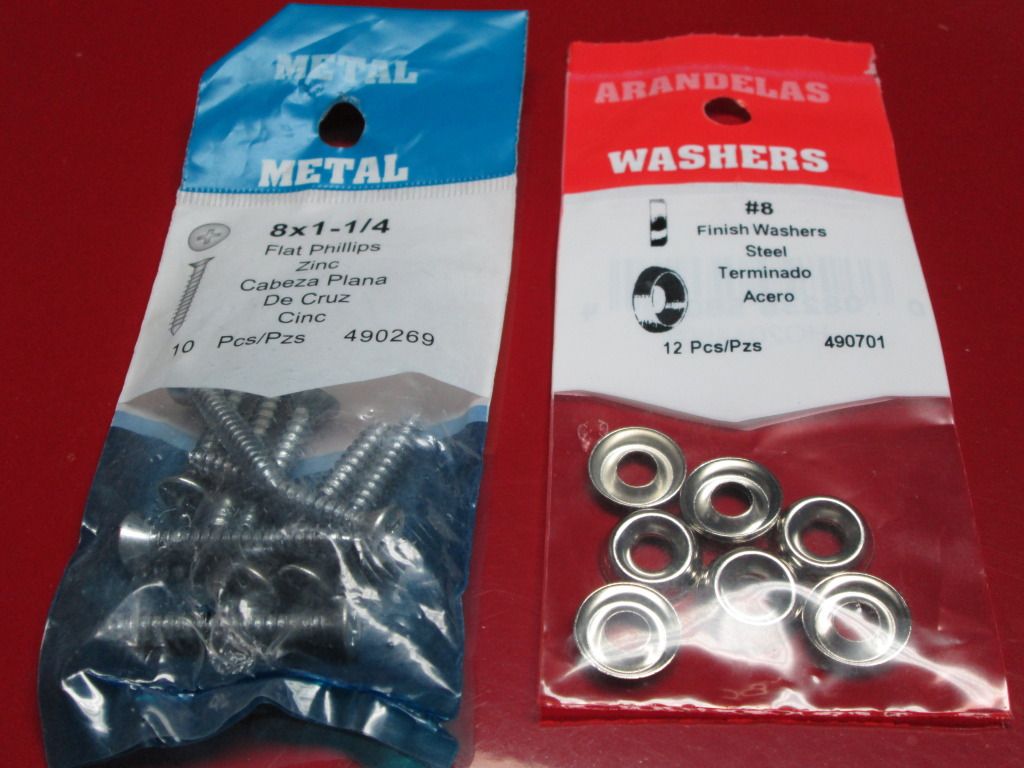
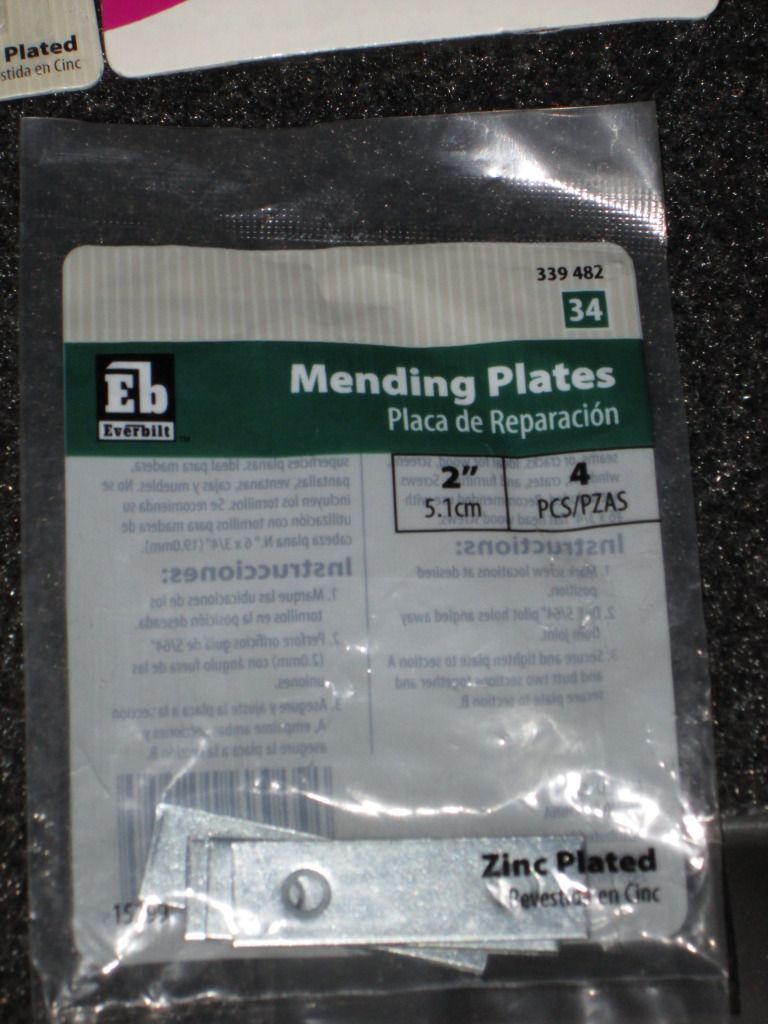
Here's the part numbers and picture of all the hardware I'll be using to mount the panels to the body(not including the weather stripping/other things I'm doing TO the panels.)........
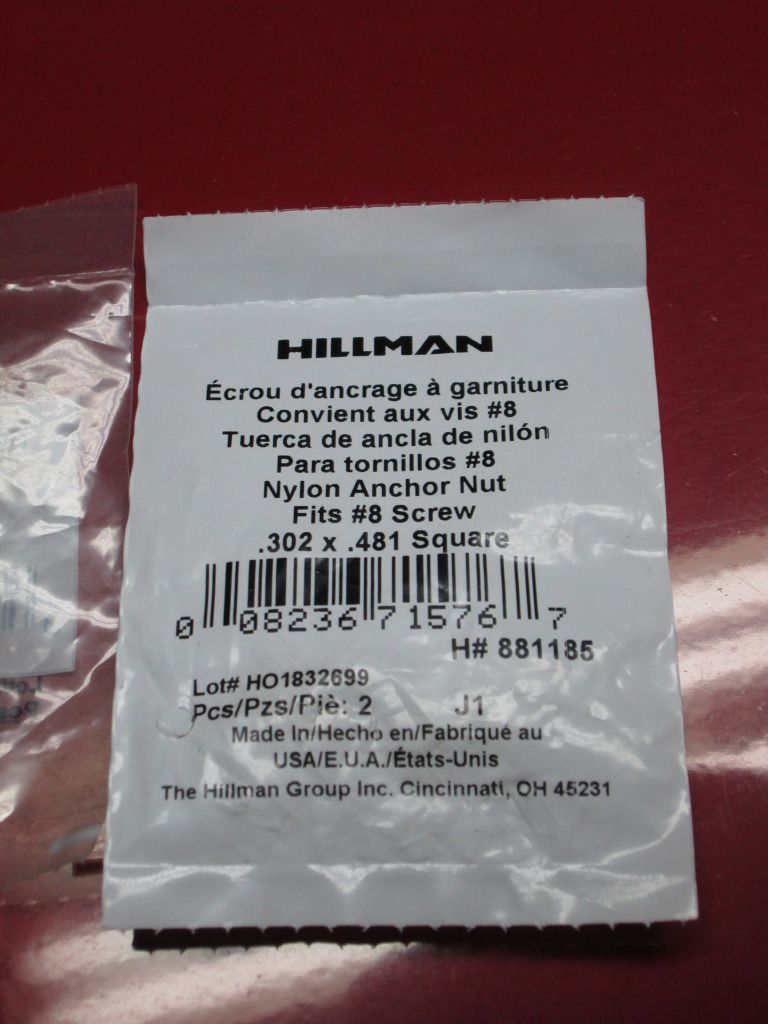
I'll be using this type Counter Sunken Washers and Screws.........
I also stopped by and picked up my second and last roll of this........
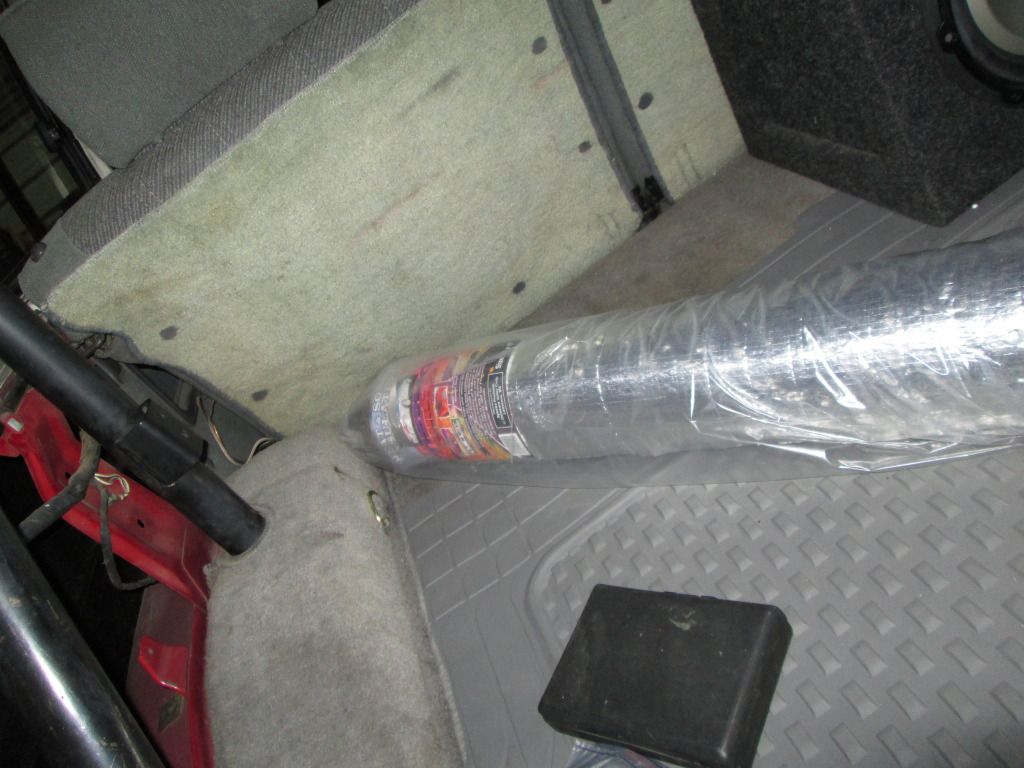
(ThermoShield/ Partly for the front and partly for the inside of the panels.. I'll explain later)......
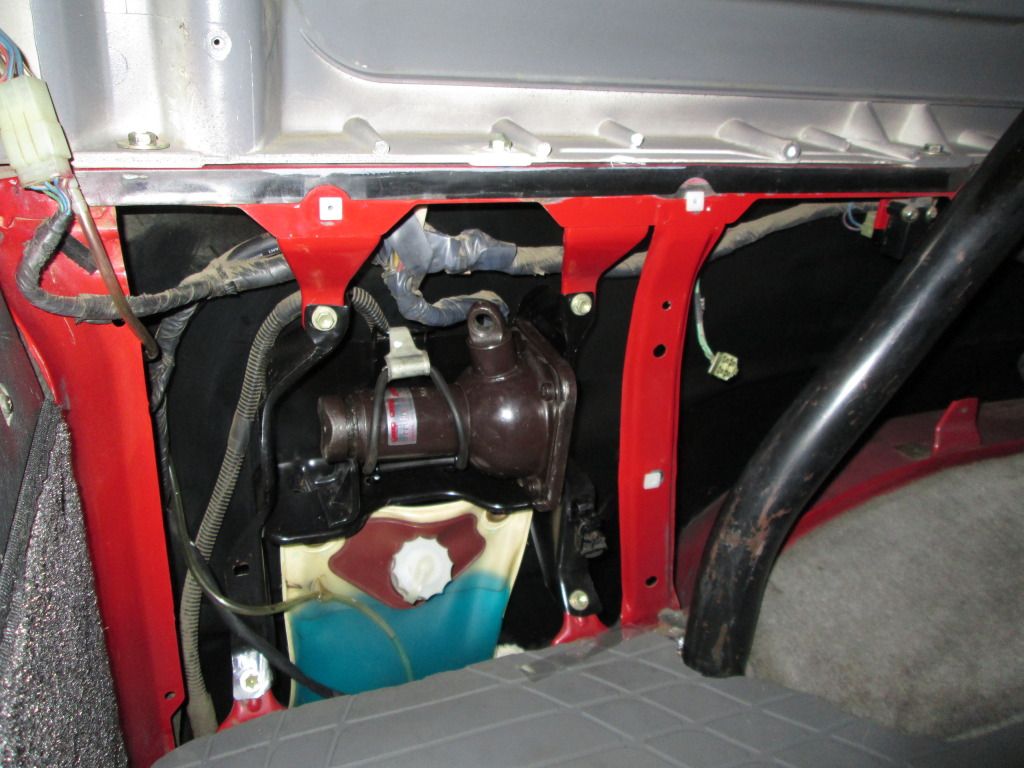
Here's some of the expansion nuts installed in the panel... They are SNUG, and that's good >>>
>>>

Then digging in the garage a lil bit, I found something I've been looking for for a while... It's a motion sensor/or/on and off / AND 2 brightness level LED, Multi-Angle Triangle fixture... LOVE this thing... Came in handy tonight. Here's 4 pics... One on with flash and one w/out.... Showing how it's lighting up the back just by itself.....
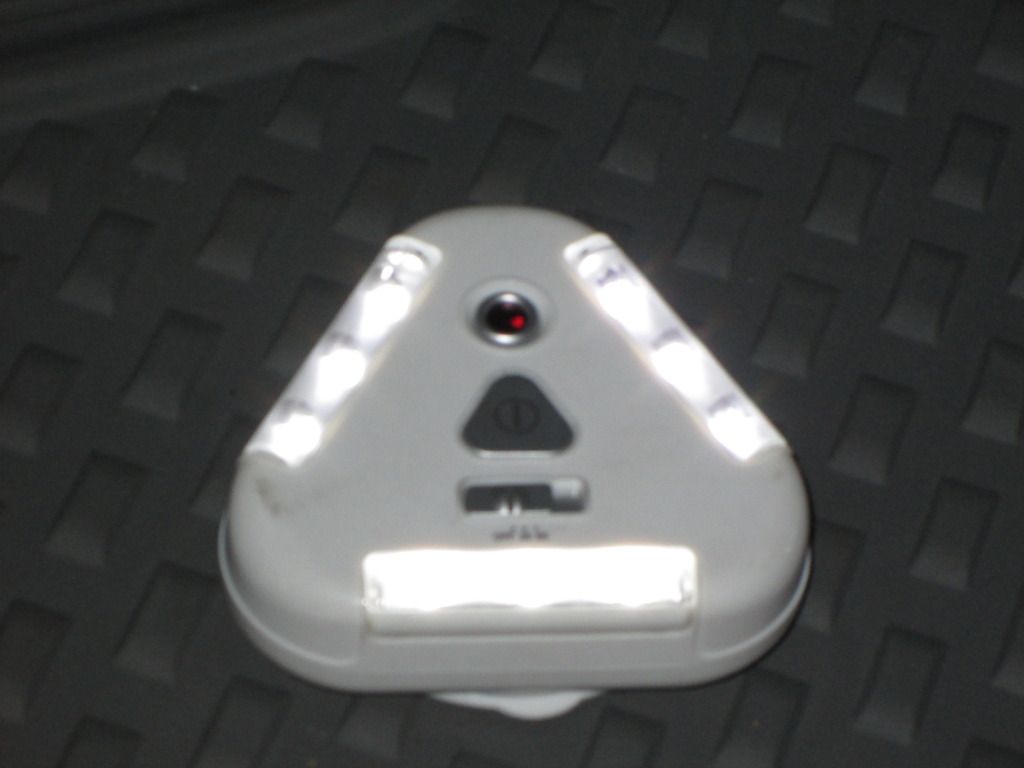
NO LIGHT/NO FLASH On Camera;
LIGHTED/ NO FLASH On Camera;
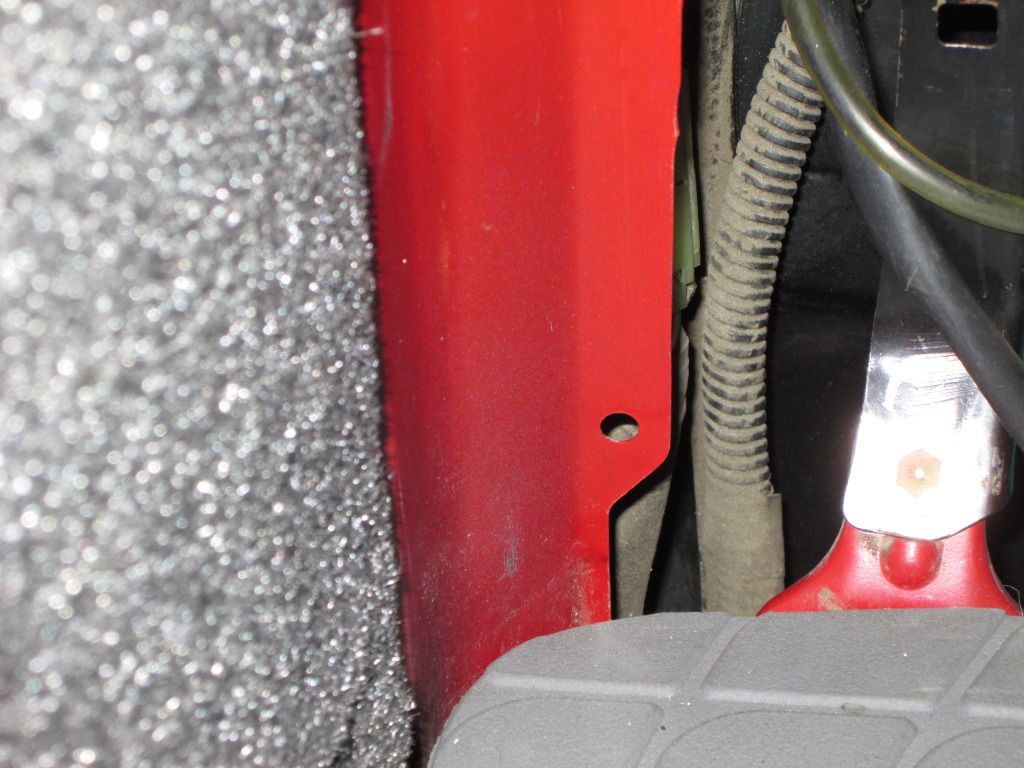
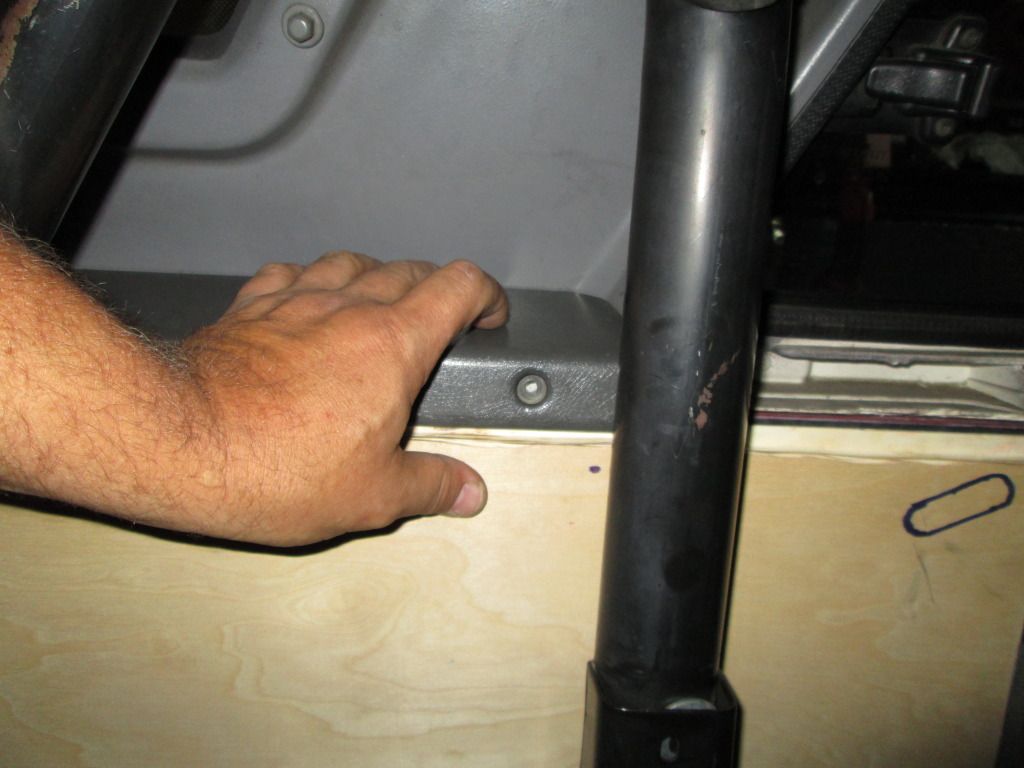
Here's one of the 2 rear most holes that seem to be smaller, by almost unnoticeable to the eye-difference.>
Instead of using the last 2 in the front/rear panels... I think I'll stop just before that. Otherwise, I will have to shave off a couple layers from the back of the new panel to fit over those panels in the back seats area... Then put screws right through both and into a couple of these new expansion nuts.
WHATCHA THINK?
************************************************** ******
PS> For now,I'm undecided on the Sub Box.. LOTS of ideas, but many of them are pretty hard to undo.... And I really like having that Sub removable, AND I don't hate having it in a box that's built for it. IT THUMPS for a 10" Single Sub... All that I need. Putting it in the panels would make it cool and clean back there........ But I just am not so sure I NEED to do that/nor that I want to just yet. We'll see.
For now, I just want to get the panels built/lights installed, carpeting over it, panels all heat shielded inside for COMFORT, which is by far the most important thing for me....
PSS> I already made templates for the MDF panels that would go inside and sideways in the walls... That part wouldn't be difficult at all, really. It's the portion inside the roll bar that might be more of a challenge. Workable.. just not SUPER urgent about it at heart right now, ya know?
........ Speaking of RAD, I hit the lot and started talking to him about what I brought up to Jason..... >>>> "uhhhhhh, OOPS, I haven't even rehashed over the 'how to mount the panels' idea
" hehehe...... Obviously, the factory lil push pin fasteners aren't gonna cut it... And those are round holes... I mentioned the Yellow Fender Expansion nuts... they are SUPER strong, but square. So RAD mentioned "we could file them square"... I'm just not up to that. And whether I would or not, I want to be able to put back my original panels if I chose to(or if I ever sold it... Yeah, not likely, but never know. lol)..... So I headed off to Lowes, whom have a MUCH better "auto hardware" dept... and otherwise as well. They simply have FAR more bolts and nuts, so to speak. ......... ......... THEN, I opened this drawer, thought, "Hmmm, are those round on the back?".. SURE ENOUGH, they were! They can only use up to #8 Metal Screws.. But I installed one and screwed the screw in just a lil ways... IT WILL NOT BUDGE, no chance!
........ I will have to do a lil coaxing in a couple holes, as they're A TINY bit smaller... But I did get one in. So, that means 8 mounting points on each side. I might add one or two more along the bottom....... but I took them all, 16 of them... So I'll have to wait for any more if I want to use more.Here's the part numbers and picture of all the hardware I'll be using to mount the panels to the body(not including the weather stripping/other things I'm doing TO the panels.)........
I'll be using this type Counter Sunken Washers and Screws.........
I also stopped by and picked up my second and last roll of this........
(ThermoShield/ Partly for the front and partly for the inside of the panels.. I'll explain later)......
Here's some of the expansion nuts installed in the panel... They are SNUG, and that's good
>>> Then digging in the garage a lil bit, I found something I've been looking for for a while... It's a motion sensor/or/on and off / AND 2 brightness level LED, Multi-Angle Triangle fixture... LOVE this thing... Came in handy tonight. Here's 4 pics... One on with flash and one w/out.... Showing how it's lighting up the back just by itself.....
NO LIGHT/NO FLASH On Camera;
LIGHTED/ NO FLASH On Camera;
Here's one of the 2 rear most holes that seem to be smaller, by almost unnoticeable to the eye-difference.>
Instead of using the last 2 in the front/rear panels... I think I'll stop just before that. Otherwise, I will have to shave off a couple layers from the back of the new panel to fit over those panels in the back seats area... Then put screws right through both and into a couple of these new expansion nuts.
WHATCHA THINK?
************************************************** ******
PS> For now,I'm undecided on the Sub Box.. LOTS of ideas, but many of them are pretty hard to undo.... And I really like having that Sub removable, AND I don't hate having it in a box that's built for it. IT THUMPS for a 10" Single Sub... All that I need. Putting it in the panels would make it cool and clean back there........ But I just am not so sure I NEED to do that/nor that I want to just yet. We'll see.
For now, I just want to get the panels built/lights installed, carpeting over it, panels all heat shielded inside for COMFORT, which is by far the most important thing for me....
PSS> I already made templates for the MDF panels that would go inside and sideways in the walls... That part wouldn't be difficult at all, really. It's the portion inside the roll bar that might be more of a challenge. Workable.. just not SUPER urgent about it at heart right now, ya know?
 10-25-2012, 01:18 AM
#5142
Nice Find!
Glad to know the expansion nuts work! I've always wanted to get rid of the cheesy push-pins. I want easily replaceable standard screws / tear-down style like on the Rovers and the Jeeps. Thanks for doing the experimenting for us, Chef!.
Re Thermo Shield
With my carpet and padding out, I can really feel the heat from the transmission hump, firewall/footwells (engine compartment and exhaust), to driver's floor (exhaust), to left passenger floor (exhaust).
On flat/horizontal surfaces I'm gonna use Thermoshield, and top with Best Step closed-cell from Sears.
If Thermo Shield & Closed-cell foam turnout too thick/tricky for for curved and tighter spaces, I may have to use Frost King peel & stick foam and foil duct insulation, and top with Peel & Stick Ensolite that I already received from RAAMAudio.
I must special mention that Rick at RAAMAudio provides excellent customer service!. He gave constant order updates and gave me discount because shipment was delayed, although delay was not a big deal for me anyway.
10-25-2012, 06:02 AM
#5143
Registered User
it was actually a good one ifyour OCD about water making its way out of the panel you could slope the silicone right out fastest possible way making sure no moisture stays in the panel
mine has SO much rust back there i havent started looking at it (i dont wanna cry)
mine has SO much rust back there i havent started looking at it (i dont wanna cry)
Mark when I put in my new to me side panels I seen mine were also painted a dark grayish paint on the inner walls too.
Ps. Yes.... I didn't miss out too much this time only about 4-5 posts lol normally I miss out on 1-2 pages hahaha
10-25-2012, 08:08 AM
#5144
Contributing Member
Join Date: Mar 2003
Location: COTKU,Ontario,Canada
Posts: 11,334
Likes: 0
Received 0 Likes
on
0 Posts
I was going to suggest rivnuts and 8/10-32 screws but those plastic thingies would work very well too... there is a chemical you can get in railway hobby shops called "Blacken It" that is used to blacken the shiny steel rails... I'm pretty sure it would work on the SS screws/washers too if you did'nt want the bling factor in back...
10-25-2012, 12:51 PM
#5145
YAYYYYYYYYY, MY MULTIQUOTE WORKED! hahaha...
Wow, yeah, .... that DOES sound too thick to me, only because after applying JUST THE THERMOSHIELD.... I could tell it was risen quite a bit in the back. HOWEVER, you don't have padding under your carpet like mine... So back there, you could give yourself another free 1/4" or so ....... Up front, not so sure, and not sure really how much you NEED after covering the entire thing in P&S and then carpet and padding w/ThermoShield on top of P&S.... I think that would be plenty.. BUT, it's your project and I'm watching anxiously.
My pleasure on the expansion nuts... I'm usually pretty good at 'adding to something existing'... I just have a hard time OCCASIONALLY, putting something together from scratch that has to work around something 'existing', ya know? Anyway, I WAS STOKED to find those yesterday!!! They, along with the solid screws w/counter sunk and flat head will make for a NOT ONLY SOLID, but clean install.. PLUS, the countersunk washers will add to holding the carpet nice and tight at each spot where they are. Thanks again for brainstorming with me, RAD, .... it helps EVERY TIME! Just speaking to someone helps me to think it out MUCH better... Even if I come up with it on my own, it's usually come much faster when I've been speaking with someone to help 'PICTURE' EVERYTHING, ya know? ..... Jason too.. that really helped yesterday.
Hahaha.... Glad you stopped in, Buddy... Hope you're well.
BTW, the panels inside are like a semi-gloss BLACK AS NIGHT "black"... Front to back, not a SPOT in there that's missed. This is why I thought that they coated it with something additional that might be like rust prevention or something... Meh, who knows. It is what it is and I have no desire to paint it, etc., lol. Was just curious. Thanks for letting me know, guys
Thanks at you too, Paul, for tossing me some of your thoughts on this! I had the rubber spray yesterday.... I just really think in the climate I'm in and such.... it's not really necessary/lil pricey (as things all add up, ya know? BUT, It's on my mind IF I DO coat them with something I don't have. I think that stuff would be SICK on ANYTHING.... Very handy stuff, like plastidip!
BTW, YES, I wanna cover the screws and such to black. I might go fora primer color... For more of a "You know they're there, KINDA" sort of look? haha. Shiny gray, flat, doesn't matter. Gunmetal gray really... not light. I have TONS of it from Doing the Con-Ferr in Primer first(dark gray primer/one step).... It's GOOD stuff! I have lots of black paint and primer... So if I DO paint the panels... it'll probably start with that, and then if I wanted too... sand it a bit and slap that rubber stuff on, ya know? You really think 1 can is enough for both panels and the tailgate? (It says on the can, "One coat is usually enough").... The guy there said, "Don't use the bed liner stuff.. it's very gritty and will hurt your knees, etc. Great for beds, but that stuff dries smooth like paint and feels like rubber... It's the best one we have... only 2$ more than the rest a can.".... I think he's right... I sprayed the stuff on a box... It was dry in 5 minutes to touch! WOW! lol.
Glad to know the expansion nuts work! I've always wanted to get rid of the cheesy push-pins. I want easily replaceable standard screws / tear-down style like on the Rovers and the Jeeps. Thanks for doing the experimenting for us, Chef!.
Re Thermo Shield
With my carpet and padding out, I can really feel the heat from the transmission hump, firewall/footwells (engine compartment and exhaust), to driver's floor (exhaust), to left passenger floor (exhaust).
On flat/horizontal surfaces I'm gonna use Thermoshield, and top with Best Step closed-cell from Sears.
If Thermo Shield & Closed-cell foam turnout too thick/tricky for for curved and tighter spaces, I may have to use Frost King peel & stick foam and foil duct insulation, and top with Peel & Stick Ensolite that I already received from RAAMAudio.
I must special mention that Rick at RAAMAudio provides excellent customer service!. He gave constant order updates and gave me discount because shipment was delayed, although delay was not a big deal for me anyway.
Re Thermo Shield
With my carpet and padding out, I can really feel the heat from the transmission hump, firewall/footwells (engine compartment and exhaust), to driver's floor (exhaust), to left passenger floor (exhaust).
On flat/horizontal surfaces I'm gonna use Thermoshield, and top with Best Step closed-cell from Sears.
If Thermo Shield & Closed-cell foam turnout too thick/tricky for for curved and tighter spaces, I may have to use Frost King peel & stick foam and foil duct insulation, and top with Peel & Stick Ensolite that I already received from RAAMAudio.
I must special mention that Rick at RAAMAudio provides excellent customer service!. He gave constant order updates and gave me discount because shipment was delayed, although delay was not a big deal for me anyway.
....... Up front, not so sure, and not sure really how much you NEED after covering the entire thing in P&S and then carpet and padding w/ThermoShield on top of P&S.... I think that would be plenty.. BUT, it's your project and I'm watching anxiously. My pleasure on the expansion nuts... I'm usually pretty good at 'adding to something existing'... I just have a hard time OCCASIONALLY, putting something together from scratch that has to work around something 'existing', ya know? Anyway, I WAS STOKED to find those yesterday!!! They, along with the solid screws w/counter sunk and flat head will make for a NOT ONLY SOLID, but clean install.. PLUS, the countersunk washers will add to holding the carpet nice and tight at each spot where they are. Thanks again for brainstorming with me, RAD, .... it helps EVERY TIME! Just speaking to someone helps me to think it out MUCH better... Even if I come up with it on my own, it's usually come much faster when I've been speaking with someone to help 'PICTURE' EVERYTHING, ya know?
..... Jason too.. that really helped yesterday. This made me laugh out loud in my works breakroom. Lol everyone turned around and looked at me like wtf... Hahaha.
Mark when I put in my new to me side panels I seen mine were also painted a dark grayish paint on the inner walls too.
Ps. Yes.... I didn't miss out too much this time only about 4-5 posts lol normally I miss out on 1-2 pages hahaha
Mark when I put in my new to me side panels I seen mine were also painted a dark grayish paint on the inner walls too.
Ps. Yes.... I didn't miss out too much this time only about 4-5 posts lol normally I miss out on 1-2 pages hahaha
BTW, the panels inside are like a semi-gloss BLACK AS NIGHT "black"... Front to back, not a SPOT in there that's missed. This is why I thought that they coated it with something additional that might be like rust prevention or something... Meh, who knows. It is what it is and I have no desire to paint it, etc., lol. Was just curious. Thanks for letting me know, guys
I was going to suggest rivnuts and 8/10-32 screws but those plastic thingies would work very well too... there is a chemical you can get in railway hobby shops called "Blacken It" that is used to blacken the shiny steel rails... I'm pretty sure it would work on the SS screws/washers too if you did'nt want the bling factor in back...
BTW, YES, I wanna cover the screws and such to black. I might go fora primer color... For more of a "You know they're there, KINDA" sort of look? haha. Shiny gray, flat, doesn't matter. Gunmetal gray really... not light. I have TONS of it from Doing the Con-Ferr in Primer first(dark gray primer/one step).... It's GOOD stuff! I have lots of black paint and primer... So if I DO paint the panels... it'll probably start with that, and then if I wanted too... sand it a bit and slap that rubber stuff on, ya know? You really think 1 can is enough for both panels and the tailgate? (It says on the can, "One coat is usually enough").... The guy there said, "Don't use the bed liner stuff.. it's very gritty and will hurt your knees, etc. Great for beds, but that stuff dries smooth like paint and feels like rubber... It's the best one we have... only 2$ more than the rest a can.".... I think he's right... I sprayed the stuff on a box... It was dry in 5 minutes to touch! WOW! lol.
10-25-2012, 01:04 PM
#5147
Going to try and finish up my panels today and 'finish-shape' them for install...
Once the panels are all cut for everything.... Drill out the mounting holes.... Slots for the Lights, etc. ... THEN I'll spray them down with that Nashua 3M Adhesive on top of the outside of the panel... BUT then I'd have to do all the cut outs in the carpet, also, which is going to be a bear to some point... IT'S VERY hard to cut through. So cutting template shapes.... eeek! lol. I'll probably more likely cut slats and account for that in my hole cut out.... (cut out a TINY bit larger than the template... That way, the carpet, folded in, will act as an additional 1/8th" on each side of the 4 sides.) ......
Once the panels are all cut for everything.... Drill out the mounting holes.... Slots for the Lights, etc. ... THEN I'll spray them down with that Nashua 3M Adhesive on top of the outside of the panel... BUT then I'd have to do all the cut outs in the carpet, also, which is going to be a bear to some point... IT'S VERY hard to cut through. So cutting template shapes.... eeek! lol. I'll probably more likely cut slats and account for that in my hole cut out.... (cut out a TINY bit larger than the template... That way, the carpet, folded in, will act as an additional 1/8th" on each side of the 4 sides.) ......
Last edited by ChefYota4x4; 10-25-2012 at 01:07 PM.
10-25-2012, 01:48 PM
#5148
Yep, probably. A few months after I got Ruby Tuesday (RT), I found a pool of water in the right-hand storage compartment, and a terry cloth used to wrap something. My Theory: cotton absorbs moisture from condensation quicker that it can dry. So my rule is: no porous, slow-drying, absorbent (like cotton or ope-cell foam) stuff inside the body panel
10-25-2012, 08:57 PM
#5150
I would reserve the T.S for hot surfaces first. I'm sure it will add significant sound and thermal insulation on firewall/footwells & floor above exhaust. However, if you end up with extra, not bad to stick on top of the closed-cell foam- i.e., for more dampening for sub. Closed-cell will not get as much condensation as metal.
In my case, I'll apply the T.S in this order, until I run out:
1) On driver side, from footwell all the way to rear passenger floor,
2) Then on transmission hump
3) Passenger footwell and floor moving back.
4) Maybe patches in engine compartment firewall if I can squeeze some in there.
BTW, finally got my roll of Thermo Shield today. Thanks for the tips. I think that's the best deal of all the fibrous/foil combination mats out there.
BTW, that nice, wide closed-cell foam from Sears is called Best Step, made by Venture-Products Also available at Pep Boys for $22. Already trimmed mine for the rear deck.
10-26-2012, 01:22 AM
#5151
Well, .... I will find out this evening(not 100% sure yet).......... BUT, ....... it looks like I might have to return EVERYTHING that's returnable by tomorrow evening. Barring a miracle... It looks as if (I'll just say "someone close to me") is in need of every dime I have, don't have and have spent in the last several days/weeks.........
This is REALLY upsetting...... But, honestly? I'm just grateful that I CAN do it if it in fact comes to that.......... VERY much was looking forward to completing this section and then moving on to the Roof Rack/CAGE system. Looks like I might just be moving onto the CAGE system PERIOD, lol... AS I have EVERY piece of that stuff to get started.(Maybe this I should take this as a message? hahaha>>> "FINISH FIRST WHAT YOU HAVE EVERYTHING TO DO!"... Like Diff Breathers, V6 and 1" bore Brake Upgrade, etc.., etc.).....
I DO HAVE A QUICK QUESTION.......
* CAN ANYONE(RRRRRRR BBBBBBBB XXXXXXXXX ??? HAHAHA)... tell me, "What kind of adhesive is best for building up the factory panels with something... AND, speaking of 'SOMETHING', lol... What could I use if I don't have a half dozen yards of 'SUNBRELLA' fabric laying around? .... "
I'll look at his thread, as I'm going to likely have to put in the PERFECT panels I got from the yard a few months back.... Again, hey, at least I have them, right? ..... haha. JK....... no facepalm... s'all good.... I mean, I'm not starving/looking for work/wondering where I will stay TOMORROW, like so many good people I've met, know, etc. ........ No, ... I'm grateful, guys, honest!
This is REALLY upsetting...... But, honestly? I'm just grateful that I CAN do it if it in fact comes to that.......... VERY much was looking forward to completing this section and then moving on to the Roof Rack/CAGE system. Looks like I might just be moving onto the CAGE system PERIOD, lol... AS I have EVERY piece of that stuff to get started.(Maybe this I should take this as a message? hahaha>>> "FINISH FIRST WHAT YOU HAVE EVERYTHING TO DO!"... Like Diff Breathers, V6 and 1" bore Brake Upgrade, etc.., etc.).....
I DO HAVE A QUICK QUESTION.......
* CAN ANYONE(RRRRRRR BBBBBBBB XXXXXXXXX ??? HAHAHA)... tell me, "What kind of adhesive is best for building up the factory panels with something... AND, speaking of 'SOMETHING', lol... What could I use if I don't have a half dozen yards of 'SUNBRELLA' fabric laying around?
.... " I'll look at his thread, as I'm going to likely have to put in the PERFECT panels I got from the yard a few months back.... Again, hey, at least I have them, right?
..... haha. JK....... no facepalm... s'all good.... I mean, I'm not starving/looking for work/wondering where I will stay TOMORROW, like so many good people I've met, know, etc. ........ No, ... I'm grateful, guys, honest!
10-26-2012, 02:08 AM
#5152
Super Moderator
Staff
iTrader: (1)
Join Date: Aug 2008
Location: Anderson Missouri
Posts: 11,788
Likes: 0
Received 25 Likes
on
22 Posts
Quote...BTW, Terry posted a few times on here how to make it hot... very simple, you ground the blue wire to the FRONT of the console mounting flanges that come out of the floor. Terry has never had an issue. I THINK that the lock switch might be made irrelevant by that... but I'm not sure though. I'll ask him.... HEY TERRY! lol..... Does your window lock switch still work for the rear window with it grounded????? JASON-IN-TN, you might know this as well, right? Quote
I have never really checked to see if the ground wire bypasses the switch, but I am sure does as it seems to get pushed accidentlly all of the time.
On the speakers, I just run 4 speakers and a nice stereo system. I try to keep mine hidden as much as possiblely keep the temptations down for someone looking in.
There has to be some drain holes back there somewhere, I just have never looked for them, like Aviator mentioned. There are some drain holes in the rocker panels and in the tail lights.
I cant recommed an adhesive at this time, especially if you are using a cloth. I used some rattle can spray at one time and there is some sticky stuff out there. I use a spray for sticking sanding paper to sanding blocks and such and it works really well. I will try and post a picture of it later on today. Still getting caught up on your thread.
10-26-2012, 11:56 AM
#5153
Thanks, Terry..... I feel like I'm going to probably be stoned for possibly abandoning this project! hahahaha.
BUT I MIGHT NOT... I'm still hanging on for hope in the 'miracle' dept. I could STILL use the wood, Carpet, etc... I just have to find out if they're going to need this money or not.
I was wondering if you think that the 'Super Seal Rubberized' stuff from Rustoleum would stick to the Plastic panels in the back(the OEM ones)????? Figured you've used it a few times, wonder if you think it'd work to reinforce it some? Stuff seems VERY solid and still flexible... Would seem to be one of the best options(I think it says it's "paintable", too? The Rubberized Paint?)
************************************************** *********
Couple things I've noticed, thought I would share.
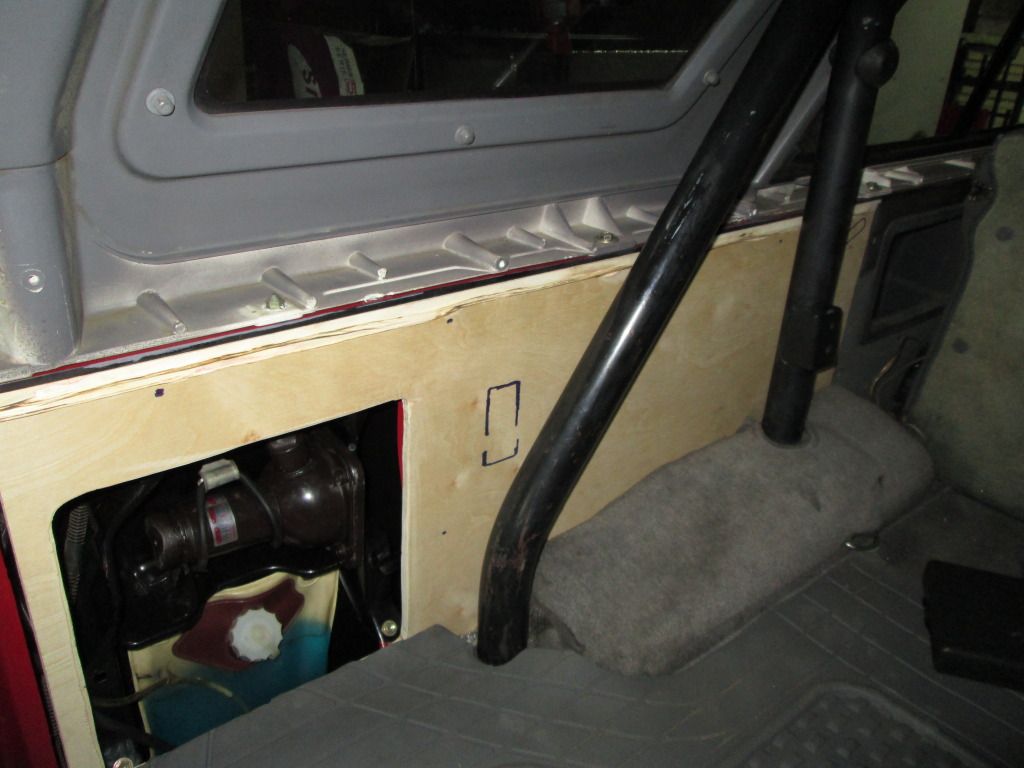
1. OBVIOUSLY I'm using the .41" Birch Panels for 'strength'... BUT, along with this comes a compromise in 'space' and 'fitment'... IT WILL FIT, ...but, if you'd want your "Interior L-Trim" to fit, you'd likely have to shave off that top 1/4-1/2" of the panel in order to get the trim to fit right up against the carpet that you wrap over the edges of the panel you've made. the ONLY other way I can see that it would work with the L-Trim is to shave off several layers of the top of the panel where the L-Trim fits over it. As it is? It just doesn't fit. So one or the other 'compromise' has to be made. The problem with shaving off several layers might possibly be that it COULD weaken the panel/and bring the mounting holes that would go into the expansion nuts VERY close to the top edge.... I'm talking like 1/8" play from top of Countersunk-Reinforced Washers?(VERY careful drilling could do it ) YOU COULD ALSO cut off that section from the top, as mention, AND then cut out a couple layers from the back, enough to lay in a strip of metal(aluminum strip?) and fasten the metal to the back of the panel cut out and use that as a 'mock' of the original, thin, OEM panel for the 'L-Trim' to fit over.
*PERSONALLY: I think it would be best/easiest, to simply cut off the top of the home made wood panel, to clear the L-Trim, then stick 3/8" Weather Stripping to the body where the L-Trim pulls into as you screw it in... (even in the back curved part hugs the slow curved/odd curved contoured portion of the shell) The rear L-Trim piece actually pops into the shell at the window, as well, with an odd triangular piece. I NEEDS to be clear of the wood(or the other way with the metal strip) in order to fit properly AT ALL!
2. At portion of the panel where it meets the front panels... You would need to;
... A. Make a slot/cut out that corner all together/ for the 'back seat latch' to meet with the latch hoop that's mounted to the chassis/body. The Latch hoop is in the way, BUT, you could just cut a groove the same angle as the latch hoop and then knock it out with a chisel and clean it up with a file.(so you could wrap carpet over the edges of even that).
... B. SAME area; The rear OEM panel meets and actually slides UNDER the front panel, which are then both secured to the body by those push pins. The rear panel??>>> It slides UNDER the front portion(there's a lil taper/step there)... OBVIOUSLY the .41" Birch is NOT going to slide under it.. And even OVER it, without again cutting out a couple layers of the backside, is not practical. Sitting over it wont work because it pulls it out, WHICH EVEN SLIGHTLY makes sinking the home made rear panel to 'PLUSH WITH THE BODY' impossible. SOOOOOOO. I WOULD cut it short/RIGHT UP TO the front panels where they pop in... Make a lil cut out of the rear seat latch hoop and call it a day.
3. When you cut out the panel, you need to either leave the last 3" or so where it begins to curve toward the bed, OFF, .... OR, you could bring it ALL THE WAY to those 2 rear most holes I showed(where I said, "These holes looks smaller" ??? They have NO rivets going into them.. No Push Pins, IOW).... If you cut it short of the curve, all you need is some 3-4" Garage Door Weather Stripping to E-6000 Glue to the back end of the panel, 'CREATING' your own "CORNER" in a sense. Also, remember... The very back of the OEM panels fit into the 'tailgate trim'. That U-shaped plastic/pliable trim piece actually holds the rear portion of the trim to the tailgate reinforced lip.... it also then glides into the 'Plastic Carpet Edging' Piece, the rear most carpet retainer by the tailgate.
hahahaha. BUT I MIGHT NOT... I'm still hanging on for hope in the 'miracle' dept. I could STILL use the wood, Carpet, etc... I just have to find out if they're going to need this money or not.
I was wondering if you think that the 'Super Seal Rubberized' stuff from Rustoleum would stick to the Plastic panels in the back(the OEM ones)????? Figured you've used it a few times, wonder if you think it'd work to reinforce it some? Stuff seems VERY solid and still flexible... Would seem to be one of the best options(I think it says it's "paintable", too? The Rubberized Paint?)
************************************************** *********
Couple things I've noticed, thought I would share.
1. OBVIOUSLY I'm using the .41" Birch Panels for 'strength'... BUT, along with this comes a compromise in 'space' and 'fitment'... IT WILL FIT, ...but, if you'd want your "Interior L-Trim" to fit, you'd likely have to shave off that top 1/4-1/2" of the panel in order to get the trim to fit right up against the carpet that you wrap over the edges of the panel you've made. the ONLY other way I can see that it would work with the L-Trim is to shave off several layers of the top of the panel where the L-Trim fits over it. As it is? It just doesn't fit. So one or the other 'compromise' has to be made. The problem with shaving off several layers might possibly be that it COULD weaken the panel/and bring the mounting holes that would go into the expansion nuts VERY close to the top edge.... I'm talking like 1/8" play from top of Countersunk-Reinforced Washers?(VERY careful drilling could do it
) YOU COULD ALSO cut off that section from the top, as mention, AND then cut out a couple layers from the back, enough to lay in a strip of metal(aluminum strip?) and fasten the metal to the back of the panel cut out and use that as a 'mock' of the original, thin, OEM panel for the 'L-Trim' to fit over. *PERSONALLY: I think it would be best/easiest, to simply cut off the top of the home made wood panel, to clear the L-Trim, then stick 3/8" Weather Stripping to the body where the L-Trim pulls into as you screw it in... (even in the back curved part hugs the slow curved/odd curved contoured portion of the shell) The rear L-Trim piece actually pops into the shell at the window, as well, with an odd triangular piece. I NEEDS to be clear of the wood(or the other way with the metal strip) in order to fit properly AT ALL!
2. At portion of the panel where it meets the front panels... You would need to;
... A. Make a slot/cut out that corner all together/ for the 'back seat latch' to meet with the latch hoop that's mounted to the chassis/body. The Latch hoop is in the way, BUT, you could just cut a groove the same angle as the latch hoop and then knock it out with a chisel and clean it up with a file.(so you could wrap carpet over the edges of even that).
... B. SAME area; The rear OEM panel meets and actually slides UNDER the front panel, which are then both secured to the body by those push pins. The rear panel??>>> It slides UNDER the front portion(there's a lil taper/step there)... OBVIOUSLY the .41" Birch is NOT going to slide under it.. And even OVER it, without again cutting out a couple layers of the backside, is not practical. Sitting over it wont work because it pulls it out, WHICH EVEN SLIGHTLY makes sinking the home made rear panel to 'PLUSH WITH THE BODY' impossible. SOOOOOOO. I WOULD cut it short/RIGHT UP TO the front panels where they pop in... Make a lil cut out of the rear seat latch hoop and call it a day.
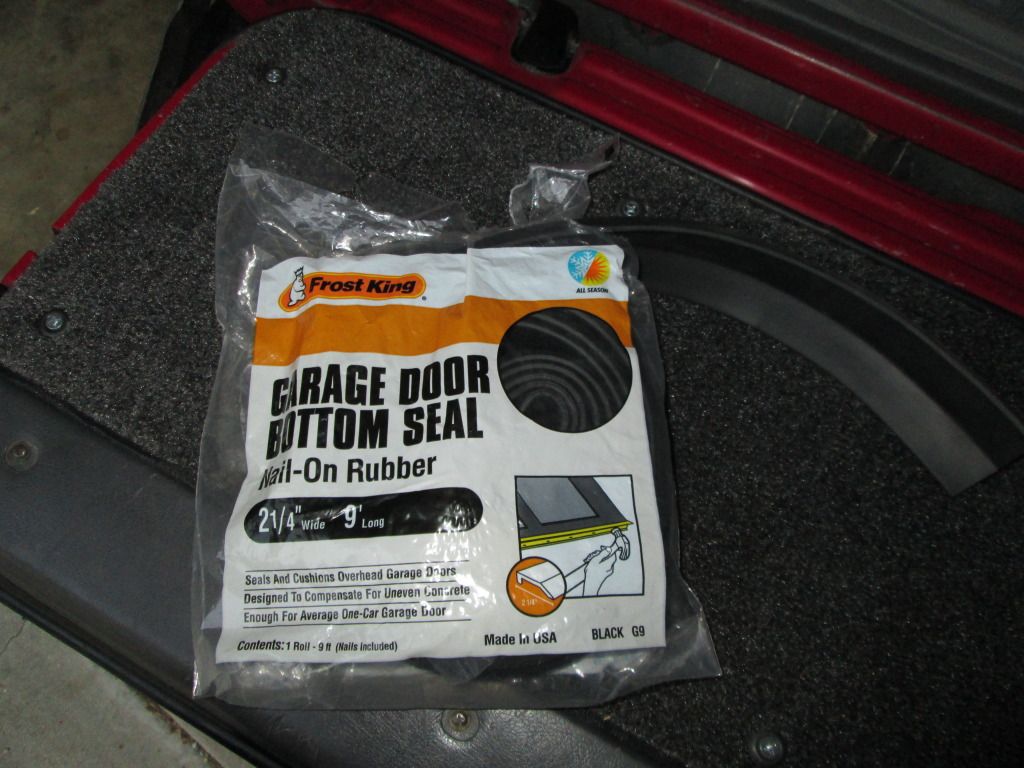
3. When you cut out the panel, you need to either leave the last 3" or so where it begins to curve toward the bed, OFF, .... OR, you could bring it ALL THE WAY to those 2 rear most holes I showed(where I said, "These holes looks smaller" ??? They have NO rivets going into them.. No Push Pins, IOW).... If you cut it short of the curve, all you need is some 3-4" Garage Door Weather Stripping to E-6000 Glue to the back end of the panel, 'CREATING' your own "CORNER" in a sense. Also, remember... The very back of the OEM panels fit into the 'tailgate trim'. That U-shaped plastic/pliable trim piece actually holds the rear portion of the trim to the tailgate reinforced lip.... it also then glides into the 'Plastic Carpet Edging' Piece, the rear most carpet retainer by the tailgate.
10-26-2012, 02:29 PM
#5154
Registered User

Join Date: Mar 2005
Location: Whittier, CA
Posts: 107
Likes: 0
Received 0 Likes
on
0 Posts
JOHN, ... it was FANTASTIC to meet you and your Son! Good people... And YOTA-FOLK, nonetheless! hahaha. Glad you got what you came for that day.. and REALLY hoping that solves your problem. Have you looked into the A-Arm Mounting section maybe being cocked sideways/hit on the frame right there? REALLY hope you have no frame damage.... My buddy is dealing with that right now... I also had a LOT of issues one time with alignment due to 'WONKY ball joints'...
CAN'T WAIT to see your 89 Extra Cab all SAS'sy and 3RZ'd(or 5VZE'd... if the logic portion doesn't take over and win! hahaha.. That was funny).
Say hi to your Son, John, .... good to see him out there slangin grease.... NOT ENOUGH of that anymore... Yet, yeah.... soon as that thing's on the road full time... You'll likely see a lot less of him, right? hahaha.
Just a reminder.. that Maetra or whatever it's called Power Antenna I have? PIECE OF CAKE install, better reception, lifetime guarantee at O'Reilly and it will ALWAYS go down on it's own when you kill the motor. I REALLY should have grabbed that power one yesterday... OEM Toyota with the mast still in? VERY rare! lol... Even though the wire was cut.... I could fix that, ya know? Have spares. Just a thought.
PLEASE tell me you have a build thread/your son, too???? I know you're not much on time in here... BUT, we'd just be happy with a few pics along the way, ya know? lol.
Again, GREAT to meet ya, John.... You should come with to the Angeles Crest one of these days pretty soon... I'll be heading up there again, shortly, if possible... You're welcome to come along. Might even be around 5-6 of our rigs if I can get that organized(schedules don't always line up, I know ... but worth a try, right? )
CAN'T WAIT to see your 89 Extra Cab all SAS'sy and 3RZ'd(or 5VZE'd... if the logic portion doesn't take over and win! hahaha.. That was funny).
Say hi to your Son, John, .... good to see him out there slangin grease.... NOT ENOUGH of that anymore... Yet, yeah.... soon as that thing's on the road full time... You'll likely see a lot less of him, right? hahaha.
Just a reminder.. that Maetra or whatever it's called Power Antenna I have? PIECE OF CAKE install, better reception, lifetime guarantee at O'Reilly and it will ALWAYS go down on it's own when you kill the motor
. I REALLY should have grabbed that power one yesterday... OEM Toyota with the mast still in? VERY rare! lol... Even though the wire was cut.... I could fix that, ya know? Have spares. Just a thought. PLEASE tell me you have a build thread/your son, too???? I know you're not much on time in here... BUT, we'd just be happy with a few pics along the way, ya know?
lol. Again, GREAT to meet ya, John.... You should come with to the Angeles Crest one of these days pretty soon... I'll be heading up there again, shortly, if possible... You're welcome to come along. Might even be around 5-6 of our rigs if I can get that organized(schedules don't always line up, I know ... but worth a try, right?
) Just wanted to give you an update on the 91 4Runner. We cleaned up and changed out the lower control arm on Sunday and took it for an alignment later that week. The numbers were nearly right on before they made any adjustments. After a little tweaking it was right in spec. I guess that lower arm was hit at some point but the frame mounts are OK. It drives straight with no pulling at all. We also changed out the antenna to the one we picked up at the yard. I had to use a Dremel cutoff wheel to remove the that blasted chrome nut on top of the existing housing but after that the new to me antenna screwed in with the help of some channel-locks. I pulled most of the dash because I needed to change out some burned out bulbs in the meter panel.
The following weekend it went up on 4 jack stands to have the brakes replaced and rear axle bearings and seals replaced. The front rotors were badly grooved and already worn to 18mm so they needed to be replaced along with 1 inner wheel bearing and of course both inner seals. I knew I had issues with the drivers side rear axle seal as the back of the backing plate was covered in oil. The shoes also soaked in oil so I doubt I got any braking from this wheel. I had ordered a couple of the Marlin rear axle service kits in advance so after we removed the axles and found a shop to do the press work. They managed to bend the backing plates a little but got them done. After several cans of brake cleaner all the grease was gone and the axles went back in, new shoes installed, and the 21 year old brake fluid was flushed out. I have been driving it all this week and it runs and drives well. My son will be driving it starting next week. I hope he appreciates all the work that went into getting it ready but I think it should be a vehicle. Only the transmission as not been gone through.
No build threads yet as I always forget to take pictures and fairly bad at posting on forums. I will see if my son might want to start one since he is already asking how to lift it.
Would like to join you some time on a run. I have never wheeled in Angeles Crest area only hiked so that would be fun.
Man again spent at least an hour reading just a few pages of your thread here as you can certainly write them. I like the additional rear window switch idea and actually picked one a a month ago during a Pick Your Part hunting trip. I will have to look to see if the 2 gen is wired like the 1st gen.
10-26-2012, 08:16 PM
#5155
John, what a nice thing to see when checking in after a long day! SUP?  Tell your son I said "Hello" to him as well. Was nice meeting you both.
Yeah, it's a bit long winded at times.. BUT, it seems like I have to figure lots of things out as I go... so it's just a lot of talking out loud, etc. lol. I'll be doing a "cliff notes" thread one day, since I'll likely give RW and many others an embolism eventually if I don't haha. Nah, actually, it'll be very concise and full of 'how to' stuff.. that's it.
Man, I tell ya, John... modifying this cargo area has taken it's toll on my brain, SERIOUSLY! hehe. But looking back... it's nothing as bad as when I've done other repairs that were keeping me 'STRANDED TIL COMPLETION'... NOT fun! lol.
I'd love to have you guys/just you, whatever, come along one of these times, soon I REALLY want to get out there, ASAP! I'll be posting another post here explaining the situation... As I seem to have driven everyone off the proverbial cliff! hahaa....
KEEP IN TOUCH, k? I'll post up when I'm going next, so if you keep up on here occasionally, you'll hopefully not miss it, ya know?
Tell your son I said "Hello" to him as well. Was nice meeting you both. Yeah, it's a bit long winded at times.. BUT, it seems like I have to figure lots of things out as I go... so it's just a lot of talking out loud, etc. lol. I'll be doing a "cliff notes" thread one day, since I'll likely give RW and many others an embolism eventually if I don't
haha. Nah, actually, it'll be very concise and full of 'how to' stuff.. that's it. Man, I tell ya, John... modifying this cargo area has taken it's toll on my brain, SERIOUSLY! hehe. But looking back... it's nothing as bad as when I've done other repairs that were keeping me 'STRANDED TIL COMPLETION'... NOT fun! lol.
I'd love to have you guys/just you, whatever, come along one of these times, soon
I REALLY want to get out there, ASAP! I'll be posting another post here explaining the situation... As I seem to have driven everyone off the proverbial cliff! hahaa.... KEEP IN TOUCH, k? I'll post up when I'm going next, so if you keep up on here occasionally, you'll hopefully not miss it, ya know?
10-26-2012, 09:37 PM
#5156
THE PROJECT CONTINUES! woot! :)
Hahaha... I just wanted to share that line first, as I was pretty heart broken that I'd have to stop for a while..... But the miracle I and the loved one were looking for came through .........
SOOOOOOOOO;
First, I was pretty frustrated with the fact that the wood was too thick for the L-trim... BUT, I knew that would be an issue, all along. I was going to put metal trim on it(might still, depends on what you guys think), cut it short and then put the L-trim over the metal back... BUT, I got out my flap disc on the angle grinder and shaved off a few layers/did some shaving off the bottom where it was not accounting for the fact that the OEM panel sits in the lower lip using fasten clips...... IT FITS! >>>
The portion I shaved to fit under the front panel so I can use screws OR "NEW" push retainers to hold it in>>>
On top......... >>
Here is the corner trim I'll likely use. it's a very good fit for this area and wont be perfect, but will hide the wiring and such all the way up to the L-trim..........

I also have basic 3/8" Weatherstripping to slap in all the way around...
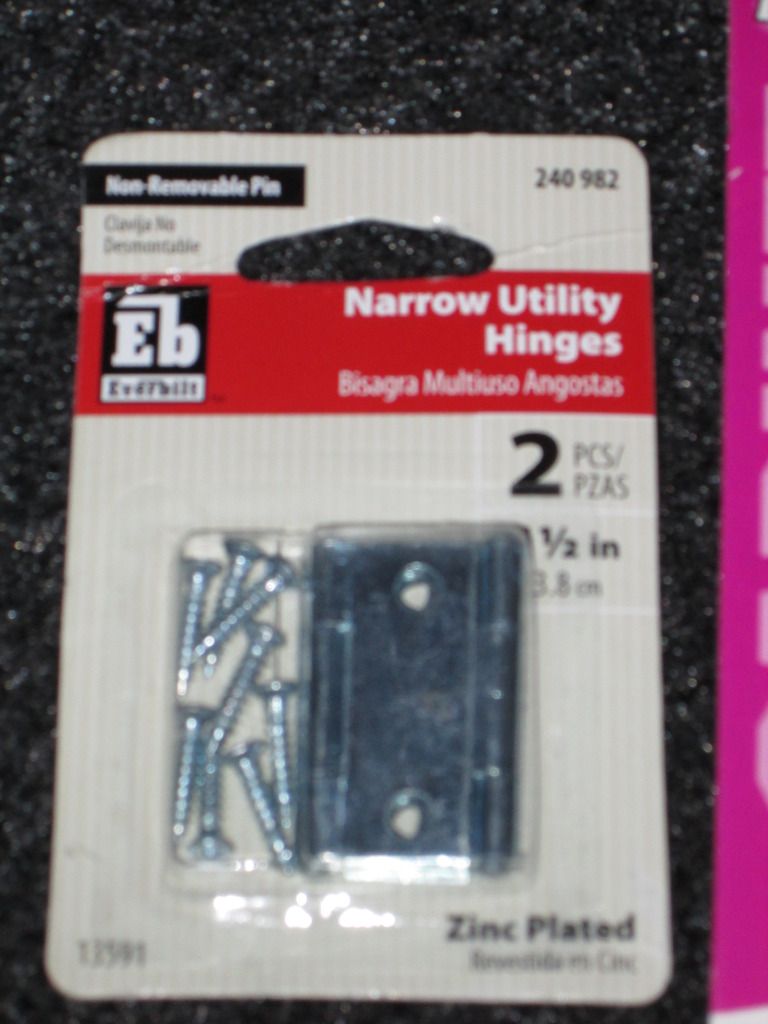
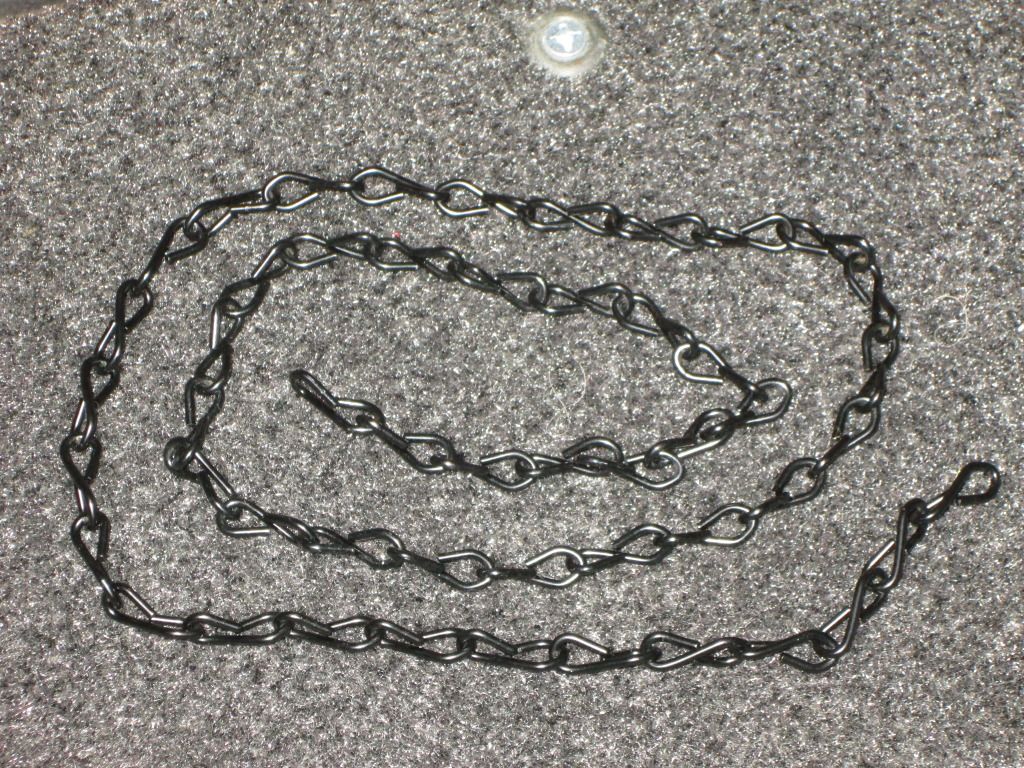
I picked up these a while back for something else...... Thought they might make pretty good lil deterrents for at least a SECOND thought, ya know? lol. When the top is of, people look in there... I've come back from shopping 3 times and found them open! hahaha. >>>>

Chain for the doors to stop them at level so I can use them as a lil platform if needed. Plus, the door will be on hinges.. so I think it's best to have them stop at level... NO? >>>
>>>
got these as spacers in case I need them for the "LOCK" to fit securely... I'd then put small washers and another plate as the stop for the lock so the doors don't cave in at all/are TOIGHT, like a TOIGER! hehe.
These are an additional find that will work just fine in place of the smaller ones in spots. I tried one out... they are SOLID when through something/anchoring on the back. I know they're not for that, but SO WHAT! lol. Soon as I can find more of those EXACT expansion nuts... those will go in.
************************************************** ******
As you saw in the first pic... there still is one remaining issue....
*** THE REAR SEAT LATCH KEEPER *** .........
i HAVE 2 CHOICES...
1. I can cut that section out..... BUT, that would leave me with no top mounting screw for that last one that joins the front and rear panels. There would be carpet there, extra padding to make it flush, and THAT instead could be used to put the push pins in???
2. I can shave out the back with a razor and chisel for the flange that the latch keep welds to(lil plate with bolt holes in it)/ Then, just drill holes to make the slot for the Keep-Hoop/ 2 Holes for the bolt holes....
Whatcha think? C'MON GUYS, this is gonna make me have a melt down, .. in need the resto minds of Toyotaville, all suffering with Toyotaticulitus, like myself, , to join together and figure this out! hahaha.
************************************************** *********
In the end, I'll probably just shave off the beveled ends... but they're not going to be supporting anything, so I'd like to keep them as a 'TINY bit of pressure' against the backside of the L-trim and to be uniform. HOWEVER, I could just let the carpet hang over and up on top... THEN, when I put the L-trim on, it would go snug up against that, ya know? Just thought I was pretty clever for thinking it up hahahahaha.
If I did keep those tapered off portions... Could I reinforce it with liquid nails? (I shaved off a lil too much on one portion toward the back, where I'd started. I'll already use liquid nails there, whether I keep the 'lip' or not, because it's just too close to where the countersunk washers go.. They would likely go over a LIL bit on those spots... NOT a huge deal.. but not 'TOIGHT', either! lol.
************************************************** *******
Gotta make the cut outs for the lights and lay all the wire for the dome light and any additional gizmos I might be tossing in. The lights I wanna use on the sides are the "Door/Off/On" Cargo Dome lights from the 2nd Gens... I have 2 PRISTINE ones... So, I figure 'why not have lights from all angles come on when I open the tailgate... OR, stay off and only one or the other come on.. OR, just turn them on.. etc. I can't do that with the OEM Deck lamps... They're toggle switches, SPST(??? >> I'm sure RAD or RBX or Ian or the like will correct me, quickly! hehe).... Basically, the stock deck lamp is ON/OFF, that's it. I was thinking of running the deck lamp switch back there as well, once I remove it from the 'TAILLIGHTS' HANGUP it has, lol.... But that might get complicated.... RAD??? haha.
Going to also run a capped 12V line to that rear panel passenger cargo door... As I want to have it "WIRED" for the Inverter/Compressor, etc., ya know? ... Might put plugs in the walls, with a Socket Panel, like RBX did sorta? Lotta drilling and cutting still to do.. BUT IT'S FIGURED OUT, AT LEAST! lol...
(At this point, even if I have to cut new panels, it wouldn't take me an hour from start to finish, as I have the templates now... The ONLY reason I would, at this point, is to 'MAKE LONGER the rear most part behind the door. I can't remember why I cut it that short from top to bottom... It was just supposed to be for the wiring and wiper fluid hose to fit through... BUT, ...mehhhhhh. lol. It'd probably be easier and WOULD be cheaper to just add a wood strip from scrap I have and join it with a joiner strip, ya know?
......... SOOOOOOOOO;
First, I was pretty frustrated with the fact that the wood was too thick for the L-trim... BUT, I knew that would be an issue, all along. I was going to put metal trim on it(might still, depends on what you guys think), cut it short and then put the L-trim over the metal back... BUT, I got out my flap disc on the angle grinder and shaved off a few layers/did some shaving off the bottom where it was not accounting for the fact that the OEM panel sits in the lower lip using fasten clips...... IT FITS! >>>
The portion I shaved to fit under the front panel so I can use screws OR "NEW" push retainers to hold it in>>>
On top......... >>
Here is the corner trim I'll likely use. it's a very good fit for this area and wont be perfect, but will hide the wiring and such all the way up to the L-trim..........
I also have basic 3/8" Weatherstripping to slap in all the way around...
I picked up these a while back for something else...... Thought they might make pretty good lil deterrents for at least a SECOND thought, ya know? lol. When the top is of, people look in there... I've come back from shopping 3 times and found them open! hahaha. >>>>
Chain for the doors to stop them at level so I can use them as a lil platform if needed. Plus, the door will be on hinges.. so I think it's best to have them stop at level... NO?
>>> got these as spacers in case I need them for the "LOCK" to fit securely... I'd then put small washers and another plate as the stop for the lock so the doors don't cave in at all/are TOIGHT, like a TOIGER! hehe.
These are an additional find that will work just fine in place of the smaller ones in spots. I tried one out... they are SOLID when through something/anchoring on the back. I know they're not for that, but SO WHAT! lol. Soon as I can find more of those EXACT expansion nuts... those will go in.
************************************************** ******
As you saw in the first pic... there still is one remaining issue....
*** THE REAR SEAT LATCH KEEPER *** .........
i HAVE 2 CHOICES...
1. I can cut that section out..... BUT, that would leave me with no top mounting screw for that last one that joins the front and rear panels. There would be carpet there, extra padding to make it flush, and THAT instead could be used to put the push pins in???
2. I can shave out the back with a razor and chisel for the flange that the latch keep welds to(lil plate with bolt holes in it)/ Then, just drill holes to make the slot for the Keep-Hoop/ 2 Holes for the bolt holes....
Whatcha think? C'MON GUYS, this is gonna make me have a melt down, .. in need the resto minds of Toyotaville, all suffering with Toyotaticulitus, like myself,
, to join together and figure this out! hahaha. ************************************************** *********
In the end, I'll probably just shave off the beveled ends... but they're not going to be supporting anything, so I'd like to keep them as a 'TINY bit of pressure' against the backside of the L-trim and to be uniform. HOWEVER, I could just let the carpet hang over and up on top... THEN, when I put the L-trim on, it would go snug up against that, ya know? Just thought I was pretty clever for thinking it up
hahahahaha. If I did keep those tapered off portions... Could I reinforce it with liquid nails? (I shaved off a lil too much on one portion toward the back, where I'd started. I'll already use liquid nails there, whether I keep the 'lip' or not, because it's just too close to where the countersunk washers go.. They would likely go over a LIL bit on those spots... NOT a huge deal.. but not 'TOIGHT', either! lol.
************************************************** *******
Gotta make the cut outs for the lights and lay all the wire for the dome light and any additional gizmos I might be tossing in. The lights I wanna use on the sides are the "Door/Off/On" Cargo Dome lights from the 2nd Gens... I have 2 PRISTINE ones... So, I figure 'why not have lights from all angles come on when I open the tailgate... OR, stay off and only one or the other come on.. OR, just turn them on.. etc. I can't do that with the OEM Deck lamps... They're toggle switches, SPST(??? >> I'm sure RAD or RBX or Ian or the like will correct me, quickly! hehe).... Basically, the stock deck lamp is ON/OFF, that's it. I was thinking of running the deck lamp switch back there as well, once I remove it from the 'TAILLIGHTS' HANGUP it has, lol.... But that might get complicated.... RAD??? haha.
Going to also run a capped 12V line to that rear panel passenger cargo door... As I want to have it "WIRED" for the Inverter/Compressor, etc., ya know?
... Might put plugs in the walls, with a Socket Panel, like RBX did sorta? Lotta drilling and cutting still to do.. BUT IT'S FIGURED OUT, AT LEAST! lol... (At this point, even if I have to cut new panels, it wouldn't take me an hour from start to finish, as I have the templates now... The ONLY reason I would, at this point, is to 'MAKE LONGER the rear most part behind the door. I can't remember why I cut it that short from top to bottom... It was just supposed to be for the wiring and wiper fluid hose to fit through... BUT, ...mehhhhhh. lol. It'd probably be easier and WOULD be cheaper to just add a wood strip from scrap I have and join it with a joiner strip, ya know?
Last edited by ChefYota4x4; 10-26-2012 at 09:41 PM.
10-27-2012, 12:29 AM
#5157
... shaved off a few layers/did some shaving off the bottom where it was not accounting for the fact that the OEM panel sits in the lower lip using fasten clips...... IT FITS! ...
*** THE REAR SEAT LATCH KEEPER *** .........
...The lights I wanna use on the sides are the "Door/Off/On" Cargo Dome lights from the 2nd Gens...
I can't do that with the OEM Deck lamps... They're toggle switches, SPST(??? >> I'm sure RAD or RBX or Ian or the like will correct me, quickly! hehe).... Basically, the stock deck lamp is ON/OFF, that's it. I was thinking of running the deck lamp switch back there as well, once I remove it from the 'TAILLIGHTS' HANGUP it has, lol.... But that might get complicated.... RAD??? ...Going to also run a capped 12V line to that rear panel passenger cargo door...
Can't comment on the latch keep because mine looks different (will post pics later).
Excellent plan on the door/off/on system.
You can actually add dash control to door/on/off system but that would be complicated- I think you'd need to add an extra switch in rear deck. Re: taillight hang-up- you already got that figured out, right?
BTW, now my deck light plan is updated:
- Replace deck lamp fixture with my overhead deck light and the deck light switch you sent me. This will allow me to control overhead light from the orig switch in dash.
- Rewire stock deck lamp fixture so it's simply on-off. Would work as night/dim light. Later, I can easily turn that into on/off/door using info we got from Bryan99
It's Single-Pole Double-Throw
Single pole meaning controlling one line/circuit. Double-Throw meaning you throw it to either of two directions that will make a connection."Toggle" or "Rocker" refer to the form/shape/mechanism of switch. Toggle switch is like a shift lever, Rocker is like a see-saw
Last edited by RAD4Runner; 10-27-2012 at 12:34 AM.
10-27-2012, 07:40 AM
#5158
Registered User
Glad to see you were able to keep the project going. And hope all is well with your friend in need. Your panels are looking clean. So are you planning on putting locks on those small panel doors?
10-27-2012, 10:34 AM
#5159
Registered User
http://www.ebay.com/itm/Furniture-0-...item5aeaaf5872
10-27-2012, 12:45 PM
#5160
Hey Guys, ...
RAD, thanks, man. And yeah, ... I've gone back and forth over which lights to use... mainly because, well, the "DOOR/OFF/ON" ones are bigger... so it's a one cut one time thing, ya know? Thanks on the SPDT, lol. I knew what Toggles and Push Button and Rockers were.. and I STILL wrote that, hahahahaha. Sometimes I just get 'STUCK' in the noggin dept., ya know? Far as the Deck lamp wiring... I could keep the Deck lamps too... That's a good idea, and they're small. That way I'd have low light/Nightlight Capability if I wanted... I'd have the dome/2 side 36MM lights for On/off/Door as the 'BRIGHT'/'WORK' lights... when setting up things for camp or working on a broken part, etc... Then have the Deck Lamps as night lights in RED? Maybe put them a lil more toward the back of the rear seats on the panels so they're in the 'middle' when sleeping in there(They would be in the 'CENTER' when the seats would be folded down, so nothing would obstruct them, then they'd offer 120* beam angle light for the whole rear. Plus, when getting up at night, if needing to hit the head, ... they'd keep my night vision in tact... Most times, with even moderate moonlight, I wouldn't need the flashlight til I got there, hahaha) ?????
Richard,.... THANKS, and I'm stoked too! haha. And, yeah, it was actually family, but s'all good. Far as me mentioning it, to be more specific in another way.... "I would NEVER likely get it back... so that's why I would have to plan to get every dime I have floating out there in "Purchased Goods" back that I could, ya know?" I WILL STILL be returning a few things... But only cuz I don't want to hold on to something I don't need, ya know? I have too much of that already! >>>

DRAGON, my PNW Brethren! lol... Sup man?
Hmmmmmm, ... you don't think the 90* or 180* options latch key lock would work? Do I need a lil hook on mine like that one? I was just gonna have it work like they do in Desks... "roll upward til behind a catch plate... then it's locked"... Not solid enough? Pics are up there in my last post... but I mean this one>>>
See, it has 90* or 180* optional cams in it... Wont that work, or am I missing something? Please let me know... Don't wanna drill if you all don't think that's a solid plan, lol.
************************************************** *****************
I was hoping someone with experience working with Birch or something would tell me whether those lips should stay or go? I could achieve the same thing with Carpet overlapping on top and under the front of the rear panels on the back, where it pops into the body. Once I bolt the panel to the sides, ... those lips won't be moving much or making contact with anything that's rocking and rolling all over the place.... So I wasn't worried about them breaking.. BUT, if they're unnecessary, ...why keep em, rightttttt???????
RAD, thanks, man. And yeah, ... I've gone back and forth over which lights to use... mainly because, well, the "DOOR/OFF/ON" ones are bigger... so it's a one cut one time thing, ya know? Thanks on the SPDT, lol. I knew what Toggles and Push Button and Rockers were.. and I STILL wrote that, hahahahaha. Sometimes I just get 'STUCK' in the noggin dept., ya know? Far as the Deck lamp wiring... I could keep the Deck lamps too... That's a good idea, and they're small. That way I'd have low light/Nightlight Capability if I wanted... I'd have the dome/2 side 36MM lights for On/off/Door as the 'BRIGHT'/'WORK' lights... when setting up things for camp or working on a broken part, etc... Then have the Deck Lamps as night lights in RED? Maybe put them a lil more toward the back of the rear seats on the panels so they're in the 'middle' when sleeping in there(They would be in the 'CENTER' when the seats would be folded down, so nothing would obstruct them, then they'd offer 120* beam angle light for the whole rear. Plus, when getting up at night, if needing to hit the head, ... they'd keep my night vision in tact... Most times, with even moderate moonlight, I wouldn't need the flashlight til I got there, hahaha) ?????
Richard,.... THANKS, and I'm stoked too! haha. And, yeah, it was actually family, but s'all good. Far as me mentioning it, to be more specific in another way.... "I would NEVER likely get it back... so that's why I would have to plan to get every dime I have floating out there in "Purchased Goods" back that I could, ya know?" I WILL STILL be returning a few things... But only cuz I don't want to hold on to something I don't need, ya know?
I have too much of that already! >>> DRAGON, my PNW Brethren! lol... Sup man?
Hmmmmmm, ... you don't think the 90* or 180* options latch key lock would work? Do I need a lil hook on mine like that one? I was just gonna have it work like they do in Desks... "roll upward til behind a catch plate... then it's locked"... Not solid enough? Pics are up there in my last post... but I mean this one>>>
See, it has 90* or 180* optional cams in it... Wont that work, or am I missing something? Please let me know... Don't wanna drill if you all don't think that's a solid plan, lol.
************************************************** *****************
I was hoping someone with experience working with Birch or something would tell me whether those lips should stay or go? I could achieve the same thing with Carpet overlapping on top and under the front of the rear panels on the back, where it pops into the body. Once I bolt the panel to the sides, ... those lips won't be moving much or making contact with anything that's rocking and rolling all over the place.... So I wasn't worried about them breaking.. BUT, if they're unnecessary, ...why keep em, rightttttt???????


