
ChefYota4x4's 1987 4Runner Build-Up Thread
 10-22-2012, 01:04 PM
#5101
Registered User
hey mark, some kind of a pattern would be awsome if you could. even on just some lite paper that you could fold up in an envalope would work. Ive got most of the plastic inserts but am missinf a few, can those or a suitible replacement be bought anywhere do you know. yours looks great, I have to figure out the panels the go on the back of the seats as well, I will probably do somthing similar as what you did with the tailgate as in a board covered with carpet Im not sure what was there to begin with mine were missing when I got my seats.
 10-22-2012, 01:26 PM
#5102
Registered User
iTrader: (4)
Join Date: May 2010
Location: People's Republic of California
Posts: 720
Likes: 0
Received 15 Likes
on
12 Posts
Where did you get that similar bed rug stuff from? Local? I have bedrug's in both my pickups and wanted to do some little boxes in thebed and cover them with bedrug to match, but if there is something cheaper and similar I'm all ears.
10-22-2012, 04:26 PM
#5103
Sub-install
Hi Chef,
I'm posting comments here for continuity...
I'd venture to guess that, without an enclosure, 10-inch sub could loud to a point when the panel behind it rattles. You could very well be listening to
, not Bob Seger 
If I were to install a sub, that's too thick for stealth mounting (within the body panel), I'd do this.
I'm posting comments here for continuity...
If I were to install a sub, that's too thick for stealth mounting (within the body panel), I'd do this.
10-22-2012, 04:59 PM
#5104
Once again, multi-quote only selectively works... So I can't go back and include: >>>
Dragon..... Thanks, man. I hear ya on the color in the wood... BUT, that's not gonna cut it with the problem I would have over time. I Need to either HOT KNIFE the edges for now, or 'edge' the two sides that don't have edging... Reason being; It will come apart, like any carpet would, rubber backed or not. Every time I close the gate, it's snug against the floor, etc.(I'm going for GOOD SEAL, ya know? )
)
I'll figure it out before it comes apart like "If you want to destroyyyyy my sweaterrrrrrrrrrrr, pull this string as I walkkkk awayyyyyyyy!" lol. Love that song! YES, that's right, I said it! hahaha.
*******
RBX, .. sup mang? ..... Yeah, I'll go back and read up on that. I'm making a compilation of notes and schematics and templates and ..... well, you get it, lol. I'm planning this out, TO THE TEE! I do not want it to suck, and want it to look really good, yet also insulate from noise and weather, ya know? The tailgate is one that let's in LOTS OF COLD! Which sucks, cuz that is where most people put the feet when crashed back there, lol. I'm doing peel and stick weatherstripping there, too, under the edges. It's gonna be TOIGHT, trust me. And far as the speaker... as I said, yeah, .. gotta check that out. I chose to ditch the panels because... well, it's just to try this out, ya know? I mean, what can it hurt, right?
  I could always put in my pristine panels instead, that I picked up at Pick-Your-Part And that's a GREAT idea to cover them, butt up with fabric and sealer... that's a brilliant idea to strengthen them. I'd do the same if I kept them in/put them back in, ya know?
Ok buddy... Soon as I pull the panel to edge the carpet, I'll do a put together with tape paper thingy ? ? ? lol. I'll try to make it close as possible.
I got it from a guy that works for Biglots that I know... He got two pieces of it from the place that does BEDRUG.. He DID NOT try to lie and say it was that stuff for sure... BUT, he did say he was positive it was from them. Maybe they do other stuff as well? I'm not sure. BUT, it's VERY tough, Grego.. I literally had trouble cutting it with a razor, lol. Had LOTS OF cramps trying to cut it with these pretty nasty fabric sheers I have... BUT eventually got it cut .... He said on occasion they get stuff from there, and it's cut out and edging done for someone at 5x6ft. Just like their other area rugs at Biglots? Maybe BEDRUG makes them for their office? hahahaha. No clue. As I said, maybe they make cheaper stuff under a different name? Try Biglots and look carefully through the Area Rug stuff.... MOST of the backing on those came apart with easy by the touch... this stuff does not, AT ALL. I think BEDRUG has a thick bottom layer that's not on this..... But for 20$ at 5x6FT...... that's 66cents a square foot, right? hahaha. It's weird... it seems to change color every time I take a pic... But it's really just like a charcoal gray as you can see from that one pic where it nearly matches the tailgate plastitrim?
Wow, THANKS, RAD! And dude, you are KILLING IT OVER THERE!!!! Nice work, man!
Are you doing foil tape over all the edges of P&S so it is literally sealed up?
I will watch the video in a bit. Just have to finish something first.
BTW, that's exactly what I was trying to say on my video regarding the box being cut to fit over the wheel well curves and such/in between the roll bar gap, then back to the new panel, with a hole just enough for the sub back and then some for 'boom air' to get through into the panel.
Dragon..... Thanks, man. I hear ya on the color in the wood... BUT, that's not gonna cut it with the problem I would have over time. I Need to either HOT KNIFE the edges for now, or 'edge' the two sides that don't have edging... Reason being; It will come apart, like any carpet would, rubber backed or not. Every time I close the gate, it's snug against the floor, etc.(I'm going for GOOD SEAL, ya know?
) I'll figure it out before it comes apart like "If you want to destroyyyyy my sweaterrrrrrrrrrrr, pull this string as I walkkkk awayyyyyyyy!" lol. Love that song! YES, that's right, I said it! hahaha.
*******
RBX, .. sup mang?
..... Yeah, I'll go back and read up on that. I'm making a compilation of notes and schematics and templates and ..... well, you get it, lol. I'm planning this out, TO THE TEE! I do not want it to suck, and want it to look really good, yet also insulate from noise and weather, ya know? The tailgate is one that let's in LOTS OF COLD! Which sucks, cuz that is where most people put the feet when crashed back there, lol. I'm doing peel and stick weatherstripping there, too, under the edges. It's gonna be TOIGHT, trust me. And far as the speaker... as I said, yeah, .. gotta check that out. I chose to ditch the panels because... well, it's just to try this out, ya know? I mean, what can it hurt, right? I could always put in my pristine panels instead, that I picked up at Pick-Your-Part And that's a GREAT idea to cover them, butt up with fabric and sealer... that's a brilliant idea to strengthen them. I'd do the same if I kept them in/put them back in, ya know? hey mark, some kind of a pattern would be awsome if you could. even on just some lite paper that you could fold up in an envalope would work. Ive got most of the plastic inserts but am missinf a few, can those or a suitible replacement be bought anywhere do you know. yours looks great, I have to figure out the panels the go on the back of the seats as well, I will probably do somthing similar as what you did with the tailgate as in a board covered with carpet Im not sure what was there to begin with mine were missing when I got my seats.
.... He said on occasion they get stuff from there, and it's cut out and edging done for someone at 5x6ft. Just like their other area rugs at Biglots? Maybe BEDRUG makes them for their office? hahahaha. No clue. As I said, maybe they make cheaper stuff under a different name? Try Biglots and look carefully through the Area Rug stuff.... MOST of the backing on those came apart with easy by the touch... this stuff does not, AT ALL. I think BEDRUG has a thick bottom layer that's not on this..... But for 20$ at 5x6FT...... that's 66cents a square foot, right? hahaha. It's weird... it seems to change color every time I take a pic... But it's really just like a charcoal gray as you can see from that one pic where it nearly matches the tailgate plastitrim? Hi Chef,
I'm posting comments here for continuity...
I'd venture to guess that, without an enclosure, 10-inch sub could loud to a point when the panel behind it rattles. You could very well be listening to this, not Bob Seger
If I were to install a sub, that's too thick for stealth mounting (within the body panel), I'd do this.
Are you doing foil tape over all the edges of P&S so it is literally sealed up?
I will watch the video in a bit. Just have to finish something first.
BTW, that's exactly what I was trying to say on my video regarding the box being cut to fit over the wheel well curves and such/in between the roll bar gap, then back to the new panel, with a hole just enough for the sub back and then some for 'boom air' to get through into the panel.
Last edited by ChefYota4x4; 10-22-2012 at 05:04 PM.
10-22-2012, 05:07 PM
#5105
Registered User
oh you were talkin bout the carpet! well yeah you have to bind the edge or it'll fray like mad i thought you were talking about seeing the wood around some of the edges
suggestions then sodiering iron along the backing to melt an seal it along the cuts
silicone wear a glove an smear it into the fibers along the edge (the back of the carpet)
theres a liquid they use in fabric stores it binds up threads like glue but remains flexible expensive which is why i suggest it at the last
10-22-2012, 05:09 PM
#5106
PS> Jason, .... The back of my seats, the covers that go over the back of the back seats is PART of the entire front and side covers... It's sewn in. I'll get picks closer up for ya if you can't see them. .... The panel on back of them is done JUST LIKE the rear panel, you're right. (Pretty sure, I'll make sure, ok? ) I'm not taking those apart, but I think 2 or 3 have them apart right now. Lemme ask them if they'd mind checking to see if they use those risen expansion nuts or the pop kind, like the yellow ones that go through the fender, k? Those mount flush with whatever they go onto... then screws go in and they expand as well. The ones in my tailgate? HOLY CRAP, I can NOT pull the tailgate panel off, Jason... they are THAT TIGHT in there now with he longer screws, ya know?
WOOT! lol.
WOOT! lol.
10-22-2012, 05:25 PM
#5107
RAD, .... I couldn't get past 30 seconds of that... hahaha. I have ALL KINDS of music..... BUT WOW! lol. I would NEVER want that kind of sounds... I have NO INTEREST, none, in impressing anyone. But when I get in and crank up a CD or high quality WMA sample of Pink Floyd or something? OH YEAH, make it crisp and clean and I'll be REAL happy! lol. PS> I want to mount my 4 channel amp in the driver side panel, behind the window module some, mounted TO THE panel-back.... I think as Long as i insulate that side but allow it to vent some, just a lil... It should be FINE! lol. I do NOT WANT AN AMP UNDER MY SEAT! BUT, I'm eventually going to do Infinity front and rear in place of my Blaupunkt 4's in the dash and Pioneer 4way 6x9's in the rear. I wouldn't run those with a JL 10" without an amp... The RMS watts they can handle is INSANE! And honestly? Those kinda speakers just sound better with a lil more power behind them, ya know? That's why I don't want more than one 10" JL... because the music I play most often doesn't need that much overwhelming bass to treble and mid's ratios... Just CLEAN, if that's a good word, ya know?
Dragon, that's a GREAT idea! I have some GOOP 6007.... it's supposed to be clear and dry somewhat pliable but PERMANENT.... you think that would work? I don't mind bonding it to the wood, either. I'll be adhesive fixing the carpet to the panel, anyhow, ya know? Maybe a hot knife and then that stuff in a bead around those two sides and the handle area? Whatcha think?
Dragon, that's a GREAT idea! I have some GOOP 6007.... it's supposed to be clear and dry somewhat pliable but PERMANENT.... you think that would work? I don't mind bonding it to the wood, either. I'll be adhesive fixing the carpet to the panel, anyhow, ya know? Maybe a hot knife and then that stuff in a bead around those two sides and the handle area?
Whatcha think?
10-22-2012, 05:32 PM
#5108
HEY GUYS.... Ok, soooooooooooo, .........
I figured keep the momentum going, and keep the wood working going....
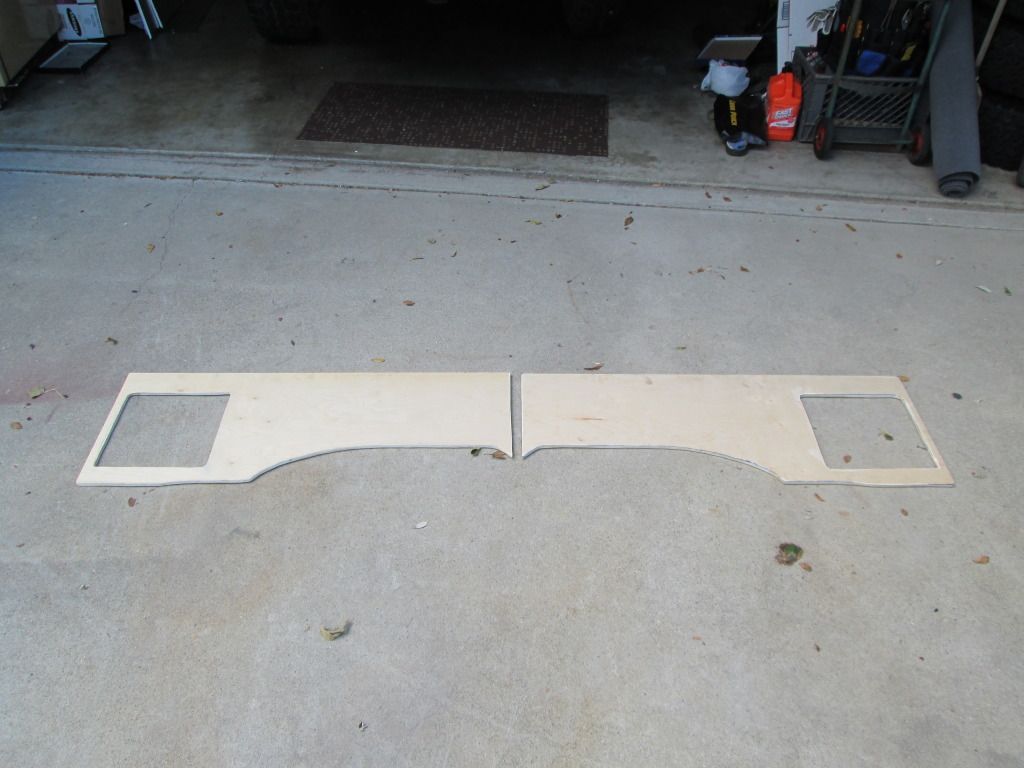
Believe it or not, this was a lil bit of work. NOT crazy... just a couple hours to do it cleanly and angle grinder-sand all the edges a lil on the plywood where it frays a tiny bit, ya know? They came out really clean... Haven't decided just yet whether it's getting the sub in the panel or not... BUT, I think so. The wood was 6$, and EASY as pie by the second one... So, now I just would grab another and start over if I don't like the one with the sub installed in it. Ya know? >>>>>>>>>>>>>>>
I figured keep the momentum going, and keep the wood working going....
Believe it or not, this was a lil bit of work. NOT crazy... just a couple hours to do it cleanly and angle grinder-sand all the edges a lil on the plywood where it frays a tiny bit, ya know? They came out really clean... Haven't decided just yet whether it's getting the sub in the panel or not... BUT, I think so. The wood was 6$, and EASY as pie by the second one... So, now I just would grab another and start over if I don't like the one with the sub installed in it. Ya know? >>>>>>>>>>>>>>>
10-22-2012, 07:24 PM
#5109
Registered User
id say that goop would do the job and since your spray gluing the rest might as well make it bullet proof
those side panels look excellent, now's the time if your going to cut the hole for the sub you could use a square an a pencil to mark out the rollbar area on the panel cut it out an then cover it all with the material your using
those side panels look excellent, now's the time if your going to cut the hole for the sub you could use a square an a pencil to mark out the rollbar area on the panel cut it out an then cover it all with the material your using
10-23-2012, 12:17 AM
#5110
Super Moderator
Staff
iTrader: (1)
Join Date: Aug 2008
Location: Anderson Missouri
Posts: 11,788
Likes: 0
Received 25 Likes
on
22 Posts
Just got caught up on your thread. Your tailgate panel turned out great. I have no panel at all for mine so will be doing about the same thing you did. On your floor area, anything is better then nothing. It helps for sound deadening, but mostly saves on the knees when crawling around back there. The corrugated ridges sure hurt if you get on them wrong.
10-23-2012, 12:19 AM
#5111
Hey Dragon, how's it going up Norte? Any weather yet? My buddy's in Salem.... he said, today, when speaking, "Hey man..... I'm good... Just MISSING THE SUN!" hahaha.
Hey Dragon, thanks for the idea, man! I think what I'll do is goop it,.... then wrap it in the ribbon as trim.. Just for looks, and I guess it wont hurt the 'sturdy factor', right? lol.
Far as the speakers...... I just can't say just yet what I wanna do.... But what I DO know, for sure;
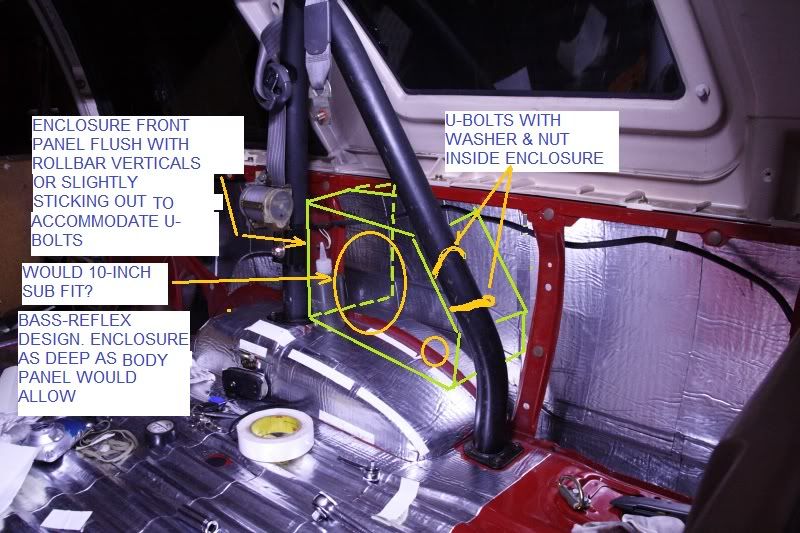
The 10 would BARELY fit between the roll bar pillars directly in the panel. A spacer would be of great benefit, if the plan is to put it right into the panel. It's around 11" in that spot.. Far as 'depth' clearance... I'm not sure. BUT, I think I would rather do it right into the panel, using spacers, as the whole idea of building a box into the panel there seems a bit difficult to pull off... See, if I just cut a whole to fit the magnet/support the magnet weight with something from the bottom... SURE< it would still allow for an 8" or so tunnel into the inside of the panel.. BUT, then I'd have to build a special box like RAD is talking about doing, and that would have to sit right up against the rear of the panel pretty much... It could be done, but just to pull the panel, it would have to separate from the inside the panel box, right? I guess the inside the panel box could have good size weather stripping pushing up against the back of the panels... BUT WOW, .......talk about a PITA! hahaha. I guess if you're gonna do this, you should do it the best way possible, right?
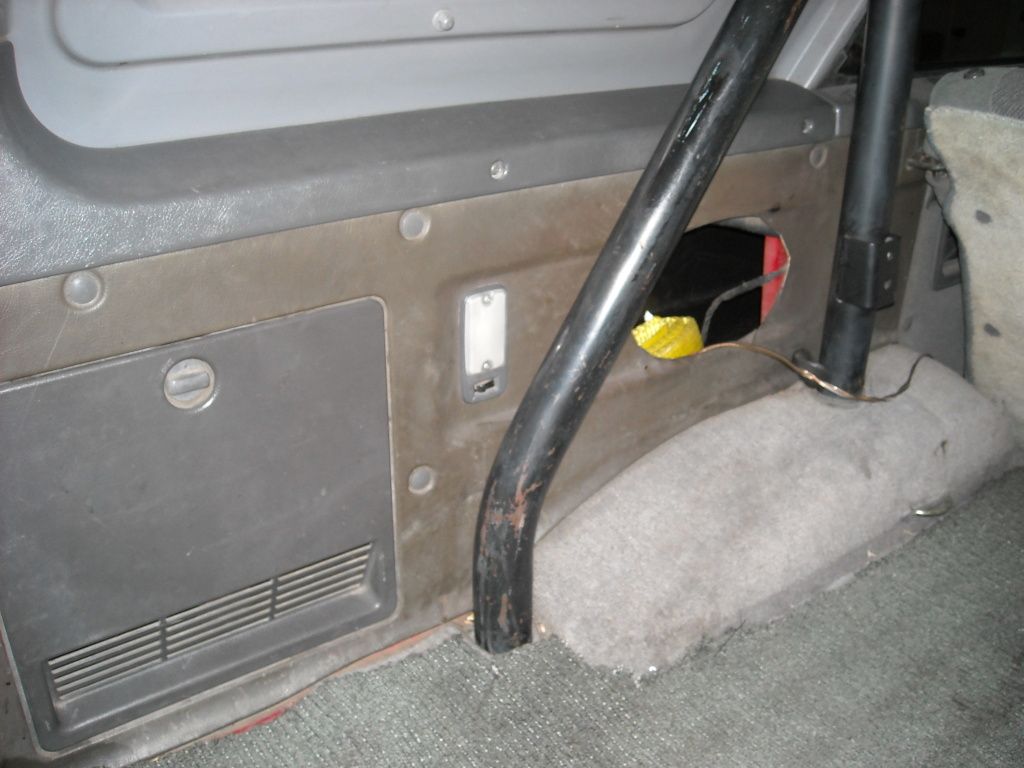
Here's the stock panel, which should give an idea of where the hole is... You can see the vertical support beam right there... And in RAD's pics, you can see all the vertical support beams, which have to be considered when installing speakers into the rear.........
Hey Dragon, thanks for the idea, man! I think what I'll do is goop it,.... then wrap it in the ribbon as trim.. Just for looks, and I guess it wont hurt the 'sturdy factor', right? lol.
Far as the speakers...... I just can't say just yet what I wanna do.... But what I DO know, for sure;
The 10 would BARELY fit between the roll bar pillars directly in the panel. A spacer would be of great benefit, if the plan is to put it right into the panel. It's around 11" in that spot.. Far as 'depth' clearance... I'm not sure. BUT, I think I would rather do it right into the panel, using spacers, as the whole idea of building a box into the panel there seems a bit difficult to pull off... See, if I just cut a whole to fit the magnet/support the magnet weight with something from the bottom... SURE< it would still allow for an 8" or so tunnel into the inside of the panel.. BUT, then I'd have to build a special box like RAD is talking about doing, and that would have to sit right up against the rear of the panel pretty much... It could be done, but just to pull the panel, it would have to separate from the inside the panel box, right? I guess the inside the panel box could have good size weather stripping pushing up against the back of the panels... BUT WOW, .......talk about a PITA! hahaha. I guess if you're gonna do this, you should do it the best way possible, right?
Here's the stock panel, which should give an idea of where the hole is... You can see the vertical support beam right there... And in RAD's pics, you can see all the vertical support beams, which have to be considered when installing speakers into the rear.........
10-23-2012, 12:28 AM
#5112
Hey Terry, another 'simultaneous late night post', hahaha...
Sup man?
What's your input on the panels and 10" and so on? Have very limited choices on this... and I want to do it all at once, including the lights and switches and so forth(still have to do the cut outs on the panels for all that stuff, too. hahha)...
You're a resto genius, Buddy... you gotta have some thoughts on this, right?
Sup man?
What's your input on the panels and 10" and so on? Have very limited choices on this... and I want to do it all at once, including the lights and switches and so forth(still have to do the cut outs on the panels for all that stuff, too.
hahha)... You're a resto genius, Buddy... you gotta have some thoughts on this, right?
10-23-2012, 01:01 AM
#5113
Registered User
chef heres a mad idea
split the side panel at the vertical support where it bolts to it now theres a certain logic to this if you do a built in box for the sub in the rollbar angle if you need to work in the back corner no need to pull the sub lose once built in with those dress up washers an longer screws you could nearly make the seam disappear so kinda like | /o| (green bar is the seam)
just an idea
10-23-2012, 08:18 AM
#5114
Registered User
Damn Mark, once again I miss out on 2 pages worth of this thread. Lol I hate not having internet. I swear I'm having withdraws. Lol.
I like how that rear tailgate came out. Looks great man. Seen your cut outs on the side panels. Nice job. Based on the paint pix I take it you're planning on having the sub stick out of the panel and mount with ubolts on to your roll bar?
BTW your rubber bed cover looks sick man. Awesome job again.
I like how that rear tailgate came out. Looks great man. Seen your cut outs on the side panels. Nice job. Based on the paint pix I take it you're planning on having the sub stick out of the panel and mount with ubolts on to your roll bar?
BTW your rubber bed cover looks sick man. Awesome job again.
10-23-2012, 09:18 AM
#5115
Contributing Member
Join Date: Mar 2003
Location: COTKU,Ontario,Canada
Posts: 11,334
Likes: 0
Received 0 Likes
on
0 Posts
Getting caught up on 4pgs worth meself...
If it's not too late Mark you should paint both sides[and all the edges obv.] of that panel board with some "liquid plastic" to seal it so moisture, mold and rot have less of a chance for doing their thing... looks like some great work going on their on that interior.
If it's not too late Mark you should paint both sides[and all the edges obv.] of that panel board with some "liquid plastic" to seal it so moisture, mold and rot have less of a chance for doing their thing... looks like some great work going on their on that interior.
10-23-2012, 10:02 AM
#5116
Registered User
Damn who would have known there would be so much stuff to take into consideration when doing these side panels. So many procautions that I didn't even think about when I was thinking about doing mine. This is a great learning experience watching this process and reading everything people are recommending lol
10-23-2012, 10:41 AM
#5117
Sound-Deadening Panels For Sub-Woofer
...... BUT, using the panel's insides as a box in a way... Not sure it would work out really well without LOTS of proper deadening, etc., right? BUT, I'm really liking this idea of yours. That pocket is LARGE, lol. I'm just not sure that with the 'SOUND' i like, (crisp clean highs and good thump, but NOT shake the whole rig lows...
On top of P&S on panel, I think a layer of the Sears/Big Lots closed-cell foam would help prevent rattling of panel. P&S will add mass to sheet metal to minimize vibration, while foam will help isolate panel from movement of air from sub, and seal off P&S smell. Use the spray adhesive (Nashua?) to stick foam on top of P&S. Better if you can leave little portions of bare panel not covered by P&S so foam sticks directly to panel on these areas.
10-23-2012, 02:36 PM
#5118
Damn Mark, once again I miss out on 2 pages worth of this thread. Lol I hate not having internet. I swear I'm having withdraws. Lol.
I like how that rear tailgate came out. Looks great man. Seen your cut outs on the side panels. Nice job. Based on the paint pix I take it you're planning on having the sub stick out of the panel and mount with ubolts on to your roll bar?
BTW your rubber bed cover looks sick man. Awesome job again.
I like how that rear tailgate came out. Looks great man. Seen your cut outs on the side panels. Nice job. Based on the paint pix I take it you're planning on having the sub stick out of the panel and mount with ubolts on to your roll bar?
BTW your rubber bed cover looks sick man. Awesome job again.
 lol.
lol. I'm not going to mount with ubolts.... I will post up how I'm doing it, after speaking with Jason_in_TN, today. We brainstormed and came up with a plan that's using MOST of what RAD said, with the wood IN the panels.... then deadening up against the metal body panels on the outermost portion... Then seam sealer on the outermost portion of those 'MOCK BOX' portions... THEN, the INSIDE portion of the 'mock box' would mount with weatherstripping to the BACK side of the support pillars.... Then the panel would mount to the front side, also with weather stripping(thick stuff, like 5/8", which compresses nicely down to just over 1/8", ya know? So as I screw in the panels, they'll be held secure as heck by the fact that they're sinking into the MDF on the backside of the metal support pillars. I'm going to do video of all this... As to make it easier to understand. RAD came up with this, but I think he's still thinking it through. I would like to do the box in the very rear most portion, like STANZ did(look at his thread).... BUT, ... I don't like not having that area as 'cargo stash'... not at all. The roll bar being there, it's already a wasted space in part... so having a risen portion up even with the 'in between' portion of the A-shape, between the bars of the roll bar... it's more practical for me, I believe. I don't care about cutting out another set of panels to use STANZ method... I just want to keep the 'DOORS' back there, on both sides. Mainly, because the driver side door is really not accessible to anything but the jack and rear window wiper fluid bag, etc. It's not a reach through... SO, I might even modify that, between the roll bars on the other side, and add my "inverter mod" and otherwise before the driver side door... then light and window switch above that.
I've even been thinking I might not do a rear window switch.... I don't mind reaching over to open it ...... IFFFFFFFFF I make the stock switch hot. If I move the switch to the dash, like others have... Then, well, I'd need to do that, for sure. BUT, I don't plan to. I know others don't like them there, but I do. I'm used to it, for one... and 2, I don't put drinks there, etc. So mine are clean and all working fine where they are. IF ANYTHING, i would put the rear window cargo area 'ADDED SWITCH' ON THE BACK OF MY CONSOLE
... That's where My head is when I sleep back there, anyway... AND, i think it's a better idea. Here's why; IF I have people in back, and we roll or something, God forbid.... They can pretty easily reach down there, if they're kinda trapped, and push that button where the ashtray area is on back of the console. ALSO, .... When I sleep in back(which is the ONLY REASON I would need a switch in back, for camping, etc.)..... My head is near the top. I can just reach up and open it... And thus.... ANYONE who is familiar with these rigs... Which would be ANYONE who would steel it... or break in, otherwise?? > > They would INSTANTLY know what that added switch is. Even if it's not hot... they would know why it's there and MAYBE TRY to get in. Seeing as its' VERY common when camping in the mountains, that tweekers and otherwise break in or steal CAT's, etc..... And seeing that I leave the windows all TINY bit cracked when camping and it's 100*F, off for a hike, whatever.... I wouldn't want them reaching in with a stick when I forget to click on my added 'window lock' switch, and opening the rear window and having free reign to 'a grab bag day in Chef's 4Runner'! ya feel me? chef heres a mad idea
split the side panel at the vertical support where it bolts to it now theres a certain logic to this if you do a built in box for the sub in the rollbar angle if you need to work in the back corner no need to pull the sub lose once built in with those dress up washers an longer screws you could nearly make the seam disappear so kinda like | /o| (green bar is the seam)
just an idea
Getting caught up on 4pgs worth meself...
If it's not too late Mark you should paint both sides[and all the edges obv.] of that panel board with some "liquid plastic" to seal it so moisture, mold and rot have less of a chance for doing their thing... looks like some great work going on their on that interior.
If it's not too late Mark you should paint both sides[and all the edges obv.] of that panel board with some "liquid plastic" to seal it so moisture, mold and rot have less of a chance for doing their thing... looks like some great work going on their on that interior.
Damn who would have known there would be so much stuff to take into consideration when doing these side panels. So many procautions that I didn't even think about when I was thinking about doing mine. This is a great learning experience watching this process and reading everything people are recommending lol
Hi Chef,
On top of P&S on panel, I think a layer of the Sears/Big Lots closed-cell foam would help prevent rattling of panel. P&S will add mass to sheet metal to minimize vibration, while foam will help isolate panel from movement of air from sub, and seal off P&S smell. Use the spray adhesive (Nashua?) to stick foam on top of P&S. Better if you can leave little portions of bare panel not covered by P&S so foam sticks directly to panel on these areas.
On top of P&S on panel, I think a layer of the Sears/Big Lots closed-cell foam would help prevent rattling of panel. P&S will add mass to sheet metal to minimize vibration, while foam will help isolate panel from movement of air from sub, and seal off P&S smell. Use the spray adhesive (Nashua?) to stick foam on top of P&S. Better if you can leave little portions of bare panel not covered by P&S so foam sticks directly to panel on these areas.
 10-23-2012, 03:04 PM
#5119
Rear Window Control on Rear of Console
- Much simpler to do, and requires less hardware. This will share window lock switch with front console switch.
- If two people are sleeping in back, both can reach it without having to crawl over the other.
Still need to verify if possible to operate without key in ignition. Else, figure out how to make circuit hot.
10-23-2012, 03:19 PM
#5120
Brilliant, Chef! Why haven't I though of that? LOL! Yes, more advantages:
Still need to verify if possible to operate without key in ignition. Else, figure out how to make circuit hot.
- Much simpler to do, and requires less hardware. This will share window lock switch with front console switch.
- If two people are sleeping in back, both can reach it without having to crawl over the other.
Still need to verify if possible to operate without key in ignition. Else, figure out how to make circuit hot.
hahaha. Yeah, sorry if I stole that from ya or something... I don't remember reading it from ya.. but it just occurred to me while typing out to Richard/redeth... "why not slap it down there... Only need 2ft. of wire or so and it's simpler, IMHO, for camping...and more hidden. NOTHING WRONG with having it by the back door... BUT, it's just too inviting to anyone who'd steal or break into one of these... Which would be someone who knows all about them, 90% of the time, ya know?
BTW, Terry posted a few times on here how to make it hot... very simple, you ground the blue wire to the FRONT of the console mounting flanges that come out of the floor. Terry has never had an issue. I THINK that the lock switch might be made irrelevant by that... but I'm not sure though. I'll ask him.... HEY TERRY! lol..... Does your window lock switch still work for the rear window with it grounded????? JASON-IN-TN, you might know this as well, right?
PS> BEFORE I FORGET. JASON-IN-TN needs rear shell to body cover trim/(Interior L-Trim 2 piece portion)..... ANYONE who's got them, please, send him a PM? Or, if you're a PYPart junky like I was getting.... and you see em, .. please grab em? (grego, Richard?).... I see him on occasion and I could maybe get them to him on the portion of his trek that winds him up in L.A. in spots, ya know? THANKS!


