
ChefYota4x4's 1987 4Runner Build-Up Thread
 10-15-2012, 09:54 PM
#5041
SUP GUYS? Well, my birthday is coming up in November... And ANOTHER family member, for the 5th year in a row, got me a 100$ Gift Card to "PEP BOYS" hehehe... SOOOOOOOOO, .... here we go...............
I was SHOCKED at how many products PepBoys has, compared to ANY other Auto Parts store, in relation to "Sound Proofing", "Heat proofing", Decorative Paneling Coverings, etc., etc, etc., ....... I took a few pics with my Cellie before grabbing what I thought would be the best investment at this point in my project journey, using my Gift Card of 100$.........
First, I'll just share the pic of some stuff that I think MANY would like to use... It's a Headliner/Paneling replacement stuff called "CARBO", ... it looks JUST like CARBON FIBER..... It's a bit pricey at 62$ a roll, but the roll has quite a bit at i believe 4Ft. x 8ft.? Maybe more length than that, but I don't think so............

It's REALLY nice stuff, .... so if you're in a LARGER Pep Boys, check it out.
...............
I then started looking through Floormats... and I remembered that the PepBoys actually carry Weathertech now.... I was contemplating getting the entire package, Front and rear Seats AND Cargo Mat, .......but, I have enough to do a custom Cargo Mat for now that will suffice.... So I just got these......(35$ WITH MY COUPON FOR 40% OFF 100$ OR MORE AND ANDDDDDD, ... I had a Gift Card, so I was just getting more out of my money, really, ya know? )>>>>
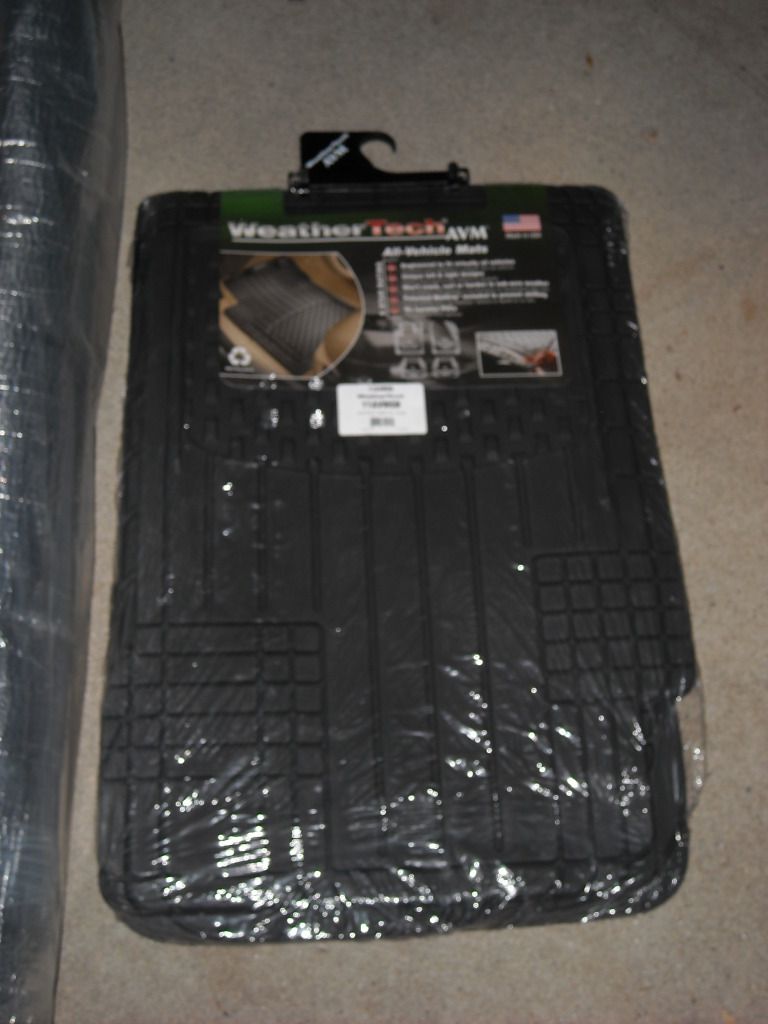
WOOT! My Weathertech ones got messed up on a trip one time... so I just bit the bullet and got the 'GOOD STUFF' haha...
..............................................
I also got the Anti-Fatigue Mat, 4ft x 92" for cheap with my coupon at 12$ >>>>
>>>>
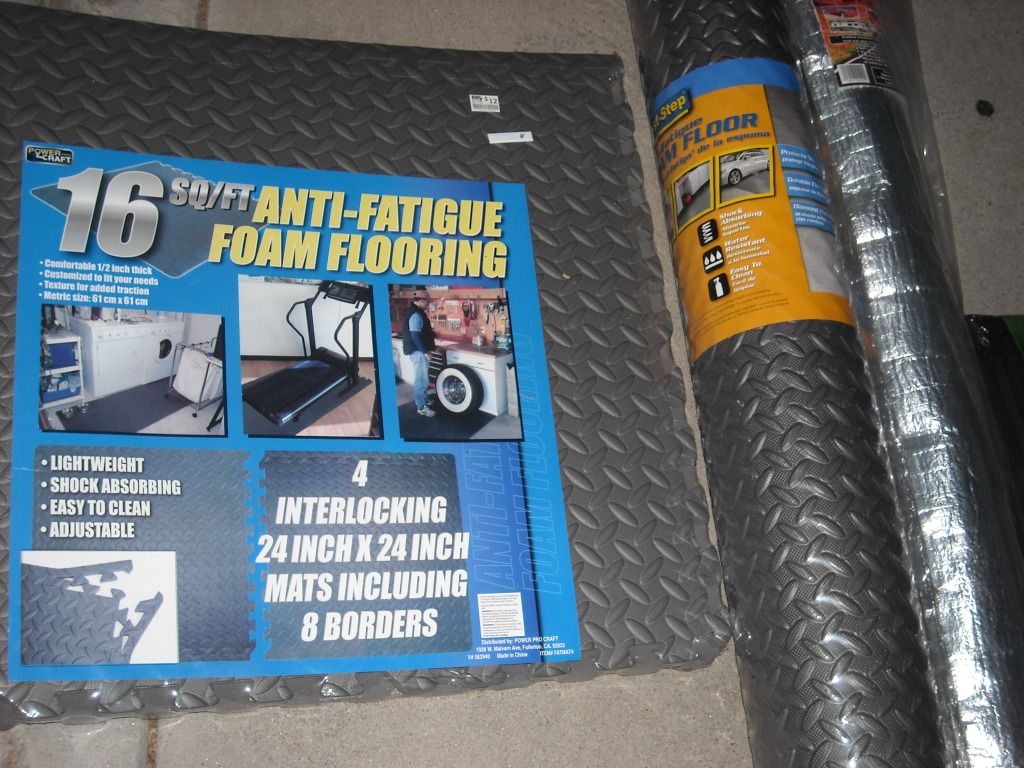
The other stuff, the squares that you put together, ... that was at Big Lots and I had earned 20$ in points, so I got that and this stuff........
Gonna use this in the recesses of the corrugated channels, because it sticks really well but then comes up if I want without extreme grinding, etc., lol... (I also have the Crazy Glue form and stick putty, which I will probably use instead, as that is INCREDIBLY strong but comes up without leaving any residue, etc... IT WILL hold the channel padding down that I'm doing... THEN, the spray will go just on the top of whatever I put in the channels... and THEN I can just pull the whole thing up if I need to...
...............................
I'm also going to clean my carpet as well as i can... because it's really still in great shape... It's just kinda stained from the risers of the corrugation... And, well, spending 80-100$ on a custom piece for just the back.. yeah, that's not gonna happen. I would more likely just use the new Gray Carpet I have for the floor ......over this... Also from PepBoys, also for 40% off which ended up being 18$!!!!! .....
.....
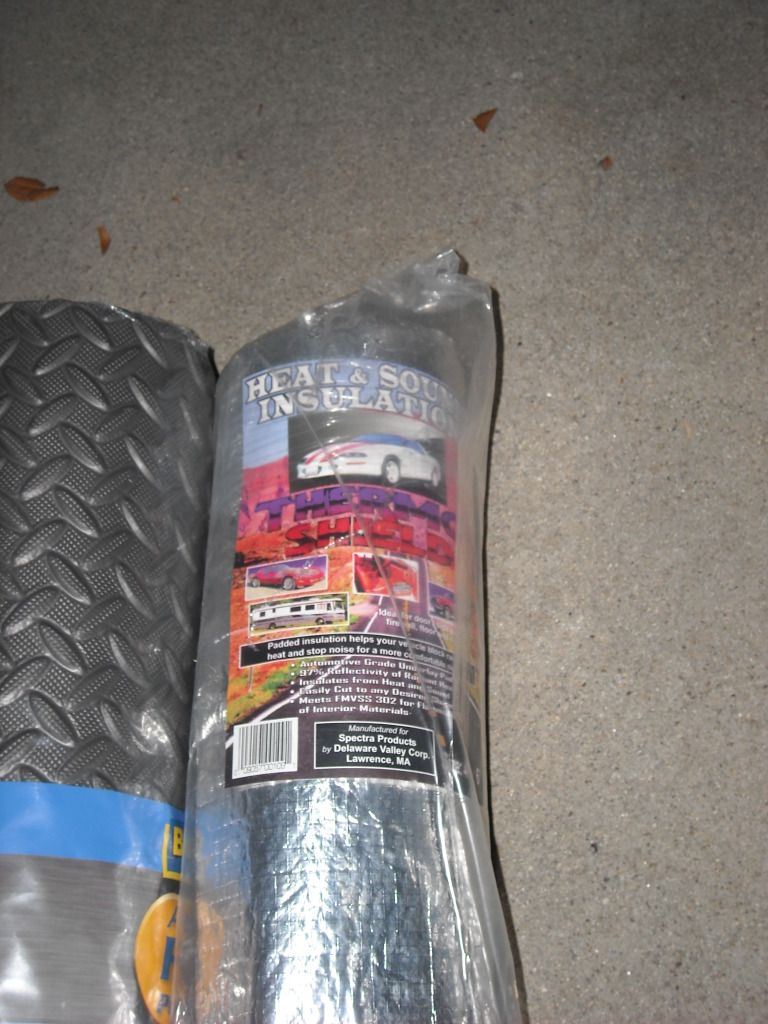
^^^ It's rated at pretty darn high temp resistance, moisture resistance and sound resistance.. so IT WILL be going in under my carpet once I pull all the old insulation/padding off, wash it up, etc.
.................................
I took some pictures of the 'before' of the back, so you can see what it's gonna look like now and later, ya know? .............
^^^ I have the Interior L-trim for that side, too... It's gonna go back on, but I'll have to custom cut the wood at the top to be able to reinstall the trim once the panel and everything is all done. The L-trim is PRISTINE, as you can see from the other pic, unlike the panels! hahaha.... I HAVE PERFECT Condition new Panels for the rear, including doors... I could paint them, etc. BUT, ........ it would be impossible to mount the 10" JL Sub in the side without cutting another hole.. And, let's face it... without putting TONS of padding and whatever all over the back of them... they'll NEVER hold in the sound.
Using the wood panels with tool drawer liner on the inside and maybe a couple sheets of DYNOMAT or something(if I can find it cheap enough)... should make for a REALLY nice and tight sound out of the panels, acting as a "SUB BOX" in a sense, ya know? I will block out the front half of the front panels, probably behind the Back Seat Pockets... and then seal that up really well... Seal up the walls, completely, and even seal up the door I'll be cutting out there. ANY OF THAT MAKE SENSE? <<<< hahaha. I'll be doing video and pics and everything, in case anyone wants to copy it, ya know? I can't add FATMAT to the list of expenses, ...............BUT, .. I think this will work until I can, ya know?
I was SHOCKED at how many products PepBoys has, compared to ANY other Auto Parts store, in relation to "Sound Proofing", "Heat proofing", Decorative Paneling Coverings, etc., etc, etc., ....... I took a few pics with my Cellie before grabbing what I thought would be the best investment at this point in my project journey, using my Gift Card of 100$.........
First, I'll just share the pic of some stuff that I think MANY would like to use... It's a Headliner/Paneling replacement stuff called "CARBO", ... it looks JUST like CARBON FIBER..... It's a bit pricey at 62$ a roll, but the roll has quite a bit at i believe 4Ft. x 8ft.? Maybe more length than that, but I don't think so............
It's REALLY nice stuff, .... so if you're in a LARGER Pep Boys, check it out.
...............
I then started looking through Floormats... and I remembered that the PepBoys actually carry Weathertech now.... I was contemplating getting the entire package, Front and rear Seats AND Cargo Mat, .......but, I have enough to do a custom Cargo Mat for now that will suffice.... So I just got these......(35$ WITH MY COUPON FOR 40% OFF 100$ OR MORE AND ANDDDDDD, ... I had a Gift Card, so I was just getting more out of my money, really, ya know? )>>>>
WOOT! My Weathertech ones got messed up on a trip one time... so I just bit the bullet and got the 'GOOD STUFF'
haha... ..............................................
I also got the Anti-Fatigue Mat, 4ft x 92" for cheap with my coupon at 12$
>>>> The other stuff, the squares that you put together, ... that was at Big Lots and I had earned 20$ in points, so I got that and this stuff........
Gonna use this in the recesses of the corrugated channels, because it sticks really well but then comes up if I want without extreme grinding, etc., lol... (I also have the Crazy Glue form and stick putty, which I will probably use instead, as that is INCREDIBLY strong but comes up without leaving any residue, etc... IT WILL hold the channel padding down that I'm doing... THEN, the spray will go just on the top of whatever I put in the channels... and THEN I can just pull the whole thing up if I need to...
...............................
I'm also going to clean my carpet as well as i can... because it's really still in great shape... It's just kinda stained from the risers of the corrugation... And, well, spending 80-100$ on a custom piece for just the back.. yeah, that's not gonna happen. I would more likely just use the new Gray Carpet I have for the floor ......over this... Also from PepBoys, also for 40% off which ended up being 18$!!!!!
..... ^^^ It's rated at pretty darn high temp resistance, moisture resistance and sound resistance.. so IT WILL be going in under my carpet once I pull all the old insulation/padding off, wash it up, etc.
.................................
I took some pictures of the 'before' of the back, so you can see what it's gonna look like now and later, ya know? .............
^^^ I have the Interior L-trim for that side, too... It's gonna go back on, but I'll have to custom cut the wood at the top to be able to reinstall the trim once the panel and everything is all done. The L-trim is PRISTINE, as you can see from the other pic, unlike the panels! hahaha.... I HAVE PERFECT Condition new Panels for the rear, including doors... I could paint them, etc. BUT, ........ it would be impossible to mount the 10" JL Sub in the side without cutting another hole.. And, let's face it... without putting TONS of padding and whatever all over the back of them... they'll NEVER hold in the sound.
Using the wood panels with tool drawer liner on the inside and maybe a couple sheets of DYNOMAT or something(if I can find it cheap enough)... should make for a REALLY nice and tight sound out of the panels, acting as a "SUB BOX" in a sense, ya know? I will block out the front half of the front panels, probably behind the Back Seat Pockets... and then seal that up really well... Seal up the walls, completely, and even seal up the door I'll be cutting out there. ANY OF THAT MAKE SENSE? <<<< hahaha. I'll be doing video and pics and everything, in case anyone wants to copy it, ya know? I can't add FATMAT to the list of expenses, ...............BUT, .. I think this will work until I can, ya know?
 10-16-2012, 10:54 AM
#5042
Wanted to get tearing everything out today^^^^^^^^^^ ... but had to take BOTH the Rents to Dr.'s appt's lol.... 2nd Appt. is at 2pm... So maybe I can get started after dropping him off around 3:30? ....... ahhhhhhhhpfffffffffbbbbbbt! hehehehe.
lol.... 2nd Appt. is at 2pm... So maybe I can get started after dropping him off around 3:30? ....... ahhhhhhhhpfffffffffbbbbbbt! hehehehe.
10-16-2012, 12:15 PM
#5043
Lookin' Good, Chef!
The thermal insulation would compress easily so I would use it where:
There's no weight on it, AND/OR Where you need thermal insulation. Meaning firewall where feet rest (lightly) and transmission hump.
The closed-sell foam resists compression better so it would work everywhere. I think it will even minimize the ridges and valleys of the rear deck, especially if you put a 1/8-inch project panel on top of it. Top off the PP with your carpet.
Closed-cell foam would not handle heat as well as the thermal insulation so I would put it on top of the latter. This arrangement will also trap more sound between closed-cell foam and floor). In fact, Rick at RAAMAT recommends I place the Ensolite I'm buying on top of thermal insulation and closed-cell foam/carpet padding.
BTW, I completed tapping off Dome circuit for my stock deck lamp and the added overhead one. Will post pics of fuse block/wiring soon. If you're already running the constant 12-V wire to your additional overhead deck lamp. Just run one 18-gauge wire from your dome light to driver-side kick panel PLUS 1 foot to work with.
10-16-2012, 01:27 PM
#5044
Where to Tap For Deck Lamp Power
Hi Chef!
Got the switches. Awesome. Thanks! Too bad, I'll be out of town this weekend so won't be able to work on mine. Anyway, I have already extended the rear wiper harness and mounted switch on dash just forward of the front wiper lever.
Here goes...
Back of fuse block that shows "Dome" fuse (7.5 Amps):

Close-up of Dome Fuse (fused side is black with white stripe)

Fused Side of Dome Fuse Ready for Tap:

Where to introduce +12VDC to stock deck lamp switch:

Connect to dome tap point.
Got the switches. Awesome. Thanks! Too bad, I'll be out of town this weekend so won't be able to work on mine. Anyway, I have already extended the rear wiper harness and mounted switch on dash just forward of the front wiper lever.
Here goes...
Back of fuse block that shows "Dome" fuse (7.5 Amps):
Close-up of Dome Fuse (fused side is black with white stripe)
Fused Side of Dome Fuse Ready for Tap:
- Connect green wire from stock deck lamp to this.
- Also connect wire to overhead deck lamp to this.
Where to introduce +12VDC to stock deck lamp switch:
Connect to dome tap point.
Last edited by RAD4Runner; 10-17-2012 at 01:00 AM.
10-17-2012, 02:20 AM
#5046
4Runner Cargo Resto-Upgrade begins.....
Ok,.... first of all, this ThermoShield stuff? HOLY CRAPULA.... it's VERY hard to cut, blade, etc. NOT SUPER hard .... but let's just say, I got a work out. Also, the whole back seat has to come out in order to get my carpet out... which I did not know. SO, for now, I simply ThermoShield'd the Rear.
You REALLY need to think this out... But for some numbers for anyone who's interested.....
1. Width to start with, at NEAR the very back is 54"(You want to lay it all the way to the metal under the rear panel) You can clean up the 'corner' after you cut and fit it.
2. First cut toward the Center is at 17" from the rear. Cut 5" straight across, then begin an arch toward the back of the rear seats again, til you reach 6.5", at which point you should be heading with your cut straight toward the back seats again. I DID NOT cuz out the 1" lil strip that would go between the wheel hump and back seats... It would become too difficult to fit the carpet and padding back on again, lol.
3. From there, you can place it in, and begin to figure out where you'll cut to make a nice clean circle around the roll bar. (THINK IT OUT! haha.. I've done this a few times, so there's a method... you want the 'cut' portion to go on the side near the panel when you're done).
4. I used 2-coated Foam ceiling sound and heat shield for the holes where the Body Mounts go... Otherwise, you wind up with a odd rise and valley right there.
On with the pics..........
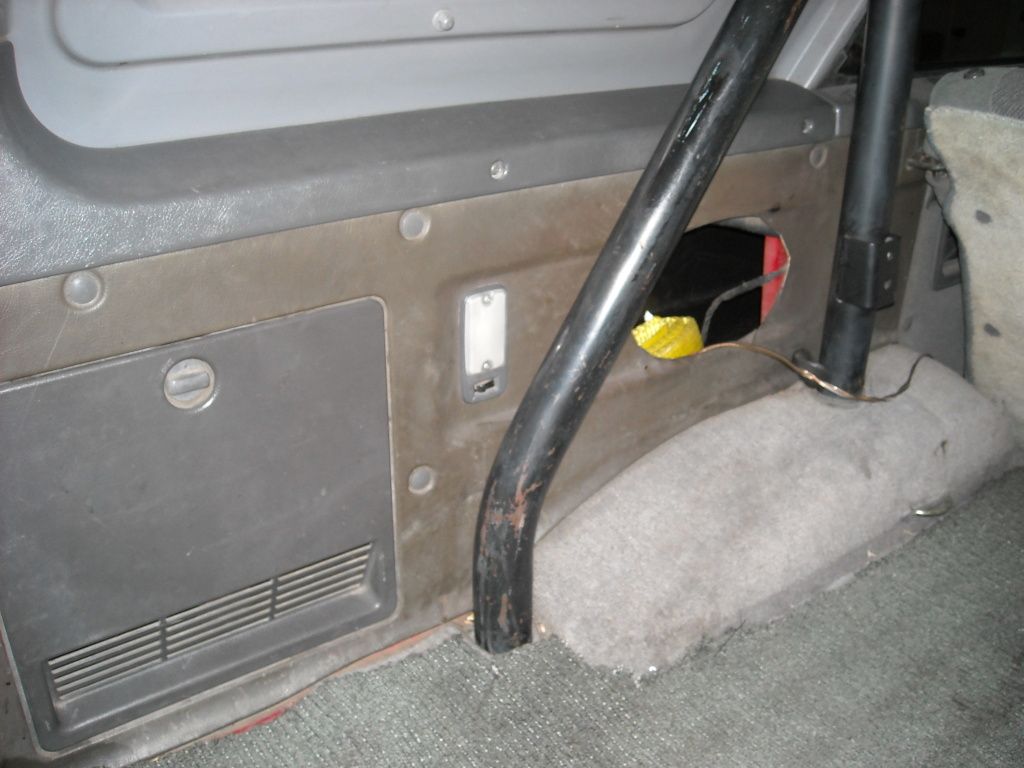
Started by pulling back the Carpet and padding, after vacuuming the carpet, then padding as I pulled it over top of the back seats.. This way, I'm not constantly cleaning up the back for 30 minutes with the shop vac, lol. And WOW was there A LOT of dirt and such under there. Twigs and quarters and even a broken off wheel stud that this IDIOT gave me at the Jiffy around 10 years ago!!!! hahaha... It was wedged behind the roll bar.......

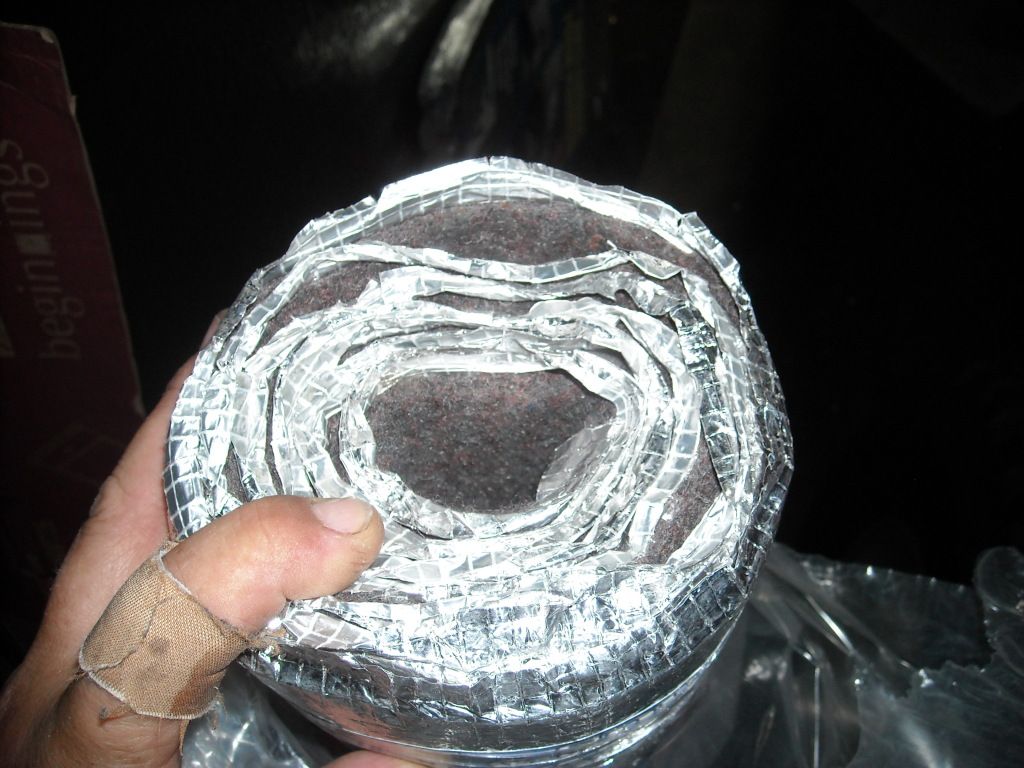
Filled in the Body Mount with firm, foil covered foam......
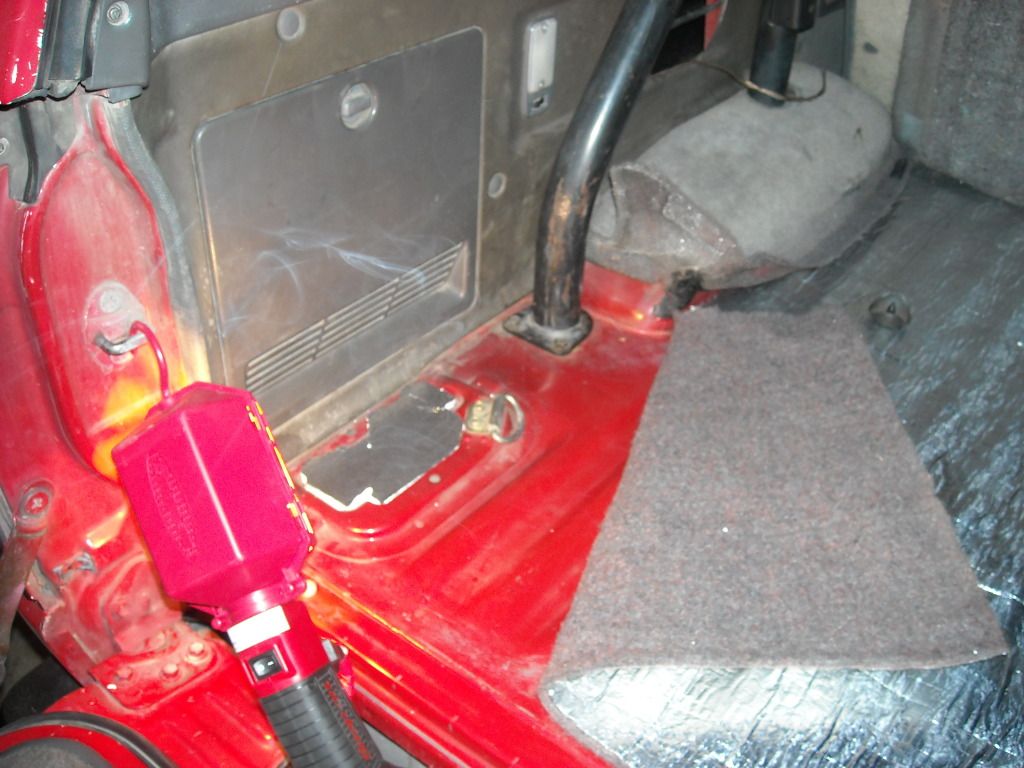
This stuff is very firm, fire retardant and should be of some help with sound... It also resists some moisture with the Aluminum Coating... BUT, not enough. I'll be covering it with a nice cut out of Closed Cell Foam Stuff you saw that I got.. THEN my carpet will go over that once it's pulled and cleaned really well. I think I figured out a way to clean it and the padding separately. I'll report back. Anyway, this is the stuff I got........
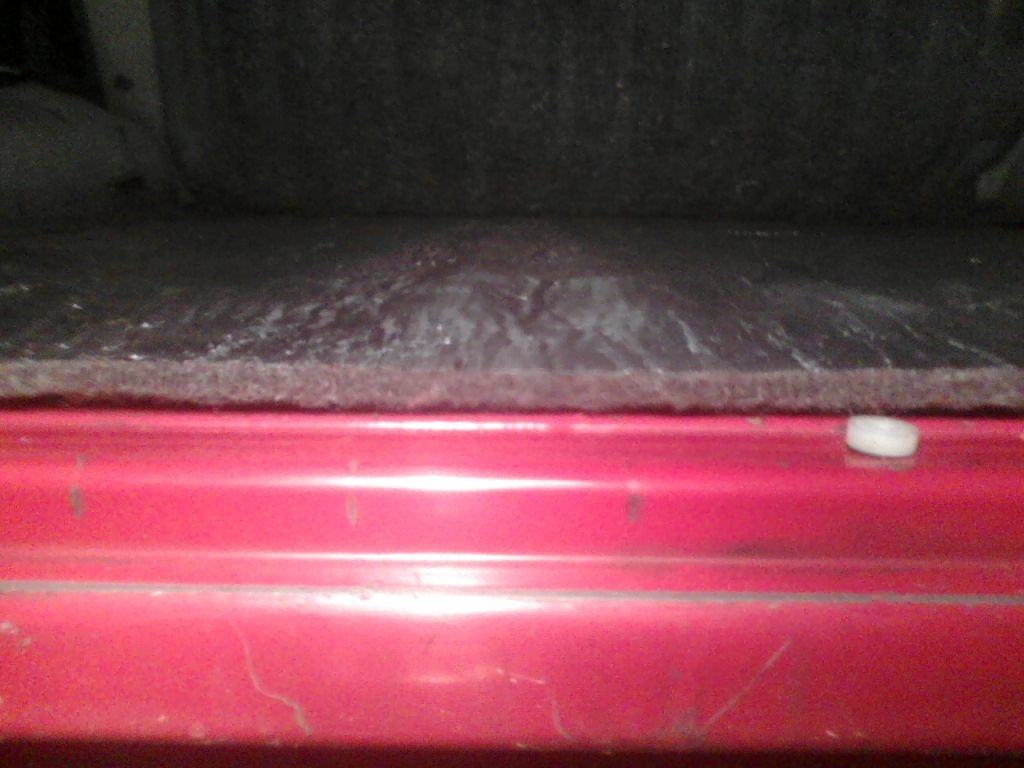
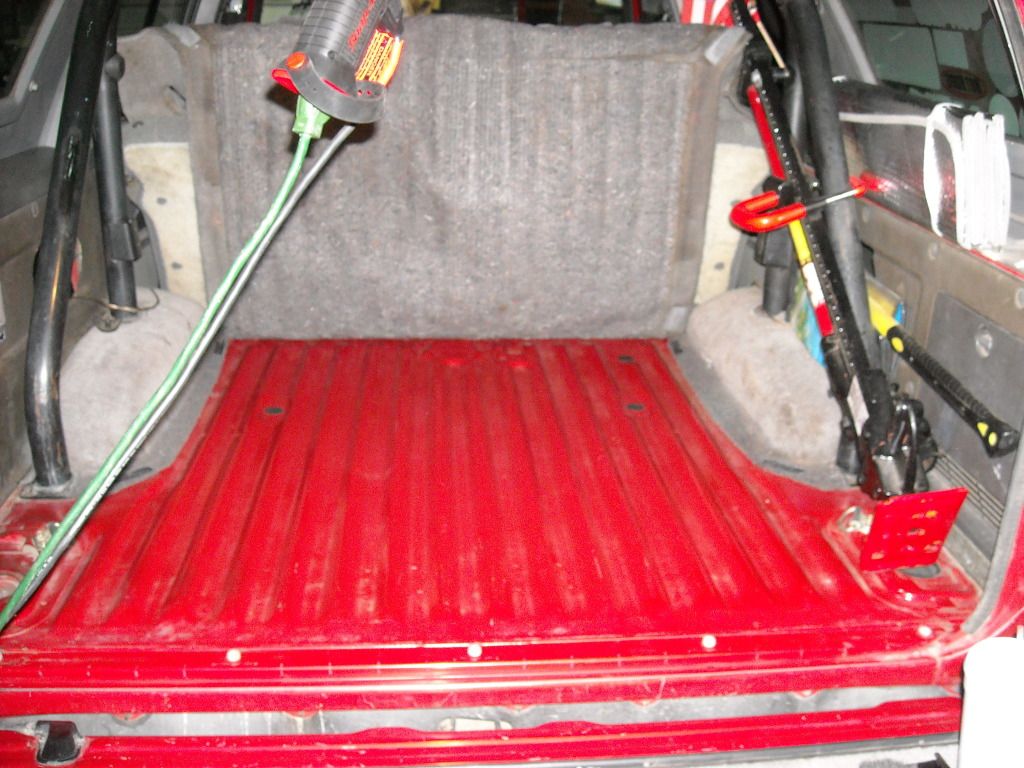
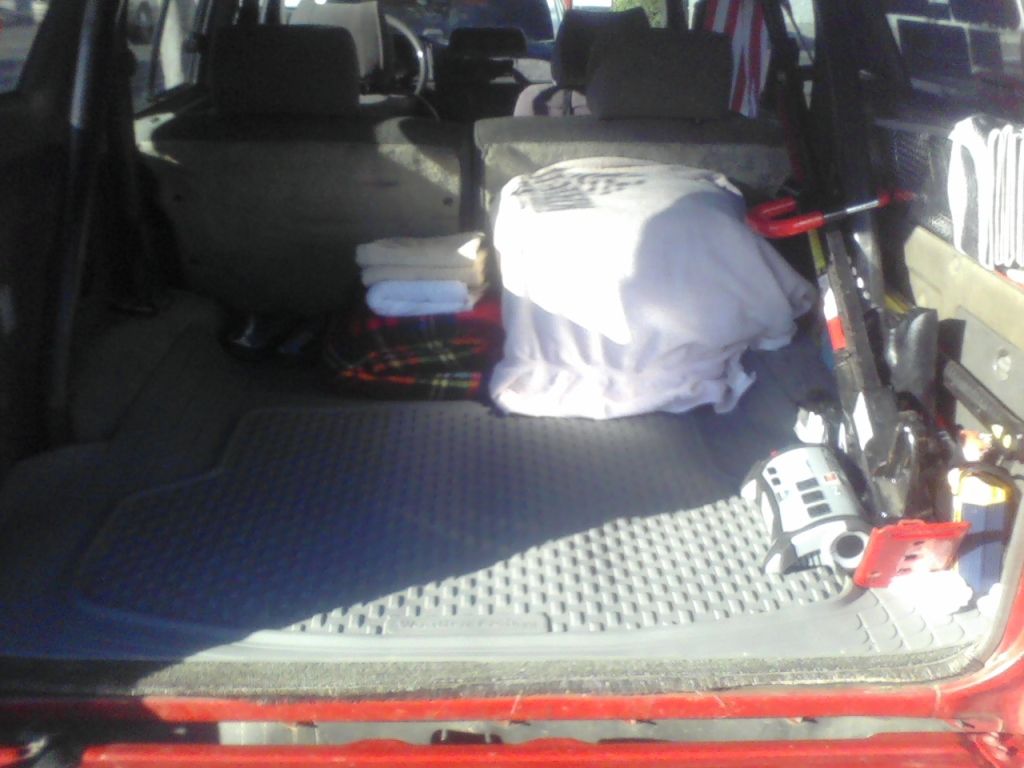
Hooks cut outs and everything.... And if you look closely(I'll get better pics when I get another camera.. mine died today )..... look closely and you'll see that my Carpet and padding is VERY SERIOUS stuff.. I mean, this stuff is like nothing I've ever seen under carpet. I'm not POSITIVE its' stock... But even the wheel humps are heavily padded and have what looks like that Black Toyota Tack Goop holding them down... THEN, it looks like they DID use thicker padding in the corrugated grooves. It's STILL, after 25 years, 1/2" Thick. hahaha. So I don't wanna be so quick to toss it, ya know? I mean, just the CARPET for the rear would be like what, 100$? with borders and such and all cut to fit around the roll bar? This carpet is like treated with something, too, on the bottom... It's some type of rubberized clear stuff.. Anyway, here's the stuff in and clean and all the way up to UNDER the sided panels in back/round the roll bar tube.. COMPLETELY covered....
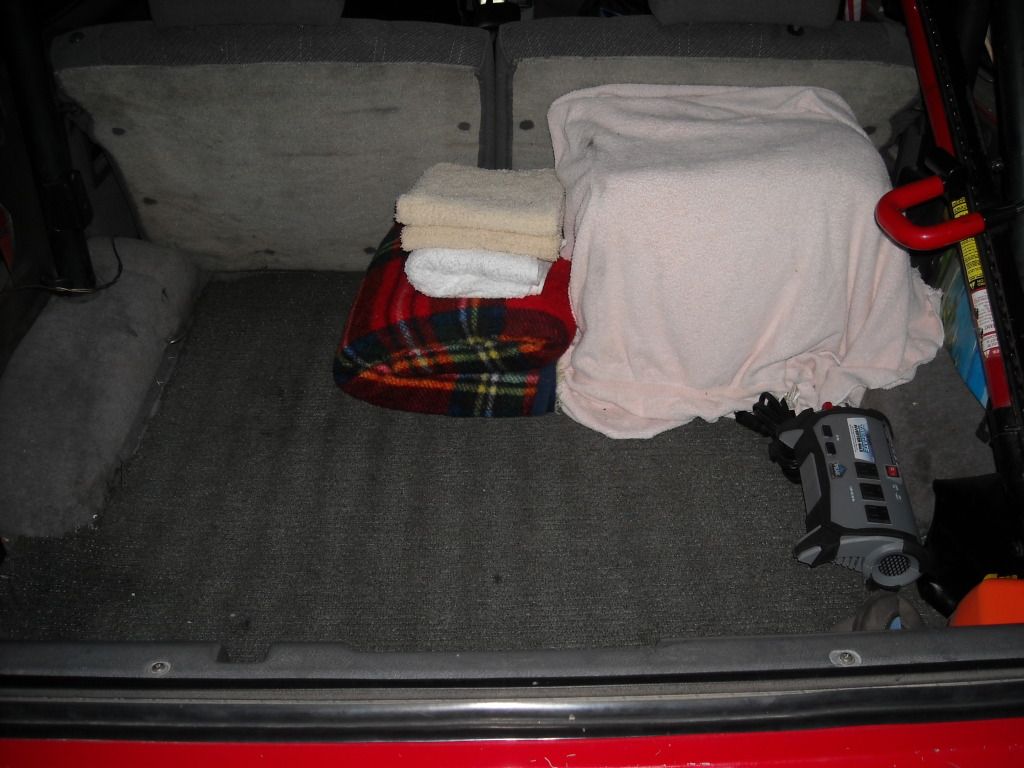
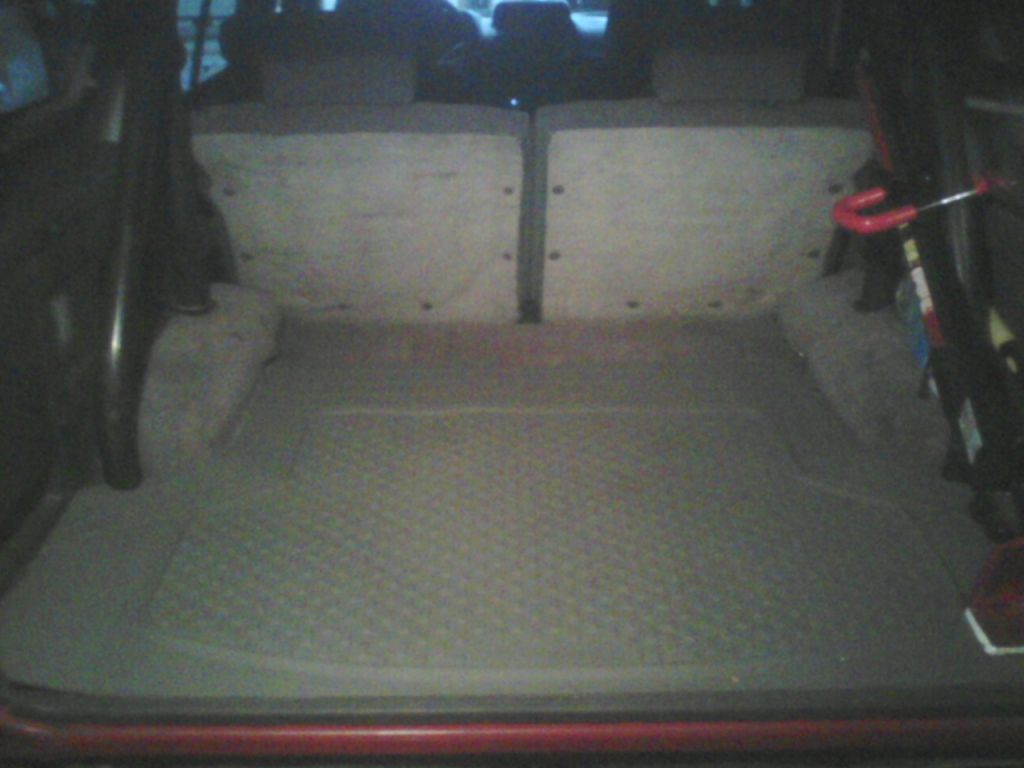
I then laid the Carpet and factory padding back down for now and....... My new Weathertech Cargo Liner.... which I got with my coupon for 38$!! WOOOOOOT! lol...
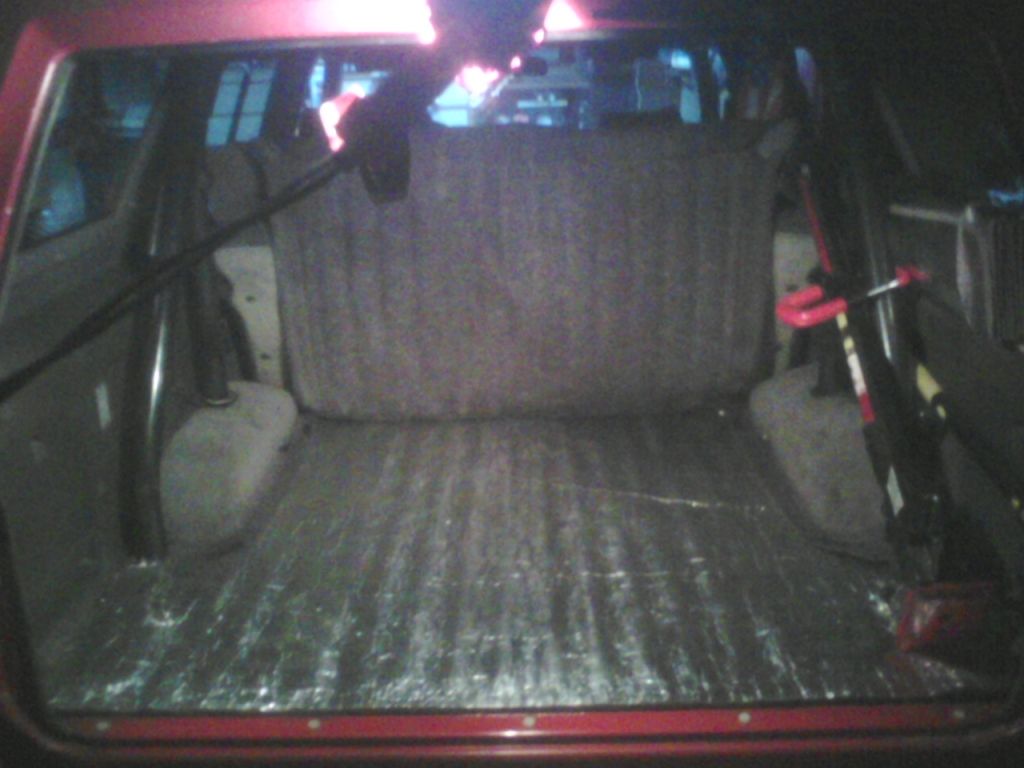
3rd Pic is from yesterday, before I pulled up the carpet or anything... ) >>>
You REALLY need to think this out... But for some numbers for anyone who's interested.....
1. Width to start with, at NEAR the very back is 54"(You want to lay it all the way to the metal under the rear panel) You can clean up the 'corner' after you cut and fit it.
2. First cut toward the Center is at 17" from the rear. Cut 5" straight across, then begin an arch toward the back of the rear seats again, til you reach 6.5", at which point you should be heading with your cut straight toward the back seats again. I DID NOT cuz out the 1" lil strip that would go between the wheel hump and back seats... It would become too difficult to fit the carpet and padding back on again, lol.
3. From there, you can place it in, and begin to figure out where you'll cut to make a nice clean circle around the roll bar. (THINK IT OUT! haha.. I've done this a few times, so there's a method... you want the 'cut' portion to go on the side near the panel when you're done).
4. I used 2-coated Foam ceiling sound and heat shield for the holes where the Body Mounts go... Otherwise, you wind up with a odd rise and valley right there.
On with the pics..........
Started by pulling back the Carpet and padding, after vacuuming the carpet, then padding as I pulled it over top of the back seats.. This way, I'm not constantly cleaning up the back for 30 minutes with the shop vac, lol. And WOW was there A LOT of dirt and such under there. Twigs and quarters and even a broken off wheel stud that this IDIOT gave me at the Jiffy around 10 years ago!!!!
hahaha... It was wedged behind the roll bar....... Filled in the Body Mount with firm, foil covered foam......
This stuff is very firm, fire retardant and should be of some help with sound... It also resists some moisture with the Aluminum Coating... BUT, not enough. I'll be covering it with a nice cut out of Closed Cell Foam Stuff you saw that I got.. THEN my carpet will go over that once it's pulled and cleaned really well. I think I figured out a way to clean it and the padding separately. I'll report back. Anyway, this is the stuff I got........
Hooks cut outs and everything.... And if you look closely(I'll get better pics when I get another camera.. mine died today
)..... look closely and you'll see that my Carpet and padding is VERY SERIOUS stuff.. I mean, this stuff is like nothing I've ever seen under carpet. I'm not POSITIVE its' stock... But even the wheel humps are heavily padded and have what looks like that Black Toyota Tack Goop holding them down... THEN, it looks like they DID use thicker padding in the corrugated grooves. It's STILL, after 25 years, 1/2" Thick. hahaha. So I don't wanna be so quick to toss it, ya know? I mean, just the CARPET for the rear would be like what, 100$? with borders and such and all cut to fit around the roll bar? This carpet is like treated with something, too, on the bottom... It's some type of rubberized clear stuff.. Anyway, here's the stuff in and clean and all the way up to UNDER the sided panels in back/round the roll bar tube.. COMPLETELY covered.... I then laid the Carpet and factory padding back down for now and....... My new Weathertech Cargo Liner.... which I got with my coupon for 38$!! WOOOOOOT! lol...
3rd Pic is from yesterday, before I pulled up the carpet or anything... ) >>>
10-17-2012, 02:48 AM
#5047
Registered User
looks awesome chef um i did the red stripes on the gold top picture but it disappeared for some reason

anyhow very nice haul of goodies an wow all the wiring good pictures rad!
yeah my first photoshop gig remodeling co. wanted to show the owners of this 'community' what their bridges an common house would look like with new decks all stained an repaired piers into the water all painted white i did he job quick an normal rate would have been 15-35 an hr they refused to pay glad i gave them only tiny hard to use half colored versions they finally did pay me 6 an hr rate they only got 4 of the 19 pictures they wanted done
they got the job an it ran nearly 1mill in renovations they sent me another check for a hundred an said thanks ... bleh soured me on 'freelance gigs' after all the work i should have gotten 600 heres one the stain color was 'pumpkin' had to edit an repair things stain th deck an ect
if the picture is a problem mods let me know ill remove it
10-17-2012, 06:24 AM
#5048
Contributing Member
Now that's my kind of shopping, Chef. Throw in a hardware store and I'm in! Your butt looks good with its cargo liner and all. Cyberhorn's color match of the gold came out way way better than my attempt, all I've got is paint, his looks perfect.
10-17-2012, 07:50 AM
#5049
Registered User
Wow! Mark. Sick job on your rear liner dude that looks really clean. Maybe I outta get something like that. Both my dogs usually come back wet with sand and dirt on their paws and chest after hiking trips. This would definitely be much easier to clean up after those trips rather then sweeping it out and washing it. Lol
How much did this project cost you to do?
For the liner and that insulation stuff?
How much did this project cost you to do?
For the liner and that insulation stuff?
10-17-2012, 10:25 AM
#5051
Yes, looking good! Chef, Weathertech fit without trimming? What model? TIA
10-17-2012, 01:25 PM
#5052
Dragon..... do you mean that you did the roof with the stripes of red much smaller and just a continuation of the body up into the roof.... BUT, it disappeared? Not sure what you mean.. That pic looks exactly like the first one... WHICH I LIKE... Was just curious to see it with the gold strips continuing(which I know, would just mean adding red stripes since the top would be all gold, hahaha. Hmmmm.... I started thinking about,... if I you another pic with my new tires and set up and such..... maybe you could do that too? hahahahaa. I hate to ask you to do any more, man... I know you're time isn't just ever abundant in the 'serving chef' realm, hahahaha...
Sorry bout the WORK RAPISTS, .... that sux, man! BTW, I LOVE your Logo.... that's REALLY catchy! Not just the graphic, but the name and all... All makes sense, ya know? lol.
Hey, Hab!  Sup girl? And, thanks, I appreciate that... I've been working hard and doing lots of squats, ... Plenty of leg curls, trying to ........... Wait, you mean my Ruby-Red's Proverbial "BUTT"? Oh yeah, ... sorry bout that! hahahaha. JK, ...anyway, yes, ..... I like the gold... What do you think? Honestly. I think I need to do a Side by Side with the all red and then Gold... etc. I've thought about it many times, and I WILL, FOR SURE, add the stripes back, if I ever paint it again.(What can I say... the weather ANDDDDDDDD lots of good maintenance... and NO DOUBT, A GARAGE, trust me, I know... They've all helped to keep this thing pretty clean....I just can't seem to get it bad enough to where i can't stand it... And WHY SHOULD I TRY TO? hahaha.) Thanks on the matt, etc. It was lots more work than I thought, cutting out the ThermoShield.... Seriously, I did NOT enjoy that! haha.. I need to find my special sawssors..... They're SO SHARP and much heavier/larger for leverage.... Meh, oh well.
Thanks, buddy... Yeah, the Weathertech LOOKS good, WORKS well and IS TOTAL CAKE to put in(Lil cutting)... I will comment more on it in the next post, price, etc. Are you saying, .... "Just the mat"? Just adding that? Sure, that'd help, totally. Again, I'll post the prices, etc., in a minute... BUT, ... the WTech mat will do nearly nothing for sound/heat resistance... And, well, to be honest.... Unless you plan on fixing that AC(and EVEN IF YOU DO! hahaha)..... I'd start thinking about insulating your rig a lil better... That guy JACKED YOU UP, man! I feel bad... BUT, you still, like us, never HAD insulation too much to begin with... And, far as what you got to start with?>>> I admire your perseverance and progress, buddy, you're making great strides in bringing her back I admire that stuff, you know that, lol. I'll post up costs and everything(and I'm not done BTW....But I'd think about insulating it.
Thanks, Grego... I think it's a nice edition, and it's EASILY cleanable. It doesn't go all the way to the back seat-backs... BUT, I have a plan for that to join another section that will complete that 'CARGO PLATFORM' and look clean. A razor and then bonding the new piece to it, with a THIN layer of clear-'GOOP' to bond them? SOLID! I HAVE A PLAN! lol.
Hey Ray, ..... good speaking with ya again... ALWAYS insightful! Thanks for making time for me
NO, I had to trim the Weathertech piece. I took off 2 sections to get it to lay flat to the floor and right near the wheel humps/up against the wheel hump carpet and carpet topper edge. Then some trimming around the roll bar/pipe(a round cut if you will)... But all in all, it's a NICE FIT, IMHO
hahahahaa. I hate to ask you to do any more, man... I know you're time isn't just ever abundant in the 'serving chef' realm, hahahaha... Sorry bout the WORK RAPISTS, .... that sux, man!
BTW, I LOVE your Logo.... that's REALLY catchy! Not just the graphic, but the name and all... All makes sense, ya know? lol. Sup girl? And, thanks, I appreciate that... I've been working hard and doing lots of squats, ... Plenty of leg curls, trying to ........... Wait, you mean my Ruby-Red's Proverbial "BUTT"? Oh yeah, ... sorry bout that! hahahaha. JK, ...anyway, yes, ..... I like the gold... What do you think? Honestly. I think I need to do a Side by Side with the all red and then Gold... etc. I've thought about it many times, and I WILL, FOR SURE, add the stripes back, if I ever paint it again.(What can I say... the weather ANDDDDDDDD lots of good maintenance... and NO DOUBT, A GARAGE, trust me, I know... They've all helped to keep this thing pretty clean....I just can't seem to get it bad enough to where i can't stand it... And WHY SHOULD I TRY TO? hahaha.) Thanks on the matt, etc. It was lots more work than I thought, cutting out the ThermoShield.... Seriously, I did NOT enjoy that! haha.. I need to find my special sawssors..... They're SO SHARP and much heavier/larger for leverage.... Meh, oh well. Wow! Mark. Sick job on your rear liner dude that looks really clean. Maybe I outta get something like that. Both my dogs usually come back wet with sand and dirt on their paws and chest after hiking trips. This would definitely be much easier to clean up after those trips rather then sweeping it out and washing it. Lol
How much did this project cost you to do?
For the liner and that insulation stuff?
How much did this project cost you to do?
For the liner and that insulation stuff?
I admire that stuff, you know that, lol. I'll post up costs and everything(and I'm not done BTW....But I'd think about insulating it. I HAVE A PLAN! lol. NO, I had to trim the Weathertech piece. I took off 2 sections to get it to lay flat to the floor and right near the wheel humps/up against the wheel hump carpet and carpet topper edge. Then some trimming around the roll bar/pipe(a round cut if you will)... But all in all, it's a NICE FIT, IMHO
10-17-2012, 01:46 PM
#5053
Registered User
DRAGON-
Those Photoshoped paint schemes look good! Just a thought, what about angling the stripes forward on the camper top section? Reflecting the opposite angle. Hope that makes sense. ha
Those Photoshoped paint schemes look good! Just a thought, what about angling the stripes forward on the camper top section? Reflecting the opposite angle. Hope that makes sense. ha
10-17-2012, 02:39 PM
#5054
Prices so far..........
I did take a trip to PepBoys with my coupons and Gift Card.... So costs before coupons, etc... I'll try..... (BTW, .... I HIGHLY recommend joining PepBoys Mailer program if you're near one. They have WAY more accessories. Not always crazy about the parts, etc., but the accessories? NIGHT AND DAY! Especially in the Stereo, Truck Equipment, 4WD Stuff's, Tool boxes and tool add ons, Roof Racks and Accessories, Carpet, Padding, etc., etc., .... it's just NO comparison, far better than the other big 2 stores... AND, if you order stuff from them and then input your info into 'YES, I WANT MAILERS'... you'll get coupons like I just got, and they DO NOT try to limit you to oil or whatever they're trying to sell... Example>>> ) >>>>
1. Weathertech Cargo Area Mat(53x41"); 49$ Reg. Price.... 30$ WITH MY COUPON!
2. Thermoshield/Heat and Sound Shield(4x6Ft); 32$ Reg. Price.... 19$ WITH MY COUPON!
3. Closed Cell Foam Pad(4x8Ft); 20$ Reg. Price.... 12$ with Coupon
Even at 32$ regular price... That ThermoShield price is FANTASTIC! Most 4x6 Sheets of that I've seen on the net run around 50-60$
I'm still going to add angled/trapezoidal pieces of Closed cell foam to the corrugated bed channels... Because I WANT THIS FLAT! haha... BUT, I also want to avoid making it 'too tall'... BECAUSE; When You go TOO TALL, you're forcing the carpet to 'shorten' from front to back... This makes it VERY DIFFICULT, in my case, to get the carpet eyelet ends back over the screw rivets that go under the tailgate end trim... I BARELY got the carpet there as it is. SO, what RAD just said in a Phone Convo to me is the solution, MAYBE.... I simply pull up the rear seats, then pull the carpet back an inch or so. ONLY problem with that is that it would then make the portion of my carpet that is PERFECTLY wrapped around the Roll bar pipe, OFF, around an inch... as well as the wheel well... SO, I might have to improvise and 'MOVE' the eyelets back, by sewing on a new piece that would 'extend' the carpet another inch in the rear.... MAKE ANY SENSE? lol. It does to me,..and I'll take pics and such if I do.
Gotta run, I'll be back for more info and mod updates, soon
10-17-2012, 03:00 PM
#5055
Gotta post pics of those eyelets, what they look like. Would threshold cover them up? How about removing them, elongating the hole - make them more like slots - then instead of eyelets, just do button hole stitch to finish slots? For heavy duty stitches, I use upholstery nylon thread for Jo-ann's Fabric or other store.
Last edited by RAD4Runner; 10-17-2012 at 03:04 PM.
10-17-2012, 04:44 PM
#5056
Registered User
i got ya now chef RED top + gold stripes up the top i can 'cook' that up for ya
sure does i can toss that one in the mixer too 
10-17-2012, 05:27 PM
#5057
Contributing Member

I like the gold in the shade Cyberhorn came up with. I envision the color as not gold gold, but a tan that very nicely mimics the gold, as in not sparkly. Make sense?
10-17-2012, 05:32 PM
#5058
Registered User
Hi Chef... Ive been gone awhile...but I was very happy to see your truck thread still going. Gonna take me a week to get caught back up on your adventures!!!

 10-17-2012, 07:17 PM
#5060
Long time no see, man! Don't sweat catching up... although, it's pretty entertaining MOST of the time... and VERY informative.... SOME of the time! hahaha. Hope to talk again soon. ************************************************** *
DRAGON, lol.... you're gonna be mad, .....
Not what I meant... but I LIKE THAT TOO!
What I meant was this.... LEAVE THE TOP GOLD.... but, instead of inverting the stripes into red on the gold top(opposite of what they are on the truck)... Rather, make the stripes just continue. So all you'd be doing was taking the red portions of the stripes on the truck onward into the top... IOW, just add those small red inbetween sections to the top... so it looks like BIG gold strips, rather than big red ones on the gold top... make sense?
 hahahahaa.


