
ChefYota4x4's 1987 4Runner Build-Up Thread
 10-14-2012, 09:59 PM
#5021
Registered User
makes sense i know terry tends to wash his carpet an seats im gona have to wash mine in the back all the engine parts most are on cardboard but with our dust issues and i know its gona need cleaning i know i want to do the press and seal thing but its not available here i think i can get a product called easy roof which is made the same way
OH hey heres my idea for your paint used my many classes in photoshop to toss this together the top would be gold metalic like the stripes

OH hey heres my idea for your paint used my many classes in photoshop to toss this together the top would be gold metalic like the stripes
 10-14-2012, 10:14 PM
#5022
OOPS, meant to post this too... Curious if it's a good price......
http://www.autoaccessoriesgarage.com...rsal-Cargo-Mat
http://www.autoaccessoriesgarage.com...rsal-Cargo-Mat
10-14-2012, 10:18 PM
#5023
WOW, Dragon, that's a trip! hahah... Can you do it without the stripes on the roof to see what that would look like? WOW, you're REALLY good at that! I don't have Photoshop I don't think... Even if I did, I'm not sure how to use it to just change colors of things like that... Nice work!
10-14-2012, 10:48 PM
#5025
Registered User
WOW, Dragon, that's a trip! hahah... Can you do it without the stripes on the roof to see what that would look like? WOW, you're REALLY good at that! I don't have Photoshop I don't think... Even if I did, I'm not sure how to use it to just change colors of things like that... Nice work!
anyhow easy option i have the file saved with its layers
 10-15-2012, 12:21 AM
#5026
DANG, ... I like em both, Dragon.... That first one almost looks like it was supposed to be like that/was a factory idea!
Wow man, ... I know your story to some degree.. But every time, I quickly put my own aches and pains into perspective! You're a SOLID DUDE, DRAGON! A fighter for sure!
Wow man, ... I know your story to some degree.. But every time, I quickly put my own aches and pains into perspective!
You're a SOLID DUDE, DRAGON! A fighter for sure!
10-15-2012, 12:23 AM
#5027
Here's a couple more mats from Sears for those who are interested....
http://www.sears.com/u-a-inc-all-wea...&blockType=G18
http://www.sears.com/agri-cover-agri...&blockType=G48
I've heard of these, too...
http://www.carid.com/1987-toyota-4ru...ts-345130.html
But that Weathertech one WOULD fit,.... it would just be short around 3"..... The problem with those, IMHO, is our beds aren't sunken... so that rear most strip that sticks up might be annoying at times? But, with the bed up, MEH, it'd be great, .... you could take a bath back there and it would stay in! hahaha.
Last edited by ChefYota4x4; 10-15-2012 at 12:28 AM.
10-15-2012, 02:07 AM
#5028
Registered User
DANG, ... I like em both, Dragon.... That first one almost looks like it was supposed to be like that/was a factory idea!
Wow man, ... I know your story to some degree.. But every time, I quickly put my own aches and pains into perspective! You're a SOLID DUDE, DRAGON! A fighter for sure!
Wow man, ... I know your story to some degree.. But every time, I quickly put my own aches and pains into perspective!
You're a SOLID DUDE, DRAGON! A fighter for sure! looks like i have found a set of rims like Terry's blueberry 15x10.5 and a spare tire hoist as well! an the seller is awesome willing to wait n take payments
Last edited by Cyberhorn The Dragon; 10-15-2012 at 09:56 AM.
10-15-2012, 02:31 AM
#5029
Super Moderator
Staff
iTrader: (1)
Join Date: Aug 2008
Location: Anderson Missouri
Posts: 11,788
Likes: 0
Received 25 Likes
on
22 Posts
Your thread took off. I was out of town playing army this weekend and looks like you have been busy. Will try to get caught up tomorrow on your thread and see what you are at.
10-15-2012, 04:56 AM
#5030
Registered User
BRYAN! haha.... Hey man, I'm sorry I've not been over to your thread again just yet... I got it figured out, while just chatting over here and on the phone with an E-E, ..... so I just planned to slap it all in and come back and surprise ya(granting it worked out like I'm hoping!  )...... But, C'est La Vie.... Here you are before that, .....even better, lol.
First, I should say, again, "THANKS!" .... Took MANY applications you've used and I'm using some of them myself(with alterations in spots).< Far as that>... I'll make sure people know that you did it a little more SUPER-FLY-clean in spots! haha.
*************************
Couple questions, sure... thanks for offering, man......... ;
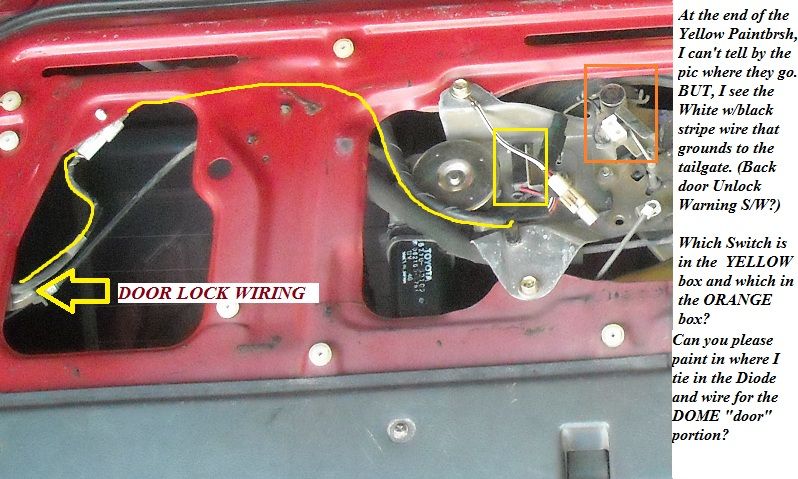
1. In regards to 'tying into the "Back Door Unlock Warning switch/Door Lock Detection Switch'............. I couldn't seem to find a pic of EXACTLY where you slapped that diode in & tied in the wire. Working with RAD4Runner(AND FINALLY figuring out the schematic in my head/spaghetti soup bowl, ) , I understand that the TAP needs to be BETWEEN the Negative Post of the Diode and the Door Lock Detection Switch... ON THE DIAGRAM, ... But I COULD NOT find a picture of the spot where you tapped in for that GREEN w/RED-stripe wire.
)...... But, C'est La Vie.... Here you are before that, .....even better, lol. First, I should say, again, "THANKS!" .... Took MANY applications you've used and I'm using some of them myself(with alterations in spots).< Far as that>... I'll make sure people know that you did it a little more SUPER-FLY-clean in spots!
haha. *************************
Couple questions, sure... thanks for offering, man......... ;
1. In regards to 'tying into the "Back Door Unlock Warning switch/Door Lock Detection Switch'............. I couldn't seem to find a pic of EXACTLY where you slapped that diode in & tied in the wire. Working with RAD4Runner(AND FINALLY figuring out the schematic in my head/spaghetti soup bowl,
) , I understand that the TAP needs to be BETWEEN the Negative Post of the Diode and the Door Lock Detection Switch... ON THE DIAGRAM, ... But I COULD NOT find a picture of the spot where you tapped in for that GREEN w/RED-stripe wire. anyway, i will try and answer your questions first....now, its been a few weeks since I have had this open, but...I am 90-95 percent sure that the switch in the orange box is the unlock detection switch (the one that is responsible for illuminating the dummy light on the dash). also, it appears to be connected with linkages to the lock mechanism, so this supports my fuzzy brain's suspicion. The one in the yellow box next to it is a "window motor limit switch" for lack of a better term...toyota may have an official name for it but i dont have a wiring diagram in front of me...anyway, if my memory serves me correctly that switch has a roller on the bottom side of it that rolls across the " half moon" shaped window gears. when the window gets to the fully up position, the switch is triggered and tells the power window control module the window is in fully up position and to stop sending current to the window motor.
I chose to put the diode directly after the white three pin connector in the upper left of the picture (truck harness side, not the side connected to the actual door latch) for a couple reasons.
1.i knew per the wiring diagram that it needed to be between the latch detection switch and the lock switch, but that was just a picture. In other words, the diagram gives you no physical sense of the routing of the wires...there could be three miles of wire between those two switches on the diagram even though they show up two inches apart.
2. I didnt want to tear apart the back gate to figure it out.
So, by putting it as close as I could to the door latch detection switch, I eliminated some unnecessary chasing down of wiring, but knowing for sure that it would indeed be "in between" those two components. technically it could be tapped anywhere along that line, but by putting it as close as possible you can physically see there is nothing connected up in between that could foul you up.
3. Also, when running wire into the tailgate from the main harness, that connector is right there as soon as you get into the tailgate. just less wire to run. I mean, the more wire you have the more possible points of failure you have. minimal is best IMO.
4. its easy access..if I screwed it up, I could get it at pretty easily right there.
As a side note, Someone mentioned above about putting everything inside the truck...(the diode and all)...im not sure that it could be done that way...could be, but it all depends WHERE PHYSICALLY in the truck the connection between the door lock detection switch is and the window lock switch is (i.e. the one I show in the diagram near where i placed the diode). if the connection point of those two wires is IN the truck then you could do it. if its actually done in the tailgate, which i suspect it is but have not verified, then the diode has to be in the tailgate.
basically, run your "door mode" wire from the light down the fiber glass shell, into the side panel, through the grommet in the rear quarter panel, follow the tailgate harness into the tailgate under the little plastic cap thingy. then once inside the tailgate, the connector is right there. unclip the connector from the tailgate... BAM, cut the wire, add the diode in line (checking orientation), tap your dome wire to the correct side of the diode, heat shrink and cover it all up. Snap your connector back together and clip it back into the tailgate...should be good to go.
Last edited by bryan89; 10-15-2012 at 05:06 AM.
10-15-2012, 05:06 AM
#5031
Registered User
if that doesnt help, I can try and get a picture or paintbrush something up tonite or tomorrow.
edit: here is a really bad paintbrush attempt at it. im 90 percent sure this is correct, as I did it from my wiring diagram. but i will verify that this is what is exactly in the truck. should be right though.
edit: here is a really bad paintbrush attempt at it. im 90 percent sure this is correct, as I did it from my wiring diagram. but i will verify that this is what is exactly in the truck. should be right though.
Last edited by bryan89; 10-15-2012 at 10:11 AM.
10-15-2012, 09:25 AM
#5032
Registered User
Omg Wow I haven't been on your thread since only Friday and you've already got 3 pages worth of stuff to read wow! Lol
Hey BTW mark those 2nd gen wipers weren't bigger then the 1st gen ones, they are shorter which is why they didn't work out. I made a video explaining everything. I'll post it up sometime today on my windshield wiper thread.
But Damn dude you've been busy. I just read pg 200. I still need to catch up on what's on 201 & 202. Lol
You outta make an index for your thread hahahaha
10-15-2012, 10:03 AM
#5033
easily done with a fast coat of red along that area then mask off the lines matching the body stripes then paint the top gold metalic remove tape an theres your stripes though the gold alone makes it look more like a factory paint job as all runners has a solid color top
Terry, you in the reserve? I was Navy, Iraqi mine interrupted my beauty rest on board the USS Tripoli at 0430 hours, 18Feb1991 - LOL!
Chef, I like the Car ID mat. Entire floor covering of Honda element I saw looks like it's made of same material. Still pricey though.
Guys, do you know of good source of raw material like that? I want to replace my carpet with rubber.
Last edited by RAD4Runner; 10-15-2012 at 10:05 AM.
10-15-2012, 10:17 AM
#5036
Registered User
Mark I'm with redeth I can't keep up buddy, trying to catch up a little but wanted ya to know I swung by. Sorry about the phone yesterday, cell phones and OKLAHOMA are not a good mix.
10-15-2012, 02:11 PM
#5037
easily done with a fast coat of red along that area then mask off the lines matching the body stripes then paint the top gold metalic remove tape an theres your stripes though the gold alone makes it look more like a factory paint job as all runners has a solid color top
looks like i have found a set of rims like Terry's blueberry 15x10.5 and a spare tire hoist as well! an the seller is awesome willing to wait n take payments
looks like i have found a set of rims like Terry's blueberry 15x10.5 and a spare tire hoist as well! an the seller is awesome willing to wait n take payments
Far as the wheels... I'd be careful going that wide, Dragon... You can begin to pop a bead a bit easier at a certain point, ya know?

Yeah, I realize now that a picture of what I exactly tapped into could be helpful...i should edit that.
anyway, i will try and answer your questions first....now, its been a few weeks since I have had this open, but...I am 90-95 percent sure that the switch in the orange box is the unlock detection switch (the one that is responsible for illuminating the dummy light on the dash). also, it appears to be connected with linkages to the lock mechanism, so this supports my fuzzy brain's suspicion. The one in the yellow box next to it is a "window motor limit switch" for lack of a better term...toyota may have an official name for it but i dont have a wiring diagram in front of me...anyway, if my memory serves me correctly that switch has a roller on the bottom side of it that rolls across the " half moon" shaped window gears. when the window gets to the fully up position, the switch is triggered and tells the power window control module the window is in fully up position and to stop sending current to the window motor.
I chose to put the diode directly after the white three pin connector in the upper left of the picture (truck harness side, not the side connected to the actual door latch) for a couple reasons.
1.i knew per the wiring diagram that it needed to be between the latch detection switch and the lock switch, but that was just a picture. In other words, the diagram gives you no physical sense of the routing of the wires...there could be three miles of wire between those two switches on the diagram even though they show up two inches apart.
2. I didnt want to tear apart the back gate to figure it out.
So, by putting it as close as I could to the door latch detection switch, I eliminated some unnecessary chasing down of wiring, but knowing for sure that it would indeed be "in between" those two components. technically it could be tapped anywhere along that line, but by putting it as close as possible you can physically see there is nothing connected up in between that could foul you up.
3. Also, when running wire into the tailgate from the main harness, that connector is right there as soon as you get into the tailgate. just less wire to run. I mean, the more wire you have the more possible points of failure you have. minimal is best IMO.
4. its easy access..if I screwed it up, I could get it at pretty easily right there.
As a side note, Someone mentioned above about putting everything inside the truck...(the diode and all)...im not sure that it could be done that way...could be, but it all depends WHERE PHYSICALLY in the truck the connection between the door lock detection switch is and the window lock switch is (i.e. the one I show in the diagram near where i placed the diode). if the connection point of those two wires is IN the truck then you could do it. if its actually done in the tailgate, which i suspect it is but have not verified, then the diode has to be in the tailgate.
basically, run your "door mode" wire from the light down the fiber glass shell, into the side panel, through the grommet in the rear quarter panel, follow the tailgate harness into the tailgate under the little plastic cap thingy. then once inside the tailgate, the connector is right there. unclip the connector from the tailgate... BAM, cut the wire, add the diode in line (checking orientation), tap your dome wire to the correct side of the diode, heat shrink and cover it all up. Snap your connector back together and clip it back into the tailgate...should be good to go.
 .... so how about with a simple 'YOU ROCK SMILEY!', lol.>>>>
if that doesnt help, I can try and get a picture or paintbrush something up tonite or tomorrow.
edit: here is a really bad paintbrush attempt at it. im 90 percent sure this is correct, as I did it from my wiring diagram. but i will verify that this is what is exactly in the truck. should be right though.
edit: here is a really bad paintbrush attempt at it. im 90 percent sure this is correct, as I did it from my wiring diagram. but i will verify that this is what is exactly in the truck. should be right though.
THANKS AGAIN!
Omg Wow I haven't been on your thread since only Friday and you've already got 3 pages worth of stuff to read wow! Lol
Hey BTW mark those 2nd gen wipers weren't bigger then the 1st gen ones, they are shorter which is why they didn't work out. I made a video explaining everything. I'll post it up sometime today on my windshield wiper thread.
But Damn dude you've been busy. I just read pg 200. I still need to catch up on what's on 201 & 202. Lol
You outta make an index for your thread hahahaha
Hey BTW mark those 2nd gen wipers weren't bigger then the 1st gen ones, they are shorter which is why they didn't work out. I made a video explaining everything. I'll post it up sometime today on my windshield wiper thread.
But Damn dude you've been busy. I just read pg 200. I still need to catch up on what's on 201 & 202. Lol
You outta make an index for your thread hahahaha
BTW, couldn't you just slap some spacers in there? You know, to 'rise' the 2nd Gen one up far enough? I'll check mine out eventually... just on too many other things right now that I HAVE to finish up completely before I'm moving on. 
Nice, Cyberhorn!
Terry, you in the reserve? I was Navy, Iraqi mine interrupted my beauty rest on board the USS Tripoli at 0430 hours, 18Feb1991 - LOL!
Chef, I like the Car ID mat. Entire floor covering of Honda element I saw looks like it's made of same material. Still pricey though.
Guys, do you know of good source of raw material like that? I want to replace my carpet with rubber.
 .... I do know that BigLots sells rubber cargo mats as well.... 12$ or something... They're not thick and corrugated like the Weathertech... but they're slip proof and they might even look more stock. They look more like the 1st Gen Pick up floor liners(instead of carpet, many were rubberized, ya know?).... They have almost always in Gray and Black... not sure you'll find tan. BUT, those ones I posted from Sears.com, they have Tan, ya know? 28$ or so I think for one of them.
 * You tied in with the diode and wiring to the loom of wire just under the portion of the metal closest to the bed when opened... So; YOU Pulled that loom clip out of the tailgate where it's held there... Pulled up and out and opened up the harness loom... of 3 wires? Blue, Green and White w/black stripe?... Then tied in the "DOOR" wire to the "Green w/Red Stripe" wire that's mentioned in the FSM/Haynes Schematic, .....before the negative side of the Diode... And you did it right there before the switches near the motor, etc., yeah? (IOW, you PHYSICALLY hacked in your diode and the rest in a manner that is representative of your Diagram in the Photoshop you did?). Then you cleanly sussed it all back up... This way, when you have to disconnect the main harness of the tailgate, it's no problem, and you just disconnect, pull it off and out and be on your way with the tailgate ...... somewhere! lol. I don't plan to EVER have to do that.. BUT, I like the idea in case I did. Not having to hack back in is NICE!
10-15-2012, 05:38 PM
#5038
Registered User
Chef,
I tore into the tailgate tonite and grabbed a photo of the diode and wiring.
its also added into my write up for future reference next to the wiring diagram.
when you look at the picture disregard the fact that the blue/red and white/black wires have heat shrink on them.....that fix was part of an unrelated repair thanks to a POs mod....for some reason he thought it would be better if the rear window operated all the time, no matter what, so he cut all of those wires, threw away the jack, and tied them together in one bunch with tape....so I had to locate a new jack and fix that when I found it....but that is a different story...
long story short, the repair/modification is a little messier than I would have liked but the PO did not leave me much wire to fix it with.
Again, the only required modification to the OEM harness for this light project is the one green wire needs to be cut and diode added inline along with your dome light wire...
my "door mode" dome light wire is black as shown below.
the white connector, for the door latch detection switch, shown on the left, clips back into the hole in the corner of the tailgate...the hole in the top of the pic.
Last edited by bryan89; 10-15-2012 at 05:43 PM.
10-15-2012, 08:15 PM
#5039
Bryan..... ,
Ignoring the fact that I'm likely sounding a bit repetitive, .............. THANK YOU! Very cool of you to do that. I'm sure you did it largely to help on your LED lighting thread... BUT STILL, it's gonna help me a lot to not have to guess... You didn't have to do that, and I APPRECIATE IT, greatly, I mean that!
Ok, ... so under the lip of metal there, where MY connector is white, where I started out on the left with my yellow line in that Paint altered photo.... Anywhere TO THE RIGHT of the connector in the picture is fine?(which is right near where that "CLIP" goes, through that hole, I see)... BUT, if I have this right, you chose to do it there largely because you wanted to be as near to the 'LOOM' hole that exits the tailgate, right? SWEET! I got it now! YEA!!!!!! hahahaha.
You're a solid dude, Bryan... and I will again risk redundancy in stating, ''HOLY CRAPOLI, that is such clean work and such a GREAT idea..... An idea that I'm stoked to be STEALING from ya! " hahaha.
I will do a VERY clean thread on this, with lots of pics and video... (as you can probably tell... I like pics and video of what I do, ... BECAUSE THAT is how I learn best, ya know?) I learn audibly just fine, or from text even... EXCEPT in this wiring stuff.. UNTIL NOW, where I've learned to read the diagrams(as crappy as they are from Toyota , )... I guess when you aren't understanding polarity and switched grounds and relays and control modules and how the schematic is correlated to REALITY, ... it's largely a losing battle! haha. NOW I have a pretty good grasp on it, thanks ESPECIALLY to RAD, Dragon, Terry, Jason, RBX, THOOK(Miss that dude stopping in, man! lol), FLECKER(Also an E-E), Irab88 and many more... And WOW how liberating that is to know I'm getting down yet another portion of this "Auto DIY World" that is one of the most troubling to likely the highest percentage of people!
WOOT! hehe....
I'll be back and over there as well with a TON of pics and such(I'll just do a summary update on your thread, as I've likely taken up WAY too much of it's 2 pages already! lol.
L8r, Bryan.... I'm sure I'm not the only one that's grateful here, trust me. (IT'S A GREAT site with MANY good people! )
Ignoring the fact that I'm likely sounding a bit repetitive, .............. THANK YOU! Very cool of you to do that. I'm sure you did it largely to help on your LED lighting thread... BUT STILL, it's gonna help me a lot to not have to guess... You didn't have to do that, and I APPRECIATE IT, greatly, I mean that!
Ok, ... so under the lip of metal there, where MY connector is white, where I started out on the left with my yellow line in that Paint altered photo.... Anywhere TO THE RIGHT of the connector in the picture is fine?(which is right near where that "CLIP" goes, through that hole, I see)... BUT, if I have this right, you chose to do it there largely because you wanted to be as near to the 'LOOM' hole that exits the tailgate, right? SWEET! I got it now! YEA!!!!!! hahahaha.
You're a solid dude, Bryan... and I will again risk redundancy in stating, ''HOLY CRAPOLI, that is such clean work and such a GREAT idea..... An idea that I'm stoked to be STEALING from ya!
" hahaha. I will do a VERY clean thread on this, with lots of pics and video... (as you can probably tell... I like pics and video of what I do, ... BECAUSE THAT is how I learn best, ya know?) I learn audibly just fine, or from text even... EXCEPT in this wiring stuff.. UNTIL NOW, where I've learned to read the diagrams(as crappy as they are from Toyota
, )... I guess when you aren't understanding polarity and switched grounds and relays and control modules and how the schematic is correlated to REALITY, ... it's largely a losing battle! haha. NOW I have a pretty good grasp on it, thanks ESPECIALLY to RAD, Dragon, Terry, Jason, RBX, THOOK(Miss that dude stopping in, man! lol), FLECKER(Also an E-E), Irab88 and many more... And WOW how liberating that is to know I'm getting down yet another portion of this "Auto DIY World" that is one of the most troubling to likely the highest percentage of people! WOOT! hehe....
I'll be back and over there as well with a TON of pics and such(I'll just do a summary update on your thread, as I've likely taken up WAY too much of it's 2 pages already!
lol. L8r, Bryan.... I'm sure I'm not the only one that's grateful here, trust me. (IT'S A GREAT site with MANY good people! )
Last edited by ChefYota4x4; 10-15-2012 at 08:17 PM.
10-15-2012, 08:31 PM
#5040
Registered User
Nice photoshops Dragon! I did that for a body shop once, helping customers decide paint schemes, but then the shop didn't want to pay me for the work... so that didn't last.
Chef, I need to hire someone to dictate your thread in to audio book for me. You put this stuff out faster than I can read it. ;-)
Chef, I need to hire someone to dictate your thread in to audio book for me. You put this stuff out faster than I can read it. ;-)


