
ChefYota4x4's 1987 4Runner Build-Up Thread
 10-13-2012, 12:32 PM
#5001
RAD, here ya go.......... (Once again, GREEN is Positive Meter Terminal and YELLOW is negative)..........
All tests with Ohmmeter set to 200 Ohms..... Came out "OL" on bulb pin to bulb pin(not matter whether on "OFF", "DOOR" or "ON"... (RAD: I have to add.... I'm not CERTAIN that when I did those tests in the previous post, with the cover on, whether or not the bulb was in
All tests with Ohmmeter set to 200 Ohms..... Came out "OL" on bulb pin to bulb pin(not matter whether on "OFF", "DOOR" or "ON"... (RAD: I have to add.... I'm not CERTAIN that when I did those tests in the previous post, with the cover on, whether or not the bulb was in
I did not like those 6.5 and 4. something readings. Please double-check according to this (with bulb on):

Also, do you use aluminum foil for reflector? If so, Pls make sure it's not touching any metal contacts. Put electrical tape on trace, then put alum foil on it. Better yet, use reflector tape.
Got my fuse block out now and am moving dome light power supply. Yeey!.
BTW, Grego, love the non-chrome finish on your wheels! Gotta do that after I do my functional mods

 10-13-2012, 01:16 PM
#5002
Hey RAD, .... I'm doing some tests on a Multi Meter, TRYING to do what I understand you're asking. I'm putting them on video... So, I'll post that up as soon as it's loaded a lil later.
You said you're "Moving dome light power supply"..... What exactly do you mean by that, RAD, ... you're losin me, man, lol. You mean you're running power to your LED Strip light in the back from the dome fuse block location? When you do this, can you PLEASE take pics and such? Then explain in VERY simple terms, exactly what you're doing?
Thanks, man... ttysoon
10-13-2012, 08:20 PM
#5005
Registered User
iTrader: (4)
Join Date: May 2010
Location: People's Republic of California
Posts: 720
Likes: 0
Received 15 Likes
on
12 Posts
************************************************** *******
Grego.... There was a pretty clean 3rd Gen Xtra Cab PU there with decent door panels and other interior stuffs... Both doors are removed and in VERY good condition(Bright red)..... much of the engine was still there... and the ENTIRE rear seat backrest and carpeting and all that was REALLY nice. There was also another PU, a 92 or so, dark blue, ..... half gutted, but pretty clean. Also 2wd. I didn't see them really until leaving. They were supposed to have a 3rd Gen 4Runner there... BUT, Richard said he didn't see it. I found this 88 4WD PU and got to work RIGHT OFF, lol.... So I didn't see.
RAD- Are you an electrical engineer or something? Mark may know why I'm asking....shhhhhhh, don't scare him away!
 10-13-2012, 08:33 PM
#5006
Today I picked up some closed cell foam and foil insulation for the outer walls of the inner panels. Under it, I'll do tool drawer liner sheets for a lil more density and because it was 6.96$ for 4x8 Sheets.
I will also use that foam insulation for the floor board for now.... I have plenty enough to cut out strips to fill the valleys and then a layer on top to make it plush.
I also got Birch 1/2" project panels, 2x4, to do the rear panels.
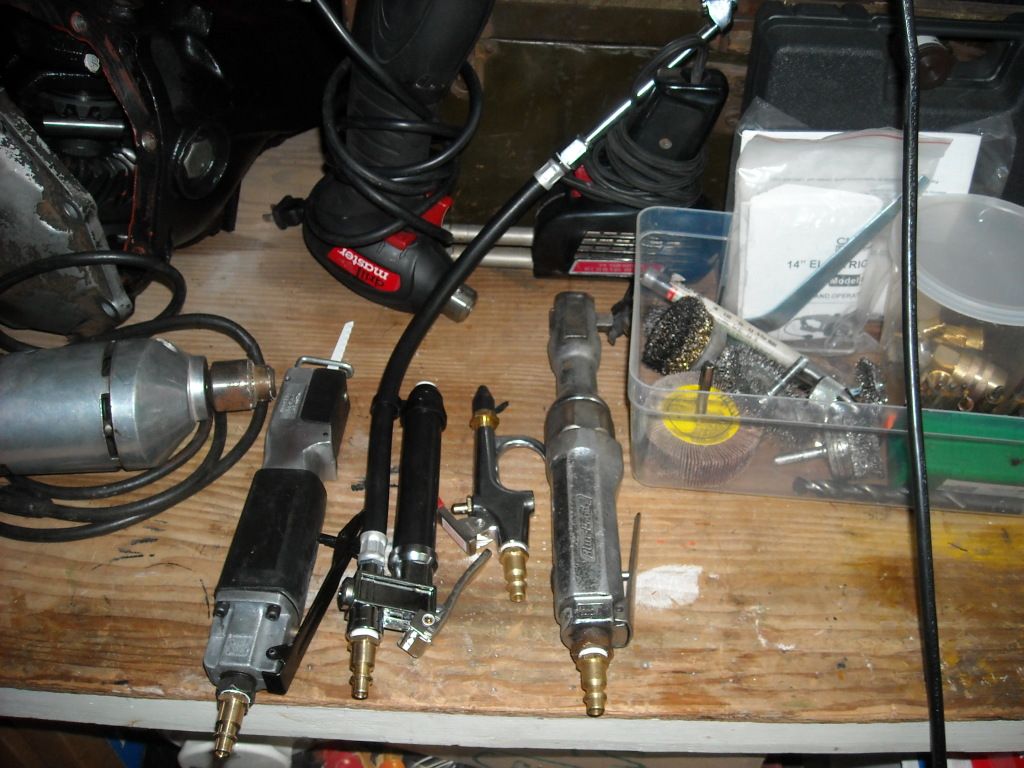
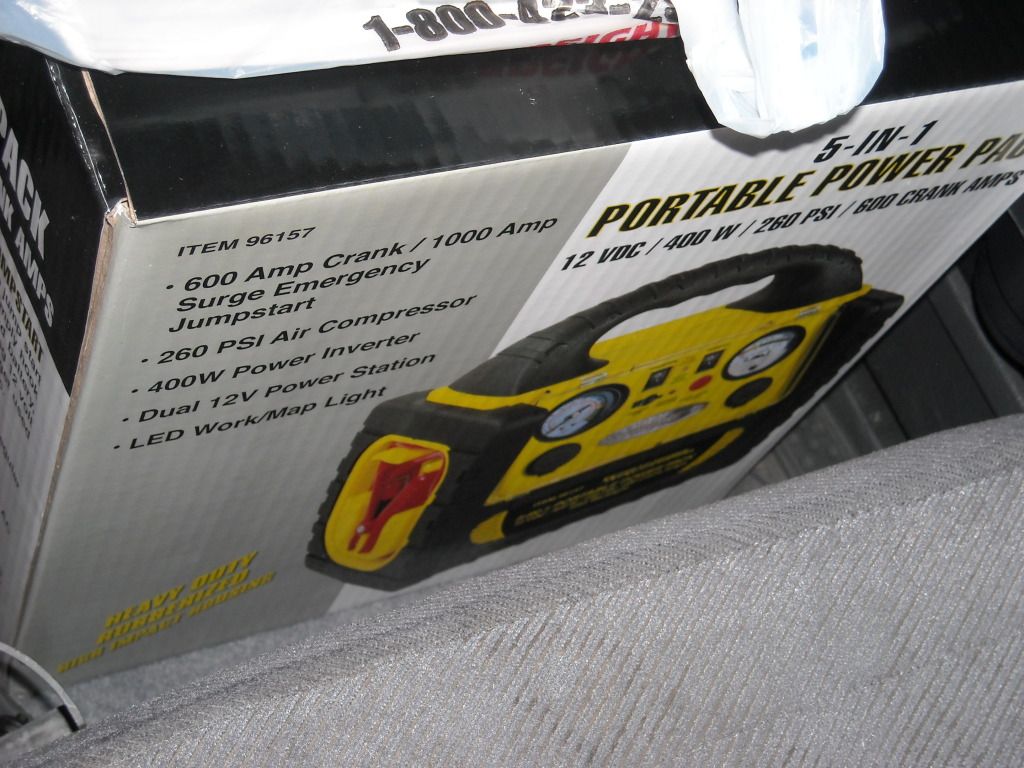
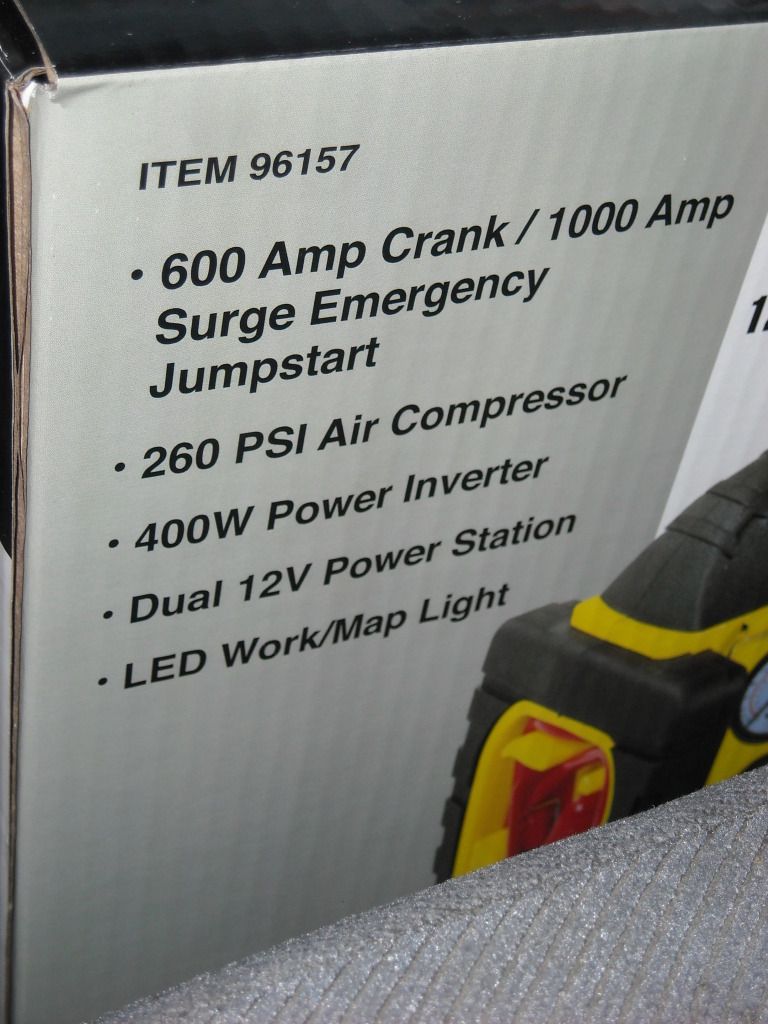
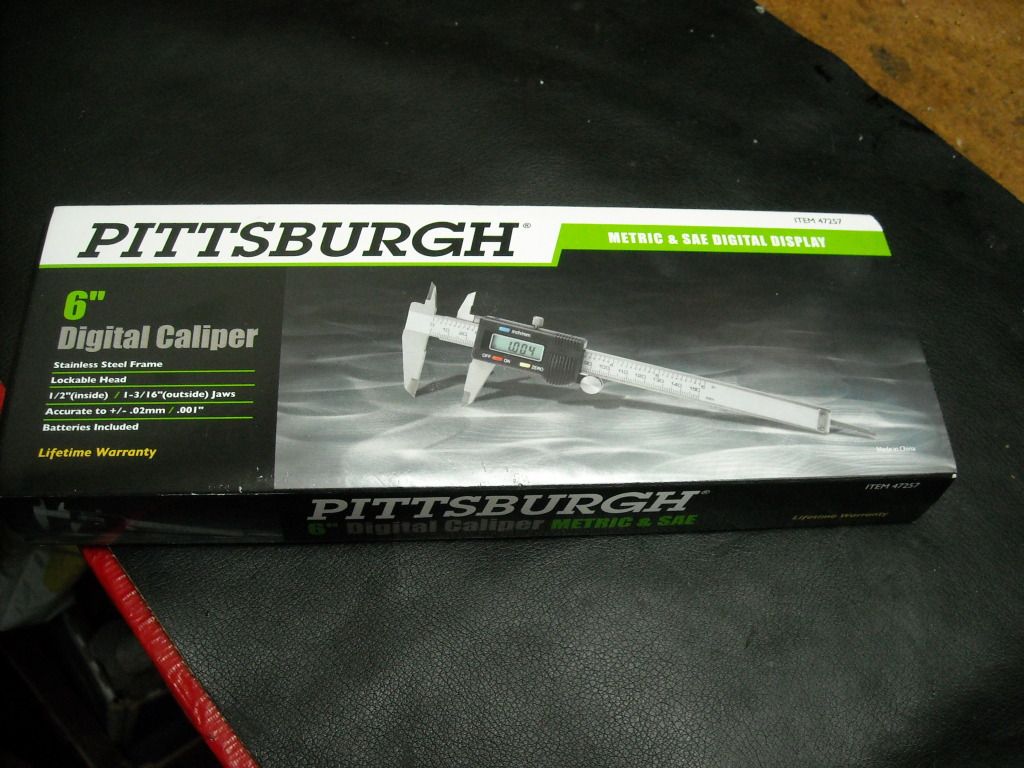
I then stopped at Harbor Freight with my last gift card and grabbed their best 5 in 1 road buddy thingymadoer with the charger/12V/Aux Plugs/260PSI Compressor/600-1000CCAmp Battery jumper.... Been wanting one for a long time, and they had a sidewalk sale that she allowed me to also use my 20% off on everything coupon... SO, that 99$ unit ended up being 79$ w/2 year warranty. Got a digital micrometer/caliper for 7$, Pneumatic Jig Zaw for 10$ and blades too for a few more, Rotary tool Skill saw type wood blades for 4.99$ 70% off, and the 6Ft x 18" tool mat was 6$ x 2.
I already have 2 rolls of very nice Auto Carpeting in Charcoal Gray for the panels, and I'll be pulling out my rear carpeting and giving it a wash.
RAD, I discovered that beneath my rear carpet, it's padded. It's also got velcro seams around the edges to meet with the wheel humps.
I think I have a pretty good idea what I want to do here... And aside from the rear corners of the paneling and fact that it's a bit more risen at the top... I'm pretty sure I can make this work. What I'll do at the top of the Birch is taper it off so the stock Inner L-Trim will fit over it and bolt through it. The screws are long enough up there that they should go in fine as long as I trim out about half of the wood... And, the wood will be strong enough to stand up to the 10" JL Sub and maybe even the Inverter... And then my switches for the rear window and window lock/ Inverter plugs, all that could be built into the panels. This, and being well insulated in the chassis panel walls, should allow for GOOD, maybe not great, but good sound insulation and excellent heat/cold insulation...... Worst case scenario, I don't like the insulation and I bit the bullet and spend 100's of dollars! lol.... But I think it'll work.
I'll post plenty of pics and video of the process, hopefully.. And I hope it helps someone who's not able to go custom crazy with the best matting, etc., ya know? I have an idea to use Garage Door edging on the rear corners... that way it's tight to the tailgate and doesn't look funny... and they're HD rubber, so they'll act as an insulator as well. The panels will be able to come off without touching those... So I'd likely fix them permanently or at least semi permanently into the corners. It's dual layer pliable rubber, similar to our shell and rear gate seals... BUT, much more HD and larger... so it could manage covering up the corners where the wood isn't there.
I can return the insulation if it's not practical... and even if not, it cost me around 12$...so I'm not concerned on a 'try', ya know?
PS> .... I had peel and seal in the cart.... and I JUST CAN'T STOMACH the smell, man.... I'm sure when it's all laid down and overlapping, it's fine... But the thought of that stuff tacked to the panel walls and floors and everything? It's scaring me, lol. If I DO end up biting the bullet on insulation...it'll likely be the Tool Drawer liners under RBT or another Hot Rod Insulation stuff. It has NO Tar, it's hypoallergenic and it's rated as one of the better combo's of 'HEAT/COLD/SOUND' insulation. I posted some links on RAD's soundproofing thread... BUT honestly? Soundproofing is not my only concern. I'm thinking about the cold and heat factor, combined with sound. I KNOW that's what RAD is doing... And it's probably what I'll end up having to do.. But I thought I'd give this a try. I can jump up and down on this stuff, the foil covered insulation... So I think once it's filled in the valleys and its' covered with carpet... it SHOULD work... We'll see.
QUESTION; GREGO, ... is that stuff you got foil on both sides? Like encapsulated tar stuff? I can't tell from the pics cuz it's installed already. The Peel and seal is tar on one side and foil on the other. I'm SURE it's effective.... but again, THE SMELL got to me in just seconds. I can't imagine that if it's hot out, 100*F+... it's not going to heat up that stuff and cause some odor? I've seen guys complain about it... But it's the net, so I would rather have 'PRACTICAL APPLICATION' INPUT from someone who's applied it! hahaha. And OH YEAH, ... as mentioned, that STUFF IS HEAVY! hahaha.
I will also use that foam insulation for the floor board for now.... I have plenty enough to cut out strips to fill the valleys and then a layer on top to make it plush.
I also got Birch 1/2" project panels, 2x4, to do the rear panels.
I then stopped at Harbor Freight with my last gift card and grabbed their best 5 in 1 road buddy thingymadoer with the charger/12V/Aux Plugs/260PSI Compressor/600-1000CCAmp Battery jumper.... Been wanting one for a long time, and they had a sidewalk sale that she allowed me to also use my 20% off on everything coupon... SO, that 99$ unit ended up being 79$ w/2 year warranty. Got a digital micrometer/caliper for 7$, Pneumatic Jig Zaw for 10$ and blades too for a few more, Rotary tool Skill saw type wood blades for 4.99$ 70% off, and the 6Ft x 18" tool mat was 6$ x 2.
I already have 2 rolls of very nice Auto Carpeting in Charcoal Gray for the panels, and I'll be pulling out my rear carpeting and giving it a wash.
RAD, I discovered that beneath my rear carpet, it's padded. It's also got velcro seams around the edges to meet with the wheel humps.
I think I have a pretty good idea what I want to do here... And aside from the rear corners of the paneling and fact that it's a bit more risen at the top... I'm pretty sure I can make this work. What I'll do at the top of the Birch is taper it off so the stock Inner L-Trim will fit over it and bolt through it. The screws are long enough up there that they should go in fine as long as I trim out about half of the wood... And, the wood will be strong enough to stand up to the 10" JL Sub and maybe even the Inverter... And then my switches for the rear window and window lock/ Inverter plugs, all that could be built into the panels. This, and being well insulated in the chassis panel walls, should allow for GOOD, maybe not great, but good sound insulation and excellent heat/cold insulation...... Worst case scenario, I don't like the insulation and I bit the bullet and spend 100's of dollars! lol.... But I think it'll work.
I'll post plenty of pics and video of the process, hopefully.. And I hope it helps someone who's not able to go custom crazy with the best matting, etc., ya know? I have an idea to use Garage Door edging on the rear corners... that way it's tight to the tailgate and doesn't look funny... and they're HD rubber, so they'll act as an insulator as well. The panels will be able to come off without touching those... So I'd likely fix them permanently or at least semi permanently into the corners. It's dual layer pliable rubber, similar to our shell and rear gate seals... BUT, much more HD and larger... so it could manage covering up the corners where the wood isn't there.
I can return the insulation if it's not practical... and even if not, it cost me around 12$...so I'm not concerned on a 'try', ya know?
PS> .... I had peel and seal in the cart.... and I JUST CAN'T STOMACH the smell, man.... I'm sure when it's all laid down and overlapping, it's fine... But the thought of that stuff tacked to the panel walls and floors and everything? It's scaring me, lol. If I DO end up biting the bullet on insulation...it'll likely be the Tool Drawer liners under RBT or another Hot Rod Insulation stuff. It has NO Tar, it's hypoallergenic and it's rated as one of the better combo's of 'HEAT/COLD/SOUND' insulation. I posted some links on RAD's soundproofing thread... BUT honestly? Soundproofing is not my only concern. I'm thinking about the cold and heat factor, combined with sound. I KNOW that's what RAD is doing... And it's probably what I'll end up having to do.. But I thought I'd give this a try. I can jump up and down on this stuff, the foil covered insulation... So I think once it's filled in the valleys and its' covered with carpet... it SHOULD work... We'll see.
QUESTION; GREGO, ... is that stuff you got foil on both sides? Like encapsulated tar stuff? I can't tell from the pics cuz it's installed already. The Peel and seal is tar on one side and foil on the other. I'm SURE it's effective.... but again, THE SMELL got to me in just seconds. I can't imagine that if it's hot out, 100*F+... it's not going to heat up that stuff and cause some odor? I've seen guys complain about it... But it's the net, so I would rather have 'PRACTICAL APPLICATION' INPUT from someone who's applied it! hahaha. And OH YEAH, ... as mentioned, that STUFF IS HEAVY! hahaha.
Last edited by ChefYota4x4; 10-13-2012 at 08:44 PM.
10-13-2012, 09:28 PM
#5007
Registered User
iTrader: (4)
Join Date: May 2010
Location: People's Republic of California
Posts: 720
Likes: 0
Received 15 Likes
on
12 Posts
There was a peculiar smell when I first installed it, but not anymore and as you know we went through a big long hot spell recently. BUT, I used FatMat...not roofing stuff, so there's no tar in the stuff I used. http://www.fatmat.com/
10-13-2012, 10:40 PM
#5008
Chef,
You got that right!. Terminal (center?) where you have green alligator clip goes to constant +12V. Just wanted to make sure because it's hard when working remotely. (Maybe Yotatech can have a Skype add-in featured on the site - LOL!)
Yep, accessing the back of fuse block is not too bad, after all. Once you remove driver's seat. Tomorrow I'll continue on relocating console switches. Too many wires to move, that it would be difficult to document and post online. However, one can simply move one wire at a time to prevent mix-up.
Grego, Yeah, I'm an E.E. , and yes, Fatmat and Raammat seem to be good values now.
Chef,
Just look for the best value out there. Measure side body panels, doors, firewall where feet rest, transmission hump and floor. However, if you plan to use closed-cell foam instead of carpet padding on floor (including under seats) no need for fatmat, there is already tar deadener there and combined with closed-cell that's a lot of sound-proofing already.
If too expensive the thermal insulation (foil & padding) may not give you much value on floor. Best to reserve that for where feet rest against the firewall, and the transmission hump.
For trunk, Closed-cell foam on bed then top it with carpet, or better yet 1/8" project panel wrapped in carpet should take care of sound-proofing even without Fatmat. The project panel will replace the 20-pound, 3/8-inch MDF that I removed.
You got that right!. Terminal (center?) where you have green alligator clip goes to constant +12V. Just wanted to make sure because it's hard when working remotely. (Maybe Yotatech can have a Skype add-in featured on the site - LOL!)
"Moving dome light power supply"..... What exactly do you mean by that...running power to your LED Strip light in the back from the dome fuse block location?
There was a peculiar smell...so there's no tar in the stuff I used. http://www.fatmat.com/
, and yes, Fatmat and Raammat seem to be good values now.Chef,
Just look for the best value out there. Measure side body panels, doors, firewall where feet rest, transmission hump and floor. However, if you plan to use closed-cell foam instead of carpet padding on floor (including under seats) no need for fatmat, there is already tar deadener there and combined with closed-cell that's a lot of sound-proofing already.
If too expensive the thermal insulation (foil & padding) may not give you much value on floor. Best to reserve that for where feet rest against the firewall, and the transmission hump.
For trunk, Closed-cell foam on bed then top it with carpet, or better yet 1/8" project panel wrapped in carpet should take care of sound-proofing even without Fatmat. The project panel will replace the 20-pound, 3/8-inch MDF that I removed.
Last edited by RAD4Runner; 10-13-2012 at 10:48 PM.
10-13-2012, 11:07 PM
#5009
Panels and Speakers
Yes, wood, especially with some padding would also insulate from outside sound better than the thin plastic panel. I also prefer vinyl because the classic 4Runner is a true utilitarian truck.
... the 10" JL Sub ...Just add a lil strip of wood a few inches to the side of the sub and maybe add a portal...
10-14-2012, 12:55 AM
#5010
Hey Guys, ..... thanks for chiming in, Grego, RAD! I appreciate it very much.... I have a plan with the stuff I have.... but, as I said, I might end up using FATMAT or something like it(a bargain version). We'll see. All has to do with what I can get away with on size, effectiveness, etc.
Yeah, RAD, I was only going to use the closed cell stuff I got on the rear, actually... But it's NOT the kind like you're thinking, pretty sure. It's the building insulation type.. More like Styrofoam covered in plastic on one side and Aluminum on the other. The more I think about it... I KNOW it would work if I top it with project board and carpet.... I just don't want it to get too "TALL", if you KWIMean? (risen too high off the bed). They have ROLLS of the bubble type, too.. that's supposed to work really well on TOP of things like wood.. So who knows, I might just go that route on the back of the wood panels(staple the stuff to it).... And I don't need much. They have 4 different size rolls, all coated in aluminum on both sides. Home depot has some that's a lil different... and they have Fatigue matting, Lowes did not that I could find(that THEY could find, I should say! hahaha)... I will try Big Lots, tomorrow. Problem with the Styrofoam stuff like I got is .... well, it's hard to CUT! BUT, even if it's not perfect, and I feel like I can use it, I could just tape over the edges that are a lil rough.
Anyway, I'll figure that out.....
Far as the tools, etc., ... I'm aware it's not the top of the line stuff... BUT, it's all worked for me for years... I don't use them enough to break them quick... So it's all good for me, ya know? I'm charging the 5 in 1 right now..... Hooked up the Pneumatic JigSaw and the Blue Point (3/8) ratchet is DEFINITELY a good toy... Also, the air tips and tire filler/gauge... Works fine. Checked it tonight too. Last one I had lasted 15 years from there.
Anyway, I'M excited about it... as I can use them any time up til around 8PM or so... And I'll be getting a lil Air Grinder and a couple other things, too(you can get an effective one around 2" or so... REALLY helps to cut fast and in tight spots, ya know?)
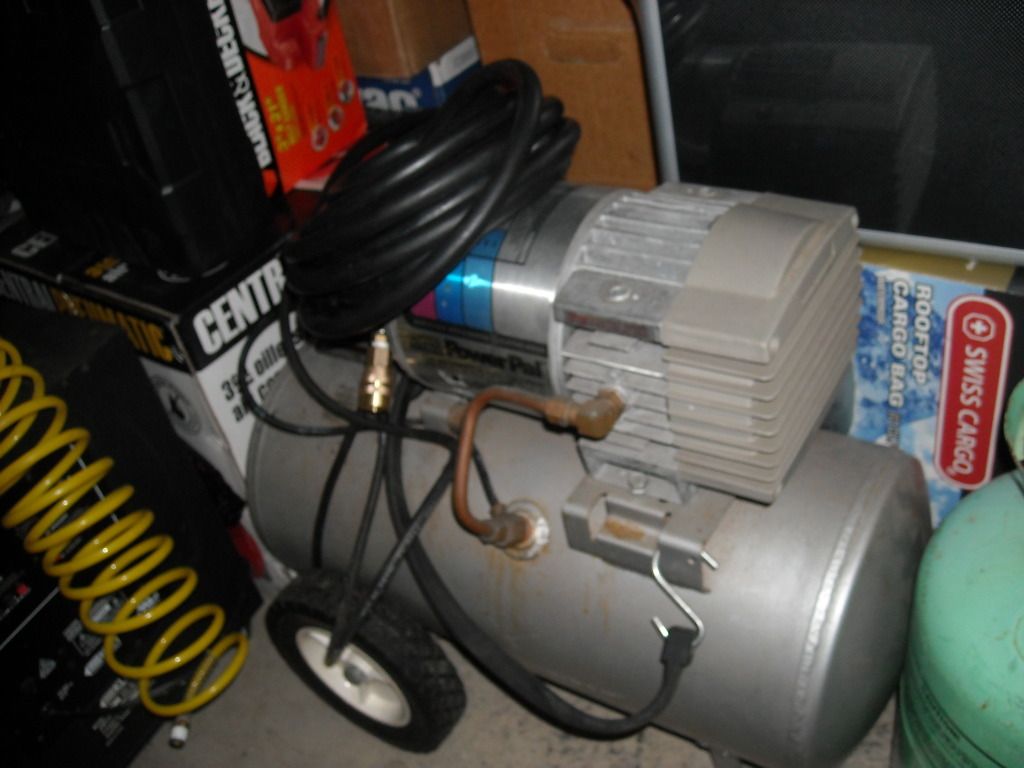
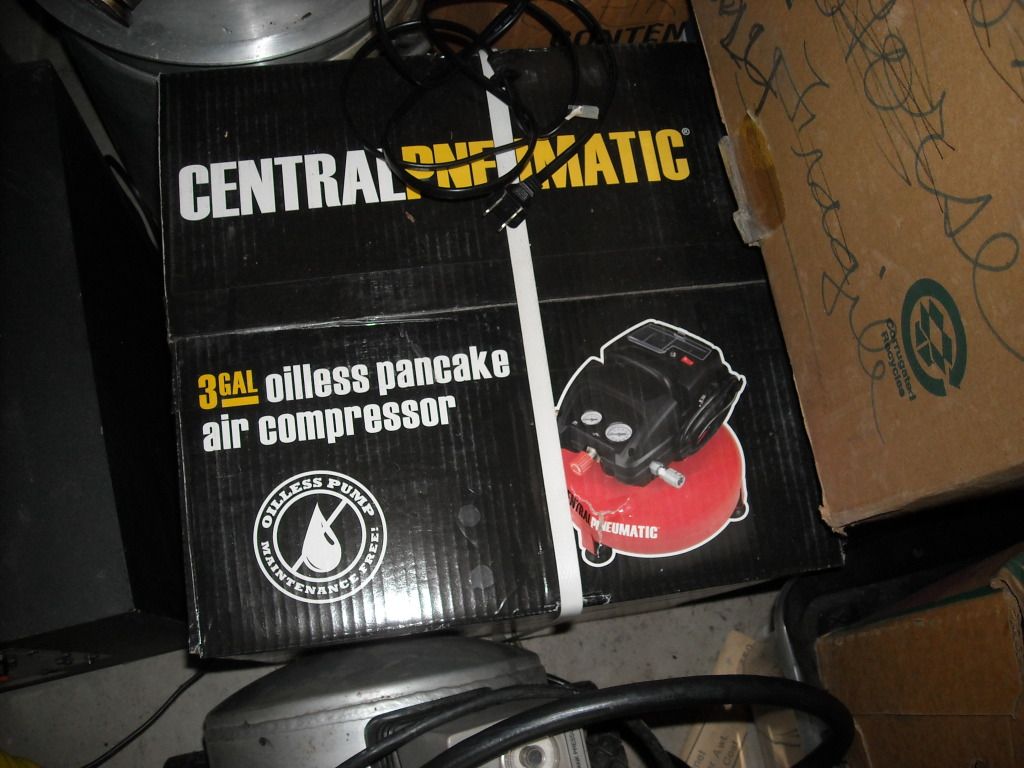
I have my old compressor that just wont break! hahaha... And another one I got for 30$! I've had it a while, just never opened it yet. It's 59$ on their street sale right now.. so I KNOW I scored by waiting for the right time... But like I said, my old girl works and has for 20 years!!!!
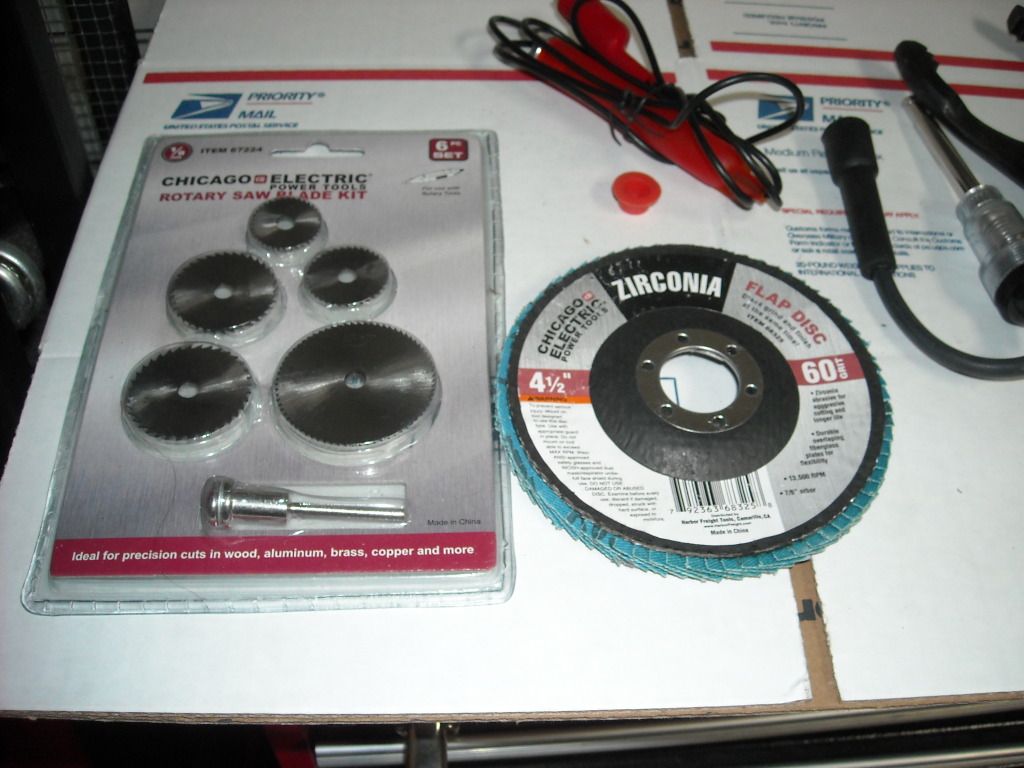
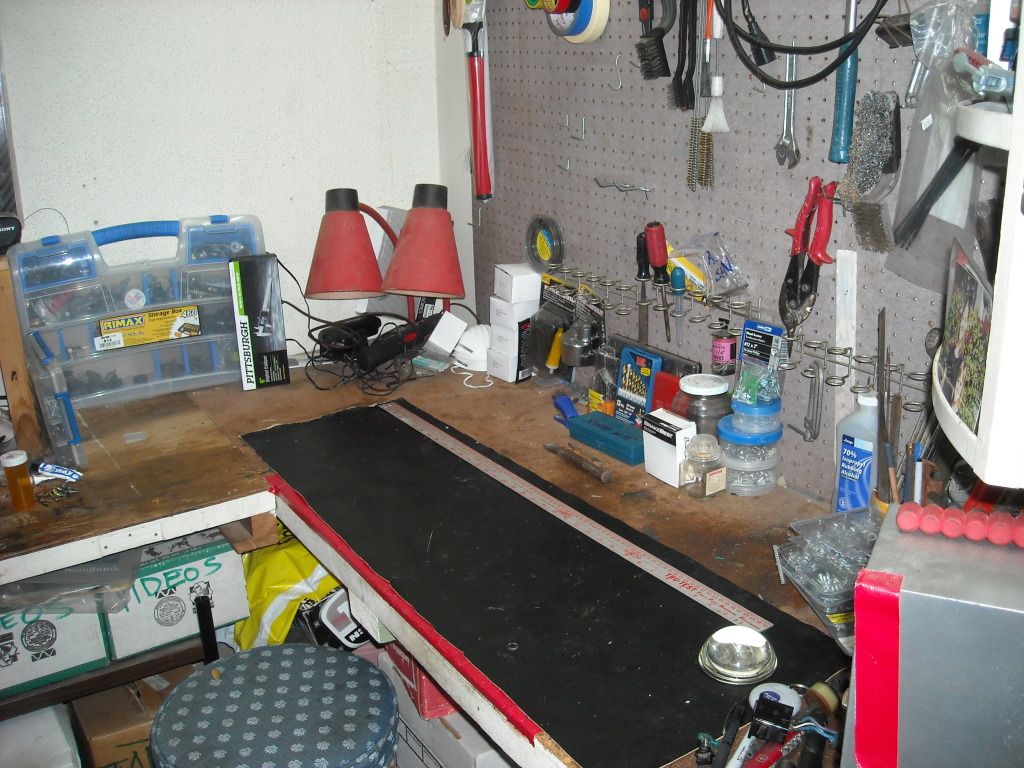
Here's the 5 in 1... The think is like 20# lol...
Some other stuff I got.........
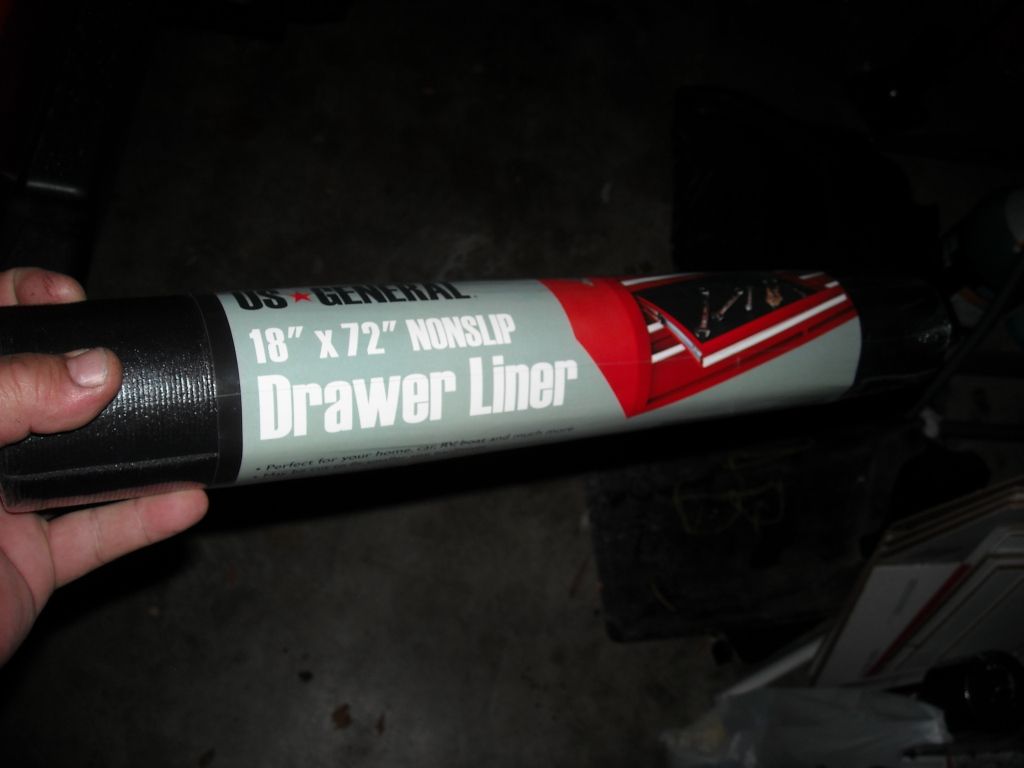
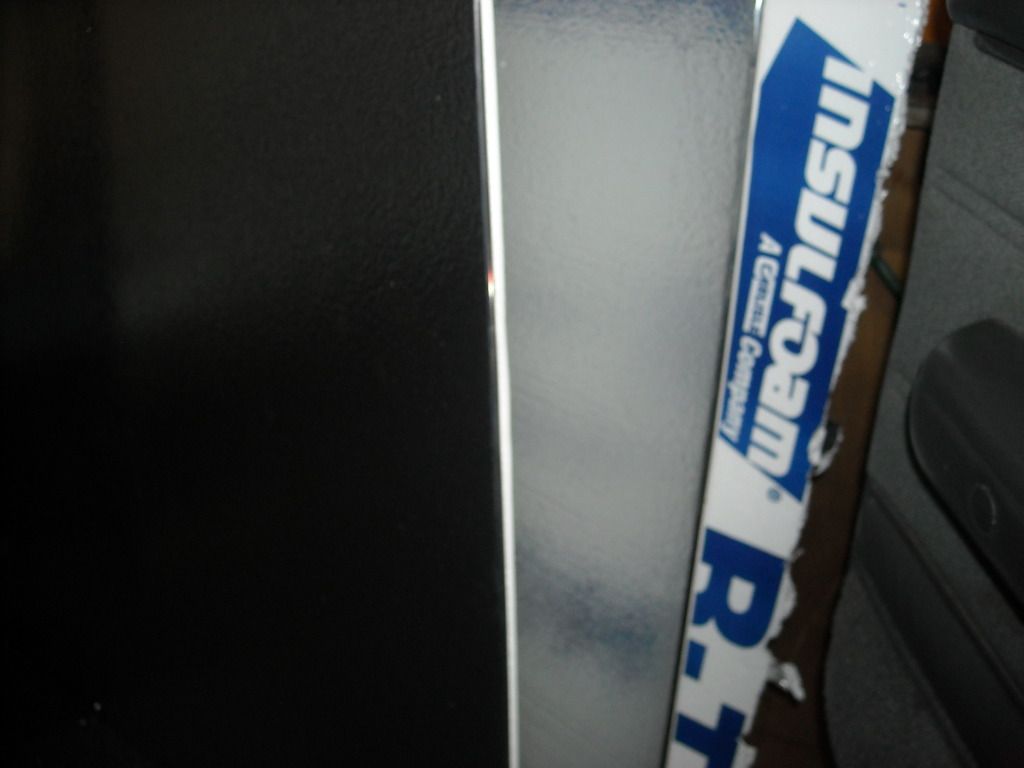
Some of the insulation stuff.. Plus, that drawer liner I think will work well to absorb drama if it's on the underside of this stuff in the panels.......
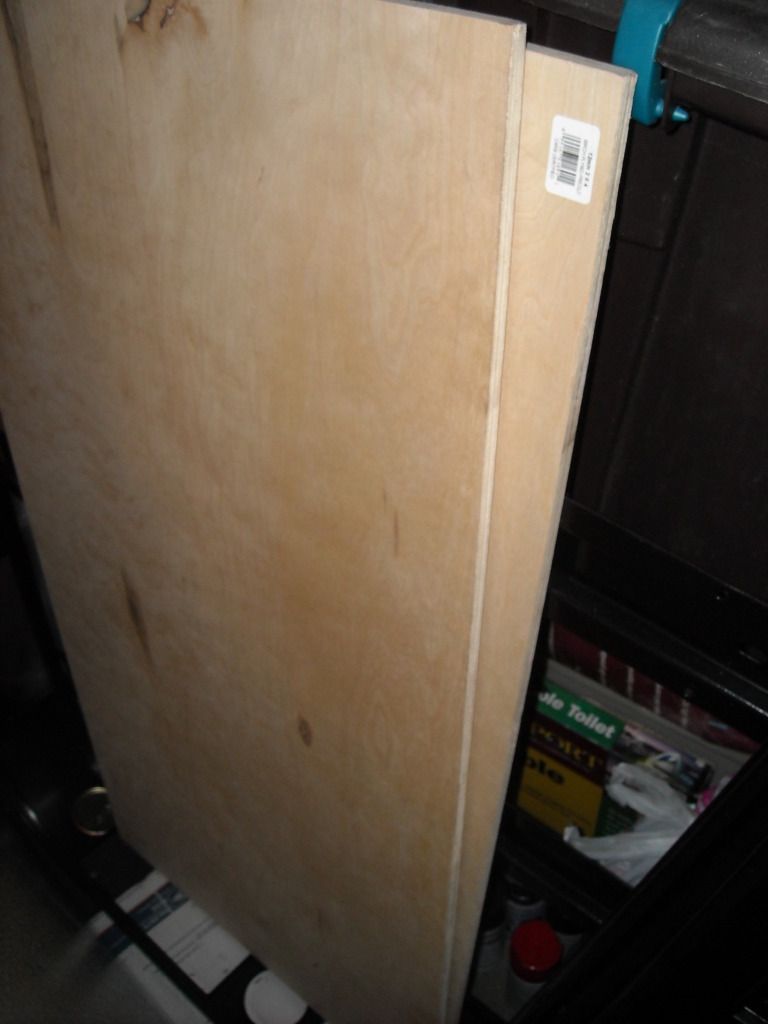
The wood I got.........
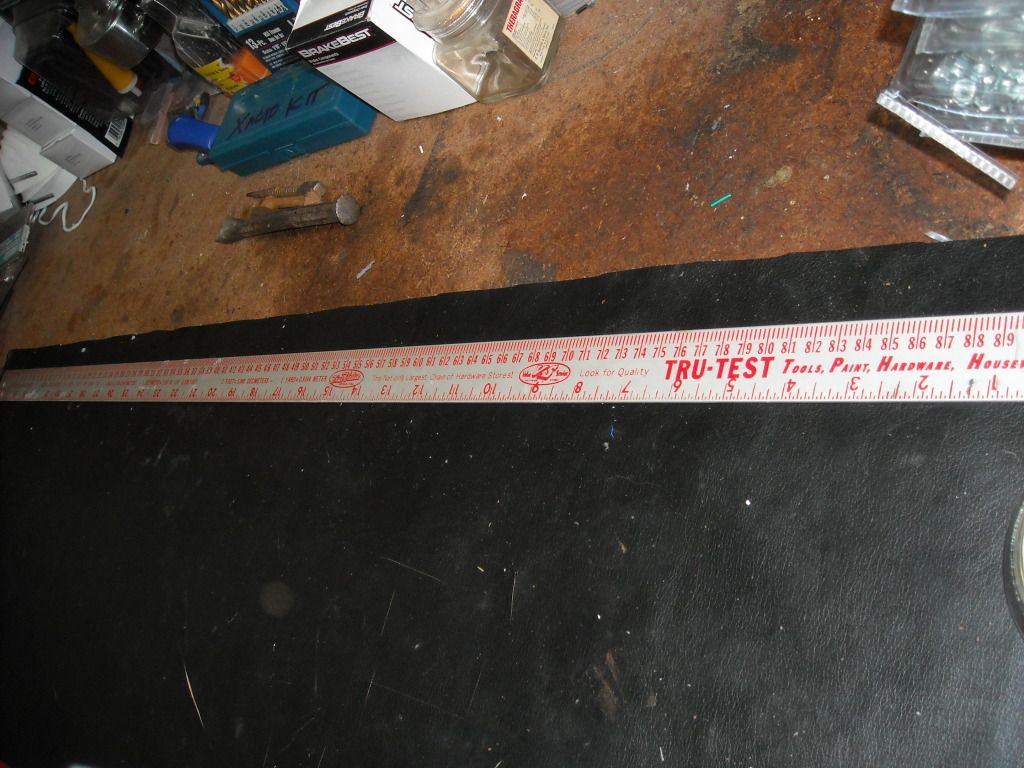
And check out my cool old school straight edge ruler... Found this after 12 years... I think it's a bit older.. but I have another that's actually 50 years old from Chicago Steel Works.... Have a Straight Edged Razor from them too.. IT'S SICK! lol... 1909!
Cleaned up my main work area, gonna be doing a bit of fine tooth honing stuff in there.... So I need it organized a lil more... (plus restoring a couple sets of Aisin Hubs, etc. ... so you know, need a lil more Mis En Place! lol.
I appreciate it very much.... I have a plan with the stuff I have.... but, as I said, I might end up using FATMAT or something like it(a bargain version). We'll see. All has to do with what I can get away with on size, effectiveness, etc. Yeah, RAD, I was only going to use the closed cell stuff I got on the rear, actually... But it's NOT the kind like you're thinking, pretty sure. It's the building insulation type.. More like Styrofoam covered in plastic on one side and Aluminum on the other. The more I think about it... I KNOW it would work if I top it with project board and carpet.... I just don't want it to get too "TALL", if you KWIMean? (risen too high off the bed). They have ROLLS of the bubble type, too.. that's supposed to work really well on TOP of things like wood.. So who knows, I might just go that route on the back of the wood panels(staple the stuff to it).... And I don't need much. They have 4 different size rolls, all coated in aluminum on both sides. Home depot has some that's a lil different... and they have Fatigue matting, Lowes did not that I could find(that THEY could find, I should say! hahaha)... I will try Big Lots, tomorrow. Problem with the Styrofoam stuff like I got is .... well, it's hard to CUT! BUT, even if it's not perfect, and I feel like I can use it, I could just tape over the edges that are a lil rough.
Anyway, I'll figure that out.....
Far as the tools, etc., ... I'm aware it's not the top of the line stuff... BUT, it's all worked for me for years... I don't use them enough to break them quick... So it's all good for me, ya know? I'm charging the 5 in 1 right now..... Hooked up the Pneumatic JigSaw and the Blue Point (3/8) ratchet is DEFINITELY a good toy... Also, the air tips and tire filler/gauge... Works fine. Checked it tonight too. Last one I had lasted 15 years from there.
Anyway, I'M excited about it... as I can use them any time up til around 8PM or so... And I'll be getting a lil Air Grinder and a couple other things, too(you can get an effective one around 2" or so... REALLY helps to cut fast and in tight spots, ya know?)
I have my old compressor that just wont break! hahaha... And another one I got for 30$! I've had it a while, just never opened it yet. It's 59$ on their street sale right now.. so I KNOW I scored by waiting for the right time... But like I said, my old girl works and has for 20 years!!!!
Here's the 5 in 1... The think is like 20# lol...
Some other stuff I got.........
Some of the insulation stuff.. Plus, that drawer liner I think will work well to absorb drama if it's on the underside of this stuff in the panels.......
The wood I got.........
And check out my cool old school straight edge ruler... Found this after 12 years... I think it's a bit older.. but I have another that's actually 50 years old from Chicago Steel Works.... Have a Straight Edged Razor from them too.. IT'S SICK! lol... 1909!
Cleaned up my main work area, gonna be doing a bit of fine tooth honing stuff in there.... So I need it organized a lil more... (plus restoring a couple sets of Aisin Hubs, etc. ... so you know, need a lil more Mis En Place! lol.
Last edited by ChefYota4x4; 10-14-2012 at 12:57 AM.
10-14-2012, 07:18 AM
#5011
Registered User
hey chef,
looks like you have a lot of projects going on at once...more than me even....
let me know if u still have any questions about the rear cargo light or the cargo mounted window switch.
we will get it sorted out for ya
looks like you have a lot of projects going on at once...more than me even....
let me know if u still have any questions about the rear cargo light or the cargo mounted window switch.
we will get it sorted out for ya
10-14-2012, 12:23 PM
#5012
BRYAN! haha.... Hey man, I'm sorry I've not been over to your thread again just yet... I got it figured out, while just chatting over here and on the phone with an E-E, ..... so I just planned to slap it all in and come back and surprise ya(granting it worked out like I'm hoping!  )...... But, C'est La Vie.... Here you are before that, .....even better, lol.
First, I should say, again, "THANKS!" .... Took MANY applications you've used and I'm using some of them myself(with alterations in spots).< Far as that>... I'll make sure people know that you did it a little more SUPER-FLY-clean in spots! haha.
*************************
Couple questions, sure... thanks for offering, man......... ;
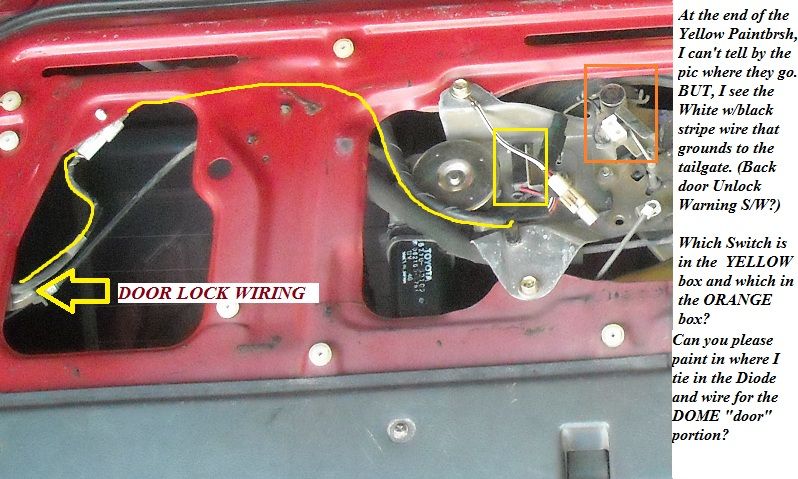
1. In regards to 'tying into the "Back Door Unlock Warning switch/Door Lock Detection Switch'............. I couldn't seem to find a pic of EXACTLY where you slapped that diode in & tied in the wire. Working with RAD4Runner(AND FINALLY figuring out the schematic in my head/spaghetti soup bowl, ) , I understand that the TAP needs to be BETWEEN the Negative Post of the Diode and the Door Lock Detection Switch... ON THE DIAGRAM, ... But I COULD NOT find a picture of the spot where you tapped in for that GREEN w/RED-stripe wire. OBVIOUSLY I would not EVEN ask you to pull your tailgate apart and show me,  .... SO, I'll take pics of MINE, opened, and hopefully, you can, maybe, if you'd be so kind, 'TAKE MY PIC AND PAINT SHOP IT' with an arrow?.... I'll try that first, with pics I have.... And you can tell me if I'm right.
2. On the fuse block, your VERY LOGICAL post to me about the "YOU COULD use one of those... BUT I DESPISE THEM"..... did NOT even sting a LITTLE BIT! hahaha.. Honestly, it immediately made me think, ... "MARK, you've done LOTS of really clean wiring, soldering, heat shrink, routing, even down to every connector and wrap for the Off Road Lights w/relay, Stereo and Amp and Sub.... WTH???.... WHY IN THE HECK would you use one of those????".... YES, I yell at myself all the time... But only in a 'COACH/ATHLETE' type way, lol....So, YES, you're right, it's CRAP! haha.... BUT, I think for a temporary EMERGENCY type thing.... I'll hold onto it in my "ON THE ROAD ''''BOX OF GOODIES'''' ", ya know? hehe.......
Far as the tailgate.... can you PLEASE show me, with "PAINT" or something, where I tie in the diode and wire for the "DOOR" portion of the added Dome Light? >>>>>
I'll start with that... and if you don't have time to edit my pic, etc.,... I understand, don't worry Bryan... Really, you HAVE done plenty already! I'll try to open the tailgate again soon and run the wire and diode so it's ready, anyhow... Just want to be sure to do it PROPERLY... so I'll take more pics of the wires, cleaned up and close up, at every connection and "Switch" I can see, ok?
THANKS AGAIN, BRYAN! LOTS of people on Yotatech are admiring the job you did, sir!
)...... But, C'est La Vie.... Here you are before that, .....even better, lol. First, I should say, again, "THANKS!" .... Took MANY applications you've used and I'm using some of them myself(with alterations in spots).< Far as that>... I'll make sure people know that you did it a little more SUPER-FLY-clean in spots!
haha. *************************
Couple questions, sure... thanks for offering, man......... ;
1. In regards to 'tying into the "Back Door Unlock Warning switch/Door Lock Detection Switch'............. I couldn't seem to find a pic of EXACTLY where you slapped that diode in & tied in the wire. Working with RAD4Runner(AND FINALLY figuring out the schematic in my head/spaghetti soup bowl,
) , I understand that the TAP needs to be BETWEEN the Negative Post of the Diode and the Door Lock Detection Switch... ON THE DIAGRAM, ... But I COULD NOT find a picture of the spot where you tapped in for that GREEN w/RED-stripe wire. OBVIOUSLY I would not EVEN ask you to pull your tailgate apart and show me, .... SO, I'll take pics of MINE, opened, and hopefully, you can, maybe, if you'd be so kind, 'TAKE MY PIC AND PAINT SHOP IT' with an arrow?.... I'll try that first, with pics I have.... And you can tell me if I'm right. 2. On the fuse block, your VERY LOGICAL post to me about the "YOU COULD use one of those... BUT I DESPISE THEM"..... did NOT even sting a LITTLE BIT! hahaha.. Honestly, it immediately made me think, ... "MARK, you've done LOTS of really clean wiring, soldering, heat shrink, routing, even down to every connector and wrap for the Off Road Lights w/relay, Stereo and Amp and Sub.... WTH???.... WHY IN THE HECK would you use one of those????".... YES, I yell at myself all the time... But only in a 'COACH/ATHLETE' type way, lol....So, YES, you're right, it's CRAP!
haha.... BUT, I think for a temporary EMERGENCY type thing.... I'll hold onto it in my "ON THE ROAD ''''BOX OF GOODIES'''' ", ya know? hehe....... Far as the tailgate.... can you PLEASE show me, with "PAINT" or something, where I tie in the diode and wire for the "DOOR" portion of the added Dome Light? >>>>>
I'll start with that... and if you don't have time to edit my pic, etc.,... I understand, don't worry Bryan... Really, you HAVE done plenty already!
I'll try to open the tailgate again soon and run the wire and diode so it's ready, anyhow... Just want to be sure to do it PROPERLY... so I'll take more pics of the wires, cleaned up and close up, at every connection and "Switch" I can see, ok? THANKS AGAIN, BRYAN! LOTS of people on Yotatech are admiring the job you did, sir!
Last edited by ChefYota4x4; 10-14-2012 at 12:24 PM.
10-14-2012, 03:25 PM
#5014
Hey Dragon, .... sup? 
I hear ya, and TRUST ME, if I don't have to open the tailgate, I AIN-GONNA! lol. .......
BUT, from what I understand, .. you have to wire it in between the "Unlock Warning Switch" and "Door Lock Detection Switch".......... I THOUGHT, at least as I understood him, that means I have to tie in between the physical switches, IN the tailgate, diode and all.... If I'm wrong, I'll be HAPPILY wrong, ya KWIMean? hahaha.
10-14-2012, 03:43 PM
#5015
Bryan89 Posted;
PART 2;
There is a switch in the actual tailgate latch that is used to control the rear window relay module and the �Back Door� dummy light on the dash.
Basically, for those who do not know, the window relay module will not power the switch for the rear window motor unless the back tailgate is closed, locked, and the top is on. It uses ground switches to determine all of these things. And if the tailgate is not fully closed and locked, the dummy light on the dash illuminates.
After some quick continuity testing and wiring diagram-age, I got the light wired up. In order to get the light to only come on with the door opens and closes, I had to add a diode to the back door switch circuit. Otherwise, the voltage would have back-fed through the back door lock switch to ground, and the dome light would have stayed on until the back door was closed AND locked. Which was not cool.
With the diode in line between the two switches, now it functions as you would expect. Open door, light on. Close door, light off. Even if it stays unlocked.
PART2 CONTINUED
Here is the modified wiring diagram for the dome light door operation. note the diode in between the back door unlock warning switch and the back door lock detection switch. i used a 3amp diode because its what i had laying around. (about the size of a small mechanical pencil eraser) But, im pretty sure a 1 amp diode would work just fine. all available from your local radio shack.
remember to get a good solder on the connection and cover in heat shrink to avoid shorts.
It NEVER SAYS, in THAT post at least, to my laymen type electrical brain circuit, lol... "OPEN THE TAILGATE COVER UP AND GET WIRING IT UP", ..................
.......BUTTTTTTTTTTTT, ... THE NEXT PAGE;
SOME MORE NOTES:
The first pic is of the OEM toyota jack I used for the rear cargo area dome light. Now, when I take my top off, its just a quick clip to disconnect and away I go.
Also, for the wire I had to run from this jack into the tailgate to the door latch switch, I utilized the factory harness connector in the rear quarter panel for an additional connection point.
There are two blank (un used) pin locations in the harness connector that comes out of the rear quarter and goes into the tailgate. so, I used a spare jack I had to add the pins necessary for my harness. now if I have to take the tailgate off for some reason, I can just un-jack the single harness and everything is taken care of. And it makes for a good factory looking install.
SOUNDS like that ONE WIRE, at least, has to be tied in by the latch... I guess maybe the switch is up UNDER the red paint area in my picture, where the yellow line is going from the left side diagonally up/to the right.... But I can't be sure. I'll wait til he tells me, s'all good.
Last edited by ChefYota4x4; 10-14-2012 at 03:44 PM.
10-14-2012, 07:50 PM
#5016
Also just wanted to share............The rear carpet on mine is very high quality.... with velcro tabs to the wheel wells, etc...AND, ....it's padded. Fairly flattened out over time...... BUT, I think if I do this OVER the filling of the corrugated valleys, with all NEW padding, sticky tacked to the underside of the carpet... I'll be fine back there! OH, yeah, and a thin layer of insulation over the TOP of the whole bed... (16" thick).....
The entire underside of my rig is coated with a very thick undercoating.... Aside from the frame, yes... Where the seats are, bed, under alumishield plates for the exhaust.... It's pretty well done... It just needs some help, ya know? And YES, I'm fully grateful for the fact that I don't fight rust and FREEZING AND BLAZING temperatures/prospectively, all year.... VERY grateful!
OH, yeah, and a thin layer of insulation over the TOP of the whole bed... (16" thick)..... The entire underside of my rig is coated with a very thick undercoating.... Aside from the frame, yes... Where the seats are, bed, under alumishield plates for the exhaust.... It's pretty well done... It just needs some help, ya know? And YES, I'm fully grateful for the fact that I don't fight rust and FREEZING AND BLAZING temperatures/prospectively, all year.... VERY grateful!
10-14-2012, 08:27 PM
#5017
Registered User
iTrader: (4)
Join Date: May 2010
Location: People's Republic of California
Posts: 720
Likes: 0
Received 15 Likes
on
12 Posts
Mark I have one of those 5 in 1's also, they're a life saver! I've jumped 5 people over the last 3-4 years with it, and charged my fish finder/bait tank batteries for my kayak once. I got mine from Costco. They are GREAT to have.
And that tool drawer matting....have that too! not only did I line my tool boxes with it but I used it to make rubber mats for the center consoles, rubber gaskets for that rear spoiler on the camry, and many other things I can't think of right now....very handy stuff!!!!
And that tool drawer matting....have that too! not only did I line my tool boxes with it but I used it to make rubber mats for the center consoles, rubber gaskets for that rear spoiler on the camry, and many other things I can't think of right now....very handy stuff!!!!
10-14-2012, 09:18 PM
#5019
Mark I have one of those 5 in 1's also, they're a life saver! I've jumped 5 people over the last 3-4 years with it, and charged my fish finder/bait tank batteries for my kayak once. I got mine from Costco. They are GREAT to have.
And that tool drawer matting....have that too! not only did I line my tool boxes with it but I used it to make rubber mats for the center consoles, rubber gaskets for that rear spoiler on the camry, and many other things I can't think of right now....very handy stuff!!!!
And that tool drawer matting....have that too! not only did I line my tool boxes with it but I used it to make rubber mats for the center consoles, rubber gaskets for that rear spoiler on the camry, and many other things I can't think of right now....very handy stuff!!!!
 That thing will power a Laptop for the length of a movie I'd imagine, ya know? Could even plug it in to the tailgate Aux 12V plug if it's getting low.. Then charge it while driving into town and such, etc. Supposedly they'll hold a good charge for 40-50 hours of use, I've heard?
 I plan to use the drawer matting for some lining of things, ya know? In the rear panel walls, etc. It should absorb SOME vibration and the insulation will do the rest.
Hahahaha... Well, I meant 1/4", not sure why I said that, lol. The 1/4" insulation stuff is like heavy duty bubble wrap with foil... Could go OVER the filled valleys of the bed and then maybe project board under my carpet and padding.
I meant I could get NEW padding if I plan to keep the Carpet... Cuz, well, I can't see how to wash it really well without removing the padding... And then the padding would still have all those stains in it... So it'd have to go, ya know?
It seems like every way I look at this, it could end up costing HUNDREDS if I do it with that 'Ready to Go' stuff for auto's....
10-14-2012, 09:48 PM
#5020
This seems to be the best deal on this stuff that I can find. (Big Lots has been sold out  )>>>> Online deal but you can pick up in store for that price......... >>>>>>
http://www.sears.com/shc/s/p_10153_12605_00914118000P
)>>>> Online deal but you can pick up in store for that price......... >>>>>> http://www.sears.com/shc/s/p_10153_12605_00914118000P


