
ChefYota4x4's 1987 4Runner Build-Up Thread
 10-08-2012, 03:21 PM
#4941
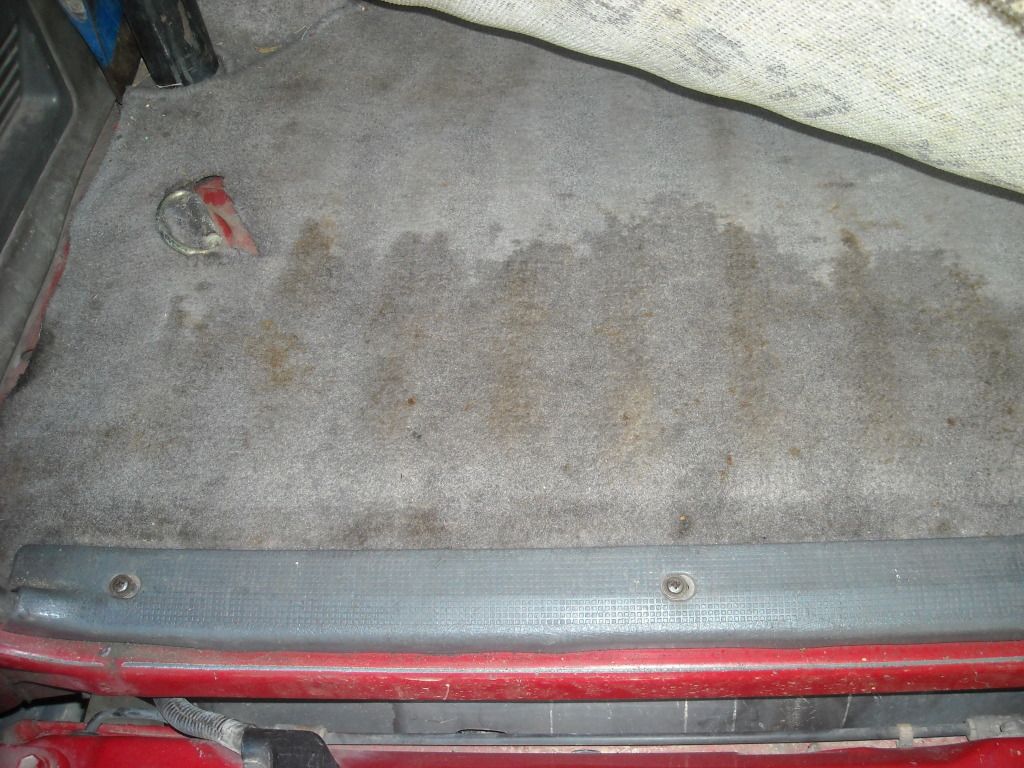
Moist air inside cab condenses on cold deck/surface. Normally it would dry next time truck is in well-ventilated place. However, if some material absorbs it and material takes too long to dry (cotton is worst) , or something blocks ventilation, you'd get a build-up.
 10-08-2012, 10:08 PM
#4942
Hey RAD, .... yeah, it's possible. BUT, it's only in that corner and I always store everything up against the back seat backs..... HOWEVER, when I camp, or even day trips in the 4Runner.... I have a cooler back there and hit PRETTY steep hills as in the videos. It's very likely that water poured out front and back of it while it was in the back corner there(Pretty sure it's where I put it)... and just created a stain by drawing out crud and such from the under padding, etc. I'm planning on re-carpeting the rear, but need to do a lil more research to get the edging right, AND I'll likely do some P&S or something under the padding back there. The noise on the drive doesn't bother me much... BUT, I think it would help keep it cooler/warmer inside depending on the season/depending on what stuff I use. I've been watching on CL and EBAY for someone who bought too much or had a store that went under, something like that, ya know?
************************************************** ************
Tomorrow, I'd like to wire in the Dome Light.... But I just don't get exactly how to wire it into the deck lamp switch and THEN, ... bypass the parking lights having to be on portion. I'll read 4crawlers page again on that... BUT, I kinda wanted to make use of the 'door' portion of the dome light.. So I'll read back through bryan89 on ih8mud.com as well. I'll also breeze through yours also and decide which way I want to go. I have them all, the threads, up right now in different tabs... I'm REALLY scared for my brain that this is taking me so much effort to get! I mean, I wired up TONS of stuff now... HOWEVER, none of it really required going into the factory wiring much, ya know? ......
Bryan89 of ih8mud, as I've said 20 times, I know, wired in the "DOOR" portion of the light to the "Safety Lock Wiring", which he also bypassed, but somehow was still able to use the voltage to, therein, for his "DOOR" portion of the 2nd Gen Dome light to activate the light when the "Lock is Pulled up"... (I guess that's part of the "DOOR OPEN" light and such for the back gate?) ......
I see how you used a coupler/that splits into 2 for something... I'll read that again to see if I understand exactly what you're doing, RAD.
You said something to me about "Jumper the Deck Lamp and then just run wire to the dome light circuit on the Kick Panel Fuse Block on the driver side"....... I think I would be happy with that, not wiring it to the "LOCK" switch or anything.......
So I have a question;
* IF I can figure out how to make the deck lamp 'constant hot' like 4crawler did(I think you did/are doing as well?).... Can I just run 12V from the Dome light fuse using a add-a-line like I did with the switch for the 4Wheel lights? >>>
* OR, do I really need to pull the fuse panel and tap into the power supply BEFORE the fuse? I think using all LED's, the Dome Fuse should be able to handle ALL of them... Total I'll be pulling 6Watts with the 2 in the doors, one in the dome up front, 2 deck lamps and the Dome light in the rear... ya know?(In fact, I think the 2 Ba9's use a watt combined.. so that's 7 WATTS, total).... instead of .........
Incandescent Watts;
* Factory Ba9s 8Watt Bulbs in the Map light, 16Watts combined
* Factory 3022 10Watt Bulbs in the Dome
* Factory 3022 3 Watt Bulbs that were in the Door Courtesy Lights x2 = 6Watts
* Factory 3022 10Watt Bulbs in the Deck Lamp ........
That's 42 Watts JUST WITH THE STOCK SET UP! ( I think the deck lamp is supposed to be a 3WATT as well.. Maybe 8W? But I had put 10Watt bulbs I got from the Junk Yards out of 1st and 2nd Gen 4Runner and 3rd and 4th Gen PU Dome lamps).....
With my 1Watt 3022 LED's and 2, 0.5W Ba9s Maplight LED's, ... Yep, it should be 7Watts total.... That's CRAZY, isn't it? hahaha. Even if I fell over and hit my head and was out all night with ALL 8 of those lights on...... It would still start in the morning..... that's awesome!
Here is 4Crawlers deck lamp pic.... AGAIN, ... lol........
Here's the link to his Tutorial on this....... (At first I thought, "YEAH, DONE!"... then reading it, I realize there's stuff that I don't understand/missing points that he understands very well.... yet I'm in special classes still, regarding them! hehe).....
http://www.4crawler.com/4x4/CheapTri...l#DeckLightMod
***************
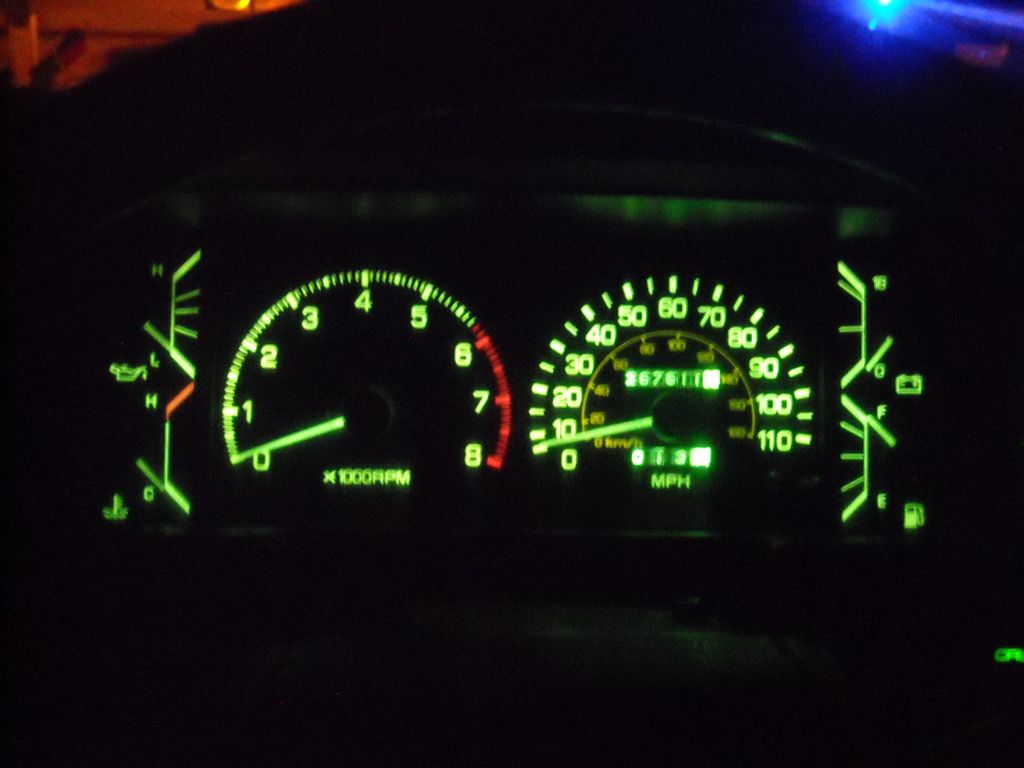
I had mentioned my Gauge Lights......... Don't think I posted that here.. BUT, since installing that new to me, in perfect condition, Dimmer.... My gauge lights and other courtesy lights like the UP/DOWN , Window lock and Wiper picture.... the Cruise Control light... ALL of them are 2 TIMES as bright now, at least... I guess I was just used to wherever it was stuck, yeah? hahaha>>>>

I did a video I'll upload as well..........
************************************
NEXT;
I tried to install that Cadillac Horn today(started WAY too late).... And while I wired up everything really nice.... Use male spades into the harness connector for the horn.... I plugged it in and it would just stay on... constant hot. .......
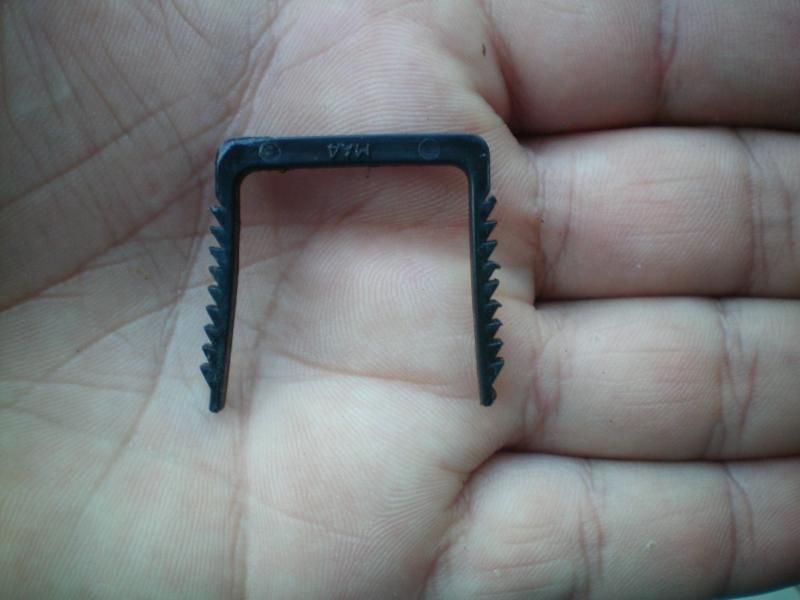
I AM NOT proud in an unhealthy way.... PLEASE tell me, in however a mocking fashion you'd like, lol......... ''''WHAT IS IT THAT I LIKELY DID WRONG?" ... AND WOW, am I ever STOKED that I stocked up on those Brown Grill to Core Support Mounting CLIPS!!!!!!!!! The last 2 that were original snapped... I'm heading over there asap to grab another spare 10 or so. WHY NOT, they're cheap and EASILY break if they're old/original.
Pulled it all out and plugged the 2nd Gen Horn back in.... AND THAT is why I thoroughly test 'projects' with connectors using spades and such.... IOW, 'Glad I didn't cut the wires in advance! hahaha. YET ANOTHER reason I cringe at cutting into stuff.. BUT, I know, this is different. I was trying to add a Horn that is, ITSELF, a ground on the body. .........
Any ideas? I'd like to use it.... IT'S ALL KINDS OF LOUD! hahaha. I even cut the mounting bracket to be able to mount it through one of the mounting holes, using an angle grinder and cut off wheel... SECONDS, not a big deal... BUT, I don't wanna feel like I wasted over an hour for no reason, ya know? I had to put the grill back on cuz I needed to still run some errands. DOH! lol.
************************************************** ************
Tomorrow, I'd like to wire in the Dome Light.... But I just don't get exactly how to wire it into the deck lamp switch and THEN, ... bypass the parking lights having to be on portion. I'll read 4crawlers page again on that... BUT, I kinda wanted to make use of the 'door' portion of the dome light.. So I'll read back through bryan89 on ih8mud.com as well. I'll also breeze through yours also and decide which way I want to go. I have them all, the threads, up right now in different tabs... I'm REALLY scared for my brain that this is taking me so much effort to get! I mean, I wired up TONS of stuff now... HOWEVER, none of it really required going into the factory wiring much, ya know?
...... Bryan89 of ih8mud, as I've said 20 times, I know, wired in the "DOOR" portion of the light to the "Safety Lock Wiring", which he also bypassed, but somehow was still able to use the voltage to, therein, for his "DOOR" portion of the 2nd Gen Dome light to activate the light when the "Lock is Pulled up"... (I guess that's part of the "DOOR OPEN" light and such for the back gate?) ......
I see how you used a coupler/that splits into 2 for something... I'll read that again to see if I understand exactly what you're doing, RAD.
You said something to me about "Jumper the Deck Lamp and then just run wire to the dome light circuit on the Kick Panel Fuse Block on the driver side"....... I think I would be happy with that, not wiring it to the "LOCK" switch or anything.......
So I have a question;
* IF I can figure out how to make the deck lamp 'constant hot' like 4crawler did(I think you did/are doing as well?).... Can I just run 12V from the Dome light fuse using a add-a-line like I did with the switch for the 4Wheel lights? >>>
* OR, do I really need to pull the fuse panel and tap into the power supply BEFORE the fuse? I think using all LED's, the Dome Fuse should be able to handle ALL of them... Total I'll be pulling 6Watts with the 2 in the doors, one in the dome up front, 2 deck lamps and the Dome light in the rear... ya know?(In fact, I think the 2 Ba9's use a watt combined.. so that's 7 WATTS, total).... instead of .........
Incandescent Watts;
* Factory Ba9s 8Watt Bulbs in the Map light, 16Watts combined
* Factory 3022 10Watt Bulbs in the Dome
* Factory 3022 3 Watt Bulbs that were in the Door Courtesy Lights x2 = 6Watts
* Factory 3022 10Watt Bulbs in the Deck Lamp ........
That's 42 Watts JUST WITH THE STOCK SET UP! ( I think the deck lamp is supposed to be a 3WATT as well.. Maybe 8W? But I had put 10Watt bulbs I got from the Junk Yards out of 1st and 2nd Gen 4Runner and 3rd and 4th Gen PU Dome lamps).....
With my 1Watt 3022 LED's and 2, 0.5W Ba9s Maplight LED's, ... Yep, it should be 7Watts total.... That's CRAZY, isn't it? hahaha. Even if I fell over and hit my head and was out all night with ALL 8 of those lights on...... It would still start in the morning..... that's awesome!
Here is 4Crawlers deck lamp pic.... AGAIN, ... lol........
Here's the link to his Tutorial on this....... (At first I thought, "YEAH, DONE!"... then reading it, I realize there's stuff that I don't understand/missing points that he understands very well.... yet I'm in special classes still, regarding them! hehe).....
http://www.4crawler.com/4x4/CheapTri...l#DeckLightMod
***************
I had mentioned my Gauge Lights......... Don't think I posted that here.. BUT, since installing that new to me, in perfect condition, Dimmer.... My gauge lights and other courtesy lights like the UP/DOWN , Window lock and Wiper picture.... the Cruise Control light... ALL of them are 2 TIMES as bright now, at least... I guess I was just used to wherever it was stuck, yeah? hahaha>>>>
I did a video I'll upload as well..........
************************************
NEXT;
I tried to install that Cadillac Horn today(started WAY too late).... And while I wired up everything really nice.... Use male spades into the harness connector for the horn.... I plugged it in and it would just stay on... constant hot.
....... I AM NOT proud in an unhealthy way.... PLEASE tell me, in however a mocking fashion you'd like, lol......... ''''WHAT IS IT THAT I LIKELY DID WRONG?" ... AND WOW, am I ever STOKED that I stocked up on those Brown Grill to Core Support Mounting CLIPS!!!!!!!!!
The last 2 that were original snapped... I'm heading over there asap to grab another spare 10 or so. WHY NOT, they're cheap and EASILY break if they're old/original. Pulled it all out and plugged the 2nd Gen Horn back in.... AND THAT is why I thoroughly test 'projects' with connectors using spades and such.... IOW, 'Glad I didn't cut the wires in advance! hahaha. YET ANOTHER reason I cringe at cutting into stuff.. BUT, I know, this is different. I was trying to add a Horn that is, ITSELF, a ground on the body.
......... Any ideas? I'd like to use it.... IT'S ALL KINDS OF LOUD! hahaha. I even cut the mounting bracket to be able to mount it through one of the mounting holes, using an angle grinder and cut off wheel... SECONDS, not a big deal... BUT, I don't wanna feel like I wasted over an hour for no reason, ya know? I had to put the grill back on cuz I needed to still run some errands. DOH! lol.
10-09-2012, 12:00 AM
#4943
HOLY 58# SMACKEREL ME IN THE MUG! I think I'm finally getting it.
* For the heck of it.... I decided to head over to iH8mud.com, to Bryan89's thread. I had commented on there, fairly extensively, as to what i'd done so far and 'thanks!' and such.. And hadn't been back. I just did, and this is what he posted.......
Originally Posted by bryan89 View Post
chef,
to clarify your original question, i have my rear dome light (the one mounted under the wiper cover) wired so the factory On/door/off functions with the rear tailgate opening...
in other words, i have a constant hot from the "Dome" circuit at the fuse box run back there for the on position that is wired straight to the light. the off is grounded to the wiper case (which is grounded through the harness to the truck)
to get the "door" effect, I am basically switching ground with the tailgate lock detection switch...
there is a two position switch in the tailgate latch on the driver side.. when the tailgate is opened it is grounded to let the rear window computer to not allow the window to operate..
i tap off that logic to complete the ground for my "door" position.
open the tailgate, the light comes on. close the tailgate, the light goes off. just like the other doors.
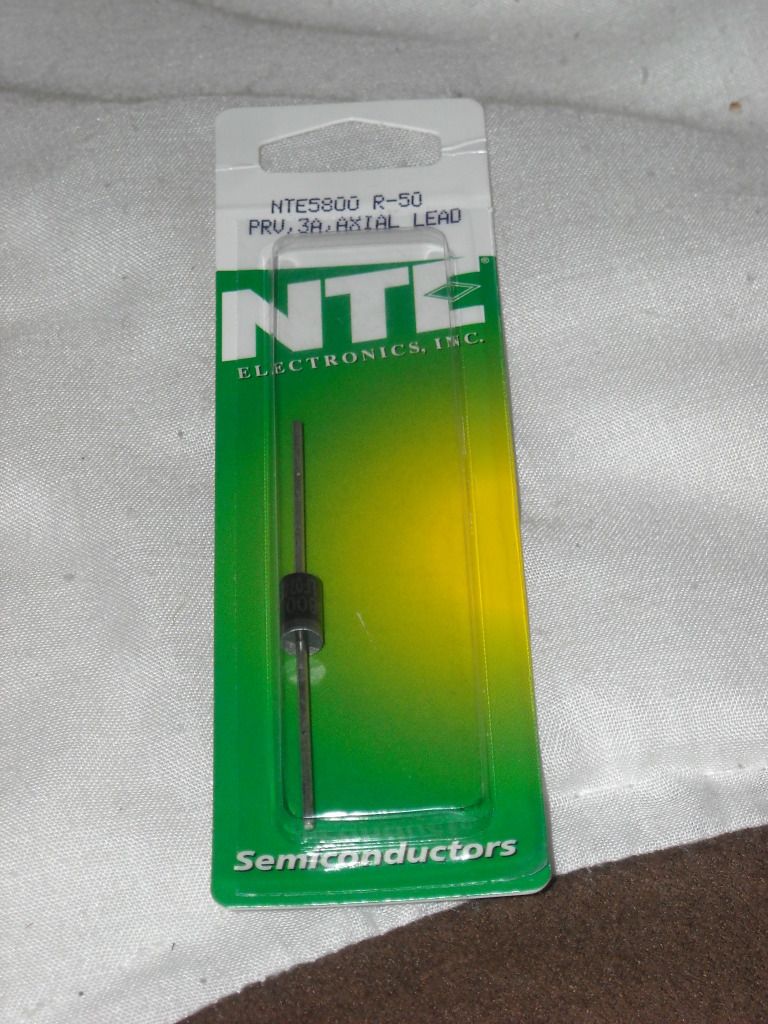
......edit: just went back and looked at the wiring diagram on page 1. the diode stops current from finding its way to ground through the back door warning switch when the door is shut. (since you have to unlock the window before you can roll it down and open the tailgate) without the diode, the rear dome light would stay on until you shut the tailgate AND locked the tailgate. the diode is basically a electrical check valve...electrons go in but not out...LOL
DUDES! I know this makes me look really silly to some people... maybe even simple, lol... BUT, I'm VERY excited to finally be getting this process of wiring this up!
I responded to him with a couple more questions... BUT, the DIODE MAKES VERY GOOD SENSE TO ME NOW!
The only problem I see, MAYBE(i'll wait for him/someone here to respond in answer), is this; "If I wire that ''SAFETY LOCK SWITCH'' to trip the light in the 'door' portion... Wont that possibly be negated if I bypass the 'rear window lock' by 'grounding out the up/down window switch to always be hot?"
.........Maybe one of you know?????????????????????? I guess I can always try to wire it up and find out the 'trail and error' way....(Hopefully less error and more "YAY"! )
)
************************************************** ************
Rear Window Bypass;
I'm going to try to wire that up tomorrow, as well as a second switch in the back. I have to reread the pointers that "RADrunner" and "DRAGON" and "TERRY" gave me, to make sure I do it right... Have pics of the process, write out my own diagram and steps 'in order of 1., 2., 3., etc.' and just be sure that when I wire in the second Rear Window Switch, I don't make it useless by missing that 'grounding out the blue wire' thingymadoer hehe.
hehe.
* For the heck of it.... I decided to head over to iH8mud.com, to Bryan89's thread. I had commented on there, fairly extensively, as to what i'd done so far and 'thanks!' and such.. And hadn't been back. I just did, and this is what he posted.......
Originally Posted by bryan89 View Post
chef,
to clarify your original question, i have my rear dome light (the one mounted under the wiper cover) wired so the factory On/door/off functions with the rear tailgate opening...
in other words, i have a constant hot from the "Dome" circuit at the fuse box run back there for the on position that is wired straight to the light. the off is grounded to the wiper case (which is grounded through the harness to the truck)
to get the "door" effect, I am basically switching ground with the tailgate lock detection switch...
there is a two position switch in the tailgate latch on the driver side.. when the tailgate is opened it is grounded to let the rear window computer to not allow the window to operate..
i tap off that logic to complete the ground for my "door" position.
open the tailgate, the light comes on. close the tailgate, the light goes off. just like the other doors.
......edit: just went back and looked at the wiring diagram on page 1. the diode stops current from finding its way to ground through the back door warning switch when the door is shut. (since you have to unlock the window before you can roll it down and open the tailgate) without the diode, the rear dome light would stay on until you shut the tailgate AND locked the tailgate. the diode is basically a electrical check valve...electrons go in but not out...LOL
DUDES! I know this makes me look really silly to some people... maybe even simple, lol... BUT, I'm VERY excited to finally be getting this process of wiring this up!
I responded to him with a couple more questions... BUT, the DIODE MAKES VERY GOOD SENSE TO ME NOW!
The only problem I see, MAYBE(i'll wait for him/someone here to respond in answer), is this; "If I wire that ''SAFETY LOCK SWITCH'' to trip the light in the 'door' portion... Wont that possibly be negated if I bypass the 'rear window lock' by 'grounding out the up/down window switch to always be hot?"
.........Maybe one of you know?????????????????????? I guess I can always try to wire it up and find out the 'trail and error' way....(Hopefully less error and more "YAY"!
) ************************************************** ************
Rear Window Bypass;
I'm going to try to wire that up tomorrow, as well as a second switch in the back. I have to reread the pointers that "RADrunner" and "DRAGON" and "TERRY" gave me, to make sure I do it right... Have pics of the process, write out my own diagram and steps 'in order of 1., 2., 3., etc.' and just be sure that when I wire in the second Rear Window Switch, I don't make it useless by missing that 'grounding out the blue wire' thingymadoer
hehe.
Last edited by ChefYota4x4; 10-09-2012 at 12:03 AM.
10-09-2012, 04:26 AM
#4945
Super Moderator
Staff
iTrader: (1)
Join Date: Aug 2008
Location: Anderson Missouri
Posts: 11,788
Likes: 0
Received 25 Likes
on
22 Posts
When I made that one post, it showed you off line, I have had that to happen to me before, no worries. I have gone to Ih8mud site and cant get around it to well. I know there is alot of info on there though. Wiring is probably the least of my favs for doing upgrades. Always worried about shorting something out. Looks like you are about to get it.
10-09-2012, 04:45 AM
#4946
Registered User
Hey Mark, I just read your updates and laughed because I ran into the same exact problem with my horn installation this past Sunday. It was constant hot power. And with the 2nd gen horns that I got the ground is fed through the body when you mount it. I ran out of time in my day so I put everything back together and left the project for another day. I think, don't quote me on this yet, but I think the actual horn button sends a ground signal. But then again why would that be since buttons and switches usually run the power. Right? But then why would it send a negative signal so I don't think that will be it. I haven't confirmed this yet. But I did notice that my horn originally has one negative and one positive wire. To where my 2nd gen horns only have positive. Another thing I suspected is that maybe it has something to do with the original horn. Maybe something inside is what makes the constant hot stop. I dunno. I'm hoping to figure this out one of these next few days when I have free time unless you beat me to it lol
Last edited by Redeth005; 10-09-2012 at 06:57 AM.
10-09-2012, 09:10 AM
#4947
I think the actual horn button sends a ground signal. But then again why would that be since buttons and switches usually run the power. Right? But then why would it send a negative signal so I don't think that will be it. I haven't confirmed this yet. But I did notice that my horn originally has one negative and one positive wire. To where my 2nd gen horns only have positive. Another thing I suspected is that maybe it has something to do with the original horn. Maybe something inside is what makes the constant hot stop. I dunno. I'm hoping to figure this out one of these next few days when I have free time unless you beat me to it lol
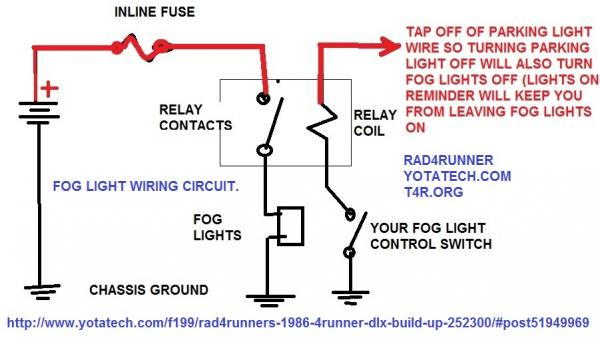
Many component that actually use power get steady ground through their bodies. Stock first-gen 4Runner horn that gets switched ground is an exception. (See 88 Runner schematic page 3 column 3) If you want to use a louder horn, especially one with steady ground through mounting, it's advisable to use a relay and wire it like fog light circuit below.
Replace stock horn with relay and replace fog light with horn.
Last edited by RAD4Runner; 10-09-2012 at 09:12 AM.
10-09-2012, 11:46 AM
#4949
Hey Guys, .... .
Thanks alot on the Horn thing, ..... I was laughing this morning when I thought about it. The SR5 Maplight has a single wire.... Because it's not connected to the doors or any other circuit..... So, it has ONE WIRE and the body itself is a ground. Not sure the Maplight has a relay... but it DOES have push button switches. Anyway, .... the GM Horn has a single wire TO it, then it's bolted to the Chassis... I should have got that... But it's been over a year since I grabbed this horn from a PU.... I guess it must have been a 2nd Gen Pu.
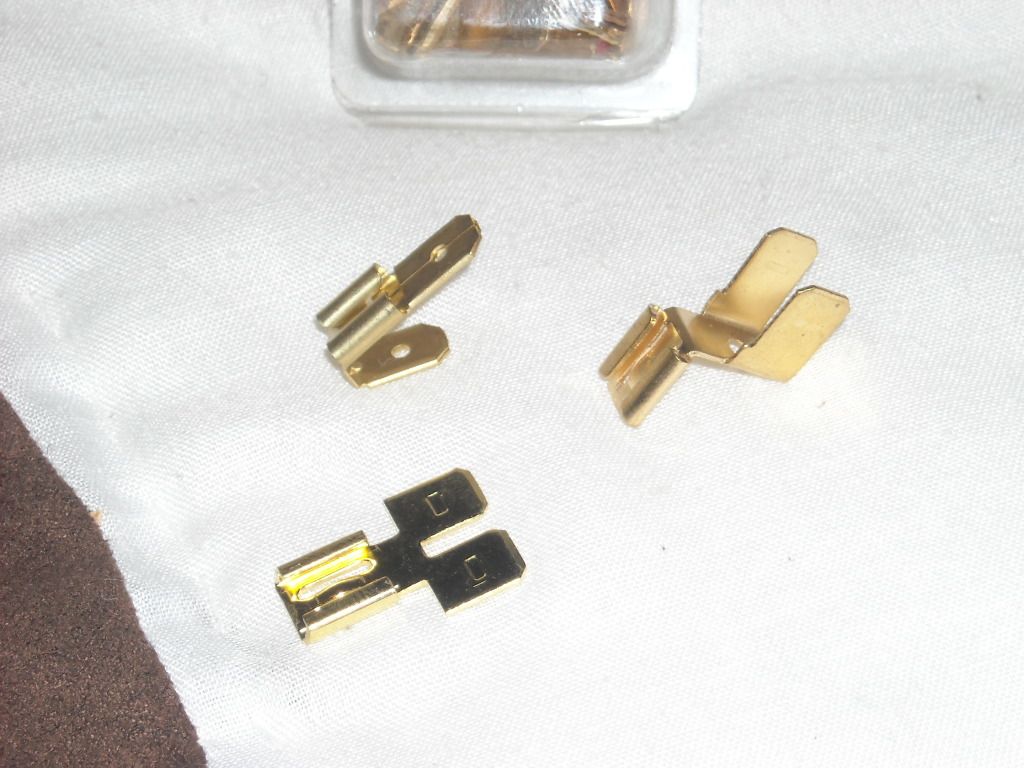
Anyway; ...THANKS RAD! SOOOOOOOOO........., lol........... Wire the Horn as if I was wiring my off road lights?? (I know, I joined the power wires on them to run to the relay.... and then ground them both to the crossmember...... BUT; Run the POWER POST off the horn to a relay, run the relay back to the second post in the toyota HARNESS connector in the front/core support area?????? >>>
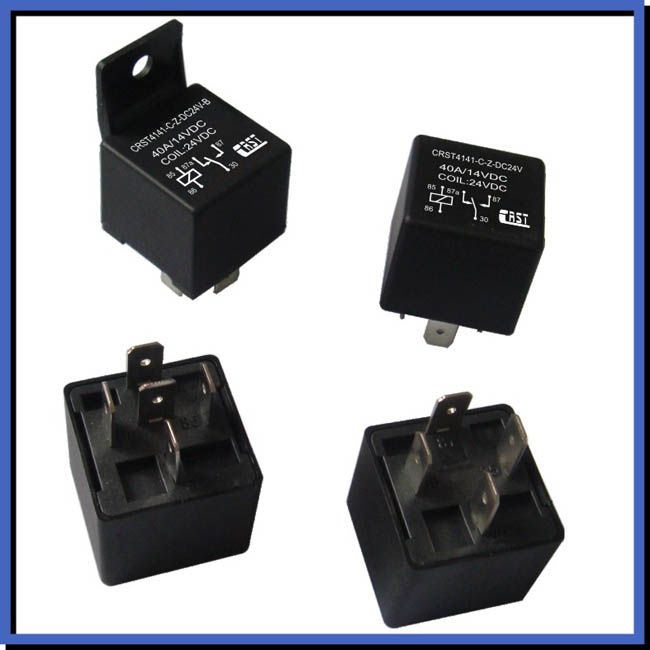
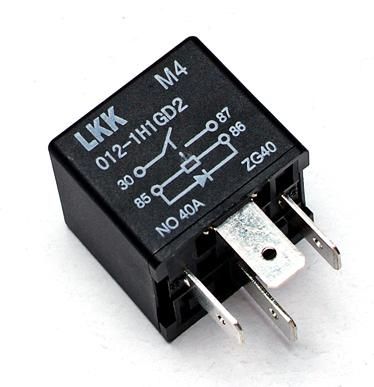
Here's a couple pix of the relays I've used... (for this, I would use the 4 post relay on the right? OR, a 3 Pin relay since the switch IS the Horn button we push)???
************************************************** **********
************************************************** **********
How about the Interior lights stuff, RAD, Terry, Dragon, anyone? I'm almost 100% on how to wire it... BUT, I feel like I'm mixing 2 methods... Since I don't remember anyone on here using the 'Rear Door Safety Lock Switch' to wire in the "DOOR" portion of that rear dome light????
********************************************
I asked Bryan and he answered me..... I'll post up My questions and his responses......
************************************************** ****************
************************************************** ****************
************************************************** ****************
Below, Bryan89 explains how he wired in the rear window switch(It is hot, but still leaving the 'safety lock' feature effective, as he didn't want his kids pressing buttons when the tailgate is down, etc.)....
************************************************** ***************
Another member on there took a different approach......
************************************************** ****************
OK, so, ......... now that I think about it..... I think I'm content with the wiring to the back staying the way it is.... BUT, letting the 'add a switch' be powered ALL the time, like Bryan89 did.
Still trying to process the whole thing(as I'm now adding lots more info and throwing a wrench in my proverbial engine that is my cranial cavity, lol)..... But I figure I should do ALL of this while I'm in the side panels.
ALSO, I notice that Bryan89 said, in the video, "I jacked in here", referring to the rear door latch, when "jacking into the 'Safety rear door LOCK' portion so that the light will turn on when the tailgate is opened. (I assume it will also be 'HOT' if you just want to manually turn it on, since it's powered initially by the dome circuit. ????
ALSO, I have a store up the street, Signal Electronics, that will have plenty of those 'ADD A PINS thingy's for the back of the fuse block... And I'D GLADLY get rid of my 'add-a-line' fuse apparatus that I have running the "Switched Power" to my 8" Dick Cepek Lights Switch/which then feeds a relay..... Do I just tell Signal Electronics, "I want Standard Auto Fuse Block Pins"??????
ALSO, far as jacking into the wiring to add a second 'Back Window "UP/DOWN" switch', ...... Am I getting this right that he spliced into the wires between the connectors to the back window and threw in the connector? I HAVE the second rear window switch WITH BOTH CONNECTORS on it... I grabbed them on purpose. ?????
I've decided to NOT try to rush this...But I'd like to get on this as soon as I have everything I need, etc.
Bryan89 Mentioned that "There are spare/extra pins" in the tailgate/top off/window motor etc. harness connector.... Is that where I jack in for "Making the dome light a quick release" like Bryan did? That way, when you disconnect the top, the dome light is also disconnected???
(Sorry guys, I'm REALLY trying, I promise... and I just want to be sure I get all this 100% before I start digging in there..... I'll likely remove all the necessary paneling and such, as it's not NECESSARY in order to operate my rig! hahaha... AND, I want to add some P&S of some type while I'm in there. Is the stuff at Home Depot or Lowes fine to use? I WILL NOT be spending 100's of $'s on this, period. But I'd like to add ANYTHING that's 'better than nothing', ya know?
THANKS, any input is appreciated.
Thanks alot on the Horn thing, ..... I was laughing this morning when I thought about it. The SR5 Maplight has a single wire.... Because it's not connected to the doors or any other circuit..... So, it has ONE WIRE and the body itself is a ground. Not sure the Maplight has a relay... but it DOES have push button switches. Anyway, .... the GM Horn has a single wire TO it, then it's bolted to the Chassis... I should have got that... But it's been over a year since I grabbed this horn from a PU.... I guess it must have been a 2nd Gen Pu.
Anyway; ...THANKS RAD! SOOOOOOOOO........., lol........... Wire the Horn as if I was wiring my off road lights?? (I know, I joined the power wires on them to run to the relay.... and then ground them both to the crossmember...... BUT; Run the POWER POST off the horn to a relay, run the relay back to the second post in the toyota HARNESS connector in the front/core support area?????? >>>
Here's a couple pix of the relays I've used... (for this, I would use the 4 post relay on the right? OR, a 3 Pin relay since the switch IS the Horn button we push)???
************************************************** **********
************************************************** **********
How about the Interior lights stuff, RAD, Terry, Dragon, anyone? I'm almost 100% on how to wire it... BUT, I feel like I'm mixing 2 methods... Since I don't remember anyone on here using the 'Rear Door Safety Lock Switch' to wire in the "DOOR" portion of that rear dome light????
********************************************
I asked Bryan and he answered me..... I'll post up My questions and his responses......
************************************************** ****************
Originally Posted by bryan89
Originally Posted by chefyota4x4 View Post
Thank you for the Write up/ Tutorial, so much, Bryan!
So, lemme just write this out as I understand it so far.......
1.) Wire the Deck and Added Dome light to 'constant hot' via the 'Dome Fuse in the kick panel'........ yes. this circuit already provides the 12 volts to your door lights / map lights / dome lights etc and when you open doors, toyota switches ground to illuminate the light.
...a. Can I get there by running the dome wiring down through the shell and out where the shell/body harness meet?)
i assume you mean wire routing? yes, if you look in post #10 on page one, I routed the wires for my rear dome light down the side of the fiberglass top, right along side the wiring for the wiper motor. then when i got to the metal cab transition, I added a jack for removing the top.
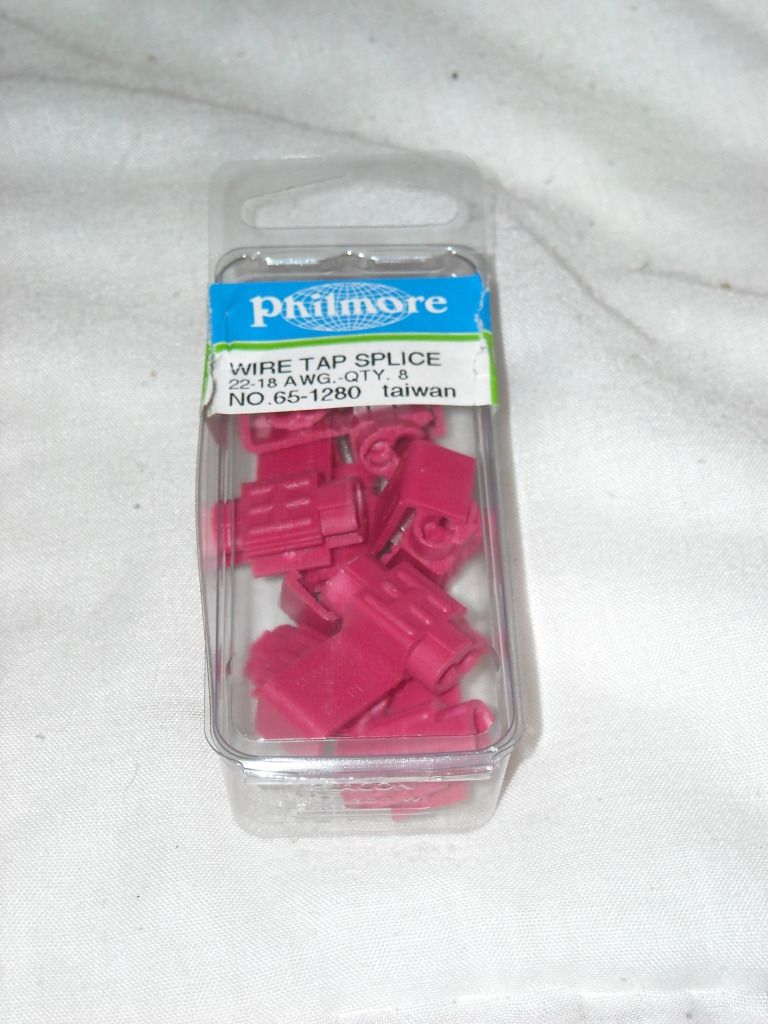
...b. Can I use an 'add-a-line' fuse jacker type thing like this? >>>
you could use one of these things, but I personally despise them. they take up a lot of space. so you wont be able to put the fuse panel cover back on likely. also, they are a dead give away that its not factory.
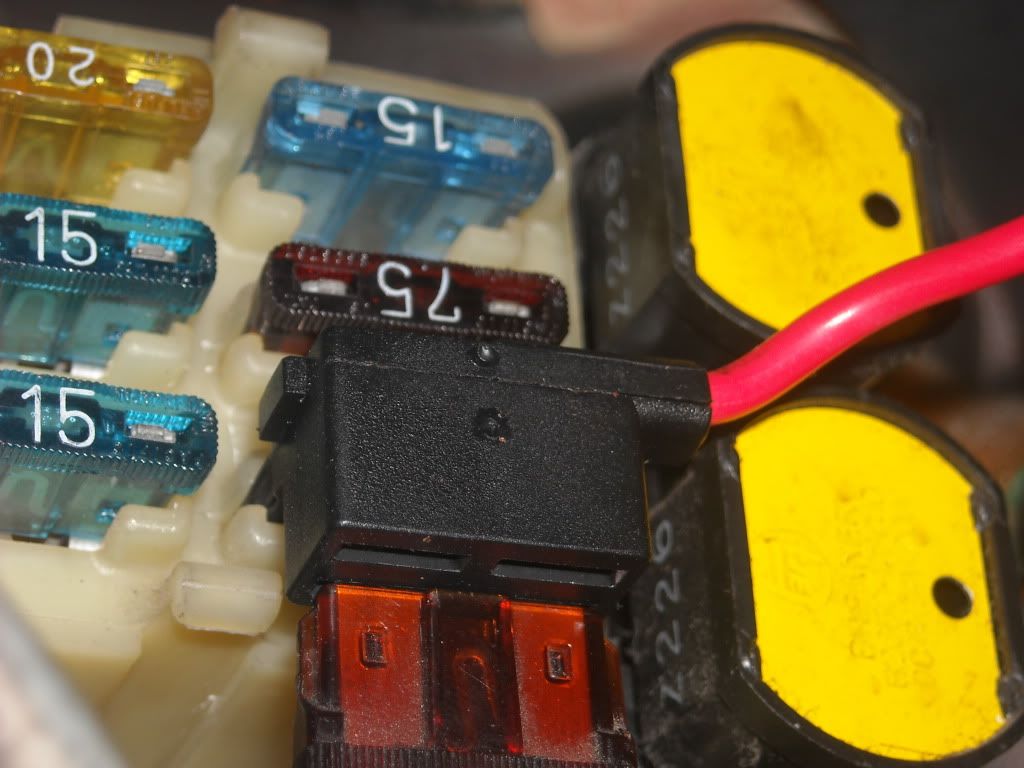
additionally, if you remove the blade receptacle for the dome circuit (see second pic on post #4 on page 1) then there is a place to tap off the dome circuit on the back of the fuse panel. this way, once installed and wires routed through original harness, you will never be able to tell it was added after market...which i like.>>>>>>>>
Remove these carefully from "Kick Panel Fuse Block"....
Adding my HOT to the Dome Circuit on the Kick Panel...
All tucked up...... Looking like factory........
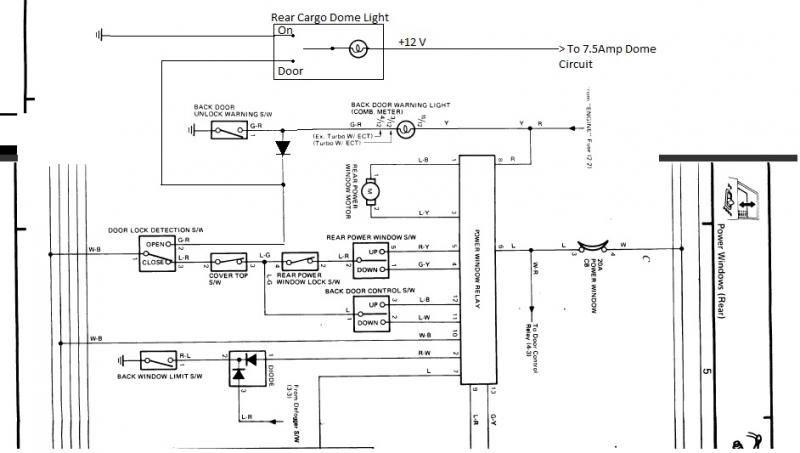
WIRING SCHEMATIC from FSM with the Diode added into the Diagram>>>
2.) I switch(?) ground position on the 'Safety Door Lock' thingymadoer in the rear? (I will go back through your write up/pics/tutorial and even diagrams , hehe... See if I TOTALLY get it, then come back here)... You do have a pic of that in the thread, right? I just repaired the Gate Latch/Lock Cables in my Build thread on Yotatech... Lots of pics.. and I mentioned how you said "You tap into the Lock Safety thingymadoohickie'... in other words of course, lol.... I think I said, "I believe Bryan89 of iH8mud was speaking of this wire.... Only one blue(or maybe it was green?) wire I can see here... I'm just hoping it's not the wiring cluster/connector behind the glass".......
yes. the rear door lock detection switch does switch ground. this is the logic that you will want to tap off from to complete your circuit for the dome light. according to my wiring diagram (its kinda hard to see) but its a "G-R" or green wire with red stripe that you will need to tap into. when in the "open" position it connects with the "W-B" or white black wire, which is tapped into ground on the left side of the wiring diagram.
the key is to make sure that your tap for the "door" part of the light is in between the diode (black triangle) and the lock detection switch. if the tap is on the wrong side of the diode, the light will remain on until you shut and lock the back door.
3.) I want to add a "Gotta GO, RIGHT NOW" constant hot switch in the rear for the back window, allowing it to always go down... I think I have that down as far as how to ground it out in front on the console front chassis screw mounting hole..... What I'm wondering is this;
i have a writeup on this as well, if you havent seen it...
http://forum.ih8mud.com/79-95-toyota...-write-up.html
I use an OEM switch and make a factory plug and play harness. no cutting. no chopping. as close as to how toyota would have done it if they thought of it as I could get.
If I do that, will it effect the "Safety Lock Switch" being able to 'enable the 'DOOR' portion of that rear Dome Light Mod?
not real sure what you are asking here...mine both work flawlessly right now...and the rear mounted window switch becomes inoperable with the tailgate open....
.......( I will have a switch in back, too, for easier escape when sleeping back there.... Which I do 90% of the time when camping..... Still have to figure out how to wire that in... But I figure I could just tap into the back pins of the connector, then heat shrink some wiring to the back SPDT(?) switch(I have a spare "UP/DOWN" back window switch I'll be wiring into the panel behind the roll bar for the 'less likely to be depressed by gear' factor.
Thank you for the Write up/ Tutorial, so much, Bryan!
So, lemme just write this out as I understand it so far.......
1.) Wire the Deck and Added Dome light to 'constant hot' via the 'Dome Fuse in the kick panel'........ yes. this circuit already provides the 12 volts to your door lights / map lights / dome lights etc and when you open doors, toyota switches ground to illuminate the light.
...a. Can I get there by running the dome wiring down through the shell and out where the shell/body harness meet?)
i assume you mean wire routing? yes, if you look in post #10 on page one, I routed the wires for my rear dome light down the side of the fiberglass top, right along side the wiring for the wiper motor. then when i got to the metal cab transition, I added a jack for removing the top.
...b. Can I use an 'add-a-line' fuse jacker type thing like this? >>>
you could use one of these things, but I personally despise them. they take up a lot of space. so you wont be able to put the fuse panel cover back on likely. also, they are a dead give away that its not factory.
additionally, if you remove the blade receptacle for the dome circuit (see second pic on post #4 on page 1) then there is a place to tap off the dome circuit on the back of the fuse panel. this way, once installed and wires routed through original harness, you will never be able to tell it was added after market...which i like.>>>>>>>>
Remove these carefully from "Kick Panel Fuse Block"....
Adding my HOT to the Dome Circuit on the Kick Panel...
All tucked up...... Looking like factory........
WIRING SCHEMATIC from FSM with the Diode added into the Diagram>>>
2.) I switch(?) ground position on the 'Safety Door Lock' thingymadoer in the rear? (I will go back through your write up/pics/tutorial and even diagrams , hehe... See if I TOTALLY get it, then come back here)... You do have a pic of that in the thread, right? I just repaired the Gate Latch/Lock Cables in my Build thread on Yotatech... Lots of pics.. and I mentioned how you said "You tap into the Lock Safety thingymadoohickie'... in other words of course, lol.... I think I said, "I believe Bryan89 of iH8mud was speaking of this wire.... Only one blue(or maybe it was green?) wire I can see here... I'm just hoping it's not the wiring cluster/connector behind the glass".......
yes. the rear door lock detection switch does switch ground. this is the logic that you will want to tap off from to complete your circuit for the dome light. according to my wiring diagram (its kinda hard to see) but its a "G-R" or green wire with red stripe that you will need to tap into. when in the "open" position it connects with the "W-B" or white black wire, which is tapped into ground on the left side of the wiring diagram.
the key is to make sure that your tap for the "door" part of the light is in between the diode (black triangle) and the lock detection switch. if the tap is on the wrong side of the diode, the light will remain on until you shut and lock the back door.
3.) I want to add a "Gotta GO, RIGHT NOW" constant hot switch in the rear for the back window, allowing it to always go down... I think I have that down as far as how to ground it out in front on the console front chassis screw mounting hole..... What I'm wondering is this;
i have a writeup on this as well, if you havent seen it...
http://forum.ih8mud.com/79-95-toyota...-write-up.html
I use an OEM switch and make a factory plug and play harness. no cutting. no chopping. as close as to how toyota would have done it if they thought of it as I could get.
If I do that, will it effect the "Safety Lock Switch" being able to 'enable the 'DOOR' portion of that rear Dome Light Mod?
not real sure what you are asking here...mine both work flawlessly right now...and the rear mounted window switch becomes inoperable with the tailgate open....
.......( I will have a switch in back, too, for easier escape when sleeping back there.... Which I do 90% of the time when camping..... Still have to figure out how to wire that in... But I figure I could just tap into the back pins of the connector, then heat shrink some wiring to the back SPDT(?) switch(I have a spare "UP/DOWN" back window switch I'll be wiring into the panel behind the roll bar for the 'less likely to be depressed by gear' factor.
************************************************** ****************
Below, Bryan89 explains how he wired in the rear window switch(It is hot, but still leaving the 'safety lock' feature effective, as he didn't want his kids pressing buttons when the tailgate is down, etc.)....
So, if you are short like me and use the cargo area of the 1st generation 4runner as a handy bed during campouts and trail runs and what not, you will have inevitably noticed that its quite difficult to take a wizz at night if the need strikes....
I will elaborate for those unfamiliar with the situation...
from the factory, the rear window is operated from one of two places: the front console, which requires the key to be in the accessories position, OR, from outside the vehicle at the tailgate with the key, which is always powered.
So, if you are camping in the back of the 4runner and nature calls, obviously the outside key switch is of no help what so ever. So, you would have to crawl out of your sleeping bag, over all of the **** that you moved to the front seats so you could sleep in the back of the truck, find the keys, turn on the ignition and roll down the window, then crawl all the way back to open the tailgate and exit... This can easily **** off the person you are sleeping with and possibly your neighboring camp members depending on how many you had.
so, to remedy this situation, I decided i wanted to add a window switch that was constant hot in the back cargo area of the truck right by the window. it would allow me to simply wake up, roll over, hit the switch and BAM get out of the truck in a hurry if need be..
To accomplish this, rather than cut up my factory harness, i opted to locate all the parts to make a completely plug and play harness for the switch...
Using the stock tailgate harness jack located in the driver rear quarter panel, i created a little jump harness using two duplicate halves of another harness and tapped off the three wires that operate the keyed tailgate switch to operate my rear window switch... it clips in to my factory harness in line with the tailgate harness and I ran the wires up to the top of the cargo panel where my switch will be located..
Wiring is pretty straight forward..all of the wiring is straight through to the other side with the exception of the three wires that have the switch spliced in parallel with the tailgate switch
Here are some pics to help explain.
Ahhhhh relief....
one added note:
the beauty of positioning the switch in the factory harness, where i did is that the factory "safety lockouts" still operate.
Meaning that the rear cargo switch is not powered when the tailgate is open..
not that its a big deal or whatever, but putting it here eliminates the possibility of rolling "out" the rear window when the tailgate is down...this could be beneficial if you have young kids or something that like to push buttons.
if you straight wire it to the window motor, the window control relay box is bypassed and this "safety lockout" feature is no longer operative...
just my two cents.. i like it cause it looks factory and I would imagine that toyota would have done it similarly if they had thought of it in 1988.
Now, if i can just stop getting side tracked and finish making doors for my cargo panels and caps for the top corners I should be good...
what do you guys think??
Another member on there took a different approach......
Originally Posted by Bogo
I like the idea so much I added an interior window control switch on my '95...
I spliced it into the wiring harness in the tailgate it's self, then tucked the switch into the cavity where the inside latch handle goes. I didn't bother with making mine splice in at a connector, but I did crimp on fasten connectors, and spliced it in that way. I'd have used in-line splices but I didn't have any on hand when I did the work. All the splices got covered with sealing type heat-shrink tubing. Make sure the wires don't get in the way of the window mechanism. I used a combination of creative routing, cable ties, and sick on cable clamps to keep them out of the way for the window and window mechanism.. While in there don't forget to lube the window mechanism.
What I want is an auto up and auto down circuit. That way when I stop the truck to get out and mend a fence, I can just push down, and by the time I get out and walk to the back, the window is fully down.
OK, so, ......... now that I think about it..... I think I'm content with the wiring to the back staying the way it is.... BUT, letting the 'add a switch' be powered ALL the time, like Bryan89 did.
Still trying to process the whole thing(as I'm now adding lots more info and throwing a wrench in my proverbial engine that is my cranial cavity, lol)..... But I figure I should do ALL of this while I'm in the side panels.
ALSO, I notice that Bryan89 said, in the video, "I jacked in here", referring to the rear door latch, when "jacking into the 'Safety rear door LOCK' portion so that the light will turn on when the tailgate is opened. (I assume it will also be 'HOT' if you just want to manually turn it on, since it's powered initially by the dome circuit. ????
ALSO, I have a store up the street, Signal Electronics, that will have plenty of those 'ADD A PINS thingy's for the back of the fuse block... And I'D GLADLY get rid of my 'add-a-line' fuse apparatus that I have running the "Switched Power" to my 8" Dick Cepek Lights Switch/which then feeds a relay..... Do I just tell Signal Electronics, "I want Standard Auto Fuse Block Pins"??????
ALSO, far as jacking into the wiring to add a second 'Back Window "UP/DOWN" switch', ...... Am I getting this right that he spliced into the wires between the connectors to the back window and threw in the connector? I HAVE the second rear window switch WITH BOTH CONNECTORS on it... I grabbed them on purpose. ?????
I've decided to NOT try to rush this...But I'd like to get on this as soon as I have everything I need, etc.
Bryan89 Mentioned that "There are spare/extra pins" in the tailgate/top off/window motor etc. harness connector.... Is that where I jack in for "Making the dome light a quick release" like Bryan did? That way, when you disconnect the top, the dome light is also disconnected???
(Sorry guys, I'm REALLY trying, I promise... and I just want to be sure I get all this 100% before I start digging in there..... I'll likely remove all the necessary paneling and such, as it's not NECESSARY in order to operate my rig! hahaha... AND, I want to add some P&S of some type while I'm in there. Is the stuff at Home Depot or Lowes fine to use? I WILL NOT be spending 100's of $'s on this, period. But I'd like to add ANYTHING that's 'better than nothing', ya know?
THANKS, any input is appreciated.
Last edited by ChefYota4x4; 10-09-2012 at 11:53 AM.
10-09-2012, 12:57 PM
#4950
Registered User
im liking bryan89 work as 1 its not hacking up the harness 2 keeps the safety systems intact an yes if there are extra pins on the top to body connector WHY not put them to use! as a disconnect for the add on light
10-09-2012, 01:08 PM
#4951
AHHHHHHHHHHHHHHHHHHHHH,  .... my STUPID FIREFOX is hanging up again! GRRRRRRRR! So sick of wasting time on this crap!
Sorry, don't mean to rant,.... it's just... well, you know I'm sure, seeing that you're CYBER-horn, right? hahaha.
************************************************** ***************
YEP! I like his method.
Curious on a couple things... I'm heading to the electronics store, grabbing pins, diode, etc..... Not sure what I need as far as the pins though. I'll ask the guy......
BUT, what I'm not 100% clear on..... Did he wire the 'HOT' wire to the Dome circuit on the kick panel and the second wire on the connector on that dome light to the 'DOOR SAFETY LOCK' thingymadoerhickie?
And, .... I'm sorry, I KNOW I'm probably really annoying by now.. BUT, WHATEVER, .. I just need to understand things I just 'CAN'T SEE' in the pics and since I've not 'had practical experience/application' of this stuff... So,
HOW DOES THAT DUAL PIN THING join into the dome and ADD a wire? Doesn't the dome Circuit pin in back there already have 2 pins in it?????
.... my STUPID FIREFOX is hanging up again! GRRRRRRRR! So sick of wasting time on this crap! Sorry, don't mean to rant,.... it's just... well, you know I'm sure, seeing that you're CYBER-horn, right? hahaha.
************************************************** ***************
YEP! I like his method.
Curious on a couple things... I'm heading to the electronics store, grabbing pins, diode, etc..... Not sure what I need as far as the pins though. I'll ask the guy......
BUT, what I'm not 100% clear on..... Did he wire the 'HOT' wire to the Dome circuit on the kick panel and the second wire on the connector on that dome light to the 'DOOR SAFETY LOCK' thingymadoerhickie?
And, .... I'm sorry, I KNOW I'm probably really annoying by now.. BUT, WHATEVER, .. I just need to understand things I just 'CAN'T SEE' in the pics and since I've not 'had practical experience/application' of this stuff... So,
HOW DOES THAT DUAL PIN THING join into the dome and ADD a wire? Doesn't the dome Circuit pin in back there already have 2 pins in it?????
Last edited by ChefYota4x4; 10-09-2012 at 01:11 PM.
10-09-2012, 02:07 PM
#4952
Registered User
ok way im getting it 2 wires in the dome light plug
1 is the hot from the fusebox
2 is from the door safety lock
remember toyotas HOT ground so the one lead of the light in the light has to be grounded / connected to the washer motor which is hotgrounded or it wouldnt work fiberglass being a nonconductor
the other side of the bulb leads to the switch which is off on with door (door safety lock) an on (the wire from the fusebox) now the diode would go into the safety lock side of the circut
SO the extra pins at the body to top connector let those two wires be disconnected when removing the top
Last edited by Cyberhorn The Dragon; 10-09-2012 at 02:10 PM.
10-09-2012, 03:10 PM
#4953
Love Bryan89's approach!
[QUOTE=ChefYota4x4;51983674] Did he wire the 'HOT' wire to the Dome circuit on the kick panel. Yes, how the dual-pin connected to the 7.5-Amp Dome light fuse is not clear. Like I mentioned, takes acrobatics to get to the fuse block- and I'm a skinny 135-pounder. Chef, options are:
1) Strip, tap and solder to 7.5 -Amp fuse in back of fuse black (clean but acrobatic- LOL!)
2) Add-a-circuit (semi-clean)
3) Run your 12V wire to your existing under-hood fuse box- altho that's way on the other side of engine compartment.
Yes, unclear to me, too. I say just tap and solder like above.
Chef,
Probably hard to find he right connector pin but try the ones from the seatbelt buckle switch I mentioned earlier - you'll never need it down there. If pins don't fit the top-to-bed connector, just use the seatbelt connector.
Yes. However, hot grounding is a mis-leading term 
A clearer say to say it would be "switched ground": Switch on dome light opens or closes connection to ground.

[QUOTE=ChefYota4x4;51983674] Did he wire the 'HOT' wire to the Dome circuit on the kick panel. Yes, how the dual-pin connected to the 7.5-Amp Dome light fuse is not clear. Like I mentioned, takes acrobatics to get to the fuse block- and I'm a skinny 135-pounder. Chef, options are:
1) Strip, tap and solder to 7.5 -Amp fuse in back of fuse black (clean but acrobatic- LOL!)
2) Add-a-circuit (semi-clean)
3) Run your 12V wire to your existing under-hood fuse box- altho that's way on the other side of engine compartment.
Chef,
Probably hard to find he right connector pin but try the ones from the seatbelt buckle switch I mentioned earlier - you'll never need it down there. If pins don't fit the top-to-bed connector, just use the seatbelt connector.
ok way im getting it 2 wires in the dome light plug
1 is the hot from the fusebox
2 is from the door safety lock
remember toyotas HOT ground so the one lead of the light in the light has to be grounded / connected to the washer motor which is hotgrounded or it wouldnt work fiberglass being a nonconductor. The other side of the bulb leads to the switch which is off on with door (door safety lock) an on (the wire from the fusebox) now the diode would go into the safety lock side of the circut
A clearer say to say it would be "switched ground": Switch on dome light opens or closes connection to ground.
10-09-2012, 09:59 PM
#4955
Wiring Goodies for Tapping in?>>>>
As I said, I was trying to get to the electronics store today... I did find some stuff there... but more at the PepBOYS!!!! lol. WTH? lol.
Anyway;
Stopped at Signal Electronics, first, and they were USELESS on auto stuff... So I checked around... And just grabbed a couple things for the future, even if I don't use them for this........
Then, I stopped into PepBoys as I had ANOTHER "Complimentary Gift Card" for 20$ .... So, I got a couple things and have a few bucks on the card still...
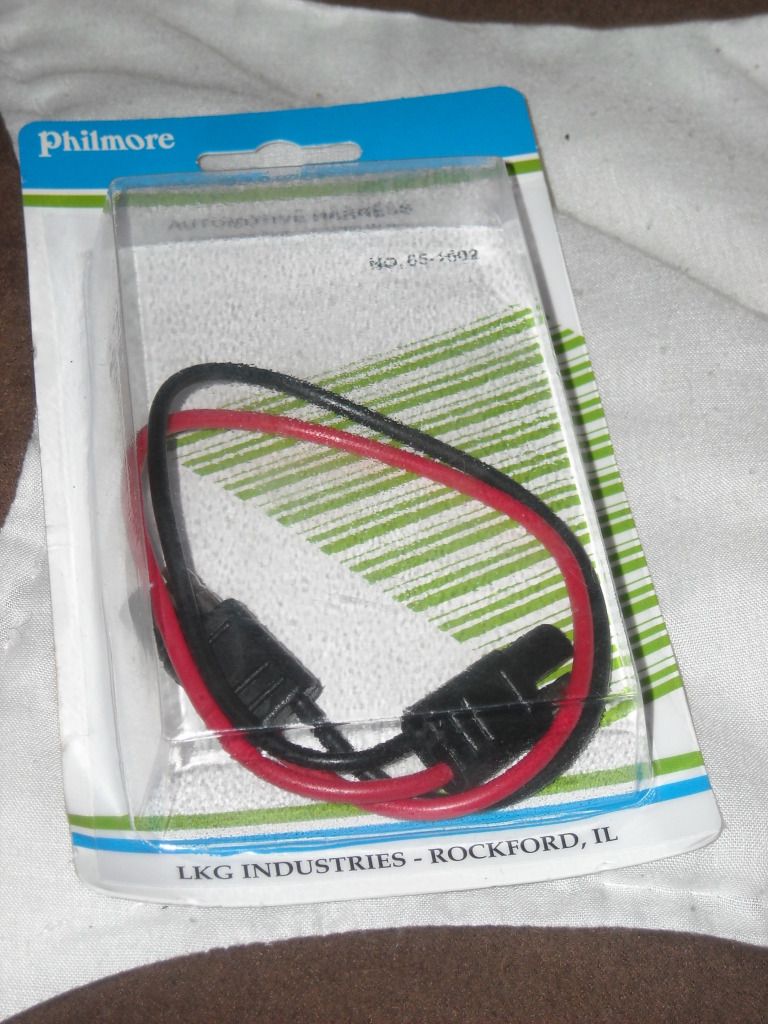
I THINK these connectors will fit in the Toyota wiring connectors to add a line.....(for the dome to disconnect when I remove the top)....
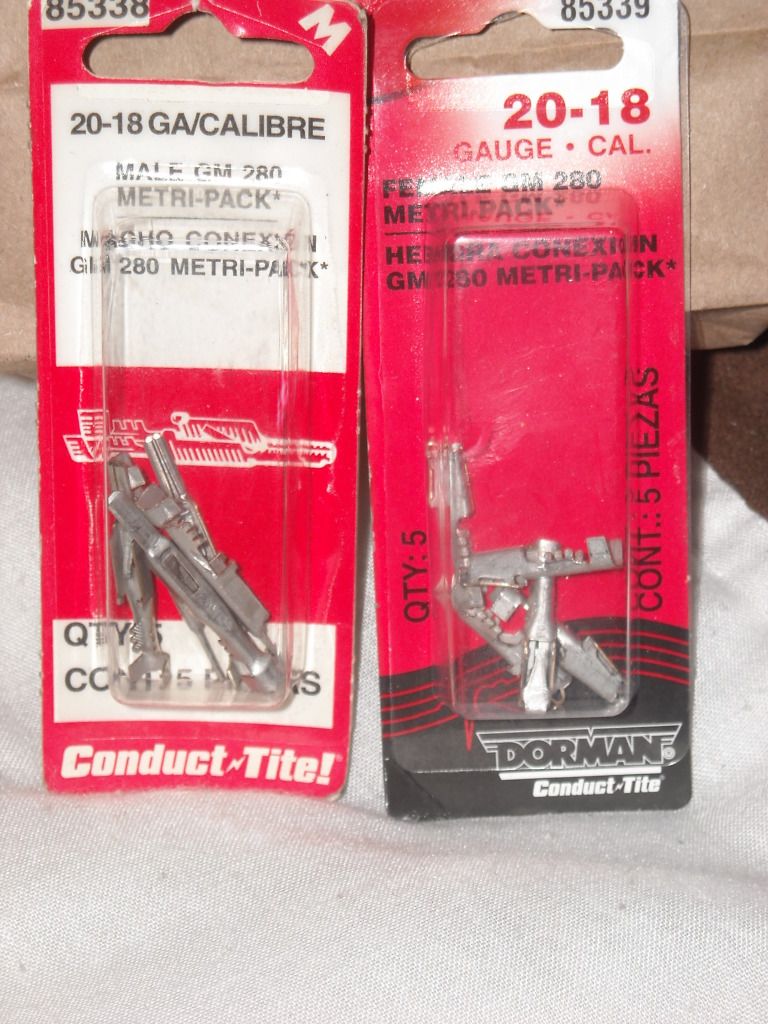
Then I saw these there... Which Signal Electronics had NEARLY NONE OF! ..... It's an assortment package.... Was free with the gift card, so WHY NOT, right? .....
**************************************
Whatcha think, so far?
I'm not going to try and do EVERYTHING as perfectly as Bryan... While I'd like to, I'm not sure I'd have too easy of a time getting that fuse block out... ... My back has really been hurting lately. (Just overdoing it, etc.).. But I want to at least TRY to do it as clean as possible, ya know?
I really don't care THAT much about a perfect 'factory' look on anything but the light itself, and as long as no wires are hanging all over and I tuck it nice like I ALWAYS DO... and then as providing nothing is TOTALLY HALF ARSED, lol... I will feel good about it, ya know?
***************************************
I'm still kinda unsure how to tap into the 'safety lock' thing ANDDD how to 'tap in to add the back window switch in the back area, like bryan and others have done.... But I'll get it. At least I have plenty of solder and a good iron, plenty of wire, plenty of connectors, plenty of heat shrink(ask Richard... I have like 300 feet of different types! hahaha... It was a sale lol) ...... Then connectors now to tap into things that I HOPE will fit/work.. Ya know?
Anyway;
Stopped at Signal Electronics, first, and they were USELESS on auto stuff... So I checked around... And just grabbed a couple things for the future, even if I don't use them for this........
Then, I stopped into PepBoys as I had ANOTHER "Complimentary Gift Card" for 20$
.... So, I got a couple things and have a few bucks on the card still... I THINK these connectors will fit in the Toyota wiring connectors to add a line.....(for the dome to disconnect when I remove the top)....
Then I saw these there... Which Signal Electronics had NEARLY NONE OF! ..... It's an assortment package.... Was free with the gift card, so WHY NOT, right? .....
**************************************
Whatcha think, so far?
I'm not going to try and do EVERYTHING as perfectly as Bryan... While I'd like to, I'm not sure I'd have too easy of a time getting that fuse block out...
... My back has really been hurting lately. (Just overdoing it, etc.).. But I want to at least TRY to do it as clean as possible, ya know? I really don't care THAT much about a perfect 'factory' look on anything but the light itself, and as long as no wires are hanging all over and I tuck it nice like I ALWAYS DO... and then as providing nothing is TOTALLY HALF ARSED, lol... I will feel good about it, ya know?
***************************************
I'm still kinda unsure how to tap into the 'safety lock' thing ANDDD how to 'tap in to add the back window switch in the back area, like bryan and others have done.... But I'll get it. At least I have plenty of solder and a good iron, plenty of wire, plenty of connectors, plenty of heat shrink(ask Richard... I have like 300 feet of different types! hahaha... It was a sale
lol) ...... Then connectors now to tap into things that I HOPE will fit/work.. Ya know?
10-09-2012, 11:34 PM
#4956
Registered User
well chef looks like from the schematics that its time to pull the safety switch from the gate an take a look at it directly
from the diagrams there's an open socket (no wire) which is the open unused connector your looking for it'll likely be on the connector right at the latch (which has the switch attached i believe)
as for the back window switch you dont need the connectors that bryan89 made though thats a awesome adapter) you just have to identify the wires that lead to the key switch that are in that corner harness an tap into those to connect your switch which you then install in the back panel
Last edited by Cyberhorn The Dragon; 10-09-2012 at 11:38 PM.
10-10-2012, 04:16 AM
#4957
Super Moderator
Staff
iTrader: (1)
Join Date: Aug 2008
Location: Anderson Missouri
Posts: 11,788
Likes: 0
Received 25 Likes
on
22 Posts
Just checking in real quick. Those red connectors, you should of said something, the current project I am on, I removed 50 of them things. The PO must of really liked them as I had them all over the place. If you use them, I would suggest wrapping them with electrical tape when done.
Electrical is my weak area, I know just enough to get me into trouble. Tapping into wires for your project is something I am not sure of. Will like to see when you get it done so I can eventually do it to mine. Soldering is the way to go though.
Electrical is my weak area, I know just enough to get me into trouble. Tapping into wires for your project is something I am not sure of. Will like to see when you get it done so I can eventually do it to mine. Soldering is the way to go though.
10-10-2012, 04:48 AM
#4958
as for the back window switch you dont need the connectors that bryan89 made though thats a awesome adapter) you just have to identify the wires that lead to the key switch that are in that corner harness an tap into those to connect your switch which you then install in the back panel

Look for light blue wire with white stripe and light blue wire with black stripe. Verify they go to Pins 11 & 12 of Rear Window Relay.


"Y" splice just forward of Top Off switch and connected to switch.
This splice is "ground" for Up/Down switch, but put lock switch between this and Up/Dn switch.

Piece of cake, or whatever Chef's fave pastry is
BTW, while you're working on that side, try if you could move harness completely behind pillars, instead of snaking to front and behind them. Would make further mods easier (i.e., new panels, mounting speakers, etc.) I already did it on the right side. Yeah, even sound proofing. With harness behind pillars, you can easily hang sound damping foam curtain behind pillars and panel and make it easy to move aside to work around.
Last edited by RAD4Runner; 10-10-2012 at 04:55 AM.
10-10-2012, 06:11 AM
#4959
Registered User
I'm really liking the dome light and the second window switch. I'm a ways off from doing them so be expecting a phone call down the road. You remember all the phone calls when I was trying to get mine running lol.
10-10-2012, 09:15 PM
#4960
Ahhhhhh, my brain is not happy with me, lately, at all!  hahaha... Know how i can tell? I look at diagrams and such and my eyes start twitching! hahaha.
Just messin... I'll be ok once I tear it open and PHYSICALLY look at my own wiring
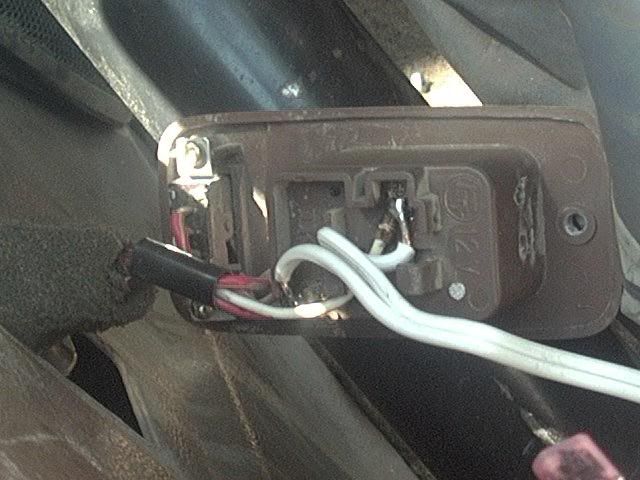
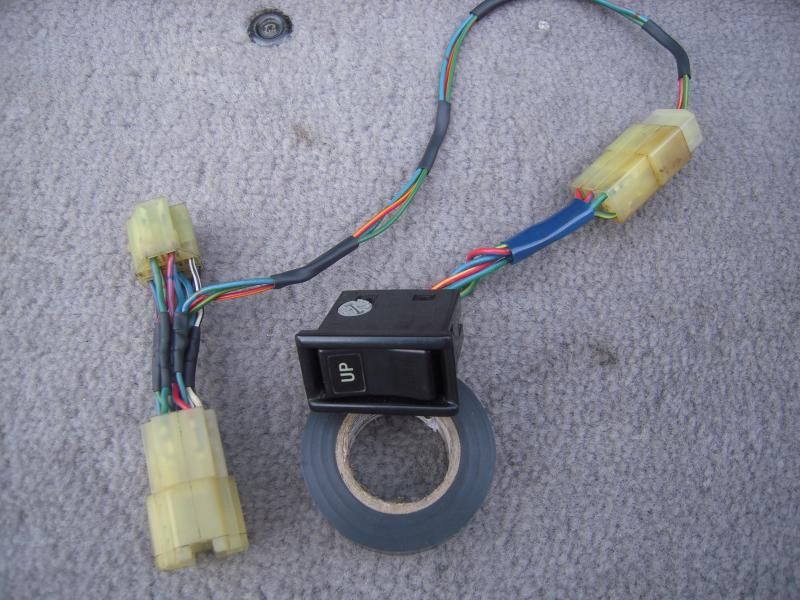
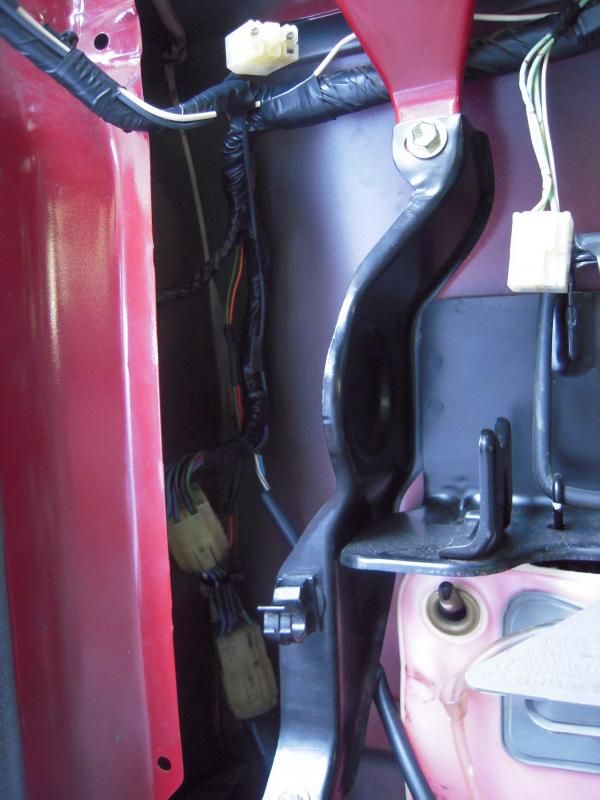
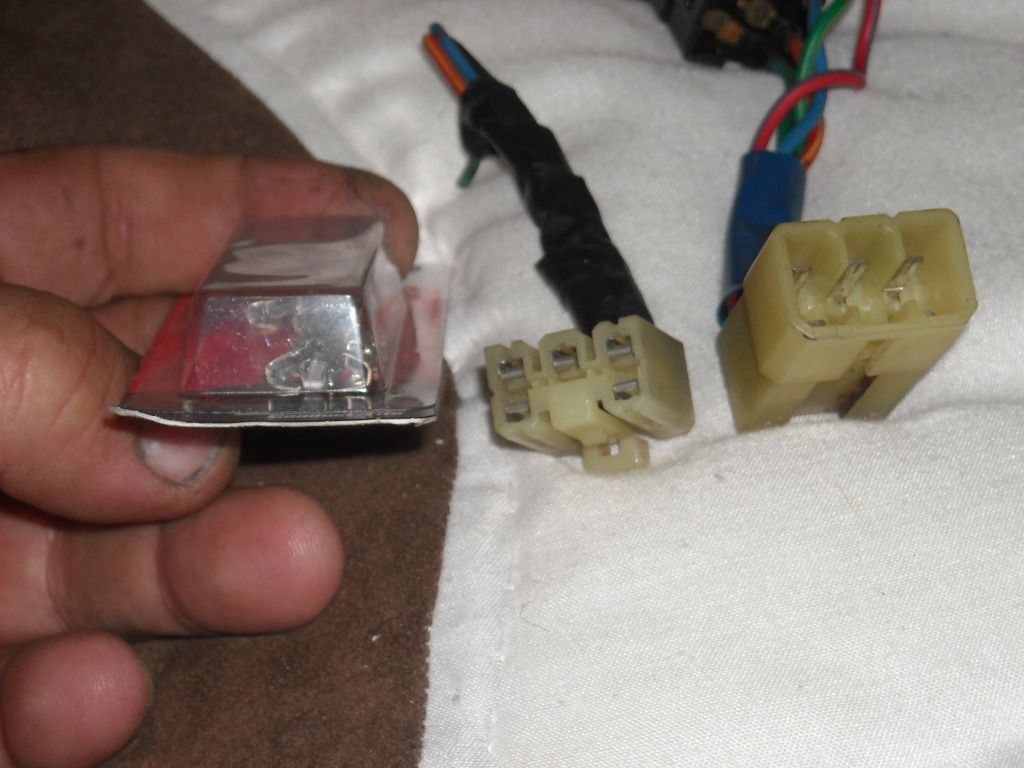
FIRST; I wanted to share what I saw on my donor "REAR WINDOW SWITCH" that I got from a Pick-Your-Part 4Runner.........
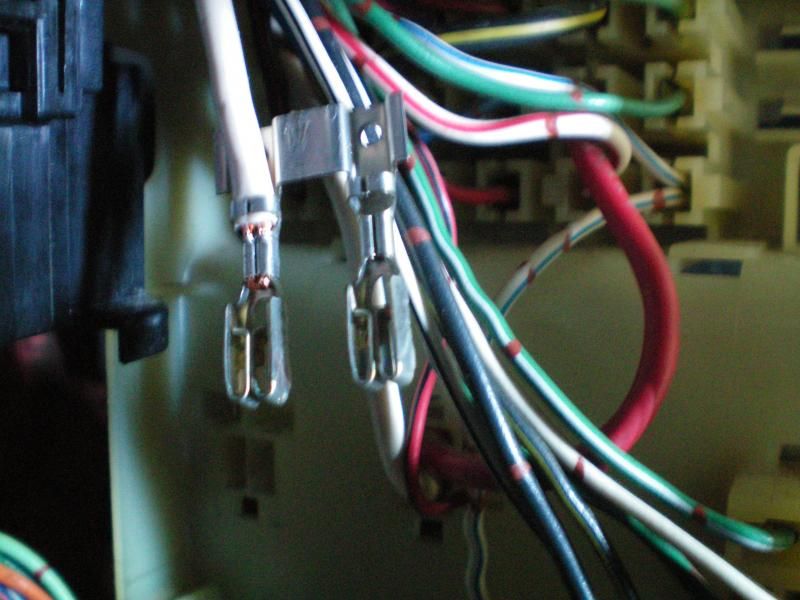
This pic is, as I understand it, the wiring I'll be using to tap into the 'Light Blue with White Stripe' wire and 'Light Blue with Black Stripe' wire(I will only use 3, and I'll post a pic of the 3 that I will use....again, as I'm understanding it ) >>>>
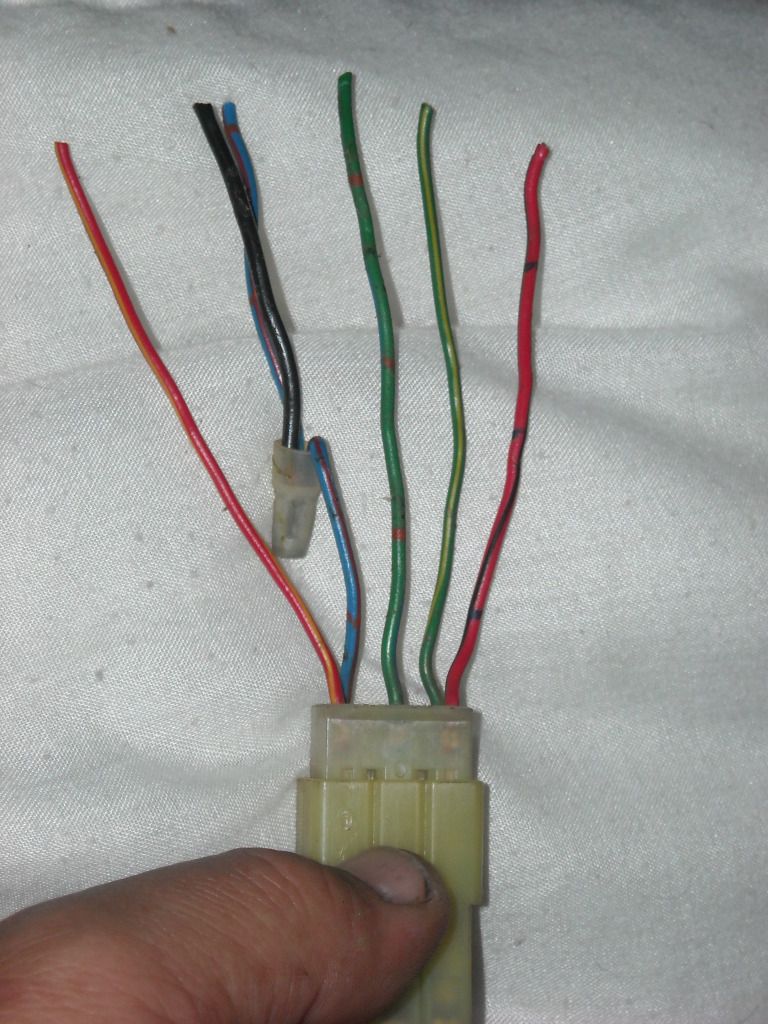
At the top most wiring of the pic(the vehicle harness wiring THAT FEEDS that switch)^^^... I noticed that the guy had apparently tapped into the 'Blue wire with Red stripe and Red dot every inch(As I understand it... That's the wire that Terry Grounds out to the console front-most mounting screw to make it constant hot, RIGHT?... I'm guessing this guy did the same, in a different way???)
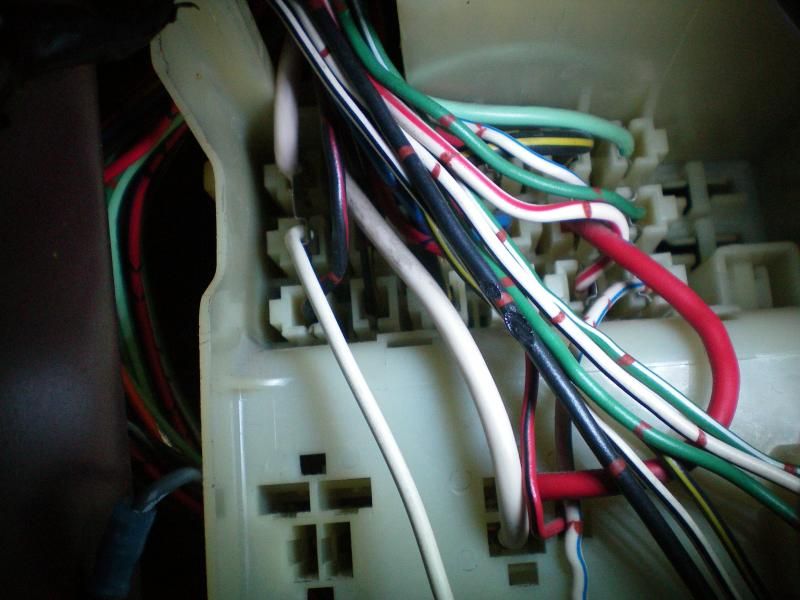
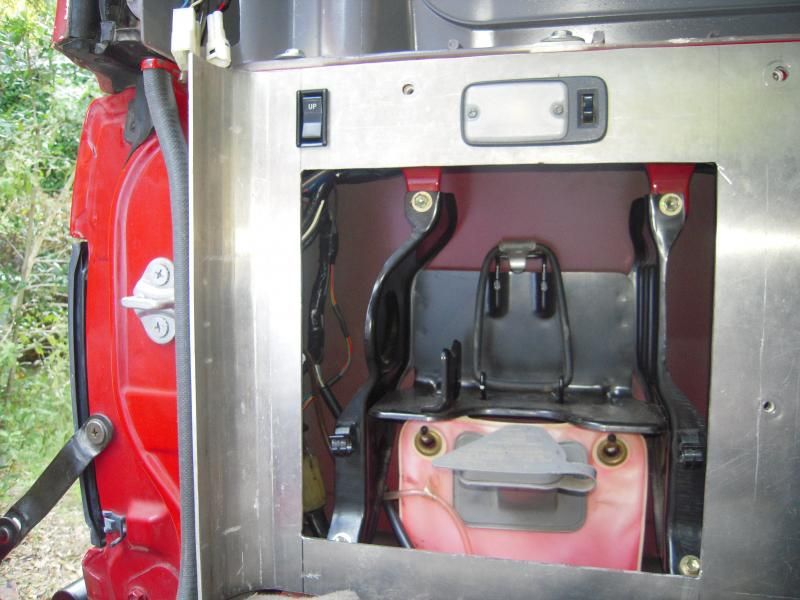
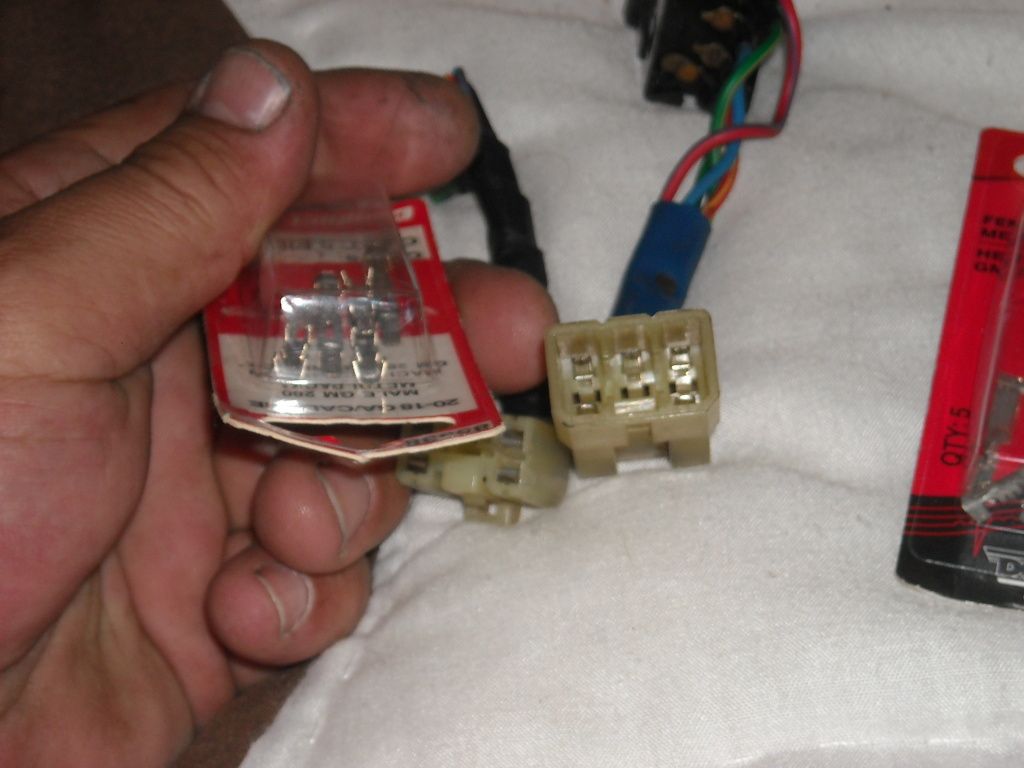
In this picture, below, I've pulled away the wires I wont be using for the 'rear deck window switch' ....and here you see the 3 wires I'll be using, .... (Red with Yellow Striped wire/ Green with Yellow Striped wire/ Blue with Red stripe and Red dots-wire )>>> ??? >>>
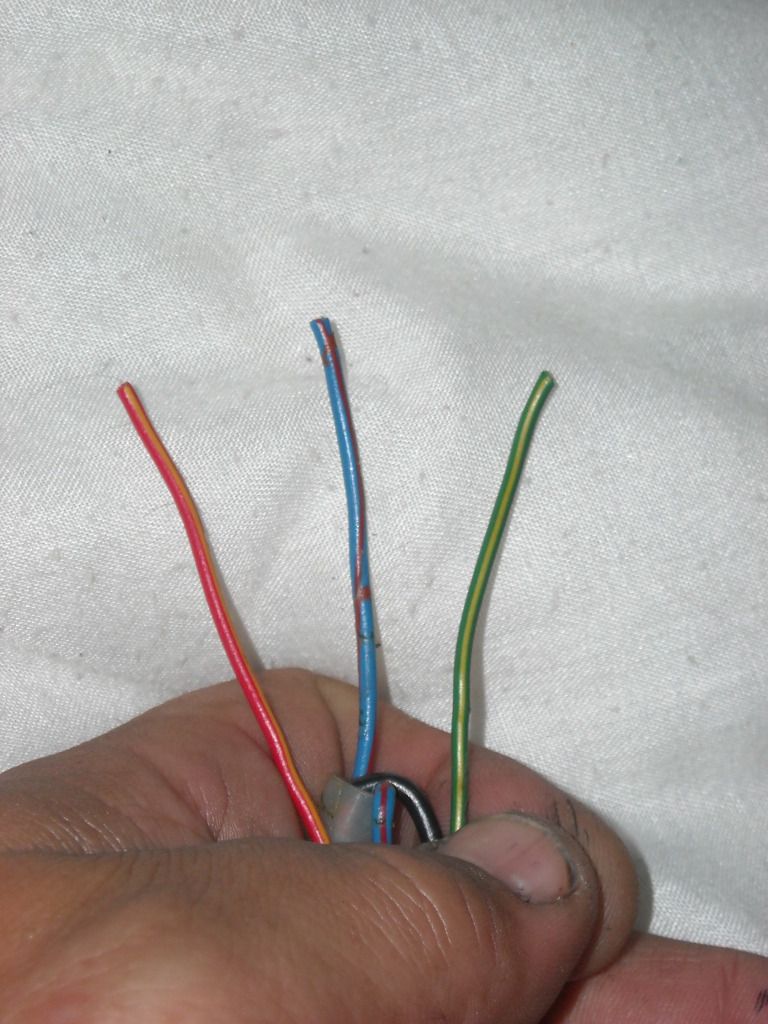
I will then take the Red Wire with Yellow Stripe and Green Wire with the Yellow Stripe and solder them into the tapped wires behind the roll bar, colored "Light Blue with White Striped" and "Light Blue with Black Striped" wires for the ''SWITCHED GROUND'' portion of this "Momentary Double Throw Switch"
So, just to see if I have at least PART of it right, pertaining to the "3" wires I use to tap into the Harness in back between the roll bar...........
1. The Red wire with Yellow Stripe is 'Switched Ground for "UP or DOWN" ' and goes to either the Light Blue with White strip or Light Blue with Black Stripe wire.(I say 'either' because I'm not sure which one of the Red with Yellow or Green With Yellow controls the "UP" and which controls the "DOWN")
2. The Green wire with Yellow Strip is 'Switched Ground for "UP or DOWN" ' and goes to either the Light Blue with White strip or Light Blue with Black Stripe(I say 'either' because I'm not sure which one of the Red with Yellow or Green With Yellow controls the "UP" and which controls the "DOWN")
3. The Royal Blue wire with Red Stripe and Red Dots IN THE HARNESS loom is "HOT" and get's tapped into, then spliced into 2, and one goes to the Royal Blue with Red striped and red Dotted wire in the Rear Window Switch wiring ....and the other should go to the "Safety Lock Top Off Switch", BEFORE/UNDER the actual TOP OFF switch. (Have to look in my Haynes for the color, as I can't see in that Diagram).
RIGHT??????????????
Question; (it was probably answered, but here'goes, lol)
When wiring the Rear Deck Window Switch in like this, only using 3 of 5 wires.... Will it automatically be "HOT and READY TO ROLL DOWN" without the key? Or would I still need to ground the Front Switch as well? (I'd rather the front switch NOT be constant hot... I'm a lil paranoid that it would make my rig even MORE easy to break into, ya know? I could HIDE the Rear Switch with Gear, and it's ONLY PURPOSE is for "Camping and Emergencies" like going head first into a 4foot deep muddy quicksand pit...then needing to go out the back/Or pinned in by trees, etc..... NEVER KNOW! HAHAHAHA"......
************************************************** ***
I'm going to do an annoying post, JUST LIKE THAT^^, for the Dome Light and Deck lamps as well..... But I wanna stick with one thing at a time until I get it! lol.
hahaha... Know how i can tell? I look at diagrams and such and my eyes start twitching! hahaha. Just messin... I'll be ok once I tear it open and PHYSICALLY look at my own wiring
FIRST; I wanted to share what I saw on my donor "REAR WINDOW SWITCH" that I got from a Pick-Your-Part 4Runner.........
This pic is, as I understand it, the wiring I'll be using to tap into the 'Light Blue with White Stripe' wire and 'Light Blue with Black Stripe' wire(I will only use 3, and I'll post a pic of the 3 that I will use....again, as I'm understanding it
) >>>> At the top most wiring of the pic(the vehicle harness wiring THAT FEEDS that switch)^^^... I noticed that the guy had apparently tapped into the 'Blue wire with Red stripe and Red dot every inch(As I understand it... That's the wire that Terry Grounds out to the console front-most mounting screw to make it constant hot, RIGHT?... I'm guessing this guy did the same, in a different way???)
In this picture, below, I've pulled away the wires I wont be using for the 'rear deck window switch' ....and here you see the 3 wires I'll be using, .... (Red with Yellow Striped wire/ Green with Yellow Striped wire/ Blue with Red stripe and Red dots-wire )>>> ??? >>>
I will then take the Red Wire with Yellow Stripe and Green Wire with the Yellow Stripe and solder them into the tapped wires behind the roll bar, colored "Light Blue with White Striped" and "Light Blue with Black Striped" wires for the ''SWITCHED GROUND'' portion of this "Momentary Double Throw Switch"
So, just to see if I have at least PART of it right, pertaining to the "3" wires I use to tap into the Harness in back between the roll bar...........
1. The Red wire with Yellow Stripe is 'Switched Ground for "UP or DOWN" ' and goes to either the Light Blue with White strip or Light Blue with Black Stripe wire.(I say 'either' because I'm not sure which one of the Red with Yellow or Green With Yellow controls the "UP" and which controls the "DOWN")
2. The Green wire with Yellow Strip is 'Switched Ground for "UP or DOWN" ' and goes to either the Light Blue with White strip or Light Blue with Black Stripe(I say 'either' because I'm not sure which one of the Red with Yellow or Green With Yellow controls the "UP" and which controls the "DOWN")
3. The Royal Blue wire with Red Stripe and Red Dots IN THE HARNESS loom is "HOT" and get's tapped into, then spliced into 2, and one goes to the Royal Blue with Red striped and red Dotted wire in the Rear Window Switch wiring ....and the other should go to the "Safety Lock Top Off Switch", BEFORE/UNDER the actual TOP OFF switch. (Have to look in my Haynes for the color, as I can't see in that Diagram).
RIGHT??????????????
Question; (it was probably answered, but here'goes, lol)
When wiring the Rear Deck Window Switch in like this, only using 3 of 5 wires.... Will it automatically be "HOT and READY TO ROLL DOWN" without the key? Or would I still need to ground the Front Switch as well? (I'd rather the front switch NOT be constant hot... I'm a lil paranoid that it would make my rig even MORE easy to break into, ya know? I could HIDE the Rear Switch with Gear, and it's ONLY PURPOSE is for "Camping and Emergencies" like going head first into a 4foot deep muddy quicksand pit...then needing to go out the back/Or pinned in by trees, etc..... NEVER KNOW! HAHAHAHA"......
************************************************** ***
I'm going to do an annoying post, JUST LIKE THAT^^, for the Dome Light and Deck lamps as well..... But I wanna stick with one thing at a time until I get it! lol.


