
ChefYota4x4's 1987 4Runner Build-Up Thread
 10-02-2012, 12:45 PM
#4881
WOW, aint that the truth? I hate to complain, knowing what others like yourself have been through.... YOU'RE A SOLID STATE TROOPER, MAN! OORAH! I have had MANY injuries/including 32 Broken bones in one accident, lol... Skull fracture, 10 Broken ribs, fingers, toes, legs.... Many breaks before that.. and yet, to deal with stuff that puts you down for SO LONG, like you have, and still have such a great attitude... Well, I know, 'what else should we do, whine?' hahaha... BUT STILL... it's not everyone who keeps the negative beaten back so well.. I admire your perseverance, buddy, s'all I'm saying! You seem to be kicking RUMP, now! and yes, getting the old creeky bones 'rump' kicked on yourself, as well...I feel ya! lol.
 10-02-2012, 12:52 PM
#4882
Registered User
well like i told terry she whacked a hill last winter (blackice even studded tires didnt help) with hers an bent the bumper an valence all to heck corner marker smashed i was in there looking to replace the starter an it was a frayed wire saved some $ there so i fixed the hill whack damage but told her the metal is getting too hard to hammer anymore next time its new valence LOL (though dont tell her i could aneal the metal by heating it good an hot then letting it cool)
10-02-2012, 01:04 PM
#4883
You talking about a light that comes on with the hood lifted and is permantly mounted on the hood? I like those anyways just because I do alot of nite driving. I just looked at my third gen and it has a switch under the hood but the wire runs into the firewall. No idea what it goes to other then a hood warning light maybe. Should be a way to make a 3rd gen light switch ground out similar to the way the dome light would work.
I think it is on your thread or someone elses about using a Chevy trucks under hood light system with a spool on it. I cant seem to keep a flashlight and if I do have one it usually has dead batteries so want to get something like that for myself, just never know when you may need it. I have had flats during the nite and it is a royal pain trying to get a tire on in pitch black.
I got tied up with drill weekend and then work and having to go to the dentist again so I am itching to get back at it on my runner. I need to get my cables installed for the tailgate and will look into what it takes to get the latchs adjusted. Not sure if you adjust them on the body or in the tailgate. I plan on making a video of the jumper wire trick to get the glass up as that will make it alot easier for you to get to the latch assembly. You wont need to make it permant. Dont think it will hurt anything as I have the 88 Runner set this way as the tailgates I always get are messed up anyways. This does solve alot of problems with the backgate.
Haynes "L" for Blue, "R" for Red. Key is pointing to wire.
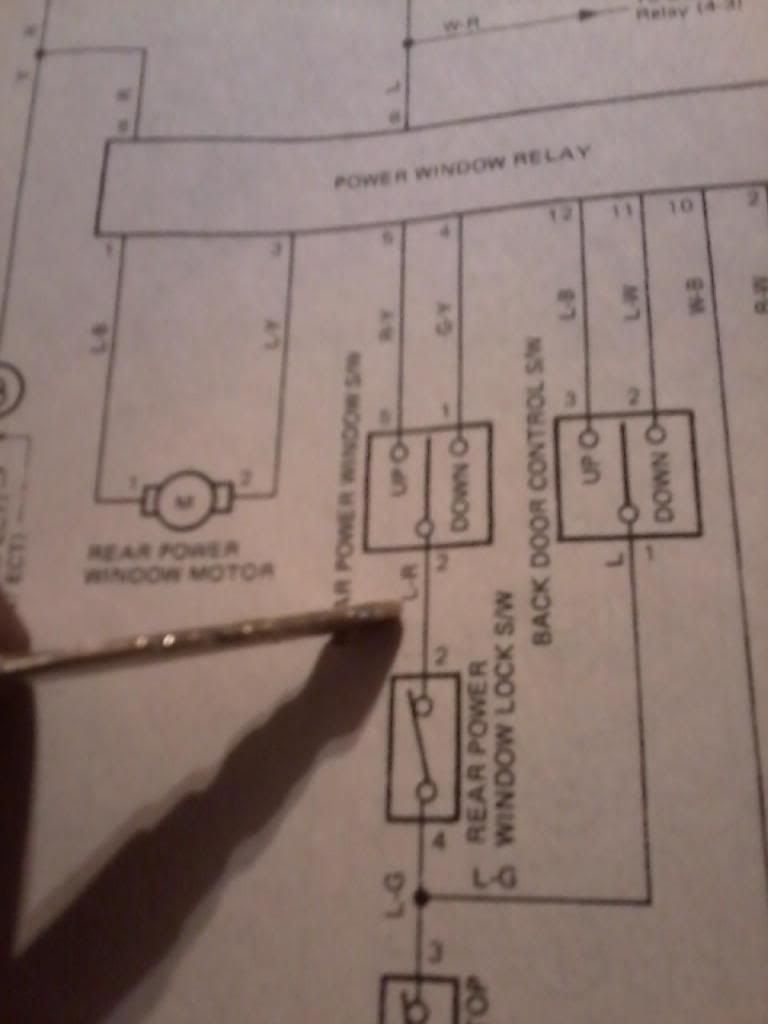
The blue wire is the one that needs grounded. I just strip off the insulation and slide it into the back side of the plug. I can only get a good ground on the front mounting tab in front of the shifter. Going to the body wont work, but since you will probably make yours temporary, you could run a long enough wire to the battery ground. This will by pass all safety features but make it where you can get to the latch in the tailgate with a lot more room.
Orient the plug the way I have it in the picture and where the dotted lines are on the top facing you.

I think it is on your thread or someone elses about using a Chevy trucks under hood light system with a spool on it. I cant seem to keep a flashlight and if I do have one it usually has dead batteries so want to get something like that for myself, just never know when you may need it. I have had flats during the nite and it is a royal pain trying to get a tire on in pitch black.
I got tied up with drill weekend and then work and having to go to the dentist again so I am itching to get back at it on my runner. I need to get my cables installed for the tailgate and will look into what it takes to get the latchs adjusted. Not sure if you adjust them on the body or in the tailgate. I plan on making a video of the jumper wire trick to get the glass up as that will make it alot easier for you to get to the latch assembly. You wont need to make it permant. Dont think it will hurt anything as I have the 88 Runner set this way as the tailgates I always get are messed up anyways. This does solve alot of problems with the backgate.
Haynes "L" for Blue, "R" for Red. Key is pointing to wire.
The blue wire is the one that needs grounded. I just strip off the insulation and slide it into the back side of the plug. I can only get a good ground on the front mounting tab in front of the shifter. Going to the body wont work, but since you will probably make yours temporary, you could run a long enough wire to the battery ground. This will by pass all safety features but make it where you can get to the latch in the tailgate with a lot more room.
Orient the plug the way I have it in the picture and where the dotted lines are on the top facing you.
Also, I'm reading Roger(4Crawlers "Deck Lamp Cheap Tricks" thingymadoer... And again, I just don't know exactly where I'm supposed to tap in. I'ma read it again... But here it is so you could help me understand it? I want to put a CONSTANT HOT switch in the back, too, by the back gate(I have an idea)... and right next to it.... a SECOND rear window switch, kinda hidden/hard to get to without breaking the windows(in which case, what difference does it make if i have a constant hot switch, right???????? lol).
Here's his write up on the deck lamp mod.........
Deck Light Mod:
You know, it is that tiny light behind the factory roll bar on the driver's side, that doesn't seem to work. Took me a while to figure out that you needed to have the parking lights on (it is fed from the main exterior light relay). Kind of useless though, for example if you are camping or sleeping in back and need some light, you have to run around to the front, turn on the parking lights, all to have a puny 3W light in back. Add to that the the deck light is essentially "on the deck", so if you have anything in back, the light will likely be blocked. The only cool thing about the deck light is that it has both front and rear switches, wired up like you would have in a hallway with a switch at each end. Turn the light on with one switch, walk down the hall and turn the light off with the other switch.
So, while this deck light is sort of lame, it has promise. First step is to re-power it off the battery. Pull the lower dash off, disconnect the deck light plug and find the dark green wire (upper left of the connector) - that supplies power to the whole circuit. I cut it, spliced in a male and female spade connector and then tapped into my CB radio power feed. Any source of power could be used, the dome light fuse that powers the dome light is right there in the fuse block. I left the old wire with a mating spade connector in case I ever wanted to revert to stock.
Then, since the light may now actually get used, I replaced the 31mm festoon bulb with a white, 6-LED festoon bulb replacement. This LED puts out more light than the 3W incandescent bulb with 1/4 the current draw (about 60mA). So now there is light available any time, controllable from the front or rear switch. However, one big problem remains, the light is usually blocked with gear in the bed.
So, to address this problem, a different light location is needed. I already have a 12V LED trouble light stick zip tied to the roll bar. It has a 12V plug on it and I have 3 - 12V outlets down the passenger side of the bed rail that I can plug it into when needed. It throws a whole lot of light but it is sometimes inconvenient fumbling around in the dark trying to find the plug and an empty socket to stick it into. So the final solution is to add a switched 12V outlet on the driver's side, right above the deck light, power is tapped off the deck light. This allows the overhead light to be left plugged in all the time and switched on and off with a switch. And the overhead light also doubles as a trouble light, it can be easily unplugged and removed. Being a solid state light, it does not suffer from banging around like a flourescent light does (I killed a few of those over the years). And the LEDs are very efficient light producers, so no worries about leaving them on for hours at a time while camping.
In the above-left image, the connections of the wires to the back of the deck light socket is shown. With LED lights, polarity matters, the R-B wire is +12V and the W-B wire is ground. The two wires are run up to a 12V outlet screwed to the side of the bed rail. The LED trouble light plugs into that outlet and can then be turned on (image above-right) or off from either the switch at the deck light or from the deck light switch on the dash. As wired, even the indicator light on the front deck light switch illuminates so you don't forget to leave it on. The lit image above does not do the light output justice (my digital camera does poor in low light), but suffice it to say, reading would not be a problem with the amount of light thrown by the overhead LEDs. Also, the trouble light has an on/off switch so it can be shut off to use only the deck light. With the 60 bright LEDs in the trouble light, it does pull a few amps of current, but it puts out about the same light as a 100W incandescent bulb.
10-02-2012, 01:25 PM
#4884
Registered User
iTrader: (4)
Join Date: May 2010
Location: People's Republic of California
Posts: 720
Likes: 0
Received 15 Likes
on
12 Posts
Nope, not it! Wasn't me who inquired about the AFM mod, never had an interest and never owned one. If I did, I would've grabbed that thing the first day it was posted on the inventory website and kept that thing for myself! 
Of course, one day when I come across one again I'll probably think about grabbing it, but not anytime soon.
I'm on a camry mission right now....DIGITAL FUEL LEVEL SENDER! With all this electrical talking you're doing you'll be able to answer all my questions when it comes to re-wiring the analog to digital gauge cluster!!
10-02-2012, 01:35 PM
#4885
Contributing Member
Join Date: Nov 2010
Location: Columbia River Gorge, Oregon...east side
Posts: 5,125
Likes: 0
Received 2 Likes
on
2 Posts
Hey Chef, the light swaps are looking good! Nice work on the cables too. I'm on vacay for most of October so I'll have tons of catch-up to do on your thread when I do check in. Man, I wish we had a pick-n-pull in town.... Cheers. 
10-02-2012, 02:03 PM
#4886
Nope, not it! Wasn't me who inquired about the AFM mod, never had an interest and never owned one. If I did, I would've grabbed that thing the first day it was posted on the inventory website and kept that thing for myself!
Of course, one day when I come across one again I'll probably think about grabbing it, but not anytime soon.
I'm on a camry mission right now....DIGITAL FUEL LEVEL SENDER! With all this electrical talking you're doing you'll be able to answer all my questions when it comes to re-wiring the analog to digital gauge cluster!!
PS> I saw they got a BUNCH of Camry's at the big yard on Blinn..... Not sure if any would have it, nor when I'm heading there again... but I WILL look if I do, ok? Be sure to answer so I don't break something or grab the wrong thing, if I DO find it, lol.
 .... Always good to hear from ya... enjoy the VACAY! Stay safe!
10-03-2012, 01:06 AM
.... Always good to hear from ya... enjoy the VACAY! Stay safe!
10-03-2012, 01:06 AM
#4887
TODAY, I ............................ HAHAHA.....>>>>>
I actually got a bit done today, off and on. Changed the oil(Gotta tell ya... having big hands and arms makes changing out the oil filter REALLY SUCK! ESPECIALLY on IFS trucks! I was TEARING my arm up, BAD, once again, so I decided, "SCREW THIS, ... I'm pulling the skid plate".......... 3 minutes later, NO KIDDING, it was off and ready for a new one! lol. (ONE QUESTION; WHY can't these Toyota-OEM filters hold the oil..... UPSIDE DOWN and AFTER coming off the motor? hahaa... IF THEY'RE SUPPOSED TO, lemme know. I've had a K&N oil filter on there,.... larger filter with a nut hex thingy on top for EASY as CAKE removal... telling ya, it was WAY easy to remove.... Well, when pulling the K&N, it was still nearly FULL of oil, a day after sitting. Does the check valve only really work 100% when the pick up is sitting in oil? Then, when you drain it, you take away the 'pinched straw' effect? Sorry, I will look it up IF i have time.... If no one knows, s'all good. Just don't tell me to 'google it'... I might go SCARFACE on ya! lol. JK,.. anyway.............
Also tested out the Supra light....
Also FINALLY, after 10 years, fixed my Dimmer Switch(swapped in a donor/new to me model from that dude who left Alaska for Florida... Akedz92?
And I fixed/installed another new to me AC-VSV that has a connector that takes my Harness plug.... Plugged in, other temporary wiring removed, .... working great, as it's been for a bit now
Lil video at the end of the day..........
10-03-2012, 10:54 AM
#4889
 ......... No worries! lol... I think many just don't have time to keep up with my thread(or maybe lost interest, lol).... S'all good. We all have lives... I, of all people, can TOTALLY relate to that... As well as relating to the fact that I don't always have something to add to MANY of the threads I'm scribed too, hehe.
 Besides.... I KNOW how busy you are with your hot model wife and work>>>


Take care, Flea!
10-03-2012, 11:10 AM
#4890
Heater Control Valve........ doh!
Hahahhaa....
As some MAY remember, ...I'm wanting to swap to a 2nd Gen 4Runner(3rd Gen PU) Heater Control Valve(Richards 89 4Runner has one too)...... They're plastic and the valve RARELY, IF EVER, FAILS! (I've checked everyone I've seen in the yards... and the blue cable on mine that controls HOT/COLD is always flawless on other rigs, WHEN it's connected to that plastic type valve.....

* The first time in 10 YEARS, of which this lever has given me nothing but trouble, I actually pulled it last night(the thing I forgot on the video, haha).... Then operated the cable by the lever while it wasn't hooked up to my old corroded Heater Control Valve I have in there now... It worked JUST FINE! This is GOOD news, actually, as I wont have to replace the Climate Cable Assembly.... Which, while Terrys_87 has taught me is 'very doable'.... I think he could also attest to it's TOTAL PITA FACTOR, where things can actually break if you're not really careful.
* The mounting bracket, as most might not know, is different... But the valve, I BELIEVE, can be switched over to my original bracket/cable housing retainer clip, and then give me many more years of problem free switching from 'hot to cold' depending on the season.
* This is important in November or so, here in this Area of L.A., as it can be 90*F all day, then 39*F that night. Having to get out and open the hood, then flip the 'switching gate' (that switches from allowing AC in to allowing air right off the heater core) by hand ..... it's just a PITA that I DON'T NEED, really, to endure, right? hahaha.
* ONE problem I can see though.... Maybe TERRY or anyone else who knows can help me? >>>>>>>>>
When I push the lever from side to side..... It's short a bit. What I mean is; When the lever is pushed all the way to the HEAT or COLD sides.... The button on the end wants to push off(I DON'T NEED THE BUTTON, lol... )>>> This makes me think that the lever, itself, inside, is 'bent'? How else could it become TOO SHORT FOR THE LEVER ACTION IT'S SUPPOSED TO ENDURE?
*****************************************
Thanks, guys... any thoughts in this one would be helpful.
* I'm going to be replacing the heater core hoses IN THE ENGINE BAY, as well, and I wondered if anyone found any at the parts store that will work... They have very specific angles, and I just don't wanna pay TOYOTA 25$ for 2 hoses! (I have to cut one, anyhow, to put in my Prestone Flush Valve- T ) ... So why get raped when the Kragen and such have so many angled versions? RIGHT? LOL.
LOL.
* When I replace them, I'll likely pull them off the heater core, CAP the heater core inlet and outlet with some spare heater hose I have/with bolts stuck in them to plug them/ and then cap the hose on top and remove it, then QUICKLY cap the wrap around pipes that the heater hoses go to(the aircraft aluminum ones that to to the timing cover on the driver side and into the underside of the intake on between the 2 and 3 intake runners on the pass. side).
As some MAY remember, ...I'm wanting to swap to a 2nd Gen 4Runner(3rd Gen PU) Heater Control Valve(Richards 89 4Runner has one too)...... They're plastic and the valve RARELY, IF EVER, FAILS! (I've checked everyone I've seen in the yards... and the blue cable on mine that controls HOT/COLD is always flawless on other rigs, WHEN it's connected to that plastic type valve.....
* The first time in 10 YEARS, of which this lever has given me nothing but trouble, I actually pulled it last night(the thing I forgot on the video, haha).... Then operated the cable by the lever while it wasn't hooked up to my old corroded Heater Control Valve I have in there now... It worked JUST FINE! This is GOOD news, actually, as I wont have to replace the Climate Cable Assembly.... Which, while Terrys_87 has taught me is 'very doable'.... I think he could also attest to it's TOTAL PITA FACTOR, where things can actually break if you're not really careful.
* The mounting bracket, as most might not know, is different... But the valve, I BELIEVE, can be switched over to my original bracket/cable housing retainer clip, and then give me many more years of problem free switching from 'hot to cold' depending on the season.
* This is important in November or so, here in this Area of L.A., as it can be 90*F all day, then 39*F that night. Having to get out and open the hood, then flip the 'switching gate' (that switches from allowing AC in to allowing air right off the heater core) by hand ..... it's just a PITA that I DON'T NEED, really, to endure, right? hahaha.
* ONE problem I can see though.... Maybe TERRY or anyone else who knows can help me? >>>>>>>>>
When I push the lever from side to side..... It's short a bit. What I mean is; When the lever is pushed all the way to the HEAT or COLD sides.... The button on the end wants to push off(I DON'T NEED THE BUTTON, lol... )>>> This makes me think that the lever, itself, inside, is 'bent'? How else could it become TOO SHORT FOR THE LEVER ACTION IT'S SUPPOSED TO ENDURE?
*****************************************
Thanks, guys... any thoughts in this one would be helpful.
* I'm going to be replacing the heater core hoses IN THE ENGINE BAY, as well, and I wondered if anyone found any at the parts store that will work... They have very specific angles, and I just don't wanna pay TOYOTA 25$ for 2 hoses! (I have to cut one, anyhow, to put in my Prestone Flush Valve- T ) ... So why get raped when the Kragen and such have so many angled versions? RIGHT?
LOL. * When I replace them, I'll likely pull them off the heater core, CAP the heater core inlet and outlet with some spare heater hose I have/with bolts stuck in them to plug them/ and then cap the hose on top and remove it, then QUICKLY cap the wrap around pipes that the heater hoses go to(the aircraft aluminum ones that to to the timing cover on the driver side and into the underside of the intake on between the 2 and 3 intake runners on the pass. side).
10-03-2012, 11:59 AM
#4891
Registered User
TODAY, I ............................ HAHAHA.....>>>>>
I actually got a bit done today, off and on. Changed the oil(Gotta tell ya... having big hands and arms makes changing out the oil filter REALLY SUCK! ESPECIALLY on IFS trucks! I was TEARING my arm up, BAD, once again, so I decided, "SCREW THIS, ... I'm pulling the skid plate".......... 3 minutes later, NO KIDDING, it was off and ready for a new one! lol.
I actually got a bit done today, off and on. Changed the oil(Gotta tell ya... having big hands and arms makes changing out the oil filter REALLY SUCK! ESPECIALLY on IFS trucks! I was TEARING my arm up, BAD, once again, so I decided, "SCREW THIS, ... I'm pulling the skid plate".......... 3 minutes later, NO KIDDING, it was off and ready for a new one! lol.
10-03-2012, 12:24 PM
#4892
Registered User
perhaps with bracket differences chef the throw lever on the valve might be the cause you might have to adjust the distance a bit with washers behind the bracket?
10-03-2012, 12:35 PM
#4893
Registered User
iTrader: (4)
Join Date: May 2010
Location: People's Republic of California
Posts: 720
Likes: 0
Received 15 Likes
on
12 Posts
Don't you have that access area in the passenger fender well? Kinda like what's on 4crawler's website...remove the panels bolts and there it is.
Then get one of these adapters and a 3/8th long extension and ratchet....easy peasy. If I didn't have to undo the drain plug, nothing but my feet would ever touch the ground.

Then get one of these adapters and a 3/8th long extension and ratchet....easy peasy. If I didn't have to undo the drain plug, nothing but my feet would ever touch the ground.
10-03-2012, 05:06 PM
#4894
Registered User
Mark I want to the second Gen valve convention as well but I don't have the parts to do it at the moment so I'm no help there, on the lever adjustment out of adjustment just not working properly thingy you speak of are you sure it not out of adjustment on the valve bracket under the hood. Maybe unhook it from the valve move the open or close the valve completely then move the lever to that position tighten it back down and see what you got. Just throwing it out there buddy. Good luck with it.
10-03-2012, 05:08 PM
#4895
YES, RICHARD, I'M WHINING, WAHHHHHHHHHH  HAAHAHA... jk, jk.... I was just trying to word it in my 'attempting to be humble' way and laugh at myself.......... But GREGO, now reminding me of that point that I've read 15 times and yet......... ONCE AGAIN FORGOTTEN, has me needing to be humble yet again, when I say, "HAAAAAAAAAHAHAHAHAHAHAHAHAHAHAHHAHAHAHAHAAHAHAHAH AAAAAAAAAAAAAAAHAHAHAHAHAHAA ............ BREATH, ................HAHAHAHAHAHAHHAHAHAHAHAHAAH!" That's LITERALLY how hard I just laughed at myself! I TOTALLY forgot about that, Grego! DAYUMMMMM! lol. Funny though, when I used to take it in for oil changes(my work would pay for it at the time, so why not, right?)..... They NEVER removed that panel. Funny thing is, I removed it just 2 years ago to change out the fuel filter!
 haaaaaaaahahahaa! WOW, that reallyyyyy cracked me up, Grego... I know it wasn't your intention... And you could've easily have been REALLY insulting and smart arse, like many on the sites are, ...... but you SPARED ME and left it for me to 'self smackdown!' lol.... I appreciate it, good sir! ........I'll just throw in a final, 'DOHHHHHHHHH!' lol
Dragon, ............ I looked in there, today, in the slot that the lever slides in?(I hope that's what you're talking about, hehehe) .... I think the apparatus that controls both brackets for "HOT/COLD" and "AC/HEAT" has snapped off the black thingy terry and I have been talking about(climate control mechanism/levers and cables).... ....... This means I'll have to at LEAST pull the entire assembly, anyhow(SOME DAY, ..it's on the lower part of my list... I mean, I can MAKE it work for now, manually... so it's ok. Maybe the black housing for all the cables... maybe it's mounting screws broke away from the back of the dash? THAT is what I'm starting to think. I have to pull the climate control face plate off and take a look.. Thanks, Dragon, for chiming in... I REALLY appreciate the ideas you and others throw in. ALWAYS worth a check/look-see
HAAHAHA... jk, jk.... I was just trying to word it in my 'attempting to be humble' way and laugh at myself.......... But GREGO, now reminding me of that point that I've read 15 times and yet......... ONCE AGAIN FORGOTTEN, has me needing to be humble yet again, when I say, "HAAAAAAAAAHAHAHAHAHAHAHAHAHAHAHHAHAHAHAHAAHAHAHAH AAAAAAAAAAAAAAAHAHAHAHAHAHAA ............ BREATH, ................HAHAHAHAHAHAHHAHAHAHAHAHAAH!" That's LITERALLY how hard I just laughed at myself! I TOTALLY forgot about that, Grego! DAYUMMMMM! lol. Funny though, when I used to take it in for oil changes(my work would pay for it at the time, so why not, right?)..... They NEVER removed that panel. Funny thing is, I removed it just 2 years ago to change out the fuel filter! haaaaaaaahahahaa! WOW, that reallyyyyy cracked me up, Grego... I know it wasn't your intention... And you could've easily have been REALLY insulting and smart arse, like many on the sites are, ...... but you SPARED ME and left it for me to 'self smackdown!' lol.... I appreciate it, good sir! ........I'll just throw in a final, 'DOHHHHHHHHH!' lol Dragon, ............ I looked in there, today, in the slot that the lever slides in?(I hope that's what you're talking about, hehehe) .... I think the apparatus that controls both brackets for "HOT/COLD" and "AC/HEAT" has snapped off the black thingy terry and I have been talking about(climate control mechanism/levers and cables)....
....... This means I'll have to at LEAST pull the entire assembly, anyhow(SOME DAY, ..it's on the lower part of my list... I mean, I can MAKE it work for now, manually... so it's ok. Maybe the black housing for all the cables... maybe it's mounting screws broke away from the back of the dash? THAT is what I'm starting to think. I have to pull the climate control face plate off and take a look.. Thanks, Dragon, for chiming in... I REALLY appreciate the ideas you and others throw in. ALWAYS worth a check/look-see
10-03-2012, 05:11 PM
#4896
PS> Grego;
I tried one of those socket things once.... it didn't seem to work right on the Toyota Filter... Kept stripping out the filter end. I'll try it again. I don't screw it too tight... So I'm not sure why it gets SOOOOOOOO tight thereafter, aside from the fact that the Toyota 'Seal' expands due to heat after the first cycle... and literally tightens itself like a lock washer. Someone once told me, "With toyota filters, go as tight as you can with your thumb on one side and 2 fingers directly across... that's it. It may seem like it wouldn't suffice... but IT WILL get MUCH tighter as the engine heats up the first time"... I guess that makes sense to me now! lol.
I tried one of those socket things once.... it didn't seem to work right on the Toyota Filter... Kept stripping out the filter end. I'll try it again. I don't screw it too tight... So I'm not sure why it gets SOOOOOOOO tight thereafter, aside from the fact that the Toyota 'Seal' expands due to heat after the first cycle... and literally tightens itself like a lock washer. Someone once told me, "With toyota filters, go as tight as you can with your thumb on one side and 2 fingers directly across... that's it. It may seem like it wouldn't suffice... but IT WILL get MUCH tighter as the engine heats up the first time"... I guess that makes sense to me now! lol.
Last edited by ChefYota4x4; 10-03-2012 at 05:13 PM.
10-03-2012, 05:21 PM
#4897
Diff Breather...........
I stopped by O'Reilly today, and I now have everything I need to do the Diff Breathers..... EXCEPT the filters. I know they're not necessary... BUT, I'll do them anyway at 2$ each, ya know?
I plan on doing the "In the taillight housing" and "Up behind the Battery" method.... I'll take tons of pics and such, as usual
***********************************************
I also got the heater hose I need to swap over to the 2nd Gen 4Runner Heater Control Valve.... THEN I'll take a look in the dash and see if I can fix it or if it's toast! At least I have 2 climate control assemblies, COMPLETE and pristine, in case I need to do it. I will probably replace the heater core while in there.... It's GOTTA be getting close to "never know" time, after 25 years, right????? I mean, might not ever have the dash apart again. (we'll see what I find when digging a lil further into the assembly. I'll letcha know, guys  )
)
L8r
I plan on doing the "In the taillight housing" and "Up behind the Battery" method.... I'll take tons of pics and such, as usual
***********************************************
I also got the heater hose I need to swap over to the 2nd Gen 4Runner Heater Control Valve.... THEN I'll take a look in the dash and see if I can fix it or if it's toast!
At least I have 2 climate control assemblies, COMPLETE and pristine, in case I need to do it. I will probably replace the heater core while in there.... It's GOTTA be getting close to "never know" time, after 25 years, right????? I mean, might not ever have the dash apart again. (we'll see what I find when digging a lil further into the assembly. I'll letcha know, guys ) L8r
10-03-2012, 06:17 PM
#4898
Super Moderator
Staff
iTrader: (1)
Join Date: Aug 2008
Location: Anderson Missouri
Posts: 11,788
Likes: 0
Received 25 Likes
on
22 Posts
I never thought of a heli coil for the exhaust manifold and I just scrapped a good one not long ago. I think Jason mentioned it to me as well and of course this was after I done got rid of it. Dont know why I didnt think of that. Great idea. I am not a fan of headers for myself.
From what I have read the Supra is suposed to be a little help. One day I wil put mine on and see if it does make a difference. It is still aways off, just got to get around to doing it.
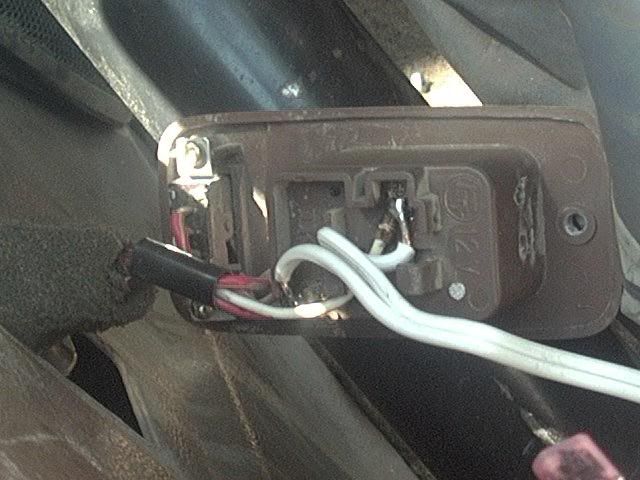
On the ground wire. In the first picture, the brown wire is my jumper wire. I am guessing you only want yours temporary. What I do is strip off about a half inch of insulation and twist the exposed wires tightly together and slip it under the plug where it will make contact with the connector in the back. To make that part permanent, I just use electrical tape and wrap it good and tight so as the wire cant back out of the plug. I dont do any cutting or splicing as far as that goes and it works great for me. Never had any problems. Make sure you have the plug sitting the way I have it in the picture and it will be the wire on the top row where I have the black dashes. This is a double row connector plug and you want it on the top row or the row closest to you.
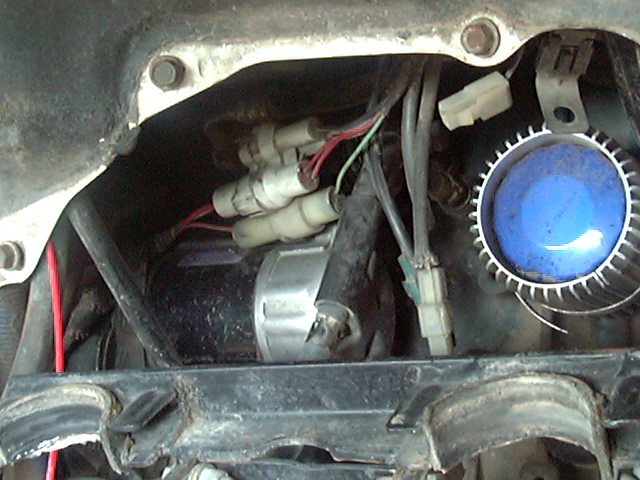
On the picture below I run the other end of the jumper wire to the front mounting tabs of the center console as that is where I can get a good ground. On that I strip off about an inch of wire and when running a mounting screw into to front of the center console, I make sure it gets a good connection with the screw and the mounting tab.
The way I do it, it can be permanent or temporary and there is no damage to the wiring. The electrical tape is what more or less determines if you want it permanent. It could be soldered, but I have never had any problems doing it this way, and I dont care for cutting into wires unless I just absolutely have to. With your top off and the jumper wire in, the window will go up, but the switch is safely out of the way. Eventually I am going to extend my wires so that I can run them under the ash tray where you have you electric antenna on your runner.
Jason told me that the reason the rear mounting tabs wont work is because they are isolated with a rubber or plastic piece between the body and the tab.
Jumper wire to the front tab.
From what I have read the Supra is suposed to be a little help. One day I wil put mine on and see if it does make a difference. It is still aways off, just got to get around to doing it.
On the ground wire. In the first picture, the brown wire is my jumper wire. I am guessing you only want yours temporary. What I do is strip off about a half inch of insulation and twist the exposed wires tightly together and slip it under the plug where it will make contact with the connector in the back. To make that part permanent, I just use electrical tape and wrap it good and tight so as the wire cant back out of the plug. I dont do any cutting or splicing as far as that goes and it works great for me. Never had any problems. Make sure you have the plug sitting the way I have it in the picture and it will be the wire on the top row where I have the black dashes. This is a double row connector plug and you want it on the top row or the row closest to you.
On the picture below I run the other end of the jumper wire to the front mounting tabs of the center console as that is where I can get a good ground. On that I strip off about an inch of wire and when running a mounting screw into to front of the center console, I make sure it gets a good connection with the screw and the mounting tab.
The way I do it, it can be permanent or temporary and there is no damage to the wiring. The electrical tape is what more or less determines if you want it permanent. It could be soldered, but I have never had any problems doing it this way, and I dont care for cutting into wires unless I just absolutely have to. With your top off and the jumper wire in, the window will go up, but the switch is safely out of the way. Eventually I am going to extend my wires so that I can run them under the ash tray where you have you electric antenna on your runner.
Jason told me that the reason the rear mounting tabs wont work is because they are isolated with a rubber or plastic piece between the body and the tab.
Jumper wire to the front tab.
Last edited by Terrys87; 10-03-2012 at 06:28 PM.
10-03-2012, 06:34 PM
#4899
Super Moderator
Staff
iTrader: (1)
Join Date: Aug 2008
Location: Anderson Missouri
Posts: 11,788
Likes: 0
Received 25 Likes
on
22 Posts
On your diff breather extention, I use the relief valve that goes into the pumpkin and put it into the hose with a good worm screw clamp. I suggest using a fuel line hose just so that it is more resistant to gear oil. Not sure of the filters you are talking about. They for the Diff?
10-03-2012, 06:42 PM
#4900
Super Moderator
Staff
iTrader: (1)
Join Date: Aug 2008
Location: Anderson Missouri
Posts: 11,788
Likes: 0
Received 25 Likes
on
22 Posts
It may be cause of my height and long arms, but on the oil filter I am able to get my left arm thru and over the AC and get to the oil filter and remove it that way. Depending on if you are able to reach it that way, I like getting to them that way. I cant see anything but just know by feel. The filter doesnt have to be cranked on tight, but it does help to have a some strength in your grip. I can actually get a better twist doing it this way over the acess panel just because of the angle.
Last edited by Terrys87; 10-03-2012 at 06:43 PM.


