
ChefYota4x4's 1987 4Runner Build-Up Thread
 09-09-2012, 11:01 AM
#4721

 If it wasn't having chips and dings and a BAD DRIVER SIDE of "oxidizing"(WTH IS UP WITH THAT?).... I'd grab a set of those Gold decals from Jamesdean and freshen her up that way... But MEH, .....kinda should wait for that until I paint it, ya know? haha... I've thought about painting them by hand though... The stripes... I have a steady hand... I think I could do it... Tape off the hood and try that first, maybe with the Bronzy Gold at Home Depot that I saw... looks like AN EXACT match.. And I'd have to sand it a lil bit anyway on those stripes... But maybe it'd be a nice fresh'n up, eh? Lemme know whatcha think, lol. (BTW, I mentioned the WTH? because I've seen SO MANY my year with original paint... and they're ALWAYS FADED ON THE DRIVER SIDE! Never facing the sun on that side if I can help it, etc.... it just seems like they forgot a coat or something.. Tailgate, Hood, entire right side has nearly NO oxidation! ...oh well, even if I find out.. WDDImake? lol. I'd still have to fix it some day anyhow.. But I appreciate it, big time, Troy... made my day, thanks lol).... I had a nice 26" HF 1/2"Drive Breaker..... helped a lot.... BFH's..... Couple hours free time and we knocked it out like it was a glassed jawed slacker! lol. He also got some of the Head Rests I'm sporting.... The 86-91 Camry SUPREME head Rests, Velour, Not the cloth... Especially important is that they have the PLASTIC RETAINER on the bottom... The Cloth-Burber style ones seem to mostly be velcro.... NO LIKEY, they leak orange foam. But anyway, they're WAY more comfortable... And last night, after eating... Richard said, "Hey, lemme sit in that again to see how my Comfort Zone will be.... "Ahhhhhhhh, mannnnnnn... I'ma fall asleep on the road", he said! hahaha. I will show them more clearly, installed... Because they REALLY pull up the 'SPACE' behind the head left by our FAR too thin Head Rests.... LOVE THEM! One of the best mods for comfort that I've done. And finding 2 Gray ones for him....WOW! That was sweet, cuz everything seemed so raped that day/recently
Thanks, again, Terry, on the BB.... she's a cutie... Just a lil doll!
 09-09-2012, 11:12 AM
#4722
PS, Terry,
That was only ONE of two 4Runners with totally wasted 80% thereof! Richard can tell ya.. The white behind it? WOW! The whole core support on the silver one was PERFECT... til they cut the cross bar portion at the top and bent back the sides. lol.
lol.
That was only ONE of two 4Runners with totally wasted 80% thereof! Richard can tell ya.. The white behind it? WOW! The whole core support on the silver one was PERFECT... til they cut the cross bar portion at the top and bent back the sides.
lol.
09-09-2012, 12:57 PM
#4723
Registered User
hey buddy just checking in looks like you made a preaty good score at the salvage yard, Im with you and everybody else on the way people have no respect for the fact the next guy might need that $20 doller part you just destroyed to get your $2 part out. hope all is well with you man grand baby is sure growing.
09-09-2012, 08:46 PM
#4725
Registered User

Join Date: Sep 2012
Posts: 4
Likes: 0
Received 0 Likes
on
0 Posts
I'm new to Yotatech but I live in Long Beach and I go wheeling a lot around SoCal. I wouldn't mind getting together with some other 1st Gen Runners for a weekend trip or something. Looking through your thread, it seems like you guys get out a lot. Let me know.
Brad
Brad
09-09-2012, 09:51 PM
#4726
Registered User
Oh nice man. What is that like 5-6 guys now? I'm sure we defonitely have enough people for a small off road trip now.
1)Me 2) you 3) the other mark 4)Grego 5)jmc 6) possibly blakefogt 7) I know im missing one more guy in socal. 8) brad and not o mention the 2 neighbours I have that are helping me with my SAS. Damn dude that's 10 people! lol might as well start a club already ha ha!
1)Me 2) you 3) the other mark 4)Grego 5)jmc 6) possibly blakefogt 7) I know im missing one more guy in socal. 8) brad and not o mention the 2 neighbours I have that are helping me with my SAS. Damn dude that's 10 people! lol might as well start a club already ha ha!
09-09-2012, 09:58 PM
#4727
Registered User
Join Date: Sep 2012
Posts: 4
Likes: 0
Received 0 Likes
on
0 Posts
Great. My business partner and I may be headed up to Jackass Meadows in a week or so. He's got a brand new, fully loaded Rubicon that needs to get bush-whacked badly. I haven't had mine out for a while but I'm in need of some new tires. I'll keep you guys updated as plans develop.
09-09-2012, 10:43 PM
#4728
Hahaha... A club would be fine, Richard.. why not? "West Coast Yota's"? lol.... Anyway, s'all good... as long as we get out there.
Nice to meet you, Brad... I used to get out A LOT more... but lately it's been a lil more steady again. I REALLY am dying to do a trip to the Sierras for a few days... BUT, ....... I'm TOTALLY grateful to have this stuff near by while I'm waiting to be able to get up there for a few again ANYONE can go, IMHO.... within reason. Anyone but a drunken/drug using/careless/dangerous/Joy Succubus! Right? lol.
SoCal is who you're thinking of, maybe, Richard? He's got a SICK 85 from hell! lol... So he'd likely want more challenging things than most of what we're doing.. BUT, there WERE some pretty nasty climbs, etc., that I avoided for the tip factor... who knows, maybe he would love it! lol. There's a couple more,too.. And GREGO! Definitely gotta get him out there, YES! lol. He's a solid dude, fo sho... So, yep, .... would be cool to get out and wheel together, all of us... Sure nuff!
Nice to meet you, Brad... I used to get out A LOT more... but lately it's been a lil more steady again. I REALLY am dying to do a trip to the Sierras for a few days... BUT, ....... I'm TOTALLY grateful to have this stuff near by while I'm waiting to be able to get up there for a few again
ANYONE can go, IMHO.... within reason. Anyone but a drunken/drug using/careless/dangerous/Joy Succubus! Right? lol. SoCal is who you're thinking of, maybe, Richard? He's got a SICK 85 from hell! lol... So he'd likely want more challenging things than most of what we're doing.. BUT, there WERE some pretty nasty climbs, etc., that I avoided for the tip factor... who knows, maybe he would love it! lol. There's a couple more,too.. And GREGO! Definitely gotta get him out there, YES! lol. He's a solid dude, fo sho... So, yep, .... would be cool to get out and wheel together, all of us... Sure nuff!
09-09-2012, 11:45 PM
#4729
OK guys, ....
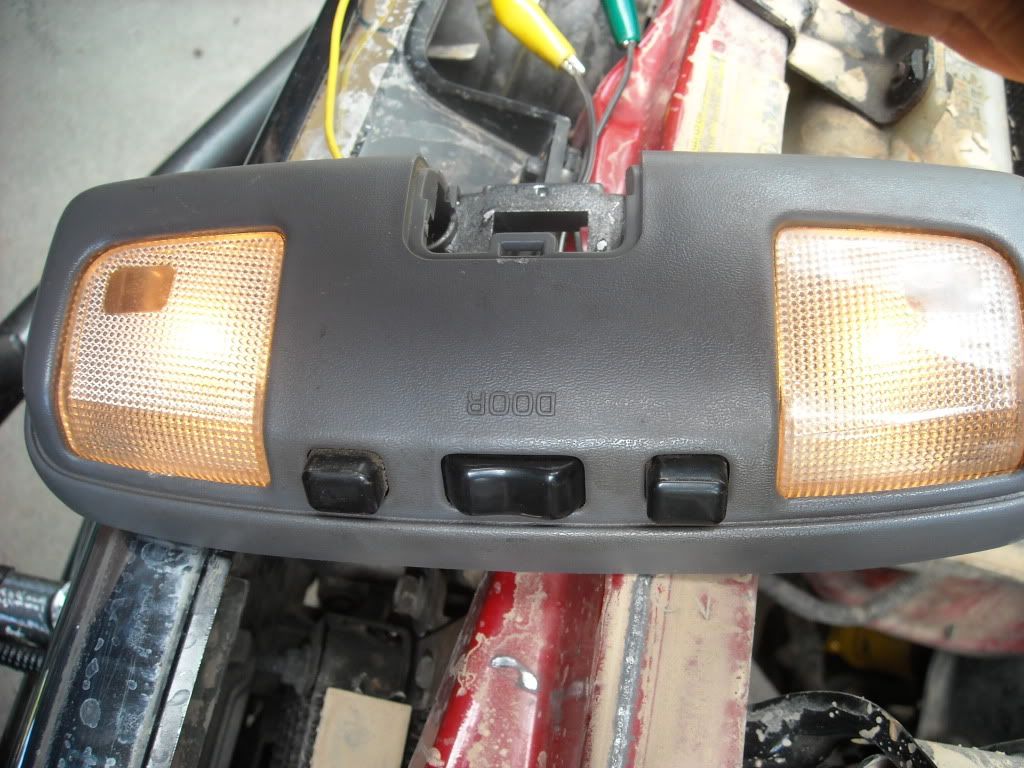
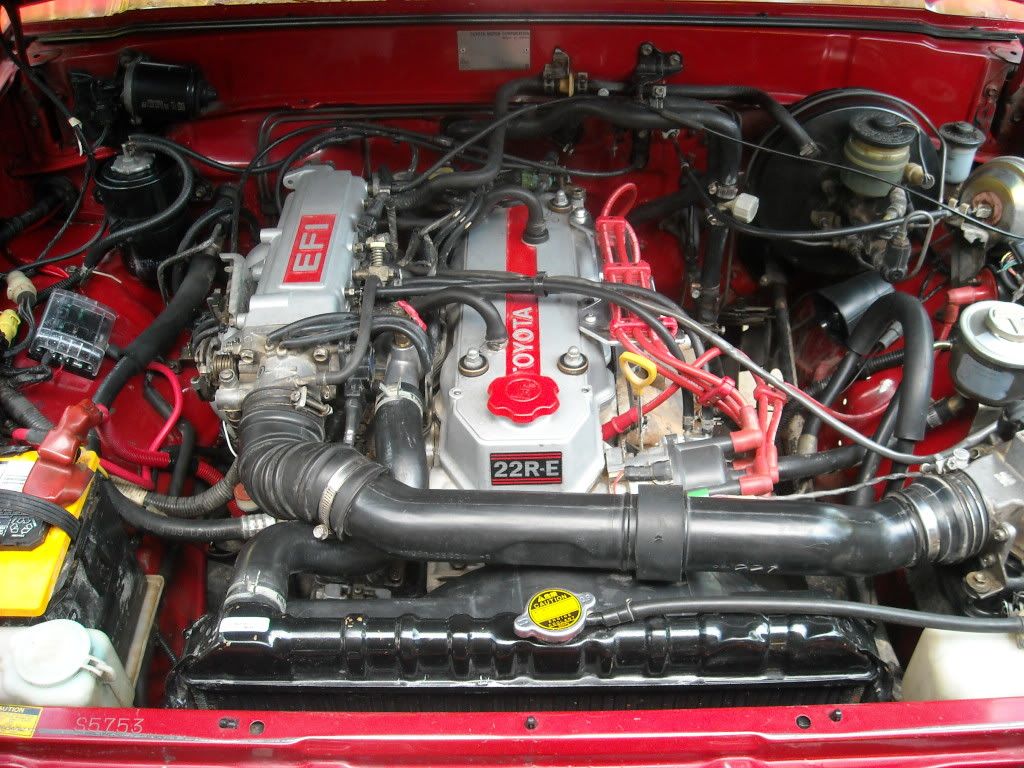
Lil post for fun.... Much of it is of my finds at Pick-Your-Part in the "Interior/Exterior Lights Dept" .... So just thought i'd post up some of my investigating and show ya what I have... see what you think about what might work best and where. I KNOW I'll be installing this.... The extendable engine compartment light I grabbed... LOVE it.... I know, probably have them at some parts stores... But this seems old school and heavy duty, ya know? And a 1$? Worth it to me (PS> The Before and after of my engine will be..... Look at the videos.. That's the clean up I had in front of me, lol)....>>>
First, I didn't do a video, but this is the 2nd Gen 4Runner Map light... it's 2- 30mm Festoons, one on each side.... WAY brighter compared to my first gen Map light... I WANT this mod! lol....

The rest are others.... the videos will speak for themselves......


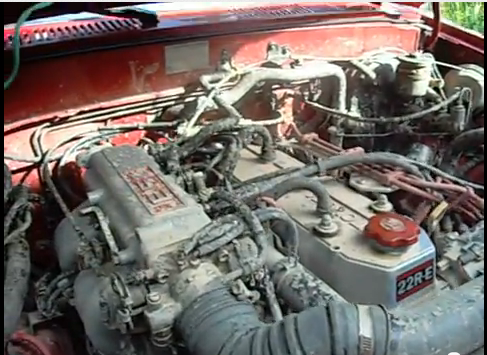
After testing these lights............. I hit the engine bay for a lil clean up. I've done it a few times on these and there's a pretty quick method for the 22RE that leaves pretty much every crevice clean... Toothbrush/Small Scrub Brush with long handle/Warm Soapy Water/Large Shop Towel and low pressure water that I can wipe clean as I go. Then I remove most of the vacuum to things that are in the way, as I'm wiping it clean at the end. Cover Alternator and Dizzy Cap and Coil and Ignitor with bags, tie off with string, TPS covered with small snack bag.... Then I flush through the condensor and radiator first, then work my way around the sides and down a bit, then move to engine, then back to bottom most part of fender wells and such and call it a day with a good shot of forced air... THE AIR IS SO GREAT to have... GET IT, if you don't got it! lol. I blow off the bags then rip them from the top outward like a flower, to keep all the water trapped in them from pouring into the dizzy cap area and then alternator same way. Not a HUGE deal for them to get a splash, ..but just good precaution.
I feel for Richard... the 3.0 does NOT SEEM AS EASY of a cleaning job... Plus, way more sensors, etc..... And lil harder to cover the Alternator and such, I believe? But he did a good job too... Anyway, here's the before(frozen Youtube Shot).... or two...
BEFORE;
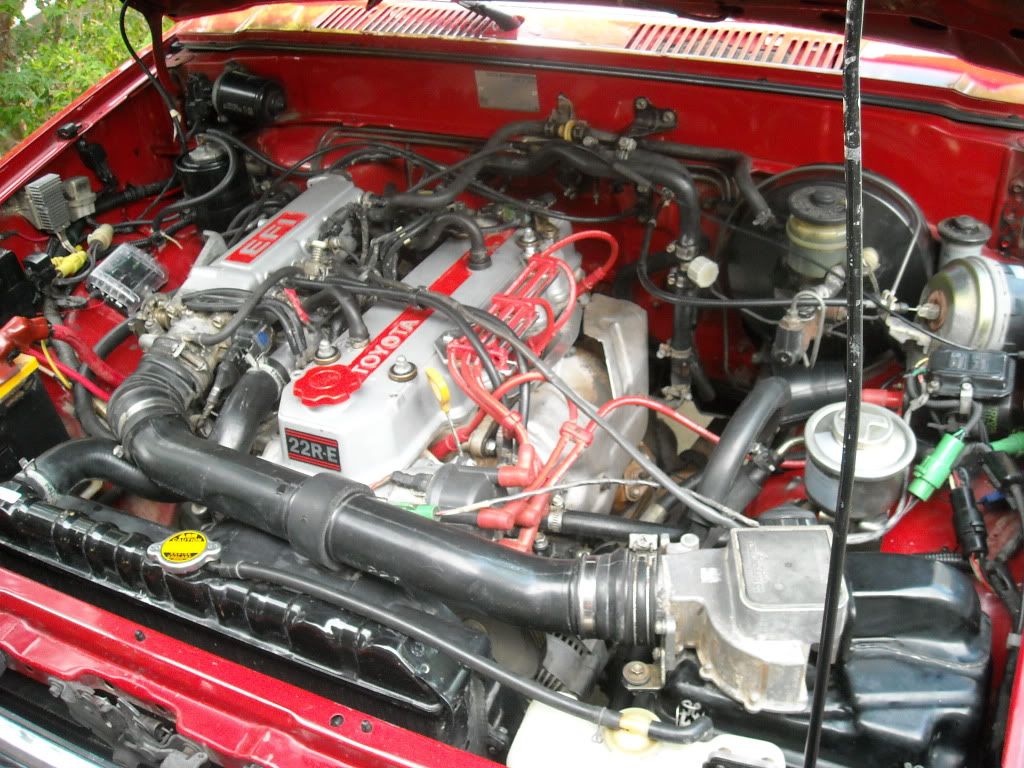
After(back to something Richard can respect when we roll with Grego and "His Immaculate Machine!" hehehe..........
AFTER:
************************************************** ****************
PS> My niece turned 17, TODAY! I can't believe it, Guys... I mean, she was TINY just a couple years ago... it seems..... What a beautiful young Woman, inside and out......

Lil post for fun.... Much of it is of my finds at Pick-Your-Part in the "Interior/Exterior Lights Dept" .... So just thought i'd post up some of my investigating and show ya what I have... see what you think about what might work best and where. I KNOW I'll be installing this.... The extendable engine compartment light I grabbed... LOVE it.... I know, probably have them at some parts stores... But this seems old school and heavy duty, ya know? And a 1$? Worth it to me
(PS> The Before and after of my engine will be..... Look at the videos.. That's the clean up I had in front of me, lol)....>>> First, I didn't do a video, but this is the 2nd Gen 4Runner Map light... it's 2- 30mm Festoons, one on each side.... WAY brighter compared to my first gen Map light... I WANT this mod! lol....
The rest are others.... the videos will speak for themselves......
After testing these lights............. I hit the engine bay for a lil clean up. I've done it a few times on these and there's a pretty quick method for the 22RE that leaves pretty much every crevice clean... Toothbrush/Small Scrub Brush with long handle/Warm Soapy Water/Large Shop Towel and low pressure water that I can wipe clean as I go. Then I remove most of the vacuum to things that are in the way, as I'm wiping it clean at the end. Cover Alternator and Dizzy Cap and Coil and Ignitor with bags, tie off with string, TPS covered with small snack bag.... Then I flush through the condensor and radiator first, then work my way around the sides and down a bit, then move to engine, then back to bottom most part of fender wells and such and call it a day with a good shot of forced air... THE AIR IS SO GREAT to have... GET IT, if you don't got it! lol. I blow off the bags then rip them from the top outward like a flower, to keep all the water trapped in them from pouring into the dizzy cap area and then alternator same way. Not a HUGE deal for them to get a splash, ..but just good precaution.
I feel for Richard... the 3.0 does NOT SEEM AS EASY of a cleaning job... Plus, way more sensors, etc..... And lil harder to cover the Alternator and such, I believe? But he did a good job too... Anyway, here's the before(frozen Youtube Shot).... or two...
BEFORE;
After(back to something Richard can respect when we roll with Grego and "His Immaculate Machine!" hehehe..........
AFTER:
************************************************** ****************
PS> My niece turned 17, TODAY! I can't believe it, Guys... I mean, she was TINY just a couple years ago... it seems..... What a beautiful young Woman, inside and out......
09-10-2012, 11:24 AM
#4730
Registered User
Damn Mark. That cleaned up super good. I should bring over my truck so u can help me do mine. Lol.
Dude I'm gonna try that toothbrush idea out. I gotta get into the tiny spaces. I was thinking of buying a couple of black paint and gray paint can and some sand paper to clean up some of the parts and metal areas that have light rust and old paint. It would make it look much nicer, cleaner, and newer look like yours and Grego's
Dude I'm gonna try that toothbrush idea out. I gotta get into the tiny spaces. I was thinking of buying a couple of black paint and gray paint can and some sand paper to clean up some of the parts and metal areas that have light rust and old paint. It would make it look much nicer, cleaner, and newer look like yours and Grego's
09-10-2012, 12:41 PM
#4731
Thanks, Richard.....
Yeah, the toothbrush works great... BUT, you need to get the ones with the 'FLEXY' bit right by the bristles.(KWIMean?) They tend to work around things a lil better...
First thing I should have mentioned..... DO THE HOOD UNDERSIDE FIRST! Obvious why, right? hahaa... For that, I just use a nylon scrub brush and spray mist or 2 or 3 of simple green..... .Then hit it with the water and VOILA, spotless!
The main thing is just working in a pattern from the top down/sides down/ evenly so that rinsing doesn't take a bunch of crap into what you just cleaned. Also SUPER important, as I said, is 'WRAPPING' electronics as best as you can... This helps not just as precaution...but "mentally", because then you're not as afraid to CAREFULLY hit it with pressure.
HOWEVER, I barely use ANY pressure at all.... I use a low pressure setting on the water hose and use the firemans tip on my hose....(narrow nozzle at the end).... This way, I can just keep the hose bent, then when letting off the bend a lil, it kinda 'FLOWS' everything in the direction I want WITHOUT too much pressure.... but enough to 'rinse off the top of whatever I'm working on'....
The toothbrush really helps with hoses and such and underside of the wires on my LCE Billet thingymadoer.... for the plug wires... I can slide the bristles under the wires and get the bottom too... THEN, when I'm nearly done, ....THEN I pull the plug wires and wipe each one down on the 'plug end'. For this, I have a wet towel with a lil simple green mixed into the 'WET'.... But for the most part, a lil 2 Cup Glass measuring cup up on the intake/valve cover filled with warm water and a splash of dish soap.... Dish soap is mild and LIFTS and is FAR better IMHO than engine degreaser... Simple Green, too...STUFF IS GOLD! Ok, it's green, but it works!
YET, NO MATTER WHAT; You have to get into all kinds of crevices and cracks and under hard lines and so on..... And once you get used to the toothbrush and rinse, toothbrush and rinse(rinsing the bristles often too).... You'll find you can move PRETTY QUICKLY with it. Just gotta keep the portion your scrubbing rinsed as you go, QUICKLY... Cuz cool water hardens grease on contact, and it doesn't wanna do anything but stick right back on whatever it's on.
I will do a lil video when I do the CRV.... FOAM IS FINE, I'm not knocking the stuff... BUT, My engine is PRETTY LOW on grease... That's not my problem... And foam doesn't pull dirt clods out of recesses, etc. THIS IS WHERE THE FORCED AIR ALSO COMES IN; When you get to a tough spot you can't reach.... USE Q-TIPS, ..... BBQ Wooden Pics, and then lil shot of forced air and it goes flying. Try to find those spots first, cuz when you do hit it, it'll blast all over the motor again, ya know?
09-10-2012, 01:00 PM
#4732
Registered User
So i know i promised naked picture of my cab without the headliner but i havn't even been able to do anythign but clean up the shed shop. had massive rain storm yesterday adn its still going today
i will get the pictures soon!
i will get the pictures soon!
09-10-2012, 01:26 PM
#4733
Registered User
Oh wow Mark. U went all out with qtips and toothpicks lol. How about you show me your techniques on my truck lol But definitely did a great job man. I gotta grab some cleaner and other things to clean up everything. I was thinking maybe removing some of the containers air filter box all my hoses etc and literally clean everywhere. I wish I could clean up the radiator. I know I have some dry dirt in there too. I'll see what I do.
09-10-2012, 05:52 PM
#4734
Hey Richard... Yeah, I cleaned the radiator AND condensor by flushing inward with 'REASONABLE' pressure.... I know they can take some high winds and pressure... But not SUPER POWERED 2" HOSE FULL BORE FIREMANS HOSE PRESSURE! lol.... Wouldn't do that. I flushed it both directions as best as I could... And hit the fan clutch as well while at it/all the front end timing cover stuffs... etc. THEN high pressure washed the skid plate and oil pan and ...so on. hahaha.... didn't use the qtips too much... Just in lil nooks and crannies, ya know? 
Hey BBrideau, .... DON'T sweat it, man.... S'all good. I WILL try to get my 2nd Gen Map light in though... Think it will be a SICK mod. I've seen it done... CAN'T FIND THE THREAD! GRRR! LOL.
Hey BBrideau, .... DON'T sweat it, man.... S'all good. I WILL try to get my 2nd Gen Map light in though... Think it will be a SICK mod. I've seen it done... CAN'T FIND THE THREAD! GRRR! LOL.
09-10-2012, 11:59 PM
#4735
Super Moderator
Staff
iTrader: (1)
Join Date: Aug 2008
Location: Anderson Missouri
Posts: 11,788
Likes: 0
Received 25 Likes
on
22 Posts
Your engine bay cleaned up nice. I am going to give your tips a try. I work pretty hard on getting my motors painted and it looks bad after awhile. I like your spark plug wire set up. What brand or where did you get those? Mine always looks like spaghetti when I get them in.
Will be looking forward to your 2nd gen light mod as they are a better light system. Will eventually want to give that a try.
Will be looking forward to your 2nd gen light mod as they are a better light system. Will eventually want to give that a try.
09-11-2012, 12:09 AM
#4736
Your engine bay cleaned up nice. I am going to give your tips a try. I work pretty hard on getting my motors painted and it looks bad after awhile. I like your spark plug wire set up. What brand or where did you get those? Mine always looks like spaghetti when I get them in.
Will be looking forward to your 2nd gen light mod as they are a better light system. Will eventually want to give that a try.
Will be looking forward to your 2nd gen light mod as they are a better light system. Will eventually want to give that a try.
Terry.... before I forget... I'ma hit you up on the tailgate of mine sticking out on the right side for MONTHS now... Almost think it's only locking on the left

 hahaha.
 Anyway, cool... Yeah, I just think of it as 'taking my time', ..but really, it's MUCH faster than other ways I've done it... And then much safer, IMHO, than doing it many other ways. Plus, I don't know.... I always feel like I have to go over and over when I did pressure washing too high. IT WORKS, not knocking it.. Just too paranoid and have had too many instances where it get's in the dizzy, even wrapped... and has gotten in the brake fluid cap cuz I forgot to wrap it one time on my 86,
hehe. You're saying... You are going to put in the 2nd Gen Dome Light? Or the 2nd Gen Map Light? Yeah, as far as the Map light...it's WAY brighter... 2- 30mm Festoons compared to 2 lil thingy's.... BUT, the lil ones are in our cool lil MAGNIFIED LENSES, RIGHT?
 .... yeah, no comparison... WAY nicer light put out. Heck, it's like having 3 dome lights all the sudden...but THEY DO focus in part on the laps of each occupant, ya know?
09-11-2012, 12:11 AM
.... yeah, no comparison... WAY nicer light put out. Heck, it's like having 3 dome lights all the sudden...but THEY DO focus in part on the laps of each occupant, ya know?
09-11-2012, 12:11 AM
#4737
PS> Terry... I also was curious what you thought about the engine light,.... NOSTALGIC, EH? hahaha... I LOVE that thing, not sure why. lol.. Know where people get em? Also.... know where I could get a cover/make one from another? Problem is it's a simple dome...BUT, it goes in and twists like a brake light bulb, to secure, ya know? Lil feet on there. But does have the rubber seal still.... Wonder if it's a factory light off something... ANYONE KNOW??????????
09-11-2012, 12:55 AM
#4738
Super Moderator
Staff
iTrader: (1)
Join Date: Aug 2008
Location: Anderson Missouri
Posts: 11,788
Likes: 0
Received 25 Likes
on
22 Posts
You talking about a light that comes on with the hood lifted and is permantly mounted on the hood? I like those anyways just because I do alot of nite driving. I just looked at my third gen and it has a switch under the hood but the wire runs into the firewall. No idea what it goes to other then a hood warning light maybe. Should be a way to make a 3rd gen light switch ground out similar to the way the dome light would work.
I think it is on your thread or someone elses about using a Chevy trucks under hood light system with a spool on it. I cant seem to keep a flashlight and if I do have one it usually has dead batteries so want to get something like that for myself, just never know when you may need it. I have had flats during the nite and it is a royal pain trying to get a tire on in pitch black.
I got tied up with drill weekend and then work and having to go to the dentist again so I am itching to get back at it on my runner. I need to get my cables installed for the tailgate and will look into what it takes to get the latchs adjusted. Not sure if you adjust them on the body or in the tailgate. I plan on making a video of the jumper wire trick to get the glass up as that will make it alot easier for you to get to the latch assembly. You wont need to make it permant. Dont think it will hurt anything as I have the 88 Runner set this way as the tailgates I always get are messed up anyways. This does solve alot of problems with the backgate.
Haynes "L" for Blue, "R" for Red. Key is pointing to wire.
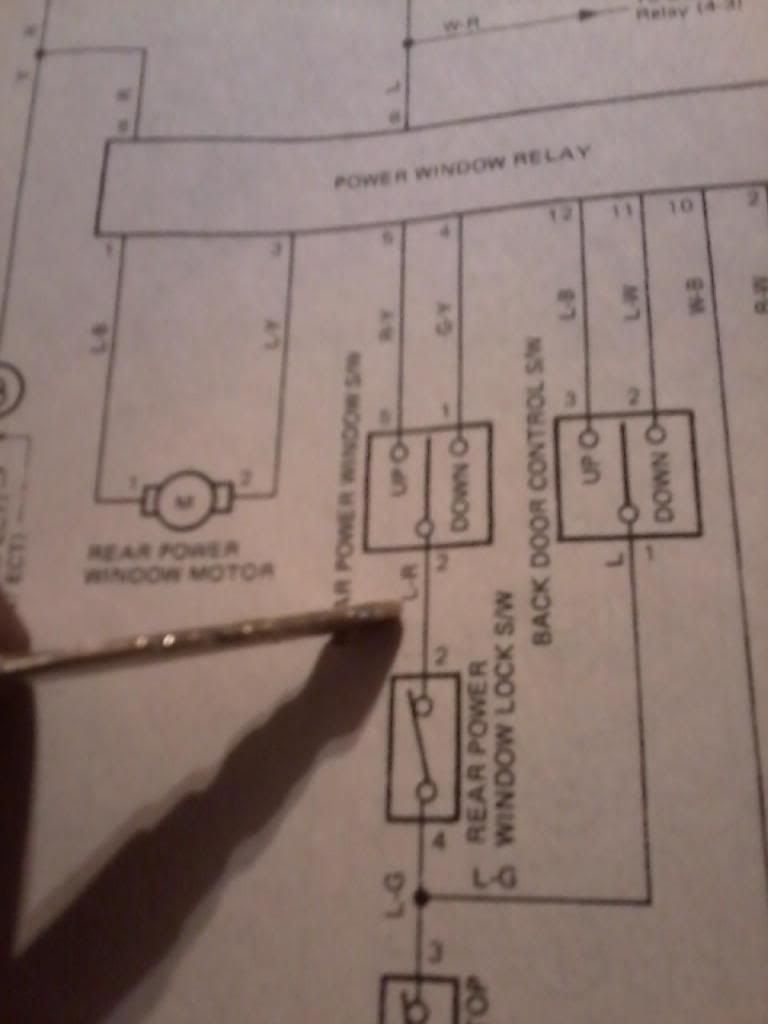
The blue wire is the one that needs grounded. I just strip off the insulation and slide it into the back side of the plug. I can only get a good ground on the front mounting tab in front of the shifter. Going to the body wont work, but since you will probably make yours temporary, you could run a long enough wire to the battery ground. This will by pass all safety features but make it where you can get to the latch in the tailgate with a lot more room.
Orient the plug the way I have it in the picture and where the dotted lines are on the top facing you.

I think it is on your thread or someone elses about using a Chevy trucks under hood light system with a spool on it. I cant seem to keep a flashlight and if I do have one it usually has dead batteries so want to get something like that for myself, just never know when you may need it. I have had flats during the nite and it is a royal pain trying to get a tire on in pitch black.
I got tied up with drill weekend and then work and having to go to the dentist again so I am itching to get back at it on my runner. I need to get my cables installed for the tailgate and will look into what it takes to get the latchs adjusted. Not sure if you adjust them on the body or in the tailgate. I plan on making a video of the jumper wire trick to get the glass up as that will make it alot easier for you to get to the latch assembly. You wont need to make it permant. Dont think it will hurt anything as I have the 88 Runner set this way as the tailgates I always get are messed up anyways. This does solve alot of problems with the backgate.
Haynes "L" for Blue, "R" for Red. Key is pointing to wire.
The blue wire is the one that needs grounded. I just strip off the insulation and slide it into the back side of the plug. I can only get a good ground on the front mounting tab in front of the shifter. Going to the body wont work, but since you will probably make yours temporary, you could run a long enough wire to the battery ground. This will by pass all safety features but make it where you can get to the latch in the tailgate with a lot more room.
Orient the plug the way I have it in the picture and where the dotted lines are on the top facing you.
09-11-2012, 08:31 AM
#4739
Registered User
You talking about a light that comes on with the hood lifted and is permantly mounted on the hood? I like those anyways just because I do alot of nite driving. I just looked at my third gen and it has a switch under the hood but the wire runs into the firewall. No idea what it goes to other then a hood warning light maybe. Should be a way to make a 3rd gen light switch ground out similar to the way the dome light would work.
I think it is on your thread or someone elses about using a Chevy trucks under hood light system with a spool on it. I cant seem to keep a flashlight and if I do have one it usually has dead batteries so want to get something like that for myself, just never know when you may need it. I have had flats during the nite and it is a royal pain trying to get a tire on in pitch black.
I got tied up with drill weekend and then work and having to go to the dentist again so I am itching to get back at it on my runner. I need to get my cables installed for the tailgate and will look into what it takes to get the latchs adjusted. Not sure if you adjust them on the body or in the tailgate. I plan on making a video of the jumper wire trick to get the glass up as that will make it alot easier for you to get to the latch assembly. You wont need to make it permant. Dont think it will hurt anything as I have the 88 Runner set this way as the tailgates I always get are messed up anyways. This does solve alot of problems with the backgate.
Haynes "L" for Blue, "R" for Red. Key is pointing to wire.
The blue wire is the one that needs grounded. I just strip off the insulation and slide it into the back side of the plug. I can only get a good ground on the front mounting tab in front of the shifter. Going to the body wont work, but since you will probably make yours temporary, you could run a long enough wire to the battery ground. This will by pass all safety features but make it where you can get to the latch in the tailgate with a lot more room.
Orient the plug the way I have it in the picture and where the dotted lines are on the top facing you.
wish i had all the stock arm console and shifter cover with all the switches and wring, PO hacked it all away took out the rear heater and used 2x4 to hold the back window up. So now i have custom done switch, ran power wire and ground to a toggle switch and have it mounted above my stereo. now i have ability to open and close window whenever i want =]
09-11-2012, 12:23 PM
#4740
You rock, Terry... Yeah, you'd told me this, right? lol... ....sorry, my bad.
I'm not sure what's likely to have happened... Maybe a shim fell out or the latch that locks it on the right side just simply broke? I have no idea. I SHOULD HAVE LOOKED AT THE ONE IN THE PYPART! grrr! lol. Heck, I could have gotten stuff out of it. Unfortunately, I hear flash floods are heading my way.... so Pick-Your-Part is likely out of the question, lol. WOW that would be a stinky place a couple days after a rain... IN FACT, I remember it happening... POOOOLS of water that they had to pump out off the ground... And you had to walk WAYYYYY out of the way to get back over to the trucks...and even then, many of them were under water.
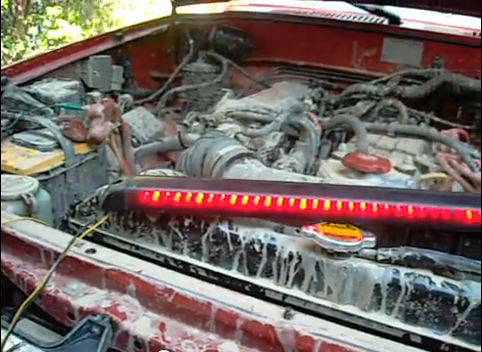
Gonna pick a light for the rear soon.... What do you think, terry? S10 3rd Brake Light 32-LED Mod? hahahaha.
....sorry, my bad. I'm not sure what's likely to have happened... Maybe a shim fell out or the latch that locks it on the right side just simply broke? I have no idea. I SHOULD HAVE LOOKED AT THE ONE IN THE PYPART! grrr! lol. Heck, I could have gotten stuff out of it. Unfortunately, I hear flash floods are heading my way.... so Pick-Your-Part is likely out of the question, lol. WOW that would be a stinky place a couple days after a rain... IN FACT, I remember it happening... POOOOLS of water that they had to pump out off the ground... And you had to walk WAYYYYY out of the way to get back over to the trucks...and even then, many of them were under water.
Gonna pick a light for the rear soon.... What do you think, terry? S10 3rd Brake Light 32-LED Mod? hahahaha.


