
ChefYota4x4's 1987 4Runner Build-Up Thread
 08-23-2012, 02:39 AM
#4601
Super Moderator
Staff
iTrader: (1)
Join Date: Aug 2008
Location: Anderson Missouri
Posts: 11,788
Likes: 0
Received 25 Likes
on
22 Posts
I have a shaft that I was thinking about keeping and rebuilding but it is in terribl shape compared to yours. The PO ran it with the boot cover off and it dry and has a coat of surface rust, plus is missing other parts. I think you will be ok with the cover as it set against the diff flange. I will look at the end cap and see what I think about it. Never had one to come off, but will be aware of it.
I will look into a bread book. I like the flat bread that I was getting in Arab and Asian countries. It is quite similar to flour tortilla shells. That is one thing I miss about traveling was the food but if I never see another airplane again that is fine with me.
I will look into a bread book. I like the flat bread that I was getting in Arab and Asian countries. It is quite similar to flour tortilla shells. That is one thing I miss about traveling was the food but if I never see another airplane again that is fine with me.
 08-23-2012, 10:27 AM
#4602
I'm reposting my last post from page 184.... Because I want it toward the top on this fresh page(sorry Terry, and thanks for your response)........
OK< so, regarding that ^^^^^ ;
I'm not sure that should stop me, as long as everything inside is in decent condition. It NEVER was loose until it got hung up on the diff flange, then as I pulled on the outer CV area, while pushing on the A-arm....
I think it just popped the cover off/the Tripod Joint just pushed it's way through the cover. I gave it a few back and forth tries, not hammering on it or anything... Just with my hands on the outer CV shaft. So.....
When I cleaned it all up, it's ALL original... that thing has never been open. HARD TO BELIEVE the grease is in such good condition! Tripod bearings look really good, ALL Spline ends look great on it... I just have to tap the cover back in with some SUPER SEALANT stuff..... Toyota used to use it, as I KNOW they did on this. They put a TINY bead of it around where it bottoms out... It's hard as Dried Glue... And with a pic I carefully cleaned all that out. FUGGETABOUT THAT STOPPING ME! Unless someone says, "No, silly, that thing is buggered!", hahaha.
I have to get a large pcv or something and some GOOD hard sealing sealant.... Bead the size of a pencil lead, that's how small I mean. then let it dry before installing again with grease and new boots........??????
************************************************** **
Just took a few shots with my 2Gig SD in the camera... I don't know when I'll have time again to head down and get a new card reader, etc.......
Here ya go..........
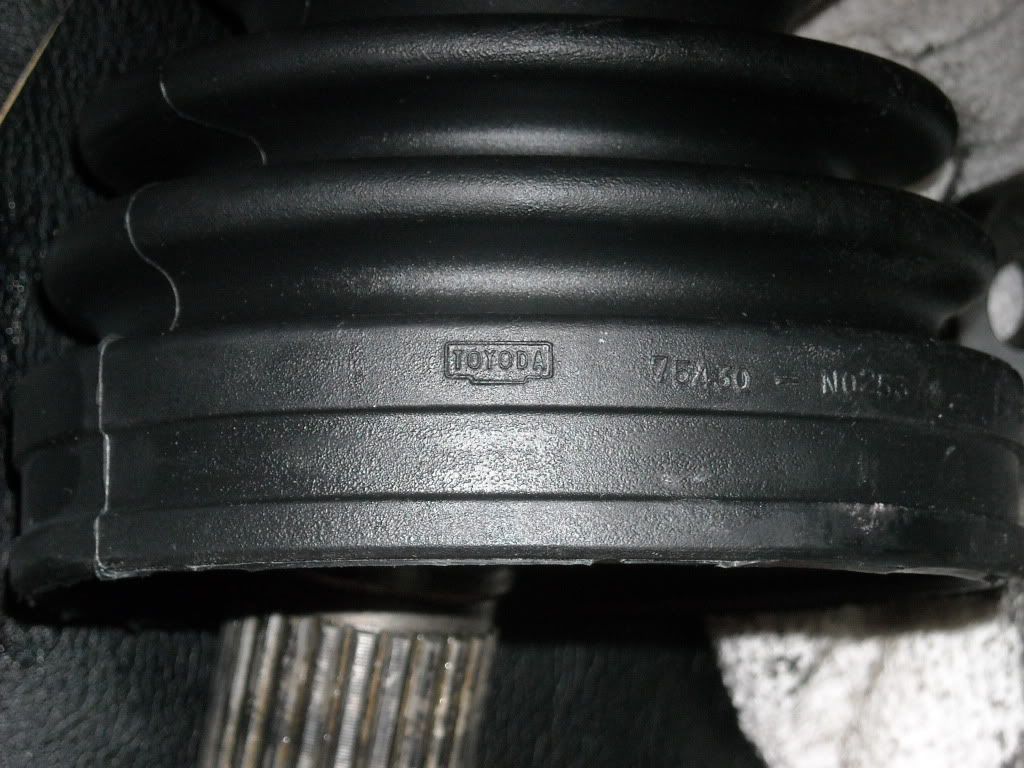
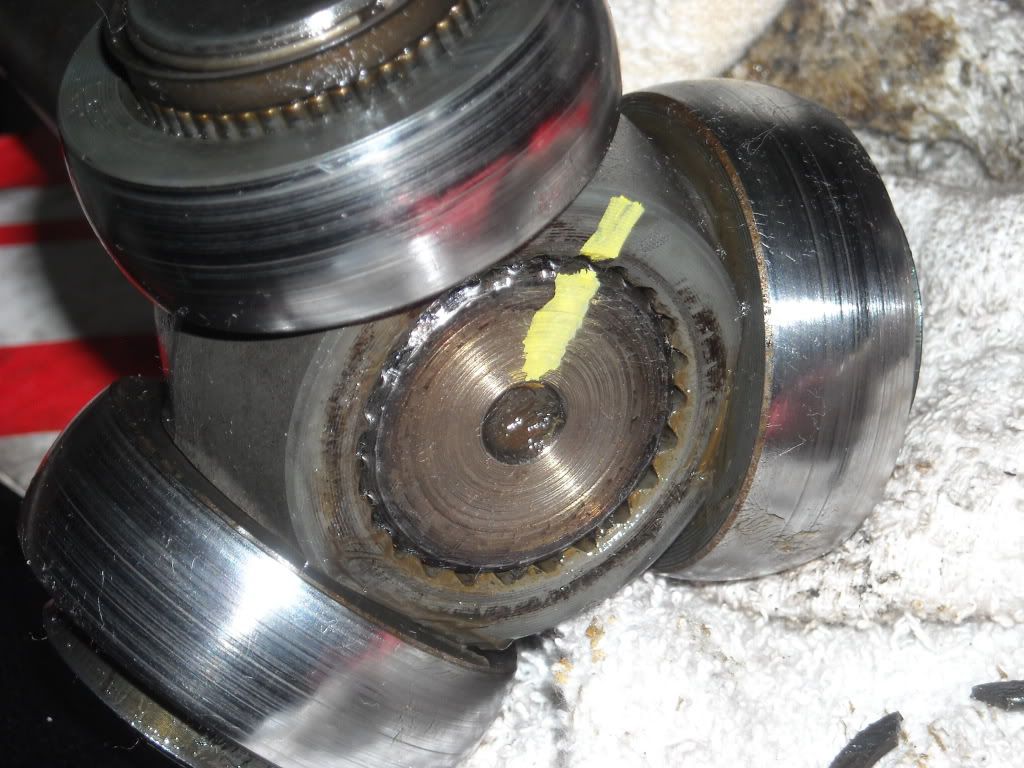
Outer CV Splines for the Driver side Shaft(these pics and video are all from the driver side CV that the inner cap came off).........
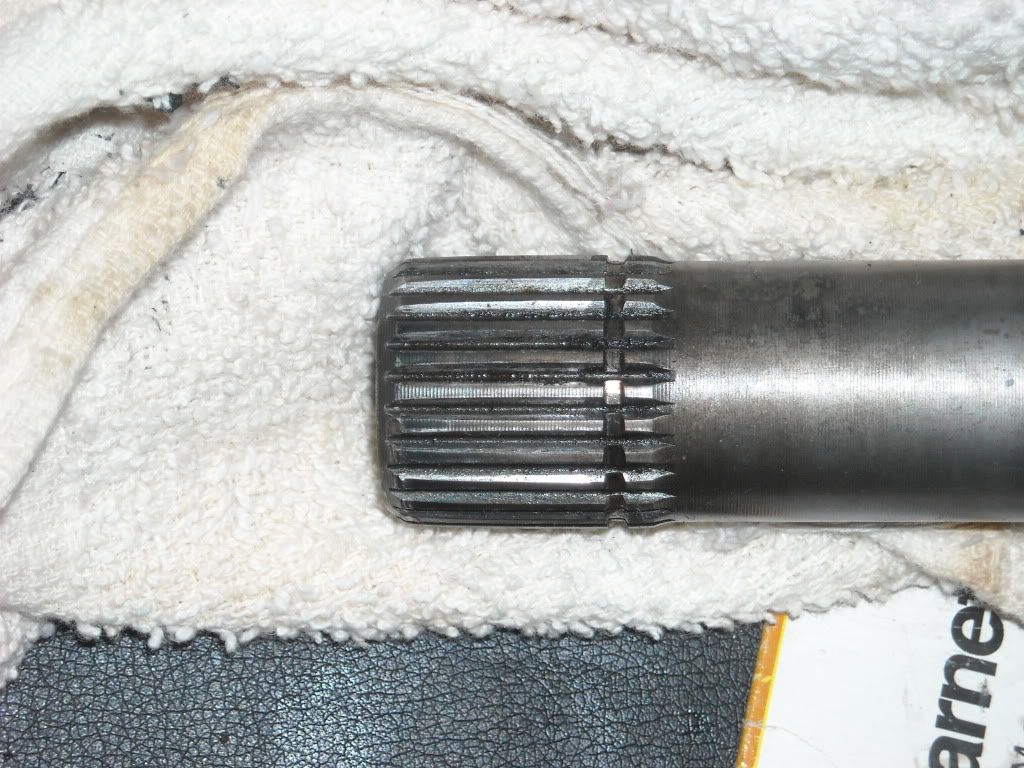
Inner Splines that Tripod Joint slide over/and clip(didn't clean this one yet, but it's just grease on it, no rust, period, and all splines look perfect, still have the machine marks from the original lathing).......
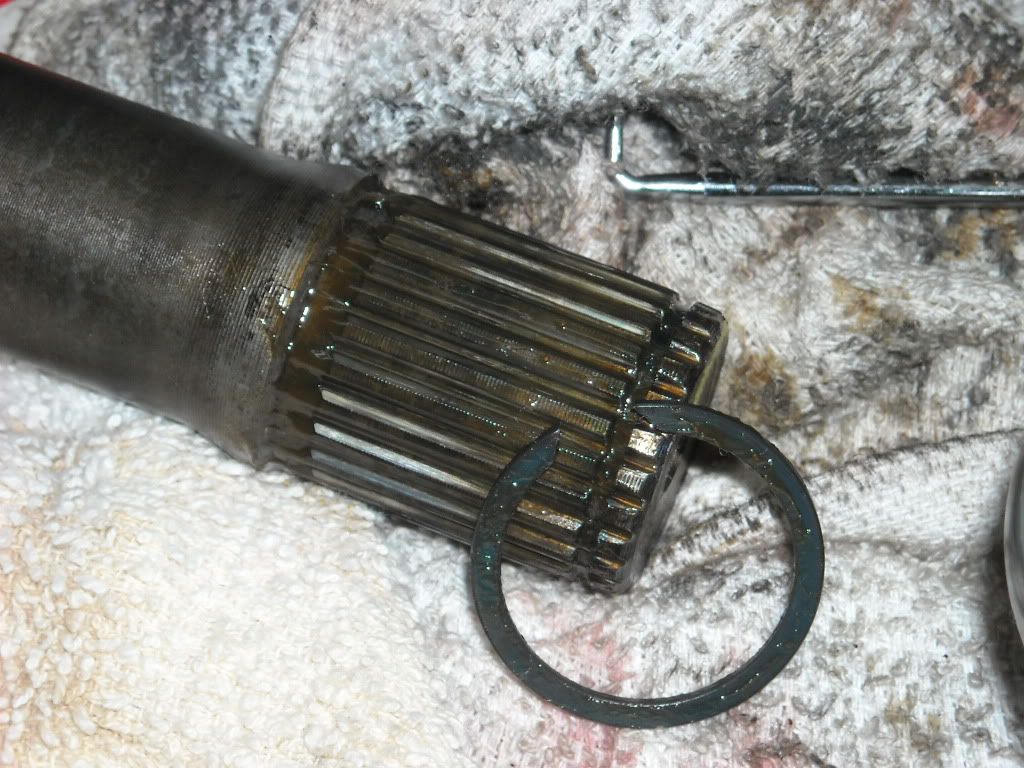
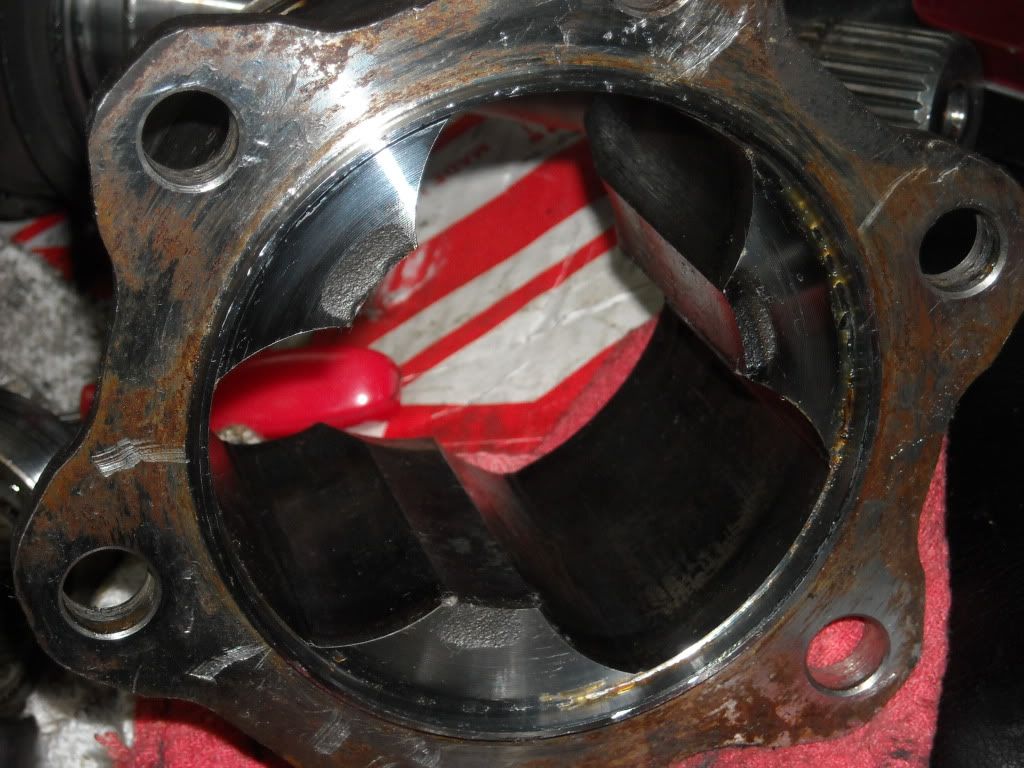
Tripod Housing and CAP that came off(it's just sitting in there barely in this shot)....
Tripod housing end cap from the outside/diff side.......
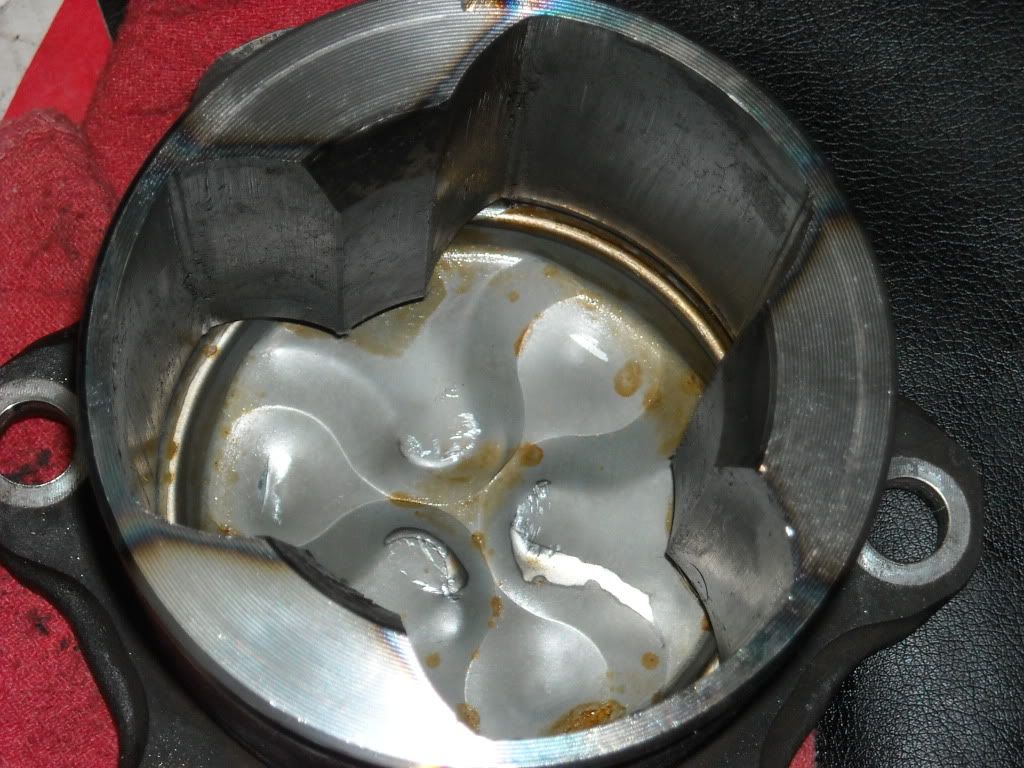
Bottom side of the tripod housing with the End cap removed.....
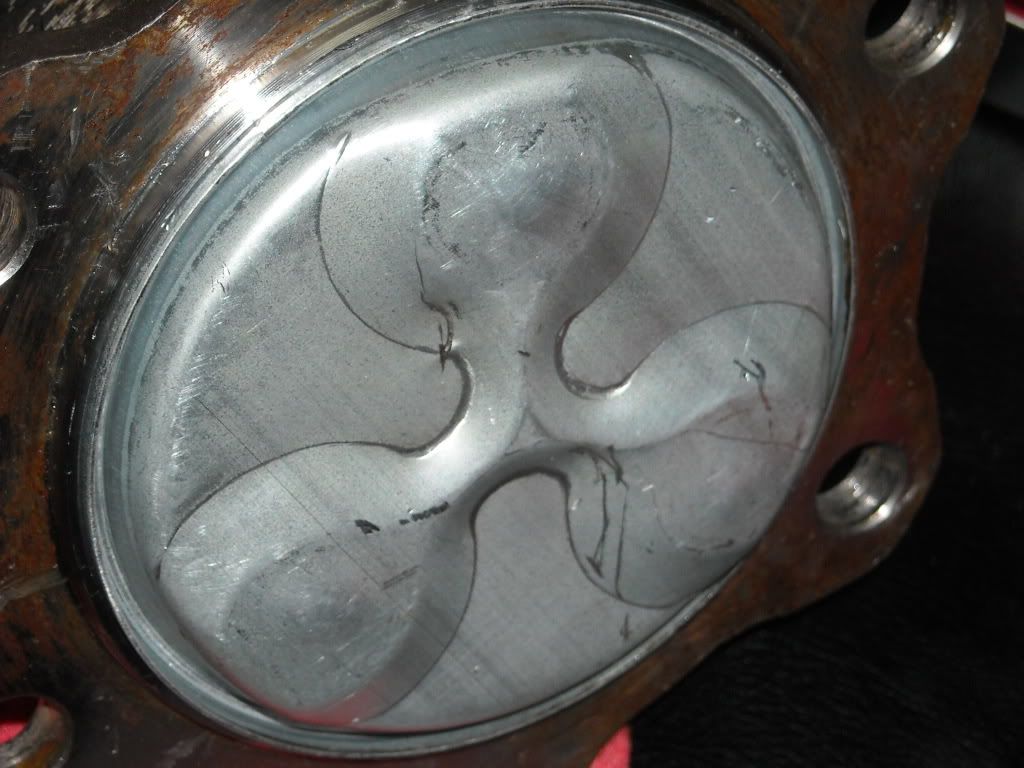
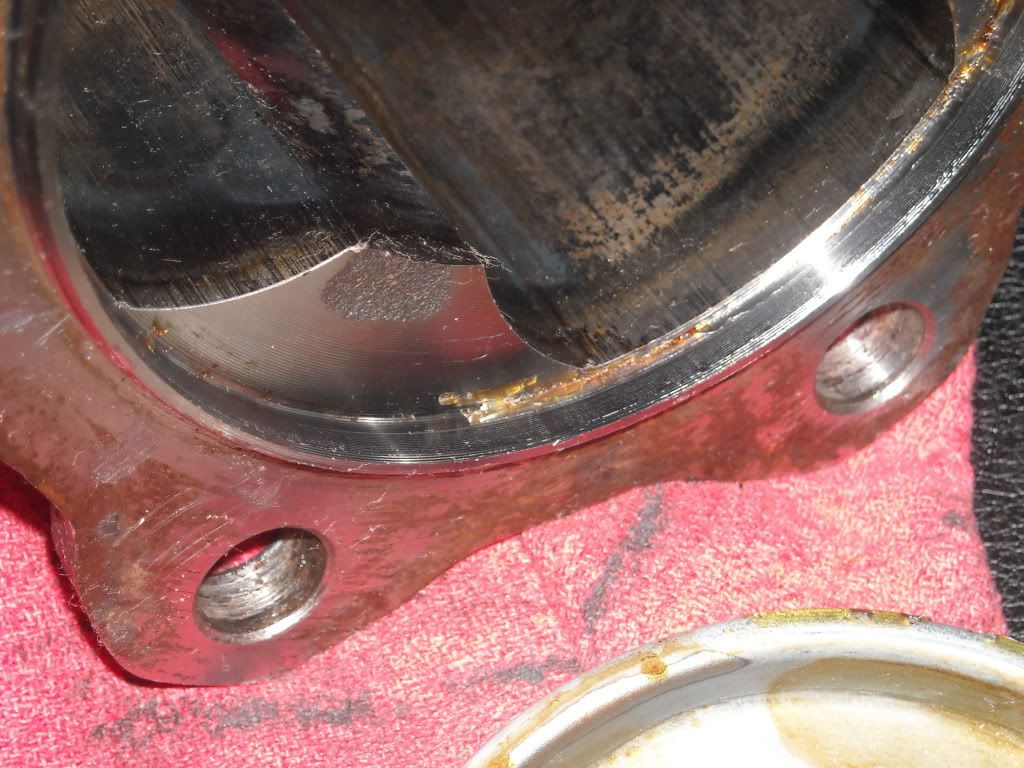
End cap seating journal... You can see the original OEM sealant in there, it's like clearish glue.. Same stuff my Machinist used on the outside of my rear main seal to housing surface(it's not EPA loved anymore, hard to find)....
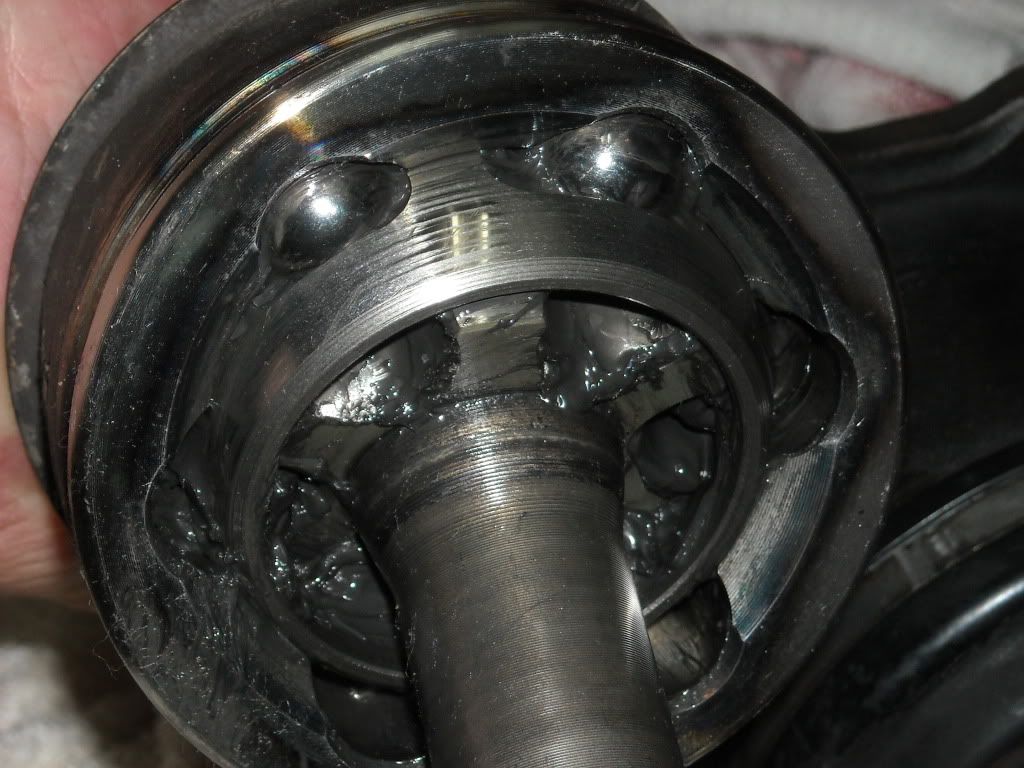
Outer CV Ball Bearing Joint/shot of bearings... lots of grease still in this one to clean out, but to give you an idea.........
************************************************** **************
Video of all of that...............

OK< so, regarding that ^^^^^ ;
I'm not sure that should stop me, as long as everything inside is in decent condition. It NEVER was loose until it got hung up on the diff flange, then as I pulled on the outer CV area, while pushing on the A-arm....
I think it just popped the cover off/the Tripod Joint just pushed it's way through the cover. I gave it a few back and forth tries, not hammering on it or anything... Just with my hands on the outer CV shaft. So.....
When I cleaned it all up, it's ALL original... that thing has never been open. HARD TO BELIEVE the grease is in such good condition! Tripod bearings look really good, ALL Spline ends look great on it... I just have to tap the cover back in with some SUPER SEALANT stuff..... Toyota used to use it, as I KNOW they did on this. They put a TINY bead of it around where it bottoms out... It's hard as Dried Glue... And with a pic I carefully cleaned all that out. FUGGETABOUT THAT STOPPING ME! Unless someone says, "No, silly, that thing is buggered!", hahaha.
I have to get a large pcv or something and some GOOD hard sealing sealant.... Bead the size of a pencil lead, that's how small I mean. then let it dry before installing again with grease and new boots........??????
************************************************** **
Just took a few shots with my 2Gig SD in the camera... I don't know when I'll have time again to head down and get a new card reader, etc.......
Here ya go..........
Outer CV Splines for the Driver side Shaft(these pics and video are all from the driver side CV that the inner cap came off).........
Inner Splines that Tripod Joint slide over/and clip(didn't clean this one yet, but it's just grease on it, no rust, period, and all splines look perfect, still have the machine marks from the original lathing).......
Tripod Housing and CAP that came off(it's just sitting in there barely in this shot)....
Tripod housing end cap from the outside/diff side.......
Bottom side of the tripod housing with the End cap removed.....
End cap seating journal... You can see the original OEM sealant in there, it's like clearish glue.. Same stuff my Machinist used on the outside of my rear main seal to housing surface(it's not EPA loved anymore, hard to find)....
Outer CV Ball Bearing Joint/shot of bearings... lots of grease still in this one to clean out, but to give you an idea.........
************************************************** **************
Video of all of that...............
08-23-2012, 12:56 PM
#4603
Contributing Member
Join Date: Nov 2010
Location: Columbia River Gorge, Oregon...east side
Posts: 5,125
Likes: 0
Received 2 Likes
on
2 Posts
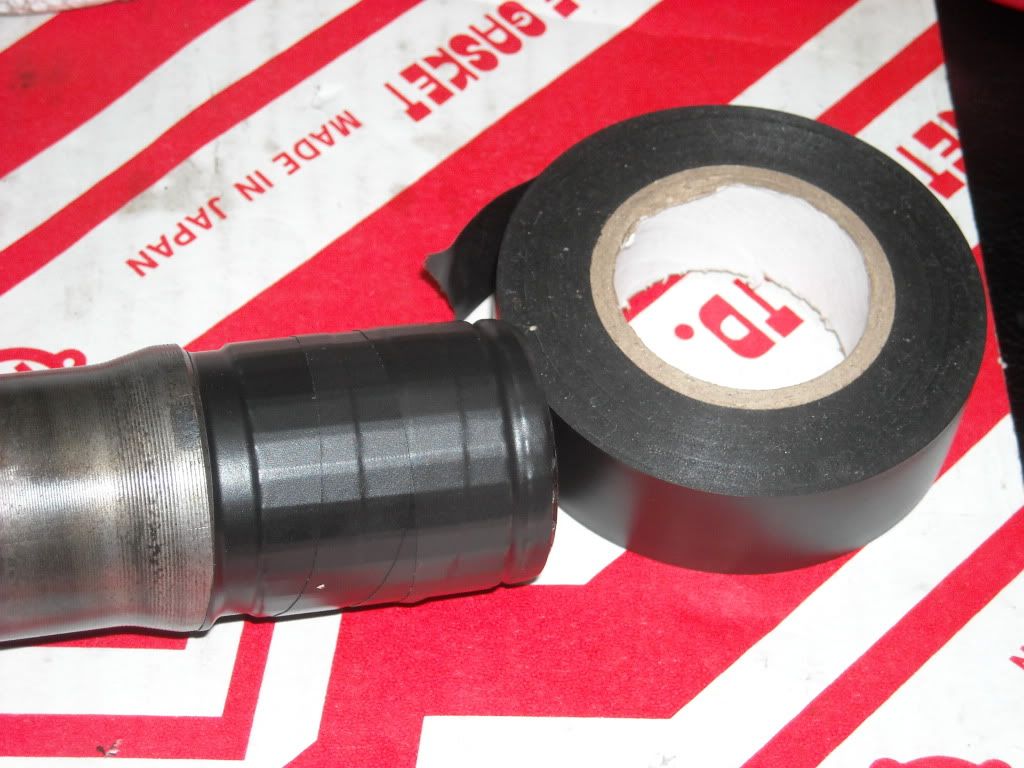
Chef, I wrapped the splines with a bit of electrical tape before sliding the boot on just in case the splines want to groove the boot a bit.
Looking good so far. A messy, sticky greasy job, huh?
Looking good so far. A messy, sticky greasy job, huh?
Last edited by rworegon; 08-23-2012 at 05:00 PM.
08-23-2012, 08:07 PM
#4604
YES, RW, .... it's messy... But I quickly figured out a way to limit my contact, directly, with the grease.(If you've seen my beginnings with this, you KNOW I'm not worried about being covered in grease when cleaning the entire engine bay/trans/t-case/front and rear diff//////////etc.,etc., etc., hahaha... BUT, with this stuff, it's just something you want to keep clean and dry or you'll be swapping out gloves and going through cleaning towels before they can make them fast enough to keep up with ya! hahaha... Actually, I just stuck my finger in each inner bearing slot to push the grease out the bearings, which ever were protruding/push grease from hole just beneath and up and out the bearing sides... Then wipe away with gloves and wipe on larger towel corner, until I couldn't get anymore out.) I didn't want to remove all of it with cleaners, etc., because, well, it was nearly pristine, anyhow... Even the inner grease was still yellow, BARELY tinged at all.
I used electrical tape, as well, RW.
However, I don't see in the FSM anything about how to keep the cap in, so I just used a lil dab of locktite on the rim and tapped it in using a Large Size Bottle Cap from a Skippy Peanut Butter Jar I found laying in the garage. I PRAY the ends don't come off .
.
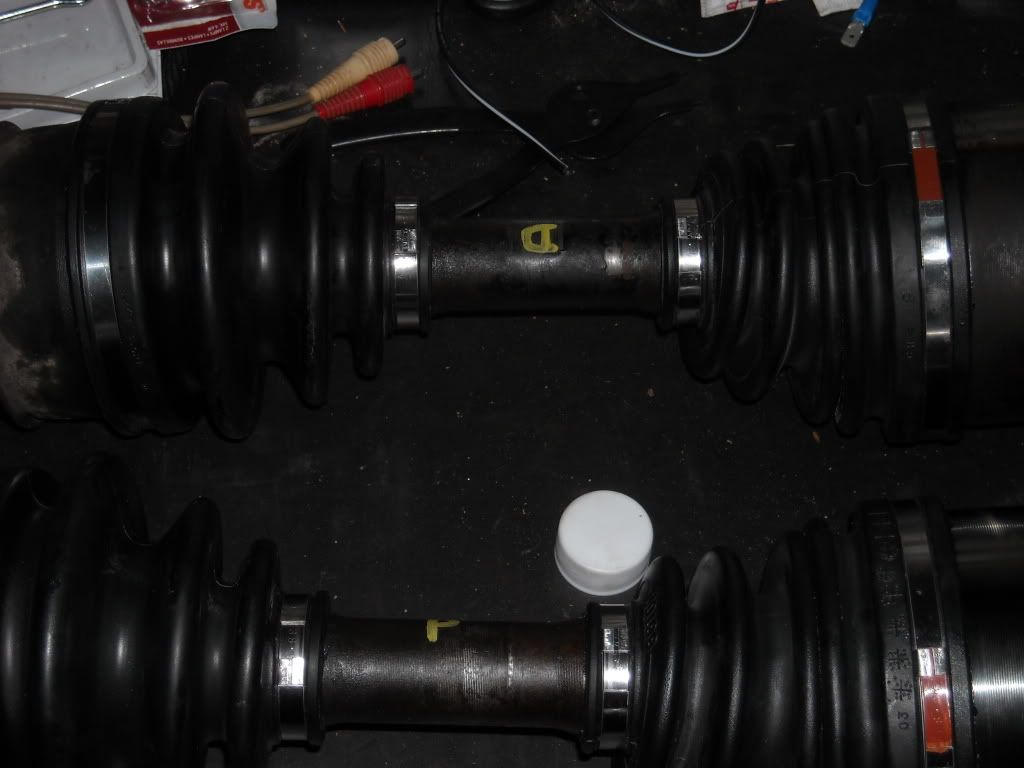
Here's some pics of the day...............
First, I want to show you what's in the package from Toyota for an "IFS 86-95 CV BOOT KIT" ....... (4 clamps, 2 types grease, 2 boots and a C-clip retaining ring for the Tripod Joint-bearings)........
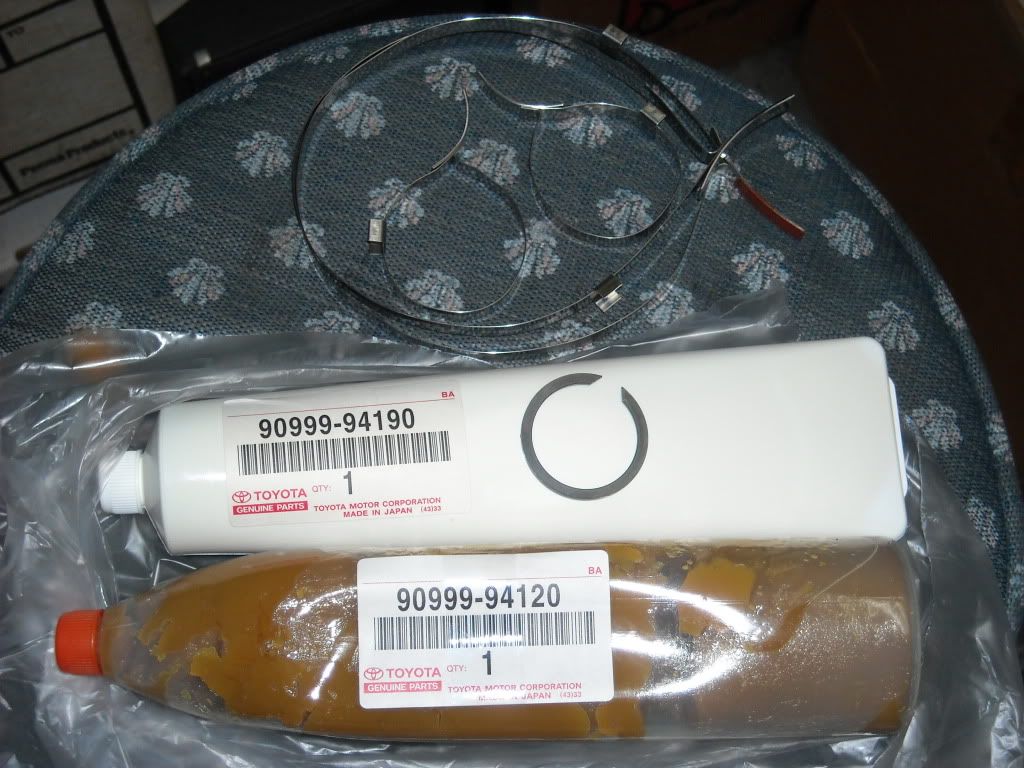
Some Yota-Porn..... Can you read it, the boot label? hahaha>>>>
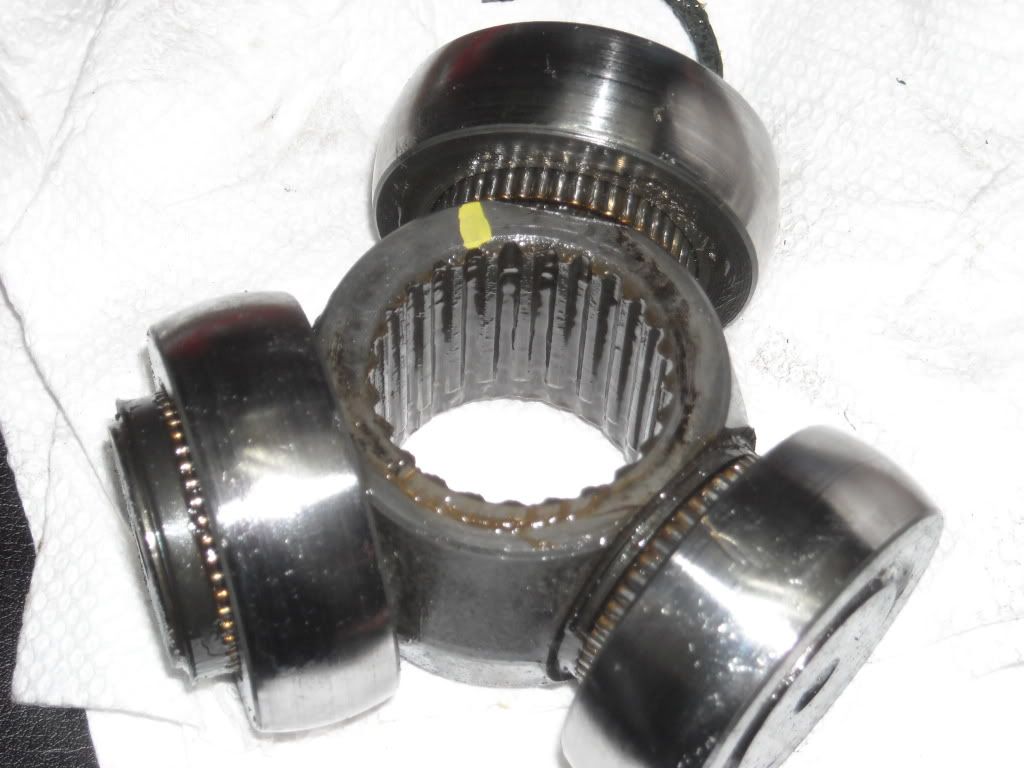
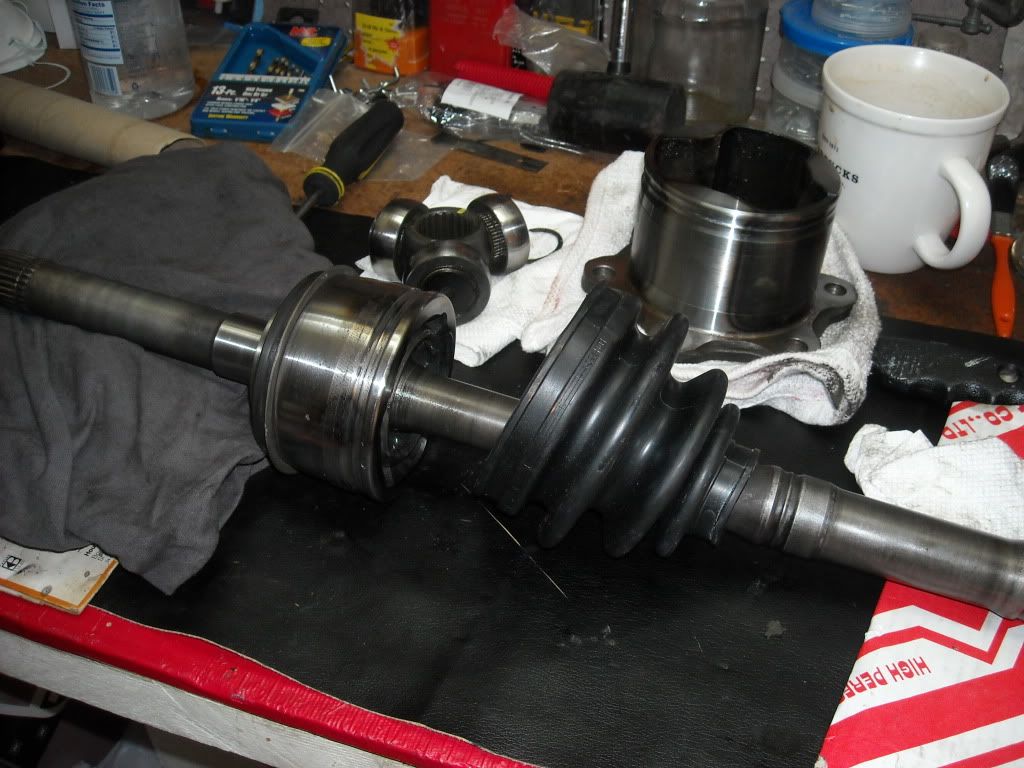
I first broke down the second/passenger side CV, removing the boots, cleaning everything up, then removing the C-Clip on the end of the Inner Slines that hold the tripod on(MARK THE THING, FIRST, after cleaning a spot off on both perspective pieces, the tripod and shaft end/Also mark the shaft and the tripod housing, to be sure you slap it back the way it came out, in the holes each bearing came out of ) .........
Once the C-clip was off I stashed it because my Toyota OEM boot kit came with a new one.... Here is the Tripod Joint removed.......
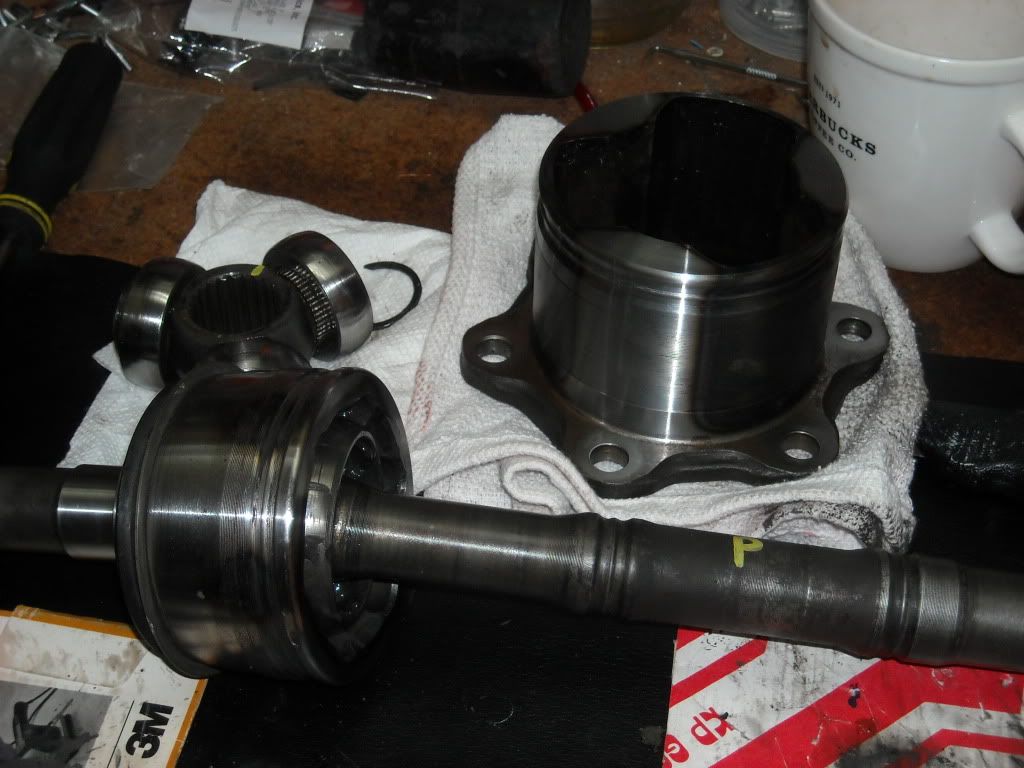
I then cleaned up the CV's, carefully, including the tripod housing and inner CV end, dust boot, etc.(The boot is in perfect condition... So I didn't opt to replace it with new)..........
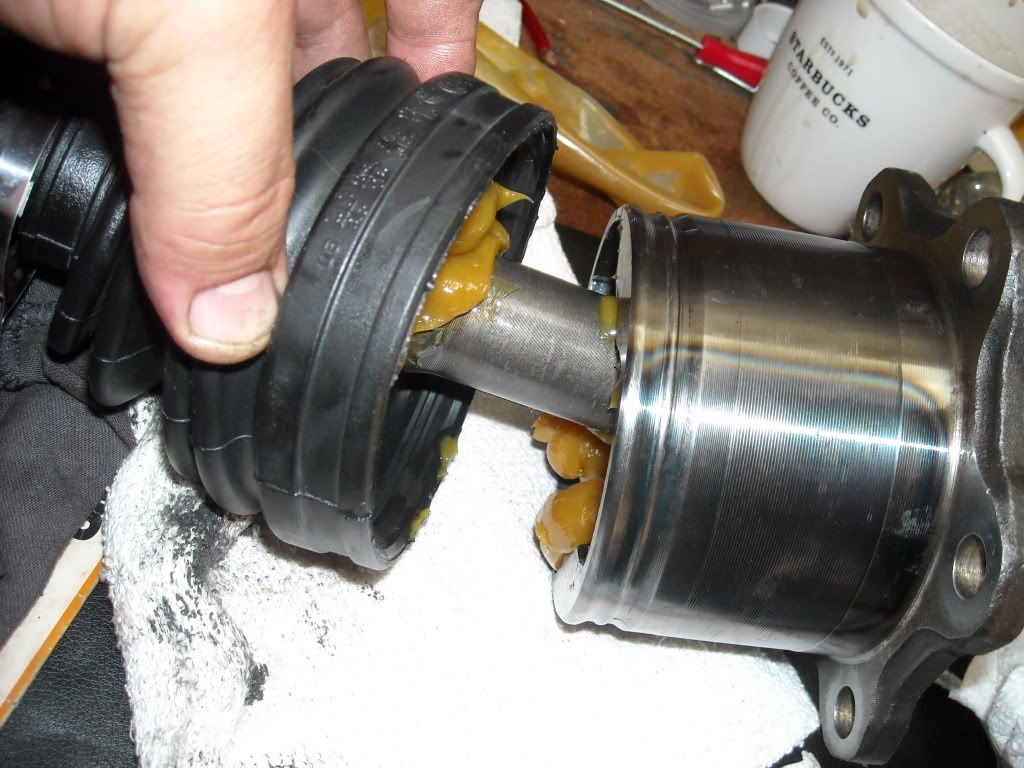
I then, following FSM instructions, wrapped the CV Splines on the inner most portion where the tripod mounts with Electrical Tape(this protects the smaller collar of the CV boots, both of which have to slide over the splines, from tearing/marking up with the spline teeth/They can have imperfections that might not cause failure to the CV... but that could start a fatal cut in the CV boot inner collars).........
Following protecting the boots, I Installed the Outer boot, first, after slightly, VERY SLIGHTLY rubbing the axle shaft with residual grease that was on my gloves/CLEAN GREASE!... Just basically put a pencil eraser size dab on one glove and rub it into the entire glove with your other pointer finger, which also should have a glove on... this is PLENTY of grease to help sliding of the boot on... and it's a lil tight, so without it it COULD be more of a PITA/// After inserting the outer boot first, over the inner splines and the first smaller retaining collar in the shaft... I filled the outer joint with the black grease provided in the OEM boot kit..... THEN I slid the outer boot up near the outer joint, turned the axle over with the inner spline bottom on the bottom, facing the table perpendicularly, then squeezed the edge of the boot over the outer bearing housing on one side and left a gap to squeeze in the remainder of the Black Grease provided..........
With the electrical tape still in place, I first put the 2 smaller boot retainers over the shaft and mildly secured the outer boots inner ring and then left the inner boots ring hanging on the shaft in the middle(Otherwise, GOOD LUCK getting that smaller boot over the outer bearing housing and boot! haha)... I slide the Inner boots larger ring over the tripod housing, just to avoid having to drag it all the way across the outer boot and inner boot to where it finally clamps down.... This way, I can secure the inner boot onto the Tripod housing and then wiggle the larger/outer boot retaining ring over where it sits and slightly clamp it down to keep it put..... (I had to pull the tripod out really quickly and slide the larger ring over the housing, AFTER this shot, because I didn't want to slide it even from the middle, over the inner boot... which get's FAT at spots before the ridge where the retaining ring sits, make sense?)...........
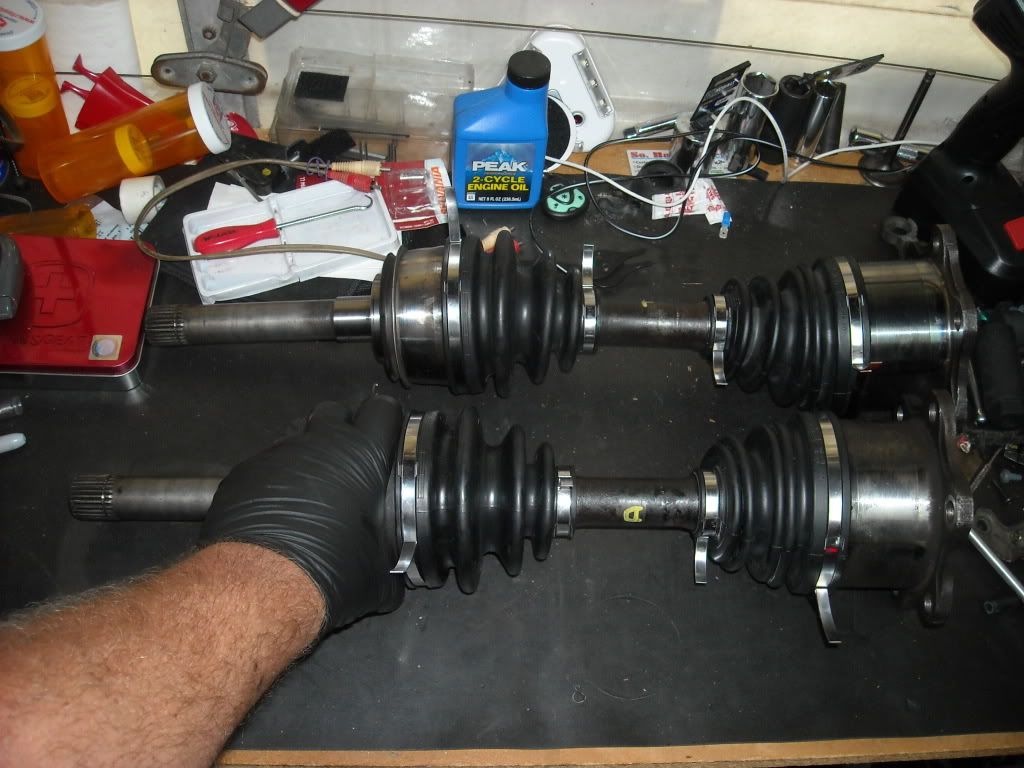
After securing all 4 boot ends onto their recessed spots, lightly securing the rings, both greased up with 95% or so of the Grease supplied..... Here we are.........
************************************************** ************
The whole 'tutorial' end of things didn't work out.... Because my videos, many of them, got wiped by that older card reader not working properly... BUT I'M NOT going to let it upset me eh chemmmmmm, sorry......... JK, JK, haha... Really, what's the point, right?
I do have some videos and will post em up after editing... But I have to do a couple more mock ones and then film the installs with my new 8Gig card(allows more time). Eventually I'll do a clean post with instructions, links, Diagrams from Toyota and FSM, Part numbers, Aisin Hub stuff as well, all included on the same post(most likely another thread, too, to keep it easier to get to for someone that might need it.
Feel free to tell me, 'OH NOOOOOOO, YOU HAVE TO TEAR EM APART AGAIN, you forgot the doohicky and thingymabobber', ok? I mean, I DO NOT want to have done this for nothing... hahaha.
I doubt it^^, but even if I'd done so.... it was a great learning experience and it distracted me from LOTS of other crap right now. I couldn't just stick to it for hours at a time like I'd liked to have.... BUT, it got done, hopefully well
I used electrical tape, as well, RW.
However, I don't see in the FSM anything about how to keep the cap in, so I just used a lil dab of locktite on the rim and tapped it in using a Large Size Bottle Cap from a Skippy Peanut Butter Jar I found laying in the garage. I PRAY the ends don't come off
. Here's some pics of the day...............
First, I want to show you what's in the package from Toyota for an "IFS 86-95 CV BOOT KIT" ....... (4 clamps, 2 types grease, 2 boots and a C-clip retaining ring for the Tripod Joint-bearings)........
Some Yota-Porn..... Can you read it, the boot label? hahaha>>>>
I first broke down the second/passenger side CV, removing the boots, cleaning everything up, then removing the C-Clip on the end of the Inner Slines that hold the tripod on(MARK THE THING, FIRST, after cleaning a spot off on both perspective pieces, the tripod and shaft end/Also mark the shaft and the tripod housing, to be sure you slap it back the way it came out, in the holes each bearing came out of
) ......... Once the C-clip was off I stashed it because my Toyota OEM boot kit came with a new one.... Here is the Tripod Joint removed.......
I then cleaned up the CV's, carefully, including the tripod housing and inner CV end, dust boot, etc.(The boot is in perfect condition... So I didn't opt to replace it with new)..........
I then, following FSM instructions, wrapped the CV Splines on the inner most portion where the tripod mounts with Electrical Tape(this protects the smaller collar of the CV boots, both of which have to slide over the splines, from tearing/marking up with the spline teeth/They can have imperfections that might not cause failure to the CV... but that could start a fatal cut in the CV boot inner collars).........
Following protecting the boots, I Installed the Outer boot, first, after slightly, VERY SLIGHTLY rubbing the axle shaft with residual grease that was on my gloves/CLEAN GREASE!... Just basically put a pencil eraser size dab on one glove and rub it into the entire glove with your other pointer finger, which also should have a glove on... this is PLENTY of grease to help sliding of the boot on... and it's a lil tight, so without it it COULD be more of a PITA/// After inserting the outer boot first, over the inner splines and the first smaller retaining collar in the shaft... I filled the outer joint with the black grease provided in the OEM boot kit..... THEN I slid the outer boot up near the outer joint, turned the axle over with the inner spline bottom on the bottom, facing the table perpendicularly, then squeezed the edge of the boot over the outer bearing housing on one side and left a gap to squeeze in the remainder of the Black Grease provided..........
With the electrical tape still in place, I first put the 2 smaller boot retainers over the shaft and mildly secured the outer boots inner ring and then left the inner boots ring hanging on the shaft in the middle(Otherwise, GOOD LUCK getting that smaller boot over the outer bearing housing and boot! haha)... I slide the Inner boots larger ring over the tripod housing, just to avoid having to drag it all the way across the outer boot and inner boot to where it finally clamps down.... This way, I can secure the inner boot onto the Tripod housing and then wiggle the larger/outer boot retaining ring over where it sits and slightly clamp it down to keep it put..... (I had to pull the tripod out really quickly and slide the larger ring over the housing, AFTER this shot, because I didn't want to slide it even from the middle, over the inner boot... which get's FAT at spots before the ridge where the retaining ring sits, make sense?)...........
After securing all 4 boot ends onto their recessed spots, lightly securing the rings, both greased up with 95% or so of the Grease supplied..... Here we are.........
************************************************** ************
The whole 'tutorial' end of things didn't work out.... Because my videos, many of them, got wiped by that older card reader not working properly... BUT I'M NOT going to let it upset me
eh chemmmmmm, sorry......... JK, JK, haha... Really, what's the point, right? I do have some videos and will post em up after editing... But I have to do a couple more mock ones and then film the installs with my new 8Gig card(allows more time). Eventually I'll do a clean post with instructions, links, Diagrams from Toyota and FSM, Part numbers, Aisin Hub stuff as well, all included on the same post(most likely another thread, too, to keep it easier to get to for someone that might need it.
Feel free to tell me, 'OH NOOOOOOO, YOU HAVE TO TEAR EM APART AGAIN, you forgot the doohicky and thingymabobber', ok? I mean, I DO NOT want to have done this for nothing... hahaha.
I doubt it^^, but even if I'd done so.... it was a great learning experience and it distracted me from LOTS of other crap right now. I couldn't just stick to it for hours at a time like I'd liked to have.... BUT, it got done, hopefully well
Last edited by ChefYota4x4; 08-23-2012 at 08:11 PM.
08-23-2012, 08:18 PM
#4605
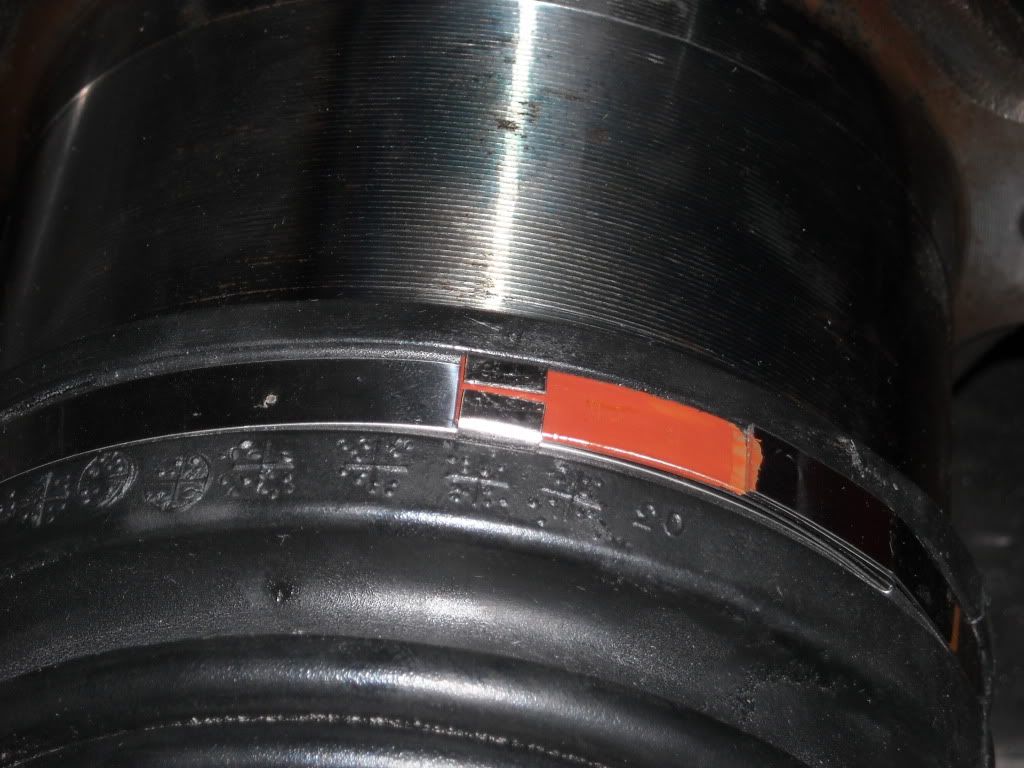
PS> RW, ............ The boot kit/Boot Retaining Rings are seemingly fold down and bend tabs types.... I'm going to read up some more... But I'm guessing from all I've read I need a couple tools to do those right? YET, in the FSM.... NOT ONE mention of a tool... It says, "Bend tensioning tabs down to inbetween the retaining tabs, then tap tabs down over the main spring tab"..... Am I missing something? hahaha.
08-23-2012, 09:09 PM
#4606
Contributing Member
Join Date: Nov 2010
Location: Columbia River Gorge, Oregon...east side
Posts: 5,125
Likes: 0
Received 2 Likes
on
2 Posts
PS> RW, ............ The boot kit/Boot Retaining Rings are seemingly fold down and bend tabs types.... I'm going to read up some more... But I'm guessing from all I've read I need a couple tools to do those right? YET, in the FSM.... NOT ONE mention of a tool... It says, "Bend tensioning tabs down to inbetween the retaining tabs, then tap tabs down over the main spring tab"..... Am I missing something? hahaha.
Those retaining rings are totally different than the ones that came in my Tacoma kit. The ones I got had little barbs that were set as tight as possible before the ears were crimped together.
The ones you have look like the end gets bent back towards the tabs by hand and then the tabs are flattened down to lock it. Ya' think? At least this is what the FSM seems to show and say.....
The ones you have look like the end gets bent back towards the tabs by hand and then the tabs are flattened down to lock it. Ya' think? At least this is what the FSM seems to show and say.....
Last edited by rworegon; 08-23-2012 at 09:20 PM.
08-23-2012, 09:23 PM
#4607
Ok, now since you insist on speaking Cantonese to me.... I'll go take a pic!  ..........hahahhaa.
Actually, they have the feel that they'll tighten all the way as I bend the tab all the way down to inside the tongues sticking up that the tab is supposed to lay inside... Then yes, you bend those down. BUT, I wonder if just bending that down and then bending the tabs over/bending end over to lock would be less tight than it would be with a tool? ............................. I'll get more pics...... (how they're sitting right now)... You can see them in the pics, above, and that's what you're referring to in regards to not recognizing them? These look EXACTLY like the original ones I removed.... 25 years later... I guess most of them had never broken, .... so why fix somethin aint brokeded, right? lol.
..........hahahhaa. Actually, they have the feel that they'll tighten all the way as I bend the tab all the way down to inside the tongues sticking up that the tab is supposed to lay inside... Then yes, you bend those down. BUT, I wonder if just bending that down and then bending the tabs over/bending end over to lock would be less tight than it would be with a tool? ............................. I'll get more pics...... (how they're sitting right now)... You can see them in the pics, above, and that's what you're referring to in regards to not recognizing them? These look EXACTLY like the original ones I removed.... 25 years later... I guess most of them had never broken, .... so why fix somethin aint brokeded, right? lol.
08-23-2012, 09:31 PM
#4608
Registered User
I'm in Ukraine right now and the food is good, but the bread is amazing. Not to mention a freshly baked loaf is like 50-75 cents USD and fresh vegetables cost about 50-75 cents USD per lbs and taste better to boot. Too bad there are no older yotas here haha.
08-23-2012, 10:08 PM
#4610
NEVERMIND on the tabs....
1. Bend over long tabs....
2. Hold down while using thimble to start bend over of 'securing/smaller tabs(my tip! hahaha).....
3. Bend tabs down flush, ......... AND THEN call them "Thursday"...Just make sure it's still Thursday in your neck of the woods if so naming said CV's 
Pics tomorrow.... EXHAUSTED from this day, DANG! lol.
1. Bend over long tabs....
2. Hold down while using thimble to start bend over of 'securing/smaller tabs(my tip!
hahaha)..... 3. Bend tabs down flush, ......... AND THEN call them "Thursday"...Just make sure it's still Thursday in your neck of the woods if so naming said CV's
Pics tomorrow.... EXHAUSTED from this day, DANG! lol.
 :
:
 08-23-2012, 10:28 PM
#4612
Registered User
its stuff like that makes me go nuts mark! was replaceing the inner cv boots on my 87, got everything done and that passgenger side came out like yours did, i was so mad i drove 30 min to the nearest toyota stealership and bought a whole cv axle...
08-23-2012, 11:20 PM
#4614
Registered User
We went to this Jewish restaurant with no prices on the menu. At the end of the meal tru come with some insane price and you have to bargain with them. We ended up getting them down from 45 dollars for the two of us down to 22.50, but we also traded our umbrella for two shots of honey vodka and a mystery gift, which turned out to be a keychain. The food was amazing and it was cheap by US standards, just fun for the experience.
Glad to see you're still plugging away at the 4runner. I haven't had much to report on the first gen. I'm still DDing it, but it refuses to break and let me do anything to it.
08-24-2012, 05:12 AM
#4615
Contributing Member
Join Date: Nov 2010
Location: Columbia River Gorge, Oregon...east side
Posts: 5,125
Likes: 0
Received 2 Likes
on
2 Posts
Chef, those re-booted CV axles look great. Now, get them back in and go wheelin'.
Yup, the Tacoma kit had Oetiker style clamps supplied on the original OEM cv and in the kit.
http://www.google.com/search?hl=en&b...WJMdDmiwLF6oFg
Yup, the Tacoma kit had Oetiker style clamps supplied on the original OEM cv and in the kit.
http://www.google.com/search?hl=en&b...WJMdDmiwLF6oFg
Last edited by rworegon; 08-24-2012 at 05:20 AM.
08-24-2012, 06:40 AM
#4616
Registered User
Great work rebuilding those CV things, oh and a good tip is to keep the boots nice and oiled. Every 6 months or so slather the outsides in grease and wipe off after 10 minutes, otherwise they dry out and crack.
still not sure where to put them on my rig!
still not sure where to put them on my rig!
Last edited by Outsane; 08-24-2012 at 06:46 AM.
08-24-2012, 01:19 PM
#4617
Man that looks so easy, but I remember doing the same back in the early 90's what a pain that was to get those out. The only reason I had to change them was because of the towing company lifted the front end instead of flat bed towing it.
Awesome job.
Awesome job.
08-24-2012, 07:52 PM
#4620
Good to know lol. Been doing boots at work for a long time and I just randomly throw grease in them. Now mind you that these are on grocery getters 4wd that never has 4wd engaged lol.


