
ChefYota4x4's 1987 4Runner Build-Up Thread
 07-28-2012, 05:14 PM
#4401
Registered User
i got something to spruce up this picture-less page...
I just finished this thing. a CT 200 Honda, modified. I had some paint left over from my 94..
BEFORE....
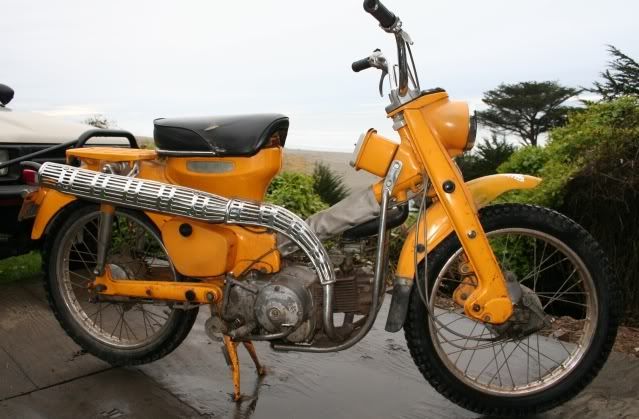
AFTER...
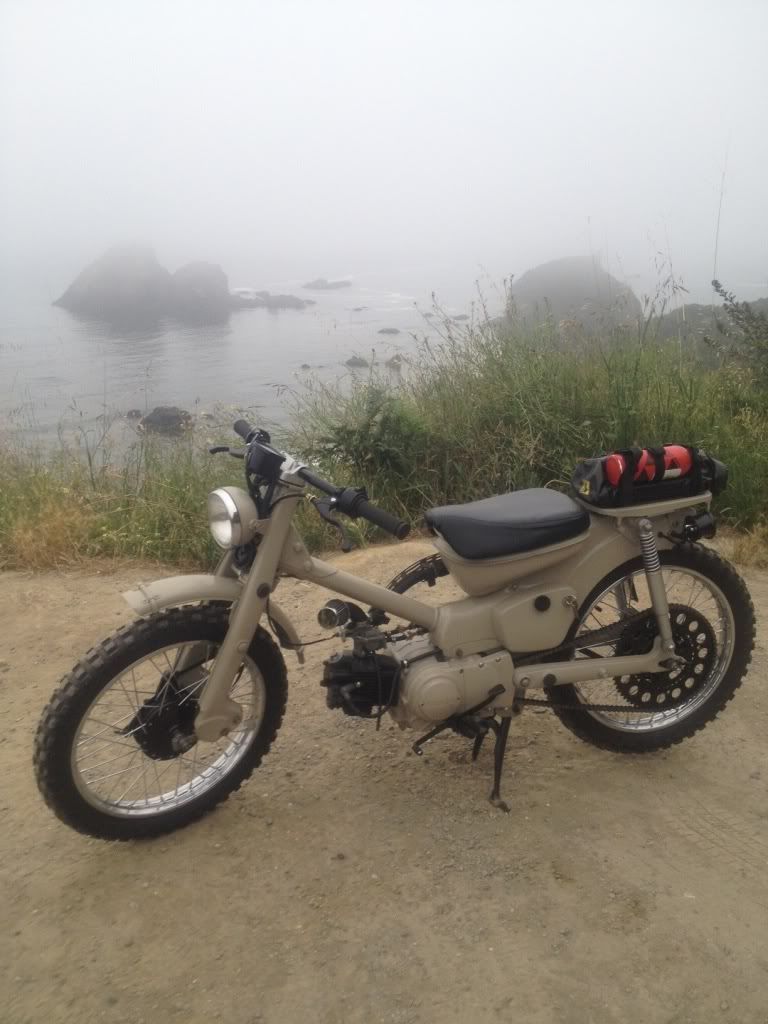
I just finished this thing. a CT 200 Honda, modified. I had some paint left over from my 94..
BEFORE....
AFTER...
Last edited by toyospearo; 07-28-2012 at 05:16 PM.
 07-28-2012, 05:32 PM
#4402
Thanks, guys
Yeah, I hear ya, Terry... "Lil longer to get up in the morn over 40, especially with MANY past injuries " haha...
Far as wheeling, I used to hit the Big Bear pass and Arrowhead and such all the time, which meant 4WD and even chains at times, or 'YOU NO CAN GET BY!' haha... Now it's more 'JOURNEYS' ... and those are far less than I'd like. BUT THAT WILL change, eventually. I'll leave it at that, it's morbid talk, lol...
Toyo, yeah, I read to have toyota reman our CV's it's 150$ per side? Really not bad considering what you get... But for 29$ a side on an OEM boot kit... I think I'll be ok. I wasn't able to get over and pick up the O'reilly CV... Probably tomorrow morning. And, I was thinking of just waiting for my boot kit, repairing it and then running that, and just keeping ONE NEW CV from O'reilly on hand for those 'in case' thingymadoer-moments! " I'll be doing my best to avoid popping another boot for a while.. But who knows if there's any drama inside my existing ones, just yet... Wont know until I open em up and see if I find any METAL substances floating around(or obvious carnage)... I really don't think so, not at all... But gotta get in to be sure. I have a feeling that even with NEW O'reilly CV's... I'm more likely to pop a boot than with my Original OEM ones, ya know?
Whatcha guys think of that idea? : *GRAB A SPARE, NEW CV FROM O'REILLY'S TO HAVE ON TRIPS AND RUN MY CV'S REBOOTED* ???????? .>>>>>>>>>
I would have a lifetime warranty on it, and I REALLY doubt I'll be in a situation where I need to switch out both on the trail... I KNOW< better safe than sorry> ... But really? I'd rather run the OEM ORIG's, ................. Hmmm.
EDIT: TOYOSPEARO.... THAT'S SICK! hahaha... REALLY love the Matching paint mod... and I can see it's running in the pic... sweet!
Yeah, I hear ya, Terry... "Lil longer to get up in the morn over 40, especially with MANY past injuries
" haha... Far as wheeling, I used to hit the Big Bear pass and Arrowhead and such all the time, which meant 4WD and even chains at times, or 'YOU NO CAN GET BY!' haha... Now it's more 'JOURNEYS' ... and those are far less than I'd like. BUT THAT WILL change, eventually. I'll leave it at that, it's morbid talk, lol...
Toyo, yeah, I read to have toyota reman our CV's it's 150$ per side? Really not bad considering what you get... But for 29$ a side on an OEM boot kit... I think I'll be ok. I wasn't able to get over and pick up the O'reilly CV... Probably tomorrow morning. And, I was thinking of just waiting for my boot kit, repairing it and then running that, and just keeping ONE NEW CV from O'reilly on hand for those 'in case' thingymadoer-moments! " I'll be doing my best to avoid popping another boot for a while.. But who knows if there's any drama inside my existing ones, just yet... Wont know until I open em up and see if I find any METAL substances floating around(or obvious carnage)... I really don't think so, not at all... But gotta get in to be sure.
I have a feeling that even with NEW O'reilly CV's... I'm more likely to pop a boot than with my Original OEM ones, ya know? Whatcha guys think of that idea? : *GRAB A SPARE, NEW CV FROM O'REILLY'S TO HAVE ON TRIPS AND RUN MY CV'S REBOOTED* ???????? .>>>>>>>>>
I would have a lifetime warranty on it, and I REALLY doubt I'll be in a situation where I need to switch out both on the trail... I KNOW< better safe than sorry> ... But really? I'd rather run the OEM ORIG's, ................. Hmmm.
EDIT: TOYOSPEARO.... THAT'S SICK! hahaha... REALLY love the Matching paint mod... and I can see it's running in the pic... sweet!
Last edited by ChefYota4x4; 07-28-2012 at 05:33 PM.
07-29-2012, 04:07 AM
#4405
Super Moderator
Staff
iTrader: (1)
Join Date: Aug 2008
Location: Anderson Missouri
Posts: 11,788
Likes: 0
Received 25 Likes
on
22 Posts
Hello Mark..I could see having one for the trail. I do know when I changed mine out, I removed the top ball joint to get mine out. Looking back I would of removed the bottom one. A friend of mine says he can do it without removing either, but I did have a tough time by not removing one. Something I wouldnt want to do away from home, but guess it is fairly common when wheeling. I just havent found the easier way of doing it.
07-29-2012, 04:18 AM
#4406
a mild trail run I went on recently wasn't the first time I had seen this happen

it is a quick fix(if you have the part) but getting him on the trailer was interesting to get him home..
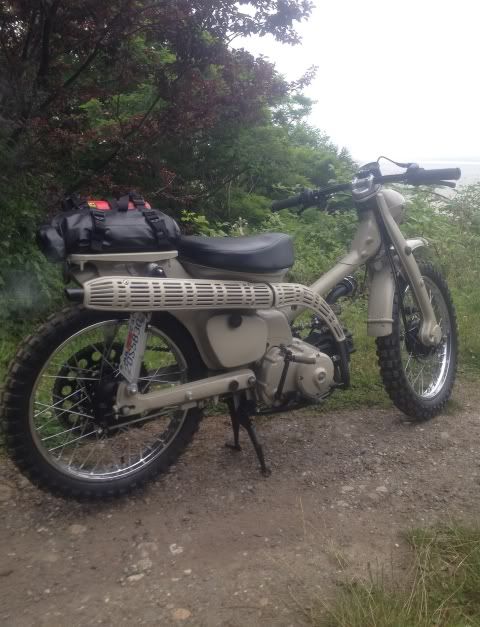
edit-Toyo nice job on the bike..You tan paint job was one of the inspiration for my paint job..but my rattle can job is crap compared to what you did...
Last edited by dropzone; 07-29-2012 at 04:20 AM.
07-29-2012, 09:59 AM
#4407
you only need a spare cv axle if your gonna break one. you can still drive on a torn boot. i dont like doing trail fixes. i rather have someone pull me back out lol. plus we both have rear lockers and most of the time, 2wd locked can get you back out. heck, one of the guys i go with is in 2wd rear locked 90% of the time
 07-29-2012, 11:48 AM
#4409
YEAH, ... me too! hahaha. Actually, I really only would bring it on trips I plan on going WAY further in. There are a couple Hot Springs treks out by Death Valley, into the CALIF. VOID, so to speak, where you drive around 30-45 Miles into the middle of NOWHERE, literally...... And, well, that even locked, aired down, the sand is SO FINE,... it just really MANDATES 4WD at times, because you can't FLY through lots of it, it can be, sporadically-- REALLY deep/fine sand, then ROCK GARDENS OF LAVA... it's like another planet!(which is why they filmed Star Trek out in the Sierras=High Desert quite a bit! haha...
Hahaha... I thought that, but they WERE GREAT! Awesome dependability And I second my earlier comment, and Terry's, in saying ''WOW!!!'', ... you just do amazing resto-work, SPEARO!!! I think you and Terry here should get together and start a resto training camp!  hahaha... (Terry has like 10 projects going, including a new 85 Xtra Cab he'll start on eventually! GRRRR! hahaha, jk)
YEP, I know it can be a PITA... but for now, I'm going to re-read up and try to do the bottle jack trick/Sway bar already deleted/ ETC, to be prepared! (I know, I'm sure you were prepared... it's just a PITA! haha... I have a BJ Spacer, which might give me a lil more play, Terry, but obviously only ABOVE the lower ball joint... And yes, that's what I'd read, a few times, was to 'remove the lower ball joint mounting bolts and lower the arm'.... or something like that. I also have to figure out if MrArmyAnt lost the spring and ball thing in the hubs or not, etc. Can't install them without them.
Haha.... Yeah, that MUST have been interesting! I have a Moog HD Idler from O'Reilly, when it was Kragen before transferring over and ditching moog parts . It can happen, and it's quite often a 'carnage for the day' culprit... I'm sure I can find one at Pick-Your-Part and grab a bushing kit and re-do an OEM one(even though they're not as strong as TC or others who make em... they're pretty stout with a bronze bushing mod, and would likely serve to get me out of a situation. All of my 'spare stuff' that I already bring, related to motor stuff's that can leave you stranded(Fuel Pump/AFM/Multiple Fuses and relays.... It's all light and doesn't take hardly any space... None of this would make it much worse).
Yeah, I hear ya... I don't like doing them either, but have had to a few times when out in the middle of nowhere(and I often go alone on adventures/within reason, I'm not suicidal! haha). I'm not planning on needing it.... I'll be careful and can honestly say, this was likely, as mentioned before, a freak thing of just happenstance/timing/comprises in the boots already there that I couldn't see, etc. The rig has seen many miles of adventures, even unlocked, and never busted a boot... So granting it was just one of those things, along with a lil too much speed off a straight line, etc... I'm sure I'll have many more years of trouble free wheeling with these. Would LOVE to rebuild them, honestly....but cleaning up as good as possible and rebooting should be alright. They really ran smoothly, even after this incident... (I had to get under mine, to see mine was... after seeing both Richards were torn, I had no idea it was, and it hadn't been right up until the end of the day at the Rock Garden(as far as I can recall)..., so yeah... 'One of those things'). I will consider it though, especially if going on one of my Sierras trips into the great void! haha.
And I second my earlier comment, and Terry's, in saying ''WOW!!!'', ... you just do amazing resto-work, SPEARO!!! I think you and Terry here should get together and start a resto training camp! hahaha... (Terry has like 10 projects going, including a new 85 Xtra Cab he'll start on eventually! GRRRR! hahaha, jk) Hello Mark..I could see having one for the trail. I do know when I changed mine out, I removed the top ball joint to get mine out. Looking back I would of removed the bottom one. A friend of mine says he can do it without removing either, but I did have a tough time by not removing one. Something I wouldnt want to do away from home, but guess it is fairly common when wheeling. I just havent found the easier way of doing it.
(I know, I'm sure you were prepared... it's just a PITA! haha... I have a BJ Spacer, which might give me a lil more play, Terry, but obviously only ABOVE the lower ball joint... And yes, that's what I'd read, a few times, was to 'remove the lower ball joint mounting bolts and lower the arm'.... or something like that. I also have to figure out if MrArmyAnt lost the spring and ball thing in the hubs or not, etc. Can't install them without them. Might consider an extra idler arm too
a mild trail run I went on recently wasn't the first time I had seen this happen
it is a quick fix(if you have the part) but getting him on the trailer was interesting to get him home..
edit-Toyo nice job on the bike..You tan paint job was one of the inspiration for my paint job..but my rattle can job is crap compared to what you did...
. It can happen, and it's quite often a 'carnage for the day' culprit... I'm sure I can find one at Pick-Your-Part and grab a bushing kit and re-do an OEM one(even though they're not as strong as TC or others who make em... they're pretty stout with a bronze bushing mod, and would likely serve to get me out of a situation. All of my 'spare stuff' that I already bring, related to motor stuff's that can leave you stranded(Fuel Pump/AFM/Multiple Fuses and relays.... It's all light and doesn't take hardly any space... None of this would make it much worse). you only need a spare cv axle if your gonna break one. you can still drive on a torn boot. i dont like doing trail fixes. i rather have someone pull me back out lol. plus we both have rear lockers and most of the time, 2wd locked can get you back out. heck, one of the guys i go with is in 2wd rear locked 90% of the time
07-29-2012, 01:11 PM
#4410
I don't carry any spares. It will always be that one part you need but don't have. Being stuff to get you thru the day/night and have a way of contacting someone for help is best IMO. Spares are heavy and take up space if you plan on bring enough to rebuild the entire truck. It's funny cuz I carry a 200 plus tool box with no spares. Figure I'll use what I have to fix what breaks. Gorilla tape, zip ties and tie straps. Oh trees and rocks makes great parts. Just reboot the oem and be done with it. Look how long they lasted you so far 
07-29-2012, 01:53 PM
#4411
Oh yeah, I know.... And the things I take so far are only around 3#.8oz.! hahaha... The AFM, extra set of radiator hoses and some other coolant hose sizes, thermostat, spare set of brake pads(as that DID happen to me and nearly leave me stranded)...etc... It's all VERY light and fits in my panel wrapped in cloth... I don't mean 'bring an extra one of everything', Toyo, hahaha... But I hear ya.. And I have around the same, regarding tools(best ones being a compressor/cables/quick charger/slime kit...even Warning Placard Triangles )... Even have c-clip tool set, Torque Bit set, 24 and 22MM wrenches and sockets, angled long needle nose style pliers and one vice grip, and all the basic tools to get me through any trouble, ...even a brake pad change(can live without the shoes to some degree just to get home! haha). I mean... you have a 300# bumper on there... WHICH I KNOW, is INDEED a great asset! ... I'm just carrying a few extra pounds along for insurance... Always have, pop's taught me that way when we used to rebuild and sell first Gen Bronco's on the side. We OFTEN used the stuff we brought when we'd go deep into the Sierras or Sequoias on adventures/expeditions
And x2 on "You're right again", pertaining to rebooting... using those. That's why I said that, cuz it came to me, through you and RW and others as the MOST practical way to get longevity out of "that section" for a GOOD while longer... And for Under 70$!!!!! WOOT! haha.
PS> Toyo, RW, Terry, whomever...... I have a punch that would work, a brass one around 12MM in OD, .......... Couldn't I punch out the Stud-bolts as far as possible to clear the CV inner flange surface and make it easier to remove them? Thought I'd throw that out there and see whatcha think.
)... Even have c-clip tool set, Torque Bit set, 24 and 22MM wrenches and sockets, angled long needle nose style pliers and one vice grip, and all the basic tools to get me through any trouble, ...even a brake pad change(can live without the shoes to some degree just to get home! haha). I mean... you have a 300# bumper on there... WHICH I KNOW, is INDEED a great asset! ... I'm just carrying a few extra pounds along for insurance... Always have, pop's taught me that way when we used to rebuild and sell first Gen Bronco's on the side. We OFTEN used the stuff we brought when we'd go deep into the Sierras or Sequoias on adventures/expeditions And x2 on "You're right again", pertaining to rebooting... using those. That's why I said that, cuz it came to me, through you and RW and others as the MOST practical way to get longevity out of "that section" for a GOOD while longer... And for Under 70$!!!!! WOOT! haha.
PS> Toyo, RW, Terry, whomever...... I have a punch that would work, a brass one around 12MM in OD, .......... Couldn't I punch out the Stud-bolts as far as possible to clear the CV inner flange surface and make it easier to remove them? Thought I'd throw that out there and see whatcha think.
07-29-2012, 02:10 PM
#4412
Below is from 4x4wire, which reminded me that I WILL need to use the 'conversion kit' that came with the Warn Premium Hubs, Richard ..... I don't see those 54MM nuts and such included in what MrArmyAnt sent me... I'll look again, but pretty much POSITIVE......... Changing from ADD to Manual is 'YOINK, SLAP ON, BOLT UP, DRIVE'... Switching from AUTO Locking Hubs to Manual is different.. I changed mine before from ALHubs to the Warn's.....Pictures to go with this page on 4x4 wire are provided in the link >>>
http://www.4x4wire.com/toyota/tech/autohub/ >>>>>>>>>>>>>>>>>>>>
Switching to Manual Hubs on a Toyota 4WD with factory AUTO hubs
Tools Needed:
-12mm socket
-Set of allen wrenches
-T-20 Torx bit
-54mm socket
Installing manual hubs on a truck or 4Runner that has ADD hubs is easy. You simply unbolt the ADD hub and bolt on the new hub. It is not even necessary to remove the wheel from the vehicle. Switching from AUTO hubs is significantly different.
New Warn Hubs w/ kit
Pictured is the 'install kit' required to switch from AUTO hubs to manual hubs. The kit is available from the same shop you would buy the hubs from. You can also just purchase the parts from the Toyota dealer, which might save you a few dollars. The kit consists of four 54mm nuts, two larger washers, and two locking washers. If the dealer pulls up the exploded diagram for a truck / 4Runner with manual hubs these parts should be easily identifiable.
Also pictured are a pair of new Warn Premium hubs. This is usually the hub of choice for people converting over to manual hubs because of the price and warranty. The hubs usually sell for approximately $130/pair, and Warn hubs come with a lifetime warranty.
Remove AUTO Hub Cover
To begin removing the AUTO hub, take off the auto hub cover and remove the 12mm bolt & washer from the end of the axle. Remove the six 12mm nuts and cone washers that are holding the hub body in place. Pull off the hub body. It may be necessary to tap the hub body with a hammer on all sides to get the cone washers to loosen.
Remove clutch and 54mm nut
Compress the spring with a pair of pliers and move it around so that you can get a size 20 torx bit in to remove the three torx bolts and remove the auto hub clutch. Remove the 54mm nut. You'll now be able to see the outer wheel bearing.
Install new washers and 54mm nuts
Install the large flat washer against the outer wheel bearing. Install one 54mm nut. Torque to 18-20 lbs. Install locking washer. Install 2nd 54mm nut. Torque to 58 lbs. Bend the tabs on the locking washer to prevent either nut from loosening.
New manual hub in place
Put the new hub in place. Install the six 12mm nuts that hold the hub body in place. Install the 12mm bolt and washer you earlier removed from the end of the axle. Install the dial on the hub using the bolts provided with your hub.
..... I don't see those 54MM nuts and such included in what MrArmyAnt sent me... I'll look again, but pretty much POSITIVE......... Changing from ADD to Manual is 'YOINK, SLAP ON, BOLT UP, DRIVE'... Switching from AUTO Locking Hubs to Manual is different.. I changed mine before from ALHubs to the Warn's.....Pictures to go with this page on 4x4 wire are provided in the link >>> http://www.4x4wire.com/toyota/tech/autohub/ >>>>>>>>>>>>>>>>>>>>
Switching to Manual Hubs on a Toyota 4WD with factory AUTO hubs
Tools Needed:
-12mm socket
-Set of allen wrenches
-T-20 Torx bit
-54mm socket
Installing manual hubs on a truck or 4Runner that has ADD hubs is easy. You simply unbolt the ADD hub and bolt on the new hub. It is not even necessary to remove the wheel from the vehicle. Switching from AUTO hubs is significantly different.
New Warn Hubs w/ kit
Pictured is the 'install kit' required to switch from AUTO hubs to manual hubs. The kit is available from the same shop you would buy the hubs from. You can also just purchase the parts from the Toyota dealer, which might save you a few dollars. The kit consists of four 54mm nuts, two larger washers, and two locking washers. If the dealer pulls up the exploded diagram for a truck / 4Runner with manual hubs these parts should be easily identifiable.
Also pictured are a pair of new Warn Premium hubs. This is usually the hub of choice for people converting over to manual hubs because of the price and warranty. The hubs usually sell for approximately $130/pair, and Warn hubs come with a lifetime warranty.
Remove AUTO Hub Cover
To begin removing the AUTO hub, take off the auto hub cover and remove the 12mm bolt & washer from the end of the axle. Remove the six 12mm nuts and cone washers that are holding the hub body in place. Pull off the hub body. It may be necessary to tap the hub body with a hammer on all sides to get the cone washers to loosen.
Remove clutch and 54mm nut
Compress the spring with a pair of pliers and move it around so that you can get a size 20 torx bit in to remove the three torx bolts and remove the auto hub clutch. Remove the 54mm nut. You'll now be able to see the outer wheel bearing.
Install new washers and 54mm nuts
Install the large flat washer against the outer wheel bearing. Install one 54mm nut. Torque to 18-20 lbs. Install locking washer. Install 2nd 54mm nut. Torque to 58 lbs. Bend the tabs on the locking washer to prevent either nut from loosening.
New manual hub in place
Put the new hub in place. Install the six 12mm nuts that hold the hub body in place. Install the 12mm bolt and washer you earlier removed from the end of the axle. Install the dial on the hub using the bolts provided with your hub.
07-29-2012, 04:50 PM
#4414
I'm a lil confused, Toyo... Don't the studs have to be knocked out the back/toward the center or diff? I pulled both front and rear diffs to swap in 4.30's, and had to swap the tube on the driver side to the donor diff I got from Yotarob2007......... I'm sure both jobs have their 'drama', but didn't I have to break those nuts free from the studs to get the front diff out? DANGIT, I'ma read up more as I have time.. Just curious. I know I have to turn the CV adn Diff to get to each nut... I just thought I could pull each nut, then knock the studs out one at a time as they come to the bottom where they DO clear, right? I'll go take a look in a few and read up on that stuff asap, Toyo... Just wasn't sure exactly what you meant by your last comment, other than what I just latter-most stated(turn, knock one out, turn, knock out another)...Sorry... as I said, "I'll go look".
Last edited by ChefYota4x4; 07-29-2012 at 09:32 PM.
07-29-2012, 09:32 PM
#4415
Well, I did a lil video from under the truck.... Was hoping to do one with instructions on the power mirror install/repair, but too lil light... I'll get it.
While waiting for the video to upload... I'll add;
* I started pulling the Aisin hubs apart.... WOW, talk about full of crap and dirt and hay and orange RTV.... just REALLY nasty in there. Got half of one of them cleaned up and as I took the Lock-Free dial out, after removing the c-clip... I went very slowly, covered the "FREE" and "LOCK" area with my hand, and............. NO BALL! The spring is in there, I can see it(yet can't seem to get it out.. So I'll just clean in there really well?????????).... But I did this over a giant oil drip tray and INSIDE of a 4" deep, full length hotel pan(the kind you put in a hot water bane for keeping food hot... Very long and decent depth).. NO BALL! I'm assuming the ball sits on top of the spring, just at the edge, like a ratchet ball bearing keeper to keep the socket tight on the shaft????? I"m 99.9999999999% sure that it wasn't there. And honestly? >>> Mr.ArmyAnt didn't appear to have removed the dial from the cover this time... It was really filled with grease and stuff. It appeared that someone had been in them before, due to the Orange RTV inside... Maybe he did that when replacing a CV or something/ Not sure, but I SWEAR it would have fallen out into the pan when I was removing the lever very carefully and slowly. Anyway, looks like I'll have to order the spring and ball kit from Wabbit...... hopefully he's back from vacation? Otherwise, it looks like I'll be sticking with the WARN hubs for now. S'all good, they're solid, have been for MANY miles, still turn like a stove top lever, ....nice and smooth!
Video from underneath my rig...... is now loading to Youtube.... as Photobucket's flashplayer keeps crashing on me!!!!
Be back with the video shortly.
07-30-2012, 01:23 AM
#4417
Super Moderator
Staff
iTrader: (1)
Join Date: Aug 2008
Location: Anderson Missouri
Posts: 11,788
Likes: 0
Received 25 Likes
on
22 Posts
I could listen to your video and then lost sound after a minute or so. The picture kept going though. I got an extra diff and will see if I can get a stud out by tapping on it. never had to remove one.
I had a tough time finding a 54 mm socket, had to check several different places. Finally got mine at Sears.
I probably should carry some spares but never do. I have always lucked out by keeping the maintaince up to where it should be and think that keeps the break downs to a minimum. But I dont hammer it when I get to an obstacle very often, and when I do, I am off of the skinny pedal real quick. I seem to know about what the limits are on the parts that could be under stress. In stock condition, they can take a good amount of abuse when needed.
The guy I traded those SR5 rims for the rusted,wrecked parts truck needs another rim. A tire shop didnt get all of the lugnuts fastened down like they should of been and the nuts wollered out the lugnut holes. Those rims came off of a 94 Runner. He was telling me that some rims use the lugnuts with a washer and I know of them and some use a acorn lugnuts. The acorn lugnut I was unaware of. Is this true? If so is there any salvages out your way that would ship a rim? The tire place admits fualt and is willing to pay for rim and shipping. He says he needs an acorn nut rim (SR5). He wants a matching set. I dont know if there are 2 different styles.
07-30-2012, 02:15 AM
#4418
I could listen to your video and then lost sound after a minute or so. The picture kept going though. I got an extra diff and will see if I can get a stud out by tapping on it. never had to remove one.
I had a tough time finding a 54 mm socket, had to check several different places. Finally got mine at Sears.
I probably should carry some spares but never do. I have always lucked out by keeping the maintaince up to where it should be and think that keeps the break downs to a minimum. But I dont hammer it when I get to an obstacle very often, and when I do, I am off of the skinny pedal real quick. I seem to know about what the limits are on the parts that could be under stress. In stock condition, they can take a good amount of abuse when needed.
The guy I traded those SR5 rims for the rusted,wrecked parts truck needs another rim. A tire shop didnt get all of the lugnuts fastened down like they should of been and the nuts wollered out the lugnut holes. Those rims came off of a 94 Runner. He was telling me that some rims use the lugnuts with a washer and I know of them and some use a acorn lugnuts. The acorn lugnut I was unaware of. Is this true? If so is there any salvages out your way that would ship a rim? The tire place admits fualt and is willing to pay for rim and shipping. He says he needs an acorn nut rim (SR5). He wants a matching set. I dont know if there are 2 different styles.
I had a tough time finding a 54 mm socket, had to check several different places. Finally got mine at Sears.
I probably should carry some spares but never do. I have always lucked out by keeping the maintaince up to where it should be and think that keeps the break downs to a minimum. But I dont hammer it when I get to an obstacle very often, and when I do, I am off of the skinny pedal real quick. I seem to know about what the limits are on the parts that could be under stress. In stock condition, they can take a good amount of abuse when needed.
The guy I traded those SR5 rims for the rusted,wrecked parts truck needs another rim. A tire shop didnt get all of the lugnuts fastened down like they should of been and the nuts wollered out the lugnut holes. Those rims came off of a 94 Runner. He was telling me that some rims use the lugnuts with a washer and I know of them and some use a acorn lugnuts. The acorn lugnut I was unaware of. Is this true? If so is there any salvages out your way that would ship a rim? The tire place admits fualt and is willing to pay for rim and shipping. He says he needs an acorn nut rim (SR5). He wants a matching set. I dont know if there are 2 different styles.
The sound worked fine for me all the way through, when posting it... But I'll listen back when I have time, tomorrow.
Sorry if it's another bad upload... It works fine all the way through on my computer. Thanks, regarding the stud thing... I know they can be hammered out, I was just wondering if I could do the passenger side one right up against the diff like that and then make it easier to slide the inside of the CV assembly downward and then out that way, rather than pulling the spline out of the hub and out over the lower BJ.... Make sense? I'm still gonna find time tomorrow to read up on that(regarding how those dudes did it). MANY said the didn't have to remove the BJ.... NOT many of them explained in detail, other than they knocked the studs out one at a time and then slid it down and out..... ahhh, half-info in most of em...but many more explained more in depth and I bookmarked em or saved em to that post a couple pages back
. Far as the wheel.. Wasn't aware of any rims like mine, SR5 Aluminum 4 spoke, that DIDN'T have the washer type... I have the washer type on mine. And while they're not TOTALLY acorn type, they still are tapered after the washer/toward the wheel. I guess the 94 could be different... But then why have that spot for the washer(make sure it's not there, that recessed/flat cut out circular spot for a washer type lug. I guess my portion inside the washer could fit INSIDE the wheel lug slot where the stud is.... And maybe the washer does all the locking? I think that may be right. I guess if they used the Washer type and it didn't work.... that's a sign of something off, for sure, eh?

You need another 94 type SR5 rim that takes NO Washer Lugs, Acorn types, right? 1 WHEEL?
07-30-2012, 02:58 AM
#4420
Super Moderator
Staff
iTrader: (1)
Join Date: Aug 2008
Location: Anderson Missouri
Posts: 11,788
Likes: 0
Received 25 Likes
on
22 Posts
Audio worked for me this time. Not sure what happened. I need one 94 rim without the washer type if that does exist. I believe they are all the same but he is saying no.
It looks to me like the stud would clear the diff, but I havent done it the way you are talking about. I didnt like my way of doing it as it cost me a ball joint. I am going to need to replace the passenger side like you as I have a ripped boot as well.
It looks to me like the stud would clear the diff, but I havent done it the way you are talking about. I didnt like my way of doing it as it cost me a ball joint. I am going to need to replace the passenger side like you as I have a ripped boot as well.


