
ChefYota4x4's 1987 4Runner Build-Up Thread

 06-04-2011, 09:19 PM
#2442
Hahaha, ..thanks, man....but think about it.... You wouldn't wish what I've been through over the last year on your worst enemy, would ya? hahaha. It was a bit of HELL to get to this point, and I'd have just assumed the first one was done right, ya know? hahahaha. THANKS HB!!... Yours rig is still one of my fav's! I know, it's not SAS yet, ...but it still just looks like a capable sucka! lol.
06-04-2011, 11:32 PM
#2443
Registered User
Aint checked in here in a minute. Seems like all is well. Quick turn around on the enigne is always good. I like that silver color on the block, it makes it pop! Never thought about usin a silver there haha. Definitly great some positive progress on this thing finally. Can't wait to see it done!
06-05-2011, 02:03 AM
#2444
YotaTech Milestone-Two Millionth Post
Mark...is that the ALUMINUM color???....we used that to and it was awesome and dried really fast too. I do like the contrasting colors I am using on Joe's motor to help differentiate things.....just saying that because your dipstick is the same color as the block.
did you get a new rubber thingy for where the dipstick goes in the block. It's not included in my kit, it should, and I think I should order one because I dont want THAT to be an issue after all the attention to detail we have done.
did you get a new rubber thingy for where the dipstick goes in the block. It's not included in my kit, it should, and I think I should order one because I dont want THAT to be an issue after all the attention to detail we have done.
06-05-2011, 07:14 AM
#2445
Registered User
Well,.... I did change the timing cover(swap for a new one) w/out pulling the head, remember?... And; Recently, when I removed the Head, the gasket was fine....but yes, I know it is a possibility, sure enough and thanks for making sure I'm aware of the risks, Jerry. Appreciate that! 
I think if I do it I that way, i will definitely use the aluminum can piece method(I think I'd rather find something more 'flat', lol.)
I know the 'corners' application of RTV up there, ....lil more tricky with the head still/already on. Hmmmm, lol.
Anyway, I have some pics, .... finished painting the block, dipstick housing, ....should have the lot done and ready tomorrow(brackets, etc.).. And I think I'm going to assemble as much of the long block as possible, including the head and possibly lower intake, before installing it into the truck. (So add 'remove hood' to the list, lol) I'll post the pics in a bit.
06-05-2011, 08:10 AM
#2446
Aint checked in here in a minute. Seems like all is well. Quick turn around on the enigne is always good. I like that silver color on the block, it makes it pop! Never thought about usin a silver there haha. Definitly great some positive progress on this thing finally. Can't wait to see it done!
Mark...is that the ALUMINUM color???....we used that to and it was awesome and dried really fast too. I do like the contrasting colors I am using on Joe's motor to help differentiate things.....just saying that because your dipstick is the same color as the block.
did you get a new rubber thingy for where the dipstick goes in the block. It's not included in my kit, it should, and I think I should order one because I dont want THAT to be an issue after all the attention to detail we have done.
did you get a new rubber thingy for where the dipstick goes in the block. It's not included in my kit, it should, and I think I should order one because I dont want THAT to be an issue after all the attention to detail we have done.
NOOOOOO!!!!! just put the timing chain on, timing cover then head. it's so much easier than messing with the head gasket. why take a chance? did they deck your timing cover with the block so it's nice and flat? and the trick i have learned with these, (and had almost 100% success) is to put the timing chain on, then timing cover, and then 2 small dabs of "the right stuff" where the timing cover meets block, then head gasket, then head. works great every time. and i also put a heli coil in the front 8mm bolt in the timing cover for the head gasket. i have seen too many of them stipped out so i have just getten in the habit of doing those while the head is off.
Ok, well, I hear ya... I just remember pushing back the tensioner while getting the timing chain back onto the cam was a lil bit of a bear... but I guess maybe, .... can I push it back from the bottom, instead, since the oil pan wont be on just yet?(What I mean is, ...have someone push it back while I slide on the chain and sprocket to the cam?)
Oh boy, I hope I don't need that on the "hidden bolt!" Mine was fine, after the head came off 3 times, in total. I know...that doesn't mean this one will be! lol. However, since then, I also have a brand new timing cover.
Far as the timing cover to block gaskets.... do you just use a TINY film? I did, last time, and I don't think I had any leaks... or wouldn't have, had my block not been cracked on that timing cover face thing....that's the only place I think it was leaking after I had to swap in the new cover.
************************************************** *********
Anyone else know about the Rubber thingy in the block(where dip stick tube joins block) that Jerry is speaking of??? It's Sunday, can't call Toyota or nuttin.
Thanks, guys, .... I have more questions, but I'm trying to set up a banquet, so, between that and still being pretty sick, plus the motor on my brain, .... I'm a bit frazzled, can't remember. lol.
06-05-2011, 03:49 PM
#2447
Registered User
Paint looks great mark, I used a thin film of sealant on my t cover but as You know can't speak for whether it leaks or not, and I'm not sure of what Jerry is speaking of.
06-05-2011, 04:02 PM
#2448
YotaTech Milestone-Two Millionth Post
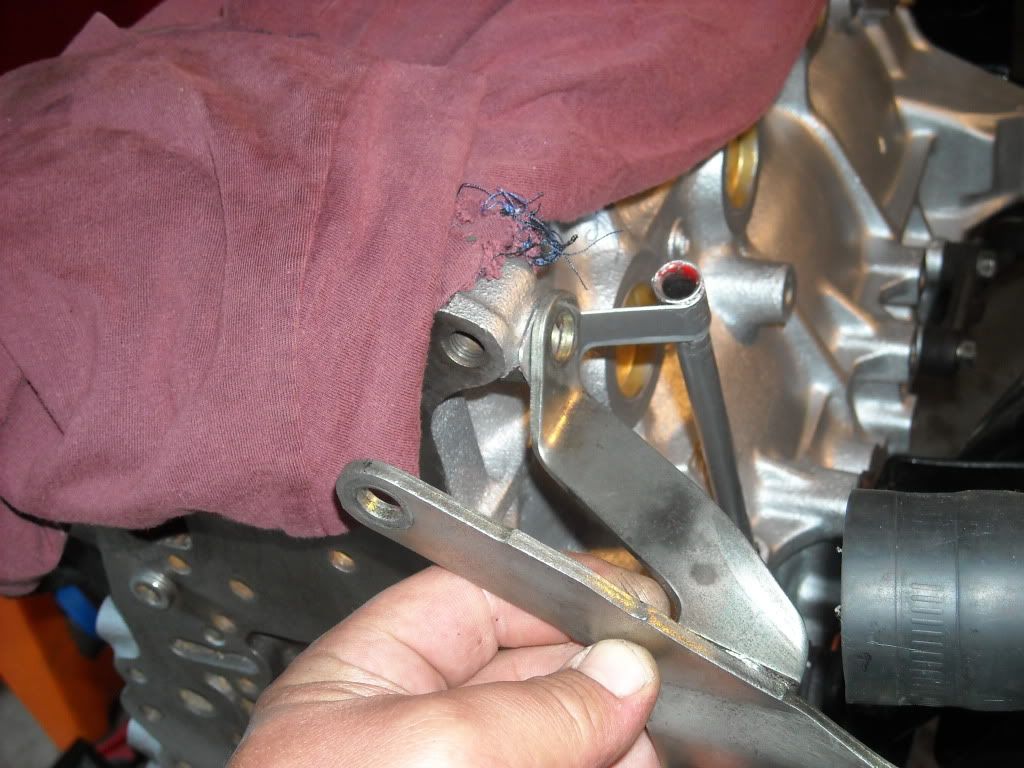
Mark....might just be different because of the different motors....if your's wedges in that seems sufficient, Joe's "pops" in and out and definitely has a rubber doughnut around it.
06-05-2011, 04:08 PM
#2449
YotaTech Milestone-Two Millionth Post
I just snapped a pic of what I'm talking about. because I never took mine out of my 22re, I have nothing to compare it against....except your's. I showed you mine, now you show me your's....hehehehhe

06-05-2011, 05:43 PM
#2451
Yeah, ...he's speaking of where the Oil Dipstick Guide Tube actually inserts into the block. Mine is a tapered flute, with a lil indentation I suppose for keeping it from going to far into the crankcase. His, as you can see below, is actually tapered OUTWARD, on the V6, where I'm assuming it inserts like the Dizzy into the guide and is kinda snug where the o-ring hits the edges. Yeah, I might use some thread sealant or something, just to BE SURE, ..but I had no leaking from there on my other motor, .....and I know, this is not my 'other' motor, hahaha. WOOOOOOOOOT! LOL... Love getting props from the owner of my favorite flatbed.... and favorite restored 83......and ...Oh geeez, now I'm jealous! lol. Jk,....thanks, Brudda! Can't wait to GET IT DONE!
06-05-2011, 05:50 PM
#2452
Registered User
 Sorry couldn't resist.
  06-05-2011, 07:10 PM
#2453
Ok, uploading some pics, ...got quite a bit done today, but not on what I'd have like to! lol.
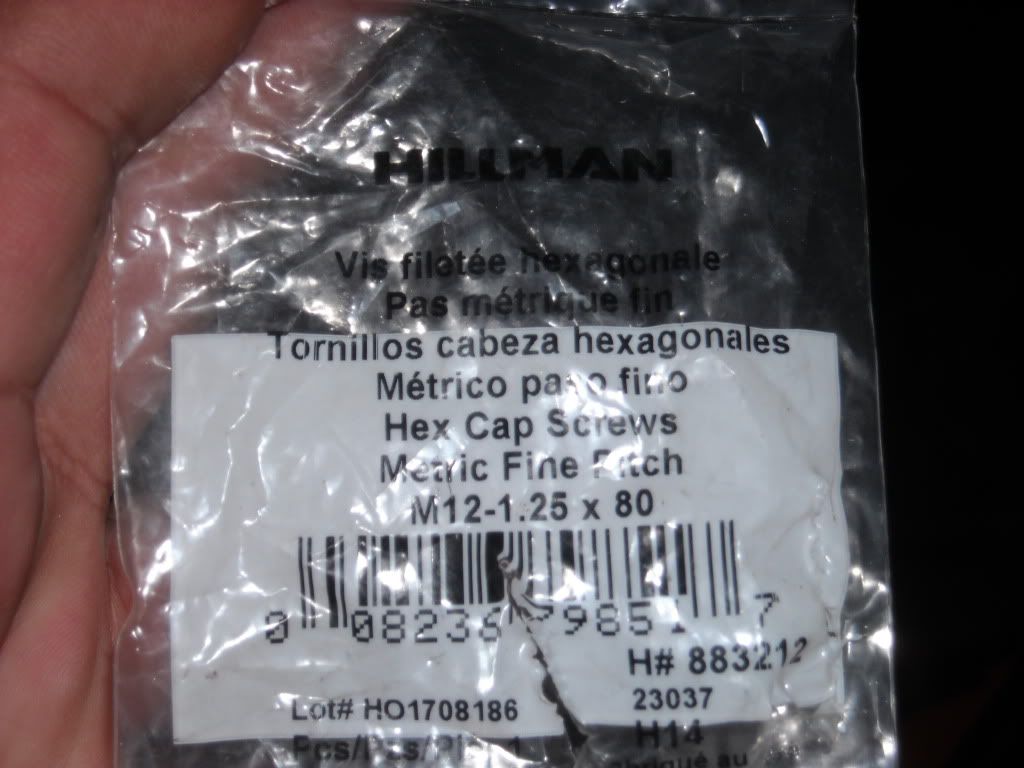
1. Needed the bolts, same thread and size, just longer, as the Bell housing to block bolts..(M12 x 1.25)..... O'reily's, NOPE, ..... Pep Boys, NOPE, .... AutoZone, NOT, .... OSH, NADA, .... Home Depot, ...HOLY CRAPOLI, NOTHING?????? Just about the head home, I decided, ... "You know, it's not like me to give up", ON ANYTHING, UNFORTUNATELY! lol.... "So, I think I'll try one more place, LOWES! ..... Another mile of walking in the parking lots and through the stores to the furthest corner, hahah... BAMMO! M12 x 1.25 100's, plus plenty of Standard Washers with smaller centers for spacing so I don't, Oh, I don't know....BOTTOM OUT A BOLT AND CRACK THE BLOCK????? i KNOW, ....WHO WOULD DO THAT, RIGHT? Pfffffffst!.... ..... So as I walk back up the isle, I see, "Unique Auto"..... WHAT? Where I find plenty of body clip screw retainers, aircraft coolant line clamps, ... couple other things I needed, and then heading out, I see "Angled 45* and 90*, 11" Needle Nose Pliers! SCORE, ON SALE! lol.... 12$ for both Kobalt pliers... woot!" .......... Long and short, it worked out.
Headed home, got a call from my buddy Andy(the guy who's helped me for 30+ hours, EASILY, at different times, "Cam swap" , "Bad Hiccup diagnosis and ECU Hunter", etc., etc. .... "Let's get lunch", ... YEAH! lol. So we did, then came back and hoisted the sucker up on the stand(Tip.... Remove the stands outer apparatus/arms from the base, install it on the block, THEN PUT IT BACK INTO THE BASE! lol.... Then we inspected a few things, had to file down a cog key that got mangled, cleaned up my clutch assembly, ....then he had to go.
I installed the Toyota Oil Filter! WOOOOOOOOOO HOOOOOOOO! lol. Jk, ...that, and installed the motor side of the mounts, water pipe, alternators lower pivot arm(all part of the mount assembly) and called it a day for a while as I had to do dinner. I will install the Oil Pressure sending unit, knock sensor and rest of it, tonight. Install the timing chain kit and cover tomorrow, then pick up the head and HOPEFULLY install it and the oil pan tomorrow night.....THEN, TUESDAY, IT'S GETTING INSTALLED, BABY!
For those of you who pray, ....PLEASE! lol. I don't think I should have any explosives or weapons around me if something goes wrong! lol.
1. Needed the bolts, same thread and size, just longer, as the Bell housing to block bolts..(M12 x 1.25)..... O'reily's, NOPE, ..... Pep Boys, NOPE, .... AutoZone, NOT, .... OSH, NADA, .... Home Depot, ...HOLY CRAPOLI, NOTHING?????? Just about the head home, I decided, ... "You know, it's not like me to give up", ON ANYTHING, UNFORTUNATELY! lol.... "So, I think I'll try one more place, LOWES! ..... Another mile of walking in the parking lots and through the stores to the furthest corner, hahah... BAMMO! M12 x 1.25 100's, plus plenty of Standard Washers with smaller centers for spacing so I don't, Oh, I don't know....BOTTOM OUT A BOLT AND CRACK THE BLOCK????? i KNOW, ....WHO WOULD DO THAT, RIGHT? Pfffffffst!....
..... So as I walk back up the isle, I see, "Unique Auto"..... WHAT? Where I find plenty of body clip screw retainers, aircraft coolant line clamps, ... couple other things I needed, and then heading out, I see "Angled 45* and 90*, 11" Needle Nose Pliers! SCORE, ON SALE! lol.... 12$ for both Kobalt pliers... woot!" .......... Long and short, it worked out. Headed home, got a call from my buddy Andy(the guy who's helped me for 30+ hours, EASILY, at different times, "Cam swap" , "Bad Hiccup diagnosis and ECU Hunter", etc., etc. .... "Let's get lunch", ... YEAH! lol. So we did, then came back and hoisted the sucker up on the stand(Tip.... Remove the stands outer apparatus/arms from the base, install it on the block, THEN PUT IT BACK INTO THE BASE! lol.... Then we inspected a few things, had to file down a cog key that got mangled, cleaned up my clutch assembly, ....then he had to go.
I installed the Toyota Oil Filter! WOOOOOOOOOO HOOOOOOOO! lol. Jk, ...that, and installed the motor side of the mounts, water pipe, alternators lower pivot arm(all part of the mount assembly) and called it a day for a while as I had to do dinner. I will install the Oil Pressure sending unit, knock sensor and rest of it, tonight. Install the timing chain kit and cover tomorrow, then pick up the head and HOPEFULLY install it and the oil pan tomorrow night.....THEN, TUESDAY, IT'S GETTING INSTALLED, BABY!
For those of you who pray, ....PLEASE! lol. I don't think I should have any explosives or weapons around me if something goes wrong! lol.
06-05-2011, 07:13 PM
#2454
HAHAHAHA! Honestly.... I would think that one has got to be one of yours, no? lol. I hear ya though... and honestly? I know you were kiddin...but I can't say I know anyone next to you that has rigged up more fixes on the fly, done more mods with whatcha got or what you find, ...and I DO love that Blueberry Flatbed of yours, you know it! lol.
Thanks for the levity, B! I'll gladly take it and raise you a 'OOOOOOH FREAKIN RAH!' HAHAHA.
Thanks for the levity, B! I'll gladly take it and raise you a 'OOOOOOH FREAKIN RAH!' HAHAHA.
Last edited by ChefYota4x4; 06-05-2011 at 07:15 PM.
06-05-2011, 07:36 PM
#2455
First, Jerry.... here's the bottom end of the stick guide.....
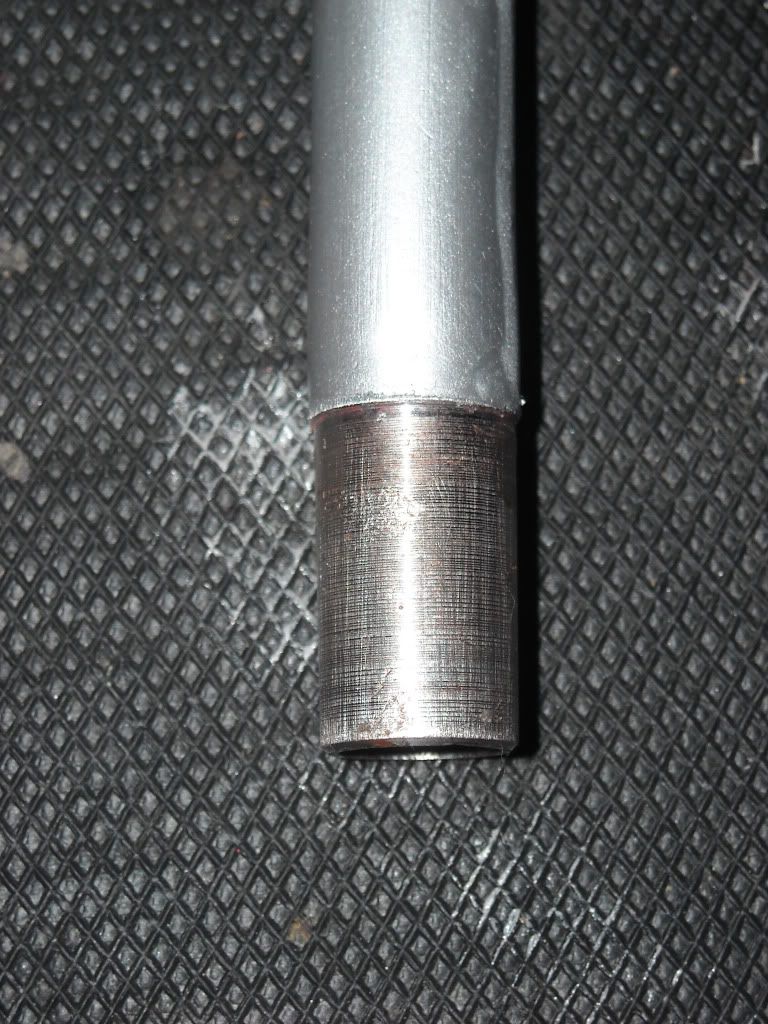
Here's where it goes in.......

************************************************** ***********
Ok, so, I mentioned what a HUNT day it was, to find those bolts for the engine stand to back of block! Grr! Anyway, here's the number if anyone needs em, ...just order ahead on Lowes.com or something, or call ahead? (They have one that is "70" in length, which is best for the upper two,.... this was for the bottom corners, as they don't bottom out.... right through)...
I also got these on my way out, the angled needle nose, 11" that I mentioned...

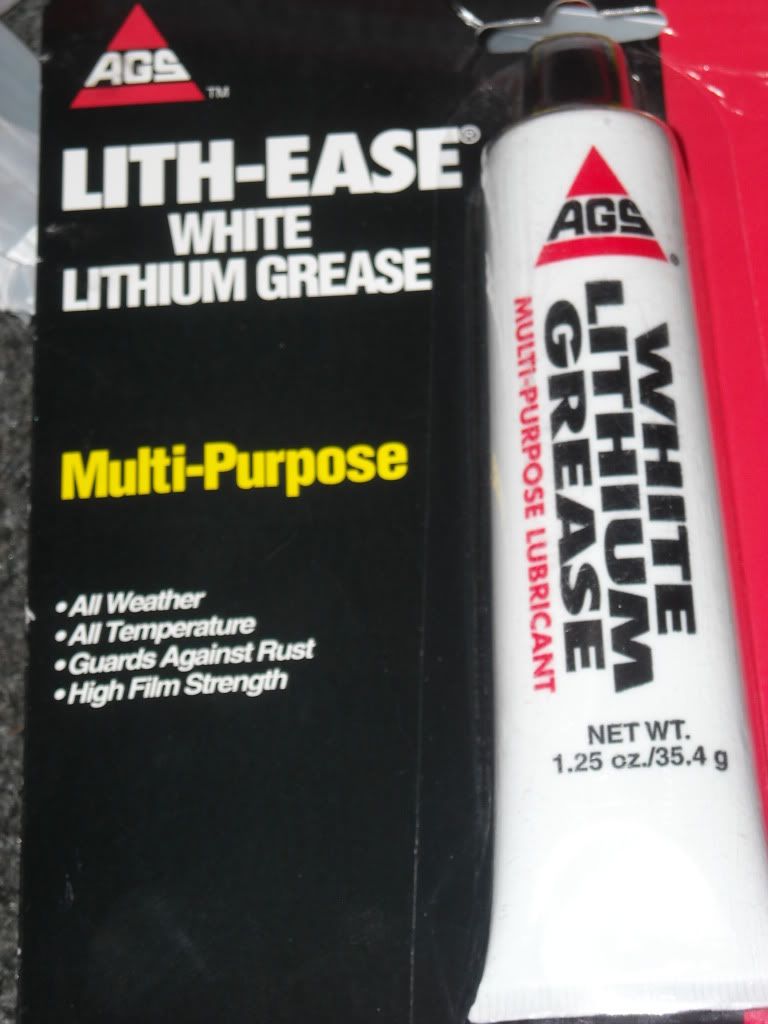
Stopped by and picked up some of this at O'Reily'NT! lol....
Then back here and, as said, "started slappin stuff on".......
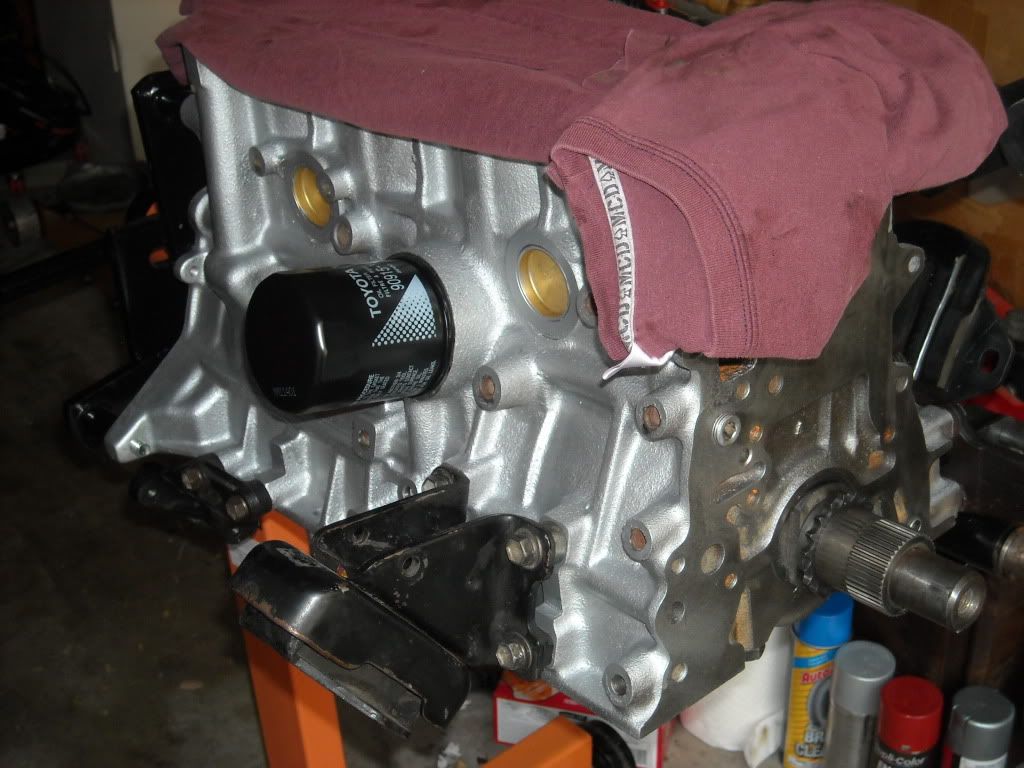
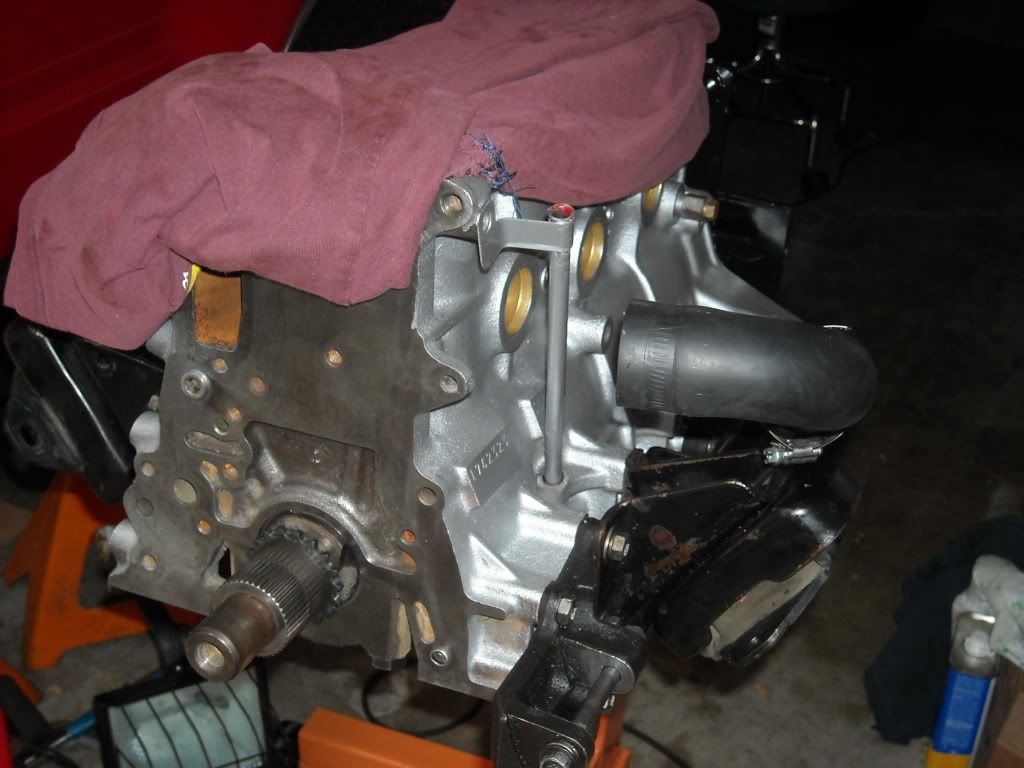
Just for reference for Jason and maybe some others who will NOT want to be tearing down the front half way to get the brackets in the right place! lol.... The front alternator bracket bolt hole goes through the t-cover(top right, the one my machinist cracked the block on)....and the side one holds in the dip stick retainer and alternator brace bolt hole at the same time.....
************************************************** **************
As I said, I should be slapping EVERYTHING on by Tuesday, LATEST, .................God Willing and the Creek Don't Rise! lol.
Here's where it goes in.......
************************************************** ***********
Ok, so, I mentioned what a HUNT day it was, to find those bolts for the engine stand to back of block! Grr! Anyway, here's the number if anyone needs em, ...just order ahead on Lowes.com or something, or call ahead? (They have one that is "70" in length, which is best for the upper two,.... this was for the bottom corners, as they don't bottom out.... right through)...
I also got these on my way out, the angled needle nose, 11" that I mentioned...
Stopped by and picked up some of this at O'Reily'NT! lol....
Then back here and, as said, "started slappin stuff on".......
Just for reference for Jason and maybe some others who will NOT want to be tearing down the front half way to get the brackets in the right place! lol.... The front alternator bracket bolt hole goes through the t-cover(top right, the one my machinist cracked the block on)....and the side one holds in the dip stick retainer and alternator brace bolt hole at the same time.....
************************************************** **************
As I said, I should be slapping EVERYTHING on by Tuesday, LATEST, .................God Willing and the Creek Don't Rise! lol.
06-06-2011, 06:41 AM
#2458
Registered User
 06-06-2011, 08:01 AM
#2460
Thanks, Jerry.... appreciate that... hope it works fantastic, too! lol.
Yeah, I'm anxious....but to be honest? ONLY really anxious because I REALLY need to get out to my Pops' by the 10th, ..ahhhh! lol. But yeah, I'm a lil anxious to start it up as well! lol. Thanks on the Suspension stuff's.... Did my best for my first time. As long as I didn't tweak anything on the suspension or diff's end, ... I'll be happy! lol.
Hey Truckman, Ian, ... thanks for the tidbit's. Is it really such a, I don't know, 'rumor', that Toyota Filters are just superior(in filtration) to most other brands(not sure who makes theirs, ....them? lol) ?? I'll look into that. I have a K&N that I only ran for 1500 Miles(you know, the twice as big one from LCE)..... Just got told by so many, "Doing this 30 years, ...trust me, go Toyota with the filters, all of them"..... so I bought a few.
Anyway, thanx for stopping in.
lol. Just a helpful tidbit Chef, a pre-92 Ford V8 oil filter threads on and seals to a 20R/22R and it's more than twice the size at about the same price as a toyota replacement. NAPA Gold #1515, NAPA ProSelect #21515, CarQuest #81515, Wix #51515 all made my Wix Filters. that's what i ran on my 20R with 1500-2500 mile oil changes.
Anyway, thanx for stopping in.


