
arlindsay1992's 1987 4Runner Build Up Thread
 02-21-2017, 04:42 PM
#161
Registered User
That's good to know about the dash cap. I'm lucky not to need one but had a cracked dash in another old car I had made me stop loving it.
Forgot to post about this. The Husky liners from a 1st gen Tacoma Extra Cab fir the 1st gen 4Runner pretty well. My 4Runner has vinyl floors so I would need to use some industrial Velcro to hold them down. I'll put pictures on my build thread.
Forgot to post about this. The Husky liners from a 1st gen Tacoma Extra Cab fir the 1st gen 4Runner pretty well. My 4Runner has vinyl floors so I would need to use some industrial Velcro to hold them down. I'll put pictures on my build thread.
 02-22-2017, 01:40 AM
#162

 02-22-2017, 02:06 AM
#163
Registered User
Thread Starter
iTrader: (8)
Join Date: May 2011
Location: Southeast Virginia
Posts: 1,517
Likes: 0
Received 353 Likes
on
219 Posts
That's good to know about the dash cap. I'm lucky not to need one but had a cracked dash in another old car I had made me stop loving it.
Forgot to post about this. The Husky liners from a 1st gen Tacoma Extra Cab fir the 1st gen 4Runner pretty well. My 4Runner has vinyl floors so I would need to use some industrial Velcro to hold them down. I'll put pictures on my build thread.
Forgot to post about this. The Husky liners from a 1st gen Tacoma Extra Cab fir the 1st gen 4Runner pretty well. My 4Runner has vinyl floors so I would need to use some industrial Velcro to hold them down. I'll put pictures on my build thread.
It is a fairly stiff plastic. Doesn't give like the vinyl over the foam of the original dashpad but I don't think it would shatter or anything like that. Those screws look nice but probably aren't any thinner than what I'm using. The main advantage of those is they have a large washer face to keep from pulling through thinner or weaker material.
02-23-2017, 06:16 PM
#164
Registered User

i've been on the fence about installing one of those dash caps for a while, now that i saw yours i think i'm gonna give a green light it looks better than i thought.
 03-22-2017, 10:43 AM
#172
Registered User
I've read so many build threads I can't keep up. Do you already have a spare rear axle that you plan to put this elocker into or do you intend to modify the one under your truck?
 03-30-2017, 03:17 PM
#175
Registered User
Thread Starter
iTrader: (8)
Join Date: May 2011
Location: Southeast Virginia
Posts: 1,517
Likes: 0
Received 353 Likes
on
219 Posts
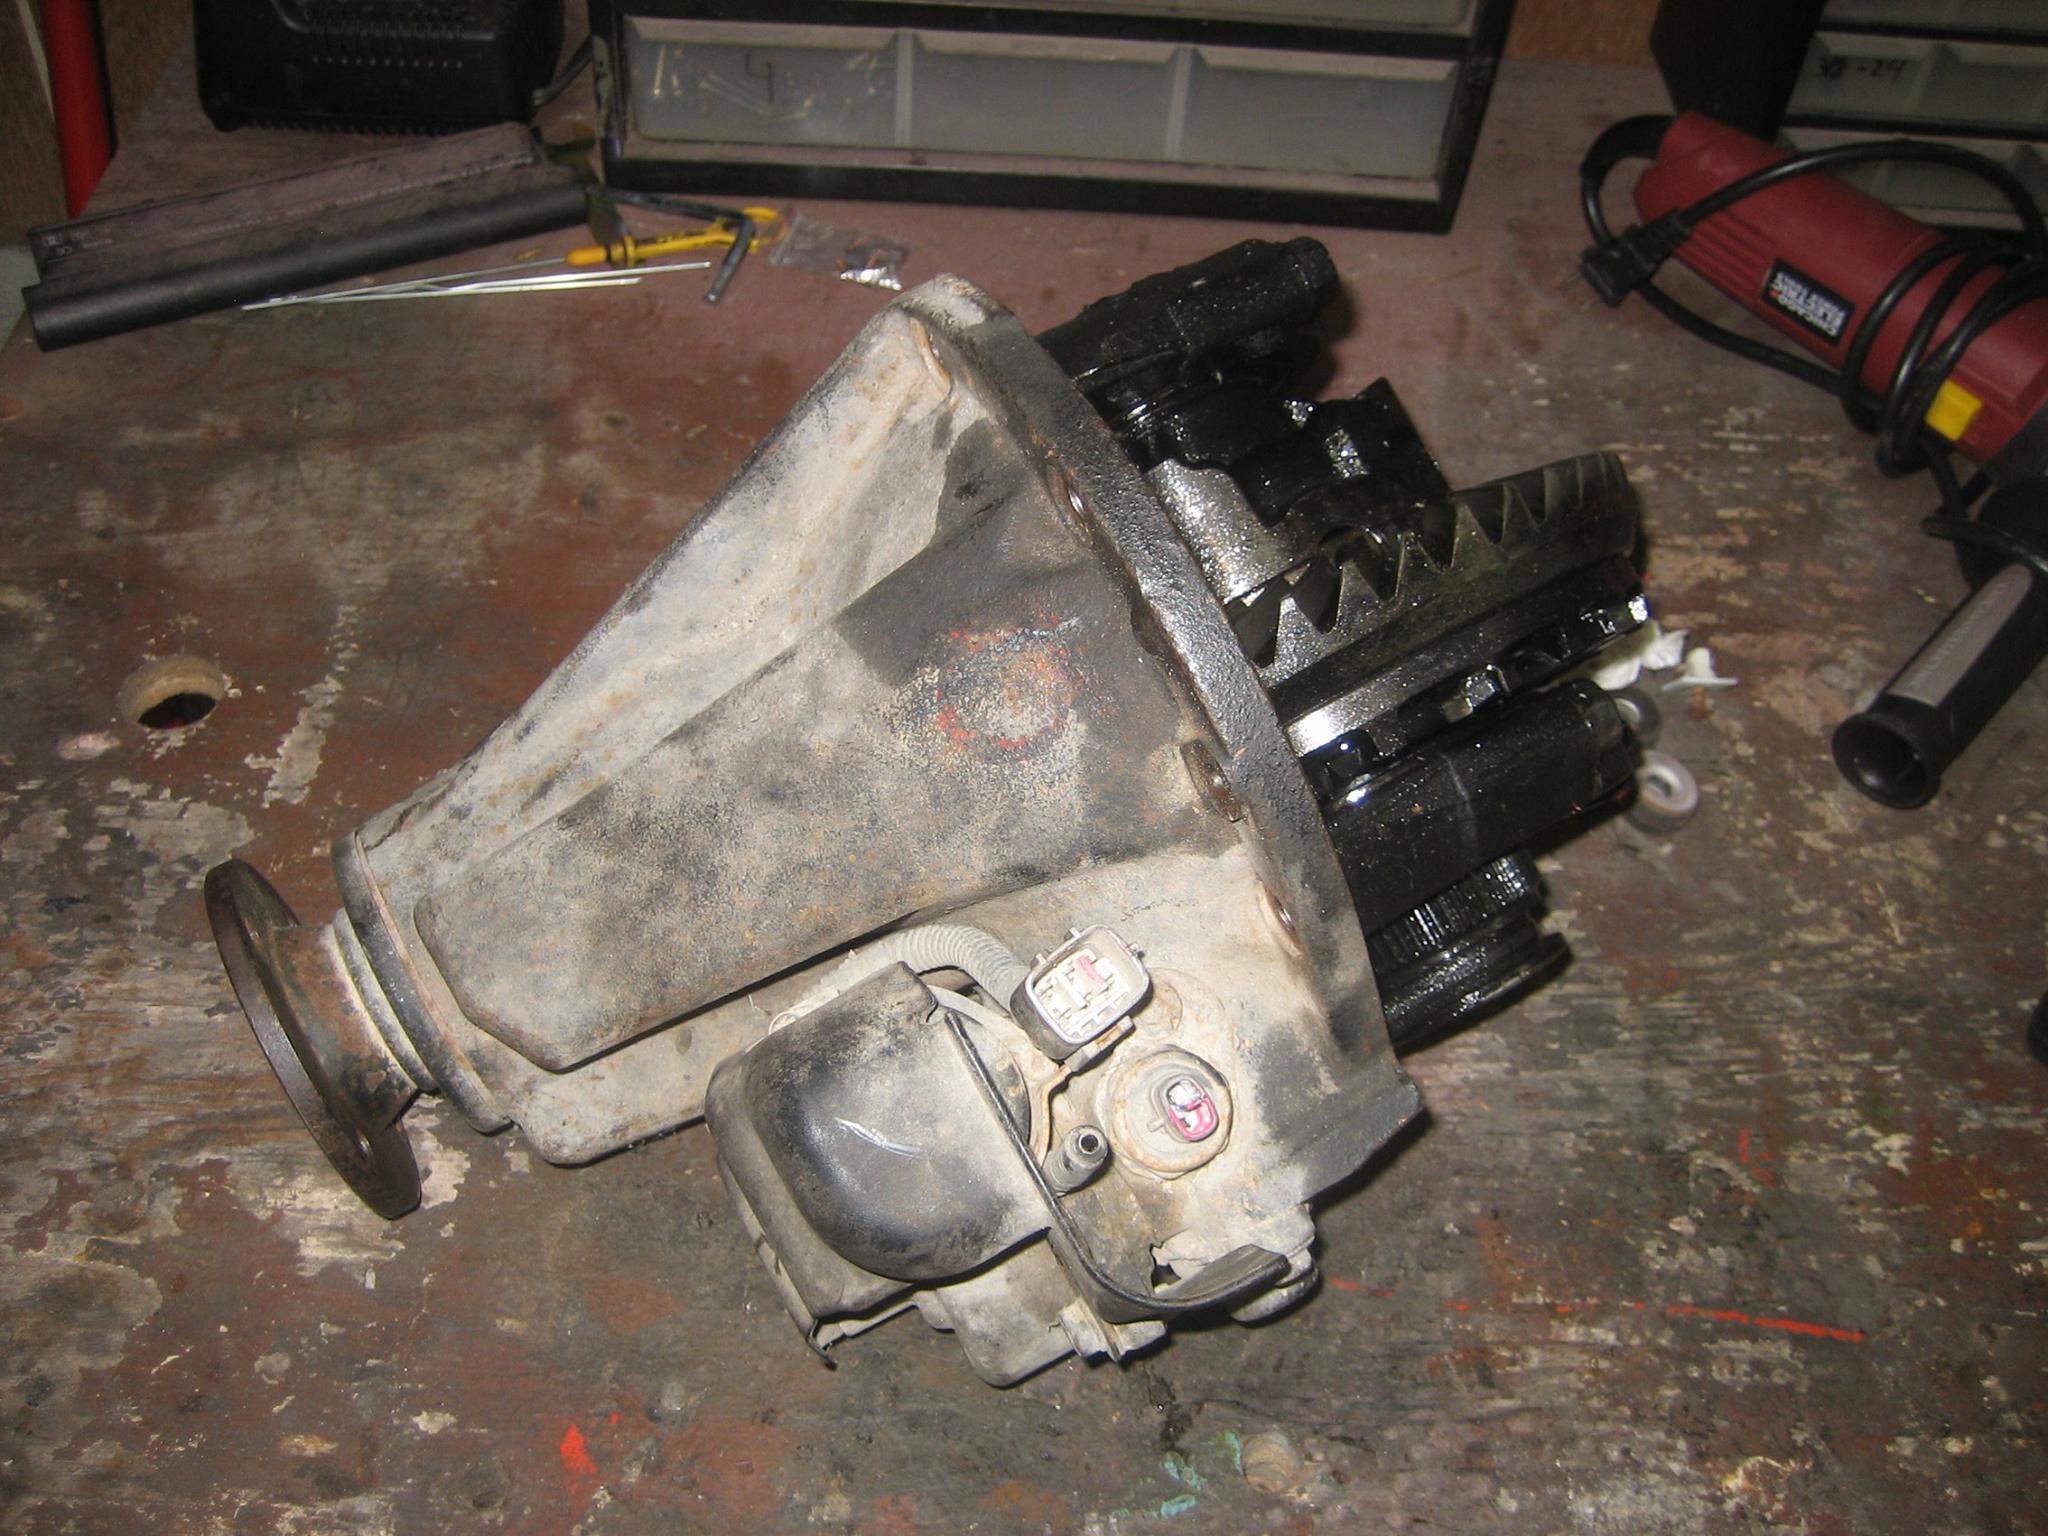
When I got the E-locker home and I was looking it over more closely I realized a very slight rough feeling when rotating the Pinion. I tore it down to inspect just in case some grit had gotten in there but the small pinion bearing had just barely started to fall apart. The other bearings were intact but had turned grey indicating they were on their way out. Decided to order a rebuild kit. I bought USA Standard Gear P/N: ZK TV6 which is the overhaul kit for a Toyota 8 inch V6. The only thing different for the E-locker is the big carrier bearing which I bought from the dealership. It's P/N: 90366-75001.
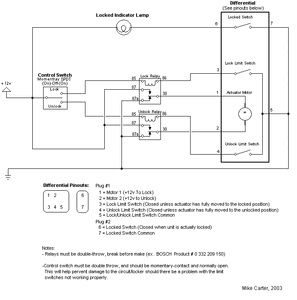
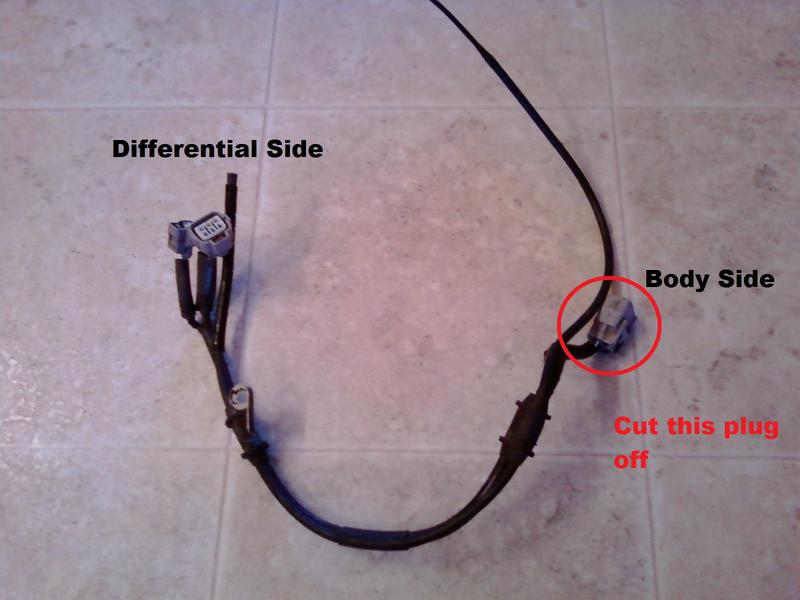
Next thing to do was build up the wiring harness to control it all. I used this diagram I found by Googling "Tacoma DIY E-locker harness." There's lots of options. I liked this one because it used relays to take load off the switch. Also the relays give an audible click at the beginning and end of the actuator's travel so you know when to let go of the switch. Once the actuator rotates fully the locker isn't necessarily engaged. The wheels may need to rotate just a bit relative to each other before the splines line up and the locking collar slides in and engages. Once the locker is engaged, a light on the switch illuminates.
To build the harness you'll need a few supplies, I bought the switch from Low Range Off Road, P/N: DIY-ELSR. This is a Carling switch. I would have preferred an OEM Toyota switch but they cost somewhere between $60 and $90 depending on where you find one. I didn't want to pay that much more. I also bought a Carling VC-01 connector and a couple WeatherPack connectors from eBay. From Toyota I bought the studs (90116-08330), harness (82127-35100), and differential gasket (42181-60050) for a template. I already had two 5 pin relays with connectors, a bunch of wire, loom, and shrink tube, butt crimps, and ring terminals so I didn't have to buy those but you might. From this point it's just a bunch of measuring wire and crimping things. I actually got almost everything done in the correct order. Only forgot to slide the shrink tube on before crimping twice.
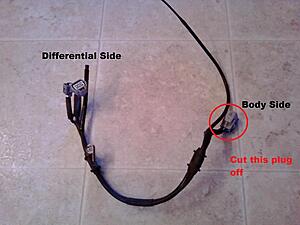
You need the Toyota harness just for the plug that goes into the actuator. The other end gets cut off and the wires extended up to connect to your DIY harness. It also has the provisions to connect the actuator breather which helps.
I paid a few extra bucks to get the correct connector for the switch. It is possible to use female spade connectors with this switch but that means when you disconnect it you have up to 10 wires to re-connect correctly. This way is way easier and cleaner.
Next thing to do was build up the wiring harness to control it all. I used this diagram I found by Googling "Tacoma DIY E-locker harness." There's lots of options. I liked this one because it used relays to take load off the switch. Also the relays give an audible click at the beginning and end of the actuator's travel so you know when to let go of the switch. Once the actuator rotates fully the locker isn't necessarily engaged. The wheels may need to rotate just a bit relative to each other before the splines line up and the locking collar slides in and engages. Once the locker is engaged, a light on the switch illuminates.
To build the harness you'll need a few supplies, I bought the switch from Low Range Off Road, P/N: DIY-ELSR. This is a Carling switch. I would have preferred an OEM Toyota switch but they cost somewhere between $60 and $90 depending on where you find one. I didn't want to pay that much more. I also bought a Carling VC-01 connector and a couple WeatherPack connectors from eBay. From Toyota I bought the studs (90116-08330), harness (82127-35100), and differential gasket (42181-60050) for a template. I already had two 5 pin relays with connectors, a bunch of wire, loom, and shrink tube, butt crimps, and ring terminals so I didn't have to buy those but you might. From this point it's just a bunch of measuring wire and crimping things. I actually got almost everything done in the correct order. Only forgot to slide the shrink tube on before crimping twice.
You need the Toyota harness just for the plug that goes into the actuator. The other end gets cut off and the wires extended up to connect to your DIY harness. It also has the provisions to connect the actuator breather which helps.
I paid a few extra bucks to get the correct connector for the switch. It is possible to use female spade connectors with this switch but that means when you disconnect it you have up to 10 wires to re-connect correctly. This way is way easier and cleaner.
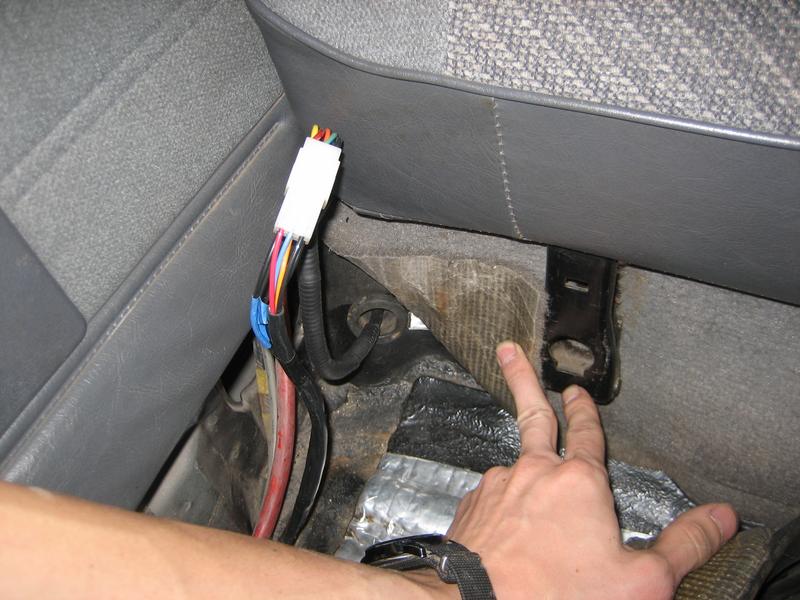
This is where it's all mounted. Tried to make it clean and not cut into interior panels.

The lower light comes on with the dash lights.

The upper light comes on when the locker is engaged.
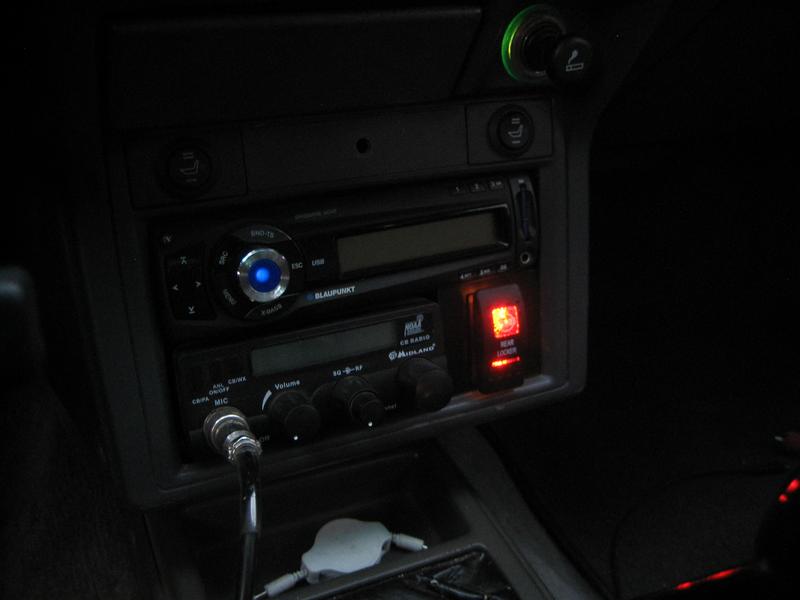
I don't have speakers here anymore, I have 6x9's in the doors, so I put the relays here. When you hit the switch you'll hear one click on and once the actuator travels fully (about 1 second) you'll hear it click off. Then you can let go of the switch.
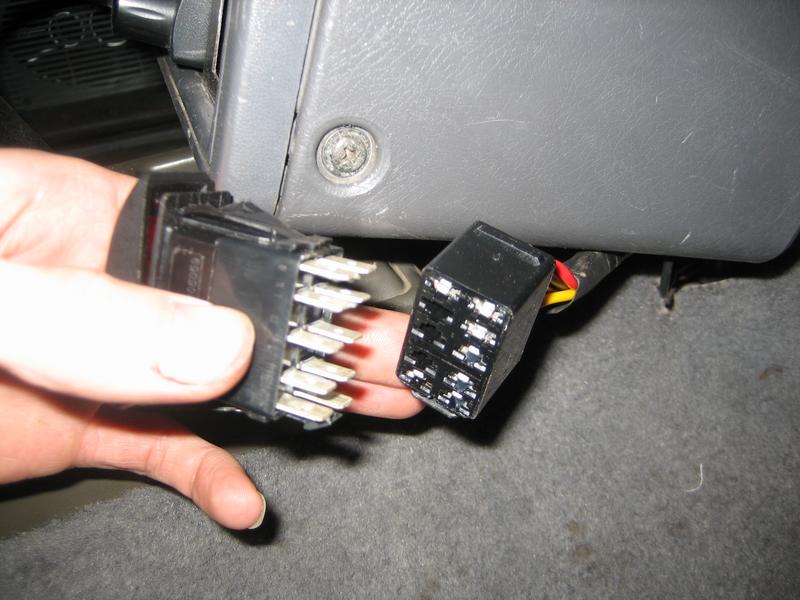
Here you can see where the wiring exits the body and a couple sealed connectors so that everything can be serviced or removed without leaving a hole in the body or having to pull wires from all over.
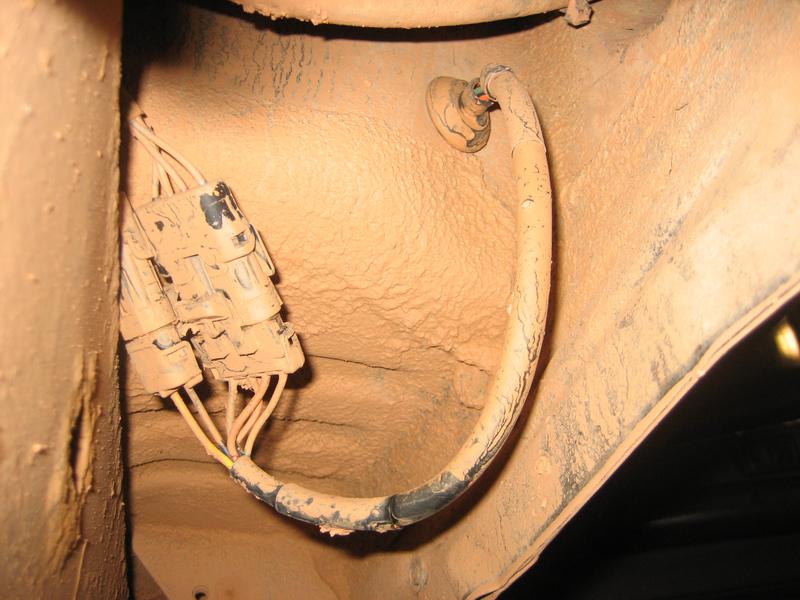
Also have a non-sealed connector on the inside so I can service or remove things from the other end without pulling wires or leaving holes.
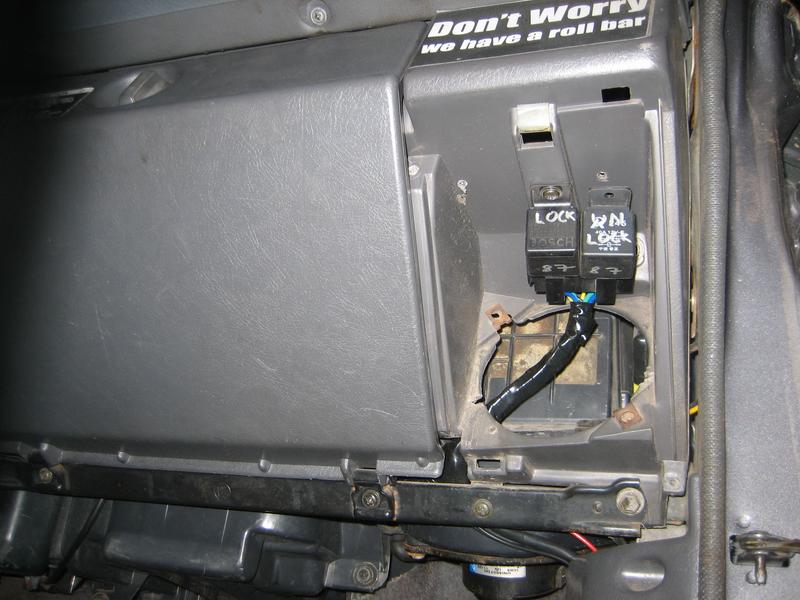
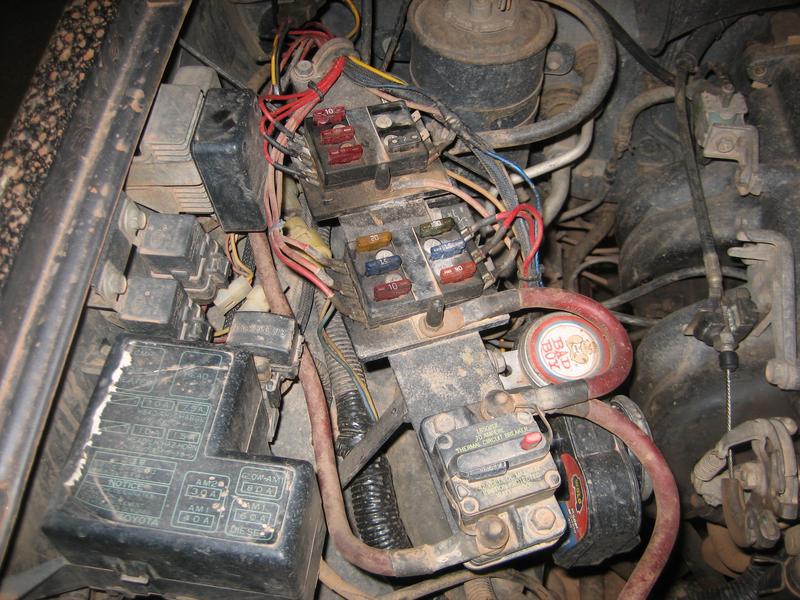
Here's where it all gets power from. The rear fuse block is powered when the ignition is on. That block feeds power to the seat heaters, CB, and now the E-locker. The front block is constantly powered. The big circuit breaker supplies power to the power inverter mounted in the trunk.
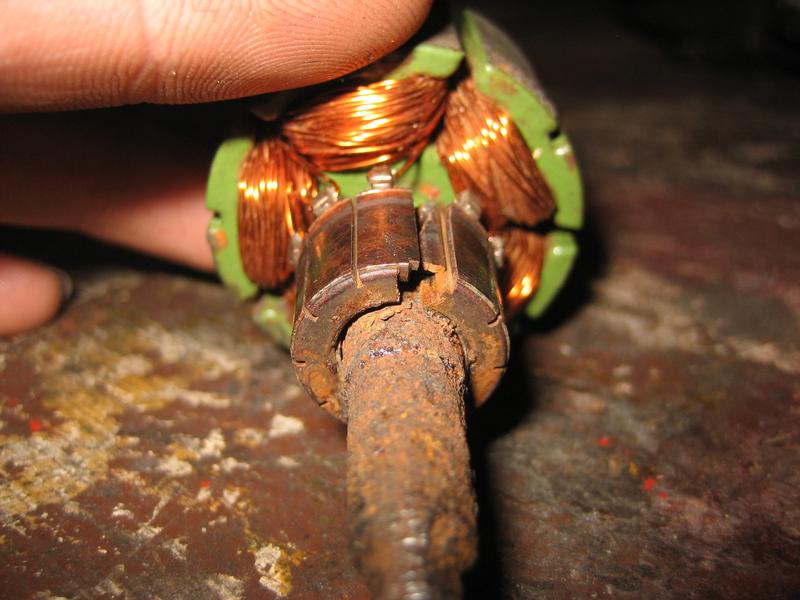
Once it was all put together I plugged it in to the diff on the workbench and tried it out. Nothing. No click, no movement. I double checked all my wiring and it all seemed good so I dug into what looked like a really clean actuator. Turns out it was junk.
Rust.

Rust.
And the actual problem. The motor rotor shaft rusted under the commutator and split it open. Went to a couple motor repair shops in town and none of them said they could fix it.
Tacoma actuators run about $800+ new. No way I'm paying that much. But Land Cruiser front high pinion E-locker actuators are under $300. Looking at pictures they look the same but they are not listed as compatible. I know the plugs are different so I crossed my fingers that was the only difference. I ordered Aisin SAT-002 from RockAuto for $273 to my door.
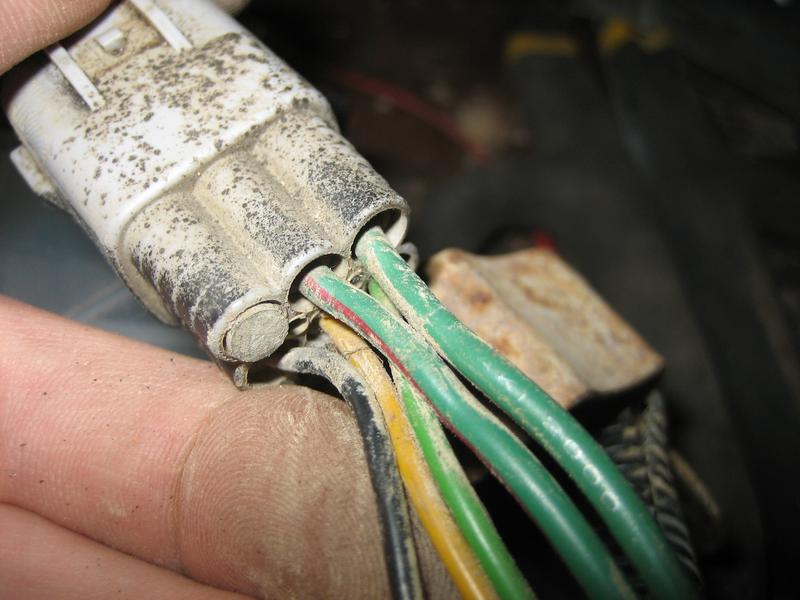
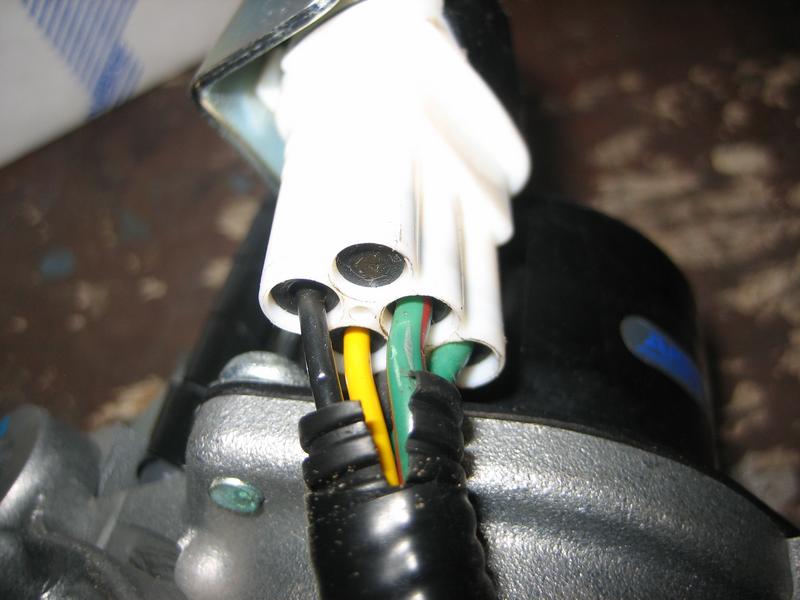
The wire colors and locations are the same between the two actuators. The pins are the same type. Just the connectors are different so I swapped them over. I then discovered that the wires for the high pinion are about 1.5 - 2 inches shorter so you have to route them differently. But for $500 in savings I'll deal with it. Also, the high pinion actuator has one less tapped hole than the Taco actuator so you can't run the factory guard. I'll make one up myself one day.
Taco wires.
Land Cruiser wires.
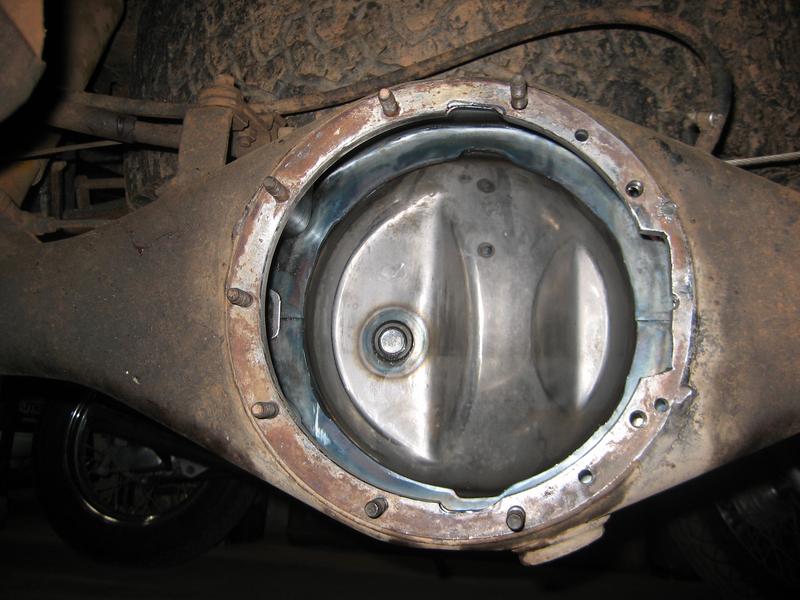
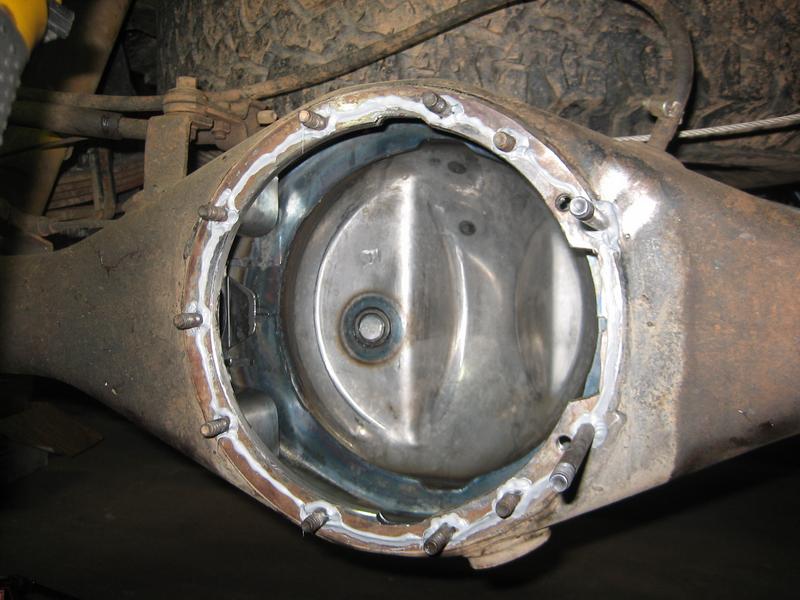
Online I read of the modifications necessary to make the original axle housing accept the E-locker, the notch for the actuator, the notches for the ring gear, the welding, the tapped holes for the new studs, and the dimple for the carrier adjustment locktab bolt. Well, I skipped a couple of these. The E-locker uses the same ring and pinion as the Toyota V6/4 Cylinder Turbo diff. Those don't require the notches cut when installed in earlier housings so I decided to try skipping it. No issue at all there. You don't need to make any more clearance for the E-locker ring gear.
Next step is cutting the notch for the actuator fork. I used a jigsaw with metal cutting blade. It was a bit slower than a grinder but the metal chips are much bigger, not as fast, and mostly pulled out of the axle housing as opposed to just everywhere like with a grinder. I plugged the axle tubes to keep junk from going too far and put a big magnet inside to try to attract chips before they got too far. It was still a mess and took a long time to clean. Here's the finished product.
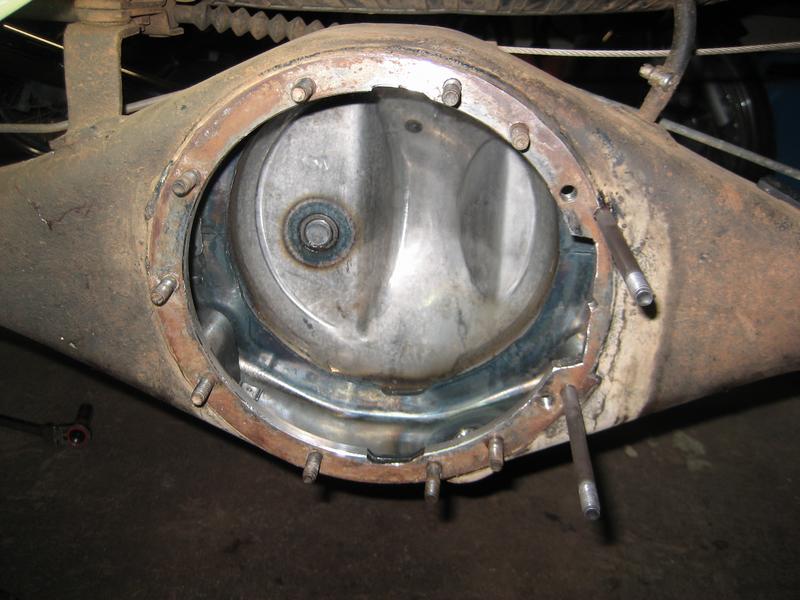
Also, I didn't feel like welding so I just drilled the holes with the differential housing in place to make sure it was all aligned. Tapped them out and there is plenty of meat there.
New studs installed with red LocTite.
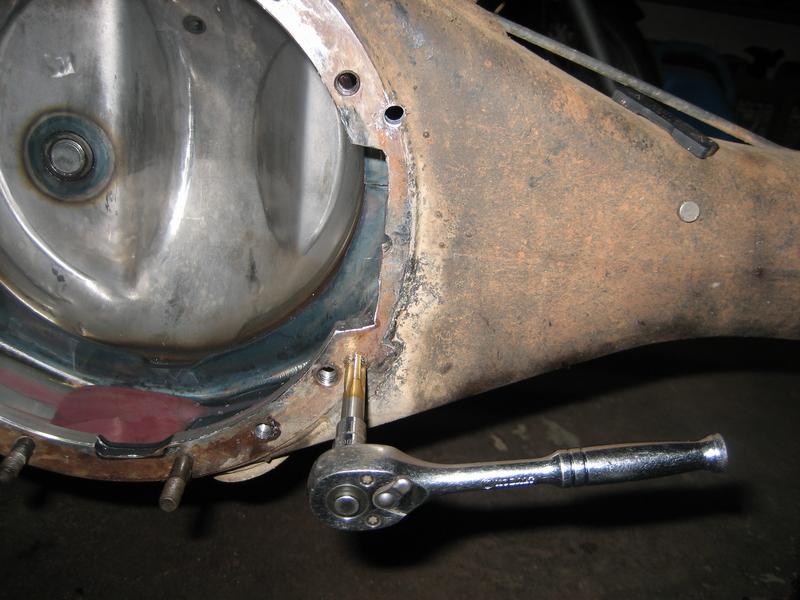
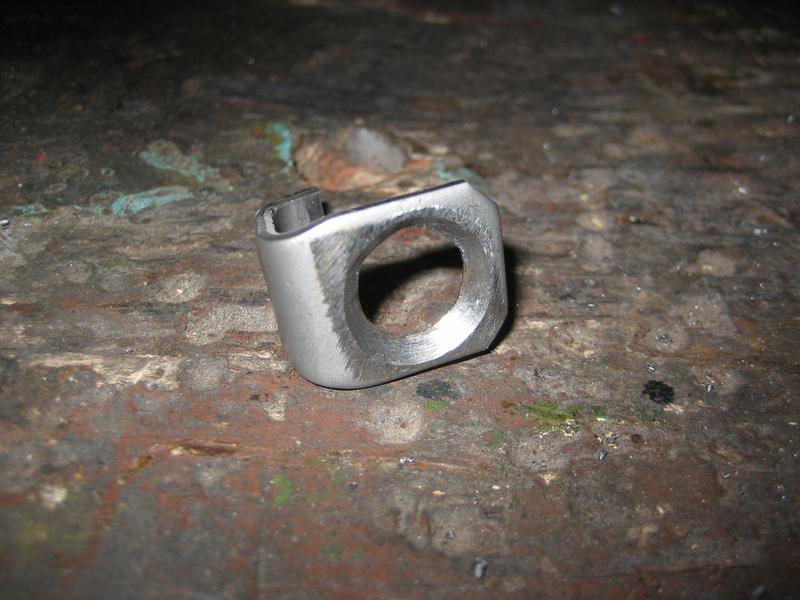
Didn't want to dent up my axle housing for the adjustment locktab. Did this instead. 90 degree countersink on the tab.
A bit had to be clearanced on the carrier bearing cap.

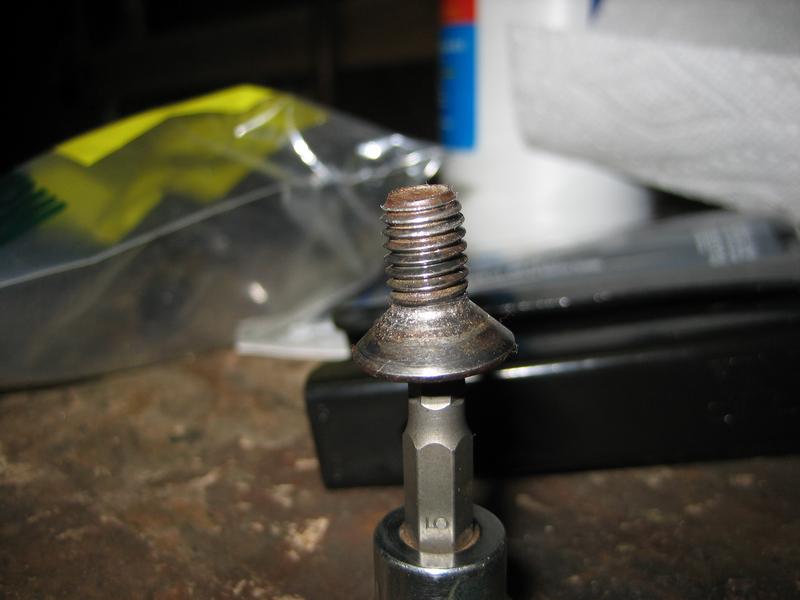
Use this bolt with a bit of blue LocTite.
Nearly flush.

Thin bead of Permatex Ultra Grey and it hasn't had any issues. Sealed up a few diffs this way and I prefer it.
And here's some proof that it works. I've driven other vehicles before and after locking and knew it would make a huge difference so I couldn't wait. Went out to a local spot with a buddy and this thing was awesome. Walked up stuff I used to have to ram. Got out of holes I used to have to go around.

Last edited by arlindsay1992; 03-31-2017 at 02:25 AM. Reason: Fix pictures
03-31-2017, 03:22 AM
#176
Registered User
Awesome work, stinks about the actuator. Good to see you getting on the trail.
04-13-2017, 04:06 AM
#177
Registered User
Thread Starter
iTrader: (8)
Join Date: May 2011
Location: Southeast Virginia
Posts: 1,517
Likes: 0
Received 353 Likes
on
219 Posts
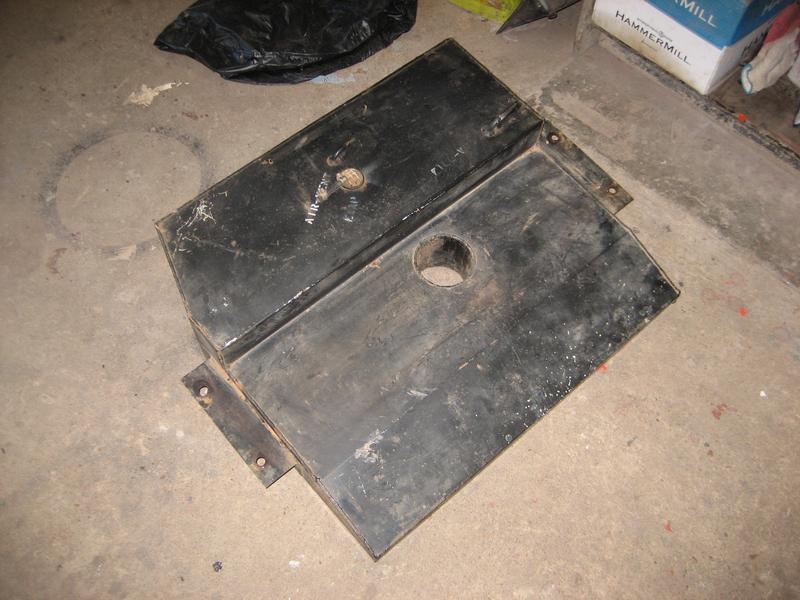
Picked up this a couple weekends back from RBx, a member on here. It's a NWMP TPA-3 auxiliary tank. For those that don't know, North West Metal Products used to make aftermarket application specific auxiliary gas tanks for Toyotas (and others I would assume). They no longer do, and they were pretty expensive when they were new, so there's not too many around. From reading old forum posts on here and Pirate, prices ranged from $400 to $700 over the years. The tank is designed to go under the frame where the spare tire fits. Different options were available which could provide a hole through the center for the spare chain hoist to pass through so the spare could be mounted under the tank, just 3 or 4 inches lower than stock. The tanks were supplied with lines and fittings to allow gravity feed from the auxiliary tank to the main tank. The filler neck goes to the wheel well. I don't have the fittings for the gravity feed, so I plan to design a transfer pump system. I just need to work out how to make sure it doesn't get damaged when the auxiliary tank runs dry, and how to prevent it from trying to pump once the main tank is full. These have a 13.5 gallon capacity which should greatly increase my range when combined with the factory 17.2 gallon tank. I have test fitted the tank and it fits the frame fine, I just don't like how low the spare sits. Like many of my projects, this will probably sit for a while til I can fully plan out the transfer system and also until I get around to building a swingout spare tire carrier off the Trail Gear bumper.

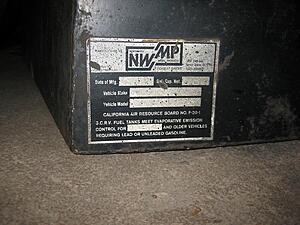
All the label markings are faded and gone.
Here's the filler neck. It's positioned in the wheel well. I'm considering cutting a hole in the body behind the wheel well to put a second filler. Not sure if I really want to do that though.

All the label markings are faded and gone.
Here's the filler neck. It's positioned in the wheel well. I'm considering cutting a hole in the body behind the wheel well to put a second filler. Not sure if I really want to do that though.
 04-13-2017, 10:23 AM
#178
Nice work on the elocker, hope to get one someday. That auxiliary fuel tank is cool, I've never seen or heard of those. It will be nice to have the extended travel range without having to refuel as often!
Last edited by rustED; 04-13-2017 at 10:25 AM.
04-13-2017, 10:32 AM
#179
Registered User
Thread Starter
iTrader: (8)
Join Date: May 2011
Location: Southeast Virginia
Posts: 1,517
Likes: 0
Received 353 Likes
on
219 Posts
Yeah, the range now is just a bit over 200 miles. I've actually gotten over 300 miles but at that point the gauge is well below E. I'm sure we all are away the gauges read way on the safe side. The most I've ever put in was a bit more than 14 gallons so I still had roughly 3 gallons in the tank. The needle was fully below the E and that's the only time I've ever seen the low fuel light come on. With the auxiliary tank I should be able to safely go 400 miles.
I do love the E-locker. The locker and tires are the two best improvements I've ever made to this truck in terms of capability.
I do love the E-locker. The locker and tires are the two best improvements I've ever made to this truck in terms of capability.
04-13-2017, 12:01 PM
#180
I always set my trip odometer when I fill the tank, I can make it 5 days back and forth to work (about 46 miles round trip) but I always get nervous when the trip odometer gets around the 250 mile mark, and my gauge reads empty, then when I fill it up and it only takes 12.5 to 13 gallons and Im like oh, I had plenty of gas left, lol. One of these days I need to recalibrate for the 31's I'm sure that's affecting my odometer reading to some degree.
I was doing some research on a Ford gas tank swap when I had my 86' 4runner. With the 302 V8 and 12 to 13 mpg average I felt like I needed the extra full caring capacity, never got it done though.
I was doing some research on a Ford gas tank swap when I had my 86' 4runner. With the 302 V8 and 12 to 13 mpg average I felt like I needed the extra full caring capacity, never got it done though.


