
arlindsay1992's 1987 4Runner Build Up Thread
 05-24-2016, 01:31 AM
#121
Registered User
Thread Starter
iTrader: (8)
Join Date: May 2011
Location: Southeast Virginia
Posts: 1,517
Likes: 0
Received 353 Likes
on
219 Posts
Thanks! The Can-Back is great. The previous owner bought it and that was basically the selling point of the truck. This is actually a brand new canvas (also bought by the previous owner and never installed til a couple weeks ago).
Thank you. It was a big moment for me to get the last coat of primer on, stand back, and be done working on it.
I've thought about that but I don't really want to cut up that bumper, I'd worry about it being as strong after. My little welder isn't really up to the task of welding 3/8" steel. The chop came out pretty well, I think. Glad it looks okay to others too.
Last edited by arlindsay1992; 05-24-2016 at 01:32 AM.
 05-24-2016, 01:39 AM
#122
Registered User
Thread Starter
iTrader: (8)
Join Date: May 2011
Location: Southeast Virginia
Posts: 1,517
Likes: 0
Received 353 Likes
on
219 Posts
Built this funky thing yesterday. Want to guess what it is?
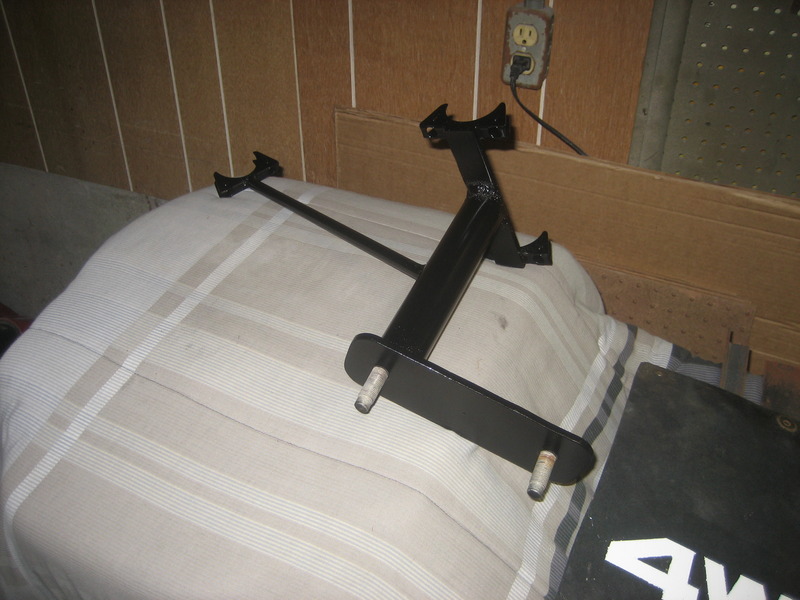
Hint: Here it is mounted in place.
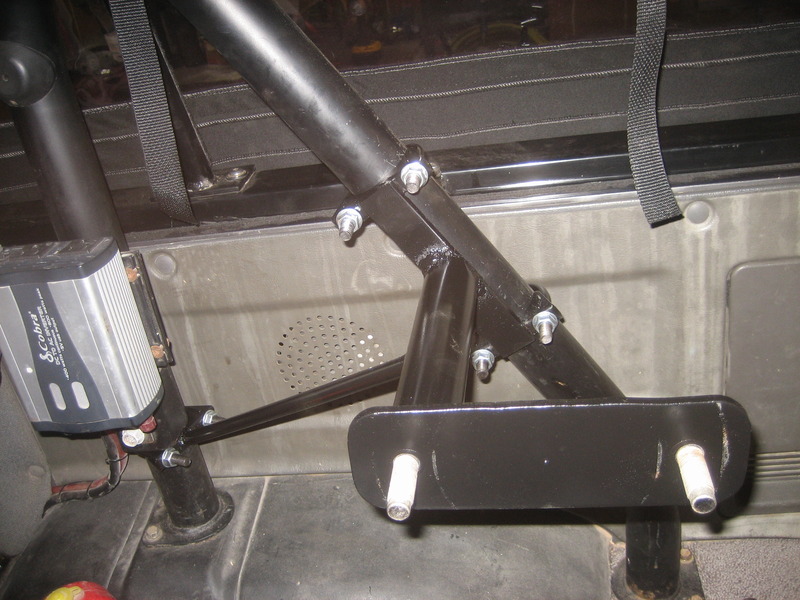
If you guessed spare tire carrier you were right. Someday I'd like to build a swingout that mounts to the bumper but I needed something to work until then. The 33 didn't fit in the stock location between the LSPV rod and the factory receiver. It may fit now with the TG bumper but I don't like how low the spare hangs down.
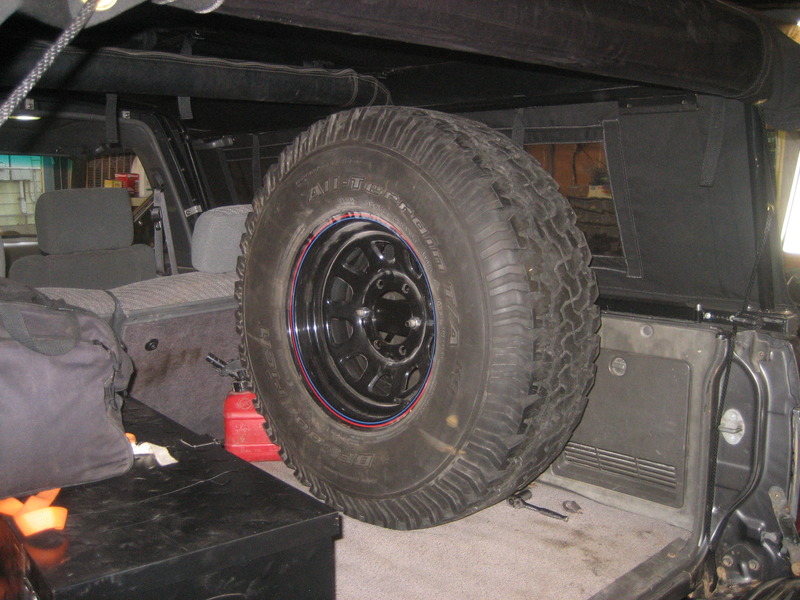
Clamps in 3 places to the roll bar. 1 7/8 exhaust clamps fit perfect on the roll bar.
Hint: Here it is mounted in place.
If you guessed spare tire carrier you were right. Someday I'd like to build a swingout that mounts to the bumper but I needed something to work until then. The 33 didn't fit in the stock location between the LSPV rod and the factory receiver. It may fit now with the TG bumper but I don't like how low the spare hangs down.
Clamps in 3 places to the roll bar. 1 7/8 exhaust clamps fit perfect on the roll bar.
 05-24-2016, 10:27 AM
#124
Registered User
Thread Starter
iTrader: (8)
Join Date: May 2011
Location: Southeast Virginia
Posts: 1,517
Likes: 0
Received 353 Likes
on
219 Posts
For less than $50 you can make your own. I bought 3 exhaust clamps and two lug nuts for less than $5. I had a couple studs, some 1/4 plate, and various tubing laying around so that reduces most of the cost. Would be hard for me to mass produce since everything was just eyeballed. The only thing I measured was the center to center for the lug studs.
05-24-2016, 04:41 PM
#126
Registered User
Thread Starter
iTrader: (8)
Join Date: May 2011
Location: Southeast Virginia
Posts: 1,517
Likes: 0
Received 353 Likes
on
219 Posts
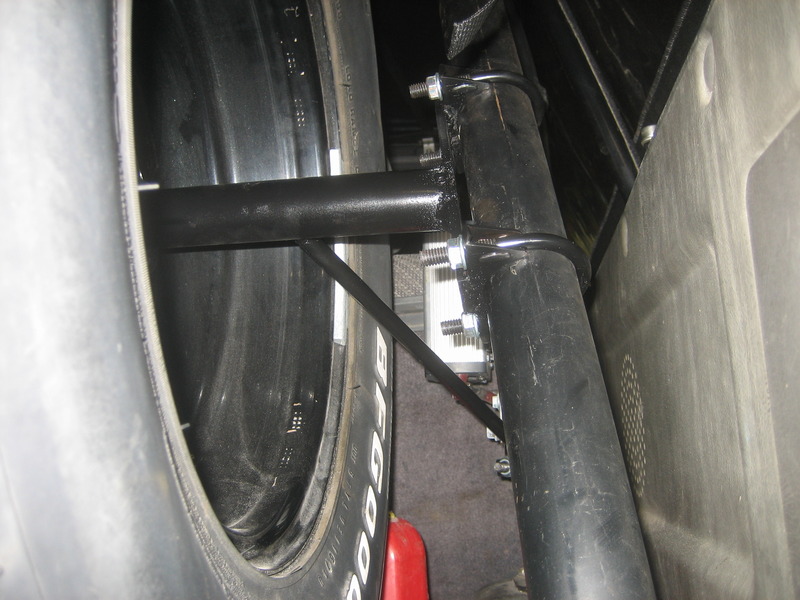
I drove with it for the first time today. It vibrates/wobbles just a bit so I'm going to add an additional gusset tomorrow. If you look at the first picture the big tube goes to the tire mounting plate right behind one of the lug studs. I'd like to add a small tube from close to the other lug stud back to the big tube. Should take care of it, I think.
05-27-2016, 10:42 AM
#128
Registered User
Thread Starter
iTrader: (8)
Join Date: May 2011
Location: Southeast Virginia
Posts: 1,517
Likes: 0
Received 353 Likes
on
219 Posts
It was installed by the windshield guys at the same time the new windshield was installed. I don't think it can be installed without pulling the windshield.
06-29-2016, 06:56 AM
#130
Registered User

Quick question/confirmation, you are running a stock front IFS (no spacer) and a OME rear medium duty. Is that correct? Did you pull any of the OME leaves?
If this is correct your pictures are the only ones I've been able find that show OME rear/stock front.
If this is correct your pictures are the only ones I've been able find that show OME rear/stock front.
Last edited by GeoRoss; 06-29-2016 at 07:02 AM.
06-30-2016, 01:29 PM
#131
Registered User
Thread Starter
iTrader: (8)
Join Date: May 2011
Location: Southeast Virginia
Posts: 1,517
Likes: 0
Received 353 Likes
on
219 Posts
All the pictures I've posted with the BFG A/T's are on OME medium duty rears and stock front IFS no crank. I pulled the shorter overload leaf from the OME springs. It definitely sits higher in the rear by two inches or so. With the hardtop on it might be a bit more even.
06-30-2016, 04:45 PM
#132
Registered User
iTrader: (1)

Join Date: Jan 2015
Location: Fairfax Station, VA 22039
Posts: 250
Likes: 0
Received 1 Like
on
1 Post
Im game for some wheeling. I dont have any of my goodies installed yet, but will definitely still be fun. Just let me know when you are going to be up here again.
I sent you a pm the other day about the roof rack you had in pics earlier in the thread. Do you still have it?
I sent you a pm the other day about the roof rack you had in pics earlier in the thread. Do you still have it?
07-01-2016, 08:08 AM
#133
Registered User
Thread Starter
iTrader: (8)
Join Date: May 2011
Location: Southeast Virginia
Posts: 1,517
Likes: 0
Received 353 Likes
on
219 Posts
As long as you have a front and rear recovery point you'll be fine. A stock truck can make it through most stuff. Sorry I forgot to reply to your PM. As for the roof racks, I sold them a few years back. I tried to find the classified thread where I sold them to get more info but I think they delete those after a while. I can't recall who made them.
07-01-2016, 10:14 AM
#134
Registered User
Sounds good. You up for a bit of wheeling? Nothing too serious but there is one good spot I know of.
All the pictures I've posted with the BFG A/T's are on OME medium duty rears and stock front IFS no crank. I pulled the shorter overload leaf from the OME springs. It definitely sits higher in the rear by two inches or so. With the hardtop on it might be a bit more even.
All the pictures I've posted with the BFG A/T's are on OME medium duty rears and stock front IFS no crank. I pulled the shorter overload leaf from the OME springs. It definitely sits higher in the rear by two inches or so. With the hardtop on it might be a bit more even.
07-01-2016, 12:06 PM
#135
Registered User
I bought some roof rails from someone on here whose mother worked for UPS so they shipped free. I know he lived in VA too. Was it you, Alex? They are unused in my garage...
07-01-2016, 12:11 PM
#136
Great job Alex that is some fine patch work you did on the body. Genius idea with the door skin around the gas filler door. Ive been following your work for a long time glad to see it is all back together again!
Cant wait for that solid axle swap!
Cant wait for that solid axle swap!
07-02-2016, 03:45 AM
#138
Registered User
Thread Starter
iTrader: (8)
Join Date: May 2011
Location: Southeast Virginia
Posts: 1,517
Likes: 0
Received 353 Likes
on
219 Posts
I'm really looking forward to the SAS too. Need to let my wallet recover for a bit though. Basically just need a spring hanger, shackles, and hi-steer.
Last edited by arlindsay1992; 07-02-2016 at 03:47 AM.
07-02-2016, 09:48 AM
#139
Registered User

Join Date: Jan 2015
Location: Hendersonville NC
Posts: 652
Likes: 0
Received 0 Likes
on
0 Posts
How did the paint cure over the rustoleum primer?
In my engine bay the epoxy sealer did not cure over the rustoleum well and the paint can still be dug into with a nail.
I'm debating on stripping it off or not as i know it will likely lift.
In my engine bay the epoxy sealer did not cure over the rustoleum well and the paint can still be dug into with a nail.
I'm debating on stripping it off or not as i know it will likely lift.
07-03-2016, 07:11 AM
#140
Registered User
Thread Starter
iTrader: (8)
Join Date: May 2011
Location: Southeast Virginia
Posts: 1,517
Likes: 0
Received 353 Likes
on
219 Posts
It was all Duplicolor primer. It seems to have all cured fine as far as I can tell. I could smell the paint curing on hot days for about two weeks after it was painted and now it all seems good to go. Time will tell, I suppose.


