
1987 4Runner Cyber Dude
 04-16-2013, 07:25 AM
#161
Registered User
iTrader: (2)
Join Date: Dec 2009
Location: Pleasanton, CA - SF Bay Area
Posts: 2,159
Likes: 0
Received 7 Likes
on
5 Posts
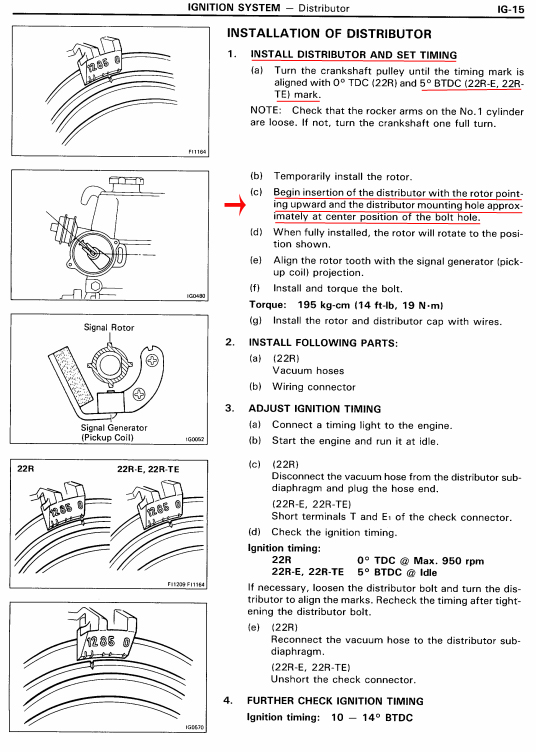
I'm with Gizler on the distributor timing too. On my head replacement thread I asked the same question, using those photos. I've done this before so I'm a little embarrassed that I forgot  Set at TDC, and like Gizler said, line it up so that notch on the distributor driver gear is JUST about to mesh with the cam gear. Chef confirmed on my other thread, and I remembered too
Set at TDC, and like Gizler said, line it up so that notch on the distributor driver gear is JUST about to mesh with the cam gear. Chef confirmed on my other thread, and I remembered too
 04-16-2013, 07:52 AM
#162
DIZZY Install Via FSM
Okay guys, I can confirm that you all are correct. I installed the DIzzy 5^ off and the rotor aligned with the impression of the rotor in the dizzy not at 1200 position that everyone speaks of.
Like So:

Then rotate to 0^ and open up the valve cover and see where that mark sits, it's exactly where it has to be as Philberts photo shows in his prior photo. I don't have to open the valve cover each time. As long as I align the rotor with impression of it in the dizzy. Works every time never missed a tooth. can't argue the fact you guys are doing it wrong and I don't know why the FSM states to set the the timing 5^ BTDC, but here's a shot of the FSM detail it out I just don't use the 1200 on the rotor like I said:
Like So:
Then rotate to 0^ and open up the valve cover and see where that mark sits, it's exactly where it has to be as Philberts photo shows in his prior photo. I don't have to open the valve cover each time. As long as I align the rotor with impression of it in the dizzy. Works every time never missed a tooth. can't argue the fact you guys are doing it wrong and I don't know why the FSM states to set the the timing 5^ BTDC, but here's a shot of the FSM detail it out I just don't use the 1200 on the rotor like I said:
04-16-2013, 11:37 AM
#164
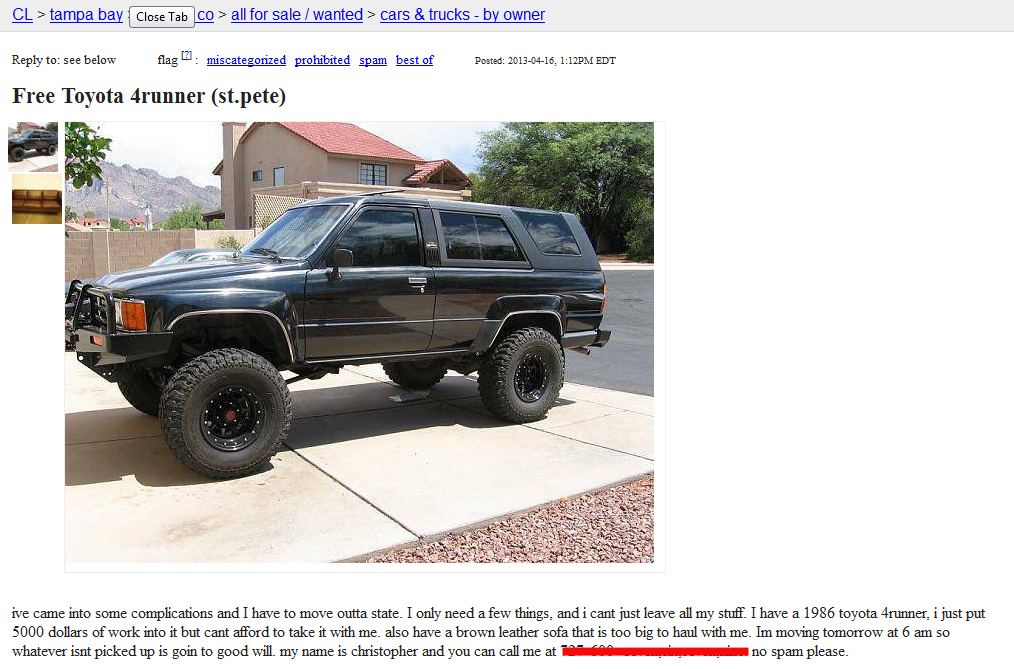
Free 4runner
This could be to true to be true, but this guy states in his title that its a free 4Runner. check it out:
http://tampa.craigslist.org/pnl/cto/3747097058.html
By the way that may be a scam, take a look at the photo with the truck and see the background. There's no mountains or hills in tampa unless they piled up on their garbage dumps.
http://tampa.craigslist.org/pnl/cto/3747097058.html
By the way that may be a scam, take a look at the photo with the truck and see the background. There's no mountains or hills in tampa unless they piled up on their garbage dumps.
Last edited by junk4u; 04-16-2013 at 11:39 AM.
 04-17-2013, 03:49 PM
#168
Tps testing
Been Testing out the TPS its kind of tough check out the specs with these cheapo meters, but I gave it a try.
Here's the check out the VTA and E2 and my reading is 463

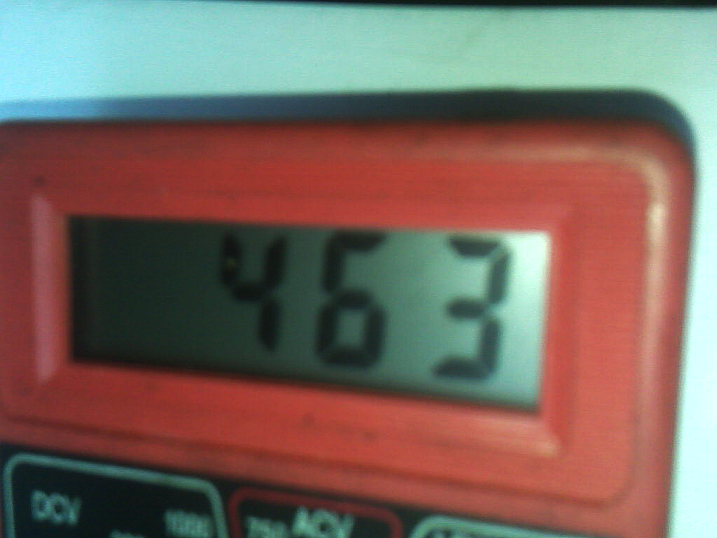
I think the TPS is a little off as this is maxed out I can't go any lower than this and the throttle screw is pretty much set at where it needs to be. The original reading I got from it untouched by me was 990.
I lowered trying to match these specs.
I guess I'll give it a try tomorrow with a little better meter
Here's the check out the VTA and E2 and my reading is 463
I think the TPS is a little off as this is maxed out I can't go any lower than this and the throttle screw is pretty much set at where it needs to be. The original reading I got from it untouched by me was 990.
I lowered trying to match these specs.
I guess I'll give it a try tomorrow with a little better meter
 04-19-2013, 11:11 AM
#173
TPS Screws
I was having such a ball loosening those screws for the TPS to adjust, I ran out and got the allen screws. Lowes had a few but not long enough, so I headed over to ACE Hardware they are more expensive, but they had them. I bought 4 of them just in case.
Will be working on that tomorrow along with a few other things.
My mowers out of wack so I've got to work on that otherwise the grass as long as it's getting will put me into some trouble.
Will be working on that tomorrow along with a few other things.
My mowers out of wack so I've got to work on that otherwise the grass as long as it's getting will put me into some trouble.
04-24-2013, 08:00 AM
#174
Tps
April 21, 2013: Played with the TPS this weekend, weather permitting as it rained a few times this weekend.
Seems like the TPS is bad, I set the TPS as best as possible matching specs, but some setting just would not set. I just got as close as possible.
Once set tighten everything up and fired the truck up. Started up a little rougher than before. Let it run a bit to warm it up then take a look at the timing.
plugged in the jump between E1 and T and nothing happened, checked the timing and it was worse than before, I couldn't even set the timing, it was at least 12 - 15^ BTDC. My guess is that the TPS is off and still needs to be calibrated.
April 23, 2013: Today I decided to take the throttle body off the plenum and try and setup the TPS.
1) Removed the air intake hose from the MAF to throttle Body to get it out of the way.
2) Removed the Vacuum line from above the throttle body. Four hoses vacuum lines.
3) Removed the Hoses from the bottom of the throttle body. Three Hoses, 2 water lines and one air line. Plugged the water hoses with a bolt to keep the fluid from draining.
4) Disconnected the connector from the TPS.
5) Removed the throttle cable from the throttle.
6) Unbolted the the throttle body from the Plenum. Three 12mm bolts and one nut on the left on the bottom.
7) Located the throttle stop screw. Did not want to adjust, as noted on some postings " screw back off the stop then screw back in until contact is made then turn 1/4" didn't adjust it as the butterfly was loose and the stop was making contact.
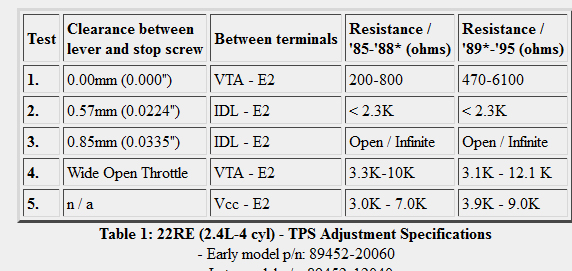
8) Inserted a feeler gauge closes to .57mm between the stop screw and the throttle lever.
9) Connected the meter to E2 and IDL as set it as close as possible to <2.3Kohm.
10) Check reading on E2 and VTA Still with in range 200 - 800 ohms.
11) Inserted a feeler gauge closes to .85 mm between the stop screw and the throttle lever.
12) Connected the meter to E2 and IDL as per specs.
13) Re-checked E2 and VTA still with in specs 594
14) Reinstalled the throttle body and connected all the hoses.
15) Cranked her up idle seems a little high. To check the TPS I inserted the jump in the diag port and the idle did not De-accelerate.
Something was wrong with my settings I guess. So i an idea to play with the tps. To tested it out, instead of setting via the meter, I loosen one of the allen screws and keep on tight. I started the truck idle was high. I loosen the other allen screw and gently tapped on the tps to move it slightly. Sure enough the idle dropped. Tapped it again in the other direction and the idle accelerated. Okay I think there is a sweet spot, so I just tapped it to where the idle would de-accelerate and tighten the allen screw. Once that was set I jumped the the port in the diag and sure enough the idle dropped and the timing went down.
Set the timing as close as possible and removed the jump in the diag and the timing went back to between 8 and 9 degree. With the jumper in I was reading 2 -3 degree.
Seems to be purring in idle, but the valves rattle like your stepping on a RATTLE SNAKE, but I'm going to adjust them again. Reading the post by Mark (chefyota) on obtaining TDC, I think it would be a good idea to re-adjust the valves. Can't thank him enough for reiterating that issue.
Seems like the TPS is bad, I set the TPS as best as possible matching specs, but some setting just would not set. I just got as close as possible.
Once set tighten everything up and fired the truck up. Started up a little rougher than before. Let it run a bit to warm it up then take a look at the timing.
plugged in the jump between E1 and T and nothing happened, checked the timing and it was worse than before, I couldn't even set the timing, it was at least 12 - 15^ BTDC. My guess is that the TPS is off and still needs to be calibrated.
April 23, 2013: Today I decided to take the throttle body off the plenum and try and setup the TPS.
1) Removed the air intake hose from the MAF to throttle Body to get it out of the way.
2) Removed the Vacuum line from above the throttle body. Four hoses vacuum lines.
3) Removed the Hoses from the bottom of the throttle body. Three Hoses, 2 water lines and one air line. Plugged the water hoses with a bolt to keep the fluid from draining.
4) Disconnected the connector from the TPS.
5) Removed the throttle cable from the throttle.
6) Unbolted the the throttle body from the Plenum. Three 12mm bolts and one nut on the left on the bottom.
7) Located the throttle stop screw. Did not want to adjust, as noted on some postings " screw back off the stop then screw back in until contact is made then turn 1/4" didn't adjust it as the butterfly was loose and the stop was making contact.
8) Inserted a feeler gauge closes to .57mm between the stop screw and the throttle lever.
9) Connected the meter to E2 and IDL as set it as close as possible to <2.3Kohm.
10) Check reading on E2 and VTA Still with in range 200 - 800 ohms.
11) Inserted a feeler gauge closes to .85 mm between the stop screw and the throttle lever.
12) Connected the meter to E2 and IDL as per specs.
13) Re-checked E2 and VTA still with in specs 594
14) Reinstalled the throttle body and connected all the hoses.
15) Cranked her up idle seems a little high. To check the TPS I inserted the jump in the diag port and the idle did not De-accelerate.
Something was wrong with my settings I guess. So i an idea to play with the tps. To tested it out, instead of setting via the meter, I loosen one of the allen screws and keep on tight. I started the truck idle was high. I loosen the other allen screw and gently tapped on the tps to move it slightly. Sure enough the idle dropped. Tapped it again in the other direction and the idle accelerated. Okay I think there is a sweet spot, so I just tapped it to where the idle would de-accelerate and tighten the allen screw. Once that was set I jumped the the port in the diag and sure enough the idle dropped and the timing went down.
Set the timing as close as possible and removed the jump in the diag and the timing went back to between 8 and 9 degree. With the jumper in I was reading 2 -3 degree.
Seems to be purring in idle, but the valves rattle like your stepping on a RATTLE SNAKE, but I'm going to adjust them again. Reading the post by Mark (chefyota) on obtaining TDC, I think it would be a good idea to re-adjust the valves. Can't thank him enough for reiterating that issue.
04-25-2013, 05:20 PM
#176
Super Moderator
Staff
iTrader: (1)
Join Date: Aug 2008
Location: Anderson Missouri
Posts: 11,788
Likes: 0
Received 25 Likes
on
22 Posts
So far I have never had a TPS issue. I always pull the part that it is attached to off in one piece so as I dont mess with the adjust ment.
About once a year I pull the valve cover and adjust the valves which is actually scheduled maintaince. Also I retorq the head bolts while I have the cover off. I bought a truck one time and two months after I had it, it blew a headgasket. One of the head bolts on the exhaust side , I was able to remove just using my fingers. I always wondered if I had of done that maintaince at the time, I might would of saved my self from doing a head gasket.
About once a year I pull the valve cover and adjust the valves which is actually scheduled maintaince. Also I retorq the head bolts while I have the cover off. I bought a truck one time and two months after I had it, it blew a headgasket. One of the head bolts on the exhaust side , I was able to remove just using my fingers. I always wondered if I had of done that maintaince at the time, I might would of saved my self from doing a head gasket.
04-26-2013, 12:47 PM
#177
Hey Terry,
Thanks for chiming in. I was able to some what adjust the TPS and the CEL seem to cancel out. I was happy with that then I went and fiddled with the thermo sensor. Pulled it out and checked it out. Cleaned up a little more, checked by placing in heated water, everything checks out. then decided to check the contacts on both sides. Turns out that the female side of the plug (wires) the brass sleeves inside weren't contacting the sensor contacts. I adjusted them inside to contact and my CEL light canceled out for that.
Here's the highlight of the week. After getting rid of all those issues above, i decide to dig into the knocking which so irritated me as it sounded like a diesel truck. I didn't like the sound at all, made me think that the cam may need to be replaced or the rockers. Anyhow, I adjusted the valves 3 times. Once setting the valves to specs again 12 and 8 (hates messing with this you can't imagine how many times I've burned myself). Cranked it up and i still get the knocking. Opened her up again and this time adjusted 11 and 7 just for the hell of it to see what happens. Knocking is less, but about 5 minutes of revving and I get a mix of a knock and a squelching sound, kind of like a a metal lathe turning without lubrication.
I did some looking around by eliminating the pulley and water pump. I removed the belts only leaving the crank shaft belt and started her up. The squelching was still there. Opened up the valve cover and readjusted the valves back to 12 and 8. Still the squelching comes and goes. I'm thinking valve stems and valve guide issues and possible cam lobe issue. I'd hate to start taking this puppy apart again, but i may have to. I have the old head out of the truck and I'm thinking of just dropping it in. First checking to see if there was any warp surfaces, the inside of it was immaculate, but the outside was in oil, which could be a leak through the head gasket.
I'm not going to change anything yet until I can narrow down the issue, but it seems to be internal and not any of the pulleys as I said I removed the belt to reduce the moving parts.
I tried recording the sound on my phone, but I can seem to retrieve it off the phone. It's definitely not a squeak but of a squelching like metal rubbing hence metal lathe.
04-26-2013, 02:19 PM
#178
Engine Rattle
Okay, I got out the camera to take a small vid of the issue and can't get it to squelch like it did before, however the knocking is loud. I accelerated and as it de-accelerates you can hear the knock. Sometimes that knock becomes the squelching.
http://s1155.photobucket.com/user/ju...ba449.mp4.html
http://s1155.photobucket.com/user/ju...ba449.mp4.html
Last edited by junk4u; 04-26-2013 at 02:21 PM.
04-26-2013, 05:26 PM
#179
Super Moderator
Staff
iTrader: (1)
Join Date: Aug 2008
Location: Anderson Missouri
Posts: 11,788
Likes: 0
Received 25 Likes
on
22 Posts
Sounds like you have a loose lifter like you mentioned. One other noise and one you are probably talking about is if I recall right, that if you tighten one of the Timing Cover bolts to tight it can flex in the center and cause some rubbing.
Harbor Freight sells a Stetescope really cheap and that could help find some noise as well.
If you are suspecting the cam and lifters, and you have another laying around. Seems like I seen Chef strap his head down and replaced his without having to replace headgasket. I would try the stethescope first and exhaust all other possibilities before swapping cams. The cams dont require bearings as they ride in the mounts as they are.
04-28-2013, 12:20 PM
#180
Sounds like you have a loose lifter like you mentioned. One other noise and one you are probably talking about is if I recall right, that if you tighten one of the Timing Cover bolts to tight it can flex in the center and cause some rubbing.
Harbor Freight sells a Stetescope really cheap and that could help find some noise as well.
If you are suspecting the cam and lifters, and you have another laying around. Seems like I seen Chef strap his head down and replaced his without having to replace headgasket. I would try the stethescope first and exhaust all other possibilities before swapping cams. The cams dont require bearings as they ride in the mounts as they are.
Harbor Freight sells a Stetescope really cheap and that could help find some noise as well.
If you are suspecting the cam and lifters, and you have another laying around. Seems like I seen Chef strap his head down and replaced his without having to replace headgasket. I would try the stethescope first and exhaust all other possibilities before swapping cams. The cams dont require bearings as they ride in the mounts as they are.
Thanks for chiming again, I sure wish more will post on my thread, it’s kind felling left out here. I guess I should post more pics of things I’m working on. Kind of tough for me as I like 2 hands while working and hold a camera isn’t part of that, I’m really sorry, I will try better. The stetescope might be a good thing to have regardless and right now HF has it for $2.99, so that’s a good thing.
Anyhow, today I sat down and banged my head trying to figure what all this knocking is. I forgot about the valve cover bolt tightening issue that could arise and that is a good point, tightening them to tight can make the rockers knock the cover. In my case it wasn’t so, I have a tendency to just tighten by hand and then turn a whole turn to tighten them. I hate when they are squashed and then heat up and kind of hard to remove. Be it so I thought I’d play with that one, so I loosen the bolt just before the oil started to pump out of the valve cover seal and still knocks so that eliminated that. I talked to a friend he said to check the compression and I did pretty much all four where at 150 to 152 compression. Doesn’t look like a problem there. And then he said it is possible you have bad gas or time is off causing problem in firing, I checked that out, but everything looks almost good.
My neighbor the airplane mechanic and he looked at it and thought the valve needed adjusting, but like I said before I’ve adjusted the valves several different ways 8-12 and 7-11 and then back to 8-12. He said the knocking is coming from the rear of the motor.
Eventually I got tired of fiddling with everything up at the top. So I sat down thought about it and as I was sitting in front of the truck I could hear a slight knock. So I adjusted the idle up to about 1000 rpm and crawled under the truck and the noise was loud. I put my hands on the oil pan and I could feel the knocking. It seems to be a rod knock that should not be there with all the work that was done to it. The crank shaft was taken to the machine shop with the block and the head for them to inspect and give me the size needed. If this is the problem the only way I know how to fix it is remove the crank shaft and take it to a machine shop and have them resurface it or buy one that is ready to go with new bearings.
I have to find a better machine shop, guys I can trust. They measured the crankshaft and I took it for granted that they were right. They said that standard bearings would be good and all they need to do is polish the journals. It seems that it’s getting harder and harder to find a good machine shop this far south.
Either way my next step is to remove the oil pan and see if anything is loose down there. I’m hoping that someone would chime in and tell me there is an easy way to remove the oil pan without pulling the engine out or dis-engaging the tranny from the motor which is a pain sliding the pan out of the way.
If this is the problem, I just can’t see how it would end up like this. I tried moving the rods by hand to see if there was and give and at the time it was zero. Well, maybe I missed something.
Last edited by junk4u; 04-28-2013 at 12:26 PM.


