
1987 4Runner Cyber Dude
 04-18-2014, 05:13 AM
#481
Once I get all this done for the window frames the only thing holding back is the butyl to seal up the windows. I'm going to order a case of each, should be enough to do both toppers and some. It seems that this butyl stuff is pretty expensive around here, you are looking at $12 to $30 for a 15' roll. the Sliding glass seems to use just the butyl tape and the rear panel glass seems to use a foam butyl coated tape. To do the sliding I think you need just over 15' and the same goes for the rear. Dealer still sells the rear panel glass seal for something like $30 MOL for each side.
 04-18-2014, 05:56 AM
#482
Super Moderator
Staff
iTrader: (1)
Join Date: Aug 2008
Location: Anderson Missouri
Posts: 11,787
Likes: 0
Received 25 Likes
on
22 Posts
The all metal finish done great on both the L trims and the other piece as well. I am the same way, I try to use OEM when possible and in some cases the only thing I will use but there are exceptions.
04-18-2014, 08:07 AM
#483
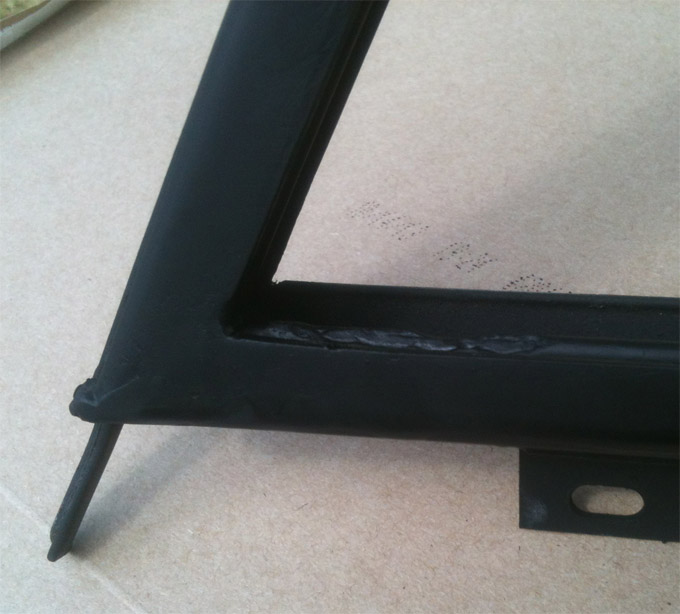
Thanks Terry, I did a rush on that Sliding window frame where I had epoxied that aluminum piece where it rusted out because I had a little time this morning. I filled with all metal and didn't wait for it to dry completely. I sanded it down using a 60grit then used 150 grit all the way to 220grit. It didn't come out as clean as the L-trim, but it looks better than before. It will go behind the trim around or under trim around the window so it won't be scene anyhow. I sprayed it with rust reformer by the pound which I know was a mistake because the all-metal wasn't complete dry. That inner metal guid you see in the middle is pitted and will remain that way because of it is slightly curved besides it will be under the gasket once it's back in place. It is covered in rust reformer and will soon be painted with rustoleum satin finished paint.
This is after I put the all-metal on and sanded it down to a rough finish.

This is looking at it down the center so you can see how thin that aluminum sheet I epoxied to it is. And you can see how pitted one of the guide is there which again will remain that way because of it's location and lip.
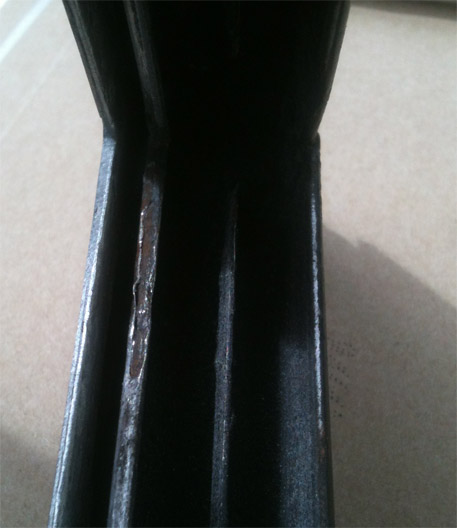
This is where I painted it with the rust reformer by the pound as you can see it running. Remember this will be covered by the trim that goes around the inside of the window.
This is after I put the all-metal on and sanded it down to a rough finish.
This is looking at it down the center so you can see how thin that aluminum sheet I epoxied to it is. And you can see how pitted one of the guide is there which again will remain that way because of it's location and lip.
This is where I painted it with the rust reformer by the pound as you can see it running. Remember this will be covered by the trim that goes around the inside of the window.
Last edited by junk4u; 04-18-2014 at 09:28 AM.
04-19-2014, 12:27 AM
#484
Super Moderator
Staff
iTrader: (1)
Join Date: Aug 2008
Location: Anderson Missouri
Posts: 11,787
Likes: 0
Received 25 Likes
on
22 Posts
I was at the carwash with mine today and while washing around the L trim area noticed a lot of debris coming out of that area and the tracks. I am going to be looking into and seeing where all that stuff is hidden at and try and get it out of there.
04-19-2014, 06:09 AM
#485
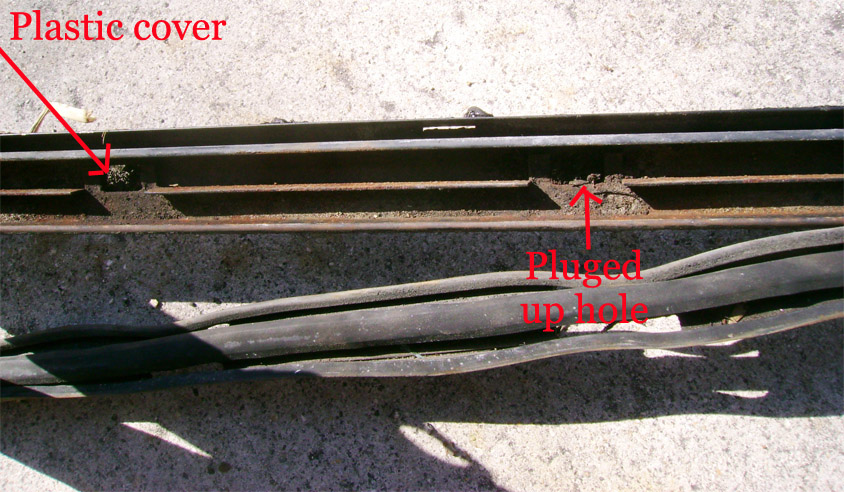
I've come to the conclusion that every once in a while if it is possible, with the frame still on the topper to slide the glass all the way to one side. Then try and lift the bottom of the gasket up and clean it out or blow it out. If you could lift up the gasket which I don't know yet with the frame in tacked then maybe a routine cleaning would be in order. This would keep the area free of junk and most likely reduce the chances of rusting or length life span of these frames.
here's what it looks like under the gasket when it gets flooded and full of crud build up in there.
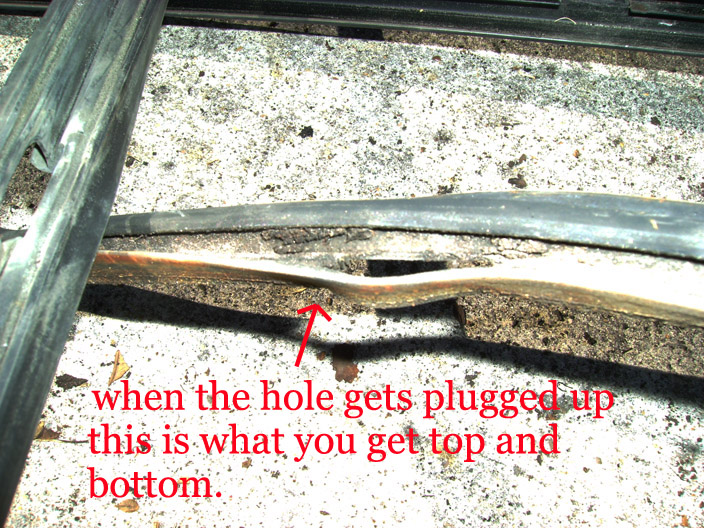
And that's under the gasket and people wonder why it would rust. That stuff would hold the moisture for a while besides clogging up the drain.
Last edited by junk4u; 04-19-2014 at 07:28 AM.
04-19-2014, 07:47 AM
#487
Since I've started the all out LED bug, I just realized my dome light was not working. I pulled off the lens cover to check the bulb and it is fine. I switched the light on nothing I put it on the door nothing. i checked to see if I had power. The answer to this is yes, as I grounded out one side of my cheapo meter and placed the + side on one of the lines, the light lit up. Okay then I tried the switch nothing. Checked the power again the light comes on because I'm grounding out the line, that's good. So I switch the lever a few time the light comes on and flickers off. I push the lever in wards and the light comes on and works.
I ended up taking apart the dome light and looked over the switch. I didn't want to take the switch apart because it was being held together by melted plastic like rivets. I could see the contacts on the inside were corroded, I got my handy die-electric grease and squirted a few time in there and move the switch back and forth and then screwed it back up, The light works great now for the on position and the passenger door side. It seems that the drivers side does not work when the door is open. The buzzer seems to work fine with the door open and with seat belt. i tested out the door switch and it's working fine and isn't sticking at all. I'm guessing 2 thing may be going on here 1) there is a short or a cut wire some where, 2) the diode that is on that run there maybe bad which is basically the same as having a short or cut wire. Now I need to find out where that diode is with that run that goes up the A pillar to the light. I didn't know these had a diode in there, but looking at the FSM Diagram it shows a diode between the switch and the dome light.
I think this should be an easy fix.
Just found out that instrument panel lights require about 19 bulbs total, 11pcs of the 194 bulb and 8 of the 74 bulb.
Last edited by junk4u; 04-19-2014 at 08:34 AM.
04-19-2014, 07:53 AM
#488
Since I've started the all out LED bug, I just realized my dome light was working. I pulled off the lens cover to check the bulb and it is fine. I switched the light on nothing I put it on the door nothing. i checked to see if I had power. The answer to the is yes, as I grounded out one side of my cheapo meter and placed the + side on one of the lines, the light lit up. Okay then I tried the switch nothing. Checked the power again the light comes one because I'm grounding out the line, that's good. So I switch the lever a few time the light comes on and flickers off. I push the lever in wards and the light comes on and works. I ended up taking apart the dome light and looked over the switch. I didn't want to take the switch apart because it was being held together by melted plastic like rivets. I could see the contacts one the inside were corroded, I got my handy die-electric grease and squirted a few time in there and move the switch back and forth and then screwed it back up, The light works great now for the on position and the passenger door side. It seems that the drivers side does not work when the door is open. The buzzer seems to work fine with the door open and with seat belt. i tested out the door switch and it's working fine and isn't sticking at all. I'm guessing 2 thing may be going on here 1) there is a short or a cut wire some where, 2) the diode that is on that run of where maybe bad which is basically the same as have a short or cut wire. Now I need to find out where that diode is with that run that goes up the A pillar to the light. I didn't know these had a diode in there, but looking at the FSM Diagram it shows a diode between the switch and the dome light. I think this should be an easy fix. Just found out that instrument panel lights require about 19 bulbs total, 11pcs of he 194 bulb and 8 of the 74 bulbs.
I did not know there was a diode in there either. But I think you are right on track with the bad diode and not the switch since the buzzer works.
I'm always afraid to mess with my done light in fear of it crumbling in my hands. I've had a few that were all old and crusty, and broke beyond repair when I messed with them. Especially the cover.
04-19-2014, 08:49 AM
#489
Good info there with the bulbs and the some light. Glad you got it working.
I did not know there was a diode in there either. But I think you are right on track with the bad diode and not the switch since the buzzer works.
I'm always afraid to mess with my done light in fear of it crumbling in my hands. I've had a few that were all old and crusty, and broke beyond repair when I messed with them. Especially the cover.
On those bulbs, the 194's I purchased I have no idea if they will fit. They may be a little to tall to fit. I can't tell you until I receive then. It they don't fit, I'll end trying the next ones I found which seem a little shorter. The 74's as soon as I ca n fine something close to what may fit I will order only then.
as far as the dome light your are right. The look like that old Japanese pottery crack ware. Mine are the same. The deck light in the cargo area on the 86 crumbled to bits when I was unscrewing it a few years ago.
The deck light is a bit to expensive as it is sold as one piece at the dealer which you can get for about $37 MOL. The dome light on the hand you can get the lens by itself for about $6.00 at the dealer. $37 is a little steep for this deck light which is hardly used, but the dome light is worth it as everyone uses it and most everyone tends to look up at it only to see the crackled lens or the slightly brown burnt lens.
04-19-2014, 09:15 AM
#490
On those bulbs, the 194's I purchased I have no idea if they will fit. They may be a little to tall to fit. I can't tell you until I receive then. It they don't fit, I'll end trying the next ones I found which seem a little shorter. The 74's as soon as I ca n fine something close to what may fit I will order only then. as far as the dome light your are right. The look like that old Japanese pottery crack ware. Mine are the same. The deck light in the cargo area on the 86 crumbled to bits when I was unscrewing it a few years ago. The deck light is a bit to expensive as it is sold as one piece at the dealer which you can get for about $37 MOL. The dome light on the hand you can get the lens by itself for about $6.00 at the dealer. $37 is a little steep for this deck light which is hardly used, but the dome light is worth it as everyone uses it and most everyone tends to look up at it only to see the crackled lens or the slightly brown burnt lens.
I really have been wanting to go through all my dash lights. I know some are burned out. I want to go all LED soon.
04-19-2014, 11:52 AM
#491
Gizler here you go on the Dome Light Lens: 81241-20060.
Sure wish we had a junk yard with a few of these 1st gen runners in them. They are all, but none right now. So I am always looking for a parts truck to buy, but they are always so far North of me.
Sure wish we had a junk yard with a few of these 1st gen runners in them. They are all, but none right now. So I am always looking for a parts truck to buy, but they are always so far North of me.
04-20-2014, 07:10 AM
#493
Just to give an up date on this stuff, Most everything is gone. I'm changing the color of the text of things gone to yellow. Everything in Red still remains to be given away for free you just have to pay for shipping. if there something here that is not pointed out and not pointed or colored text and you think you may need it just PM I may just part with it.
Remember its FREE just pay shipping
Remember its FREE just pay shipping
Okay I got some pics of stuff I got off that pickup last week.
Here Door floor trim Panel, Glove Box Has a wood panel decal that looks like its out of the 60/70's----GONE , aRadio Bezel, some air Duct, Storage compartment that attaches to the radio bezel, some trim that goes around the door, a wiper, a hood support and grommet
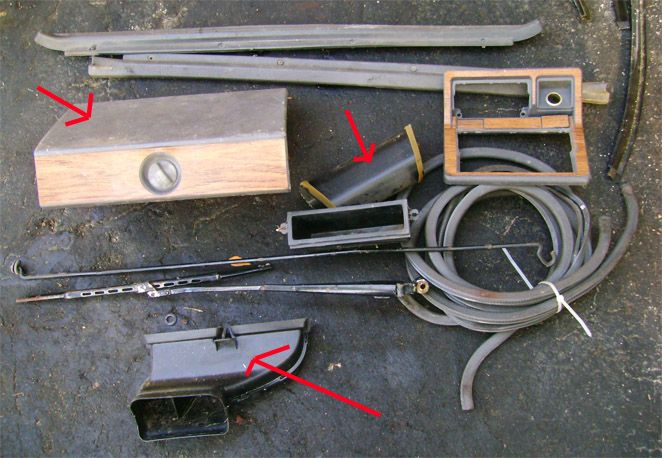
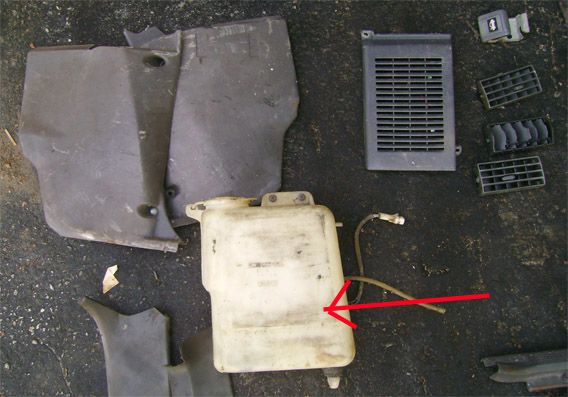
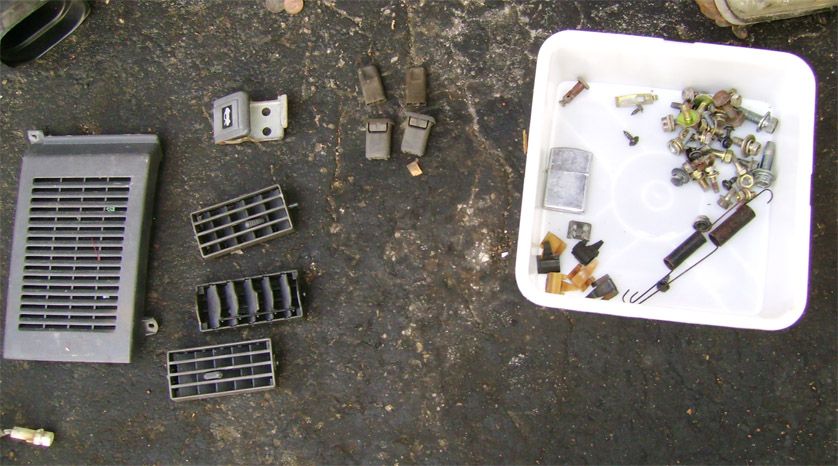
Here you have kick panels, a dash radio cover, Hood release lever, vent register only, water reservoir for the wipers no motor.
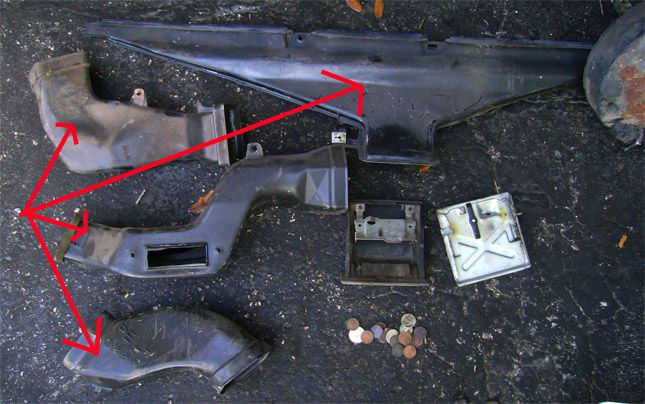
More duct work and ash tray with some change.
A Pillar paneling these are slightly brittle, but I can be used.
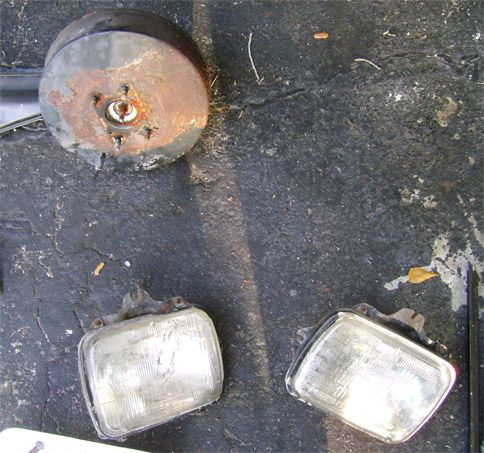
Head lights and Brake Booster which I may need soon.
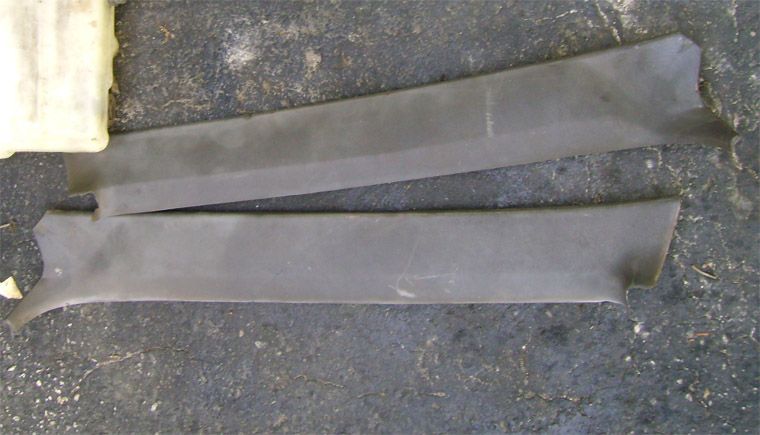
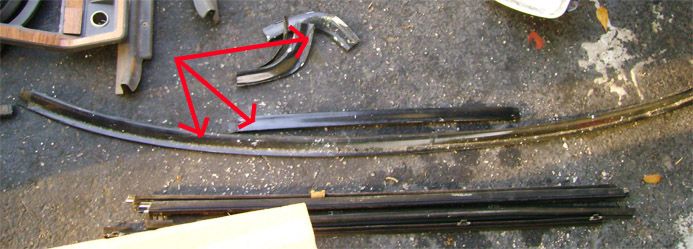
Windshield Trim bottom long, passenger corners and vertical don't know what happen to others they weren't there, and just below on the picture is inner and outter door weather strips.
Some of the stuff here is already shown above.
There are door lock and door lock guides which i needed. And in the Box you can see a bunch of nuts, bolts and screws I just collect off the floor of the truck, Always looking for these they come in handy. Also are the springs for the clutch and I think the other is for the brake not sure. In there is also a couple of door weather stripping clips that i really needed to hold them in place. Drivers side was missing them and every time I closed the door the weather stripping would pop out.
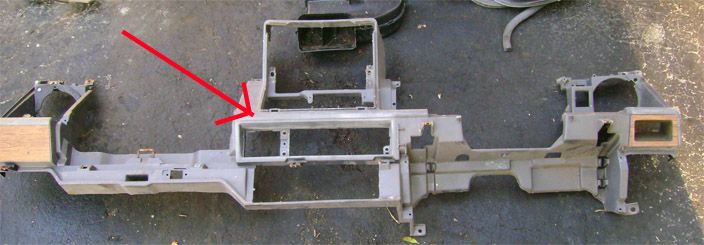
here is what they call the lower instrument panel.
I'm keeping most of the stuff here, but everything you see with an arrow point at it you are well to it. You can have them free, but must pay for shipping. And remember it's only those parts with a red arrow point at it that you can have for free.
Here Door floor trim Panel, Glove Box Has a wood panel decal that looks like its out of the 60/70's----GONE , aRadio Bezel, some air Duct, Storage compartment that attaches to the radio bezel, some trim that goes around the door, a wiper, a hood support and grommet
Here you have kick panels, a dash radio cover, Hood release lever, vent register only, water reservoir for the wipers no motor.
More duct work and ash tray with some change.
A Pillar paneling these are slightly brittle, but I can be used.
Head lights and Brake Booster which I may need soon.
Windshield Trim bottom long, passenger corners and vertical don't know what happen to others they weren't there, and just below on the picture is inner and outter door weather strips.
Some of the stuff here is already shown above.
There are door lock and door lock guides which i needed. And in the Box you can see a bunch of nuts, bolts and screws I just collect off the floor of the truck, Always looking for these they come in handy. Also are the springs for the clutch and I think the other is for the brake not sure. In there is also a couple of door weather stripping clips that i really needed to hold them in place. Drivers side was missing them and every time I closed the door the weather stripping would pop out.
here is what they call the lower instrument panel.
I'm keeping most of the stuff here, but everything you see with an arrow point at it you are well to it. You can have them free, but must pay for shipping. And remember it's only those parts with a red arrow point at it that you can have for free.
04-20-2014, 12:16 PM
#494
Brake Pads
I have been debating for a couple of days now on which brake pads should I get for the front brakes. I'll give you a story about my issue with brakes I have on my 86 4Runner when I purchased the Truck Brand New.
When I purchased my first 4Runner on July 7, 1986 and drove off the dealer everything was great. Took it around town and then shortly after that started Driving up to G-ville (Gainesville, Florida). After a few runs back and forth when I would brake I'd hear a grinding noise this is one 5 or 6 months after purchasing the truck. The drive one way was about 350mile or 4hours and I was doing this almost every other week, so I put a lot of miles on the truck the first few years. what was getting to me was braking and the grinding sound. I took it in to the dealer who looked it over and found nothing wrong. I knew the owner of the dealership so he made the guys look it over pretty good. I took a drive with the service tech and then the manager and the grinding never came up, so it was hard for them to figure out what was going on. the owner of the dealership did me a favor and contacted the local Toyota branch office here in South Florida. They in turn sent out a rep who actually new what the issue was and it wasn't an issue. The cause was they were equipped with semi-metallic pads as the brake pads and rotor heats up the grinding would start and the vent cooling would remedy some of it. The rep went on to say that because of the design these were the recommended pads. this is what he said at the time.
Now back to 2014. Brake pads have come a long way since then. Since I am preparing to and looking at working on the braking soon as most of you have notice I am debating which brake pads to purchase Semi-metalic or ceramic. I tried checking what the dealer sales and I believe they are selling semi-metallic based on the SKU#.
Organic Pads replaced abestos pads, but was never used or recommended for the truck.
semi-Metalic: was original material used. noisy lasted pretty long.
Ceramic came into play shortly after the mid-eighties and have come a long way. And are replacing metallic pads. Although I under stand that they are quieter, but wear out quicker on heavy vehicles.
So which would you use or which have you used. Please comment.
I am leaning towards semi-metallic and have to deal with the additional noise besides the noisy engine.
04-20-2014, 07:59 PM
#495
.... I'm guessing 2 thing may be going on here 1) there is a short or a cut wire some where, 2) the diode that is on that run there maybe bad which is basically the same as having a short or cut wire. Now I need to find out where that diode is with that run that goes up the A pillar to the light. I didn't know these had a diode in there, but looking at the FSM Diagram it shows a diode between the switch and the dome light.
Haha Japanese crack ware. Haha. Totally right. My original cargo light was so brittle and crumbly. I swear you looked at it and some pieces fell off. Luckily I found another one in mint condition at the junkyard a few weeks back. I should order a new dome lens from the dealer. That's not a bad price at all.
04-20-2014, 08:06 PM
#496
Registered User
On the L trim ive removed that glass with the butyl...its an experience.Thats why my L trims havent been transferred over to replace the rusted ones currently on it.
04-21-2014, 06:08 AM
#497
Sounds like good analysis. Yeah, the biggest challenge is physically tracing the wires.
LOL! Crack ware, alright. Same here. rather than spend money on replacement deck light iF a 4Runner, might as well buy an LED strip that would be brighter and can be mounted in more strategic location (i.e., where it would not be obstructed by cargo). Then convert old deck light to night light for camping in back.
LOL! Crack ware, alright. Same here. rather than spend money on replacement deck light iF a 4Runner, might as well buy an LED strip that would be brighter and can be mounted in more strategic location (i.e., where it would not be obstructed by cargo). Then convert old deck light to night light for camping in back.
I plan on restoring the truck as close as to stock with some add on benefits such as the LED lights and Music Player AKA radio with the ability to remove some of the mods when desired.
Kornhuskerwizard, you aren't kidding one bit. Little did i know how much of a task it was going to be to restore the topper and this is for my original 86 4Runner that I plan on using on the 87 4Runner for the term that it would take me to to work on the 87 topper. So learn on the 86 Topper and it will be easier on the 87 topper. Plus I found out I can get a box of that Butyl tape and foam butyl coated tape for less than $60 shipped and it would be enough to do both tops plus another one. finding the butyl tape was an task, but in my search I found a company with really good pricing on it plus they stocked the windshield gasket that I need for the trucks as a very discounted rate. It cheaper than I can get anywhere shipped.
04-21-2014, 05:46 PM
#498
Got a little bit done today.
Started out tracing the wires for the dome light. The wires seem to make a few turns and splits somewhere behind the drivers side dash. I didn't a 12v circuit tester (Light tester) handy and I really didn't want to use a multimeter to check continuity which would prove to be difficult, so i grabbed my old handy toner (tone generator/Amplifier Probe which prove to be handy looking for this issue).
The first thing i did was pull the A pillar moldings off to see if I could see the wires. No such luck. Then I got out the Toner since I realized it would be difficult to see where all those cables go wrapped up the way they were. Most of you should be familiar with this tool.

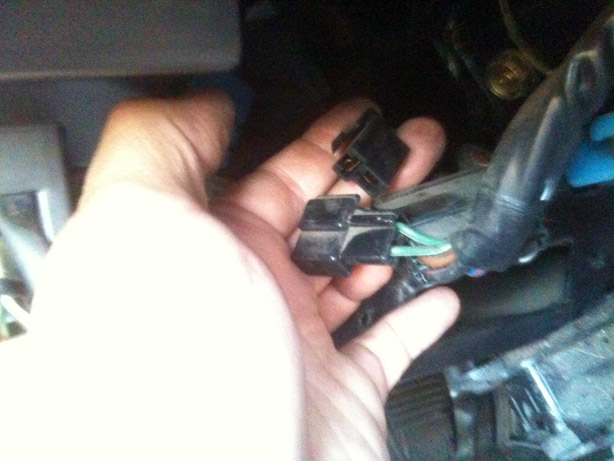
I unplugged one of door switches those wire coming from the switches are red and connect the tone generator to it and started moving around the wand to see were it would start toning as you see in the next picture the wand has a bright light which and you can't hear it but it chirps like crazy the closer you get to the source.
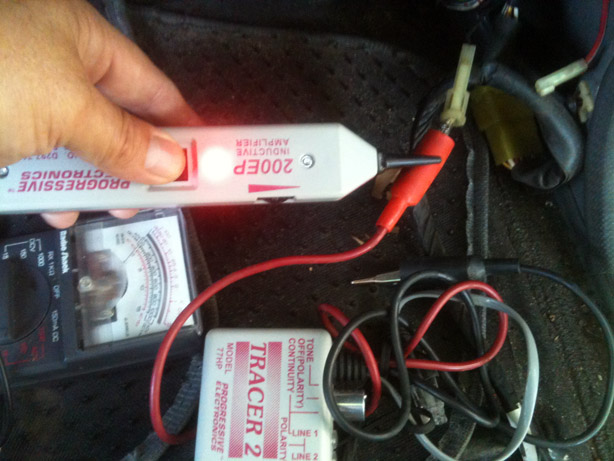
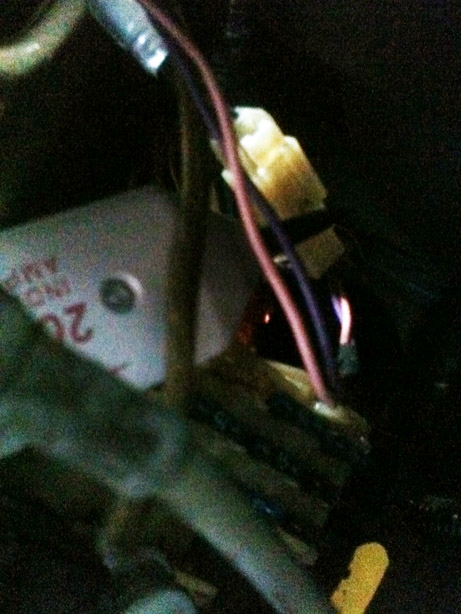
The picture above shows it connected to the passenger side door switch (red wire). There aren't any cables running up the A pillar on the passenger side pillar at least that I can telling checking with the toner. Also on the passenger side ceiling there isn't any tone, but on the drivers side there is. That means all the cables for the dome light runs on the drivers side. At this point I can't check to good under the dash because the wires are pushed to were I couldn't get a good solid tone. This were I head over to the drivers side and start checking for a tone and sure enough i find the cable just above the fuse panel (2 black wires one for the right and one for the left door switch). Some where along the line the color changed or it is a split from the red wire. You can see the toner in the picture right behind the connector.
Those 2 wires there only one has a tone and it test that the passenger side is the live one and no tone from the drivers side. I then connect the tone gen. to the drivers side door switch and I don't get tone coming from any of the wire but the tone is still audible under the dash. This leads me to believe that the short isn't running up the pillar as I get tone on the ceiling when connected the line leading up the pillar.
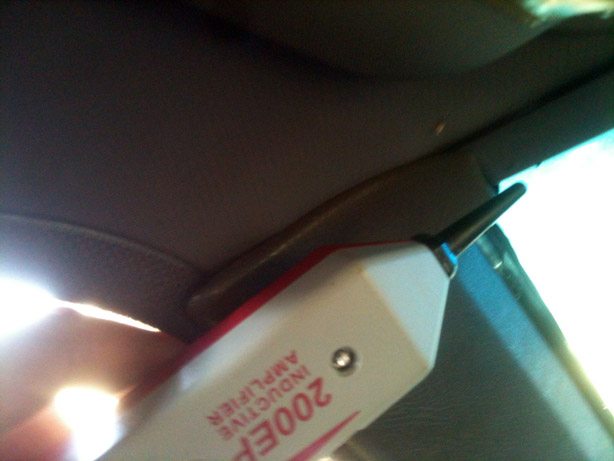
Checking the ceiling for tone with the toner.
Check back under the dash I find 2 green wire under the steering column.


Okay that goes to the ignition switch which means that for the door buzzer I guess.
Toning further on, which i didn't have time to go to deep as when i started tracing further there are cables leading to the dash which I'm going to assume is head up behind the instrument cluster. I'm backing off this for now as I'd rather do more to this once I have more of a reason to dismantle the dash assembly further like when I get my LED bulbs to try out.
At least for now I know its not the wire running up the pillar and into the dome lamp that has a short. I'm going to print out the wire schematics for this portion of the truck to see if I can get a better idea where those diodes would be.
By the way I was also able to check continuity from the passenger side door switch all the way to the connector that leads up the pillar on the drivers side. Yet from the drivers side door switch to the same connector leading up I get no continuity. Short is behind the drivers side dash.
Started out tracing the wires for the dome light. The wires seem to make a few turns and splits somewhere behind the drivers side dash. I didn't a 12v circuit tester (Light tester) handy and I really didn't want to use a multimeter to check continuity which would prove to be difficult, so i grabbed my old handy toner (tone generator/Amplifier Probe which prove to be handy looking for this issue).
The first thing i did was pull the A pillar moldings off to see if I could see the wires. No such luck. Then I got out the Toner since I realized it would be difficult to see where all those cables go wrapped up the way they were. Most of you should be familiar with this tool.
I unplugged one of door switches those wire coming from the switches are red and connect the tone generator to it and started moving around the wand to see were it would start toning as you see in the next picture the wand has a bright light which and you can't hear it but it chirps like crazy the closer you get to the source.
The picture above shows it connected to the passenger side door switch (red wire). There aren't any cables running up the A pillar on the passenger side pillar at least that I can telling checking with the toner. Also on the passenger side ceiling there isn't any tone, but on the drivers side there is. That means all the cables for the dome light runs on the drivers side. At this point I can't check to good under the dash because the wires are pushed to were I couldn't get a good solid tone. This were I head over to the drivers side and start checking for a tone and sure enough i find the cable just above the fuse panel (2 black wires one for the right and one for the left door switch). Some where along the line the color changed or it is a split from the red wire. You can see the toner in the picture right behind the connector.
Those 2 wires there only one has a tone and it test that the passenger side is the live one and no tone from the drivers side. I then connect the tone gen. to the drivers side door switch and I don't get tone coming from any of the wire but the tone is still audible under the dash. This leads me to believe that the short isn't running up the pillar as I get tone on the ceiling when connected the line leading up the pillar.
Checking the ceiling for tone with the toner.
Check back under the dash I find 2 green wire under the steering column.
Okay that goes to the ignition switch which means that for the door buzzer I guess.
Toning further on, which i didn't have time to go to deep as when i started tracing further there are cables leading to the dash which I'm going to assume is head up behind the instrument cluster. I'm backing off this for now as I'd rather do more to this once I have more of a reason to dismantle the dash assembly further like when I get my LED bulbs to try out.
At least for now I know its not the wire running up the pillar and into the dome lamp that has a short. I'm going to print out the wire schematics for this portion of the truck to see if I can get a better idea where those diodes would be.
By the way I was also able to check continuity from the passenger side door switch all the way to the connector that leads up the pillar on the drivers side. Yet from the drivers side door switch to the same connector leading up I get no continuity. Short is behind the drivers side dash.
Last edited by junk4u; 04-21-2014 at 07:02 PM.
04-21-2014, 06:10 PM
#499
Got a little bit done today. Started out tracing the wires for the dome light. The wires seem to make a few turns and splits somewhere behind the drivers side dash. I didn't a 12v circuit tester (Light tester) handy and I really didn't want to use a multimeter to check continuity which would prove to be difficult, so i grabbed my old handy toner (tone generator/Amplifier Probe which prove to be handy looking for this issue). The first thing i did was pull the A pillar moldings off to see if I could see the wires. No such luck. Then I got out the Toner since I realized it would be difficult to see where all those cables go wrapped up the way they were. Most of you should be familiar with this tool. I unplugged one of door switches and connected the tone generator to it and started moving around the wand to see were it would start toning as you see in the next picture the wand has a bright light which and you can't hear it but it chirps like crazy the closer you get to the source. The picture above shows it connected to the passenger side door switch. There aren't any cables running up the A pillar at least that I can telling checking with the toner. Also on the passenger side ceiling there isn't any tone, but one the drivers side there is. That means all the cables for the dome light runs on the drivers side. Checking the ceiling for tone with the toner.
That's a nice tool to have to be able to find out where your wires go. Especially if there are sections that you cannot physically see to trace. I also would rather use that type than just a voltmeter. Every time I do anything electrical, I always wish I had a third hand!!
04-21-2014, 06:34 PM
#500
Looks like you are making some progress.
That's a nice tool to have to be able to find out where your wires go. Especially if there are sections that you cannot physically see to trace. I also would rather use that type than just a voltmeter. Every time I do anything electrical, I always wish I had a third hand!!
That's a nice tool to have to be able to find out where your wires go. Especially if there are sections that you cannot physically see to trace. I also would rather use that type than just a voltmeter. Every time I do anything electrical, I always wish I had a third hand!!
I got my tone generator back about 15yrs ago at that time it cost me like $89 bucks at a store called graybar, they are cheaper now as tech has improved over the years. A really inexpensive one is available at HF for less than $25, it comes in handy to trace wires, besides mine also has a continuity check.


