
1987 4Runner Cyber Dude
 03-05-2014, 12:49 PM
#401
Super Moderator
Staff
iTrader: (1)
Join Date: Aug 2008
Location: Anderson Missouri
Posts: 11,788
Likes: 0
Received 25 Likes
on
22 Posts
You guys have it so nice. One or two days of winter is about all I need to experience the 4 seasons. When I win the lottery that I don't play, we are moving further south. These winters are getting longer.
The windshield shop will be calling me in the next few days. I pm'd you some information. I forgot to mention that they can get the windshield clips for $10 or $20. If you go to pull the windshield, it will break as they are brittle. I posted the kit in Chefs thread in ruby around 10 pages back. I will try and look up the kit.
The windshield shop will be calling me in the next few days. I pm'd you some information. I forgot to mention that they can get the windshield clips for $10 or $20. If you go to pull the windshield, it will break as they are brittle. I posted the kit in Chefs thread in ruby around 10 pages back. I will try and look up the kit.
Last edited by Terrys87; 03-05-2014 at 01:00 PM.
 03-05-2014, 12:57 PM
#402
You guys have it so nice. One or two days of winter is about all I need to experience the 4 seasons. When I win the lottery that I don't play, we are moving further south. These winters are getting longer.
The windshield shop will be calling me in the next few days. I pm'd you some information. I forgot to mention that they can get the windshield clips for $10 or $20. If you go to pull the windshield, it will break as they are brittle.
The windshield shop will be calling me in the next few days. I pm'd you some information. I forgot to mention that they can get the windshield clips for $10 or $20. If you go to pull the windshield, it will break as they are brittle.
The weather was good all day around 83-85 degrees, that is until I started pulling out my stuff, it started to rain. Though it wasn't much of rain, maybe 2 or 3 minutes then just clouds and then sunny. all in 15minutes.
I don't know which clips you are talking about... The clips that I see are the ones holding the metal trim in place, but if I am going the rubber weatherstrip route, I don't believe I will be needing it and that would be a good thing considering less abrasion or something that may scratch around the windshield. Let me know if I wrong about that.
I will PM shortly on the gasket, sounds like a good deal so far, going to take your photo of the gasket you had up or sent to me to safelite to see what they say.
03-05-2014, 01:04 PM
#403
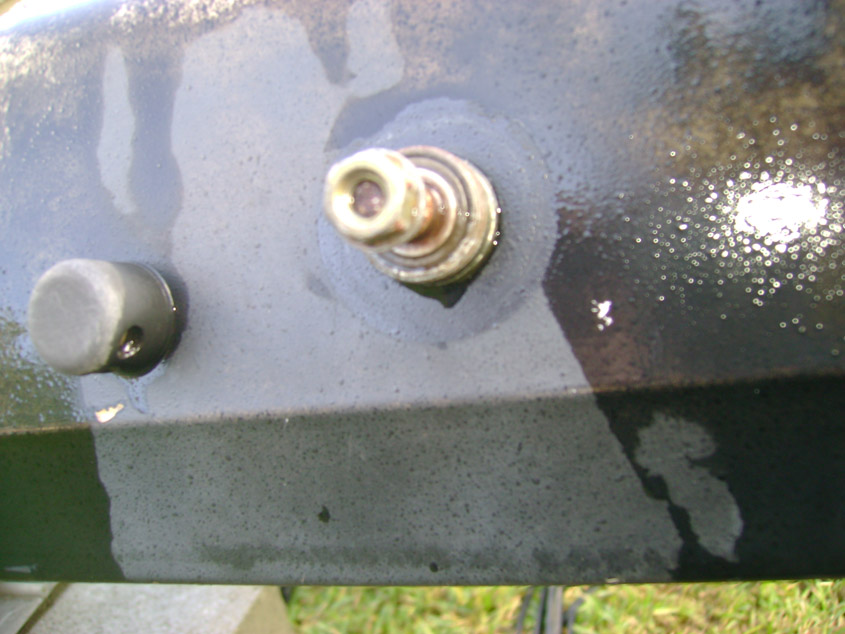
material Used Around the windshield
Okay here's some of the stuff I got to work around the windshield of which some I did not use. with all metal I read a tech sheet on filling holes and gave it a whirl. Here are some of the goods.

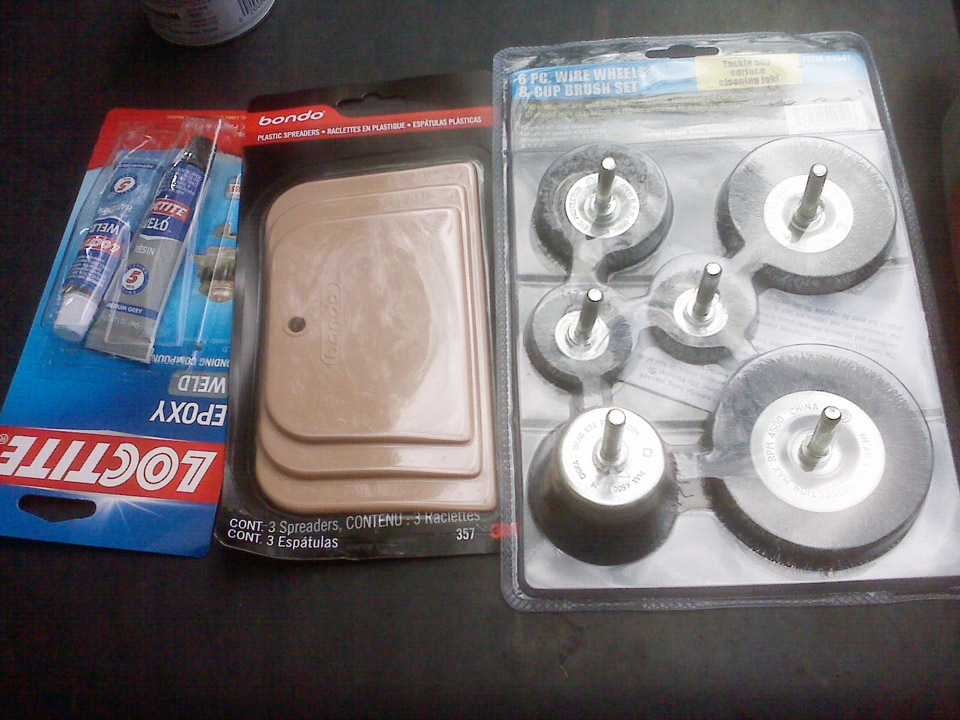
I didn't label this as it would seem we all know what these are.
I didn't label this as it would seem we all know what these are.
03-05-2014, 01:26 PM
#404
Mess I made
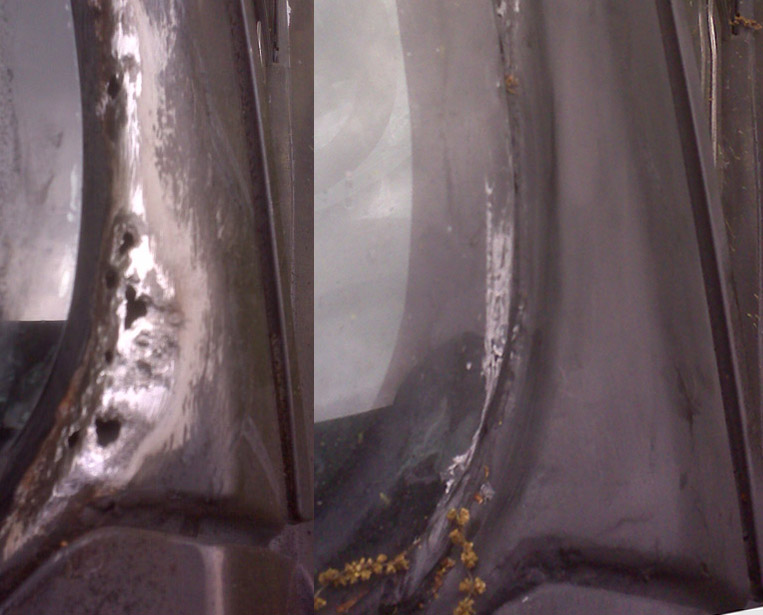
Okay, I painted the rust holes with some Rust-o-Leum the other day just to slow it from rusting further, till I could get to it.
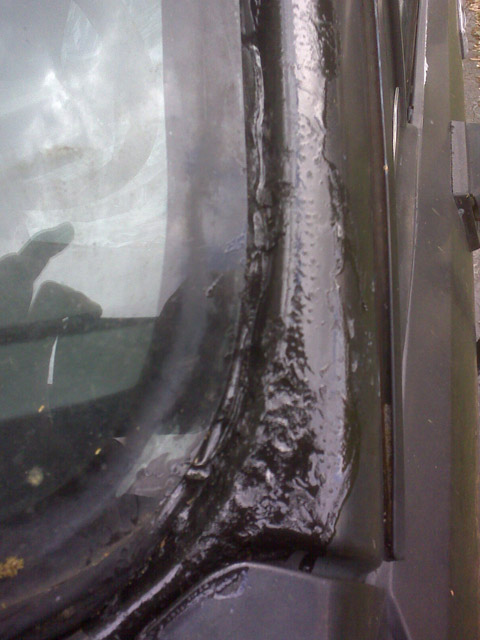
This before I wire wheeled it. There isn't a hole, but it's rusted through, I can't figure why my phone didn't get the pictures of the passenger side which was worse and I took several, but they didn't come out at all. Seems like the phone didn't like that side.

After some wire wheeling the holes start to pop out. So this doesn't looks good, not what I expected which was much less.
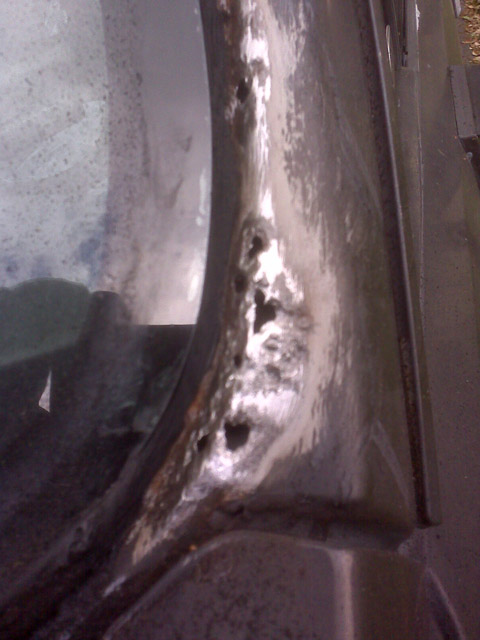
After more wire wheeling and I don't see the rust smoke anymore this is what I got. What you don't see after this is I took that can of black primer and sprayed the area with only to make sure it over sprays the inside of the channel.
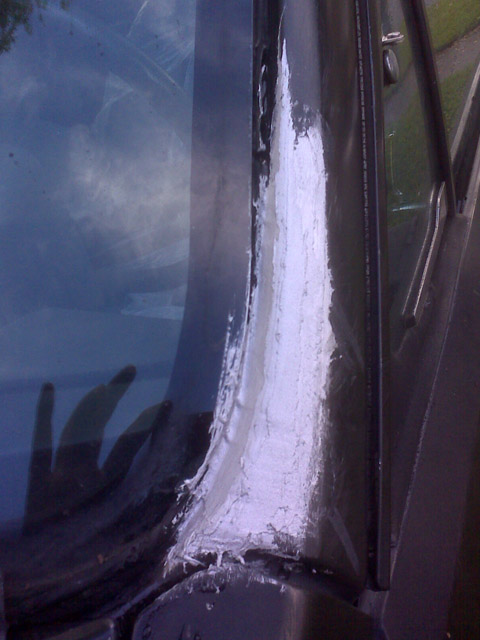
Here is the mess I put on. Didn't follow the tech sheet I found on filling the hole, I kind of squeezed a little through the hole as I am kind of worried about how it would hold up under stress even though they say it will tolerate a very heavy load and will not shrink. The stuffs great, but you don't want to play with it to long as it starts to set and then you are in trouble. I haven't sanded it down nor have I sprayed primer on it yet, I want to let it set longer to harden then sand.

Filled up the holes on the passenger side as well.
Here's a vid on this ALL-Metal
[YOUTUBE]
[/YOUTUBE]
This before I wire wheeled it. There isn't a hole, but it's rusted through, I can't figure why my phone didn't get the pictures of the passenger side which was worse and I took several, but they didn't come out at all. Seems like the phone didn't like that side.
After some wire wheeling the holes start to pop out. So this doesn't looks good, not what I expected which was much less.
After more wire wheeling and I don't see the rust smoke anymore this is what I got. What you don't see after this is I took that can of black primer and sprayed the area with only to make sure it over sprays the inside of the channel.
Here is the mess I put on. Didn't follow the tech sheet I found on filling the hole, I kind of squeezed a little through the hole as I am kind of worried about how it would hold up under stress even though they say it will tolerate a very heavy load and will not shrink. The stuffs great, but you don't want to play with it to long as it starts to set and then you are in trouble. I haven't sanded it down nor have I sprayed primer on it yet, I want to let it set longer to harden then sand.
Filled up the holes on the passenger side as well.
Here's a vid on this ALL-Metal
[YOUTUBE]
03-06-2014, 07:19 AM
#406
Okay, I was able to get a few minutes in. I found that it isn't a good idea like all the other fillers bondo, etc... to leave it without primer which is what I did over night. I don't think I put enough hardener in it either, but its hard and I mean pretty hard, well it partially aluminum.
After some sanding and grinding with a dremel and grinding tip which helped out a lot. I'll take a picture this afternoon of the dremel tip I used.
I still need to sand down the area smoother and cleaner, but roughly this is what I got so far and the stuff is hard.


With the primer you have got to work quickly as right now it seems to be pollen fever. There's so much pollen from the oak tree as those buds drop off it they are all over the place and end up staining the sidewalk which means another season of pressure washing.
This all-metal stuff is really good, but you have to move as it will harden up before you know it making it harder to smooth out. Then you have to go through the same that I did which was sanding with 60 then 150, and I still need to sand more. I primed it even though it states on there website its water proof, I'd prefer to anyhow. I can't wait to pull that windshield off and start working on all the areas, but got to locate a windshield first.
I think the repair is not to shabby as oppose to what it was before and hopefully this stuff will hold as good as they say it will compared to bondo which means no cracking or peeling.
Before and After....
After some sanding and grinding with a dremel and grinding tip which helped out a lot. I'll take a picture this afternoon of the dremel tip I used.
I still need to sand down the area smoother and cleaner, but roughly this is what I got so far and the stuff is hard.
With the primer you have got to work quickly as right now it seems to be pollen fever. There's so much pollen from the oak tree as those buds drop off it they are all over the place and end up staining the sidewalk which means another season of pressure washing.
This all-metal stuff is really good, but you have to move as it will harden up before you know it making it harder to smooth out. Then you have to go through the same that I did which was sanding with 60 then 150, and I still need to sand more. I primed it even though it states on there website its water proof, I'd prefer to anyhow. I can't wait to pull that windshield off and start working on all the areas, but got to locate a windshield first.
I think the repair is not to shabby as oppose to what it was before and hopefully this stuff will hold as good as they say it will compared to bondo which means no cracking or peeling.
Before and After....
03-06-2014, 07:46 AM
#407
Painting
Just out of curiosity, I am thinking of painting at some point. My plan is to get some body parts from maybe a parts truck (Fenders, Hood, tail gate, cowl, etc...) cleaning them up and painting them and then putting them on the truck and taking the ones off and priming them and saving for the 86 4Runner.
Finding a parts truck this far south has been a task and a half. Most of these trucks have left the country in these parts mostly to South America. they pop up once in a while rather cheap, but most completely scavenged or stripped already.
for instance this one, looks to have a decent topper, but that's it everything else has been stripped per description.
http://orlando.craigslist.org/pts/4356571620.html
03-06-2014, 07:53 AM
#408
For Got to mention when I was picking up the all-metal filler, the guys at the auto paint supply store offered me the following:
One Gallon base urethane Black PPG $100 (Matrix Paint mfg)
One Gallon 2k Primer (U-Pol)
One Gallon Urethane Clear Coat (Matrix paint mfg)
Total was $250 includes all activator and reducer
add a discount of $30 making the total $220
Next day I went there to pick up the all-metal filler and he offered me the same items for $210, $10 more discounted.
Have you guys heard of U-Pol Primer and Matrix Paint?
03-07-2014, 04:12 AM
#409
Well, tries yesterday afternoon to get something done, but the weather wasn't helping. Seems like a tornado watch is a subject of alert, man those winds for about an hour was terrible, couldn't really do anything. Hope it's better today.
03-07-2014, 09:29 AM
#410
Anybody? Got any suggestions or comments about this/
For Got to mention when I was picking up the all-metal filler, the guys at the auto paint supply store offered me the following:
One Gallon base urethane Black PPG $100 (Matrix Paint mfg)
One Gallon 2k Primer (U-Pol)
One Gallon Urethane Clear Coat (Matrix paint mfg)
Total was $250 includes all activator and reducer
add a discount of $30 making the total $220
Next day I went there to pick up the all-metal filler and he offered me the same items for $210, $10 more discounted.
Have you guys heard of U-Pol Primer and Matrix Paint?
One Gallon base urethane Black PPG $100 (Matrix Paint mfg)
One Gallon 2k Primer (U-Pol)
One Gallon Urethane Clear Coat (Matrix paint mfg)
Total was $250 includes all activator and reducer
add a discount of $30 making the total $220
Next day I went there to pick up the all-metal filler and he offered me the same items for $210, $10 more discounted.
Have you guys heard of U-Pol Primer and Matrix Paint?
03-08-2014, 03:43 PM
#411
Super Moderator
Staff
iTrader: (1)
Join Date: Aug 2008
Location: Anderson Missouri
Posts: 11,788
Likes: 0
Received 25 Likes
on
22 Posts
Just call when you get a chance and I could give you some better tips about painting. I put some in the PM.
Below is what I remember on the back glass. I will be working on mine again soon and will get some better pics.( Seal is binding the back glass.)
I will keep updating and going back and adding to this post as I get the info. I will also pull info from the 88s build on the rear awindow. When I first started working on these back glasses, I was intimidated and know several questions come up about this problem.
I have learned alot and is one area I have been able to answer quite a few questions that other have had on the Main Page when they pop up.
I bought a backglass off of Craigslist from a member here in Kansas City. My back hatch has the back glass broken out of it and the PO had it all disassembled so I am piecing it back together.
Here is all that is need to get the window togther. A battery, gear mechanisim, window, and tailgate.

Take some wire and coming off of the window motor and run a length of wire to each terminal. By switching the polarity of the wires on the battery it will control the direction goes form UP or Down. ( Pic above is only one, but both need it). If your window glass isnt broken but not operating, I have done the same thing, but run enough wire to the front of the cab that I can use the cigaretter lighter hot wire on the backof it, and a good ground to operate the window. It is really handy having the backglass operating.
Operate the motor to where levers that go into the window tracks are flat. Then work the assembly into the hatch.
I found it easier to remove the weather seal from the tailgate.( I am misssing the other window seal so cant tell you about it). Push the tabs toward the back of the tailgate (license plate side direction). These are BRITTLE and more then likely you will break a few no matter how gentle you are.
Slide the window into the tracks of the tailgate about halfway down to where it meets the wheels and the cutout on the tracks. (Here is what I forgot about. I still need a refresher but think you will see it when you get to it.)
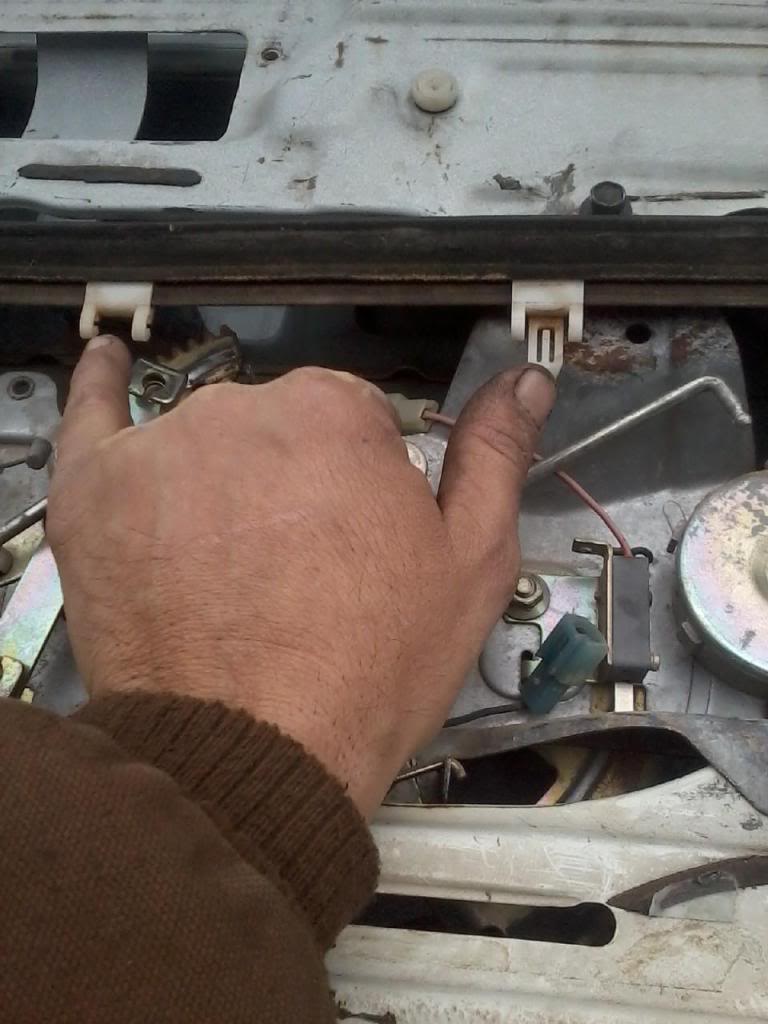
I tried to show tabs and how the motor should be facing you. With the gear assembly not bolted, you can slide it side to side enough to get the wheels in the tracks. My tracks are really rusted and I will be working on that but wanted to help take some of the scare out of the tailgate. Still have some more work to do to this and will keep updating as I figure it out.
[IMG]http://i1098.photobucket.com/albums/g377
L Trim Removal.
To get the L trims off, you have to remove the whole window from the inside. On Passneger Side, I have my feet in the floorboard and knees in the seat, I place my left arm across the top and apply pressure from my elbow to my fist. Applying a little more with my elbow and start breaking the glue tht holds the window in. I try to keep all of the glue on the glass portion. I use a putty knife to help. Once I get the top seperated from the cap. I hook my arm thru the window to keep it from falling to the ground. Once the glass is out, the L trims are just bolted to the window part which will be visble when out.
Below is what I remember on the back glass. I will be working on mine again soon and will get some better pics.( Seal is binding the back glass.)
I will keep updating and going back and adding to this post as I get the info. I will also pull info from the 88s build on the rear awindow. When I first started working on these back glasses, I was intimidated and know several questions come up about this problem.
I have learned alot and is one area I have been able to answer quite a few questions that other have had on the Main Page when they pop up.
I bought a backglass off of Craigslist from a member here in Kansas City. My back hatch has the back glass broken out of it and the PO had it all disassembled so I am piecing it back together.
Here is all that is need to get the window togther. A battery, gear mechanisim, window, and tailgate.
Take some wire and coming off of the window motor and run a length of wire to each terminal. By switching the polarity of the wires on the battery it will control the direction goes form UP or Down. ( Pic above is only one, but both need it). If your window glass isnt broken but not operating, I have done the same thing, but run enough wire to the front of the cab that I can use the cigaretter lighter hot wire on the backof it, and a good ground to operate the window. It is really handy having the backglass operating.
Operate the motor to where levers that go into the window tracks are flat. Then work the assembly into the hatch.
I found it easier to remove the weather seal from the tailgate.( I am misssing the other window seal so cant tell you about it). Push the tabs toward the back of the tailgate (license plate side direction). These are BRITTLE and more then likely you will break a few no matter how gentle you are.
Slide the window into the tracks of the tailgate about halfway down to where it meets the wheels and the cutout on the tracks. (Here is what I forgot about. I still need a refresher but think you will see it when you get to it.)
I tried to show tabs and how the motor should be facing you. With the gear assembly not bolted, you can slide it side to side enough to get the wheels in the tracks. My tracks are really rusted and I will be working on that but wanted to help take some of the scare out of the tailgate. Still have some more work to do to this and will keep updating as I figure it out.
[IMG]http://i1098.photobucket.com/albums/g377
L Trim Removal.
To get the L trims off, you have to remove the whole window from the inside. On Passneger Side, I have my feet in the floorboard and knees in the seat, I place my left arm across the top and apply pressure from my elbow to my fist. Applying a little more with my elbow and start breaking the glue tht holds the window in. I try to keep all of the glue on the glass portion. I use a putty knife to help. Once I get the top seperated from the cap. I hook my arm thru the window to keep it from falling to the ground. Once the glass is out, the L trims are just bolted to the window part which will be visble when out.
03-08-2014, 04:30 PM
#412
Super Moderator
Staff
iTrader: (1)
Join Date: Aug 2008
Location: Anderson Missouri
Posts: 11,788
Likes: 0
Received 25 Likes
on
22 Posts
I would see if he would come down on his price some, but I know what parts go for and what I get into there is still parts that would make up for it instead of going to the salvage. Just depends on what you would need. If you had a place to store them, it doesn't take much to strip one down. It is actually better to keep it whole but I cant keep a whole truck so I got creative and have 3 trucks in on shed minus body and frame. Parting another one soon (Wrecked 92 two wheel drive)
I did have 3 different generations of trucks and keeping the parts separate was getting confusing. I stay 84-88 for the most part. Craigslist is a pain in the rear but you can sell parts there. I have never done ebay, but what they want for their parts and if they sold, I could retire, lol.
I will say having a parted out a runner and a pickup, having my own stash of parts has more then paid for themselves several times over and then not having to go hunt them down is so nice. I have used parts I never thought I would of needed. When I scrap something, it really is just the non repairable stuff that goes to scrap.
You may have to sit on them for a while and it never fails when I sell a part, I eventually need it. Just to restore your 87, it probably not worth it, but if you decide to restore your 86 and depending on what you needed, it could pay for itself.
Without drive train and interior like it said. Ebay, salvages, parts on this site.
Back glass $100
Depending on tailgates condition $100 and up.
Piecing the tailgate out can add up quick.
Hubs $50
Window Relay $40
Fuel Pump Assembly $150
Fuel Float varies
Igniter $50
Fuel Tank $50
Wiring harnesses can get expensive $100 and up for each(3) one. Main fuse, Injector, or Main Harness.
Doors $50-$200 depending on where you live.
Hood $50
SR5 Options can be $25 for each one (maplights, pockets, electric antenna, consoles,...)
Fenders if good $50
Bumper Brackets $25 for each.
Mud flaps $25 each.
L-trims $50 or more.
Electric switches varies (door, window, back glass)
Headlights $10
Grill $25
Wheels $10 each
Valance $20
Blinker Assemblies $15 each.
Bumper $75
Tires $25 each if descent condition.
V6 Brakes parts $50.
It may look like junk, but there are parts there that I have used on each of my builds that would more then pay for itself for me. None of those are interior or drivetrain like you mentioned or in the ad. On something like that, really see if it is cheaper to buy the truck or just a handful of parts you need.
Really going to depend on what you would need. Nuts and bolts are nice to have and I even use the light bulbs. I spent $25 just for brake and blinker bulbs to get my 86 legal as I used all of my parts bulbs on other trucks.
Last edited by Terrys87; 03-08-2014 at 04:37 PM.
03-10-2014, 05:45 PM
#413
Great info
Hey Terry,
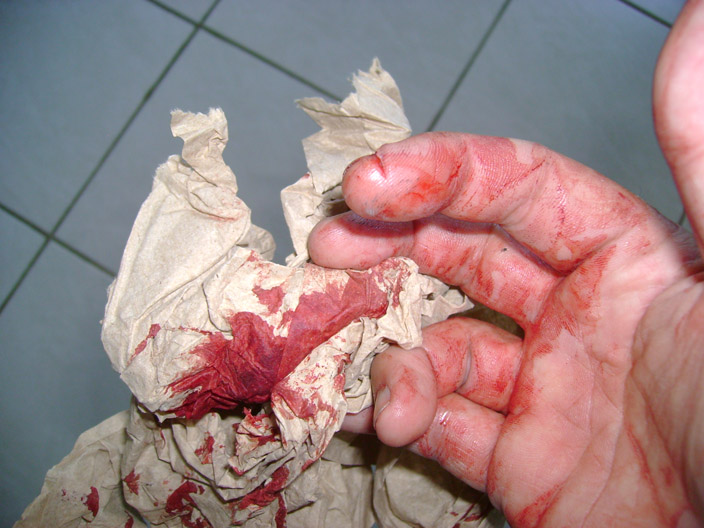
Great info. I ended up cutting my finger on that fixed glass on the backside of the topper. The trim around that glass is sharp just like a dull knife. Didn't hurt, just a bunch of blood all over the place that I had to stop work just to stop the bleeding.
I was going to start working on the 87 4Runner topper, but I thought that would be difficult if I take everything apart and nothing to really cover the back until I finish it. I was going to put the 86 4Runner topper on the 87 for the time being, but decided to work on the 86 first and once it's complete i could put it on the 87 and work on the 87. The difference between the 2 is the interior, 86 is a beige or white and the 87 is coated grey. Anyhow I'm working on the 86 Topper first and got all the glass off the topper funny thing is how well the sliding glass frame was stuck to the topper with only butyl tape. The back glass is actually held with butyl tape and a nut and screws. I'll post the pictures I took tomorrow so you guys could see what I'm talking about.
The topper is now free of glass and I'm going to start painting it soon. I couldn't get the the rust-oleum oil base semi-gloss black around here. Seems like the only thing they have is Flat Black and Gloss Black in the Oil Base. I contacted Rust-oleum today and they said I could mix the flat and gloss just make sure to keep track of the amount of each paint mixed to keep track once I find the desired shine. I'm going to roll to improve the lost texture from wear. With Rust-oleum confirmation I'm going to run out tomorrow and get a qt of each gloss and flat and mix them together to see how they turn out.
03-11-2014, 11:00 AM
#414
Registered User
Hey Terry,
Great info. I ended up cutting my finger on that fixed glass on the backside of the topper. The trim around that glass is sharp just like a dull knife. Didn't hurt, just a bunch of blood all over the place that I had to stop work just to stop the bleeding.
I was going to start working on the 87 4Runner topper, but I thought that would be difficult if I take everything apart and nothing to really cover the back until I finish it. I was going to put the 86 4Runner topper on the 87 for the time being, but decided to work on the 86 first and once it's complete i could put it on the 87 and work on the 87. The difference between the 2 is the interior, 86 is a beige or white and the 87 is coated grey. Anyhow I'm working on the 86 Topper first and got all the glass off the topper funny thing is how well the sliding glass frame was stuck to the topper with only butyl tape. The back glass is actually held with butyl tape and a nut and screws. I'll post the pictures I took tomorrow so you guys could see what I'm talking about.
The topper is now free of glass and I'm going to start painting it soon. I couldn't get the the rust-oleum oil base semi-gloss black around here. Seems like the only thing they have is Flat Black and Gloss Black in the Oil Base. I contacted Rust-oleum today and they said I could mix the flat and gloss just make sure to keep track of the amount of each paint mixed to keep track once I find the desired shine. I'm going to roll to improve the lost texture from wear. With Rust-oleum confirmation I'm going to run out tomorrow and get a qt of each gloss and flat and mix them together to see how they turn out.
03-11-2014, 11:04 AM
#415
Topper
I've prepped the topper for some rust-oleum which I'm going to pickup this afternoon.
I mentioned that I cut my finger and it is pretty deep, but nothing that a little neosporin and some super glue won't fix. Cut about a 1/4 inch deep along the side, doesn't look like much, but when my son saw the cut and the blood running down my leg he squenched at the sight and said its bad... HAHAHA I'm think just bloody at the time. Really doesn't look like much until actually pull it apart that's when everyone screams.
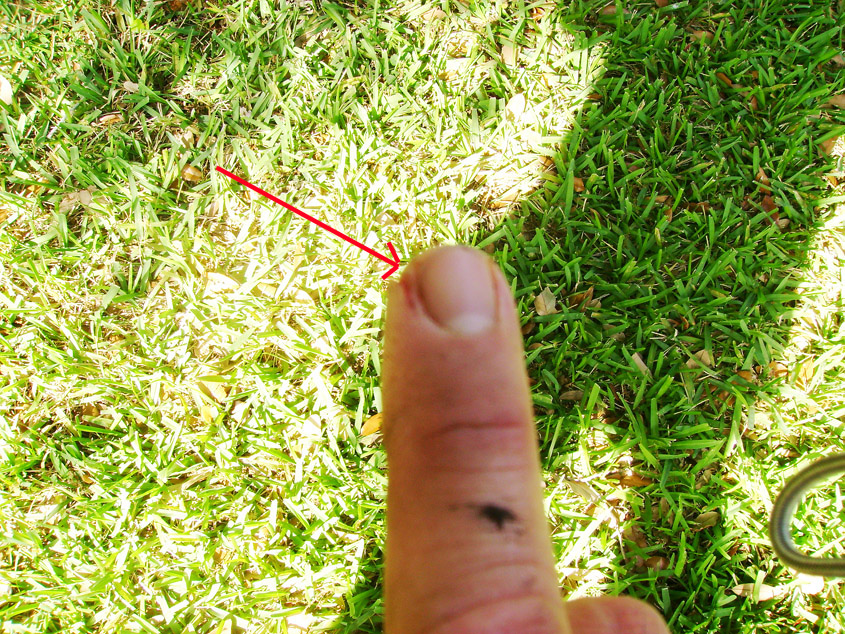
Just letting you know if you guys start taking apart those rear side topper glasses that trim molding is sharp.
Back on topic...
Scrub down the top with water then with soap and water. That finish is totally shot. Down to the fiberglass. I didn't want to mess with Gel coating as it is a messy subject, I called a buddy of mine who sometimes mess with fiberglass and he did me a favor and called a boat guy he knows who said that it is okay to paint the fiberglass with rust-oleum as the do that a lot with canoes and it last for a life time.
Here's what I'm talking about.
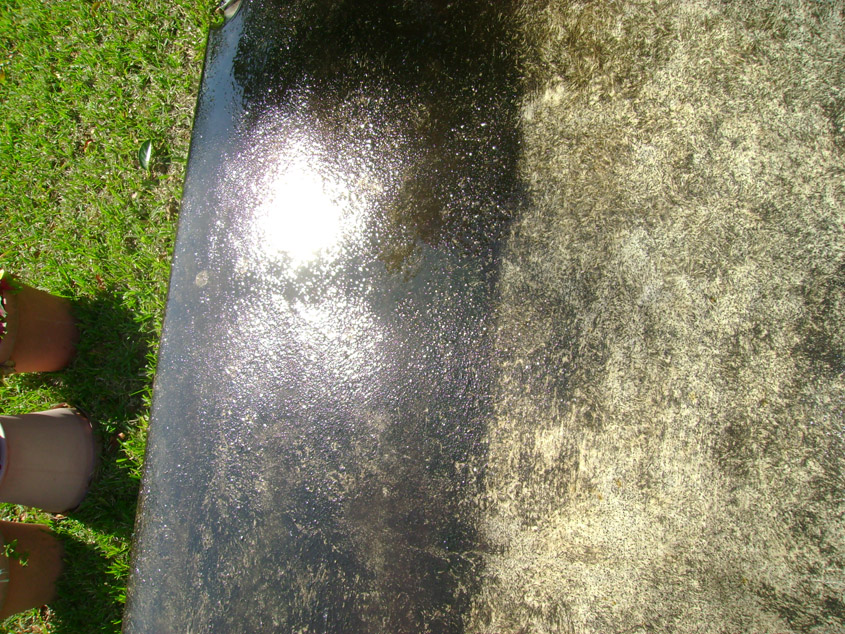
Right is scrubbed down and left is not.
Removal of the rear glass is pretty easy and simple just remove all those screws and one nut at the top of the glass. Once that's done, push the glass out and it will make a gap between the topper and the glass from the outside. The Butyl tape is tough so you have to put a screw driver there to hold it open.
Remove all the screws and a nut from the inside then push.
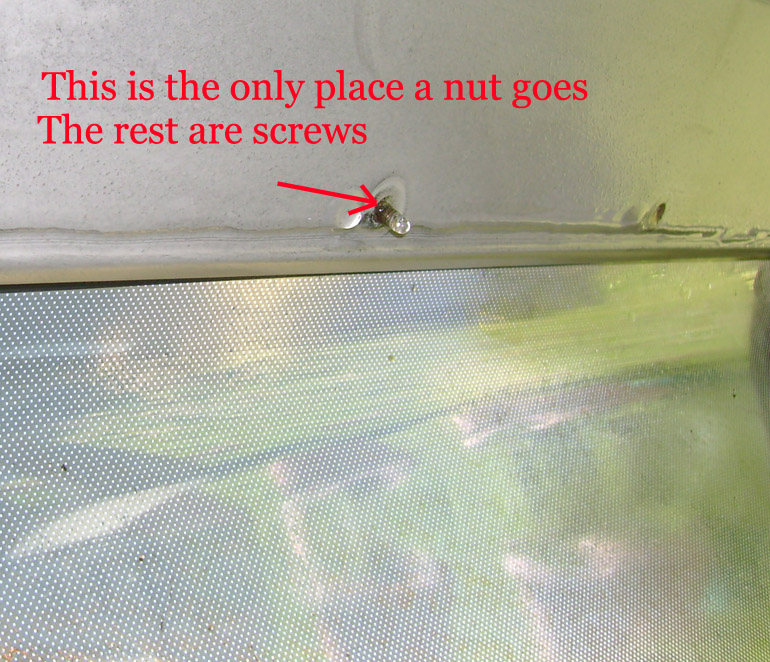
Once pushed up on the outside put a screw driver in between the glass and the topper.
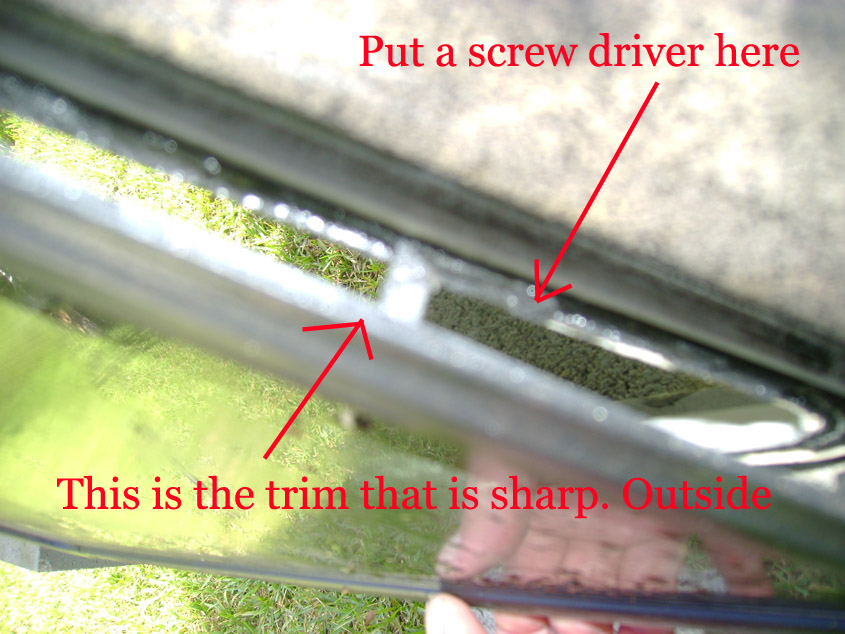
You can cut butyl from the inside, you can also cut it from the outside, but like me you may end up with a cut on your finger. don't pull the glass all the way out you have lift it up because of that threaded post for that one nut.
It's pretty neat the design of these toppers all around the glass they have a kind of a gap or drainage.

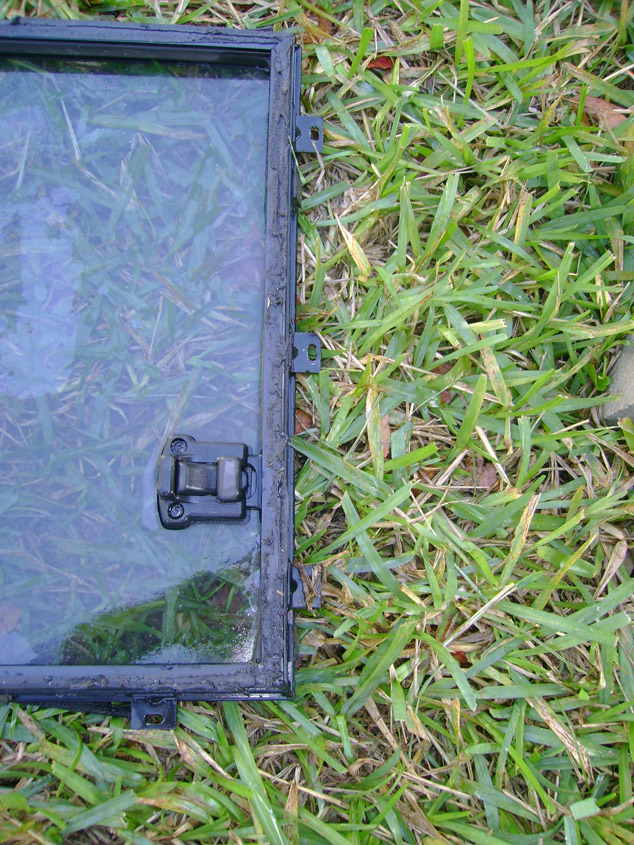
On the front side, that glass you have take something to slide down the edge between the frame and the topper and cut the butyl tape along the bottom and then on the front vertical, once that's done from the out side you can start by lightly prying the frame out.

Once you get it off all you have holding it in place is the butyl tape.

the L trim on the front part of the topper is attached with screws to the frame of the glass, the only way to take the L trim off is by removing the entire frame from the topper. There are 6 screws holding it in place. there is some rust on the L trim, but rather decent from what I can see. the frame holding the glass is actually worse, but I won't really know until I take those glasses completely out.
I'm going to paint the topper sort of a semigloss black rather than the gloss as that is what i remember it to be. Here's a look at how much of black that was and the black that faded. Look around the where I took the cap for the wiper off.
I'll run a small test with a ounce of gloss black and ounce of flat black to see what it looks like maybe I'll have to add less flat to get the desired shine out of it.
I mentioned that I cut my finger and it is pretty deep, but nothing that a little neosporin and some super glue won't fix. Cut about a 1/4 inch deep along the side, doesn't look like much, but when my son saw the cut and the blood running down my leg he squenched at the sight and said its bad... HAHAHA I'm think just bloody at the time. Really doesn't look like much until actually pull it apart that's when everyone screams.
Just letting you know if you guys start taking apart those rear side topper glasses that trim molding is sharp.
Back on topic...
Scrub down the top with water then with soap and water. That finish is totally shot. Down to the fiberglass. I didn't want to mess with Gel coating as it is a messy subject, I called a buddy of mine who sometimes mess with fiberglass and he did me a favor and called a boat guy he knows who said that it is okay to paint the fiberglass with rust-oleum as the do that a lot with canoes and it last for a life time.
Here's what I'm talking about.
Right is scrubbed down and left is not.
Removal of the rear glass is pretty easy and simple just remove all those screws and one nut at the top of the glass. Once that's done, push the glass out and it will make a gap between the topper and the glass from the outside. The Butyl tape is tough so you have to put a screw driver there to hold it open.
Remove all the screws and a nut from the inside then push.
Once pushed up on the outside put a screw driver in between the glass and the topper.
You can cut butyl from the inside, you can also cut it from the outside, but like me you may end up with a cut on your finger. don't pull the glass all the way out you have lift it up because of that threaded post for that one nut.
It's pretty neat the design of these toppers all around the glass they have a kind of a gap or drainage.
On the front side, that glass you have take something to slide down the edge between the frame and the topper and cut the butyl tape along the bottom and then on the front vertical, once that's done from the out side you can start by lightly prying the frame out.
Once you get it off all you have holding it in place is the butyl tape.
the L trim on the front part of the topper is attached with screws to the frame of the glass, the only way to take the L trim off is by removing the entire frame from the topper. There are 6 screws holding it in place. there is some rust on the L trim, but rather decent from what I can see. the frame holding the glass is actually worse, but I won't really know until I take those glasses completely out.
I'm going to paint the topper sort of a semigloss black rather than the gloss as that is what i remember it to be. Here's a look at how much of black that was and the black that faded. Look around the where I took the cap for the wiper off.
I'll run a small test with a ounce of gloss black and ounce of flat black to see what it looks like maybe I'll have to add less flat to get the desired shine out of it.
Last edited by junk4u; 03-11-2014 at 11:16 AM.
03-11-2014, 11:14 AM
#416
I'm going to run down to Kmart this afternoon to get 2 qts of rust-oleum Oil base enamel one flat and one gloss. I contacted Rust-oleum and the emailed me back.
Thank you for contacting Rust-Oleum Product Support. We appreciate your interest in Rust-Oleum coatings. You can certainly mix two products from the same product line. However, be sure to track how much of each you use as there would be no way to recreate that color/sheen after mixing. I hope this information is helpful to you.
I'll get back to you on how it works out. I'm more into the body as the rust around the windshield kind of disturbed me. I have the same on the 86 4Runner and so decided to buy the 87. Huh... never thought I would be doing it on the 87 so early in the game.
The topper I am working on now belongs to the 86 which i will put on the 87 temporary after I fix up the major issues like the topper coating and windows.
Did you ever fix you L trim around your drivers side? That all-metal is something I'm going to use to repair the places that are rusted away, which isn't to bad on the 86 as i had original thought. The window frame is worse and may require a replacement if I can find one.
03-12-2014, 02:35 PM
#417
Kmart Scene
Okay went to Kmart yesterday and picked up 2 qts of the oil based rust-oleum, one flat and one gloss. While I was there I brushed that cut on my finger against one of the hanging merchandise thus opening up the cut. Blood started pouring out on my finger my palm my arm and then on the floor. Yes it was a lot. The employees there were freaking out asking question how did you cut it how etc... I just asked for some paper towel to squeeze to finger to stop the bleeding. They had to clean up the trail of blood.
It was like the excitement of the day for those employees.
The first coat didn't make out to well only because of the roller. Seems like a medium roller from HD is just that medium quality. I guess the fuzzy furry roller I picked isn't for the job, even though it states on it that its good for oil based paint. I may pick up some xylol Xylene to thin out the rust-oleum and spray it using the airgun I picked up at HF.
Here's one of the cans I picked up, I already mixed it up.

This is before I painted it
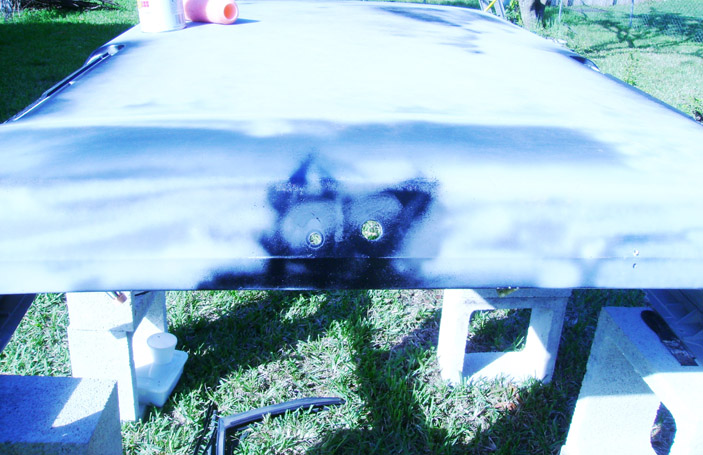
This is what the topper looked like with the first coat which i am not pleased with at all because of the roller hairs on it. I will have to sand it down a little and that's where the next coat I think will be with the spray guy to keep off those roller hairs. Doesn't look too bad, but when you stand next to it, those fuzzy hairs stand out.
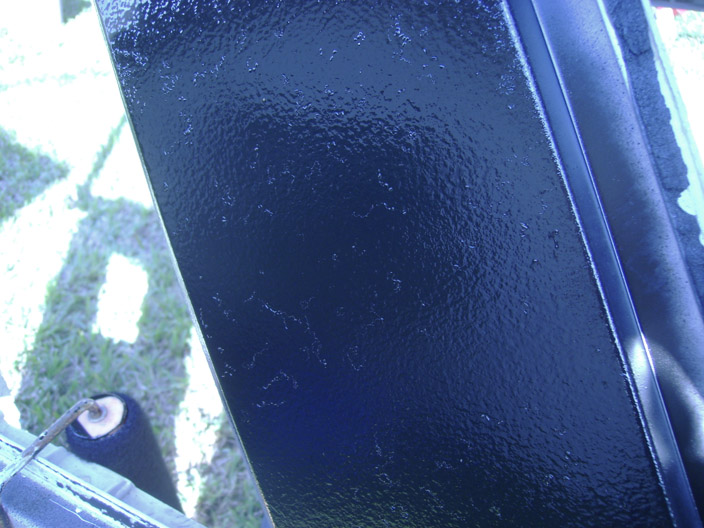
Look at the part of the backside which doesn't look to bad I wish the hole topper would come out this way I would be very happy.
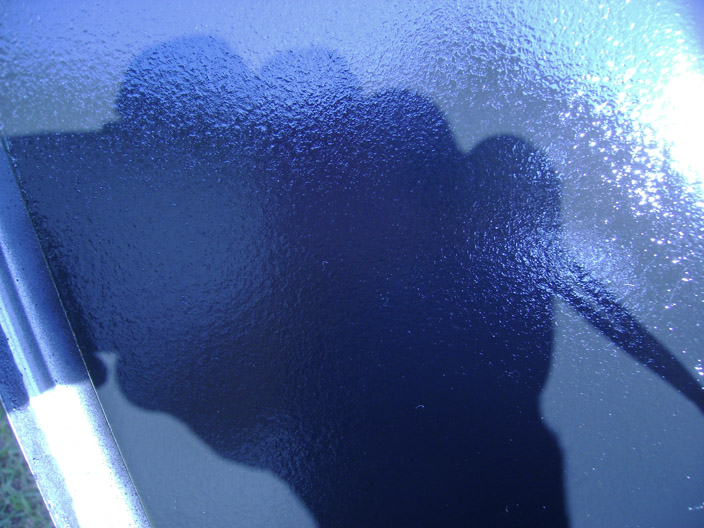
It's basically up at the front of the topper that all these fuzzy roller hair stuck to it, so kind of when it was fresh new roller. I just hate the extra work sanding a little to remove those hairy things. I will pick up some stuff on. here's a pic of the front side.
It's worse at the top where I actually started rolling. I am hoping sanding a little will help reduce them down and spraying it with a spray gun will turn out better. Hey it was only $9.99 for the spray gun what do I have to loose but $10 for now.
I will be out of town so i won't be able to work on it till after Saturday.
In the meantime if anyone has any suggestions other than what I have read online which is what basically I'm following let me know. different roller, etc...
It was like the excitement of the day for those employees.
The first coat didn't make out to well only because of the roller. Seems like a medium roller from HD is just that medium quality. I guess the fuzzy furry roller I picked isn't for the job, even though it states on it that its good for oil based paint. I may pick up some xylol Xylene to thin out the rust-oleum and spray it using the airgun I picked up at HF.
Here's one of the cans I picked up, I already mixed it up.
This is before I painted it
This is what the topper looked like with the first coat which i am not pleased with at all because of the roller hairs on it. I will have to sand it down a little and that's where the next coat I think will be with the spray guy to keep off those roller hairs. Doesn't look too bad, but when you stand next to it, those fuzzy hairs stand out.
Look at the part of the backside which doesn't look to bad I wish the hole topper would come out this way I would be very happy.
It's basically up at the front of the topper that all these fuzzy roller hair stuck to it, so kind of when it was fresh new roller. I just hate the extra work sanding a little to remove those hairy things. I will pick up some stuff on. here's a pic of the front side.
It's worse at the top where I actually started rolling. I am hoping sanding a little will help reduce them down and spraying it with a spray gun will turn out better. Hey it was only $9.99 for the spray gun what do I have to loose but $10 for now.
I will be out of town so i won't be able to work on it till after Saturday.
In the meantime if anyone has any suggestions other than what I have read online which is what basically I'm following let me know. different roller, etc...
03-12-2014, 02:49 PM
#418
Super Moderator
Staff
iTrader: (1)
Join Date: Aug 2008
Location: Anderson Missouri
Posts: 11,788
Likes: 0
Received 25 Likes
on
22 Posts
Ouch!!! Sometimes papercuts or minor cuts hurt and bleed more then a normal cut. I havent rolled out a top but I have used rollers and to keep from getting that fuzz everywhere I singe it with a lighter. It can make a fireball for a second when first lighting it.
I have a red runner with the stripes on it but the PO blocked it all it as one color. I can still get measurements off of it. I am just getting back into the swing of things after this weekend and will get caught up here shortly.
I have a red runner with the stripes on it but the PO blocked it all it as one color. I can still get measurements off of it. I am just getting back into the swing of things after this weekend and will get caught up here shortly.
03-12-2014, 03:13 PM
#419
Hey Terry...
Thanks for your suggestion I might give that a try when I return on Sunday, but my mind is set that the next coat will be sprayed, but that can change. I like the idea of lighting up the roller, but that will be like a candle considering what its made of. My mind might change by the time I return. On those strips if you can, i would appreciate it when you have time to measure those things out, hate doing that to you as you have your hand full with all the trucks you are working on. thanks let me know when you do have the measurements.
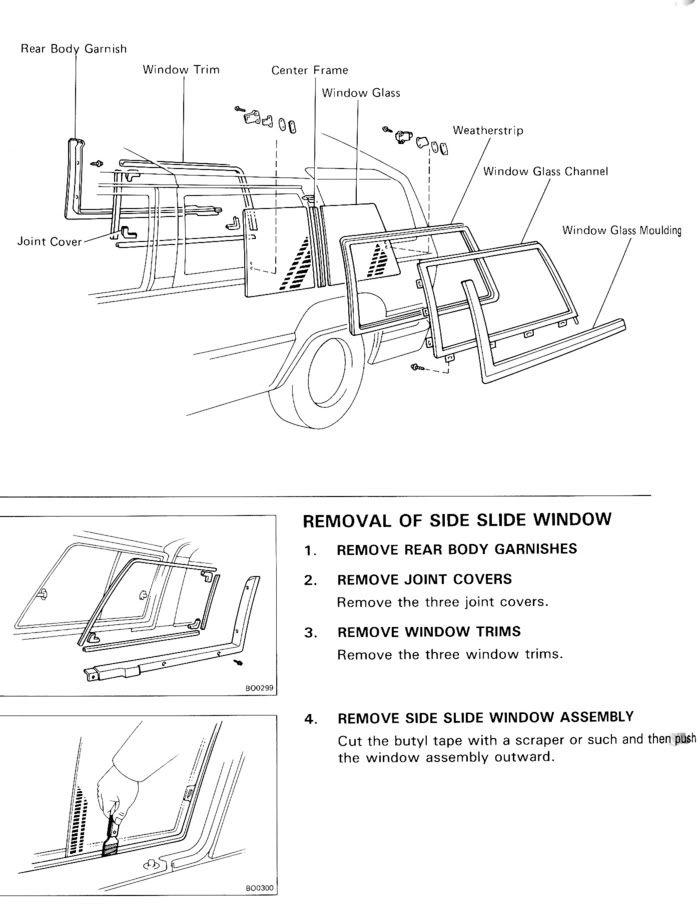
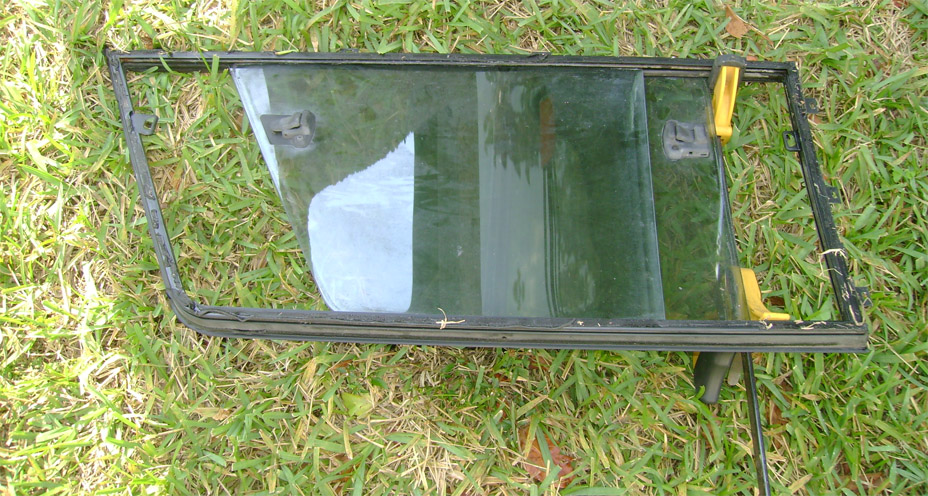
I played around with the sliding glass window and took it apart. Not as easy as the FSM shows it to be.
You have to remove the center bar screws to kind of stretch out the frame to remove the glass.
Removing the screw:

Once the screw(s) is remove center the glass in the middle

You can then do what the FSM says to do which is put your foot on each side of the frame and pull then release the glass. Not as easy as it sounds or look as I tried several time to do it that way.
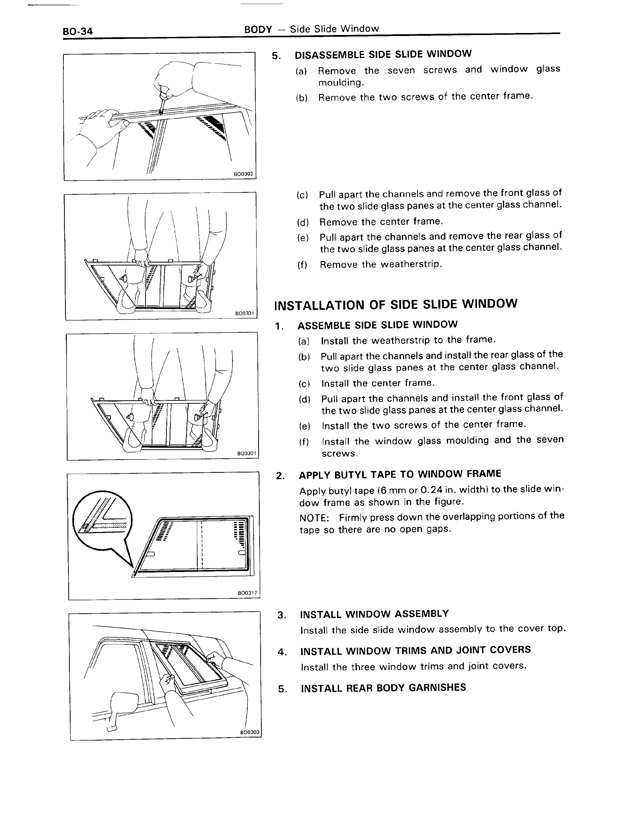
I got one of my retching clamps and reverse the head on it and used it to push out the frame.
Worked much easier as it only required me to pull up on one side and slip the glass out with the other hand, easy as pie.
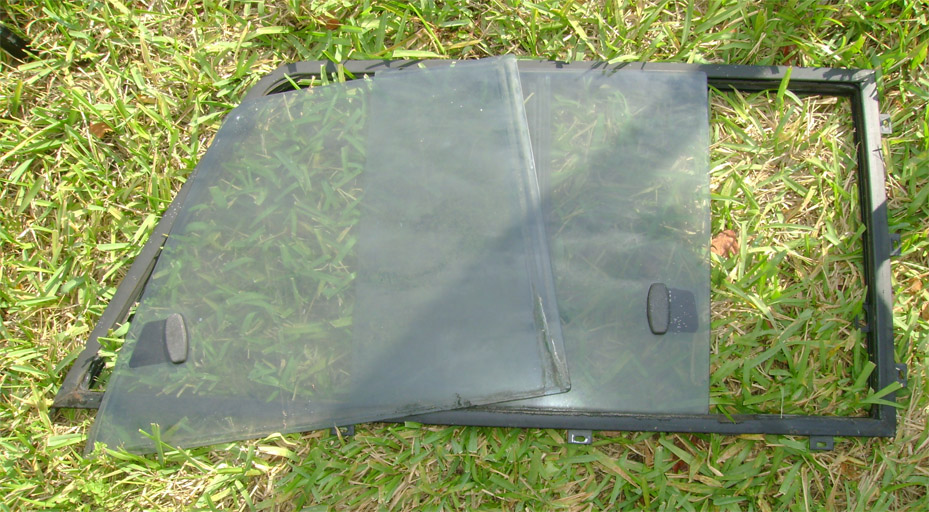
Frame is a bit rusty so I'll be working on this as well, just wanted to fiddle with some while we have a longer day light.
Thanks Terry for the help. Once you get the kick start going its best for me to do as much as possible before I get side tracked with something else.
CHefs got his had full and he's moving like the FLASH put that thing together I'm really impressed.
Thanks for your suggestion I might give that a try when I return on Sunday, but my mind is set that the next coat will be sprayed, but that can change. I like the idea of lighting up the roller, but that will be like a candle considering what its made of. My mind might change by the time I return. On those strips if you can, i would appreciate it when you have time to measure those things out, hate doing that to you as you have your hand full with all the trucks you are working on. thanks let me know when you do have the measurements.
I played around with the sliding glass window and took it apart. Not as easy as the FSM shows it to be.
You have to remove the center bar screws to kind of stretch out the frame to remove the glass.
Removing the screw:
Once the screw(s) is remove center the glass in the middle
You can then do what the FSM says to do which is put your foot on each side of the frame and pull then release the glass. Not as easy as it sounds or look as I tried several time to do it that way.
I got one of my retching clamps and reverse the head on it and used it to push out the frame.
Worked much easier as it only required me to pull up on one side and slip the glass out with the other hand, easy as pie.
Frame is a bit rusty so I'll be working on this as well, just wanted to fiddle with some while we have a longer day light.
Thanks Terry for the help. Once you get the kick start going its best for me to do as much as possible before I get side tracked with something else.
CHefs got his had full and he's moving like the FLASH put that thing together I'm really impressed.
03-13-2014, 05:04 PM
#420
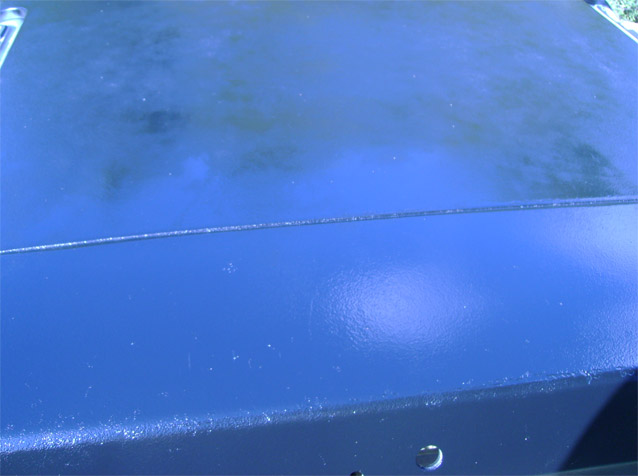
I'm leaving in the morning and should be back on Sunday to work on the topper. I sanded the topper a little bit today to see if I could get some of those fuzzy roller hair off. Turns out it's not that easy, even though you sand it the hairs stand up and still sticks on one side basically it looks like hair. Took a rubber band and rub them and they pulled off so it looks better now.
Although the rubber band pulled them off I was left with a 1/16 to 1/32 hair stem stick up. I got to thinking what Terry mentioned about singeing the roller. I took a map gas torch on low and singed those tips and it worked like a charm. Looks better now. Still some hair still embedded in the paint, but I'll see about get those when I return.
Although the rubber band pulled them off I was left with a 1/16 to 1/32 hair stem stick up. I got to thinking what Terry mentioned about singeing the roller. I took a map gas torch on low and singed those tips and it worked like a charm. Looks better now. Still some hair still embedded in the paint, but I'll see about get those when I return.
Last edited by junk4u; 03-13-2014 at 05:06 PM.


