
1987 4Runner Cyber Dude
 07-13-2013, 01:11 PM
#301
Thanks Orion22rte I need all the support I can get, I've have stumbles of all sorts with this one. Good news though...
Thanks Terry, good to hear from you as you have one of the best threads here that is informative, believe me I've been stalking your thread...HAHAHA...
Thanks Terry, good to hear from you as you have one of the best threads here that is informative, believe me I've been stalking your thread...HAHAHA...
 07-13-2013, 01:25 PM
#302
Now for the update. I got that engine all hooked up double checked everything to make sure nothings missing. Sometime when you over compensate on checking things you almost always forget something. Some how I miss placed the hose I went to put back both hoses on the top of the valve cover the one for the PCV and the one on the top front of the cover 3/4OD. The on on the top cover is the one I can find. When i was putting the one for the PCV on I put the other aside till I finished putting one on. I got distracted with the other little hoses and plug those in, when I reached over to get the hose it was gone. I looked over and under in and out. Not a sign so I asked someone else to look because sometime someone else can see things that I can't. No such luck, lucky me I had one similar in size, but different in the curve it fit.
Well cranked it up and wham... It starts no problem a little rough adjusted the idle a little just to get it going. Set the time etc... Truck seems to be running fine the best part so far...NO KNOCKING... Yea... . You guys have no clue to how happy I am, doing the happy dance...
Here's a short vid of the truck running and reving and you can hear there's no knocking now and this is before I tune it.
[YOUTUBE]
[/YOUTUBE]
I finally got my ride going... So Happy.
Well cranked it up and wham... It starts no problem a little rough adjusted the idle a little just to get it going. Set the time etc... Truck seems to be running fine the best part so far...NO KNOCKING... Yea...
. You guys have no clue to how happy I am, doing the happy dance...Here's a short vid of the truck running and reving and you can hear there's no knocking now and this is before I tune it.
[YOUTUBE]
I finally got my ride going... So Happy.
07-13-2013, 01:37 PM
#303
By the way I still to this very minute don't have a clue to what that knocking was. It baffled me , annoyed me
  , intrigued me
 and entertained me
 for a while, but its gone now.
Took it for a quick spin around the block just to see how it performs and it seems to be doing good.
, annoyed me , intrigued me and entertained me for a while, but its gone now.Took it for a quick spin around the block just to see how it performs and it seems to be doing good.
07-13-2013, 04:09 PM
#304
Super Moderator
Staff
iTrader: (1)
Join Date: Aug 2008
Location: Anderson Missouri
Posts: 11,788
Likes: 0
Received 25 Likes
on
22 Posts
Your motor sounds great. It does make you wonder what the noise was but it didnt come back and that would of been more frustrating. Congratulations on getting it up and running again today.
Appreciate the compliments on my builds. I spend alot of time trying to put up what I have found and how to fix some of these problems on the cheap but are still reliable. Some I find on the net, some I just stumble thru. I have a knack of just getting into situations. Alsways a good experience afterwards. Not so much during the experience.lol
Appreciate the compliments on my builds. I spend alot of time trying to put up what I have found and how to fix some of these problems on the cheap but are still reliable. Some I find on the net, some I just stumble thru. I have a knack of just getting into situations. Alsways a good experience afterwards. Not so much during the experience.lol
07-15-2013, 06:16 AM
#306
Terry thanks and always appreciate the help - Its a wonder how the smallest things can affect things in a big way, I was lurking on your threads and would have never guessed what the cause of your stall out was. Who would of guess it was the air intake connecter hose. Thank goodness that's all it was. The bad part is if you buy it at the dealer it will run you $100 or so, but know you you probably have access to plenty of them.
bbrideau thanks and yeah it is good. your build is fantastic. I have a buddy in
buddy in Ontario Canada, North Bay and does a lot of ice/hole fishing and hunting. He invited at one time to buy some property up there as it was cheaper there than here in South Florida. Really nice country out your way.
07-15-2013, 06:24 AM
#307
Okay as we all know finally got the truck up and running again. Will be taking it for my daily rides this week. I am trying to schedule a trip to Okeechobee next week which is only about a 150 +/- miles north of me. Most of you all know that I occasionally head up that way that's where I got the tranny/t-case plus front differential and it's still there, so I'll be taking a trip up that way to pick it up.
07-15-2013, 06:32 AM
#308
Registered User
Terry thanks and always appreciate the help - Its a wonder how the smallest things can affect things in a big way, I was lurking on your threads and would have never guessed what the cause of your stall out was. Who would of guess it was the air intake connecter hose. Thank goodness that's all it was. The bad part is if you buy it at the dealer it will run you $100 or so, but know you you probably have access to plenty of them.
bbrideau thanks and yeah it is good. your build is fantastic. I have a buddy in
buddy in Ontario Canada, North Bay and does a lot of ice/hole fishing and hunting. He invited at one time to buy some property up there as it was cheaper there than here in South Florida. Really nice country out your way.
bbrideau thanks and yeah it is good. your build is fantastic. I have a buddy in
buddy in Ontario Canada, North Bay and does a lot of ice/hole fishing and hunting. He invited at one time to buy some property up there as it was cheaper there than here in South Florida. Really nice country out your way.
07-15-2013, 06:39 AM
#309
bbrideau, Yup you guys get much colder on the west side. But in general, you guys in Canada have it made for good nature rides (4Wheeling). Down here in South Florida, blood sweat and tears it so hot and wet/muggy we do have the terrains you have. We have to drive way north to even hit the dirt...Hahaha
07-16-2013, 03:07 PM
#310
Been tinkering with the truck trying to fine tune a few things. I'm going to post a few items in a bit of stuff I'm going to start working on little by little sort of a check list.
But right now I started cleaning up these that I got back near the forth I reported, I'm just getting around to cleaning them up.
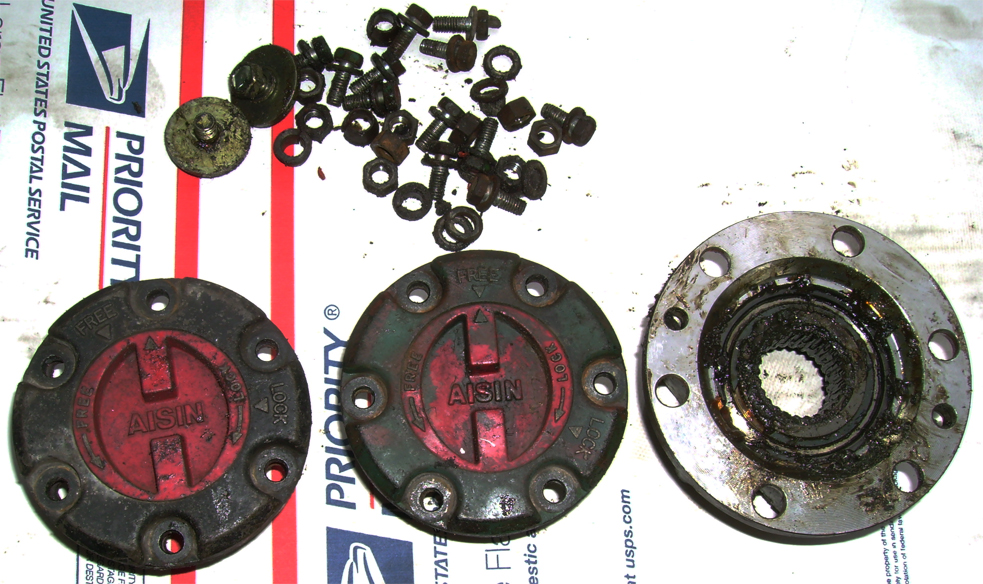


Eventually I would like to do away with the auto hubs and put these on, but without the other housing, I'm just going to have to wait till I find one.
But right now I started cleaning up these that I got back near the forth I reported, I'm just getting around to cleaning them up.
Eventually I would like to do away with the auto hubs and put these on, but without the other housing, I'm just going to have to wait till I find one.
07-17-2013, 05:57 AM
#311
Registered User
man those are some mucky hubs! those hub bodies are from a SFA I'm assuming? To bad i just decided to use my spare set of hubs for the wives 2nd gen, already swapped the non add diff and tubes on it just need to throw those on and no more front end wear and tear
07-17-2013, 06:07 AM
#312
Registered User
Good plan, that hub needs some serious cleanup. Too bad you weren't able to get the other side, that would have been perfect.
07-17-2013, 08:47 AM
#313
bbrideau - Yup they are really mucky. They came out of a 89 Toyota with IFS. I don't know if there is a difference between the SFA or IFS, but I looked up on a system that shows me parts numbers and came up with the same part number for both. I may be wrong on the way i am looking at it though.
Cory, still putting my list of things I would like to start working on at this point. Truck was a little rough when I started it, didn't see anything wrong, so I took a shot and check compression. Sure enough they were off, 120, 130, 120 and 150. Turned out I needed to do the valve lashing as they where to tight. Now we are 150, 160, 155 and 160, much better.
Cory, still putting my list of things I would like to start working on at this point. Truck was a little rough when I started it, didn't see anything wrong, so I took a shot and check compression. Sure enough they were off, 120, 130, 120 and 150. Turned out I needed to do the valve lashing as they where to tight. Now we are 150, 160, 155 and 160, much better.
07-17-2013, 01:27 PM
#314
lis of stuff i need to work on.
Here�s my list of things I want to get started on next:
1) Bed primer and bed liner paint Herculiner or Rustoleum bedliner
2) Sound Deadening � Peel and Stick side walls
3) Complete AC repairs
4) Get new rubber windshield trim. The trim that was only available for the hilux and hilux surf part number 56121-89117
5) Priming and painting the truck panels in sections. Yeah I know I�ve been told that�s not a good idea, but it would be easier for me and I think I would be able to get a cleaner paint job done.
6) Adding the rear spring to help with sag
7) Redoing the brakes front and back
8) Changing the muffler and cat
9) Adding remote door opener and kill start so if they try to steal it they can't start it.
10) Re-keying the door locks.
I'll keep adding as I think about what needs to be done, what has to be done and what I would like to do.
Also, i would like to start working on the 1986 4Runner engine rebuild, which would be a good thing to start some of that now as I have it fresh in my head. Hahaha
07-18-2013, 10:35 AM
#315
Registered User
Good list there buddy. Are you going to use that AC compressor rebuild kit that you posted wayyy back? As far as brakes go, I may have caliper rebuild kits for your fronts if you want them.
07-18-2013, 11:29 AM
#316
It would nice to have that caliper rebuild kit from you and I really appreciate the offer, but I think you should hold on to them for the time that you may need it(not saying that you will need it, but who knows). I'm just hoping that one day another one of those Toyota truck pulls up in at the scrap yard in much better shape. I've got a bunch of stuff I'm going to dump up there, not enough to compensate for what I've taken so far.
I haven't started with any aesthetic yet as far as interior or exterior, just working on fine tuning the truck. I got 2 codes that came out yesterday of which are fixed already thermosensor and oxysensor both had a the wire loose inside the connectors. Still there are small issues could be injectors, gas pump/filter, TPS adjustment (kind of difficult for me to get it to specs), seems to drop idle a little from time to time also looking at the IAC. Eventually over time I will work out the little nick nacks or bugs out of it, but for now it's running.
Depending on my budget, I am also going to start working on the motor for the 86 4Runner. In other words like Terry said, if I don't have the $ right now i can start working on thing that don't require spending. I'll start cleaning up the block and checking the head and maybe this time see about doing the head job myself with the help of my neighbor who's done this many times himself.
07-19-2013, 06:21 AM
#317
Registered User
bbrideau - Yup they are really mucky. They came out of a 89 Toyota with IFS. I don't know if there is a difference between the SFA or IFS, but I looked up on a system that shows me parts numbers and came up with the same part number for both. I may be wrong on the way i am looking at it though.

Cory, still putting my list of things I would like to start working on at this point. Truck was a little rough when I started it, didn't see anything wrong, so I took a shot and check compression. Sure enough they were off, 120, 130, 120 and 150. Turned out I needed to do the valve lashing as they where to tight. Now we are 150, 160, 155 and 160, much better.
Cory, still putting my list of things I would like to start working on at this point. Truck was a little rough when I started it, didn't see anything wrong, so I took a shot and check compression. Sure enough they were off, 120, 130, 120 and 150. Turned out I needed to do the valve lashing as they where to tight. Now we are 150, 160, 155 and 160, much better.
07-20-2013, 12:38 PM
#318
Exhaust leak
Today, I was looking for exhaust leaks as the truck runs great so far. A little rough at the beginning, but it seems to have work it self out.
I knew about the the muffler had a hole in it and was looking to replace it, but I could hear a leak when accelerating. I had an idea as to where it was leaking because I didn't like what I saw when I originally bolted up the manifold to the pipe. On the pipe flange to manifold there is a sleeve that the doughnut gasket inserts on that gasket which aligns to the exh. mani when it bolts up.
Originally when unbolted the pipe from the exhaust I thought it might me a problem along the way. I am thinking of welding a lip and then grinding and filing down to rebuild that lip so that it would seal up good, other wise I have to go out and buy or wait till I find one in a junk yard. I'll try to see about molding one in there by weld and grinding, seems like it may be the quickest way.
Then there's the muffler that needs to be changed as well. Haven't decided on just buying the muffler or the whole muffler pipe setup yet. Muffle to weld up would run me way less.
I also found out that the AC was leaking freon though I haven't run any type of test yet vacuum or pump it full of nitrogen, but I'd best get some mineral oil, new seals and a dryer first before I do anything else. I purchased a compress a few months ago to replace the one that was originally installed which I under stand was a replacement anyhow,but it seems the clutch bearing might be shot as it was not turning.
07-22-2013, 04:02 PM
#319
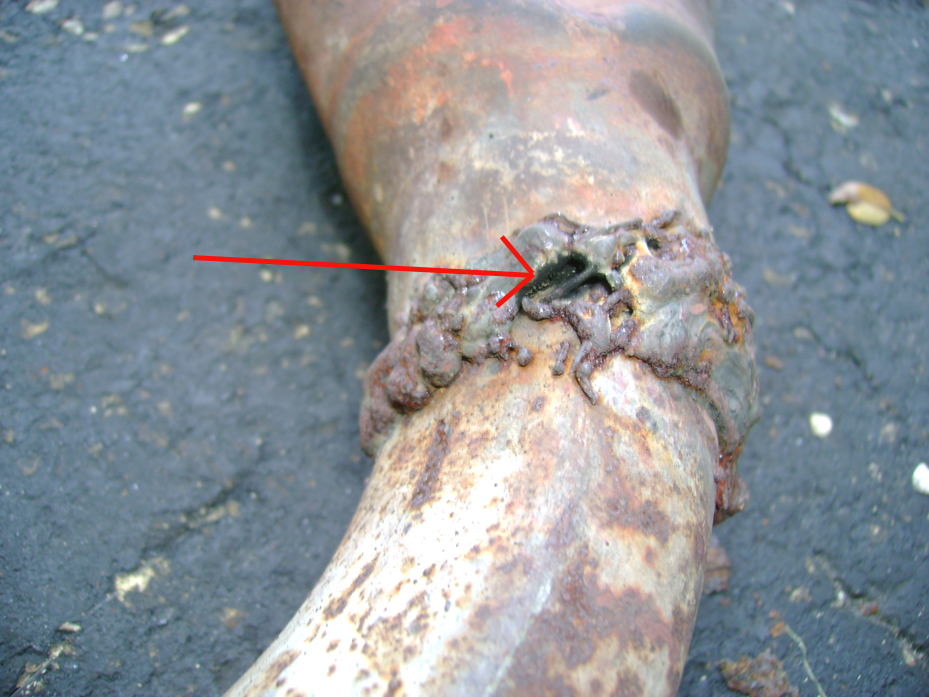
Today I took the exhaust down pipe off to if was can do something with it. Turns out more leaks were happening than originally thought.
Here are some pictures of the leak.
This is the the leak, because this portion is cracked or chipped, it seems to leak around here.

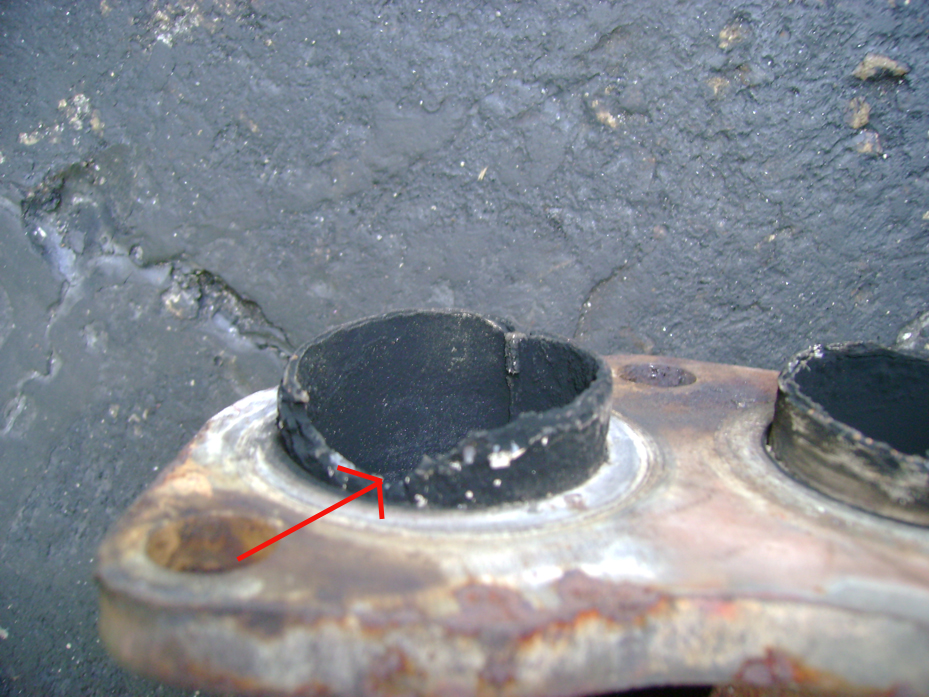
A little further look at this shows the pipe is cracked straight through seems like the pipe is brittle here, we started grinding it down to prepare for a little welding when we notice not only the welding separation, but the crack line running on the inside in the same direction and area.

Looking further down we see a weld not to good of a weld and we see carbon, it seems like it is leaking here as well, a very small leak, but a leak.
We tried to weld a lip on that flange that hold the donuts Gaskets, it didn't work because the piping was so badly cracked the pipe just keep falling apart. Called it a day and decided to go buy a small 3 to 4" - 1 1/2" OD exhaust piping, but no luck no place had that size. Went to 5 placed Advanced, Napa, AutoZone, Tire kingdom and Midas no one had a piece to sell or want to give me a piece. I also call a couple of places and none said they don't have any to sell. My neighbor said he'll try and roll one out of a scrap stainless steel sheet at his job.
I have to head out of town for the day so no work on this tomorrow. Should be back at it again Wednesday afternoon.
Here are some pictures of the leak.
This is the the leak, because this portion is cracked or chipped, it seems to leak around here.
A little further look at this shows the pipe is cracked straight through seems like the pipe is brittle here, we started grinding it down to prepare for a little welding when we notice not only the welding separation, but the crack line running on the inside in the same direction and area.
Looking further down we see a weld not to good of a weld and we see carbon, it seems like it is leaking here as well, a very small leak, but a leak.
We tried to weld a lip on that flange that hold the donuts Gaskets, it didn't work because the piping was so badly cracked the pipe just keep falling apart. Called it a day and decided to go buy a small 3 to 4" - 1 1/2" OD exhaust piping, but no luck no place had that size. Went to 5 placed Advanced, Napa, AutoZone, Tire kingdom and Midas no one had a piece to sell or want to give me a piece. I also call a couple of places and none said they don't have any to sell. My neighbor said he'll try and roll one out of a scrap stainless steel sheet at his job.
I have to head out of town for the day so no work on this tomorrow. Should be back at it again Wednesday afternoon.
Last edited by junk4u; 07-22-2013 at 04:45 PM.
07-22-2013, 11:47 PM
#320
Super Moderator
Staff
iTrader: (1)
Join Date: Aug 2008
Location: Anderson Missouri
Posts: 11,788
Likes: 0
Received 25 Likes
on
22 Posts
These manifolds can be a pain. If I have a good connection from the "Y" pipe to the manifold, I will cut the pipe further on down just to avoid breaking the seal on that area that you showed.
I went thru your thread again and didnt see any pictures of your 86. Got any or I miss it somewhere? I try on my threads to show there is so much to do that doesnt cost anything or very little that does need done. I try to stay at $25 a week on my projects and when I do spend some, you will see alot of busywork or using supplies that I have on hand. Sometimes $25 can be a fortune. It is this week as I had a few things to come up but I got plenty to keep me busy for awhile.
On your 86, since you have had it for so long, it is something that has a lot of memories for you. It may be awhile before you can get started on it and put any funds and time into it, but you still have it and tomorrows always have better days in them.
When you do get started on it, I would suggest that you get it into a rolling project as soon as possible. The reason I say rolling project, even if it just means driving it around the yard, you will get some sort of satisfaction out of it, otherwise it will just feel like a money pit or time pit on it.
If you have the patience then not getting it moving so fast has its rewards as well as you can take your time and go thru each system thoroghly and can save you some time on having to go back and redo some things. The thing I like about projects is that it is not something I am depending on. I actually enjoy working on problems. When I have a daily driver to go down and even it is something I know and can fix easily, it is nerve wracking.
"Determination and Desperation" is rewarding. My fuel guage hasnt been working for awhile and supposedly at ninety something dollars for a new float assembly for my fuel tank, it just wasnt going to happen. It isnt pretty, but I got the float assembly working out of desparation for free. Just took a little time and I learned something.
You have learned a few tricks on your 87 that will help you on your 86. Each one teaches you something for the next build.


