
Scheefdog’s 79 Truck Build
 01-16-2012 | 05:50 PM
#1

Thread Starter
Registered User
Joined: Aug 2010
Posts: 62
Likes: 1
From: Colorado
Scheefdog’s 79 Truck Build
I am going to backlog on my build a little to start, probably should have started a build thread when I bought the truck. I have found a lot of great information on this forum and hope that I can give back with my build thread.
August 2010
I have always owned Toyota trucks and have always wanted a 1st gen w/ the round headlights. Well I picked one up....I plan to use it to bomb around town and as a trail rig...

I bought it from a kid who was getting rid of it because the engine was blown and didn't want to spend the money to get it fixed. He only owned the truck for a few months and was driving on the highway going up a hill and the truck lost power and started knocking. He towed it to a local mechanic and the guy said it would need a new engine because the crankshaft bearings were gone.

The body is in decent shape, looks straight w/ the usual rust spots. Interior is fairly ratty and there are some good Flintstones holes underneath the floor mats that will need to be addressed. He wanted to unload it for cheap so I decided to go for it. This is my first project truck.

I towed it home and looked things over(the truck sat for 6 months) The battery was totally dead, the radiator didn't have any coolant in it, the oil looked good. I filled the radiator up with water and put the jumper cables on and she fired right up...but had a loud knocking sound. I was tempted to try to drive but didn't want to do any further damage. So I tore into the engine and ended doing a full rebuild.


I found a used 20r head (mine was toast from the camshaft eating into the head), had the local machine shop clean it up. Then, I bought a remanufactured 22r short block and assembled everything.


The truck was up and running smooth with a fresh motor. Unfortunately, I only made a few short runs and found that the alternator wasn't charging the battery....
PS- It may take me a couple days to catch up with posts to where I am currently at with the truck.
August 2010
I have always owned Toyota trucks and have always wanted a 1st gen w/ the round headlights. Well I picked one up....I plan to use it to bomb around town and as a trail rig...
I bought it from a kid who was getting rid of it because the engine was blown and didn't want to spend the money to get it fixed. He only owned the truck for a few months and was driving on the highway going up a hill and the truck lost power and started knocking. He towed it to a local mechanic and the guy said it would need a new engine because the crankshaft bearings were gone.
The body is in decent shape, looks straight w/ the usual rust spots. Interior is fairly ratty and there are some good Flintstones holes underneath the floor mats that will need to be addressed. He wanted to unload it for cheap so I decided to go for it. This is my first project truck.
I towed it home and looked things over(the truck sat for 6 months) The battery was totally dead, the radiator didn't have any coolant in it, the oil looked good. I filled the radiator up with water and put the jumper cables on and she fired right up...but had a loud knocking sound. I was tempted to try to drive but didn't want to do any further damage. So I tore into the engine and ended doing a full rebuild.
I found a used 20r head (mine was toast from the camshaft eating into the head), had the local machine shop clean it up. Then, I bought a remanufactured 22r short block and assembled everything.
The truck was up and running smooth with a fresh motor. Unfortunately, I only made a few short runs and found that the alternator wasn't charging the battery....
PS- It may take me a couple days to catch up with posts to where I am currently at with the truck.
Last edited by scheefdog; 01-16-2012 at 07:16 PM.
01-16-2012 | 06:06 PM
#2
Thread Starter
Registered User
Joined: Aug 2010
Posts: 62
Likes: 1
From: Colorado

The wiring was all hacked up and put back together before the plug into the voltage regulator. I first replaced the voltage regulator but that didn't do the trick so I decided to upgrade the alternator setup. I found a 86+ alternator(with internal regulator) and brackets to put on instead. It was a headache to get it wired in because of the hack job wiring the previous owner had done, but ended up being worth the trouble because now I have a constant 14.8 volts!
The exhaust manifold was also leaking and I couldn't get it to seal. Trail gear happened to be having a sale on their header so I decided it was a go. I installed the new header and reworked the exhaust(which I still need to finish) with a new junkyard muffler that actually sounds pretty good.

The carburetor that the previous owner installed was giving me some starting issues.
I realized that the truck was going to require more work than I originally thought and winter was arriving so I ended up parking the truck for the winter since I didn't have a place to work on it.
01-16-2012 | 06:29 PM
#3
Thread Starter
Registered User
Joined: Aug 2010
Posts: 62
Likes: 1
From: Colorado
Once summer hit I was back into the truck. The bench seat was killing my back everytime I would drive the truck so I picked up some used seats.

Next thing I knew I had the interior completely stripped and I was fixing the rust holes in the floor.


I cut out the old rust and welded in new sheets. Then put rust-stop on all the surface rust spots of the floor and used bondo to smooth the contour of my patches.

I welded in new brackets for the seats I got (02 Camry).

Then went to town rolling on bedliner in the cab.

At least the cab floor and seats are nice now! (even if the dash is still gross!)

Next thing I knew I had the interior completely stripped and I was fixing the rust holes in the floor.
I cut out the old rust and welded in new sheets. Then put rust-stop on all the surface rust spots of the floor and used bondo to smooth the contour of my patches.
I welded in new brackets for the seats I got (02 Camry).
Then went to town rolling on bedliner in the cab.
At least the cab floor and seats are nice now! (even if the dash is still gross!)
Last edited by scheefdog; 01-16-2012 at 06:32 PM.
01-16-2012 | 06:56 PM
#4
Thread Starter
Registered User
Joined: Aug 2010
Posts: 62
Likes: 1
From: Colorado
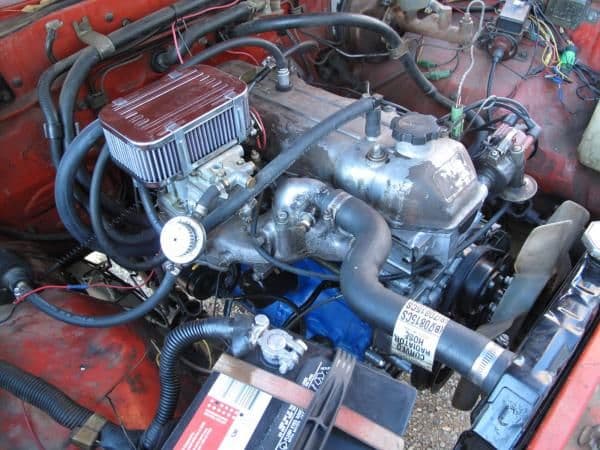
I finally took the time to and clean up the engine bay(which I should have done when I was rebuilding the motor.) I stripped and painted the valve cover flat black, found a fan shroud and installed it, welded in a tray for the battery to sit on, cleaned up more of the wiring etc.
[pic to be uploaded...I know I have some pictures of the engine all cleaned up]
I also took off the aftermarket electronic fuel pump that was on the truck because it wasn't hooked up to a relay, just wired for when the ignition was on. I installed a mechanical fuel pump but quickly realized I also needed the eccentric thing to go on the cam gear to drive it. Once I found one, I was up and running better than ever with a new mechanical fuel pump. I adjusted the timing and valves again since I had put about 1k miles on the new motor. I tracked down a gauge cluster with a tach and did some tinkering to get it installed and working in my cluster. This is a worthwhile mod for anyone with a 79 or 80 since it is basically plug and play to add one to your truck.
I wasn't feeling very confident with the 30 year old springs and steering so I decided new suspension was in order...
01-16-2012 | 07:06 PM
#5
Thread Starter
Registered User
Joined: Aug 2010
Posts: 62
Likes: 1
From: Colorado
I decided my goal with the suspension and steering was to make the truck more capable off-road while not making it so big and flexy that I couldn't still drive it on the highway. I wanted to end up running 31s-33s at the most.
I ended up going with the following-
Old Man Emu Springs
Procomp ES3000 shocks (cheap as I knew I might mess with them later)
Greasable Shackles- 5" from Trail Gear
U-bolt flip kits- front and rear
High Steer- from Trail Gear
IFS Power Steering Box (and pump etc.)
IFS Rear Axle w/ Elocker
Spacers-1.5" up front to match rear width
Rebuild front axle and hubs
Upgrade the brakes
This is how the truck was before it all began...
Last edited by scheefdog; 01-16-2012 at 07:08 PM.
01-16-2012 | 08:00 PM
#6
Thread Starter
Registered User
Joined: Aug 2010
Posts: 62
Likes: 1
From: Colorado
I started with the rear end of the truck first. The first major obstacle I ran into was the leaf spring pins did not want to come out. They ended up being a pain in the ass to remove. After giving up trying to cut them off with a sawzall(wasn't working), I welded an old head bolt to each pin so I could twist and get leverage to break the pin loose from inside the bushing and pull it out. I had to buy new pins and the best price I found was through autozone.

I was glad to get the old axle and springs out from under the truck and start on the fun stuff. First, I stripped down the IFS rear axle that was out of an 86 4runner with 4.30 gears. A little modification to the housing to fit the elocker third I picked up; a little cutting and grinding then drilling and tapping a couple new holes and it was in.


I reused the factory bump stops by welding them to the top of the new u-bolt plates and also reused the factory lower shock mount and welded it to the axle.

I stripped down the front axle next, cutting off all the old steering junk and welding a gusset along the top. I did a full-rebuild of the axle using the trail gear kit and it was straight forward. I ended up replacing the birfields with new chromoly ones because the bearing cages were looking suspect on the originals.


I rebuilt the hubs at the same time and installed remanufactured IFS calipers and vented FJ rotors. As well as the new high steer.

IFS steering box mounted! Drilling through the frame was a chore, make sure you have a good drill and bits. I also installed the power steering pump, lines, and cooler behind the grill because my truck didn't have power steering to begin with.

The front done and waiting for wheels. Wait, actually I need bumpstops, shocks, and wheelspacers first.

That's all I can type for tonight, I will try to update more tomorrow!
I was glad to get the old axle and springs out from under the truck and start on the fun stuff. First, I stripped down the IFS rear axle that was out of an 86 4runner with 4.30 gears. A little modification to the housing to fit the elocker third I picked up; a little cutting and grinding then drilling and tapping a couple new holes and it was in.
I reused the factory bump stops by welding them to the top of the new u-bolt plates and also reused the factory lower shock mount and welded it to the axle.
I stripped down the front axle next, cutting off all the old steering junk and welding a gusset along the top. I did a full-rebuild of the axle using the trail gear kit and it was straight forward. I ended up replacing the birfields with new chromoly ones because the bearing cages were looking suspect on the originals.
I rebuilt the hubs at the same time and installed remanufactured IFS calipers and vented FJ rotors. As well as the new high steer.
IFS steering box mounted! Drilling through the frame was a chore, make sure you have a good drill and bits. I also installed the power steering pump, lines, and cooler behind the grill because my truck didn't have power steering to begin with.
The front done and waiting for wheels. Wait, actually I need bumpstops, shocks, and wheelspacers first.
That's all I can type for tonight, I will try to update more tomorrow!
Last edited by scheefdog; 01-19-2012 at 05:57 PM.
Trending Topics
 01-19-2012 | 06:31 PM
#11
Thread Starter
Registered User
Joined: Aug 2010
Posts: 62
Likes: 1
From: Colorado
I finished up the suspension and only ran into one big issue. The front driveshaft that came on my truck was not a cv style, it was just u-joints on both ends and therefore didn't even have enough flex to be installed with the new lift.  I decided to drill another hole in the front shackles to run them at about 3.75" instead of the full 5" in case that was throwing it off. Still not enough flex, so I went ahead and finished everything else up.


Here are a few pics of the truck with the same tires and new lift on it. WOW! What a difference with the new steering, suspension, and axle rebuild! The truck handles so tight and responsive now and doesn't bottom out on every little bump. The springs seem stiff, but I'm sure they will break in and soften up.
After driving the truck around for a couple weeks with the small tires I got lucky and scored a set of 5 used BFG ATs that are 285/75r16. I had a set of Tundra rims I had acquired earlier in the summer with the hope of using them on the truck so I was pumped. The tires are a little bigger than what I originally planned to run, 265/75r16, but they look great on the truck and the healthy motor seems to handle them fine. A few pics with the new rubber.


I picked up a front driveshaft and made a few modifications to the suspension at the same time. I decided to pull a leaf out of the back of the O.M.E. springs because the shackle angle sucked and it was too stiff. I moved the front springs to the 5" hole on the shackles to give it more height and uptravel in the front. This made a BIG difference in the way the suspension handled. The front shocks are limiting the downtravel a lot, but I expected this as I didn't want to do a new driveshaft yet.
I also pulled off the front bumper because it was rattling and driving me crazy. The truck looks better already and gives me a reason to build a bumper!
Until another update tomorrow...
I decided to drill another hole in the front shackles to run them at about 3.75" instead of the full 5" in case that was throwing it off. Still not enough flex, so I went ahead and finished everything else up. Here are a few pics of the truck with the same tires and new lift on it. WOW! What a difference with the new steering, suspension, and axle rebuild! The truck handles so tight and responsive now and doesn't bottom out on every little bump. The springs seem stiff, but I'm sure they will break in and soften up.
After driving the truck around for a couple weeks with the small tires I got lucky and scored a set of 5 used BFG ATs that are 285/75r16. I had a set of Tundra rims I had acquired earlier in the summer with the hope of using them on the truck so I was pumped. The tires are a little bigger than what I originally planned to run, 265/75r16, but they look great on the truck and the healthy motor seems to handle them fine. A few pics with the new rubber.
I picked up a front driveshaft and made a few modifications to the suspension at the same time. I decided to pull a leaf out of the back of the O.M.E. springs because the shackle angle sucked and it was too stiff. I moved the front springs to the 5" hole on the shackles to give it more height and uptravel in the front. This made a BIG difference in the way the suspension handled. The front shocks are limiting the downtravel a lot, but I expected this as I didn't want to do a new driveshaft yet.
I also pulled off the front bumper because it was rattling and driving me crazy. The truck looks better already and gives me a reason to build a bumper!
Until another update tomorrow...
01-21-2012 | 08:07 PM
#12
Thread Starter
Registered User
Joined: Aug 2010
Posts: 62
Likes: 1
From: Colorado
A few pics of the interior. It is still a work in process as I need to find a dash to replace mine since the stereo was ripped out at some point. I did find some interior pieces including an SR5 steering wheel which is cool.


I made some aluminum door panels out of some scrap sheet that I had around and put soundproofing behind the panels(protecto wrap) which made a big difference in road noise and rattles. I'm looking forward to doing the dash and adding more soundproofing(and a stereo).

I flushed the heater core in preparation for some winter driving and played with the valve to get it circulating coolant. The blower only works on the highest setting so I'll probably mess with that and rebuild the blower when I do the dash.

I also added a bike shifter connected to the throttle so I can set the idle speed on my truck manually since the choke isn't working. It works well for crawling offroad
I made some aluminum door panels out of some scrap sheet that I had around and put soundproofing behind the panels(protecto wrap) which made a big difference in road noise and rattles. I'm looking forward to doing the dash and adding more soundproofing(and a stereo).
I flushed the heater core in preparation for some winter driving and played with the valve to get it circulating coolant. The blower only works on the highest setting so I'll probably mess with that and rebuild the blower when I do the dash.
I also added a bike shifter connected to the throttle so I can set the idle speed on my truck manually since the choke isn't working. It works well for crawling offroad
01-24-2012 | 07:42 PM
#15
Thread Starter
Registered User
Joined: Aug 2010
Posts: 62
Likes: 1
From: Colorado
I decided to make a front bumper for the truck since it was feeling a little naked and I needed a good weekend project. I'll let the pictures speak...
started out by reinforcing the frame to make a solid mounting surface

tacking together one side

center winch plate and receiver

my welding is getting better with every project and I was excited with the welds on the bumper

painting

finished product on the truck


started out by reinforcing the frame to make a solid mounting surface
tacking together one side
center winch plate and receiver
my welding is getting better with every project and I was excited with the welds on the bumper
painting
finished product on the truck
01-25-2012 | 04:08 AM
#16
Registered User
Joined: Aug 2011
Posts: 654
Likes: 2
From: Swamp east MO
Sweet was that a kit bumper of did you cut the outside pc's to make it? I like how the bumper tucks up tight and out of the way, makes me reconsider what I wanted to put on mine (tube bumper)......Look'n good.
 01-25-2012 | 08:57 AM
#18
Thread Starter
Registered User
Joined: Aug 2010
Posts: 62
Likes: 1
From: Colorado
Thanks! I designed and fab'd the bumper from scratch using basic tools. I cut all the pieces of plate out with a grinder, straight edge for a guide and cutoff wheels. I made a cardboard template of the bumper first to get the angles and everything figured out before hand.
I'm really happy with the way it came out and will try to post some better pics of it on the truck (since the light is flat in the ones above).
I'm really happy with the way it came out and will try to post some better pics of it on the truck (since the light is flat in the ones above).


Thread
Thread Starter
Forum
Replies
Last Post
voiddweller
86-95 Trucks & 4Runners (Build-Up Section)
19
05-02-2016 09:10 PM
Badger62811
86-95 Trucks & 4Runners (Build-Up Section)
0
06-26-2015 09:26 PM
saphirekosmos
Newbie Tech Section
1
06-22-2015 10:26 AM


