Elvota's 3.4 swap
#41
Installed the 3.0 oil pan and pickup on the 3.4. Everything fit perfectly as expected.
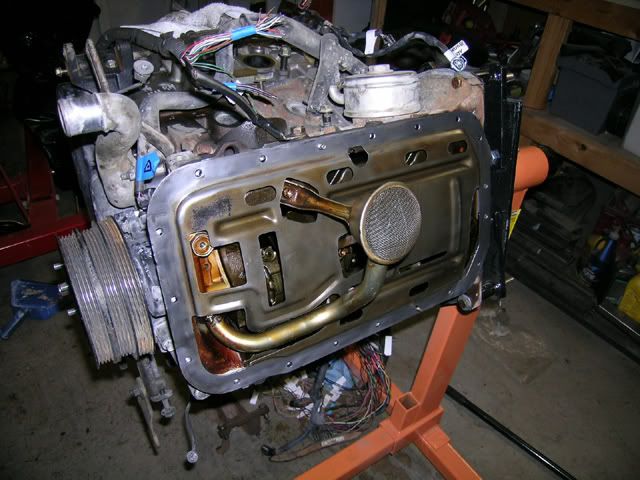
My block already had the factory "middle" dipstick hole with a plug in it, so I just knocked it out and installed the new Toyota dipstick guide. For the original dipstick hole in the front of the block, I tapped it to 10x1.5mm. Didn't even have to drill. Then RTV and screwed in a plug:
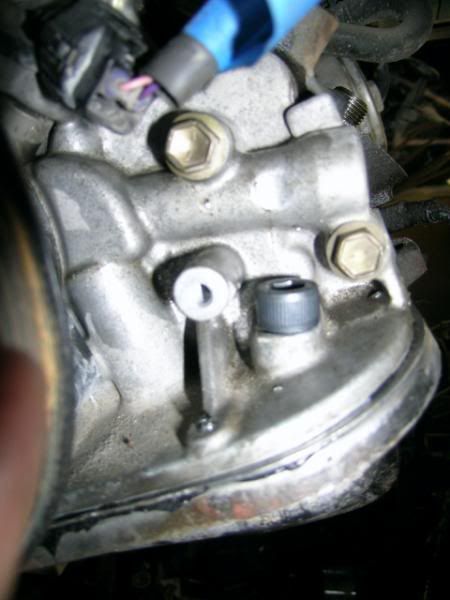
Then I installed the new dipstick tube and dipstick. Perfect fit.
Part numbers if anyone is interested:
Dipstick - Toyota 15301-62060
Dipstick Guide - Toyota 11452-62060
Union - Toyota 0405-10033
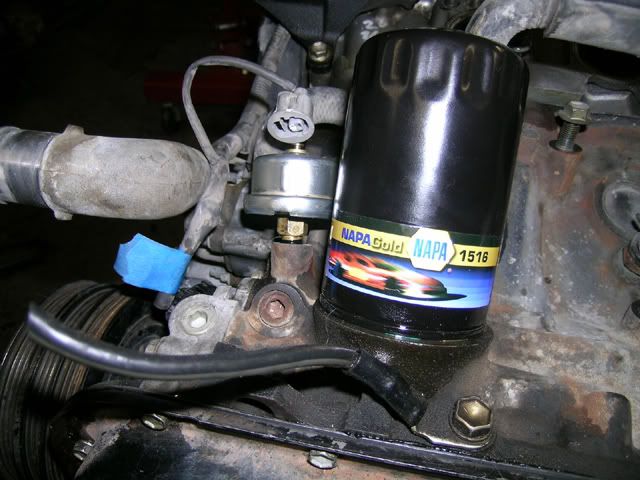
Also installed the 3.0 oil pressure sender. Still need to swap out the plug:
Physical difference between the two senders:
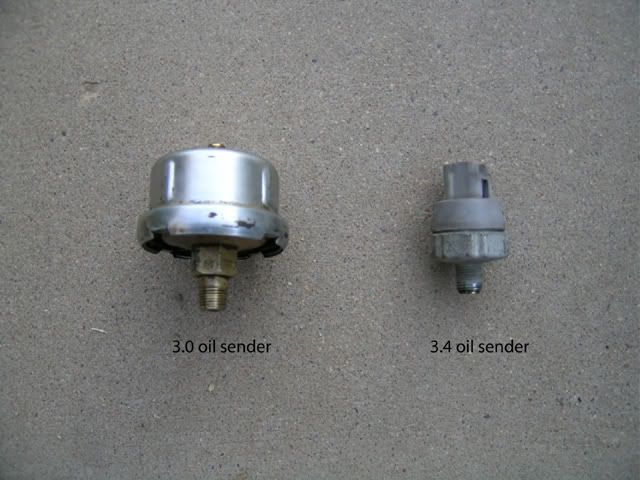
For sale: One 3.4 oil pressure sender.

My block already had the factory "middle" dipstick hole with a plug in it, so I just knocked it out and installed the new Toyota dipstick guide. For the original dipstick hole in the front of the block, I tapped it to 10x1.5mm. Didn't even have to drill. Then RTV and screwed in a plug:

Then I installed the new dipstick tube and dipstick. Perfect fit.
Part numbers if anyone is interested:
Dipstick - Toyota 15301-62060
Dipstick Guide - Toyota 11452-62060
Union - Toyota 0405-10033
Also installed the 3.0 oil pressure sender. Still need to swap out the plug:

Physical difference between the two senders:

For sale: One 3.4 oil pressure sender.

#42
Alternator
I wanted to retain my 3.0 alternator after the swap as it is an upgrade 150 AMP version. So, I started seeing what I would need to do.
Some pics of the physical differences between the two:
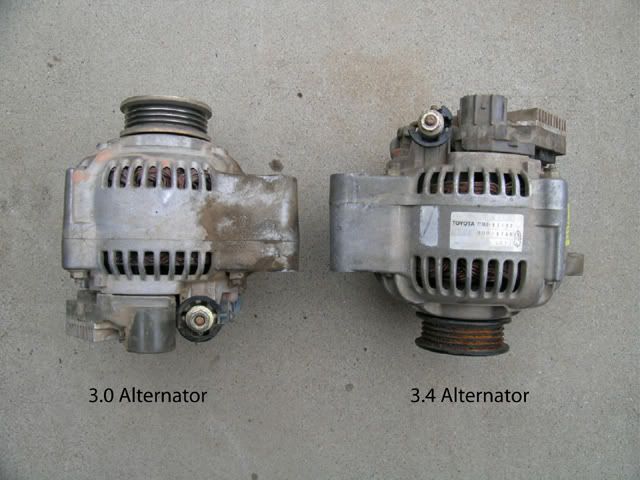
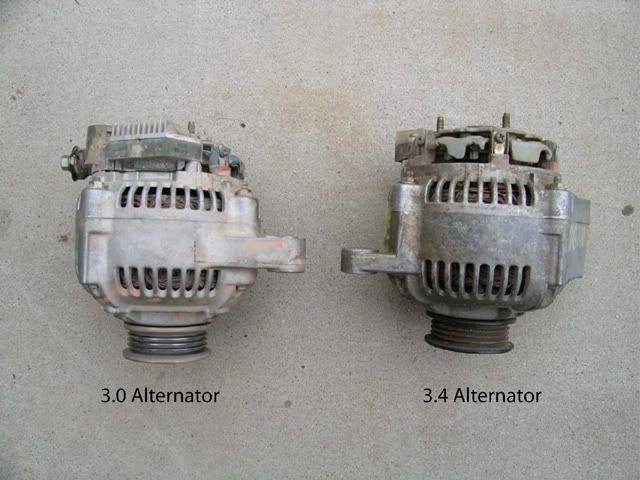
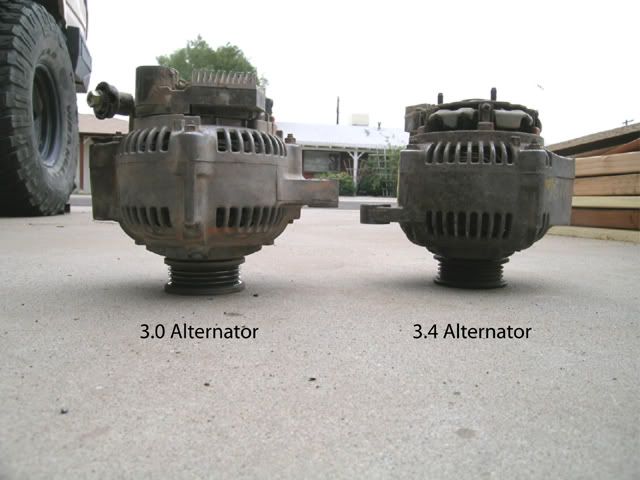
As you can see, they are very similar. Main ear is identical. Pulley is even the same size and grooves. Plugs are different, but I still have the 3.0 plug hanging off my firewall so that should make things easier.
The main problem is with the position of the lower ear. The 3.4 is thinner and closer to the pulley. This results in a difference in the brackets themselves:
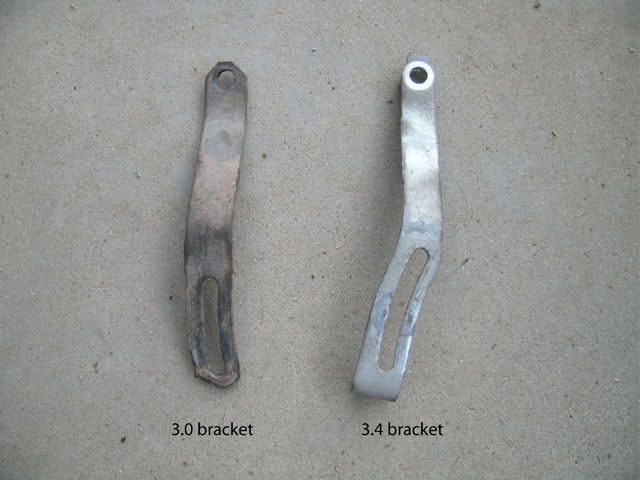
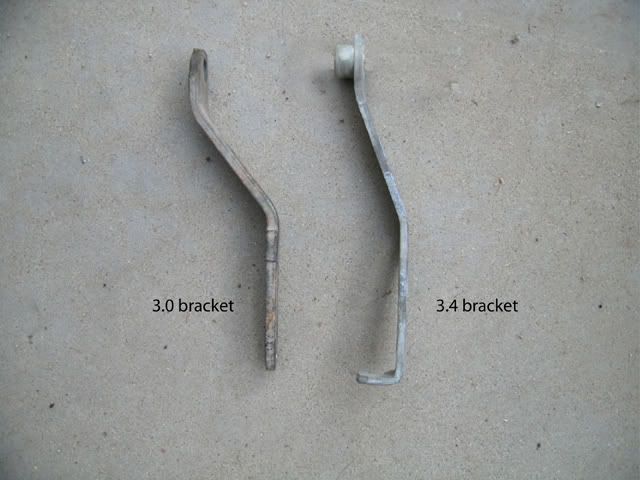
At first, I thought I would just use the 3.0 lower bracket on the 3.4 block, but there was a clearance issue with the coolant neck. So then I thought I would try and use the 3.0 neck on the 3.4:
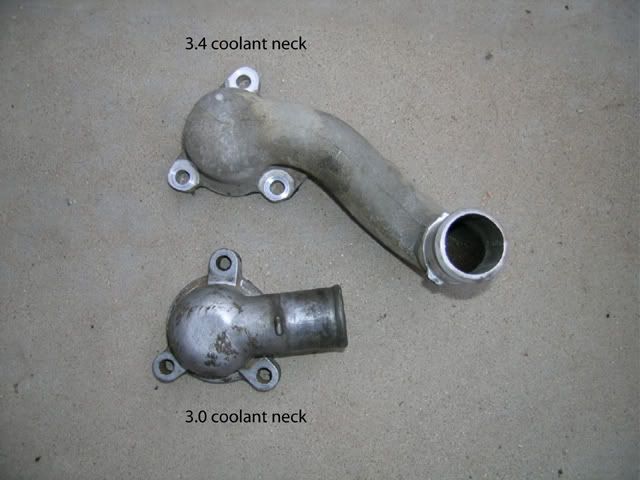
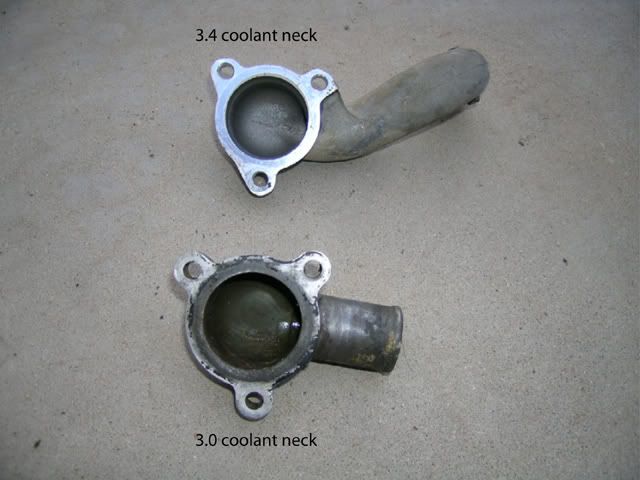
They actually are compatible. So I installed the 3.0 neck on the 3.4 but that really put the output at an odd angle. So, I retained the 3.4 neck on the 3.4, and went about seeing what would have to be done to use the 3.4 alternator bracket on the 3.0 alternator.
Turns out it's a pretty simple process. All I had to do was add 4 washers to the back of the bracket against the block. I then ground off 2mm or so off the lower 3.0 alt ear. The grinding wasn't really necessary, as the bracket could have flexed over to accommodate... but I figured why not. The bracket now bolts to the front of the 3.0 alt ear, instead of the back on the 3.4 alt.
I also ended up cutting off the bend for the 3.4 adjuster. I didn't have the threaded barrel part anyway, and the 3.0 had no such mechanism to apply belt tension:
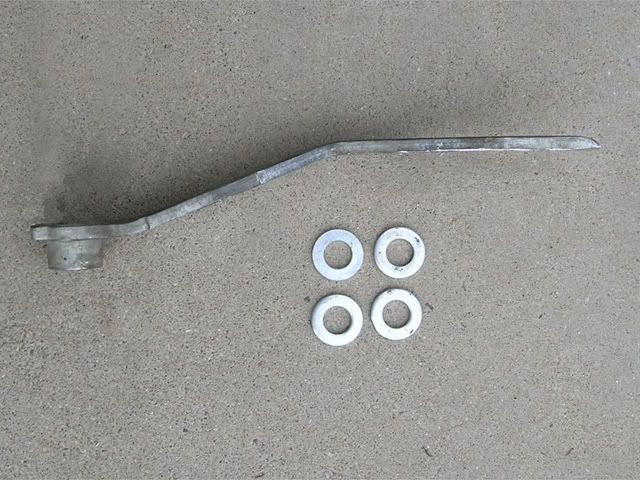
After that, the 3.0 alt fit on just fine:
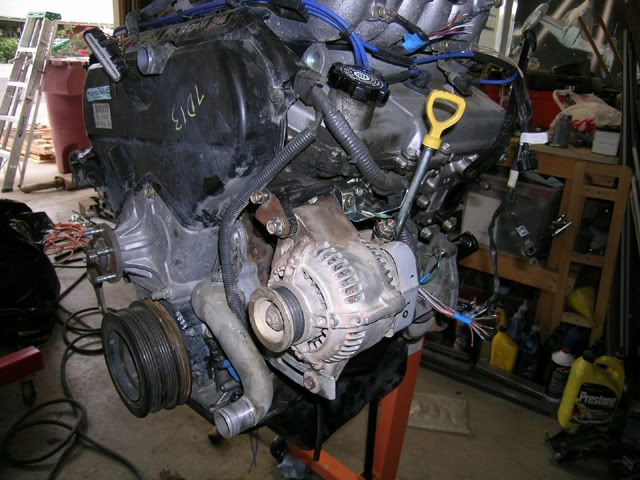
Some pics of the physical differences between the two:


As you can see, they are very similar. Main ear is identical. Pulley is even the same size and grooves. Plugs are different, but I still have the 3.0 plug hanging off my firewall so that should make things easier.
The main problem is with the position of the lower ear. The 3.4 is thinner and closer to the pulley. This results in a difference in the brackets themselves:


At first, I thought I would just use the 3.0 lower bracket on the 3.4 block, but there was a clearance issue with the coolant neck. So then I thought I would try and use the 3.0 neck on the 3.4:


They actually are compatible. So I installed the 3.0 neck on the 3.4 but that really put the output at an odd angle. So, I retained the 3.4 neck on the 3.4, and went about seeing what would have to be done to use the 3.4 alternator bracket on the 3.0 alternator.
Turns out it's a pretty simple process. All I had to do was add 4 washers to the back of the bracket against the block. I then ground off 2mm or so off the lower 3.0 alt ear. The grinding wasn't really necessary, as the bracket could have flexed over to accommodate... but I figured why not. The bracket now bolts to the front of the 3.0 alt ear, instead of the back on the 3.4 alt.
I also ended up cutting off the bend for the 3.4 adjuster. I didn't have the threaded barrel part anyway, and the 3.0 had no such mechanism to apply belt tension:

After that, the 3.0 alt fit on just fine:

Last edited by Elvota; 01-31-2008 at 11:45 AM.
The following users liked this post:
90SR5Truck (08-03-2020)
#43
EVAP Routing
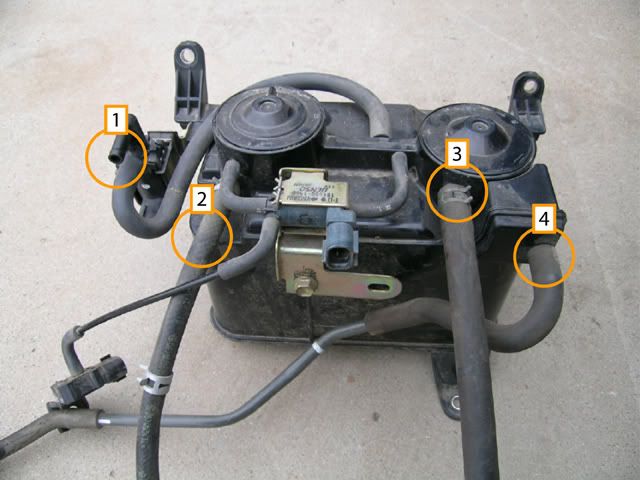
I am trying to figure out where all the lines go for my EVAP box. Anyone have any pictures or diagrams... or better yet happen to know where these lines need to be attached?
I think Number 4 goes back to the gas tank, but I have two line currently attached to my 3.0 EVAP assembly that seem to go back to the tank as well.
Input appreciated. I'll probably post this question in the 96-2002 4Runner section as well since it's a little buried here.
(https://www.yotatech.com/forums/f2/e.../#post50681878)
I think Number 4 goes back to the gas tank, but I have two line currently attached to my 3.0 EVAP assembly that seem to go back to the tank as well.

Input appreciated. I'll probably post this question in the 96-2002 4Runner section as well since it's a little buried here.
(https://www.yotatech.com/forums/f2/e.../#post50681878)
Last edited by Elvota; 12-03-2007 at 08:12 PM.
#44
Those high pressure hoses don't twist at all, so make sure the ends are clocked right. My suggestion would be to have them put on one end then screw it on and mark the hose where the other end needs to be. Then go back and have them install the other end.
Great pics and details BTW

Last edited by mt_goat; 11-29-2007 at 03:11 PM.
#45
#46
Thanks for the diagram as well. I almost have my head around wiring diagrams, and now I have to figure out vacuum line diagrams.

#47
This of course assumes I am doing everything correctly and my 4Runner will eventually run... or end up becoming a huge flower pot in the front yard.

#48
Sorry, I can't read that vac line diagram either.

#50
hey just so you know i think mt goat and i covered this earlier in his thread but i believe a 3.0 alternator after 92 should bolt to your 3.4 flanges and tensioner. I had the same problem but whent to a wrecking yard and pulled a 3.4 all ternator and a 93 3.0 and my original 89 3.0 and compared the 3. cant tell you for sure what the differnces are right now but pretty sure dale didnt have this trouble. i even used the 3.0 rad hose and thermostat housing.
one thing i would suggest you dont install the alt till after you put the engine in there is only about 1/4 inch between the steering shaft and the alt when its on and tight.
one thing i would suggest you dont install the alt till after you put the engine in there is only about 1/4 inch between the steering shaft and the alt when its on and tight.
#51
Also if i remember coretly you said you were going to be using headers? If you go with downey ones be sure to order them without the egr on it because it will interfer with your steering. I bought them knowing that but was given header with it so i cut it off and plugged it. Just so ya know

#52
#53
I believe a 3.0 alternator after 92 should bolt to your 3.4 flanges and tensioner. I had the same problem but went to a wrecking yard and pulled a 3.4 alternator and a 93 3.0 and my original 89 3.0 and compared the 3. Cant tell you for sure what the differences are right now but pretty sure dale didn't have this trouble.
That's a good point. I'll remove it before install. It's just there loosely to make sure if fit, so shouldn't be a problem. Thanks for the tip.
#54

Last edited by Elvota; 11-30-2007 at 08:17 PM.
#55
Fuel Line Redirect
Got a few things done today. Pretty much has been raining since noon... so couldn't get to the truck itself. Shouldn't' complain, I can remember Breknraj completing this swap under a tarp in 12 inches of snow. 
Started moving around the fuel lines from the PS to the DS. Just like Fallman had recommended, you can rotate the 3.4 supply line pretty easily. Just loosen the banjo bolt at the end of the fuel rail and give it a twirl.
Something like this:
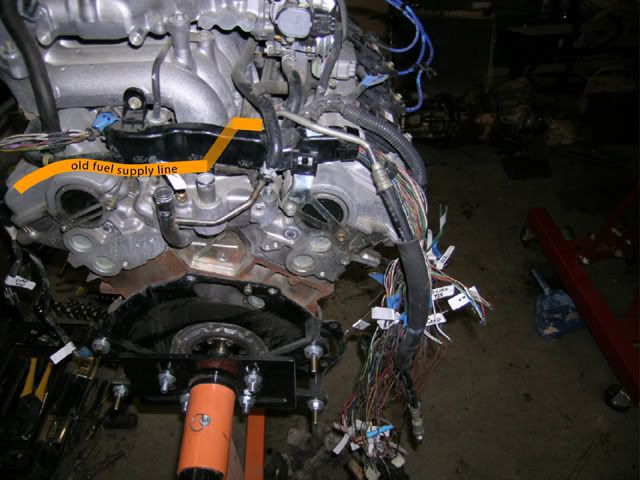
Of course, I don't have it in the truck yet... but it seems plenty long enough to reach the factory 3.0 hardline and the ends are compatible. No adapters or couplers should be required.
Also re-routed the return line.
Original position (rubber hose curved in foreground):
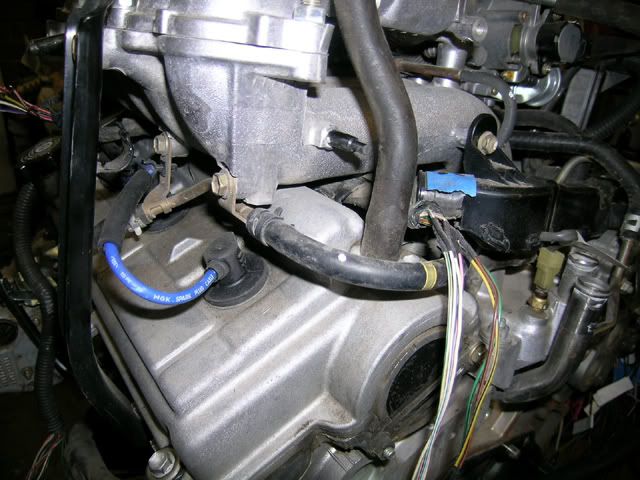
This took slightly more work, but was pretty straightforward. Just rotate the rubber U-bend and cut off one of the hardline brackets. The remaining bracket bolts perfectly to an existing hole in the intake. The bracket and hardline are pretty easy to tweak and get things where you need them.
End result:
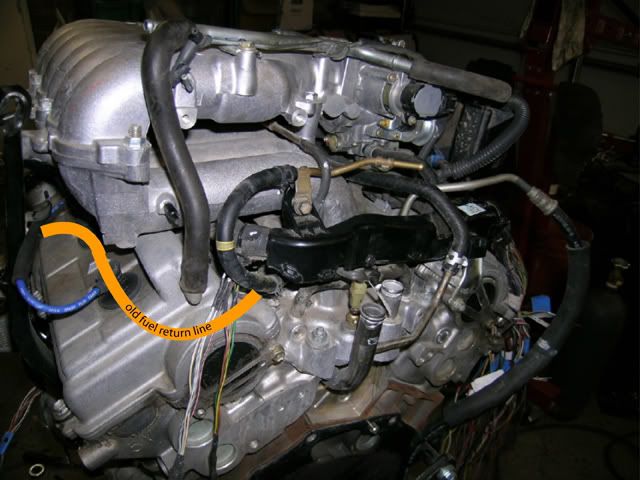
You can now see the return heading to the PS and ready to be connected. I'll just tie this one into the existing 3.0 return line as well with some extra fuel grade hose.

Started moving around the fuel lines from the PS to the DS. Just like Fallman had recommended, you can rotate the 3.4 supply line pretty easily. Just loosen the banjo bolt at the end of the fuel rail and give it a twirl.
Something like this:

Of course, I don't have it in the truck yet... but it seems plenty long enough to reach the factory 3.0 hardline and the ends are compatible. No adapters or couplers should be required.
Also re-routed the return line.
Original position (rubber hose curved in foreground):

This took slightly more work, but was pretty straightforward. Just rotate the rubber U-bend and cut off one of the hardline brackets. The remaining bracket bolts perfectly to an existing hole in the intake. The bracket and hardline are pretty easy to tweak and get things where you need them.
End result:

You can now see the return heading to the PS and ready to be connected. I'll just tie this one into the existing 3.0 return line as well with some extra fuel grade hose.
Last edited by Elvota; 12-07-2007 at 04:42 PM.
#56
Diagnosis Box Repair
My 3.4 donor had been hit pretty hard on the DS front fender, and that took the EVAP box as well as a few other items from that side of the engine. While I have found a new EVAP box and related components at another salvage yard, I had a crushed 3.4 diagnosis box to deal with.
My plan is to add a OBDII port inside, but figured this box will come in handy for timing and such... at least it was necessary on the 3.0.
Question: I have heard that an OBDII port is an OBDII port. Any truth to that? I need to find one at the salvage yard and thought I'd just look for one in any vehicle. Anyone know what years and up I should start looking? '96 and up maybe?
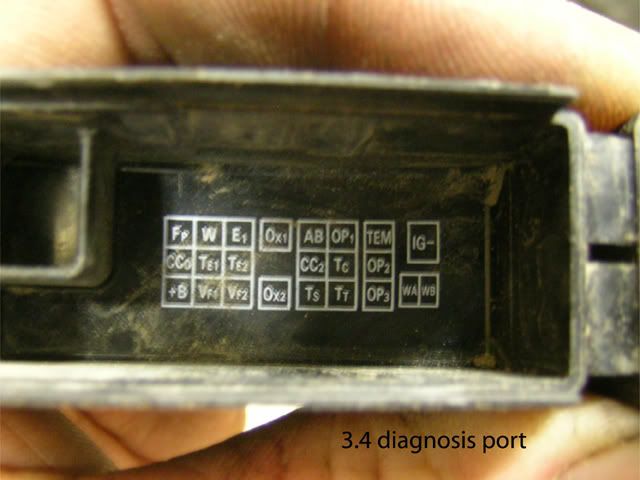
So, I took a closer look at the difference between the 3.0 box and the 3.4 box. Turns out they are pretty similiar, as most items involved with this swap.
The layout of the 3.4 box:
The layout of the 3.0 box:
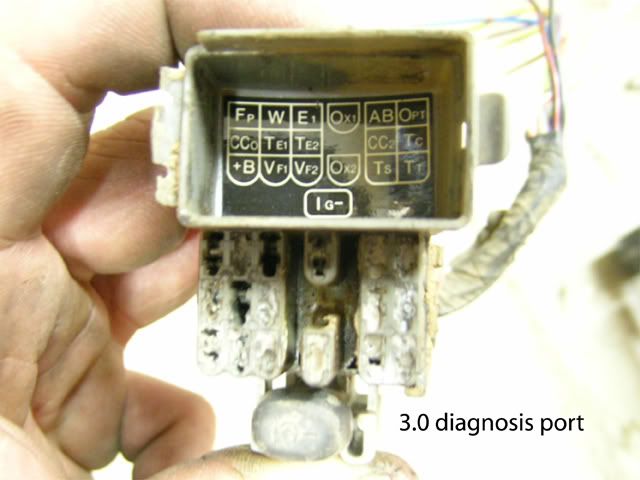
As one can sort of make out from the pics, the connections and basic layout between the two are almost identical. The 3.4 has a few more options, but very close.
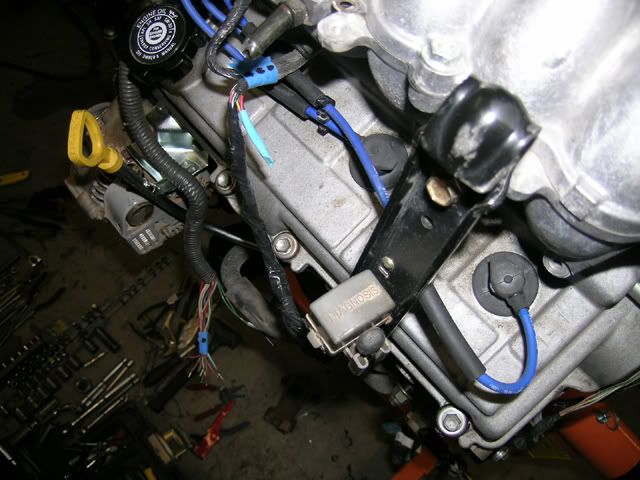
I transfered the B+, TE1, E1 and IG leads from the 3.4 harness to my almost undamaged 3.0 diagnosis box. I had a few 3.4 wires left, but didn't bother connecting them. I left them hanging instead and can join them later if I find it necessary to do so.
At least I have a usable box for now, with the connections accessible for timing and other procedures in the future. Plus the lid diagram is still correct :
:
Hopefully the rain will die down a bit and I can start working on relocating the battery. I plan to build my own tray, so we'll see how that works out.
My plan is to add a OBDII port inside, but figured this box will come in handy for timing and such... at least it was necessary on the 3.0.
Question: I have heard that an OBDII port is an OBDII port. Any truth to that? I need to find one at the salvage yard and thought I'd just look for one in any vehicle. Anyone know what years and up I should start looking? '96 and up maybe?
So, I took a closer look at the difference between the 3.0 box and the 3.4 box. Turns out they are pretty similiar, as most items involved with this swap.
The layout of the 3.4 box:

The layout of the 3.0 box:

As one can sort of make out from the pics, the connections and basic layout between the two are almost identical. The 3.4 has a few more options, but very close.
I transfered the B+, TE1, E1 and IG leads from the 3.4 harness to my almost undamaged 3.0 diagnosis box. I had a few 3.4 wires left, but didn't bother connecting them. I left them hanging instead and can join them later if I find it necessary to do so.
At least I have a usable box for now, with the connections accessible for timing and other procedures in the future. Plus the lid diagram is still correct
 :
:
Hopefully the rain will die down a bit and I can start working on relocating the battery. I plan to build my own tray, so we'll see how that works out.
Last edited by Elvota; 12-07-2007 at 04:44 PM.
#57
Ya i bought my headers from performance products and didnt get the right year without the egr. i did notice after the fact that they mention what come with and without it. I should have just called them yet performance products had a good deal on them at the time.
#58
the obdII is a plug you can buy. you can take it from any model but youll want the pins for it. I bought mine from a site i dont remember and it came with the female and 10 pins. it only takes 4 wires to connect and make work
#59
Thanks. I look around. Hadn't thought about going new for that part. I do know the connections I need from the 3.4 electronics, so I'll just have to put all that together now.
#60
a new one plus shipping cost me $11 so not too bad. i did have troubles with shipping cause of usps but that wasnt the companies fault. the site was www.carplugs.com they sell the plug and pins for the OBDII. as for the schematics which youll need for the exact year make model check out https://techinfo.toyota.com/ youll have to pay by day or month hell even year but in one day you can get tons and tons of info for everything imaginable for you and this swap. save and print it all


