
3.4 swap started
 07-27-2006, 05:09 AM
#101
Contributing Member
Thread Starter
3.4 swap with auto transmission started
This was the latest delay, designing and fabbing protection for the motor mounts:


I made one for each side, although the drivers side is the one under tension in forward gears, with dual cases, reverse has potental to rip a rubber mount apart too. (Pics were before I painted with truck bed spray, which should help deaden the chain rattle noises)
I decided to bolt down to the frame rather than welding it down to provide adjustment later. The adjustment seems very important to me with chaining down the mounts, I want some slack to allow the rubber to isolate vibrations, but not too much slack. With the new mounts provided by ORS I figure they will be settling in and squishing down over time. The old ones were squished down about 1/4 inch. The plate will be bolted down with grade 8 washers stacked under it, they can be removed later to tighten the chains or more added to provide more slack. Also the D-ring size can be changed for even more adjustment.
I'm also replacing the bolts from the motor mount bracket into the block. The stock 3.0 bolts were not quite long enough IMHO. Engineering basics say to provide at least 1 1/2 times the diameter of the bolt in thread depth. The stock bolts were just short of that safety factor. Probably fine for the stock 150 hp engine, but I'm going for double that hp. The 3.4 block is tapped for longer bolts, so I bought some longer ones.
By keeping a limit on engine movement I'm also keeping my fingers crossed that I can get away with just a one inch body lift and no hood scoop. I do plan on removing the hood insulation and cutting the hood bracing that's in the way. If not, I think I'll cut a hole in the hood before I add a taller BL.
Last edited by mt_goat; 02-02-2008 at 09:08 AM.
 07-27-2006, 12:16 PM
#102
Contributing Member
Thread Starter
While the crank pulley has easy access I did a little more welding to make a SST for holding the crank. I fabbed it up out of scrap steel and used some 3/8" grade 8 bolts with the heads cut off for the pins. 3/8" is a perfect fit for the crank. Tried it out already, 217 ft-lbs didn't budge the crank bolt.


Last edited by mt_goat; 02-02-2008 at 09:11 AM.
 08-07-2006, 05:12 PM
#105
Contributing Member
Thread Starter
Sorry haven't made the time to update much,
The exhaust cross-over got a coat of Very high temp paint:

And a wrapping of header wrap. EDIT 1/8/09: The wrap didn't seem to work out too good, see page 29. It appears ceramic coating may be a better way to go.

The new (hopefully leak free) Marlin V6 adapter coupler is on now:

And the Ultimate Crawler ready to go on:

The crawler is on:

The mechanical speedo sender has to be removed from the crawler to work with my 93 SR5 instrument cluster and the electronic speedo sender from my 3.0 will go in its place (according to Marlin):

The exhaust cross-over got a coat of Very high temp paint:
And a wrapping of header wrap. EDIT 1/8/09: The wrap didn't seem to work out too good, see page 29. It appears ceramic coating may be a better way to go.
The new (hopefully leak free) Marlin V6 adapter coupler is on now:
And the Ultimate Crawler ready to go on:
The crawler is on:
The mechanical speedo sender has to be removed from the crawler to work with my 93 SR5 instrument cluster and the electronic speedo sender from my 3.0 will go in its place (according to Marlin):
Last edited by mt_goat; 01-17-2009 at 07:44 AM.
08-07-2006, 07:13 PM
#107
Contributing Member
Thread Starter
Originally Posted by Elvota
It is just silly how nice your rig is going to be. 
What are your thoughts on header wrap holding in moisture on a trail rig? Any worries?
What are your thoughts on header wrap holding in moisture on a trail rig? Any worries?
Not too worried about moisture on a part that gets so hot. It will evaporate off by just running it a while after a soaking. The VHT paint was to protect from rusting too. Mike @ ORS recommends it for his cross-over and he's done a few of these already. I'm just following his advice.

Last edited by mt_goat; 08-07-2006 at 07:16 PM.

 08-08-2006, 05:16 AM
#111
Contributing Member
Thread Starter
Thanks guys!
Here you go TN: http://community.webshots.com/album/399172301OQQGRv
Next projects are sliders and a rear bumper so don't laugh at the chrome nurf bars please.
Here you go TN: http://community.webshots.com/album/399172301OQQGRv
Next projects are sliders and a rear bumper so don't laugh at the chrome nurf bars please.
Last edited by mt_goat; 08-08-2006 at 05:26 AM.
08-14-2006, 08:48 PM
#113
Registered User

Join Date: Aug 2006
Posts: 2
Likes: 0
Received 0 Likes
on
0 Posts
Very nice looking truck, I've got an 86' 2WD SR5 Turbo with a 1jz-gte in it, signed up because im looking for a 4Runner to put a 5vzfe in it and use it to tow my 86' to the track! Looks great!
08-15-2006, 05:15 AM
#114
Contributing Member
Thread Starter
Thanks guys, I dropped the engine in this weekend for some test fitting. The ORS exhaust crossover looks to fit great. The 5VZ air box is a tight fit but I'm going to make it work, the front of the box will be almost touching the windshield washer bottle and the intake of the box is almost touching the interfender. I marked the interfender for a little hole cutting job later, that will have it breathing from inside the fender like the Tacos do, minus the elbow.
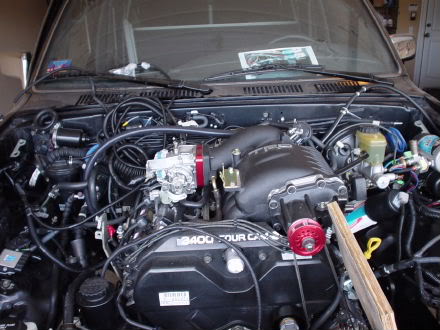
Last edited by mt_goat; 02-19-2010 at 07:09 AM.
08-15-2006, 08:10 AM
#115
Registered User
Join Date: Aug 2006
Posts: 2
Likes: 0
Received 0 Likes
on
0 Posts
That should give it quite a bit of pep, what kind of extra power are you expecting out of the supercharger? Like I said I'd like to do a 3.4L swap but I have a extra 7m-gte laying around so I'm just debating between the two. I'd love to hear what you think of the 3.4!
 08-15-2006, 09:36 AM
#117
Contributing Member
Thread Starter
Yeah Cebby I plan on removing the insulation and cutting the bracing under the hood. If that doesn't do it I'll be looking for that hood scoop. If I'm real close to fitting I may try a couple washers between the hood and hinges just to see what it looks like before I cut the hole. I will have a hard time cutting the hole because I've taken such good care of the paint job for 13 years. :cry:
08-15-2006, 09:42 AM
#118
Contributing Member
Thread Starter
Originally Posted by 1jznatruck
That should give it quite a bit of pep, what kind of extra power are you expecting out of the supercharger? Like I said I'd like to do a 3.4L swap but I have a extra 7m-gte laying around so I'm just debating between the two. I'd love to hear what you think of the 3.4!
 . Any updates ?
08-21-2006, 05:38 PM
. Any updates ?
08-21-2006, 05:38 PM
#120
Contributing Member
Thread Starter
Well since you ask Thomas, I got a few things done. The tranny is about ready to go in, just have a little more heat shielding to do on the tranny wiring harness, it goes right by the exhaust.
I got the 4crawler short throw shifter kit on:


So here it is ready to bolt up:

I found a shifter boot for the 2nd transfer case shifter at Pepboys that should work to keep the elements out of the cab:

Here is a test fit of the ECU, I was able to get one bracket to fit:

The URD FTC fit good behind the glove box, with a little trimming on the glove box:

Got some of the dash put back together:

I got the 4crawler short throw shifter kit on:
So here it is ready to bolt up:
I found a shifter boot for the 2nd transfer case shifter at Pepboys that should work to keep the elements out of the cab:
Here is a test fit of the ECU, I was able to get one bracket to fit:
The URD FTC fit good behind the glove box, with a little trimming on the glove box:
Got some of the dash put back together:
Last edited by mt_goat; 02-02-2008 at 09:23 AM.


