
3.4 swap started
 09-22-2006, 08:55 AM
#181
Contributing Member
Join Date: Oct 2005
Location: Smoky San Diego
Posts: 2,346
Likes: 0
Received 0 Likes
on
0 Posts
What transmission pan do you have on yours, Dale? Are you worried about the angle of your shifter linkage seeing as yours goes kinda like this:
vvvvvvvvvvv|
vvvvvvvvvvv|
------------o
Whereas the angle in a vehicle that actually came with a A340H tranny goes more like:
vvvvvvvvvvvvvvvvv/
vvvvvvvvvvvvvvvv/
----------------o
vvvvvvvvvvv|
vvvvvvvvvvv|
------------o
Whereas the angle in a vehicle that actually came with a A340H tranny goes more like:
vvvvvvvvvvvvvvvvv/
vvvvvvvvvvvvvvvv/
----------------o
Last edited by Tanto; 09-22-2006 at 08:57 AM.
 09-22-2006, 09:56 AM
#182
Registered User
Lookin good MT goat.
Ive done the 3.4 supercharger swap and have only had one small problem. The boost port fitting on the back of the charger is a straight MPT fitting. I would recomend using a 90 degree fitting before you put your charger on ( lot easier to access).
Here is why in the 2nd gen Runner our heater controls really get in the way of the 3.4 swap (2" body lift on mine). The boost port fitting rubs on the hot water lines, at least in mine I had this problem. Actualy ripped some air lines easy fix though.
I cant wait to see your truck and some engine pics.
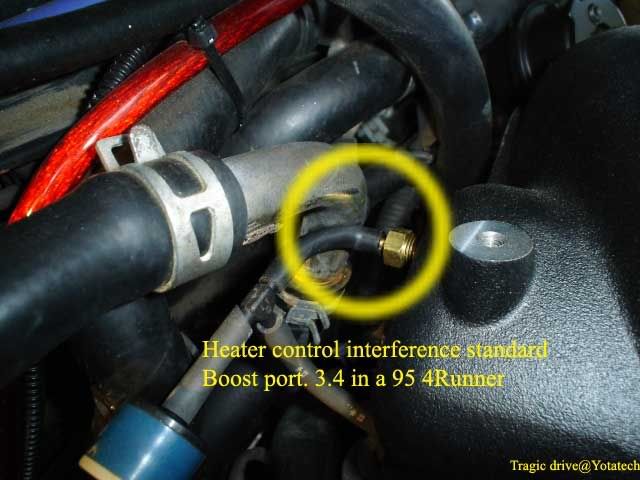
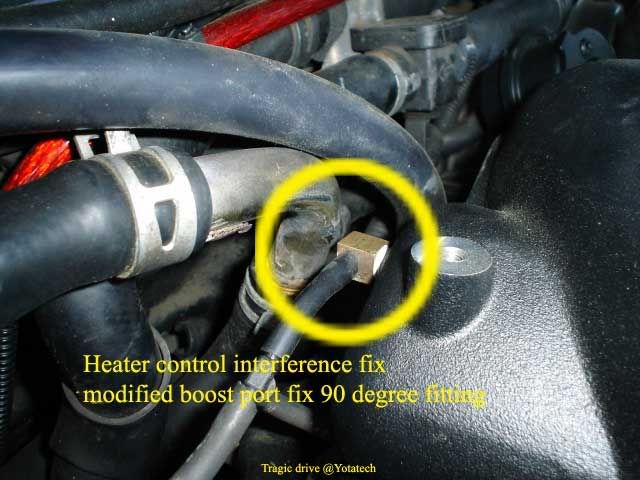
ARRRRRR!!!! WHO DIDNT LOOM THE 4GA!?!? DEATH TO THE NON LOOMERS! jk LOL
 09-22-2006, 10:05 AM
#183
Contributing Member
Thread Starter
What transmission pan do you have on yours, Dale? Are you worried about the angle of your shifter linkage seeing as yours goes kinda like this:
vvvvvvvvvvv|
vvvvvvvvvvv|
------------o
Whereas the angle in a vehicle that actually came with a A340H tranny goes more like:
vvvvvvvvvvvvvvvvv/
vvvvvvvvvvvvvvvv/
----------------o
vvvvvvvvvvv|
vvvvvvvvvvv|
------------o
Whereas the angle in a vehicle that actually came with a A340H tranny goes more like:
vvvvvvvvvvvvvvvvv/
vvvvvvvvvvvvvvvv/
----------------o
09-22-2006, 10:08 AM
#184
Contributing Member
Thread Starter
09-22-2006, 02:34 PM
#186
Registered User
Join Date: Jul 2006
Posts: 268
Likes: 0
Received 0 Likes
on
0 Posts
Hey, nice work on the o2 bungs, now you gonna make me a couple of the also  ..... I started on the conversion harness for mine yesterday, just about got that harness finished up, cant wait to get started on the engine swap!!
..... I started on the conversion harness for mine yesterday, just about got that harness finished up, cant wait to get started on the engine swap!!
09-22-2006, 03:15 PM
#187
Registered User
 trdtoy made some stainless bungs up! he's selling em' for 5 bucks each! i found them in the buy n sell on customtacos (i bought one for my exhaust)....
09-22-2006, 03:20 PM
trdtoy made some stainless bungs up! he's selling em' for 5 bucks each! i found them in the buy n sell on customtacos (i bought one for my exhaust)....
09-22-2006, 03:20 PM
#188
Contributing Member
Join Date: Oct 2005
Location: Smoky San Diego
Posts: 2,346
Likes: 0
Received 0 Likes
on
0 Posts
Then again, you could still be playing with the ideal height of the shifter FAIK.
09-22-2006, 03:21 PM
#189
Contributing Member
Thread Starter

Last edited by mt_goat; 09-22-2006 at 03:32 PM.
09-22-2006, 03:24 PM
#190
Contributing Member
Thread Starter
Last edited by mt_goat; 09-23-2006 at 07:42 AM.
09-22-2006, 03:30 PM
#191
Contributing Member
Thread Starter
Yeah, your pan looks like it would hold about another quart over the OEM one. I noticed it because the OEM one is pretty much a box with an open top. Yes, I'm talking about the angle in park solely as a reference point and it's in relation to where you've got your shifter.
Then again, you could still be playing with the ideal height of the shifter FAIK.
Then again, you could still be playing with the ideal height of the shifter FAIK.
The shifter works fine, it moves from park to low without hitting anything.
09-22-2006, 03:43 PM
#192
Contributing Member
Join Date: Oct 2005
Location: Smoky San Diego
Posts: 2,346
Likes: 0
Received 0 Likes
on
0 Posts
It very well could be that the pan needed to be changed to account for your front driveshaft being on the passenger side. Glad to hear you don't have any issues with the shifter linkage setup like that 
09-23-2006, 03:52 PM
#193
Contributing Member
the wire goes thru the body. Why would I need a housing over it when its not rubbing on anything and is fused at the battery ?
Mt Goat, Your o2 bungs look great I had this same problem last November when I was doing my exhaust and came up with the same solution. You might want to double nut the threads even if you are using stainless steel bolts. My pics and solution are at the end of this thread. https://www.yotatech.com/forums/f2/q-those-who-have-done-3-4l-swap-68154/
09-23-2006, 07:11 PM
#194
Registered User
 Every run of 1/0 in my truck is loomed and I wouldnt have it any other way! It's also generally considered good installation technique, even if not necessary.
[/thread hijack]
Last edited by Bumpin' Yota; 09-23-2006 at 07:13 PM.
09-29-2006, 01:55 AM
#195
Contributing Member
Thread Starter
The turtle knobs are on!

Had to make 2 dogleg shifters to fit up in the right places in the console though, PITA.

So here's my dogleg shifter tricks. I started with that same piece of 3/8" thick steel angle iron. (I'm getting my $4 worth out of this piece of scrap)

And drilled 1/2" holes to fit the shifter shaft through:

This hole needed to be drilled at an angle to get the shifter in the right spot. I used uneven parallel bars to support the piece on the drilling table.

Here's where I cut the shifters in half:

Some test fitting before welding to get the angles perfect:

Assembled and welded up:

I also tack welded the shifter extension set screws in place so they can't ever back out on me and fall into the gear box:
Edit: I later found out that I ruined the rubber isolator in the shifter with the heat from welding and had to remove a lot of the rubber and fill the void with silicone RTV. It seems to be working fine with the RTV, just takes a while to dry and harden in the center.
Some wiring had to be done for the auto shift lock control, OD button and lights. The ORS instructions covered 4 of the wires and I had to call Mike about what to do the other 5 wires. He doesn't do many auto conversions so he had to look at the EWDs and call me back the next day with the rest of the wiring instructions.

I used the plugs from the 3.0 and the shift lock control from the 3.4, but I moved the shift lock control mounting bracket a lttle so the 3.0 ECT power button would fit into place on the console.

The 3.0 ECT power button from my old console fit into the new console perfect without modification. Just to review (from page 1) this new console was ordered from the dealer, it is for a 1989-1995 4cyl 4WD AT Truck with gray interior (part #58802-35031-BO). I think the BO part of that number is the color code. The parts guy said there are not many more of these consoles available. It comes with the leather boot but I ordered a second boot for my extra TC shifter.

The 2nd leather boot was shaped wrong for the place I wanted to put it, so I bent the wire into the shape needed:

And this is the spot the 2nd shifter is going:

And how the boot fits now:

So putting it all together, the rubber boot slides onto the shifter (with the help of some soapy water):

And the t-case shifters go into place:

The 3.4 auto shifter seals the front floor hole with modifcation and the rubber boot I bought at Pepboys seals the rear shifter hole:

The back part of my old console mates up to the new front part perfect without modifcation. I just need to spill some cokes, Sonic burgers, and tater tots on the new part so it matches the old part better:


Had to make 2 dogleg shifters to fit up in the right places in the console though, PITA.
So here's my dogleg shifter tricks. I started with that same piece of 3/8" thick steel angle iron. (I'm getting my $4 worth out of this piece of scrap)
And drilled 1/2" holes to fit the shifter shaft through:
This hole needed to be drilled at an angle to get the shifter in the right spot. I used uneven parallel bars to support the piece on the drilling table.
Here's where I cut the shifters in half:
Some test fitting before welding to get the angles perfect:
Assembled and welded up:
I also tack welded the shifter extension set screws in place so they can't ever back out on me and fall into the gear box:
Edit: I later found out that I ruined the rubber isolator in the shifter with the heat from welding and had to remove a lot of the rubber and fill the void with silicone RTV. It seems to be working fine with the RTV, just takes a while to dry and harden in the center.
Some wiring had to be done for the auto shift lock control, OD button and lights. The ORS instructions covered 4 of the wires and I had to call Mike about what to do the other 5 wires. He doesn't do many auto conversions so he had to look at the EWDs and call me back the next day with the rest of the wiring instructions.
I used the plugs from the 3.0 and the shift lock control from the 3.4, but I moved the shift lock control mounting bracket a lttle so the 3.0 ECT power button would fit into place on the console.
The 3.0 ECT power button from my old console fit into the new console perfect without modification. Just to review (from page 1) this new console was ordered from the dealer, it is for a 1989-1995 4cyl 4WD AT Truck with gray interior (part #58802-35031-BO). I think the BO part of that number is the color code. The parts guy said there are not many more of these consoles available. It comes with the leather boot but I ordered a second boot for my extra TC shifter.
The 2nd leather boot was shaped wrong for the place I wanted to put it, so I bent the wire into the shape needed:
And this is the spot the 2nd shifter is going:
And how the boot fits now:
So putting it all together, the rubber boot slides onto the shifter (with the help of some soapy water):
And the t-case shifters go into place:
The 3.4 auto shifter seals the front floor hole with modifcation and the rubber boot I bought at Pepboys seals the rear shifter hole:
The back part of my old console mates up to the new front part perfect without modifcation. I just need to spill some cokes, Sonic burgers, and tater tots on the new part so it matches the old part better:
Last edited by mt_goat; 02-02-2008 at 02:21 PM.
09-29-2006, 04:12 AM
#196
Registered User
Join Date: Dec 2002
Location: Idaho
Posts: 4,655
Likes: 0
Received 0 Likes
on
0 Posts
Looks sweet, this is exactly how I would have done my swap had I not sold the 3.4 I bought....
Why didn't you go with twin stick on the rear? is it due to the dogleg?
Why didn't you go with twin stick on the rear? is it due to the dogleg?
09-29-2006, 04:56 AM
#197
Contributing Member
Thread Starter
I don't think you need it with dual cases do you? If you want to go to 2WD low range I think you just leave the rear case in 2WD and put the front case in low range. The front case is just low or high.
09-29-2006, 06:56 AM
#199
Contributing Member
Thread Starter


