Corax's 1UZ VVTi 4runner swap
 09-29-2019, 09:56 AM
#1
Registered User
Thread Starter
Corax's 1UZ VVTi 4runner swap
copy/paste of my recent engine swap thread because . . . why not, we need more V8 1st gens and Pickups. I'm getting about 15mpg city and 17 mpg highway and having 300hp on tap has made my 4runner fun enough that I'm finally going long travel
After 12 years of running a 7MGE swap in my 1st gen 4runner, it's time for a change. The 7M is a great engine and has never let me down - not a single head gasket issue after putting ARP head bolts in it and has towed my trailer from coast to coast several times. But, it does lack a bit of giddy-up when towing my racecar or when flat-towing rally cars off stage. This swap has been done several times in different configurations, so this isn't anything new or ground-breaking, just a collection of what I find (hopefully) works.
tip of the hat to Cebby's swap thread
My 4runner originally had a 22RE in it, so here are some numbers to compare
22RE, 2.4L, 112 HP@4600, 142 lb�ft@3400, iron block/alum head, weighs ~320 lbs
7M-GE, 3.0L, 199 HP@6000, 188 lb�ft@3600, iron block/alum head, weighs ~460 lbs
1UZ non-VVTi (89-97), 256 HP@5400, 260 lb�ft@4400, alum block/alum heads, weighs ~360 lbs
1UZ VVTi (98-99), 300hp@6000, 310 lb�ft@4000, alum block/alum heads, weighs ~360 lbs
2UZ VVTi, 230-270HP@4800, 315 lb�ft@3400, iron block/alum heads, weighs ~540 lbs
3UZ VVTi, 300HP@5600, 325 lb�ft@3400, alum block/alum heads, weighs ~385 lbs
A lot of info on the engine can be found HERE or elsewhere in the Lextreme forums
This engine was voted to the Ward's 10 Best Engines list for 1998 through 2000 and is based on Toyota’s CART/IRL race engine.
I've been researching this swap for several months, and recently started collecting parts. the 1UZ never came with a manual trans behind it. Inchworm makes an adapter to bolt a gear drive transfer case to the back of the original auto trans (http://www.lowrangeoffroad.com/toyot...hwormgear.html), but I wanted to keep the truck manual.
Manual trans adapters are available for a variety of different manufacturer transmissions. Since this is going into a Toyota, I only have to worry about deciding between the W or R series transmission. With correct differential gearing and sensible driving habits, the W trans should be able to hold 300hp in a truck somewhat reliably - keeping the W trans would make a non-VVTi swap easier. I plan on using the VVTi version of the 1UZ which will be right on the edge of reliability for the W trans, so I opted to use the R150f instead. This is the transmission found behind the V6 4runners and pickups and has been known to hold up to 400 ft/lbs of torque reliably. The transfer case is chain driven with a planetary reduction instead of the gear drive reduction unit behind the W trans - as long as you're not planning on severe duty/abuse, there is nothing wrong with the chain drive transfer case, besides, it's also geared lower (you can always get an adapter to mount the gear drive transfer behind the R trans if you want more low range gearing options).
Here are some more numbers:
Gear ratios: 1st - 2nd - 3rd - 4th - 5th - Rev
W56: 3.954:1 - 2.141:1 - 1.384:1 - 1.00:1 - 0.85:1 - 4.091:1
R150F: 3.830:1 - 2.062:1 - 1.436:1 - 1.00:1 - 0.838:1 - 4.22:1
Transfer case low range ratio:
Gear drive 21 spline RF1A: 2.28:1
Chain drive/planetary 23 spline VF1A : 2.57:1
There are 2 different adapter kits for the R150f -- pre- and post-'96. Pre-'96 the input shaft length is about 6.25" from the face of the input bearing retainer, after that it changed to about 7.5". The R150f used a cable driven speedometer up to '93ish, afterwards it changed to an electronic speedo (good to know if you plan on keeping the stock cluster). In '96 they also went to multi-cone synchros for 2nd and 3rd gears for better shifting, as well as a synchronized reverse gear to prevent grinding the idler gear when shifting to reverse.
There are adapter bell housings available to keep the clutch slave external, but I've heard they can be poor quality and require more work (for example, you have to mill the clutch slave boss to the height you want and then drill/tap the bolt holes, many of those kits include a flywheel but you need to cut the ring gear off the flexplate and weld it onto the supplied flywheel). Some kits also come with 3VZ or 3SGTE (MR2 turbo) flywheels which have had their bolt holes elongated to match the 1UZ bolt pattern - originally, I thought that was inviting balance problems, but then I realized that the flywheel is kept concentric with the crank via a centerbore, so shouldn't be an issue (though I think some of them may require you to use the thin flexplate spacer between the flywheel and crank).
Xcessive Manufacturing offers some products for the 1UZ swap, but nothing specifically for Toyota trucks
Northwest Toys has a number of products specifically for Toyota truck swaps
For the manual trans adapter, I'm planning on using the kit from http://www.1uzfeswapkit.com/ (link now redirects to XAT Racing). It's a bit pricey (about as much as a JDM 1UZ complete), but comes with everything I should need - adapter plate, flywheel & flywheel bolts, hydraulic release bearing, hoses, pilot bearing. The 1uzfeswapkit flywheel allows the use of a clutch and pressure plate from either a '90 4runner or '94 Turbo MR2 (both use a 9.25" diameter clutch disc), so plenty of options are available. I think I'll be using a Spec Clutch Stage 2+ (rated to 450 ft/lbs) or Stage 3+ pressure plate and disc (rated to 500 ft/lbs), which will hopefully, keep nice street manners.
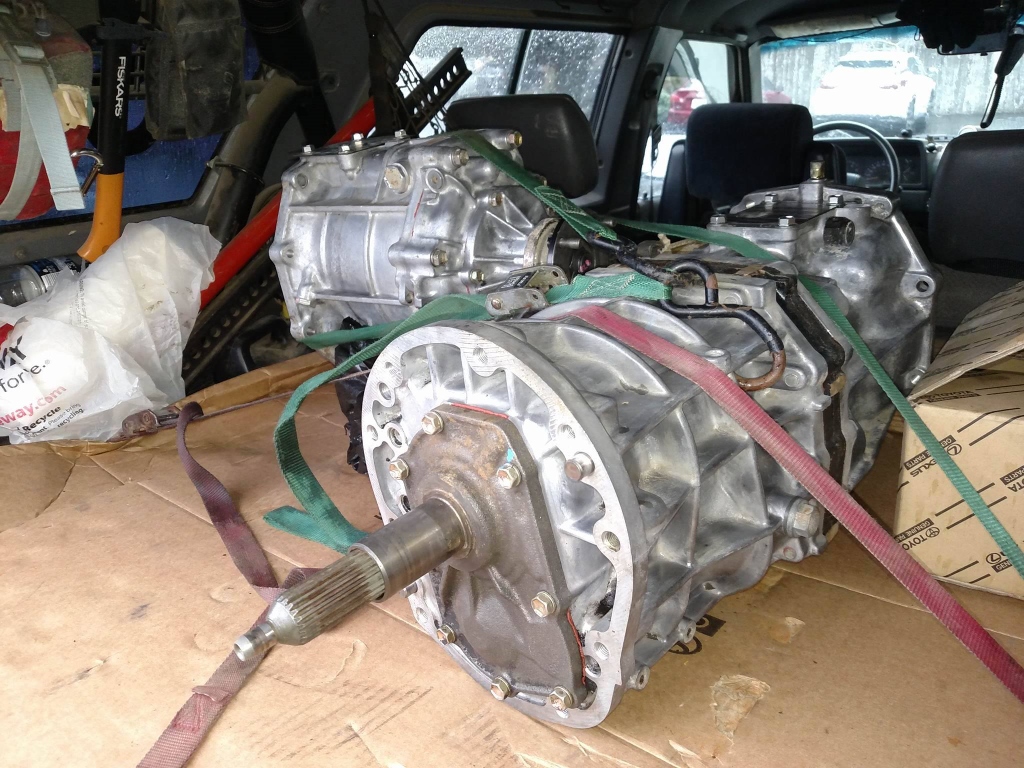
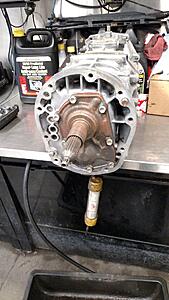
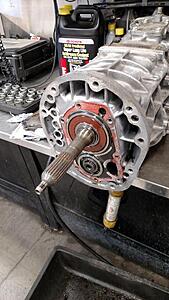
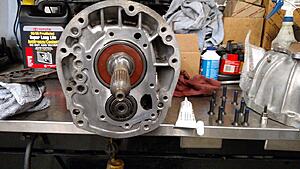
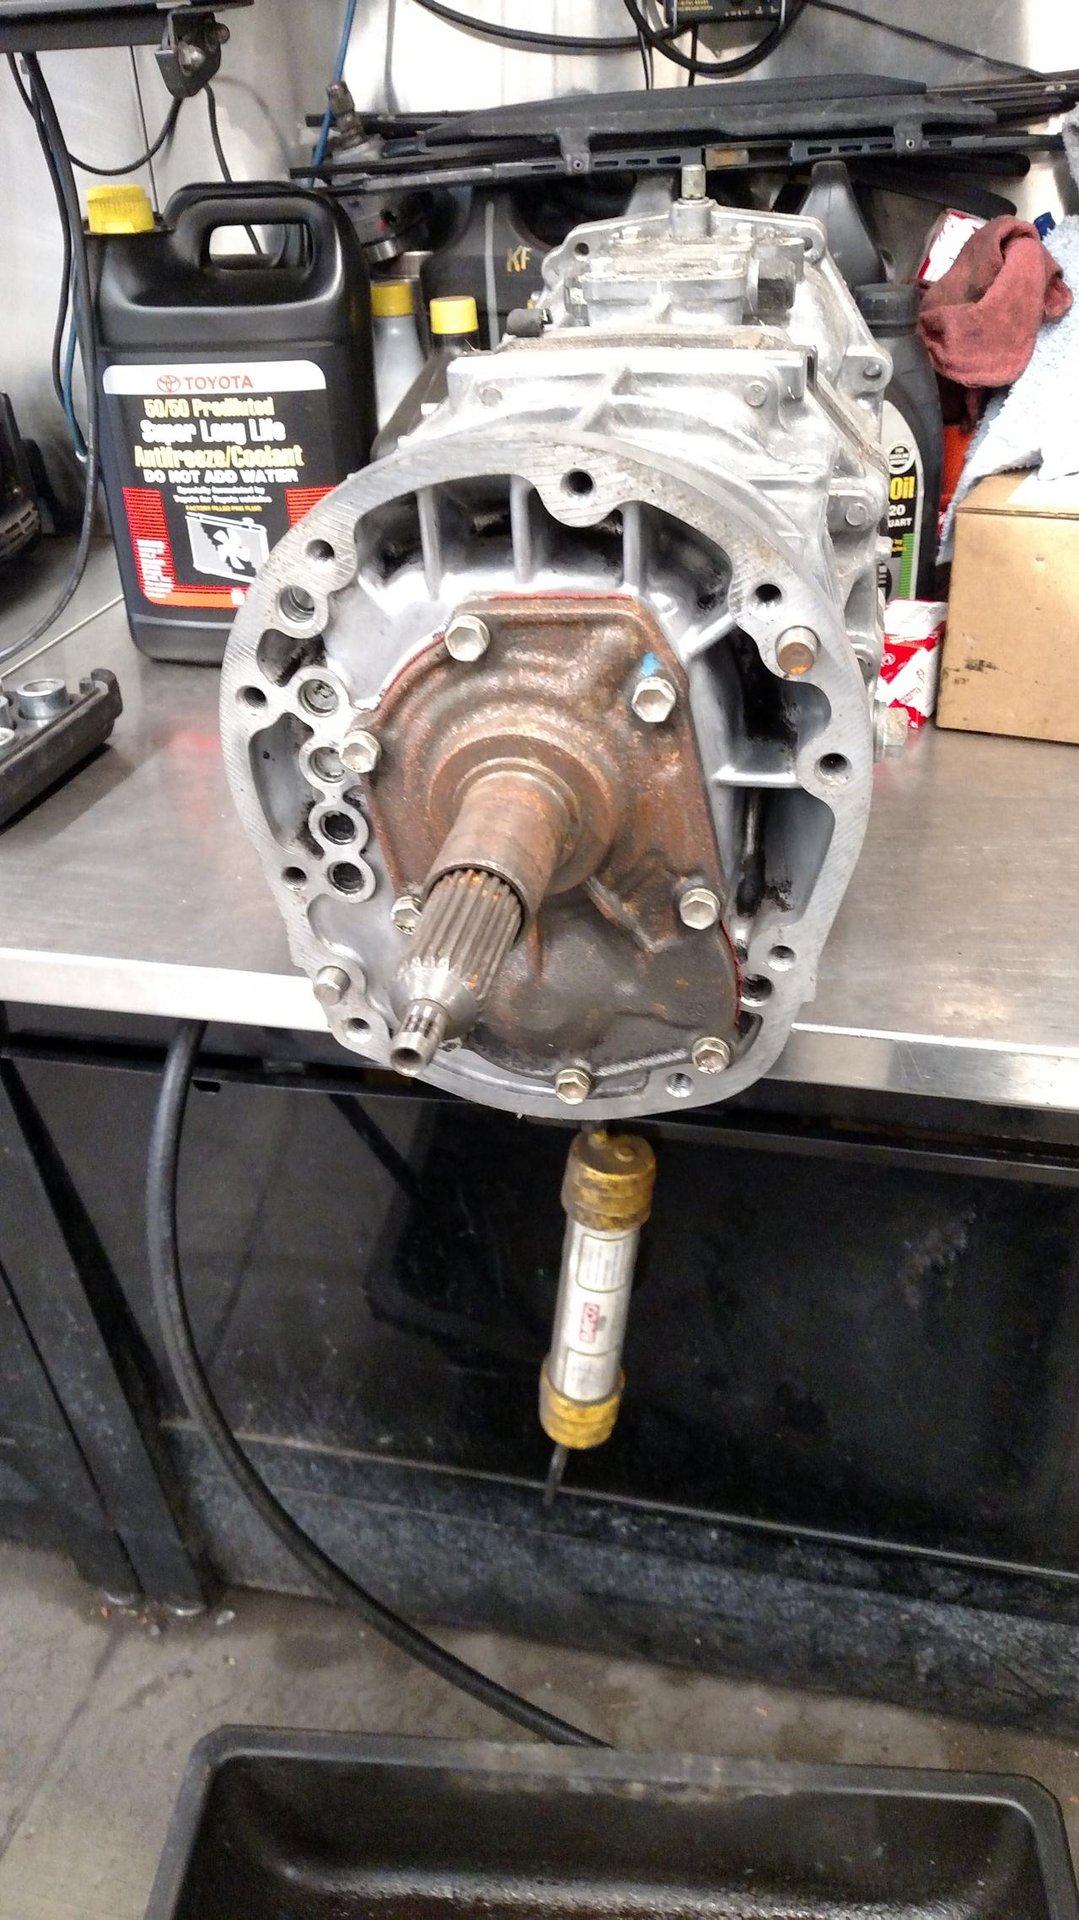
Here's the R150f I found on CL for $100. I bought it from a guy who does does a fair number of Toyota part-outs and offroad builds, he has a garage and a reputation to maintain, so I'm satisfied with a hand-shake guarantee that there's nothing wrong with it
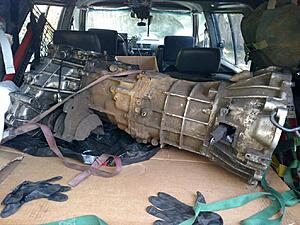
after some time in the hot tank at work (the input shaft bearing retainer still needs to be modified for the hydraulic clutch release bearing)

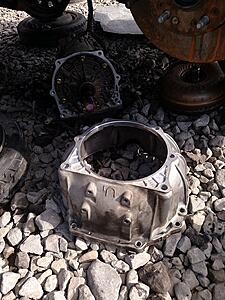
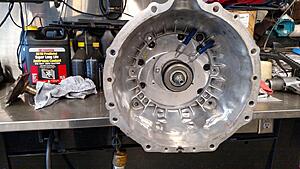
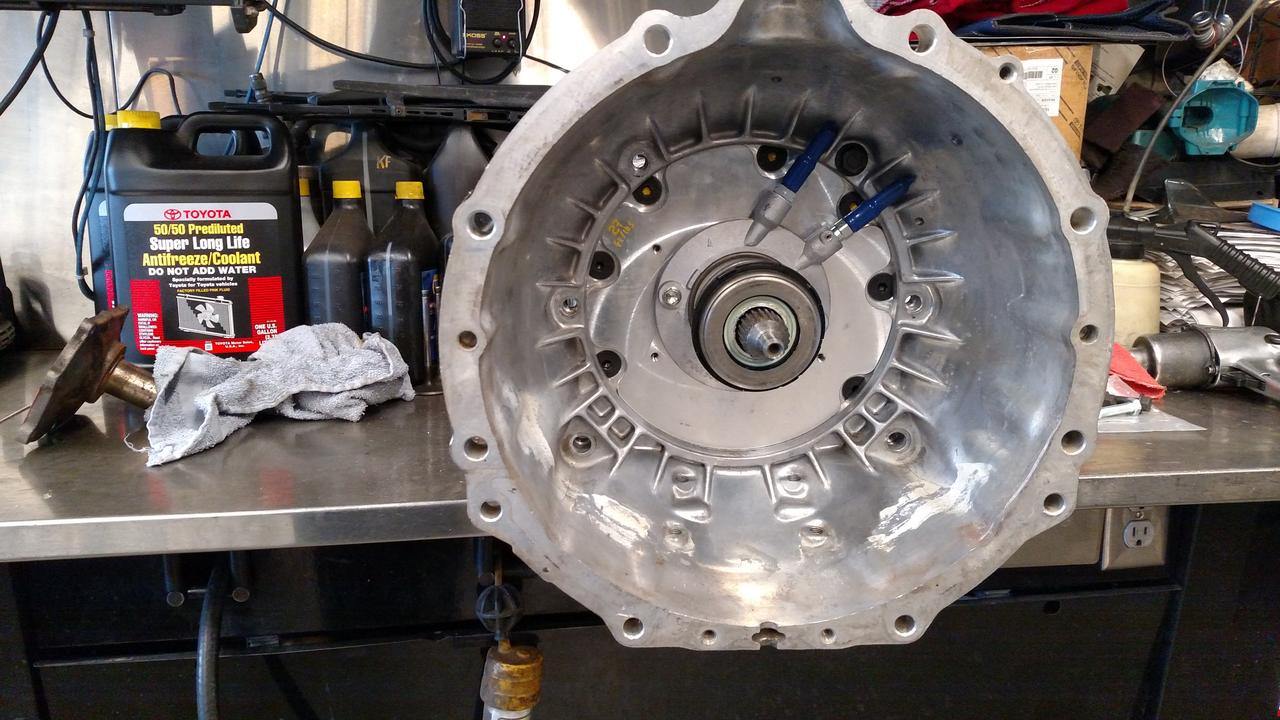
At one of the local PickNPull junkyards, I dropped the trans out of an LS400 so I could snag the bell housing. Many of the 1UZ's on ebay come with a transmission (which could be sold off if you only want it for the bell housing), but a few hundred can be saved buying the engine by itself. Note the “U1” cast into the bellhousing, supposedly, there is also a U2 cast but you are not likely to see it in this country – the U2 cast has a slightly different offset and may not work with existing manual trans adapters.
After 12 years of running a 7MGE swap in my 1st gen 4runner, it's time for a change. The 7M is a great engine and has never let me down - not a single head gasket issue after putting ARP head bolts in it and has towed my trailer from coast to coast several times. But, it does lack a bit of giddy-up when towing my racecar or when flat-towing rally cars off stage. This swap has been done several times in different configurations, so this isn't anything new or ground-breaking, just a collection of what I find (hopefully) works.
tip of the hat to Cebby's swap thread
My 4runner originally had a 22RE in it, so here are some numbers to compare
22RE, 2.4L, 112 HP@4600, 142 lb�ft@3400, iron block/alum head, weighs ~320 lbs
7M-GE, 3.0L, 199 HP@6000, 188 lb�ft@3600, iron block/alum head, weighs ~460 lbs
1UZ non-VVTi (89-97), 256 HP@5400, 260 lb�ft@4400, alum block/alum heads, weighs ~360 lbs
1UZ VVTi (98-99), 300hp@6000, 310 lb�ft@4000, alum block/alum heads, weighs ~360 lbs
2UZ VVTi, 230-270HP@4800, 315 lb�ft@3400, iron block/alum heads, weighs ~540 lbs
3UZ VVTi, 300HP@5600, 325 lb�ft@3400, alum block/alum heads, weighs ~385 lbs
A lot of info on the engine can be found HERE or elsewhere in the Lextreme forums
This engine was voted to the Ward's 10 Best Engines list for 1998 through 2000 and is based on Toyota’s CART/IRL race engine.
I've been researching this swap for several months, and recently started collecting parts. the 1UZ never came with a manual trans behind it. Inchworm makes an adapter to bolt a gear drive transfer case to the back of the original auto trans (http://www.lowrangeoffroad.com/toyot...hwormgear.html), but I wanted to keep the truck manual.
Manual trans adapters are available for a variety of different manufacturer transmissions. Since this is going into a Toyota, I only have to worry about deciding between the W or R series transmission. With correct differential gearing and sensible driving habits, the W trans should be able to hold 300hp in a truck somewhat reliably - keeping the W trans would make a non-VVTi swap easier. I plan on using the VVTi version of the 1UZ which will be right on the edge of reliability for the W trans, so I opted to use the R150f instead. This is the transmission found behind the V6 4runners and pickups and has been known to hold up to 400 ft/lbs of torque reliably. The transfer case is chain driven with a planetary reduction instead of the gear drive reduction unit behind the W trans - as long as you're not planning on severe duty/abuse, there is nothing wrong with the chain drive transfer case, besides, it's also geared lower (you can always get an adapter to mount the gear drive transfer behind the R trans if you want more low range gearing options).
Here are some more numbers:
Gear ratios: 1st - 2nd - 3rd - 4th - 5th - Rev
W56: 3.954:1 - 2.141:1 - 1.384:1 - 1.00:1 - 0.85:1 - 4.091:1
R150F: 3.830:1 - 2.062:1 - 1.436:1 - 1.00:1 - 0.838:1 - 4.22:1
Transfer case low range ratio:
Gear drive 21 spline RF1A: 2.28:1
Chain drive/planetary 23 spline VF1A : 2.57:1
There are 2 different adapter kits for the R150f -- pre- and post-'96. Pre-'96 the input shaft length is about 6.25" from the face of the input bearing retainer, after that it changed to about 7.5". The R150f used a cable driven speedometer up to '93ish, afterwards it changed to an electronic speedo (good to know if you plan on keeping the stock cluster). In '96 they also went to multi-cone synchros for 2nd and 3rd gears for better shifting, as well as a synchronized reverse gear to prevent grinding the idler gear when shifting to reverse.
There are adapter bell housings available to keep the clutch slave external, but I've heard they can be poor quality and require more work (for example, you have to mill the clutch slave boss to the height you want and then drill/tap the bolt holes, many of those kits include a flywheel but you need to cut the ring gear off the flexplate and weld it onto the supplied flywheel). Some kits also come with 3VZ or 3SGTE (MR2 turbo) flywheels which have had their bolt holes elongated to match the 1UZ bolt pattern - originally, I thought that was inviting balance problems, but then I realized that the flywheel is kept concentric with the crank via a centerbore, so shouldn't be an issue (though I think some of them may require you to use the thin flexplate spacer between the flywheel and crank).
Xcessive Manufacturing offers some products for the 1UZ swap, but nothing specifically for Toyota trucks
Northwest Toys has a number of products specifically for Toyota truck swaps
For the manual trans adapter, I'm planning on using the kit from http://www.1uzfeswapkit.com/ (link now redirects to XAT Racing). It's a bit pricey (about as much as a JDM 1UZ complete), but comes with everything I should need - adapter plate, flywheel & flywheel bolts, hydraulic release bearing, hoses, pilot bearing. The 1uzfeswapkit flywheel allows the use of a clutch and pressure plate from either a '90 4runner or '94 Turbo MR2 (both use a 9.25" diameter clutch disc), so plenty of options are available. I think I'll be using a Spec Clutch Stage 2+ (rated to 450 ft/lbs) or Stage 3+ pressure plate and disc (rated to 500 ft/lbs), which will hopefully, keep nice street manners.
Here's the R150f I found on CL for $100. I bought it from a guy who does does a fair number of Toyota part-outs and offroad builds, he has a garage and a reputation to maintain, so I'm satisfied with a hand-shake guarantee that there's nothing wrong with it

after some time in the hot tank at work (the input shaft bearing retainer still needs to be modified for the hydraulic clutch release bearing)
At one of the local PickNPull junkyards, I dropped the trans out of an LS400 so I could snag the bell housing. Many of the 1UZ's on ebay come with a transmission (which could be sold off if you only want it for the bell housing), but a few hundred can be saved buying the engine by itself. Note the “U1” cast into the bellhousing, supposedly, there is also a U2 cast but you are not likely to see it in this country – the U2 cast has a slightly different offset and may not work with existing manual trans adapters.

 09-29-2019, 09:57 AM
#2
Registered User
Thread Starter
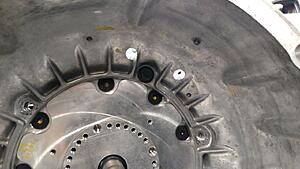
Back to the engine side of things, it seems the LS400 front sump oil pan is the preferred piece for IFS trucks and only requires shaving the steering stabilizer off of the drag link (already did that with my 7M swap). Engine mounts can be custom or bought - Northwest Toys offers a pre-made mount kit, I've also seen a mount on ebay - for the money, I'll make my own using the stock 22RE rubber mounts (can direct-swap/upgrade to GM polyurethane trans mounts in the future if I want). Supposedly the VVTi engine is a bit of an easier fit at the firewall due to redesigned valve covers, the non-VVTi engine driver side valve cover may interfere with the e-brake bracket (relocate to inside the cab? thought I read that somewhere).
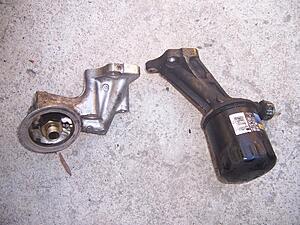
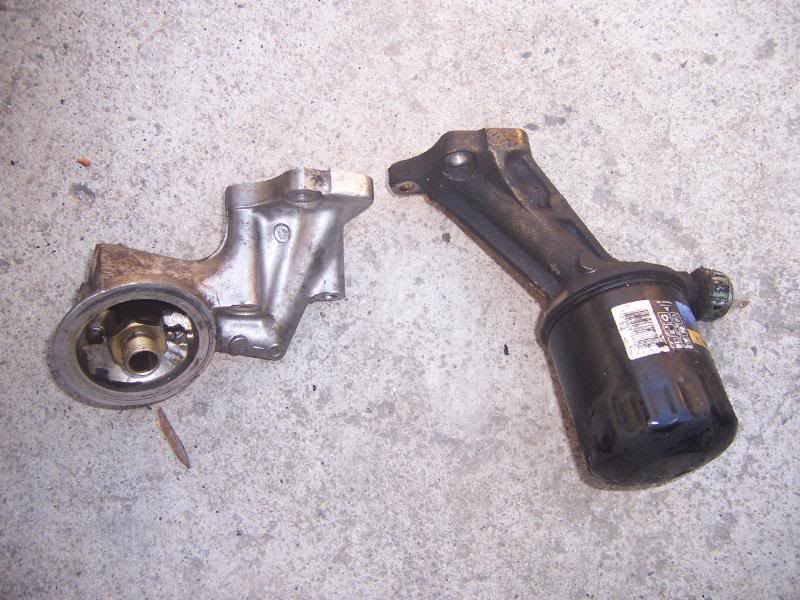
The oil filter adapter from the LS400 will hit the power steering gear box, supposedly the SC400 oil filter adapter will not - both bolt to the block in the same manner and use a figure-8 o-ring to seal to the block
(SC400 on the left, LS400 on the right - neither are available to purchase new)
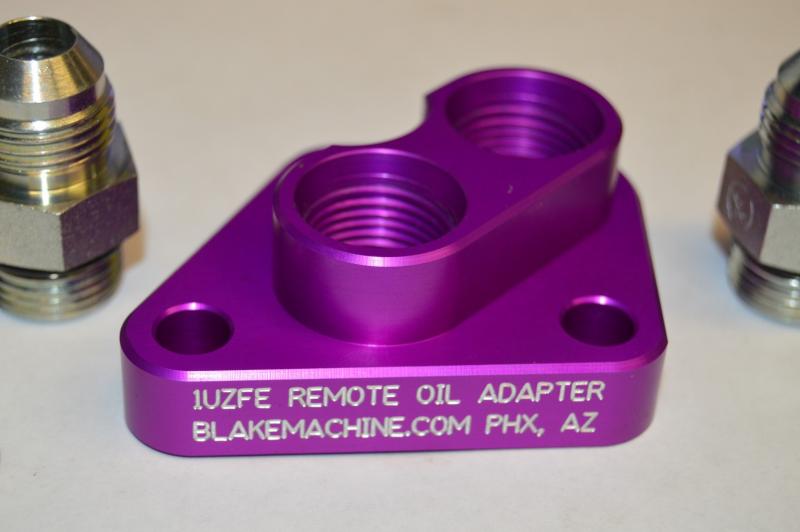
So I got this adapter instead. It uses -8AN JIC fittings, so I can make my own hoses with reusable hose ends and put the oil filter wherever I want (I will be doing the same with the PS pump hose)

The non-VVTi engine is supposed to be easier to wire, though I don’t put much stock in that assertion. Both use a kind of “modular” wiring where all but one or 2 of the ECU connectors are pre-wired to the engine. The remaining 2 connectors only need a few wires connected to run – things like auto trans control (integrated into the engine control module) and ABS can be ignored without detriment.
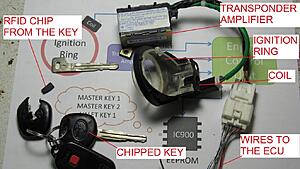
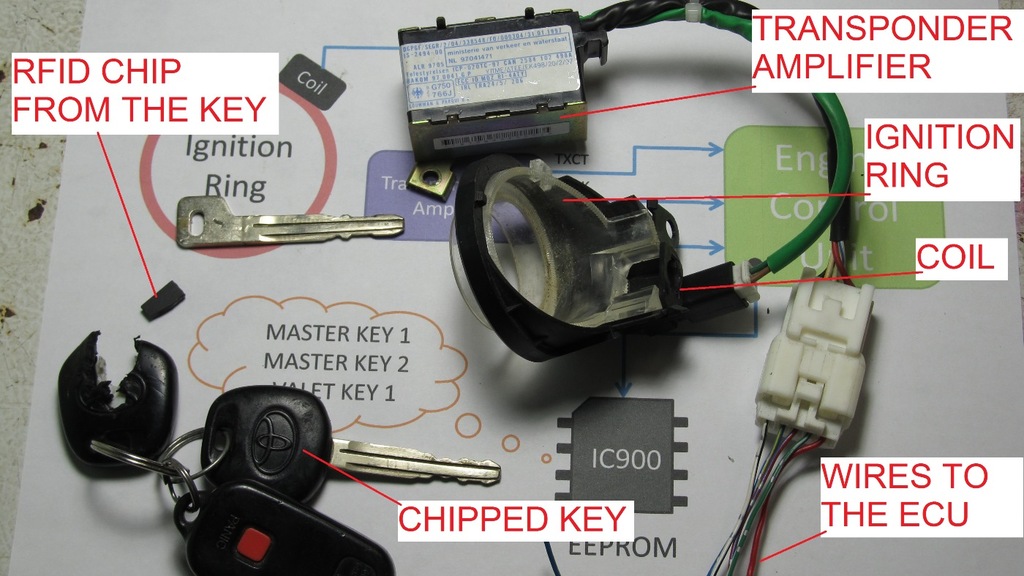
The biggest issue with the VVTi version lies with the immobilizer. All VVTi 1UZs have an immobilizer built into the ECU which disables the injectors if it doesn’t detect the correct key transponder code. The wiring for the immobilizer is easy though. Power (W wire), ground, (W-B wire) and 3 wires to the ECU.
The complication is from the fact that on Toy/Lex ECUs before ’03, if you lost all the keys, you could NOT program a new key to the ECU – you needed at least 1 “master” key to program new keys to the ECU, or you needed to buy a new ECU which was in a “virgin” unprogrammed state. There are a few work arounds. You can try to find an ECU which has had the immobilizer removed/hard-wired out of the equation similar to this. Another option is to directly connect to the IC900 EEPROM inside the ECU and play around with the hexadecimal code a bit – Instructable, as well as a good description of the immobilizer, are here. Luckily, we have a tool at work which can put the ECU into “virgin” or programmable mode. ’98 ECUs seem to be a bit less stable to this hack than ’99 ECUs, if given the choice, try to get a ’99 ECU. Even better, get the keys which are already matched to whatever ECU you buy and don’t worry about hacking into the EEPROM. It’ll be nice to have the peace of mind knowing the truck will be harder to steal after I get this all done.
I “borrowed” this pic from the Instructable linked above, it shows the parts of the immobilizer system. It took less than � hr in the junkyard to pull the antenna and immobilizer amplifier – any 98-05 immobilizer amplifier and antenna should operate the same (GS/LS/SC400, GS/SC300, etc)
The VVTi 1UZ also introduced multiplex communication – 2 communication wires used to link different modules instead of 1 wire for each sensor input or ECU output. This isn’t much of an issue, except that there is no way (that I can discern) to get the ECU to operate the stock 4runner Check Engine Light – you can however pull ECU data and codes from the OBDs connector, which I think is more useful. There is a TACH wire from the ECU which should operate the stock tachometer (might have to “correct” the signal so the tach is accurate by adjusting the dashpot on the cluster board, or adding a variable resistor - fix is already documented elsewhere on the the interwebs). Instrument cluster gauges will need to use the sensors which were on the original engine in the vehicle (in my case, 22RE water temp and oil pressure sensors)
There’s a theme going here - many things changed from ’97 to ’98 when VVTi was introduced. Another (minor) hurdle is the fuel system. The pre-98 1UZ used a return-style fuel system - pressurized hose from the fuel pump, pressure regulator on the engine fuel rail, return line to the tank to bleed off excess pressure. The VVTi uses a returnless system for improved evaporative emissions and to reduce fuel heating – the fuel pump & regulator are in-tank with only a single hose running up to the engine. An external fuel pressure regulator will fix that using the stock return line on the vehicle. I’ll also be installing a Denso 9500152 fuel pump to keep up with fuel demands – should be a direct fit replacement.
For the exhaust, I’ve read that the LS400 stock manifolds will NOT work, they stick out too far and hit the frame rails. Luckily, all the 1UZ, 2UZ, and 3UZ exhaust manifold bolt patterns are the same, so I got a pair of free/take-off “log style” manifolds at work. There are also a number of stainless manifolds on eBay which may or may-not fit (I’ve had decent luck with OBX manifolds in the past – decent welds and nice thick manifold flanges). This guy got a pair to work on an early 1UZ with just a bit of modification to clear the steering column shaft
The oil filter adapter from the LS400 will hit the power steering gear box, supposedly the SC400 oil filter adapter will not - both bolt to the block in the same manner and use a figure-8 o-ring to seal to the block
(SC400 on the left, LS400 on the right - neither are available to purchase new)
So I got this adapter instead. It uses -8AN JIC fittings, so I can make my own hoses with reusable hose ends and put the oil filter wherever I want (I will be doing the same with the PS pump hose)
The non-VVTi engine is supposed to be easier to wire, though I don’t put much stock in that assertion. Both use a kind of “modular” wiring where all but one or 2 of the ECU connectors are pre-wired to the engine. The remaining 2 connectors only need a few wires connected to run – things like auto trans control (integrated into the engine control module) and ABS can be ignored without detriment.
The biggest issue with the VVTi version lies with the immobilizer. All VVTi 1UZs have an immobilizer built into the ECU which disables the injectors if it doesn’t detect the correct key transponder code. The wiring for the immobilizer is easy though. Power (W wire), ground, (W-B wire) and 3 wires to the ECU.

The complication is from the fact that on Toy/Lex ECUs before ’03, if you lost all the keys, you could NOT program a new key to the ECU – you needed at least 1 “master” key to program new keys to the ECU, or you needed to buy a new ECU which was in a “virgin” unprogrammed state. There are a few work arounds. You can try to find an ECU which has had the immobilizer removed/hard-wired out of the equation similar to this. Another option is to directly connect to the IC900 EEPROM inside the ECU and play around with the hexadecimal code a bit – Instructable, as well as a good description of the immobilizer, are here. Luckily, we have a tool at work which can put the ECU into “virgin” or programmable mode. ’98 ECUs seem to be a bit less stable to this hack than ’99 ECUs, if given the choice, try to get a ’99 ECU. Even better, get the keys which are already matched to whatever ECU you buy and don’t worry about hacking into the EEPROM. It’ll be nice to have the peace of mind knowing the truck will be harder to steal after I get this all done.
I “borrowed” this pic from the Instructable linked above, it shows the parts of the immobilizer system. It took less than � hr in the junkyard to pull the antenna and immobilizer amplifier – any 98-05 immobilizer amplifier and antenna should operate the same (GS/LS/SC400, GS/SC300, etc)
The VVTi 1UZ also introduced multiplex communication – 2 communication wires used to link different modules instead of 1 wire for each sensor input or ECU output. This isn’t much of an issue, except that there is no way (that I can discern) to get the ECU to operate the stock 4runner Check Engine Light – you can however pull ECU data and codes from the OBDs connector, which I think is more useful. There is a TACH wire from the ECU which should operate the stock tachometer (might have to “correct” the signal so the tach is accurate by adjusting the dashpot on the cluster board, or adding a variable resistor - fix is already documented elsewhere on the the interwebs). Instrument cluster gauges will need to use the sensors which were on the original engine in the vehicle (in my case, 22RE water temp and oil pressure sensors)
There’s a theme going here - many things changed from ’97 to ’98 when VVTi was introduced. Another (minor) hurdle is the fuel system. The pre-98 1UZ used a return-style fuel system - pressurized hose from the fuel pump, pressure regulator on the engine fuel rail, return line to the tank to bleed off excess pressure. The VVTi uses a returnless system for improved evaporative emissions and to reduce fuel heating – the fuel pump & regulator are in-tank with only a single hose running up to the engine. An external fuel pressure regulator will fix that using the stock return line on the vehicle. I’ll also be installing a Denso 9500152 fuel pump to keep up with fuel demands – should be a direct fit replacement.
For the exhaust, I’ve read that the LS400 stock manifolds will NOT work, they stick out too far and hit the frame rails. Luckily, all the 1UZ, 2UZ, and 3UZ exhaust manifold bolt patterns are the same, so I got a pair of free/take-off “log style” manifolds at work. There are also a number of stainless manifolds on eBay which may or may-not fit (I’ve had decent luck with OBX manifolds in the past – decent welds and nice thick manifold flanges). This guy got a pair to work on an early 1UZ with just a bit of modification to clear the steering column shaft
 09-29-2019, 09:58 AM
#3
Registered User
Thread Starter
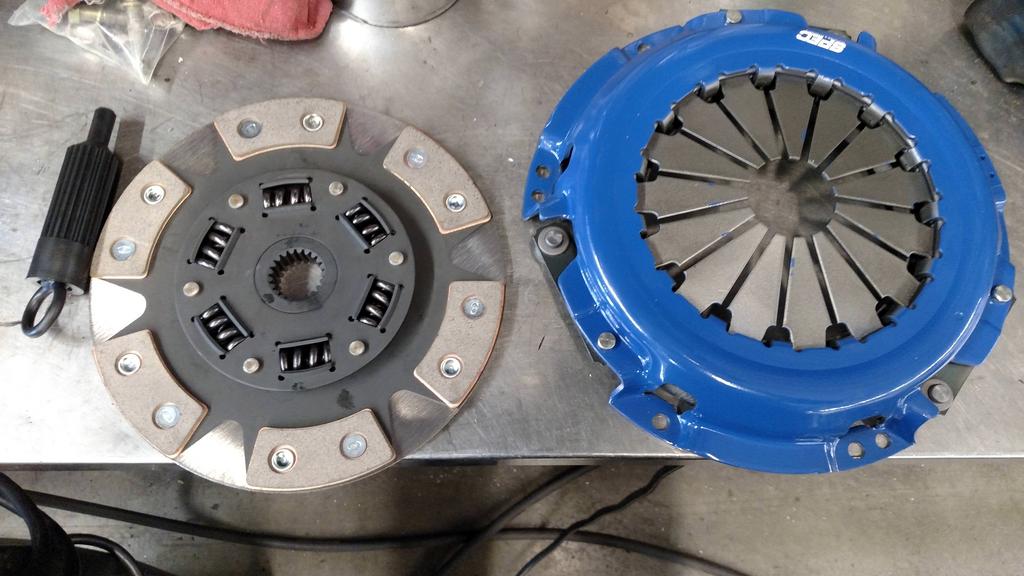
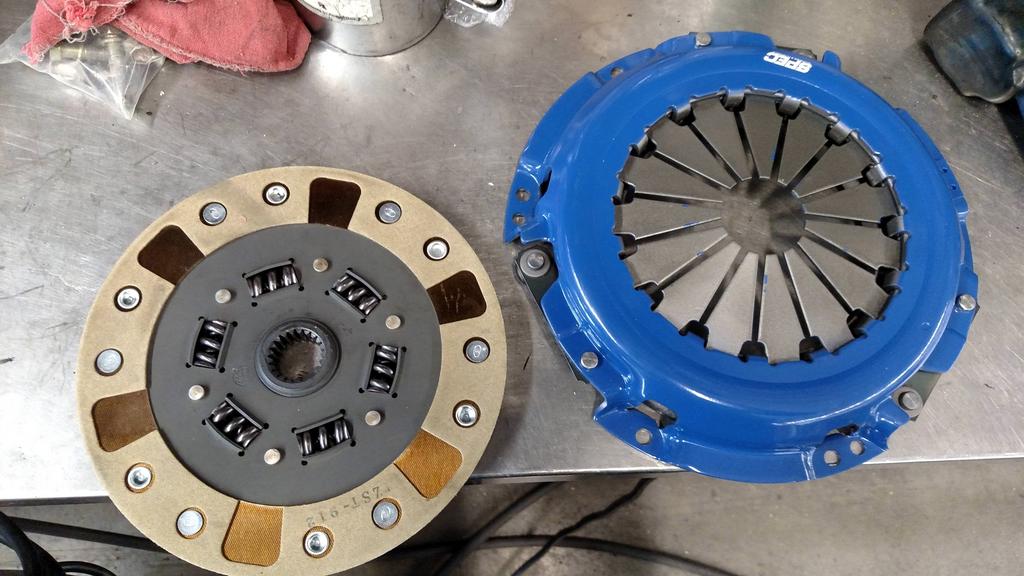
A bit more progress and parts are starting to ship - next will be the adapter kit and the engine will be last (warranty is usually 30 days to 6 months, I want to have as much of that time with the engine running as possible). Big purchase this week was a Spec Clutch Stage 2+ kit. Their stage 1 clutch is rated for 350 ft/lbs and has been used with the non-VVTi 1UZ, but since the version engine I'm going for is rated 300 ft/lbs, I wanted a bit more margin - stage 2+ is rated for 450 ft/lbs and is supposed to maintain nice pedal engagement. (note: there are some bad reviews of Spec Clutches online from about 8 years ago, I haven't found any bad reviews more recent than that + several people recommended Spec based on personal experience)
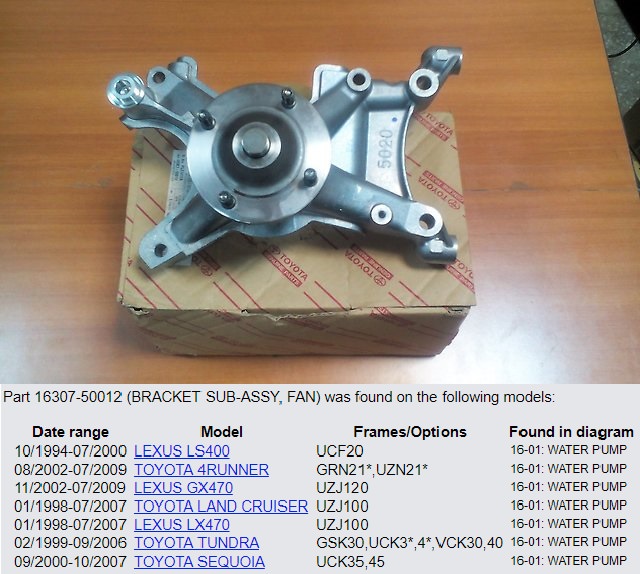
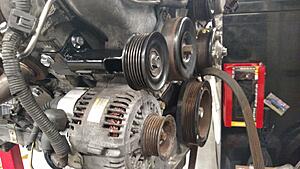
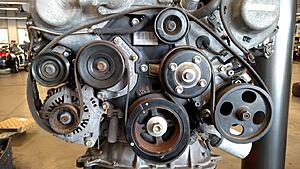
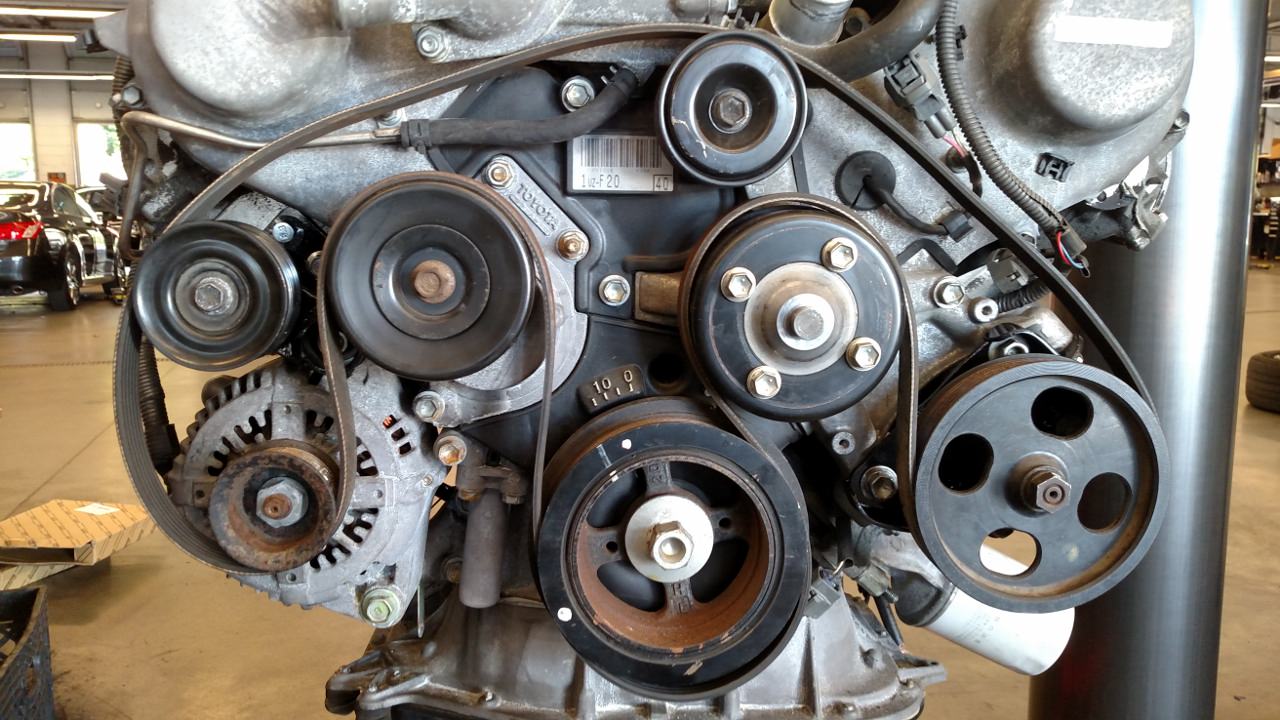
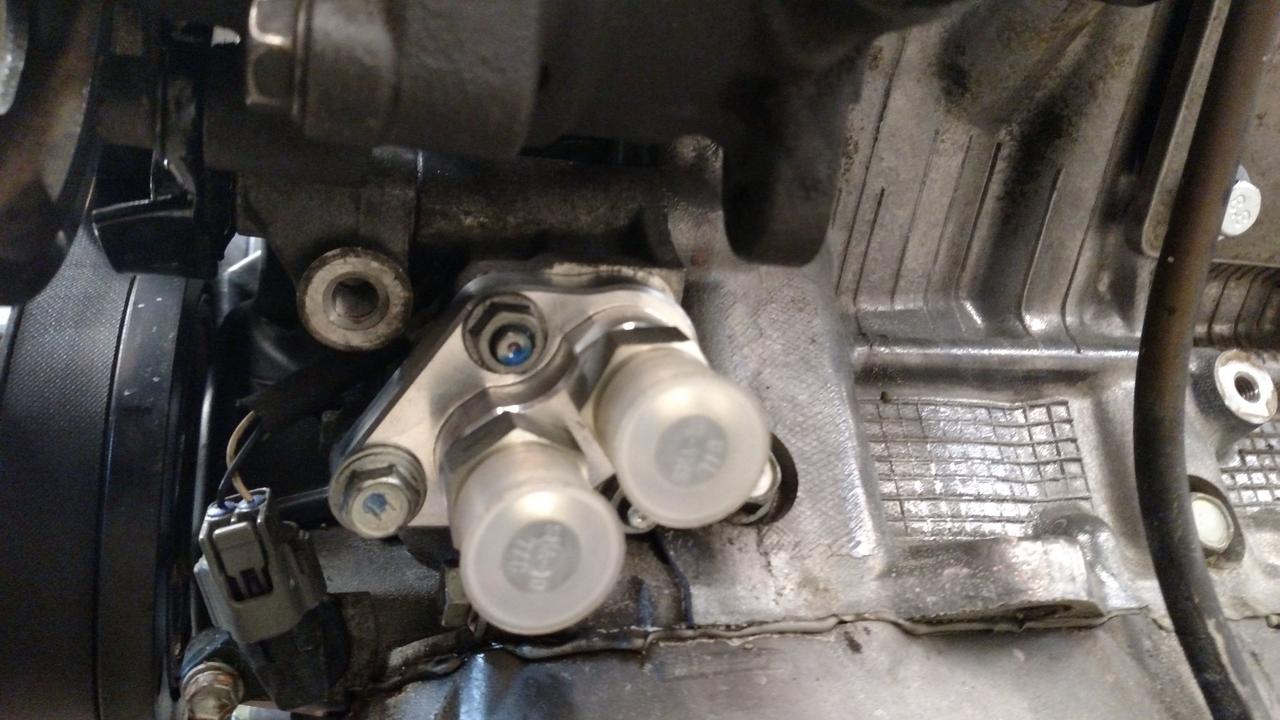
One of the issues I noticed with the JDM VVTi engines is that they all seem to have used a hydraulic radiator fan. That is, there's a pump, separate from the power steering pump, which pressurizes fluid to run the radiator fan. The fan pump can't simply be removed because it's one of the timing cover pieces and is needed for routing the serpentine belt. Here it is (not my engine):

Hydraulic fan pump on the left, simple idler pulley on the right
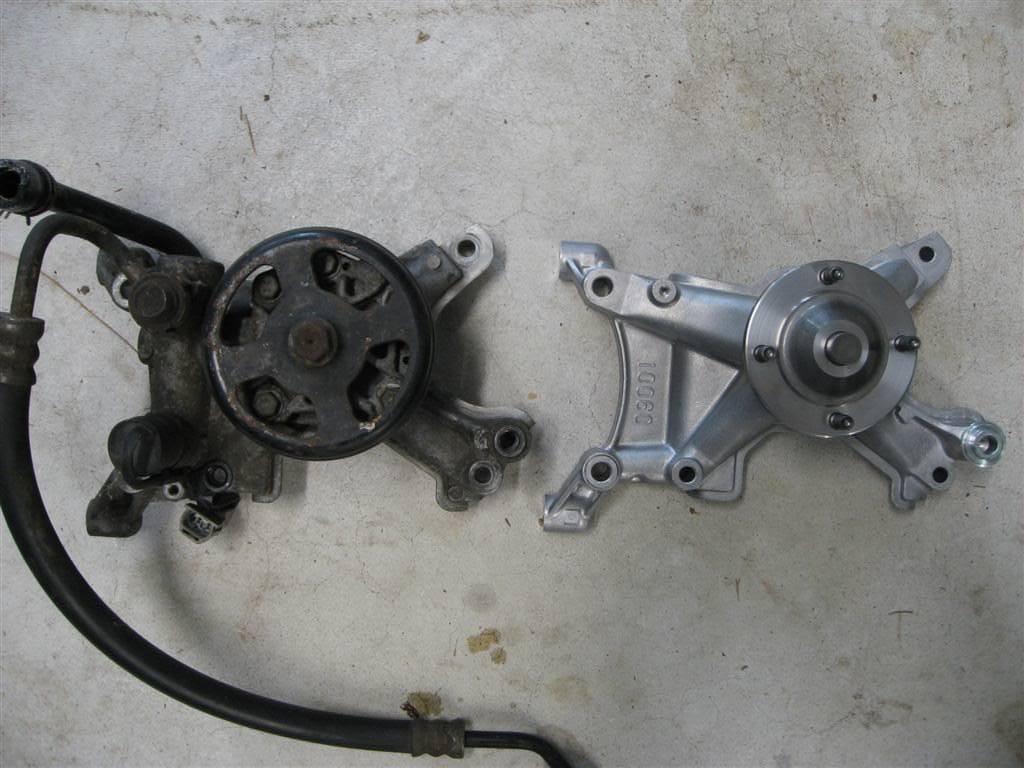
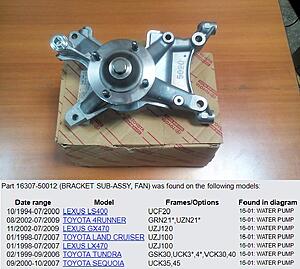
Luckily, most of the US engines didn't have this so all I need was the simpler idler pulley which I got a junkyard using the interchange info below (it can also be purchased new, but I've NEVER seen one go bad yet)
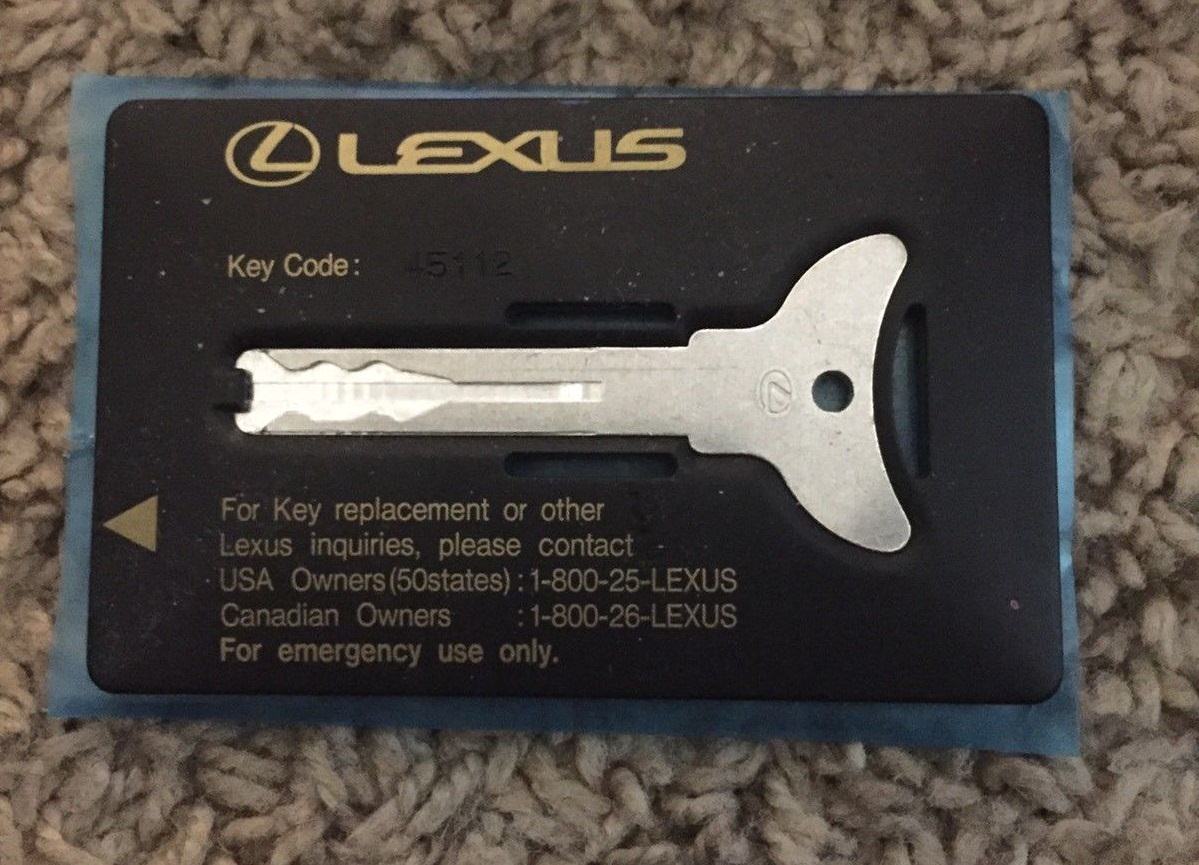
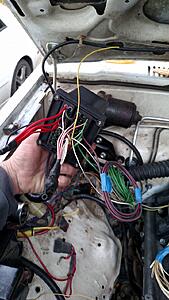
I had a bit of insight the other day regarding the immobilizer. I was going to try to retrofit my old ignition lock cylinder with a "laser cut" key cylinder (I have several at work with plenty of tumblers to be able to rekey them - see how the key is "side-cut" in the pic below? that's a laser cut key). That way, I could put the immobilizer antenna around the ignition and use a regular laser cut immobilizer key - immobilizer triggering solved. BUT, I don't want to have to use a separate key for the doors and tailgate. So, I remembered that Lexus had a flat, credit card sized emergency key available for their first gen immobilizers ('98 till about 05 on most models w/ immobilizer, card needs to match the generation of the immobilize system) . My plan now is to have the immobilizer antenna somewhere in the truck with this flat key next to it - when I don't want the engine to be able to start, I just move the flat key or take it with. It could be as simple as having it on one side of the glovebox, or in the sunvisor, or wherever I want to mount the immobilizer antenna coil. I got a used key card on ebay for less than $20

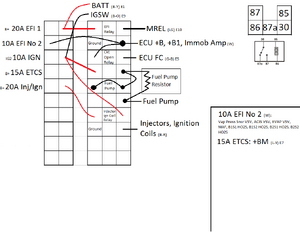
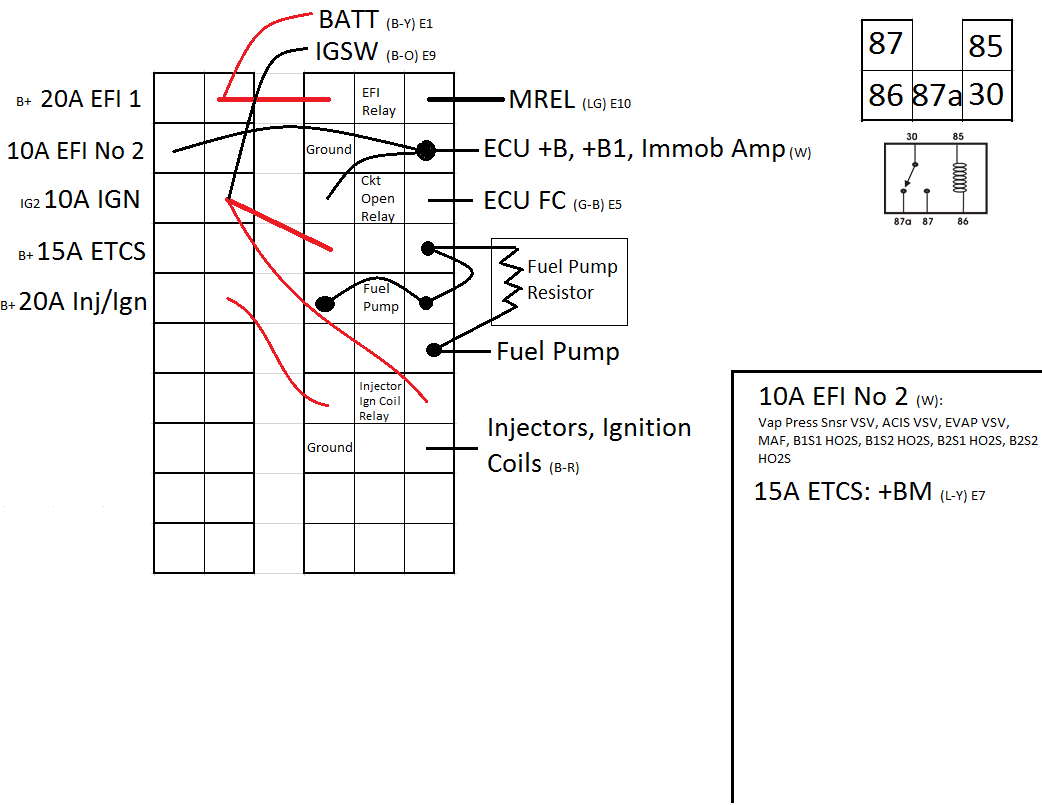
I also started planning the electrical a bit more. This is the diagram for a US version '99 LS400, I'm not sure if the JDM harness and ECU pinouts will be similar or different - that basic architecture of the system should match even if the exact pins used does not (very WIDE pic, right click and "save as" or open in new tab if you want to zoom in for greater detail)

All that spaghetti should only require a few powers, grounds and relays to make it work. A single Bussmann fuse relay block should be just the ticket, I'll supply constant B+ and switched ignition to the relay block from the ignition switch and let it handle all the heavy lifting. There's a good tutorial on these marvelous, cheap, weatherproof pieces here: DIY Bussmann RTMR Fuse Block, Part 1 ? Introduction Bodenzord and Waytek has them for less that $30 (plus terminals and seals/plugs - IIRC, terminals are rated to 30 amps). This is the same fuse block I used in the Celica and I couldn't be happier with how they turned out. I'll probably use one for the engine to keep the whole affair as plug-and-play as possible and use another to tidy up the mess of wiring which has accumulated over the 10+ years I've owned this truck. This is how the engine fuse box will be wired (view from back side). Note I'll be using an LS400 fuel pump resistor so the ECU can control high/low fuel pump speed (less electrical strain when high fuel output isn't required), but others have been fine just running the fuel pump at a constant 12V without the resistor.
One of the issues I noticed with the JDM VVTi engines is that they all seem to have used a hydraulic radiator fan. That is, there's a pump, separate from the power steering pump, which pressurizes fluid to run the radiator fan. The fan pump can't simply be removed because it's one of the timing cover pieces and is needed for routing the serpentine belt. Here it is (not my engine):

Hydraulic fan pump on the left, simple idler pulley on the right
Luckily, most of the US engines didn't have this so all I need was the simpler idler pulley which I got a junkyard using the interchange info below (it can also be purchased new, but I've NEVER seen one go bad yet)
I had a bit of insight the other day regarding the immobilizer. I was going to try to retrofit my old ignition lock cylinder with a "laser cut" key cylinder (I have several at work with plenty of tumblers to be able to rekey them - see how the key is "side-cut" in the pic below? that's a laser cut key). That way, I could put the immobilizer antenna around the ignition and use a regular laser cut immobilizer key - immobilizer triggering solved. BUT, I don't want to have to use a separate key for the doors and tailgate. So, I remembered that Lexus had a flat, credit card sized emergency key available for their first gen immobilizers ('98 till about 05 on most models w/ immobilizer, card needs to match the generation of the immobilize system) . My plan now is to have the immobilizer antenna somewhere in the truck with this flat key next to it - when I don't want the engine to be able to start, I just move the flat key or take it with. It could be as simple as having it on one side of the glovebox, or in the sunvisor, or wherever I want to mount the immobilizer antenna coil. I got a used key card on ebay for less than $20
I also started planning the electrical a bit more. This is the diagram for a US version '99 LS400, I'm not sure if the JDM harness and ECU pinouts will be similar or different - that basic architecture of the system should match even if the exact pins used does not (very WIDE pic, right click and "save as" or open in new tab if you want to zoom in for greater detail)
All that spaghetti should only require a few powers, grounds and relays to make it work. A single Bussmann fuse relay block should be just the ticket, I'll supply constant B+ and switched ignition to the relay block from the ignition switch and let it handle all the heavy lifting. There's a good tutorial on these marvelous, cheap, weatherproof pieces here: DIY Bussmann RTMR Fuse Block, Part 1 ? Introduction Bodenzord and Waytek has them for less that $30 (plus terminals and seals/plugs - IIRC, terminals are rated to 30 amps). This is the same fuse block I used in the Celica and I couldn't be happier with how they turned out. I'll probably use one for the engine to keep the whole affair as plug-and-play as possible and use another to tidy up the mess of wiring which has accumulated over the 10+ years I've owned this truck. This is how the engine fuse box will be wired (view from back side). Note I'll be using an LS400 fuel pump resistor so the ECU can control high/low fuel pump speed (less electrical strain when high fuel output isn't required), but others have been fine just running the fuel pump at a constant 12V without the resistor.
 09-29-2019, 09:59 AM
#4
Registered User
Thread Starter
finally starting to move on this again. My budget is looking to shape up something like this
$900 JDM 1UZ VVTi engine, harness, ECU delivered
$900 1UZ Swap kit, full adapter kit using a 1UZ bell
$400 9.25" Spec Clutch Stage 2+ clutch kit (rated 450 ft/lbs)
$100 R150f transmission & transfer case (Craigslist)
$300ish trans seals, Denso LS400 fuel pump, 3/4" bore clutch MC, new eng & trans rubber mounts, FP regulator, oil filter relocation, hoses, exhaust pre-bent pipe, etc. - - not including driveshaft work if it needs to be done (I've read final position of the transfer case is within an inch of stock)
There are places I could save money, but . . . you know, "buy once, cry once"
I'm also off-setting the cost of the swap by selling my bolt in, plug-and-play 7M swap
I just purchased the engine, and hopefully, I'll get it running and road worthy within the 30 day warranty the engine comes with.
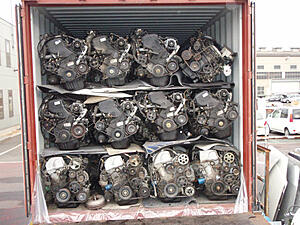
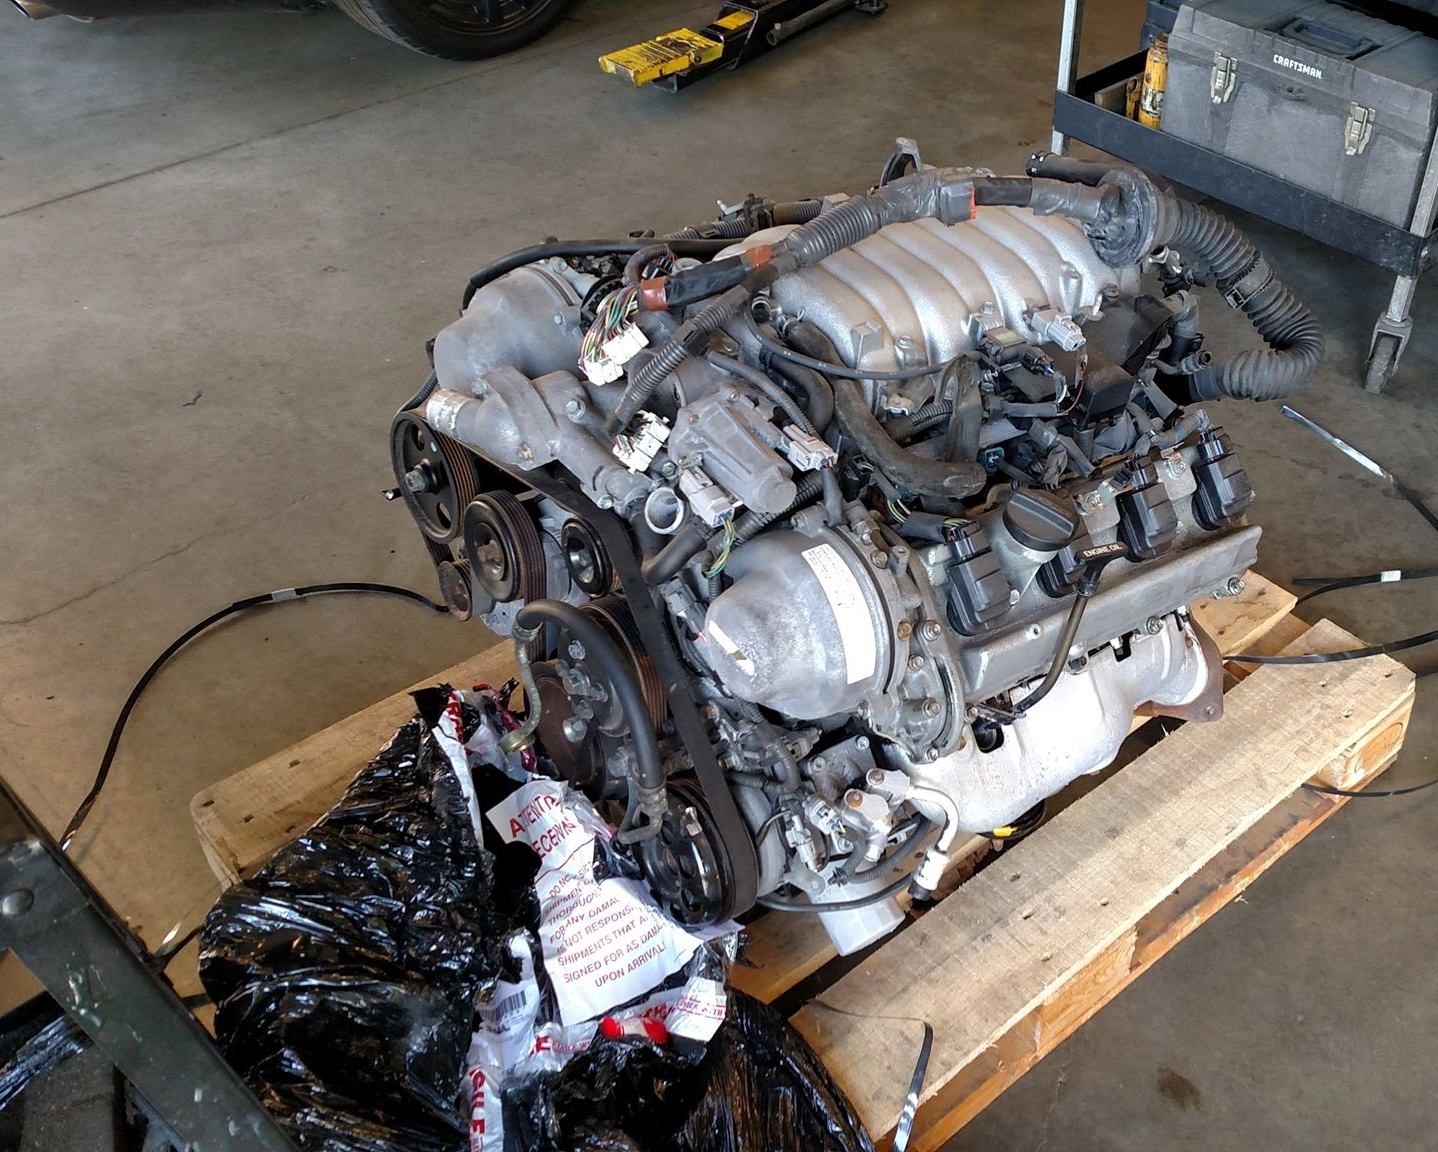
Almost all JDM engine dealers offer a 30 day warranty, some give 60 days, very few offer 90 days. After looking at engines on eBay for the last few weeks, I settled on an engine from JDM Alliance out of Texas - they have a lot of reviews and most of them are positive. There will always be a few unsatisfied people, it's inevitable. These are basically junkyard engines after all which have been shipped halfway around the world stacked 3 or 4 high with cardboard separating the layers. Here's how they're often packed inside the container - a layer of parts, whatever they have on hand is tossed on top before adding another layer
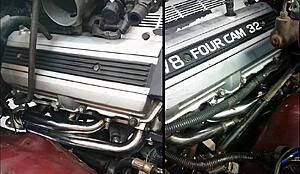
One thing I've realized while looking at a lot of engines is that the 1UZFE w/ VVTi came in 2 versions in Japan. I believe the 1st, which is the one of the left, was offered from 98-2000 (note the larger ignition coils, these rarely go bad). In 2001, the US got the 3UZ with a displacement bump to 4.3L. The 1UZ was still offered in Japan until 2003ish, but with the updated ignition coils that the 3UZ in the US used. The coils are not interchangeable, and I would almost guarantee that the ECU pinout is different. Since it's REALLY hard to find Japanese spec wiring diagrams, I spent a bit of extra time looking for one which I could use a USDM spec ECU with (which will also allow me to use the Torque app to see sensor data).

There's also 2 other differences with JDM 1UZs. In the US, the harness comes off the back right side of the engine in the LS400 and SC400 models, through the firewall on the same side, and the ECU is mounted inside the vehicle. In Japan, since the steering wheel is on the wrong side, and there's usually no room on the "driver side", the harness comes off the left side of the engine before going through the firewall. On the GS400 (USDM and JDM), the harness comes off the front left of the engine, and the ECU mounts in a special box in the engine bay. I wasn't sure if I'd have room in the engine bay for an ECU, so I bought a 1UZ with the harness coming off the back. If I HAVE to, I might get a USDM harness, but I think the harness may reach to put the ECU inside on the passenger side (or I may have to extend the wires). Or, I could still mount it in the engine bay if I have to (inside a proper enclosure to keep dirt and water out), but I'd have some extra harness to deal with if I go that route.
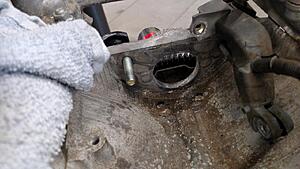
That's about it for now. Engine should be here in 5 working days. I need to make sure the exhaust manifolds I have (from a GX470) will bolt up, and I'm going to pull the intake to "fix" the starter mounting down in the valley of the enginefinally starting to move on this again. I just purchased the engine, and hopefully, I'll get it running and road worthy within the 30 day warranty the engine comes with.
Almost all JDM engine dealers offer a 30 day warranty, some give 60 days, very few offer 90 days. After looking at engines on eBay for the last few weeks, I settled on an engine from JDM Alliance out of Texas - they have a lot of reviews and most of them are positive. There will always be a few unsatisfied people, it's inevitabl. These are basically junkyard engines after all which have been shipped halfway around the world stacked 3 or 4 high with cardboard separating the layers. Here's how they're often packed inside the container - a layer of parts, whatever they have on hand is tossed on top before adding another layer
$900 JDM 1UZ VVTi engine, harness, ECU delivered
$900 1UZ Swap kit, full adapter kit using a 1UZ bell
$400 9.25" Spec Clutch Stage 2+ clutch kit (rated 450 ft/lbs)
$100 R150f transmission & transfer case (Craigslist)
$300ish trans seals, Denso LS400 fuel pump, 3/4" bore clutch MC, new eng & trans rubber mounts, FP regulator, oil filter relocation, hoses, exhaust pre-bent pipe, etc. - - not including driveshaft work if it needs to be done (I've read final position of the transfer case is within an inch of stock)
There are places I could save money, but . . . you know, "buy once, cry once"
I'm also off-setting the cost of the swap by selling my bolt in, plug-and-play 7M swap
I just purchased the engine, and hopefully, I'll get it running and road worthy within the 30 day warranty the engine comes with.
Almost all JDM engine dealers offer a 30 day warranty, some give 60 days, very few offer 90 days. After looking at engines on eBay for the last few weeks, I settled on an engine from JDM Alliance out of Texas - they have a lot of reviews and most of them are positive. There will always be a few unsatisfied people, it's inevitable. These are basically junkyard engines after all which have been shipped halfway around the world stacked 3 or 4 high with cardboard separating the layers. Here's how they're often packed inside the container - a layer of parts, whatever they have on hand is tossed on top before adding another layer

One thing I've realized while looking at a lot of engines is that the 1UZFE w/ VVTi came in 2 versions in Japan. I believe the 1st, which is the one of the left, was offered from 98-2000 (note the larger ignition coils, these rarely go bad). In 2001, the US got the 3UZ with a displacement bump to 4.3L. The 1UZ was still offered in Japan until 2003ish, but with the updated ignition coils that the 3UZ in the US used. The coils are not interchangeable, and I would almost guarantee that the ECU pinout is different. Since it's REALLY hard to find Japanese spec wiring diagrams, I spent a bit of extra time looking for one which I could use a USDM spec ECU with (which will also allow me to use the Torque app to see sensor data).

There's also 2 other differences with JDM 1UZs. In the US, the harness comes off the back right side of the engine in the LS400 and SC400 models, through the firewall on the same side, and the ECU is mounted inside the vehicle. In Japan, since the steering wheel is on the wrong side, and there's usually no room on the "driver side", the harness comes off the left side of the engine before going through the firewall. On the GS400 (USDM and JDM), the harness comes off the front left of the engine, and the ECU mounts in a special box in the engine bay. I wasn't sure if I'd have room in the engine bay for an ECU, so I bought a 1UZ with the harness coming off the back. If I HAVE to, I might get a USDM harness, but I think the harness may reach to put the ECU inside on the passenger side (or I may have to extend the wires). Or, I could still mount it in the engine bay if I have to (inside a proper enclosure to keep dirt and water out), but I'd have some extra harness to deal with if I go that route.
That's about it for now. Engine should be here in 5 working days. I need to make sure the exhaust manifolds I have (from a GX470) will bolt up, and I'm going to pull the intake to "fix" the starter mounting down in the valley of the enginefinally starting to move on this again. I just purchased the engine, and hopefully, I'll get it running and road worthy within the 30 day warranty the engine comes with.
Almost all JDM engine dealers offer a 30 day warranty, some give 60 days, very few offer 90 days. After looking at engines on eBay for the last few weeks, I settled on an engine from JDM Alliance out of Texas - they have a lot of reviews and most of them are positive. There will always be a few unsatisfied people, it's inevitabl. These are basically junkyard engines after all which have been shipped halfway around the world stacked 3 or 4 high with cardboard separating the layers. Here's how they're often packed inside the container - a layer of parts, whatever they have on hand is tossed on top before adding another layer
09-29-2019, 09:59 AM
#5
Registered User
Thread Starter
My engine was delivered on Wednesday, so now the fun begins prepping it for install in 2 weeks
If you look really close, it's the same exact engine in the pic from post #3 above. That was just a random pic on eBay that I stole almost a year ago, and it ended up being the same exact engine I ordered.

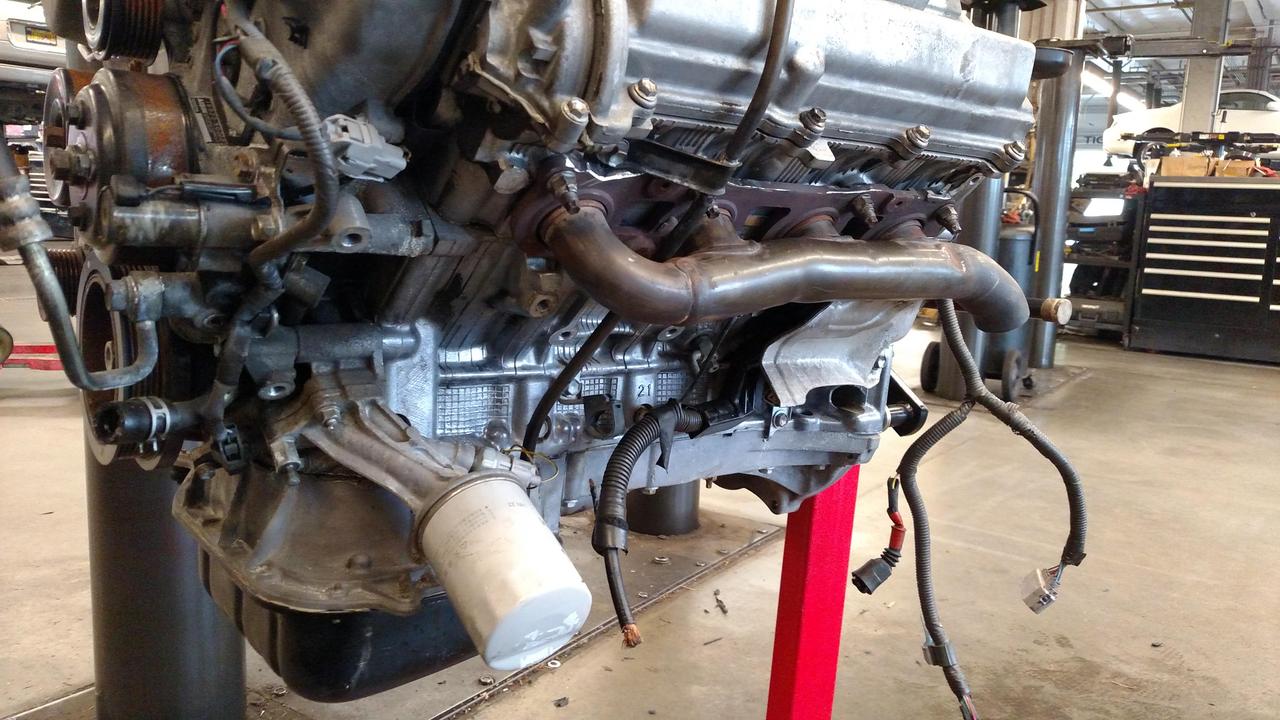
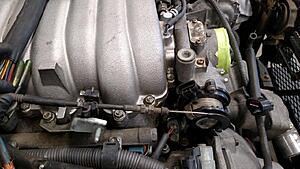
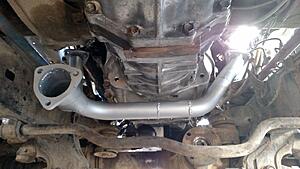
first order of business was to unbolt the big heavy cast iron manifolds and bolt on the GX470 log style manifolds I saved for this project (note, the cats were cut off for clearance, the exhaust will have a bigger cat after the spot where the 2 sides merge). These tuck in really close to the engine and are required for steering gear box clearance on the driver side - not the best design, but it will suffice

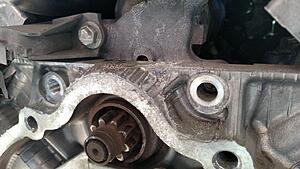
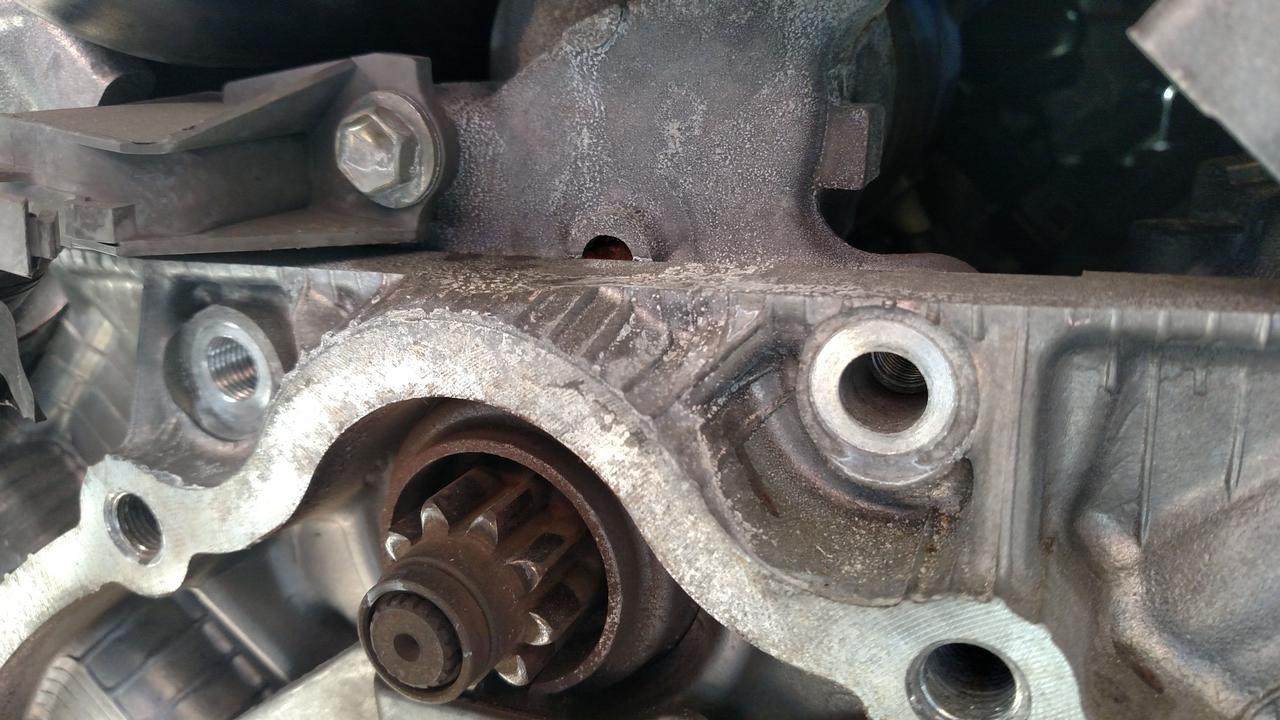
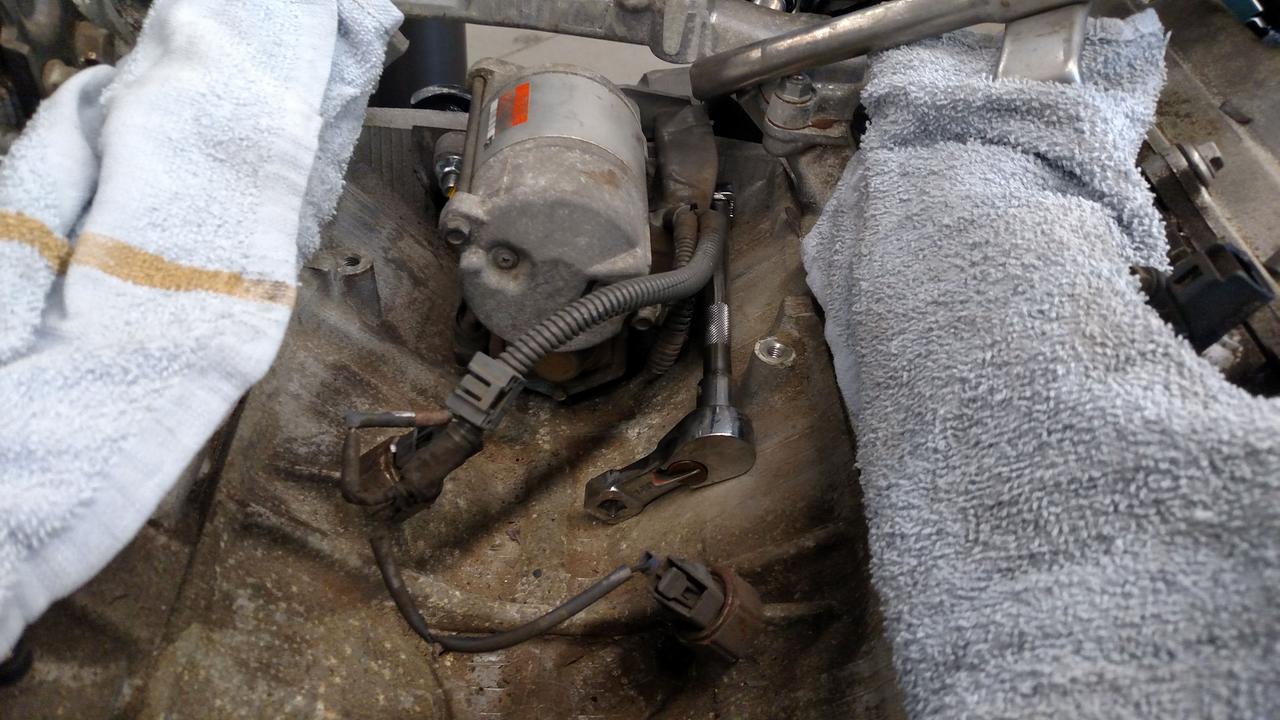
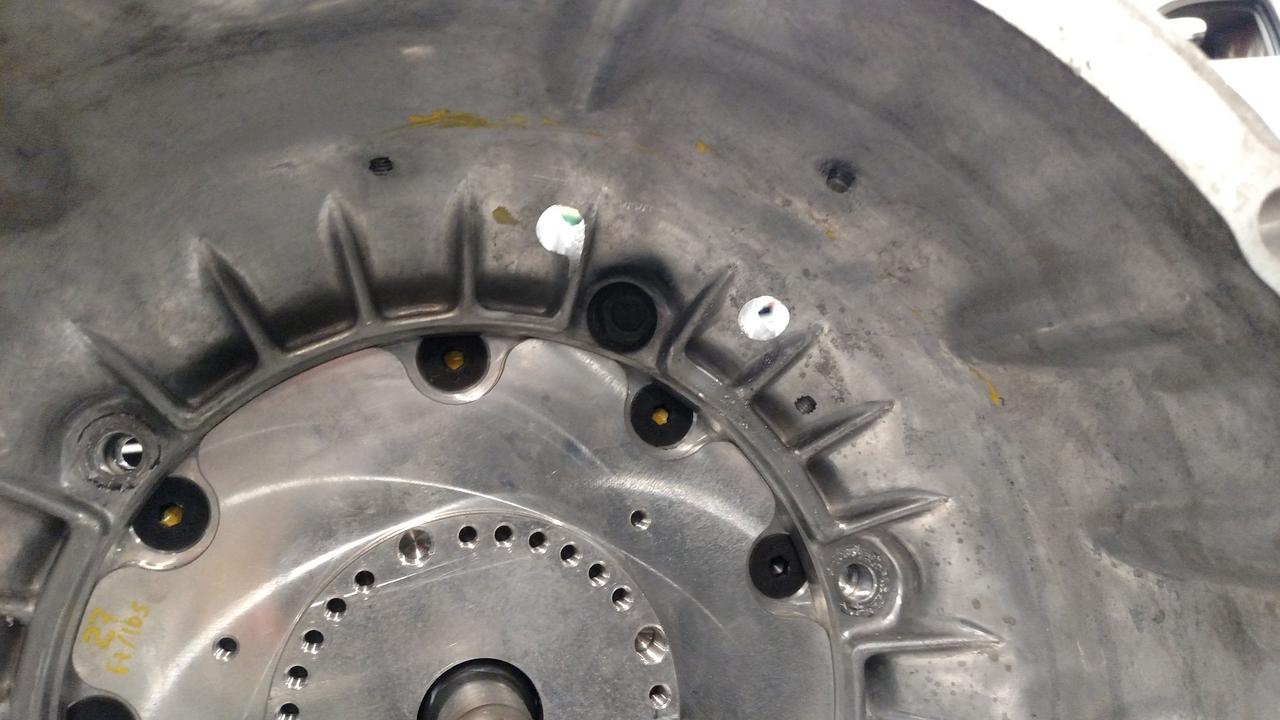
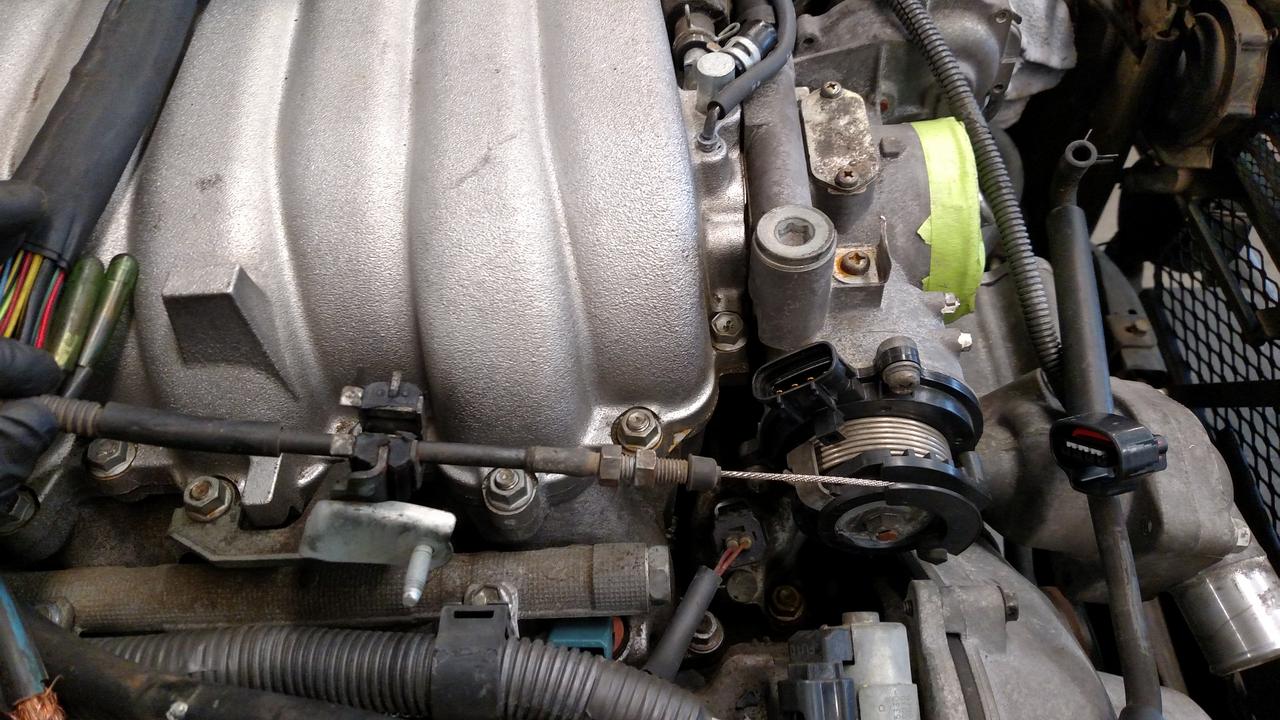
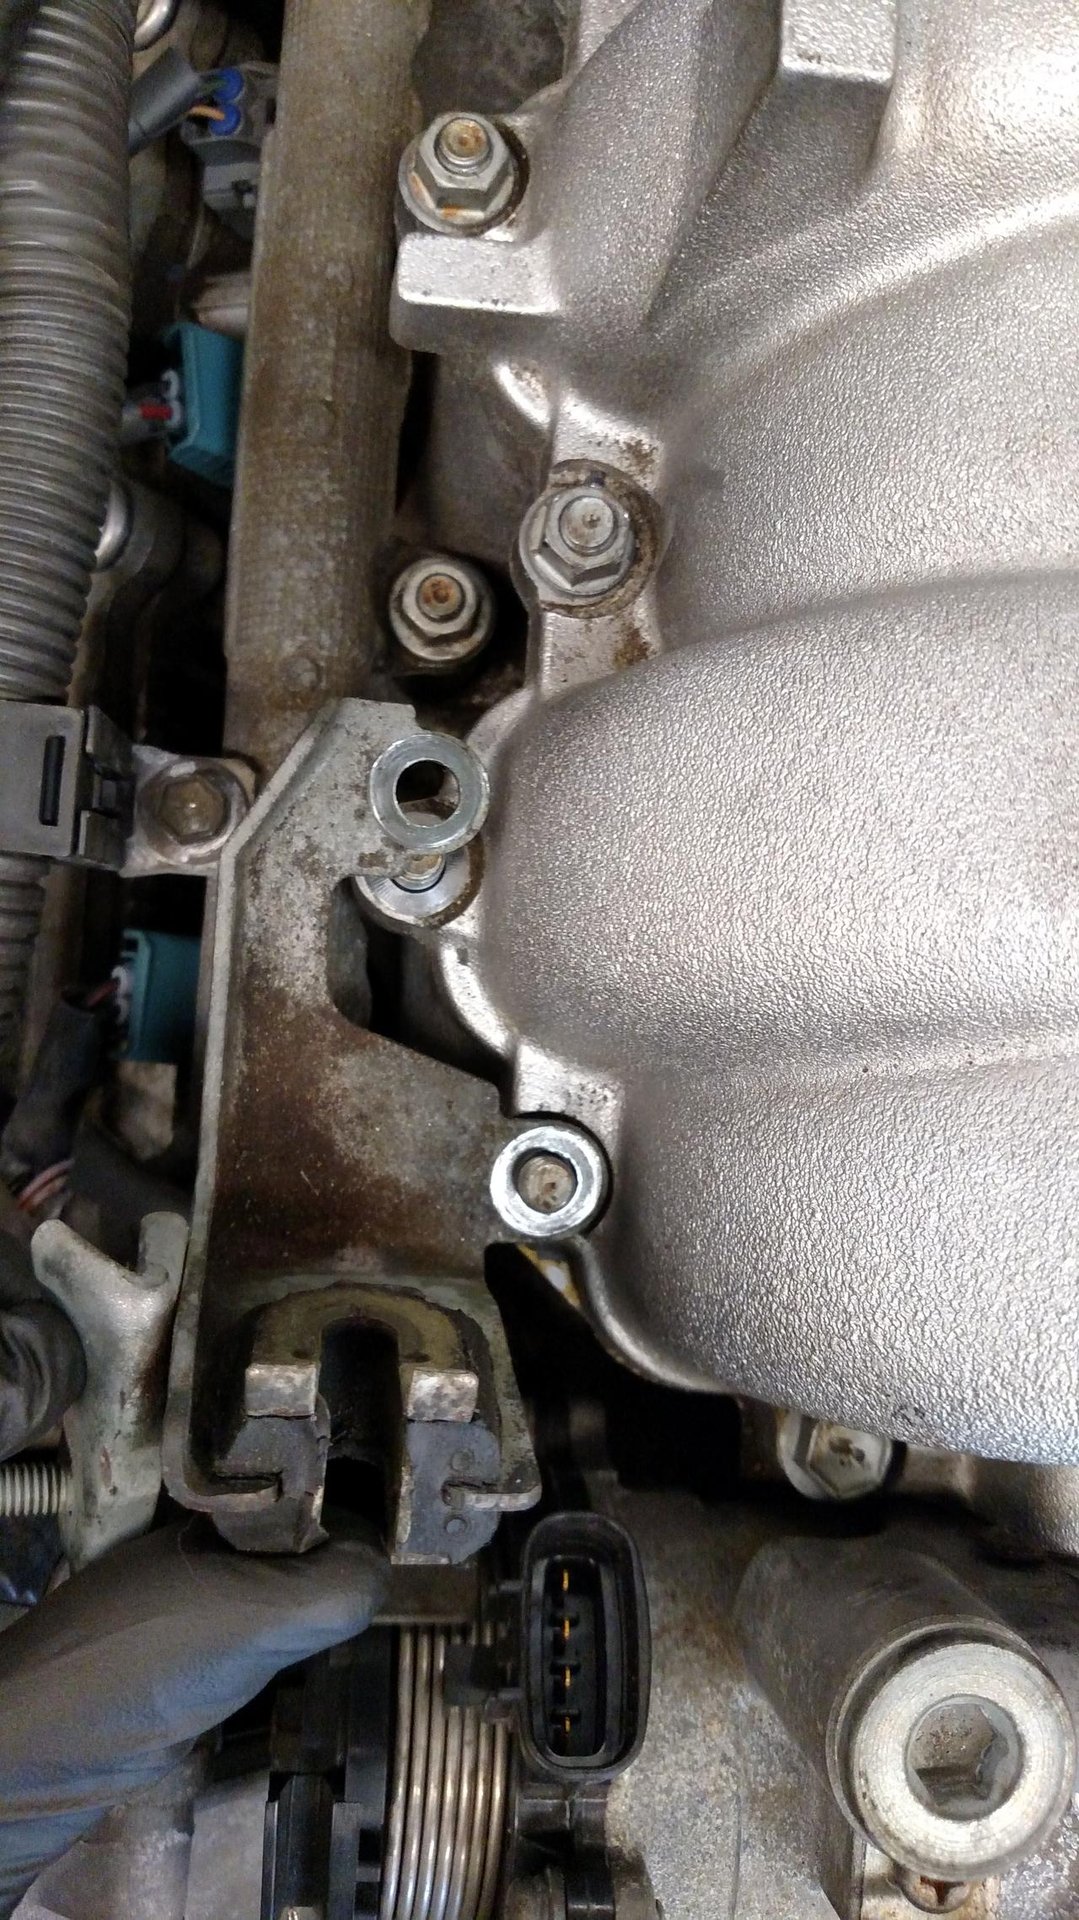
next up was a starter motor mod to making servicing easier if I ever have to replace it. In stock configuration, the starter bolts in from the back side of the block. If I have the engine tucked as close to the firewall as possible, that makes removing the bolts very difficult, if not impossible. So the fix is to tap the holes for M10x1.25 helicoils - no need to drill the holes in the block, they are already the perfect size. In the pic, the left side hole is already heli-coiled.
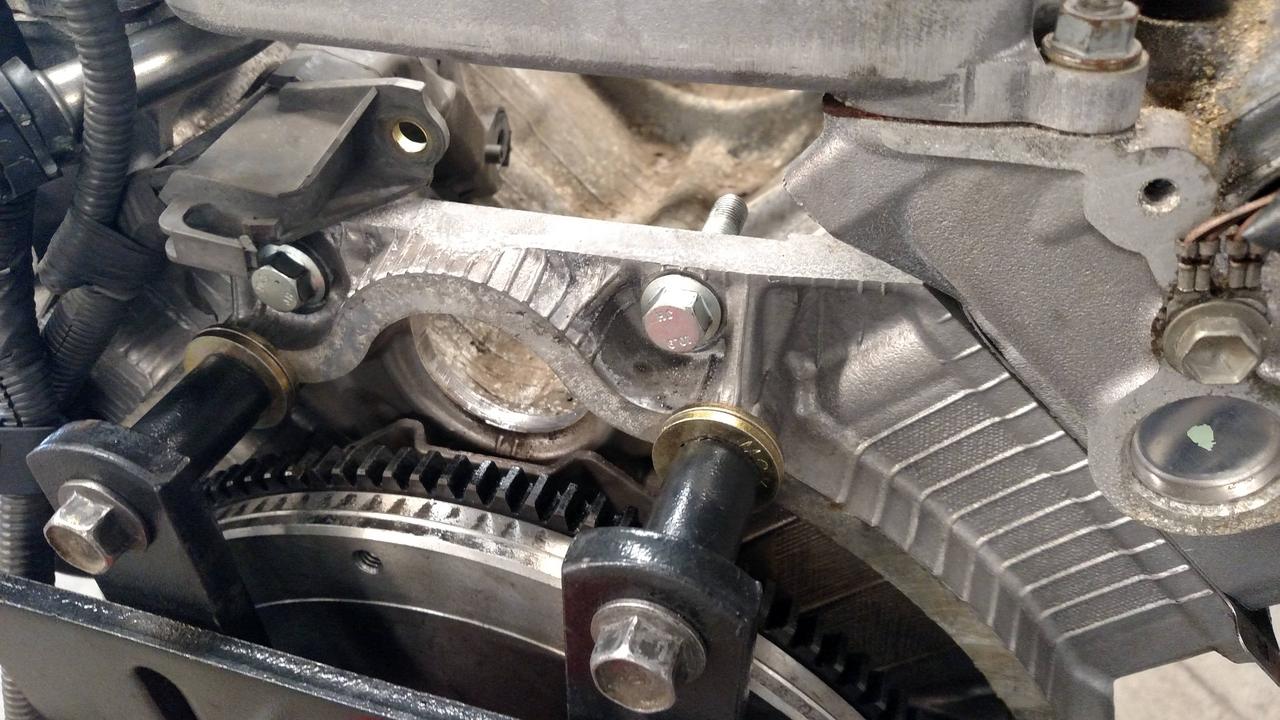
run 2 M10x1.25 x 45mm long bolts in from the back side. You can also see my shiny new flywheel. The 1UZ was never offered with a manual trans, so this is from a 3VZE engine with slightly elongated bolt holes. The center bore is a very tight fit on the snout at the end of the crank, so I have no worries about it being concentric.
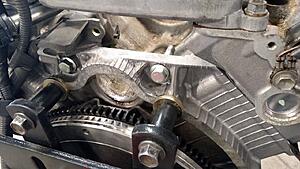
note the slot I cut in the end of the bolt (painted yellow) - if the bolts do have to be removed, just break them loose with a wrench and use a screw driver from the front side to thread them out towards the rear of the truck
see the way the harness is routed in on the right side in the pic above? this meant I had to use a plain crows foot to tighten the stud/bolt under the harness. Kind of a pain, but hopefully not as bad as having to remove the bolts from between the engine and the firewall
I got the engine side of the engine mounts made. These were cut and drilled out of 1/4" plate to reduce warpage when I weld on the part which goes down to the rubber mounts, otherwise, 1/8" probably would have sufficed. I also got a start on making the brackets to relocate the power steering pump to the driver side - pics of those when I get them done.

If you look really close, it's the same exact engine in the pic from post #3 above. That was just a random pic on eBay that I stole almost a year ago, and it ended up being the same exact engine I ordered.
first order of business was to unbolt the big heavy cast iron manifolds and bolt on the GX470 log style manifolds I saved for this project (note, the cats were cut off for clearance, the exhaust will have a bigger cat after the spot where the 2 sides merge). These tuck in really close to the engine and are required for steering gear box clearance on the driver side - not the best design, but it will suffice
next up was a starter motor mod to making servicing easier if I ever have to replace it. In stock configuration, the starter bolts in from the back side of the block. If I have the engine tucked as close to the firewall as possible, that makes removing the bolts very difficult, if not impossible. So the fix is to tap the holes for M10x1.25 helicoils - no need to drill the holes in the block, they are already the perfect size. In the pic, the left side hole is already heli-coiled.
run 2 M10x1.25 x 45mm long bolts in from the back side. You can also see my shiny new flywheel. The 1UZ was never offered with a manual trans, so this is from a 3VZE engine with slightly elongated bolt holes. The center bore is a very tight fit on the snout at the end of the crank, so I have no worries about it being concentric.
note the slot I cut in the end of the bolt (painted yellow) - if the bolts do have to be removed, just break them loose with a wrench and use a screw driver from the front side to thread them out towards the rear of the truck

see the way the harness is routed in on the right side in the pic above? this meant I had to use a plain crows foot to tighten the stud/bolt under the harness. Kind of a pain, but hopefully not as bad as having to remove the bolts from between the engine and the firewall
I got the engine side of the engine mounts made. These were cut and drilled out of 1/4" plate to reduce warpage when I weld on the part which goes down to the rubber mounts, otherwise, 1/8" probably would have sufficed. I also got a start on making the brackets to relocate the power steering pump to the driver side - pics of those when I get them done.
 09-29-2019, 10:00 AM
#6
Registered User
Thread Starter
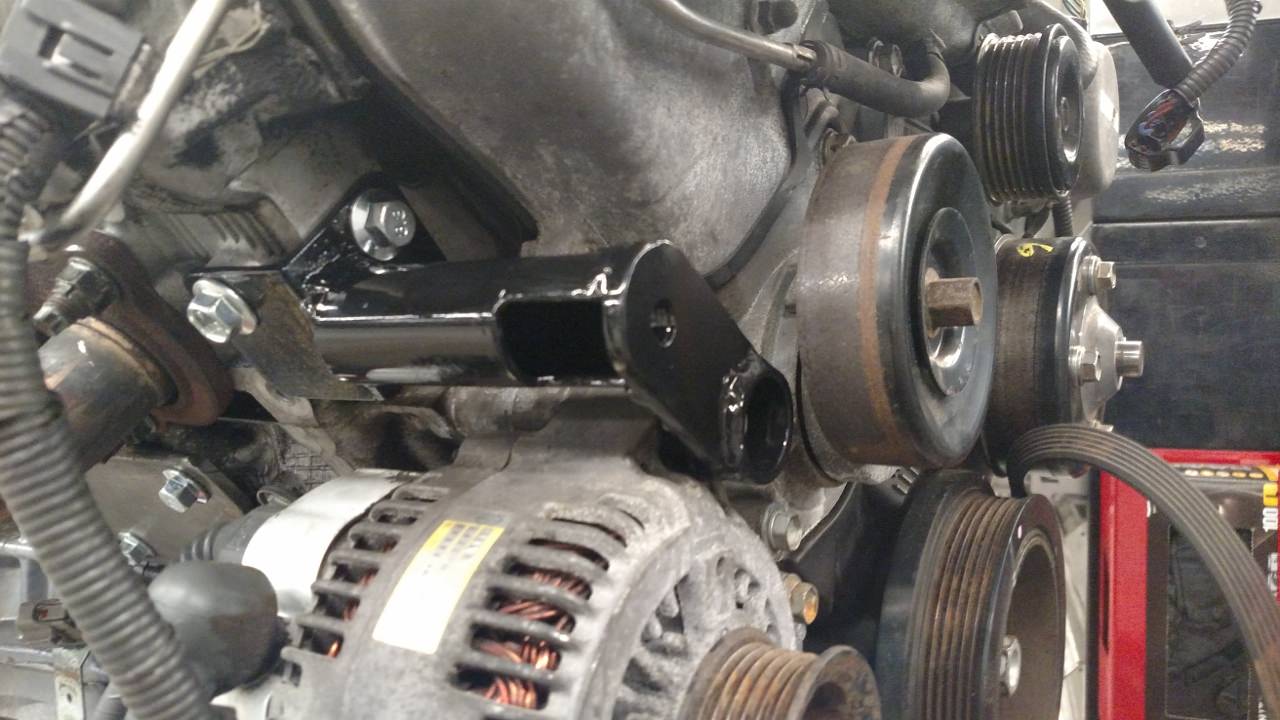
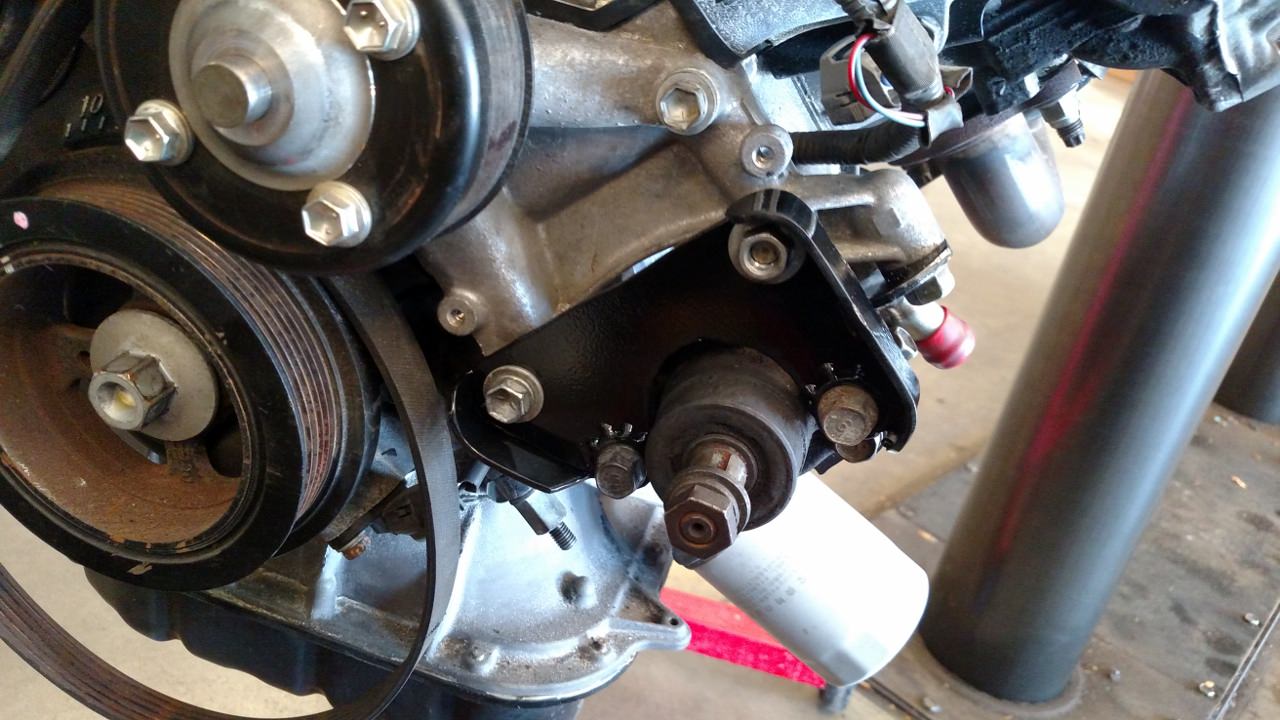
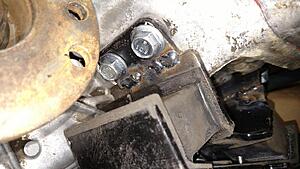
PS pump relocation.
To keep the auto tensioner, I needed an idler where the PS pump used to be on the right side of the engine, so I made this bracket. The idler is the same part as the upper idler pulley

on the left side, for the PS pump. I used a stock 1UZ pulley and had it bored to .710" to work with the 4runner PS pump (keyway was hand filed in 5 minutes). I should be able to use the stock 4runner PS lines with this setup.

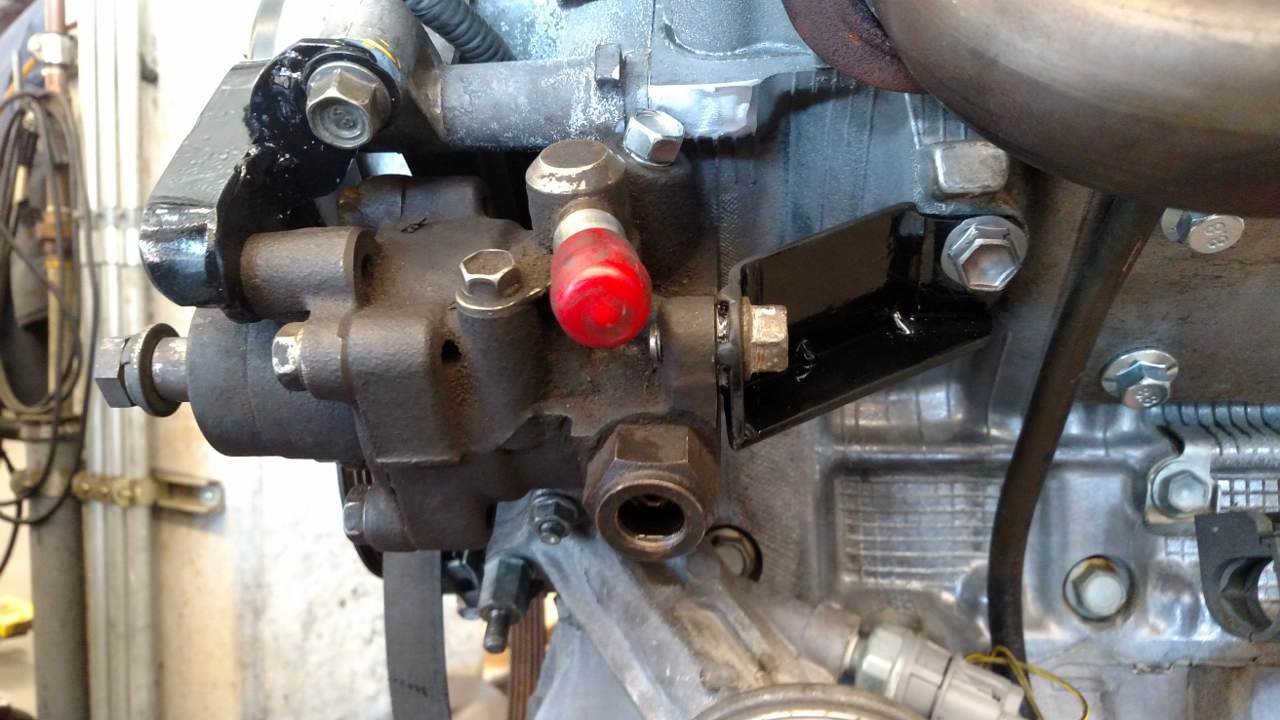
the air control valve which raises the idle slightly when the pump is building pressure was eliminated. There just wasn't enough room if I wanted to keep the pump as close to the engine as possible + I've read online where many people have eliminated leaking ones with no bad side effects.
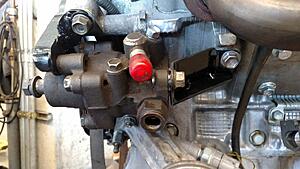
you can see why the extra idler pulley was required to clear the tensioner
To keep the auto tensioner, I needed an idler where the PS pump used to be on the right side of the engine, so I made this bracket. The idler is the same part as the upper idler pulley

on the left side, for the PS pump. I used a stock 1UZ pulley and had it bored to .710" to work with the 4runner PS pump (keyway was hand filed in 5 minutes). I should be able to use the stock 4runner PS lines with this setup.
the air control valve which raises the idle slightly when the pump is building pressure was eliminated. There just wasn't enough room if I wanted to keep the pump as close to the engine as possible + I've read online where many people have eliminated leaking ones with no bad side effects.
you can see why the extra idler pulley was required to clear the tensioner
 09-29-2019, 10:00 AM
#7
Registered User
Thread Starter
Been a busy last few days . . .
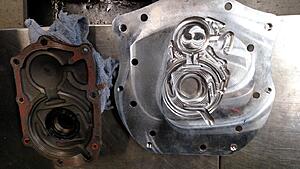
Installed the trans adapter plate. started by removing the front trans plate
side by side view of the adapter plate and the stock front trans plate, note all the oil passages machined into the adapter
all cleaned and ready for the adapter
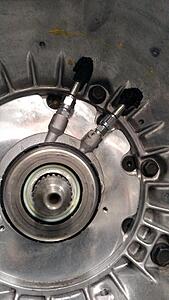
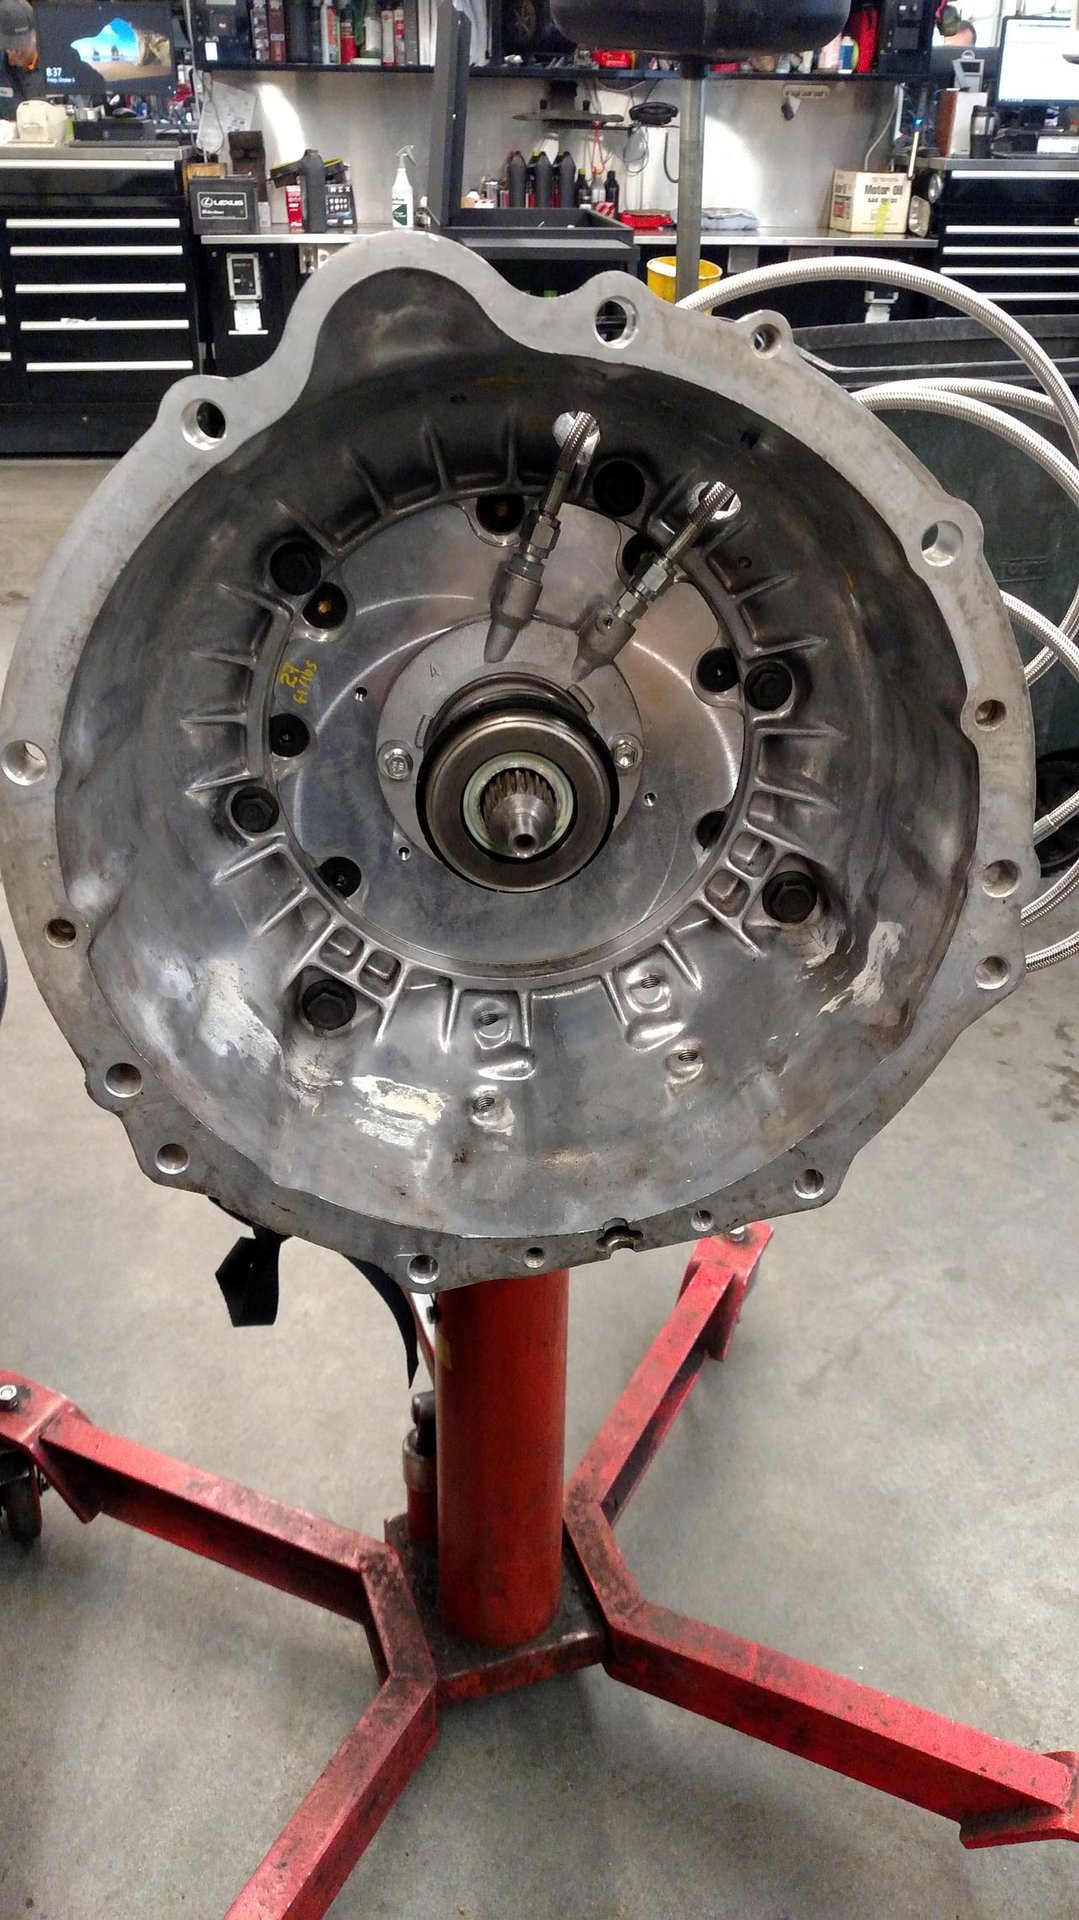
adapter plate installed and locations marked for hoses
5/8" holes drilled
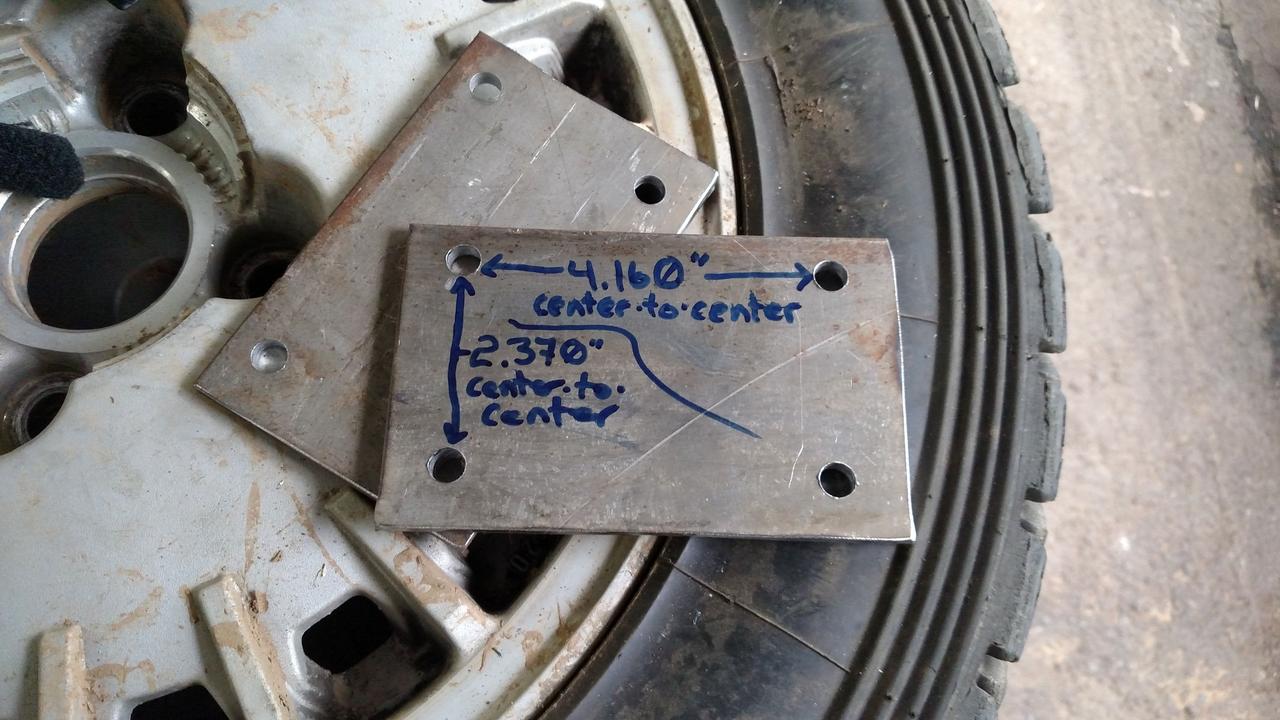
. . . which had to be elongated slightly because my marks were a hair off, here's the distance to the center of the hose

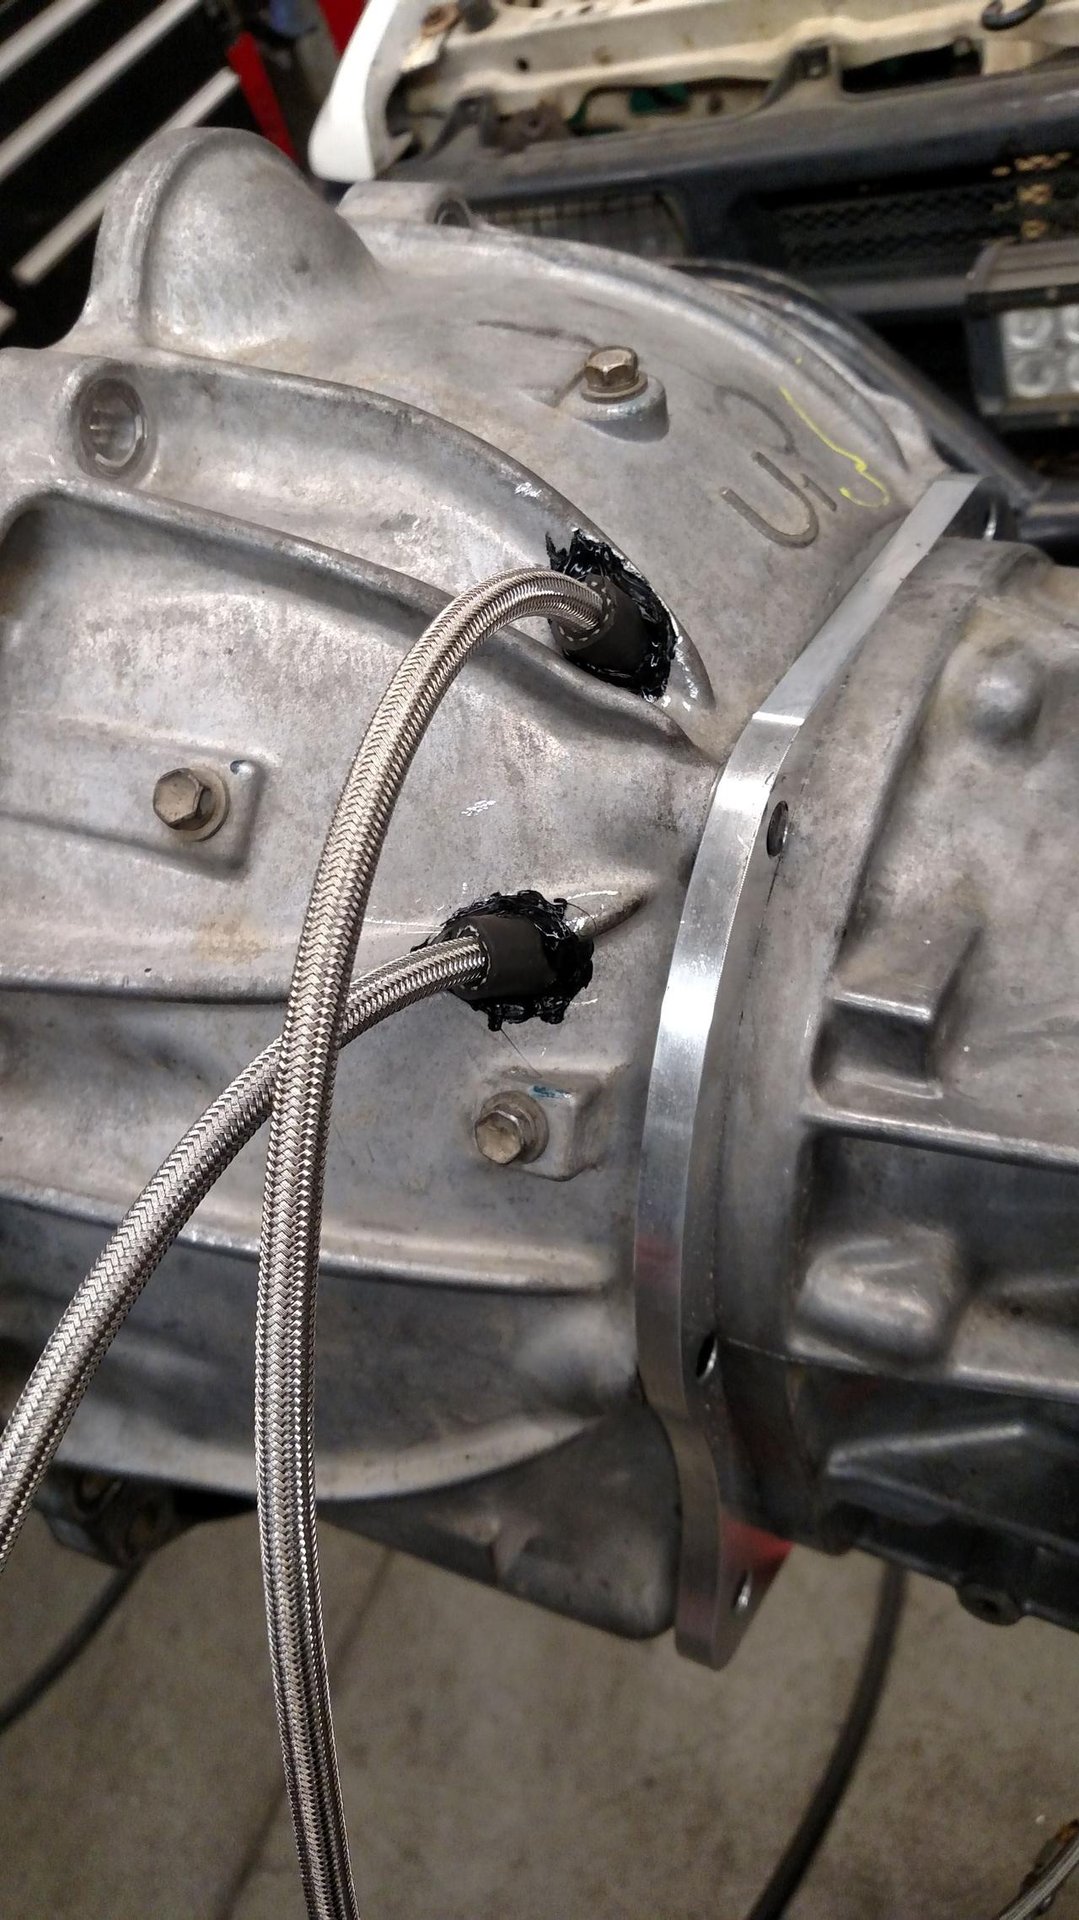
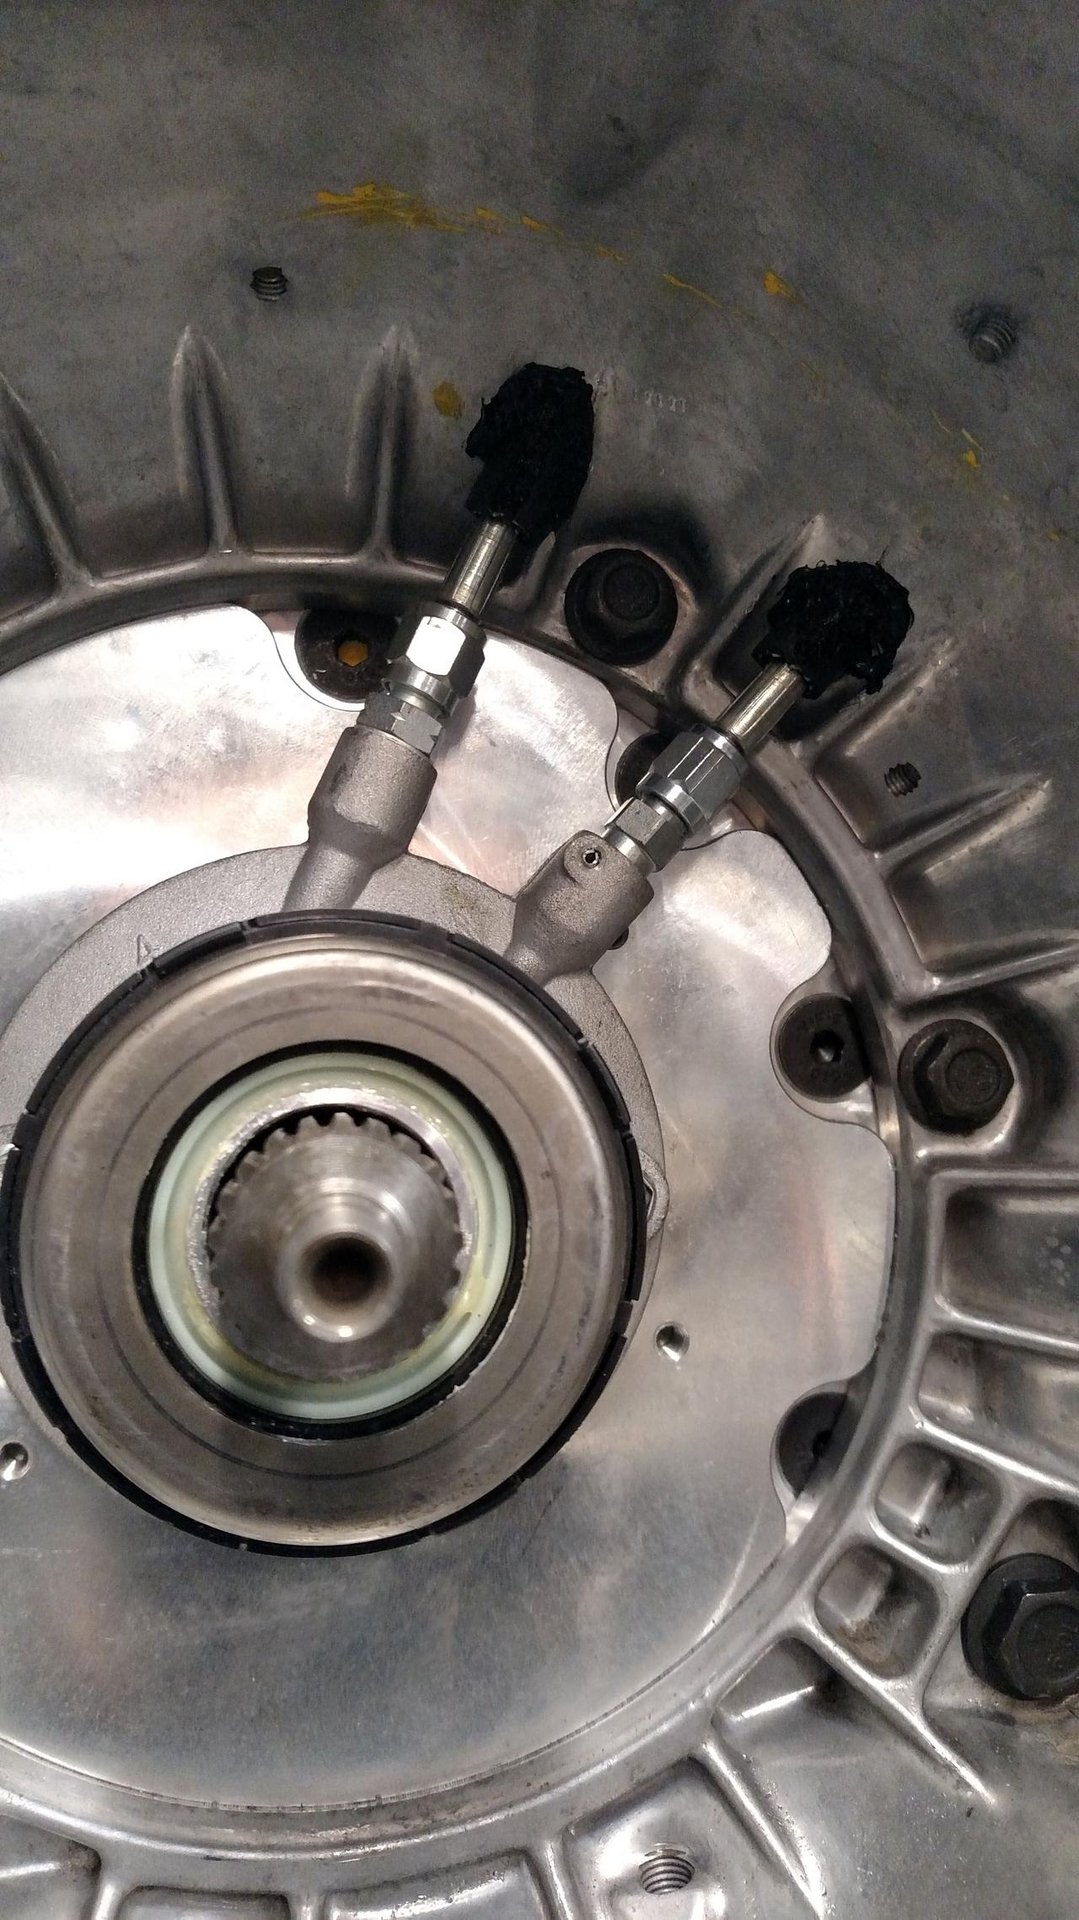
hoses installed

short piece of rubber hose over the clutch slave hose and the holes sealed with Toyota FIPG
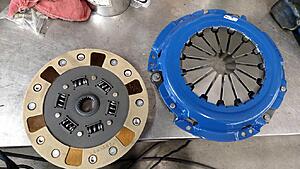
Spec Stage 2 Clutch set I'll be using

ready for the real work to begin, last day the 7MGE will be powering my 4runner

couple hours later. trans removed, engine disconnected and ready to get pulled
end of day 1
Installed the trans adapter plate. started by removing the front trans plate

side by side view of the adapter plate and the stock front trans plate, note all the oil passages machined into the adapter

all cleaned and ready for the adapter

adapter plate installed and locations marked for hoses
5/8" holes drilled
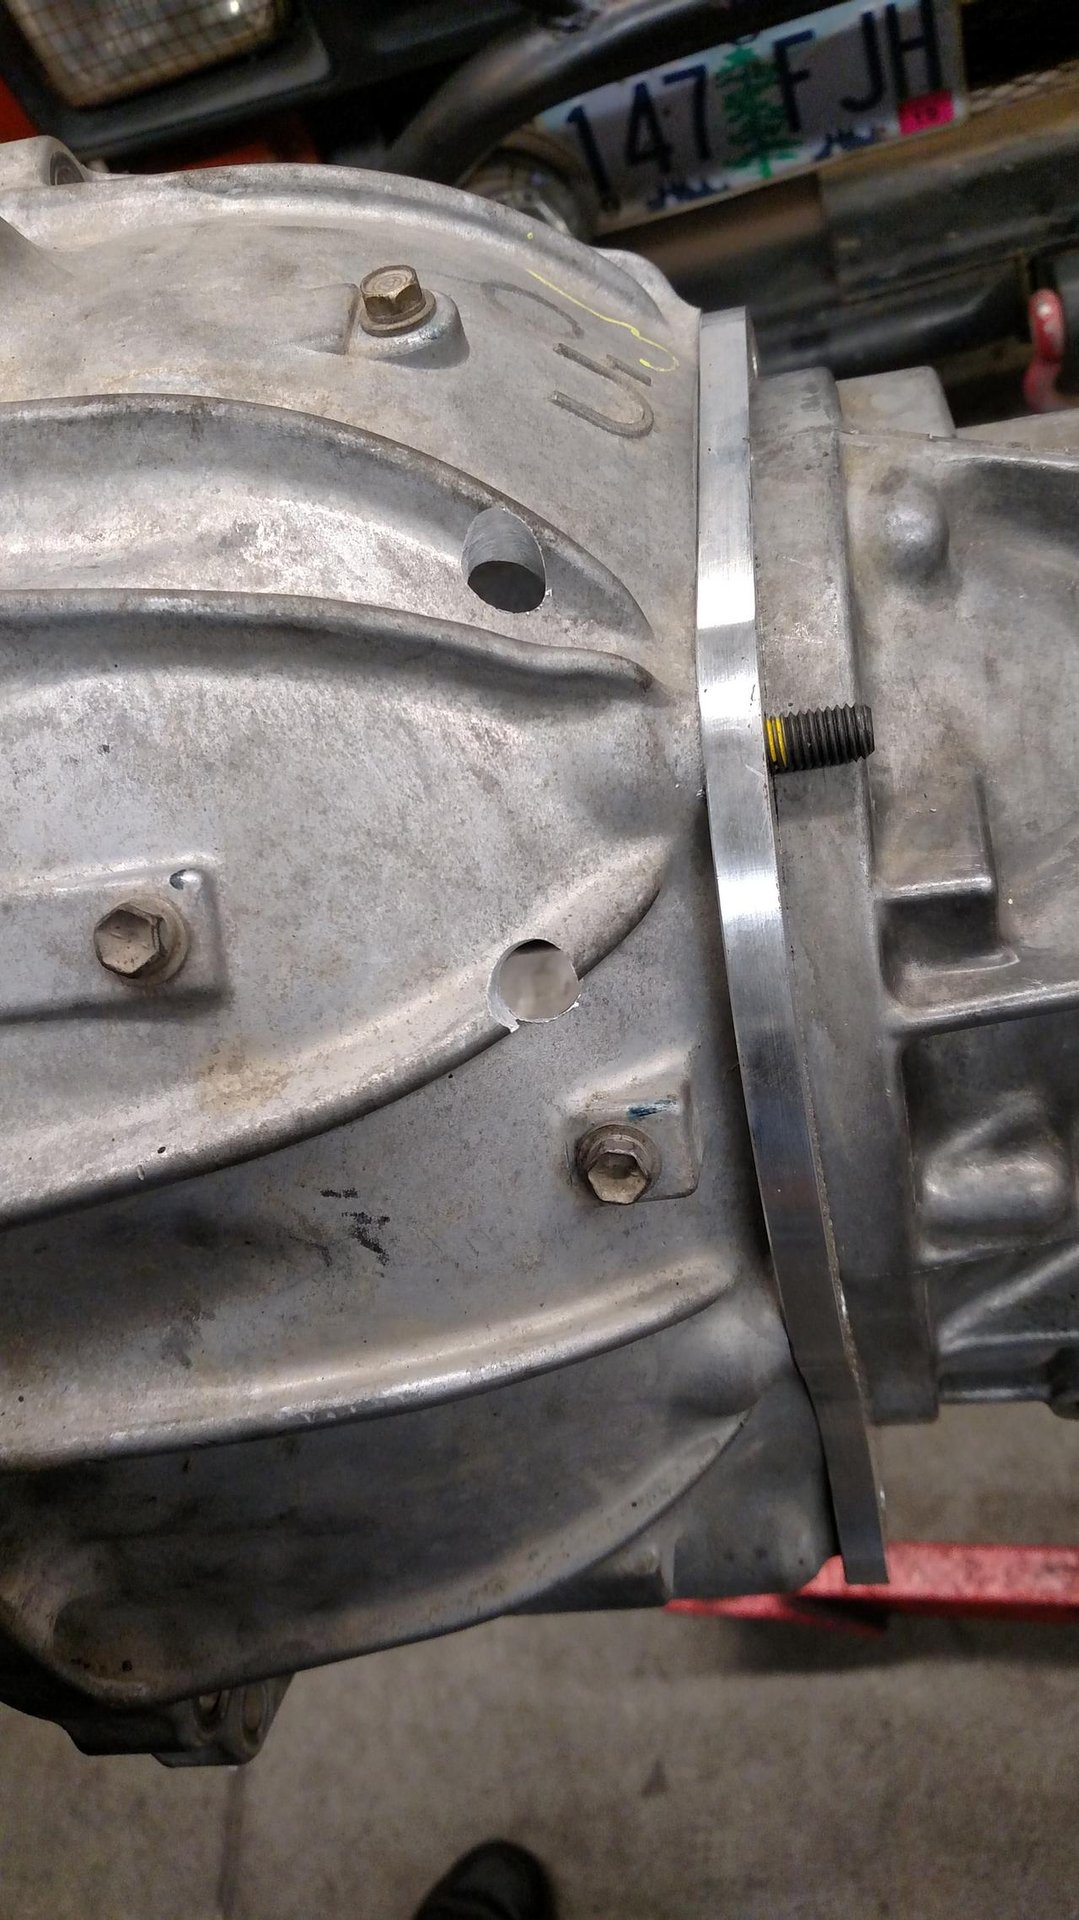
. . . which had to be elongated slightly because my marks were a hair off, here's the distance to the center of the hose

hoses installed
short piece of rubber hose over the clutch slave hose and the holes sealed with Toyota FIPG
Spec Stage 2 Clutch set I'll be using
ready for the real work to begin, last day the 7MGE will be powering my 4runner
couple hours later. trans removed, engine disconnected and ready to get pulled

end of day 1
Trending Topics
09-29-2019, 10:01 AM
#8
Registered User
Thread Starter
the stock oil filter adapter interferes with the frame rail, so this adapter was installed. I'll be running JIC (-8AN) connectors/hoses to a remote mount filter

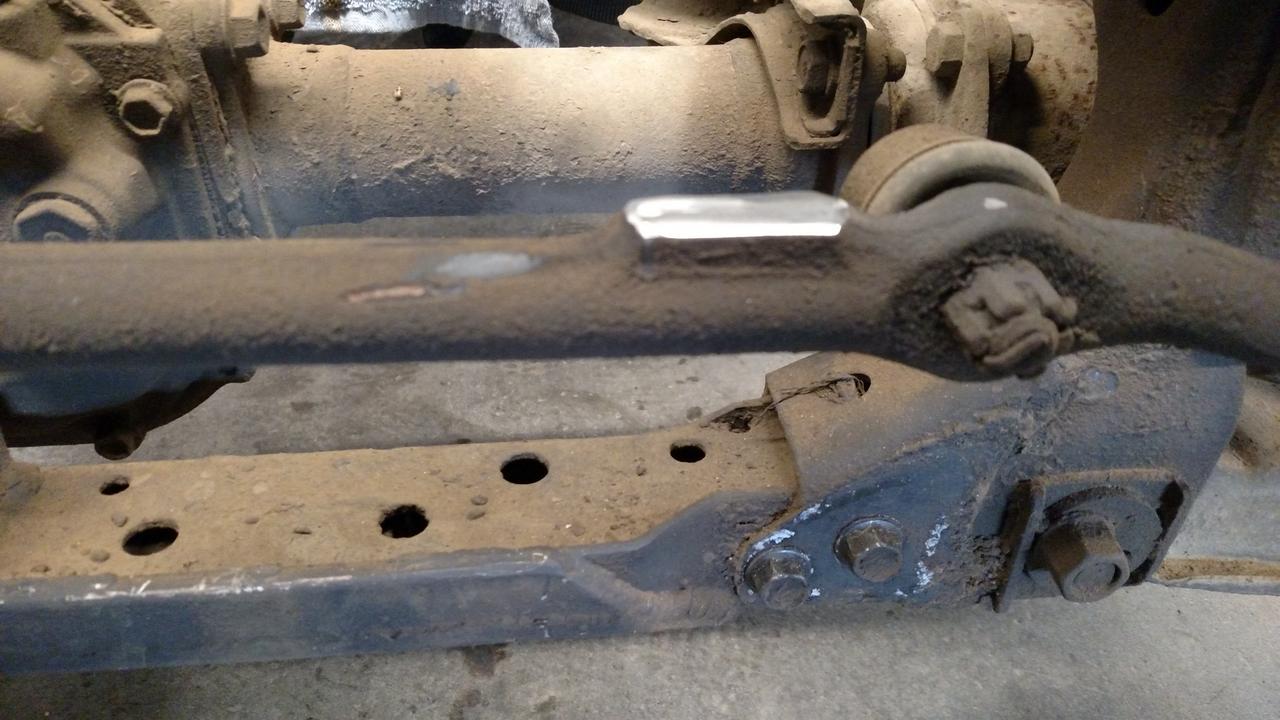
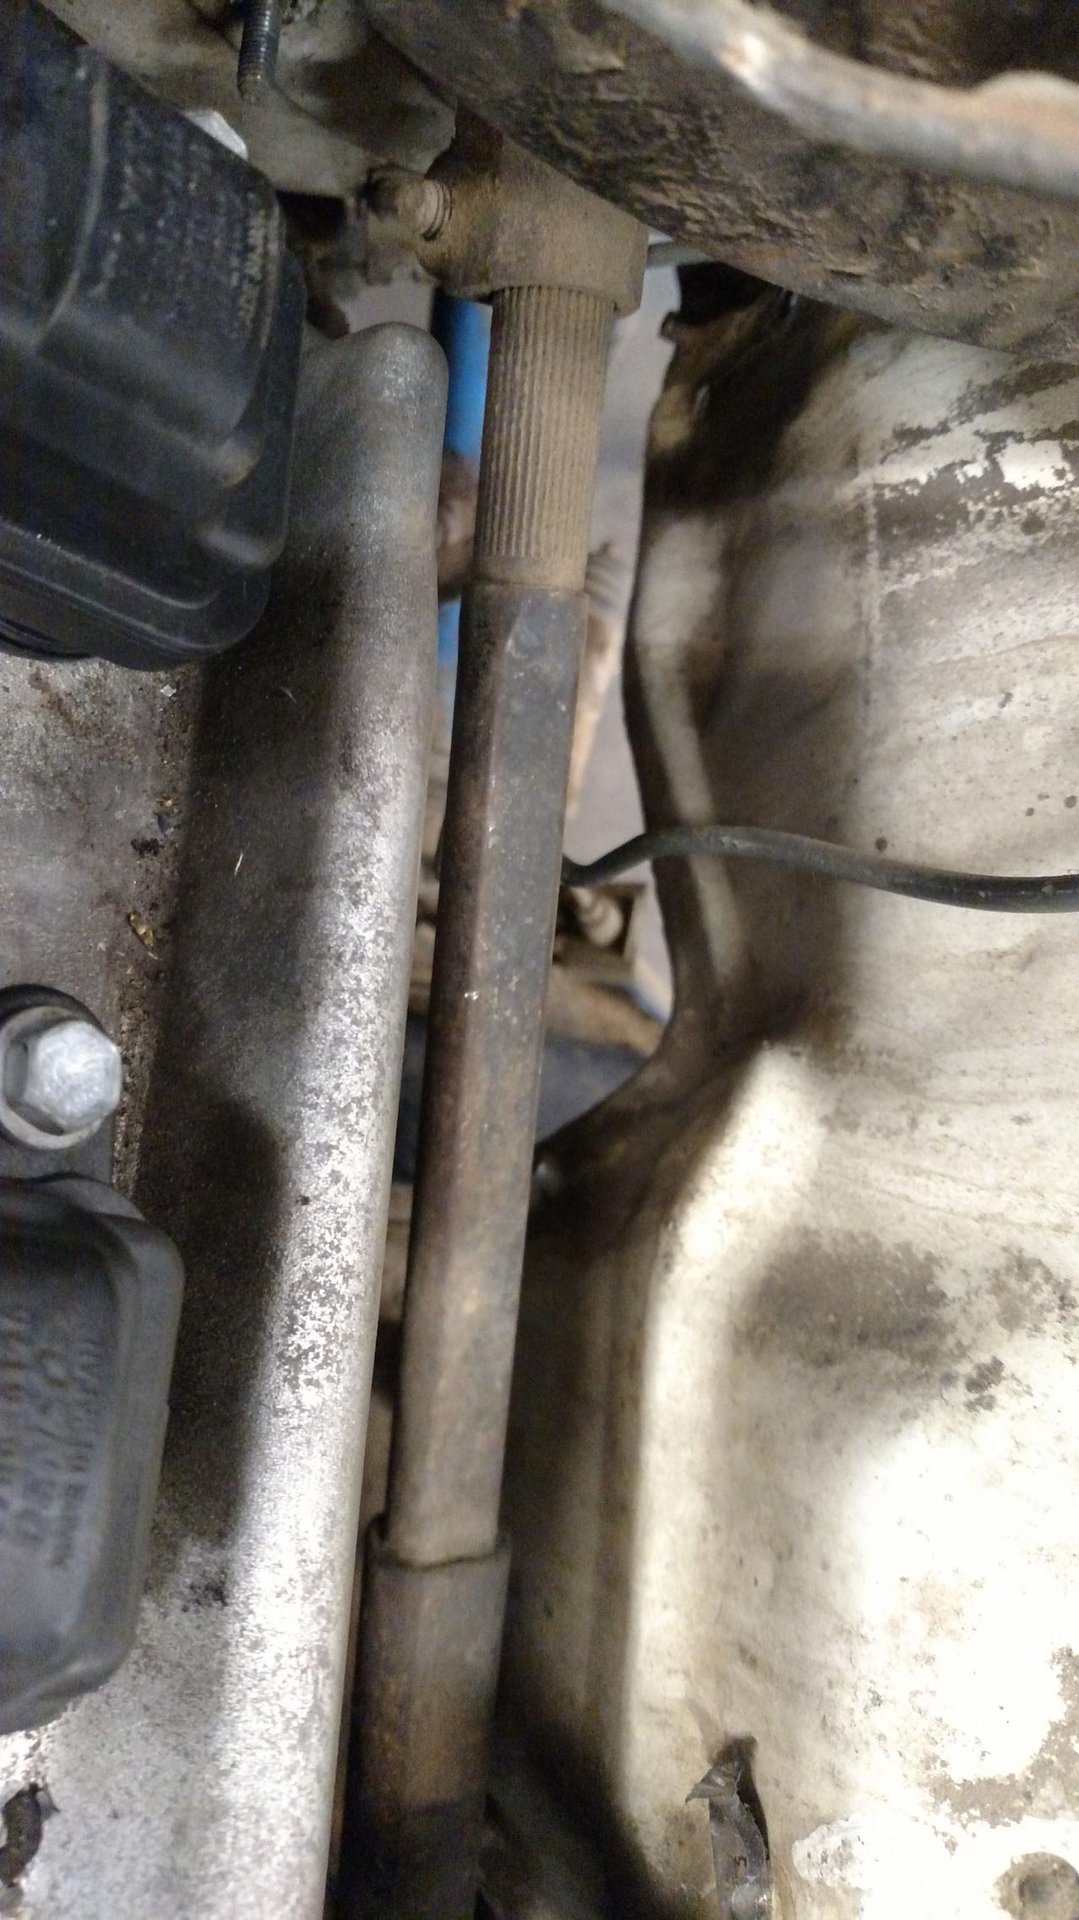
steering linkage ground down . . . you'll see why in a little bit

this is the original brake line routing, the 2 lines in the middle had to be moved, the fuel line I added years ago on the right was removed - again, you'll see in a few pics how/why

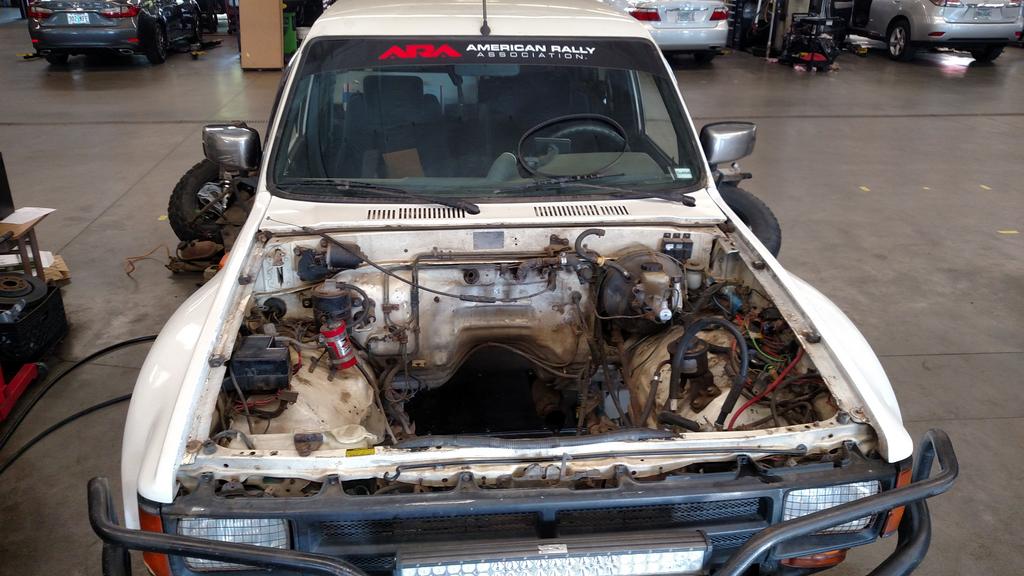
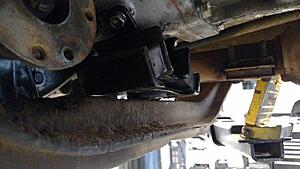
end of day 2 - trans was installed (rear was set on cross member, front was held up with a ratchet strap between the frame rails), engine is test fitted with the oil pan resting on a 5/8" piece of wood on top of the steering linkage (for clearance while I fabbed up the engine brackets, should have gone with a 3/4" piece), and the engine brackets were finalized and painted
the next day, I pulled the engine again to clearance some items. you can see the brake lines which were getting pinched by the valve cover were just moved over to a new bolt hole and the firewall was clearanced a bit with a body hammer. I would have liked to move everything back another inch, but this was the best I could get it.

clearance after the engine was reinstalled
steering shaft clearance on the driver side (there's actually a tiny bit more than it looks like) - remember that under acceleration, the engine is going to roll away from it
this is also another reason why I couldn't move it back any further - another 1/2" back and the valve cover would be hitting the steering shaft coupler
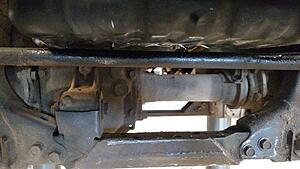
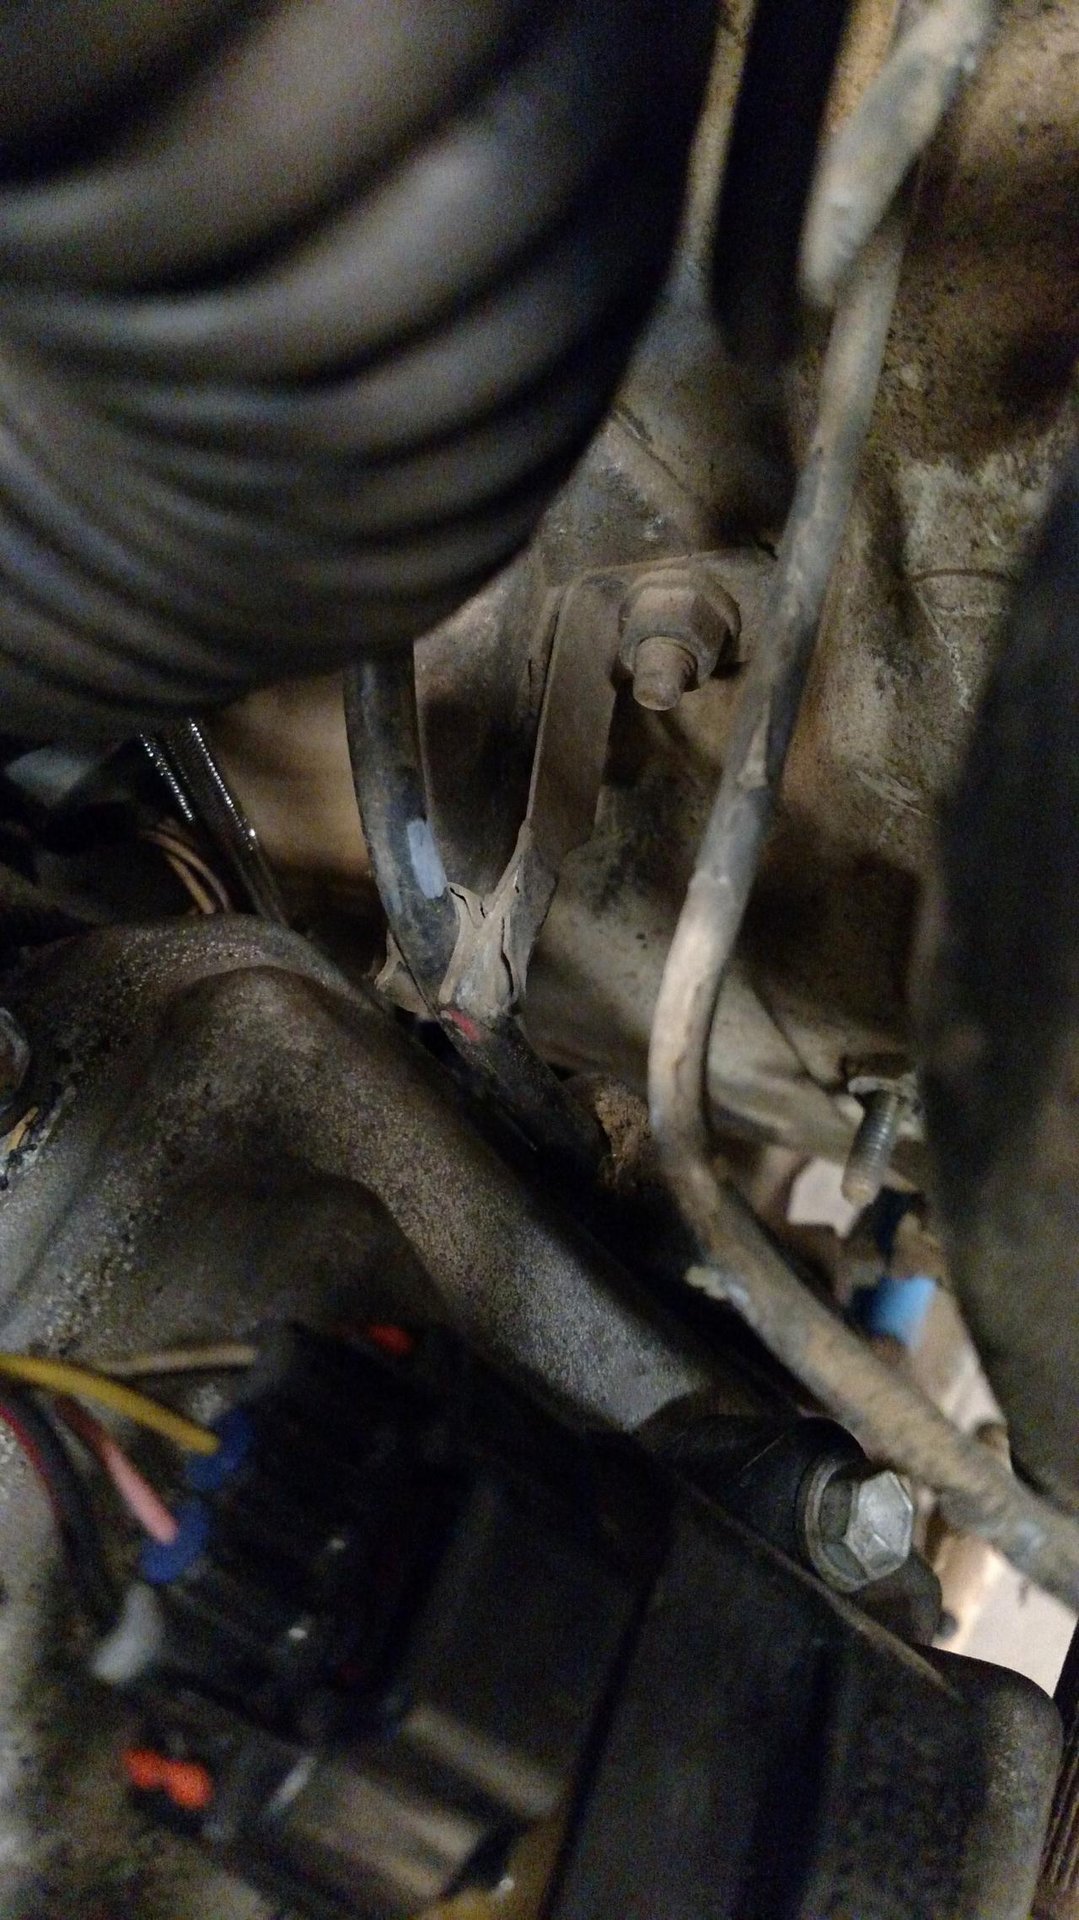
third reason why I couldn't go back any further, the engine is right up on the parking brake cable bracket and speedo cable
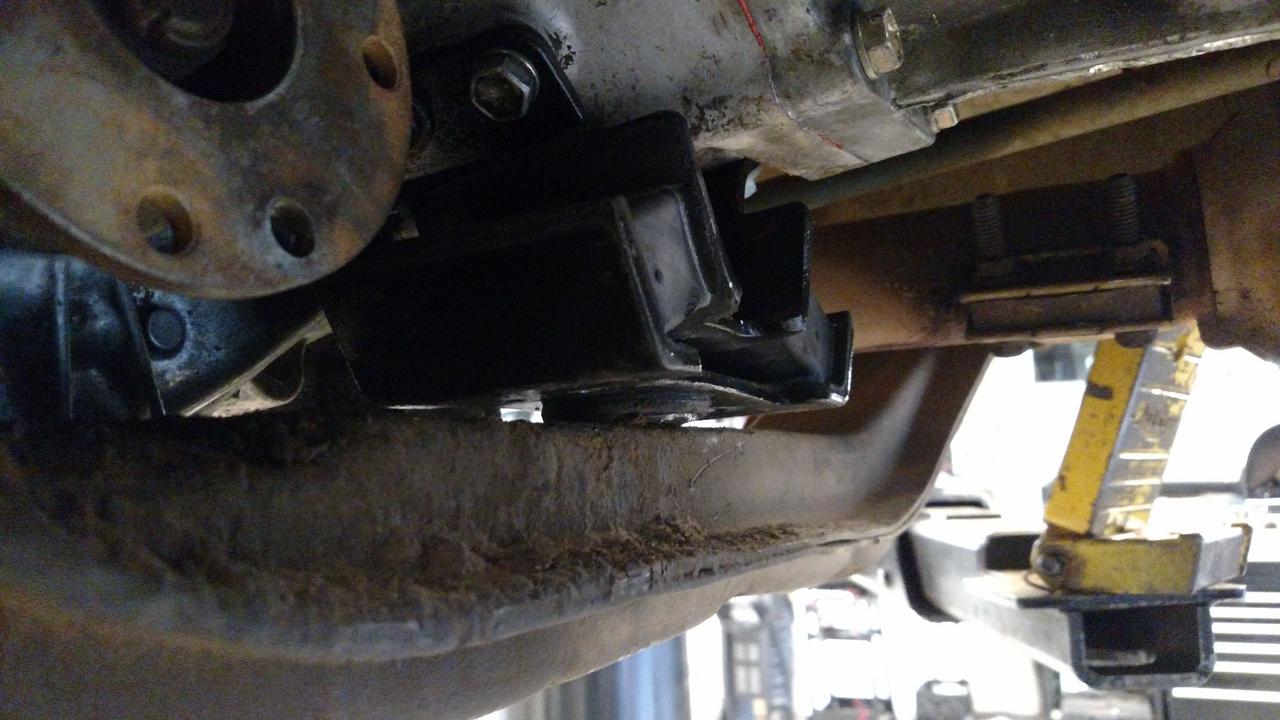
all of this left me with the trans mount about 1" too far forward to drop into the pocket on the trans cross member (more on that later)
with the weight of the engine on brand new 22RE rubber mounts, the oil pan dropped about 1/2" and was a bit too close (I used 5/8" spacers when I made the brackets). On the plus side, the linkage drops away from the pan when the wheels are turned to either side

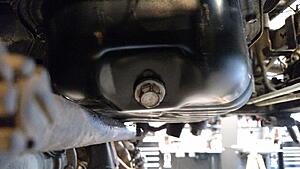
the poly engine mounts I was using on the 7M had 1/4" spacers underneath them, I reused one of the spacers and that gave me enough space to feel comfortable about oil pan clearance. I'll probably add a spacer to the other side as well later
I didn't get a chance yet to compare how much the stock throttle cable moves vs. how much it takes to open the throttle on the engine, but the 1UZ throttle bracket will obviously not work
i tried moving it forward one set of holes, but it won't work + the mount itself is too thick for the stock cable to allow any adjustment

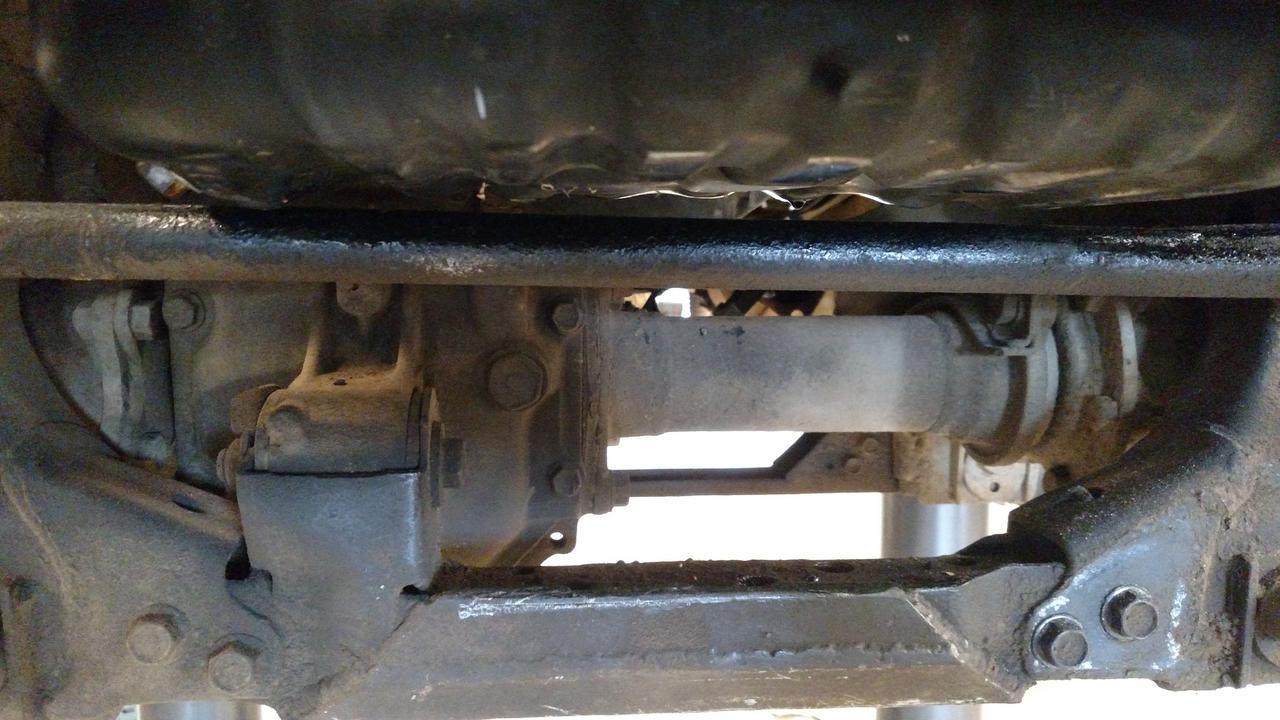
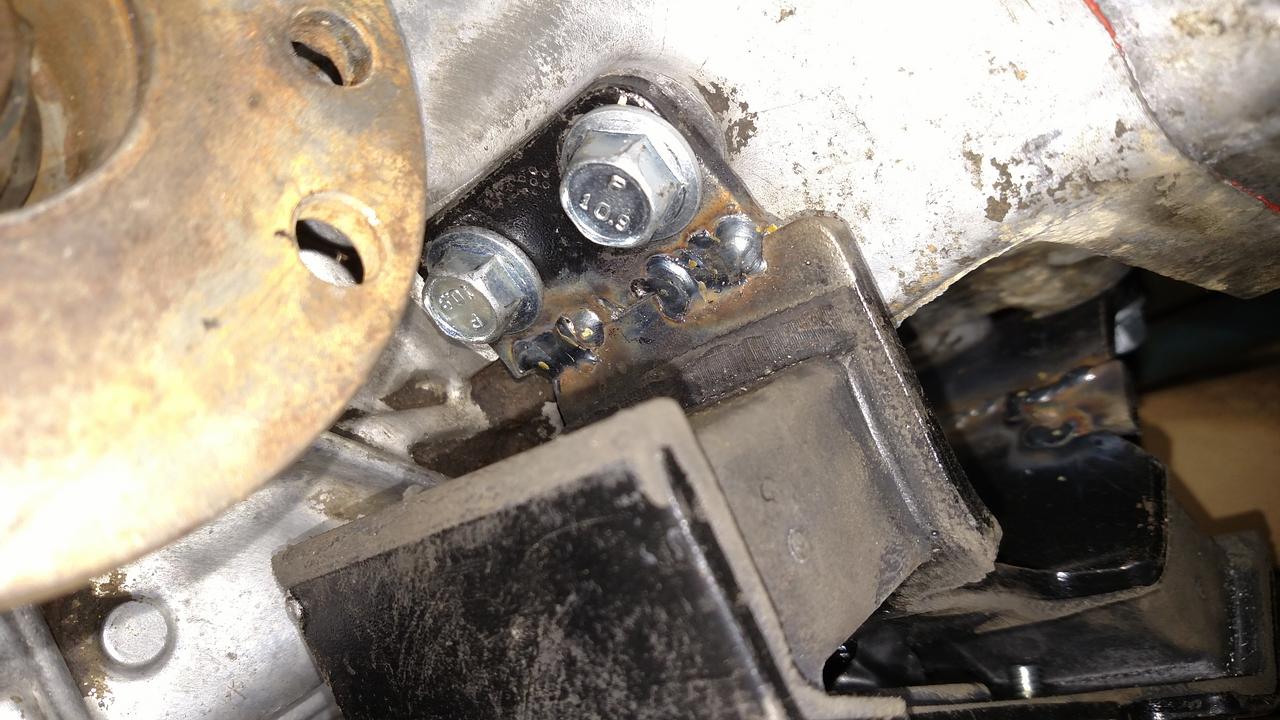
back to the trans mount . . . slotting out holes in the cross member and trans mount didn't give me enough shift to get it to bolt up. you know the saying, "if all you have is a hammer, everything looks like a nail"? well, if you have a welder, anything metal is whatever the hell you want it to be (trans mount cut/rewelded). yes, the welds look crappy, but they passed the hammer test. I don't think anyone changed the tip on the shop welder since I did it about 5 years ago. could have done better with my welder at home, probably going to make a tube crossmember and use a completely stock mount when I have some time
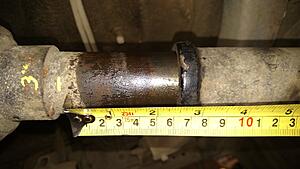
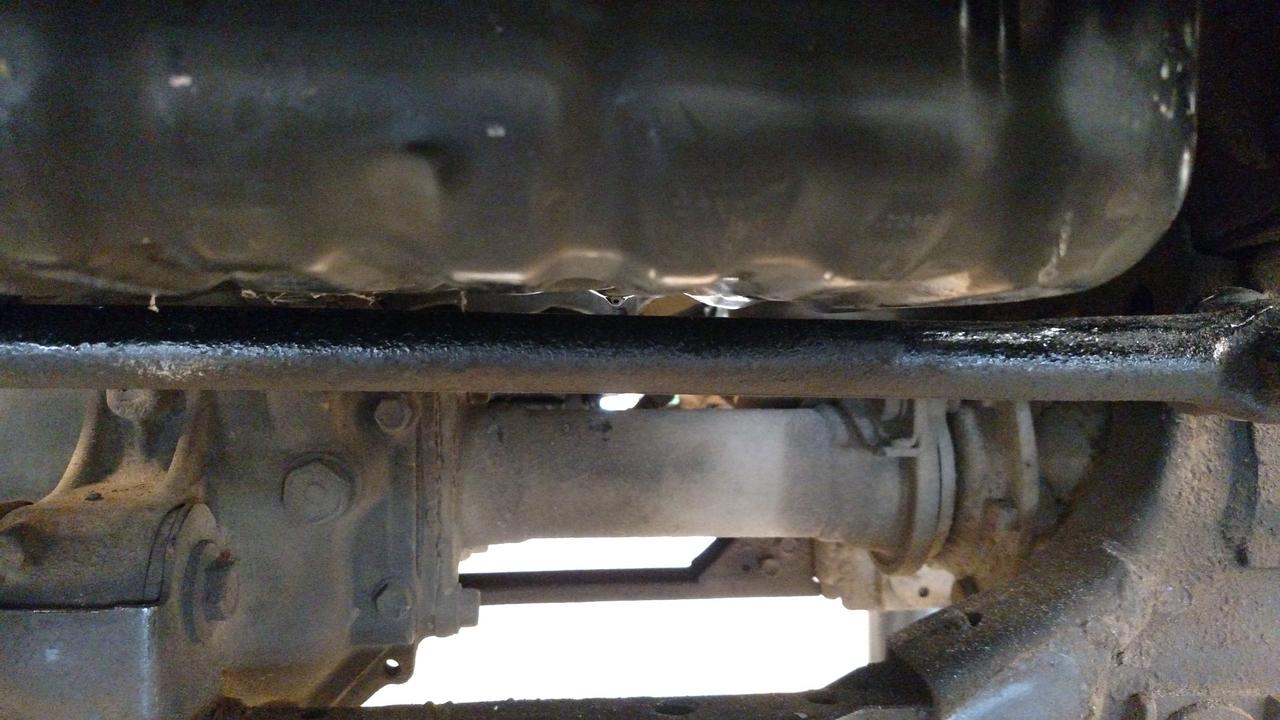
I believe I won't have to get the rear driveshaft cut or lengthened. From fully collapsed to extended to the point where the slip yoke is right at the edge of the seal is about 3.125". At full droop, I still have 5/8" of an inch before the slip yoke pulls out of the seal and a bit more before the slip yoke comes apart. Once it's on the ground I can remeasure, and if I think it's necessary, I have an old GX470 driveshaft which is slightly longer. The stock one is still only 1/2" more extended than it was originally
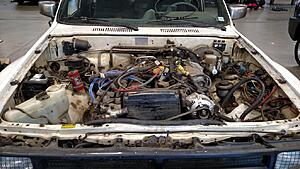
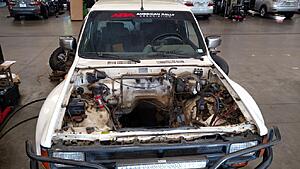
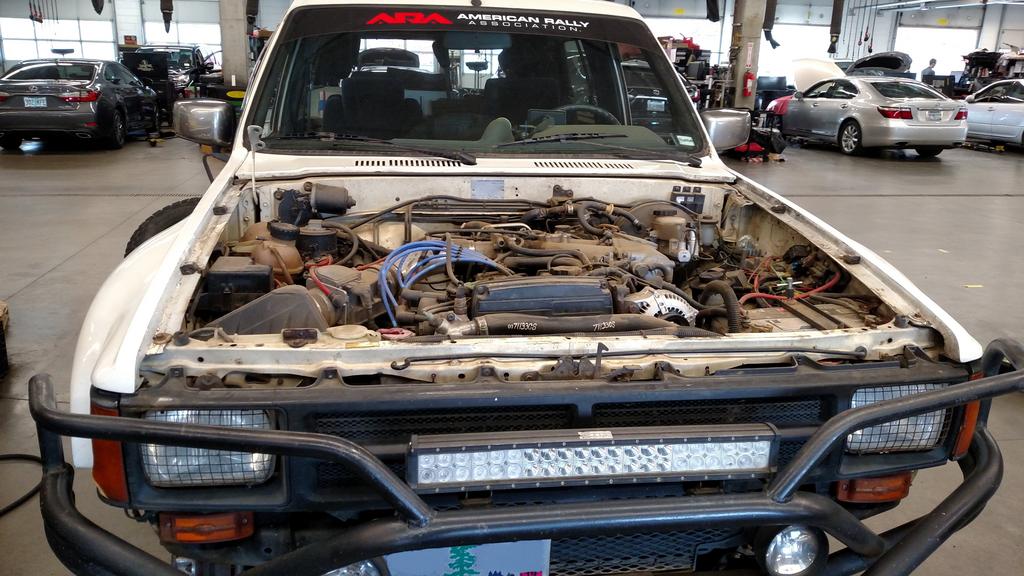
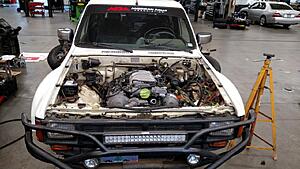
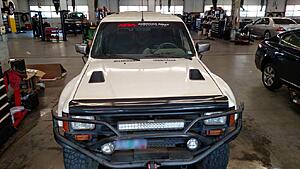
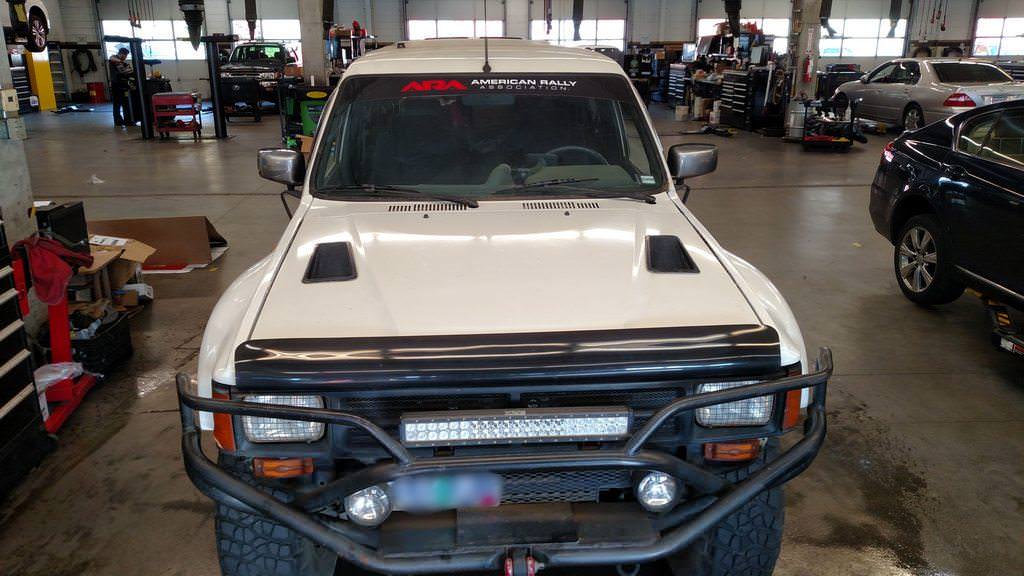
end of day 3. engine, trans, rear driveshaft installed. time for wiring and a few other ancillaries. After 30 years of the slip yoke not moving, the front driveshaft slip yoke is stuck/seized - I'm hoping soaking it and some heat will free it up. Check it out, the hood closes and it looks drivable again[img]data:image/gif;base64,R0lGODlhAQABAIAAAAAAAP///yH5BAEAAAAALAAAAAABAAEAAAIBRAA7[/img]
steering linkage ground down . . . you'll see why in a little bit
this is the original brake line routing, the 2 lines in the middle had to be moved, the fuel line I added years ago on the right was removed - again, you'll see in a few pics how/why
end of day 2 - trans was installed (rear was set on cross member, front was held up with a ratchet strap between the frame rails), engine is test fitted with the oil pan resting on a 5/8" piece of wood on top of the steering linkage (for clearance while I fabbed up the engine brackets, should have gone with a 3/4" piece), and the engine brackets were finalized and painted

the next day, I pulled the engine again to clearance some items. you can see the brake lines which were getting pinched by the valve cover were just moved over to a new bolt hole and the firewall was clearanced a bit with a body hammer. I would have liked to move everything back another inch, but this was the best I could get it.
clearance after the engine was reinstalled
steering shaft clearance on the driver side (there's actually a tiny bit more than it looks like) - remember that under acceleration, the engine is going to roll away from it
this is also another reason why I couldn't move it back any further - another 1/2" back and the valve cover would be hitting the steering shaft coupler
third reason why I couldn't go back any further, the engine is right up on the parking brake cable bracket and speedo cable
all of this left me with the trans mount about 1" too far forward to drop into the pocket on the trans cross member (more on that later)
with the weight of the engine on brand new 22RE rubber mounts, the oil pan dropped about 1/2" and was a bit too close (I used 5/8" spacers when I made the brackets). On the plus side, the linkage drops away from the pan when the wheels are turned to either side
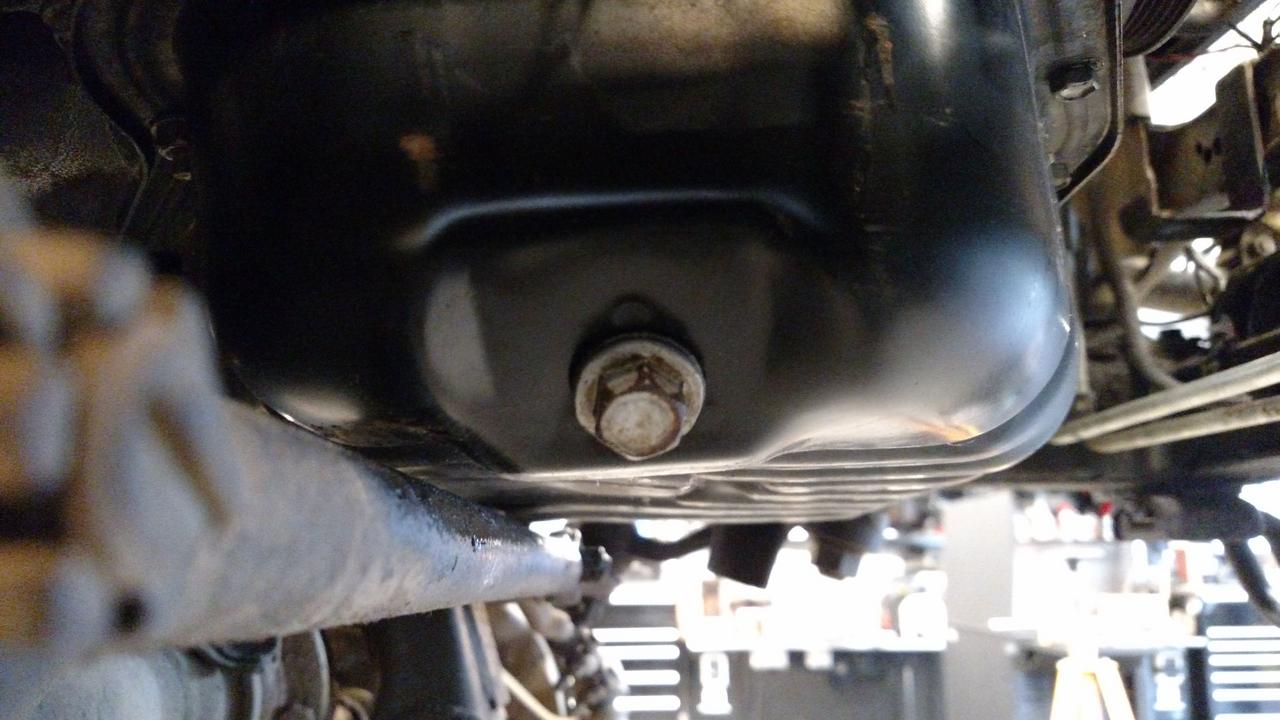
the poly engine mounts I was using on the 7M had 1/4" spacers underneath them, I reused one of the spacers and that gave me enough space to feel comfortable about oil pan clearance. I'll probably add a spacer to the other side as well later
I didn't get a chance yet to compare how much the stock throttle cable moves vs. how much it takes to open the throttle on the engine, but the 1UZ throttle bracket will obviously not work
i tried moving it forward one set of holes, but it won't work + the mount itself is too thick for the stock cable to allow any adjustment
back to the trans mount . . . slotting out holes in the cross member and trans mount didn't give me enough shift to get it to bolt up. you know the saying, "if all you have is a hammer, everything looks like a nail"? well, if you have a welder, anything metal is whatever the hell you want it to be (trans mount cut/rewelded). yes, the welds look crappy, but they passed the hammer test. I don't think anyone changed the tip on the shop welder since I did it about 5 years ago. could have done better with my welder at home, probably going to make a tube crossmember and use a completely stock mount when I have some time
I believe I won't have to get the rear driveshaft cut or lengthened. From fully collapsed to extended to the point where the slip yoke is right at the edge of the seal is about 3.125". At full droop, I still have 5/8" of an inch before the slip yoke pulls out of the seal and a bit more before the slip yoke comes apart. Once it's on the ground I can remeasure, and if I think it's necessary, I have an old GX470 driveshaft which is slightly longer. The stock one is still only 1/2" more extended than it was originally

end of day 3. engine, trans, rear driveshaft installed. time for wiring and a few other ancillaries. After 30 years of the slip yoke not moving, the front driveshaft slip yoke is stuck/seized - I'm hoping soaking it and some heat will free it up. Check it out, the hood closes and it looks drivable again[img]data:image/gif;base64,R0lGODlhAQABAIAAAAAAAP///yH5BAEAAAAALAAAAAABAAEAAAIBRAA7[/img]
 09-29-2019, 10:02 AM
#9
Registered User
Thread Starter
Monday, a coworker borrowed a trailer and towed my 4runner home for me where I can finish the rest of the swap

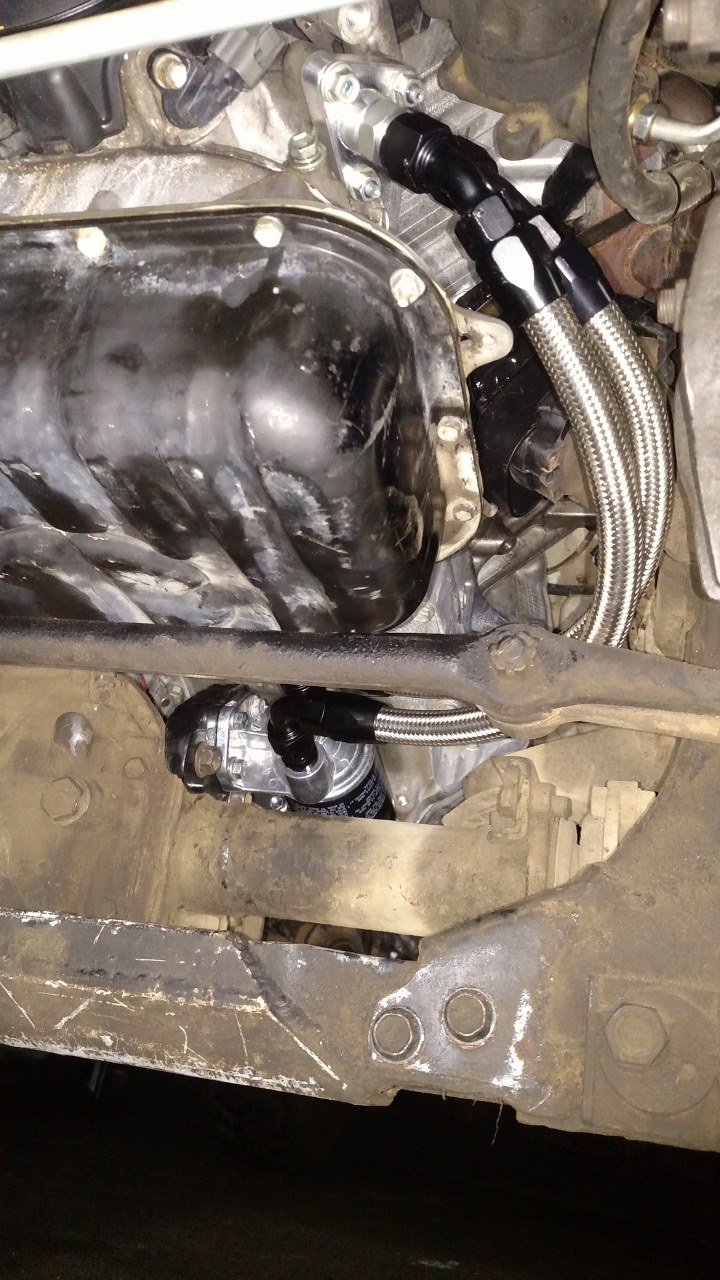
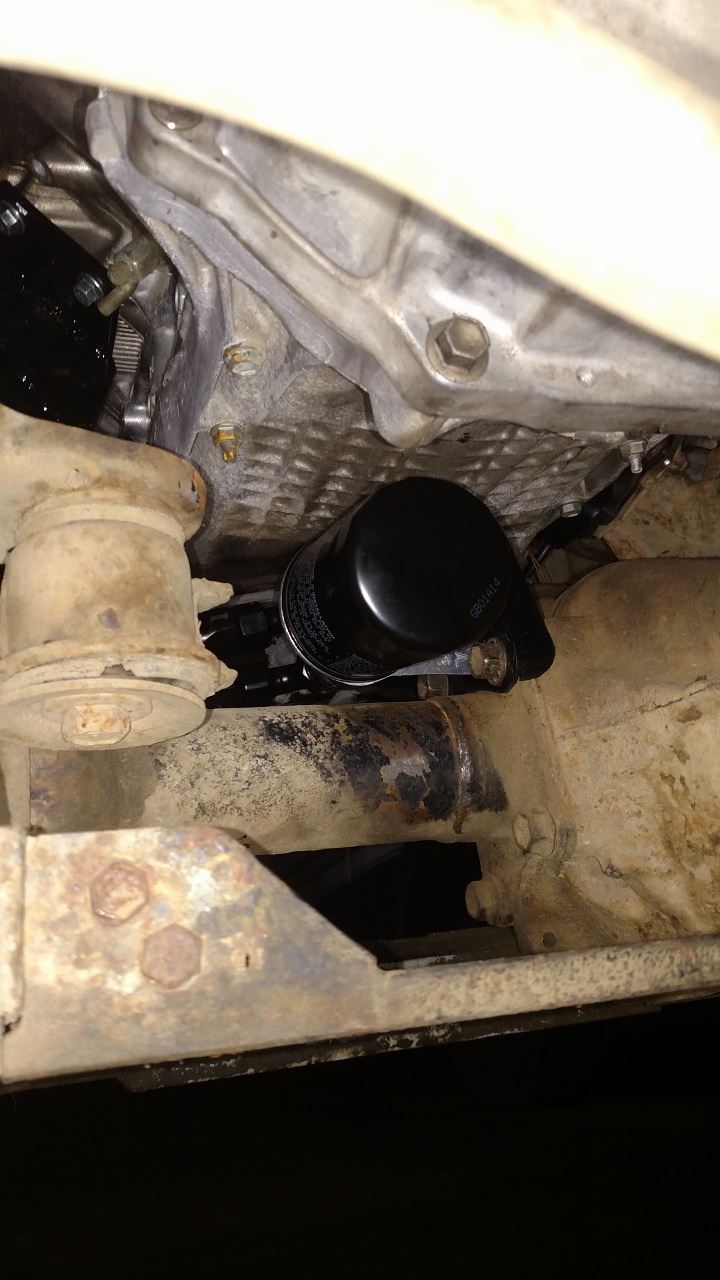
One of the first orders of business is to get it so I can move it around in gear with the starter, so I had to finish the oil filter relocation. Tuesday, I figured out that the -8AN oil filter adapter I ordered for the engine was actually -10AN, and none of the hoses and fittings I ordered last year would work. So I ordered new -10AN pieces, and while I was waiting for them to show up, made a bracket to bolt the filter mount onto the front diff.
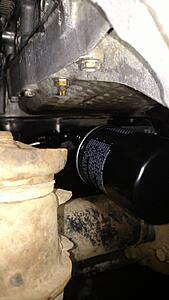
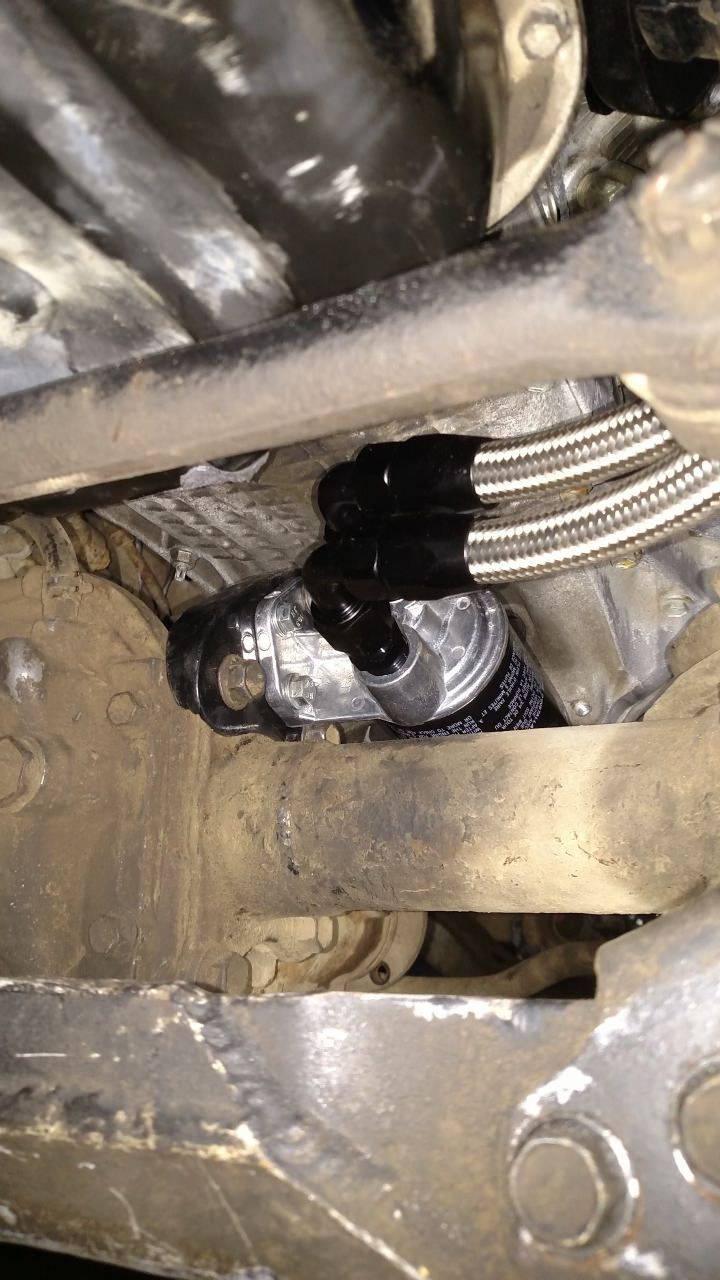
Nice, short hoses, about 14" long each, and full flow fittings (bent tube, not a drilled block of metal) should reduce restriction to flow. Note, the 45 degree -10 fittings barely fit next to each other on the engine adapter.
Partial view of my bracket on the front diff. I used to use cardboard a lot when making pieces like this. Now I like to measure the bolt holes, distance between the holes, then I go inside to make a model of it in Sketchup (CAD), and when I'm done, I can print the exact pattern. My brackets are so exact now, I can drill holes to the same size as the bolts (so they barely slide through) and everything lines up without having to elongate or file anything bigger.
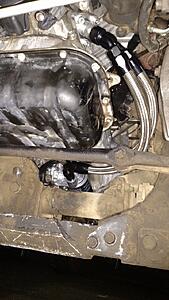
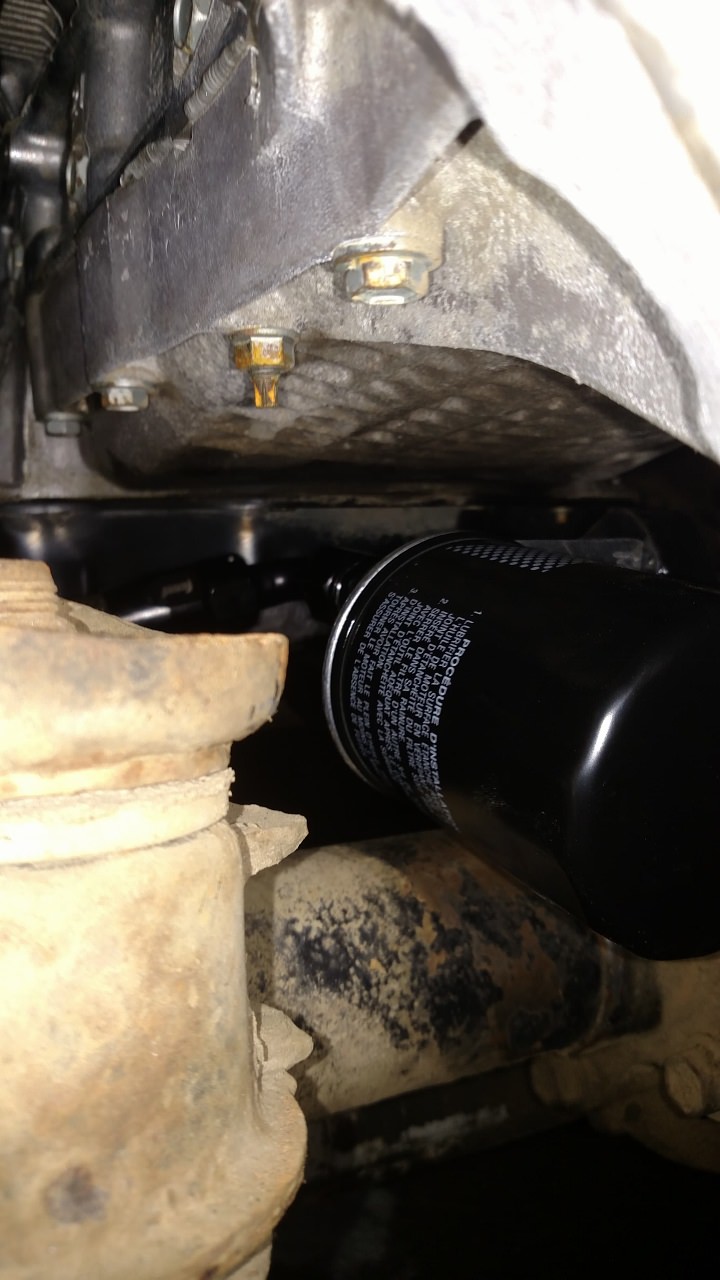
easy access to the filter for changes, and it's well protected (I have a skid plate that's going under it / between the control arms again when I'm done)
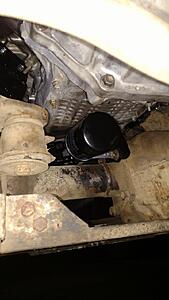
plenty of room between the oil pan and the filter, I can even run one of the oversized filters if I decide to. I only use Toyota (Denso) oil filters, they're not expensive and they're fairly high quality.

One of the first orders of business is to get it so I can move it around in gear with the starter, so I had to finish the oil filter relocation. Tuesday, I figured out that the -8AN oil filter adapter I ordered for the engine was actually -10AN, and none of the hoses and fittings I ordered last year would work. So I ordered new -10AN pieces, and while I was waiting for them to show up, made a bracket to bolt the filter mount onto the front diff.
Nice, short hoses, about 14" long each, and full flow fittings (bent tube, not a drilled block of metal) should reduce restriction to flow. Note, the 45 degree -10 fittings barely fit next to each other on the engine adapter.
Partial view of my bracket on the front diff. I used to use cardboard a lot when making pieces like this. Now I like to measure the bolt holes, distance between the holes, then I go inside to make a model of it in Sketchup (CAD), and when I'm done, I can print the exact pattern. My brackets are so exact now, I can drill holes to the same size as the bolts (so they barely slide through) and everything lines up without having to elongate or file anything bigger.
easy access to the filter for changes, and it's well protected (I have a skid plate that's going under it / between the control arms again when I'm done)
plenty of room between the oil pan and the filter, I can even run one of the oversized filters if I decide to. I only use Toyota (Denso) oil filters, they're not expensive and they're fairly high quality.
 09-29-2019, 10:02 AM
#10
Registered User
Thread Starter
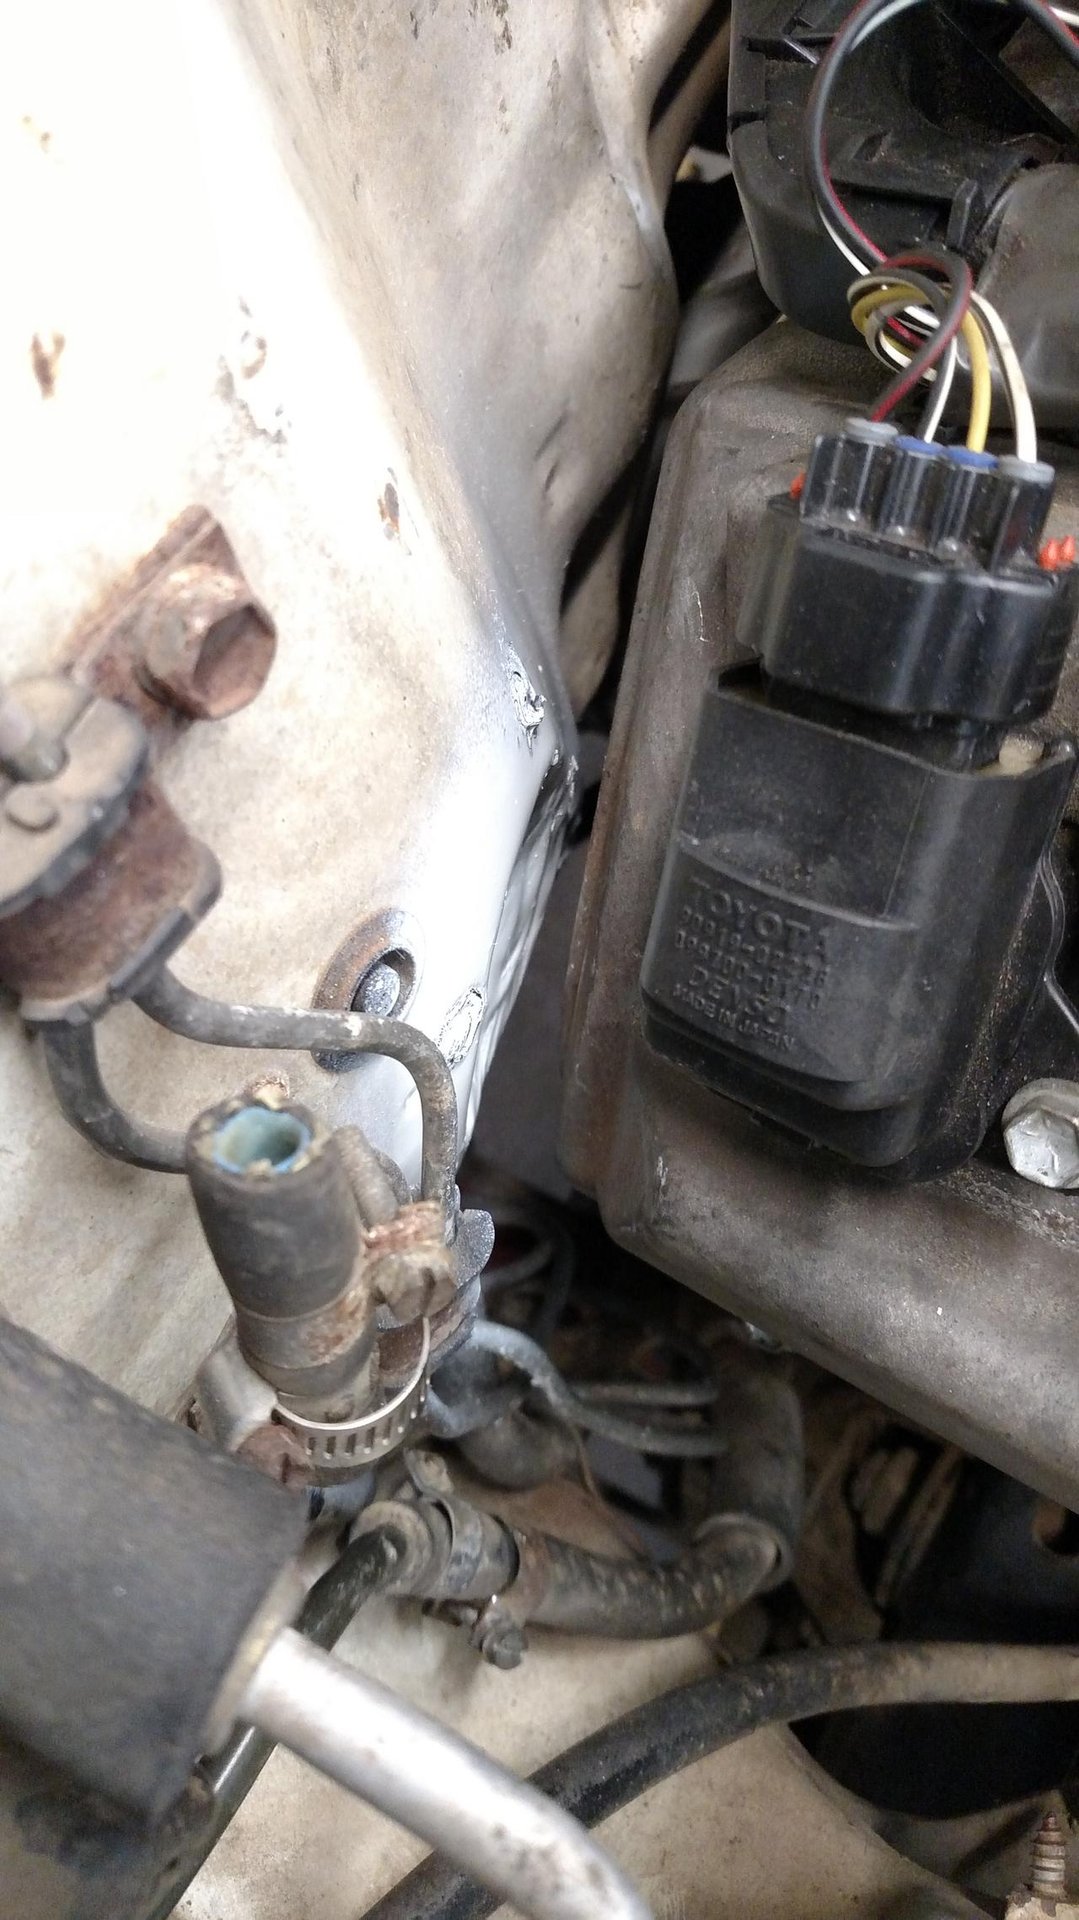
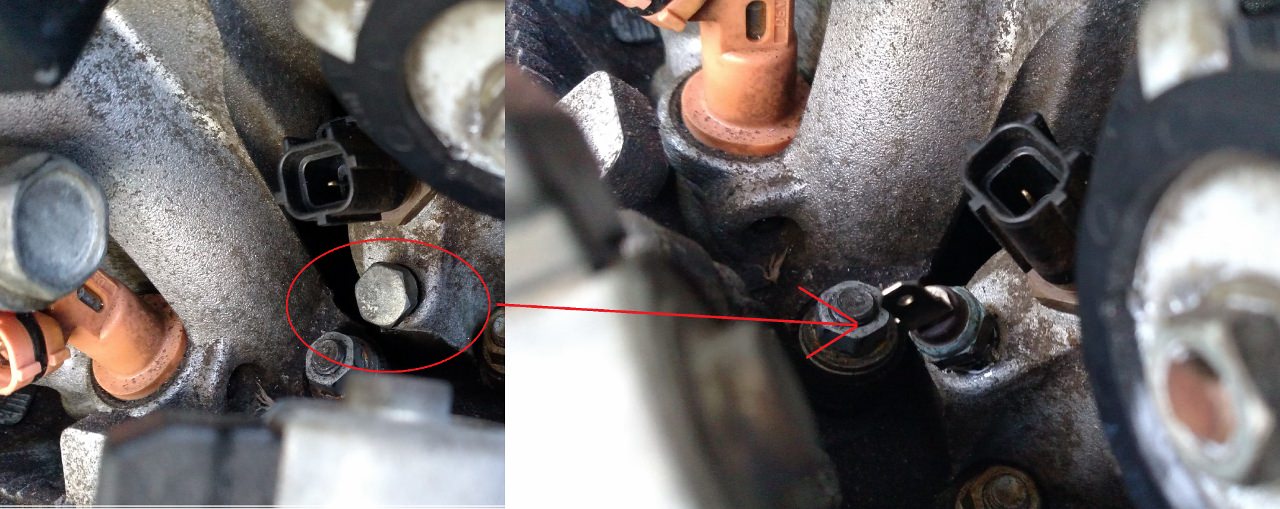
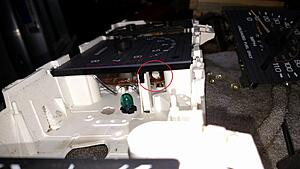
the 1UZ uses a single coolant temp sensor wired to the ECU, the ECU then sends the temperature to the instrument cluster via multiplex ( called MPX, similar to CAN bus). My 1988 4runner cluster can't do anything with that computer-speak, so I needed a coolant temp sensor for my cluster. There is a blank sensor port next to the OEM temp sensor. the hole is 1/8" British pipe thread (not NPT). The sensor I found came from a '94 Tercel, but seems to be fairly common in newer Toyotas and is fairly close (enough) to the resistance values of the original sensor for the truck

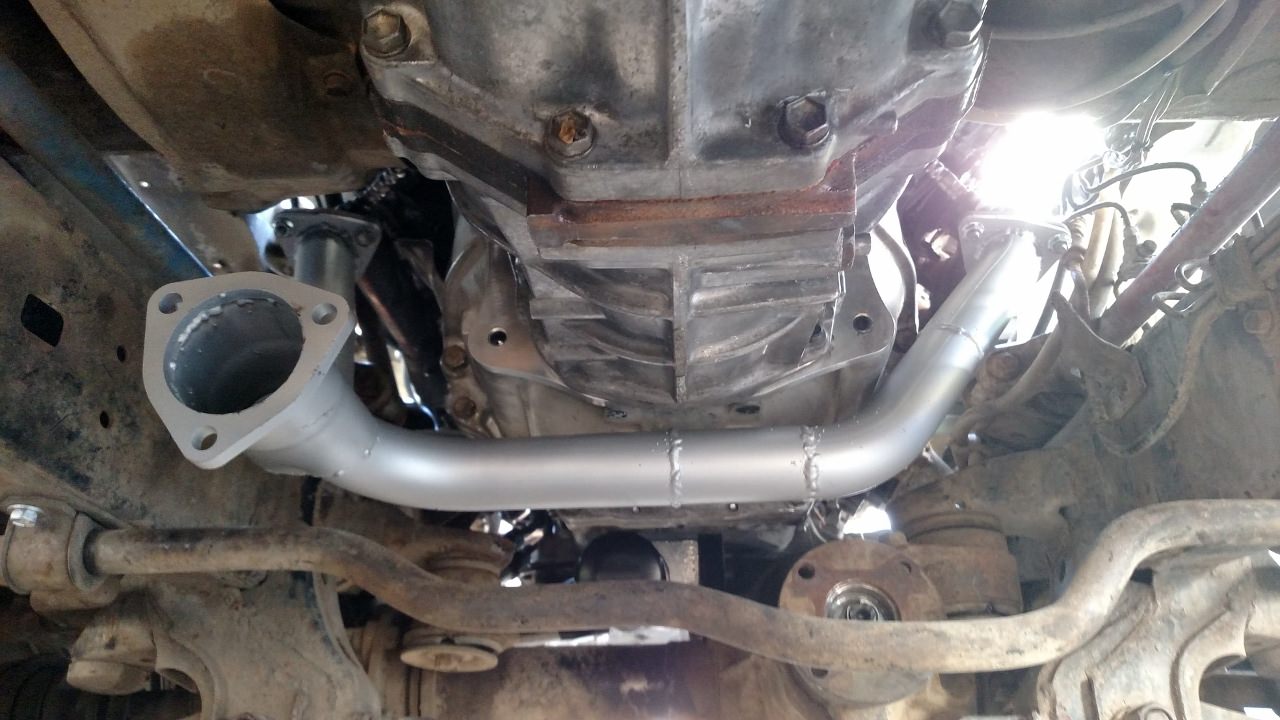
fabbed up and painted my cross-over pipe. I still need to brace the tubes so vibration doesn't lead to cracked welds
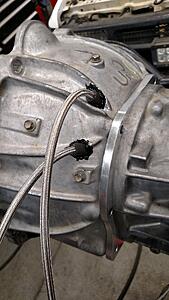
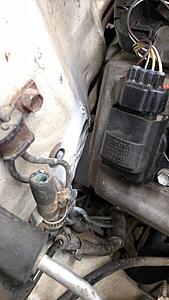
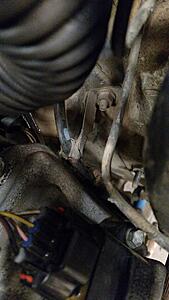
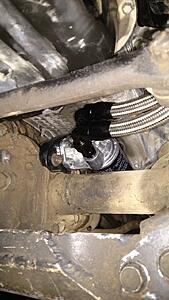
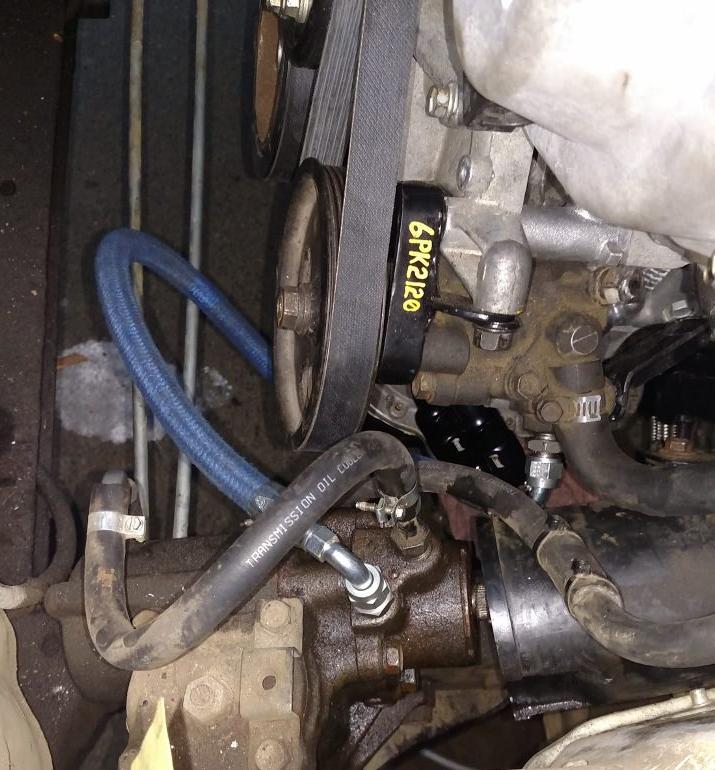
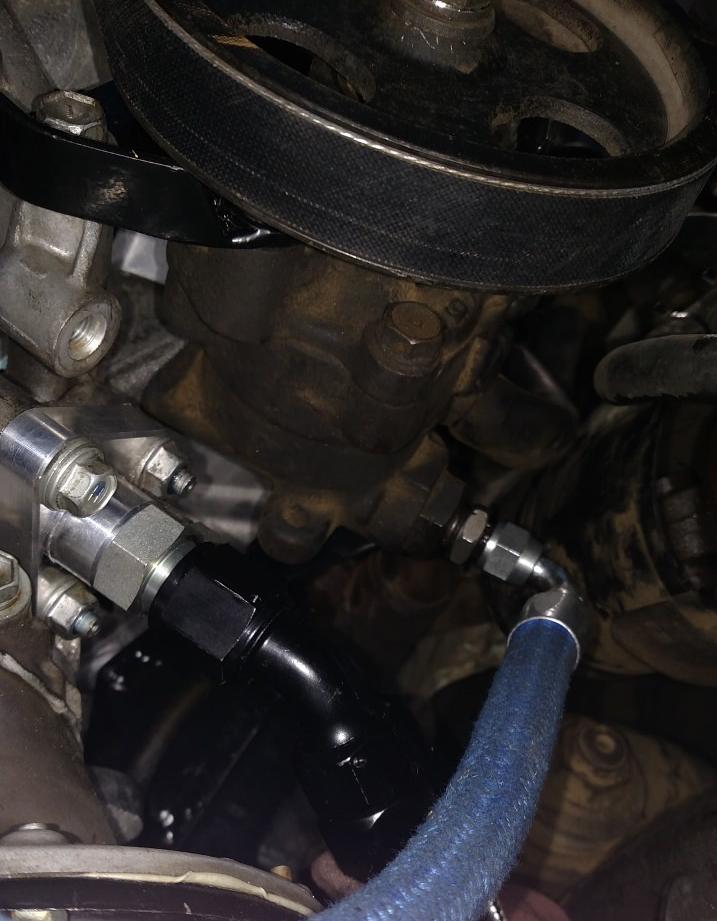
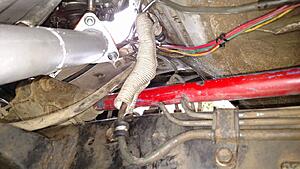
the stock 22RE PS line was a bit too close to the steering column shaft. If I knew ahead of time, I could have rotated my PS relocation bracket just a bit and it would've been fine. I don't feel like making a new bracket, so I repurposed some Aeroquip high pressure hose and hose ends I has left over from my rallyx car to connect the pump to the gearbox
fabbed up and painted my cross-over pipe. I still need to brace the tubes so vibration doesn't lead to cracked welds
the stock 22RE PS line was a bit too close to the steering column shaft. If I knew ahead of time, I could have rotated my PS relocation bracket just a bit and it would've been fine. I don't feel like making a new bracket, so I repurposed some Aeroquip high pressure hose and hose ends I has left over from my rallyx car to connect the pump to the gearbox
09-29-2019, 10:02 AM
#11
Registered User
Thread Starter
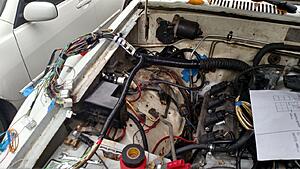
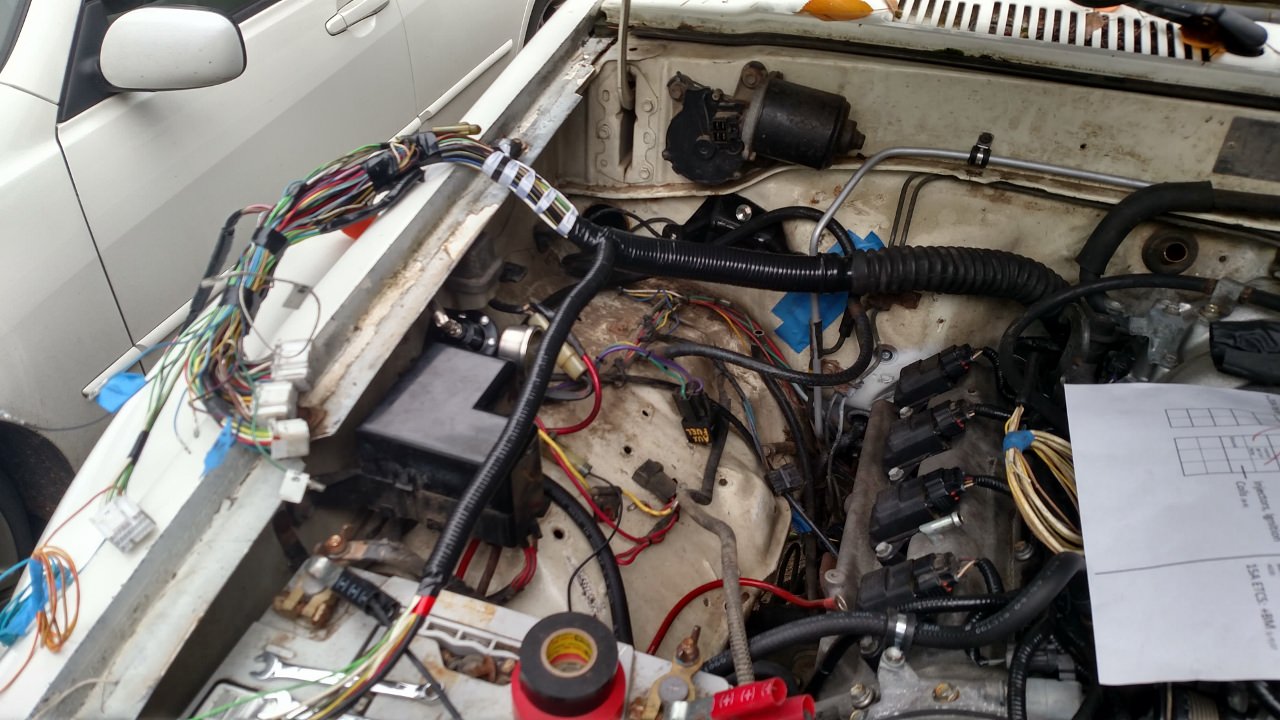
I wasn't able to figure out a good spot in the engine bay to mount the ECU in an enclosure, so I decided to mount it inside the 4runner after all. This meant that I needed a US spec harness since the JDM harness goes through the firewall on the left side of the vehicle (and there's no room on the driver side for the ECU). I found a cheap harness on eBay and stripped it completely down to the bare essentials. Every piece of factory corrugated tube and electrical tape was pulled as well as removing all the auto trans wires. It was then cable laced and re-covered. It's just long enough to be routed through the factory hole in the firewall (using the original firewall grommet) and reach the ECU behind the glovebox.
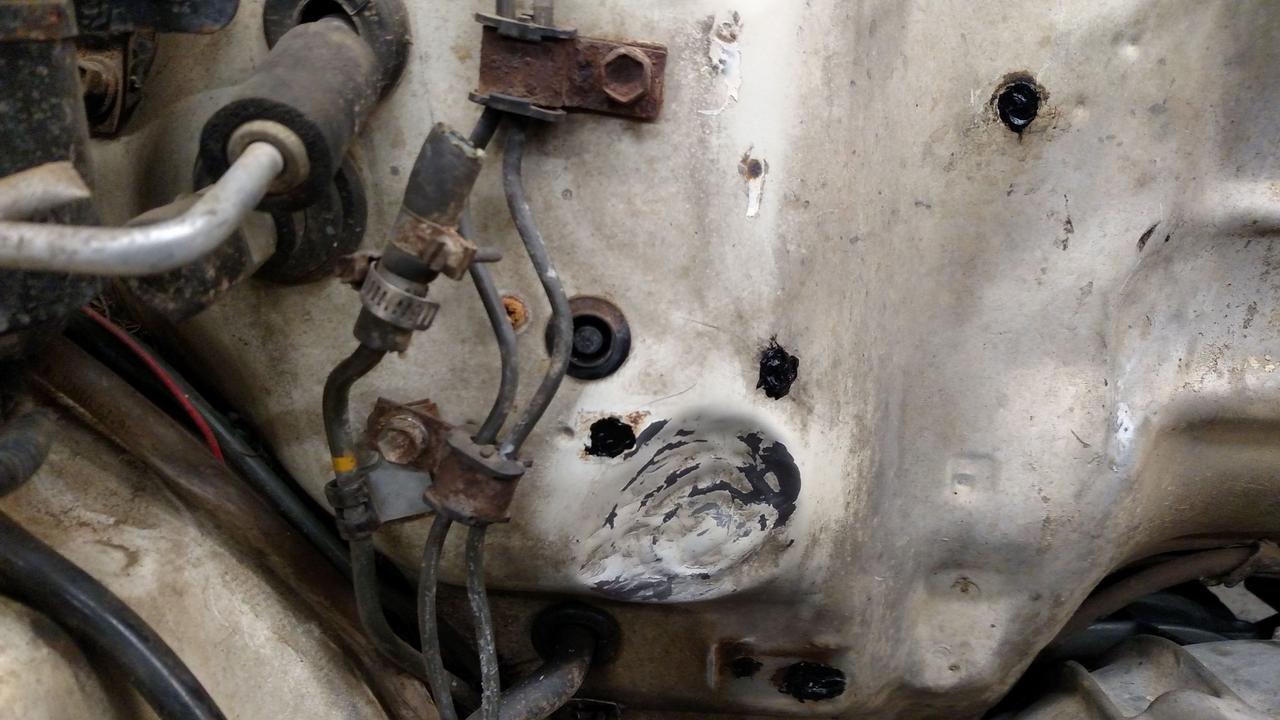
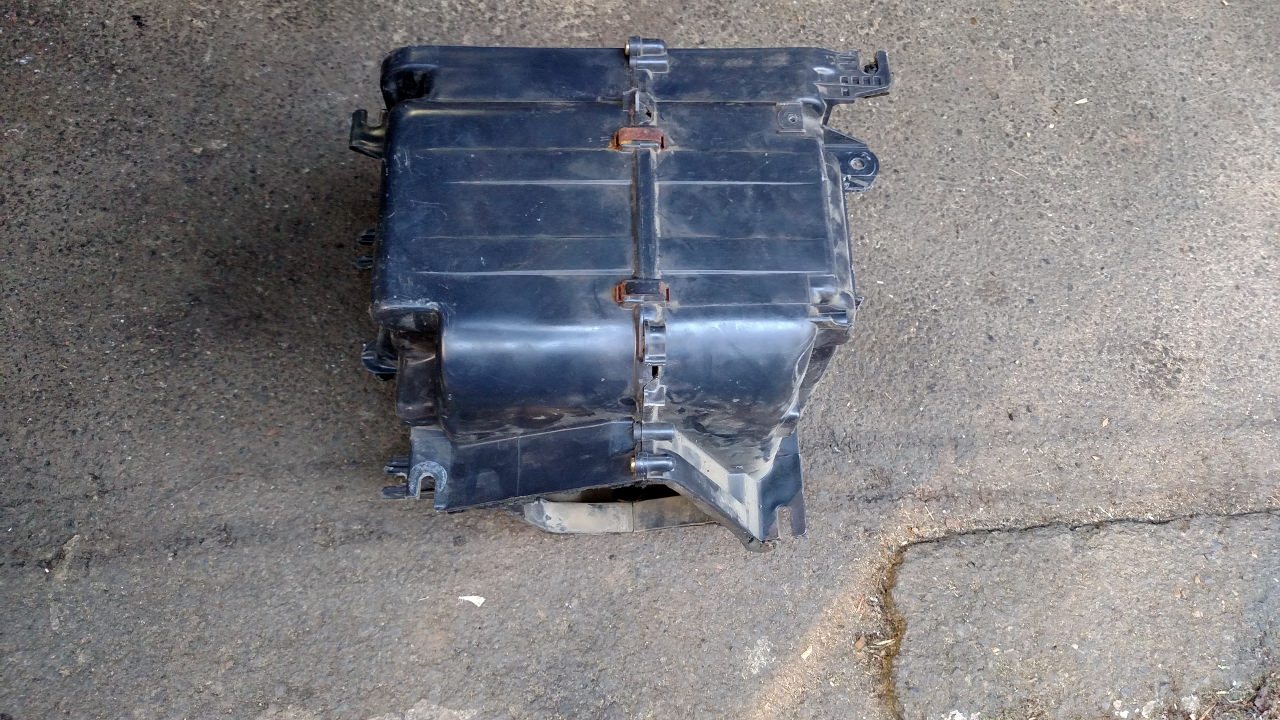
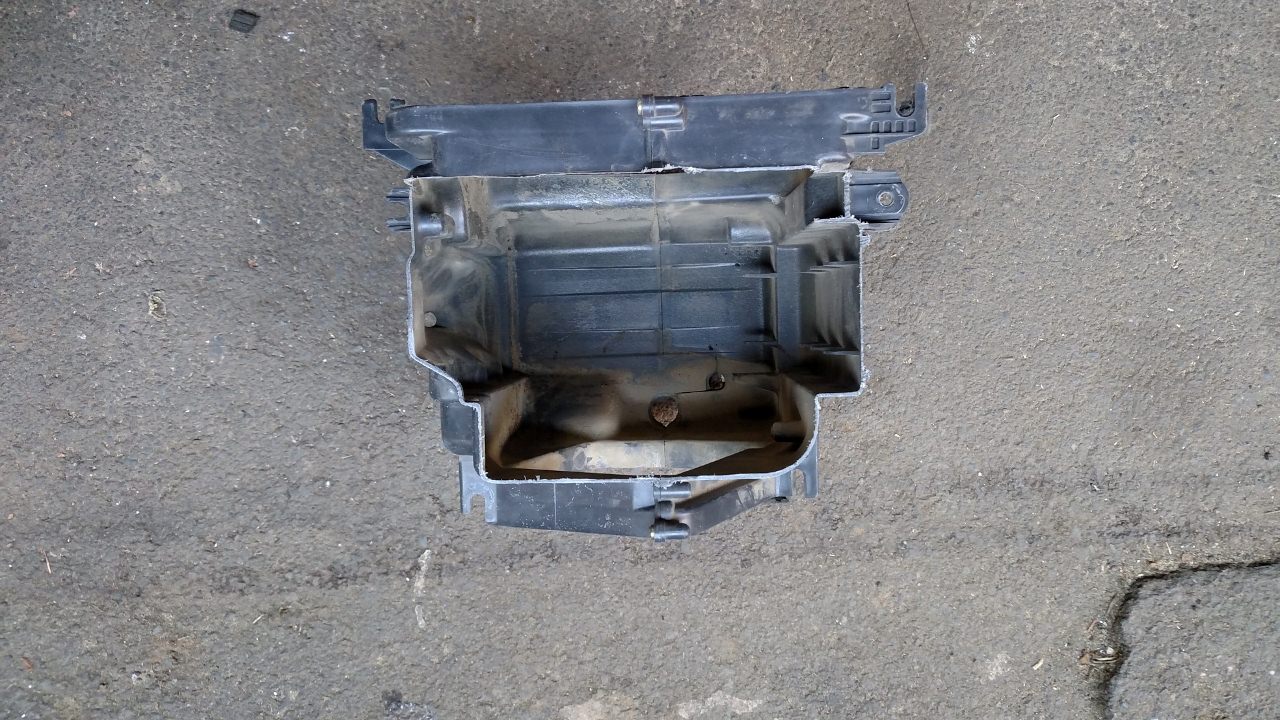
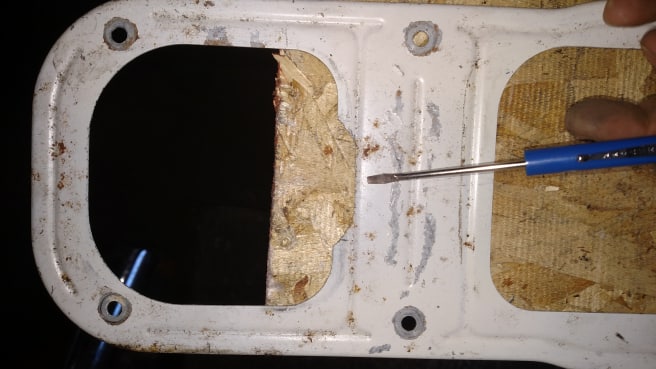
There's not enough room between the glove box and evaporator box to mount the ECU, but there are 2 options to fix that. The simplest way is to cut the curved back off of the glove box and put a new flat piece in its place. Since I haven't had A/C for at least a decade and a half, I went my own way and modded the evap box to fit the ECU.


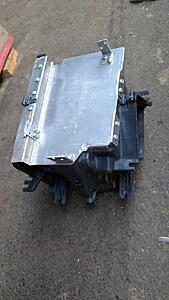
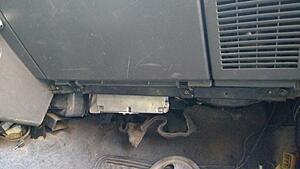
It sticks out the bottom a little bit, but it's not lower than the evap box itself. I could have moved it up a bit higher, but I wouldn't have been able to get to all the bolts to fasten the evap box back into place.
There's not enough room between the glove box and evaporator box to mount the ECU, but there are 2 options to fix that. The simplest way is to cut the curved back off of the glove box and put a new flat piece in its place. Since I haven't had A/C for at least a decade and a half, I went my own way and modded the evap box to fit the ECU.


It sticks out the bottom a little bit, but it's not lower than the evap box itself. I could have moved it up a bit higher, but I wouldn't have been able to get to all the bolts to fasten the evap box back into place.
 09-29-2019, 10:03 AM
#12
Registered User
Thread Starter
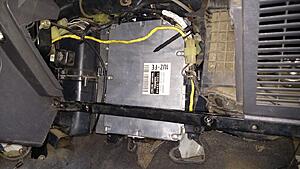
Mainly been tidying up a few odds and ends - fuel delivery, wiring, etc. It's the small details which usually take the longest but add a lot in reliability and easier servicing.
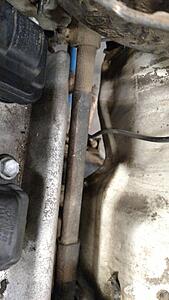
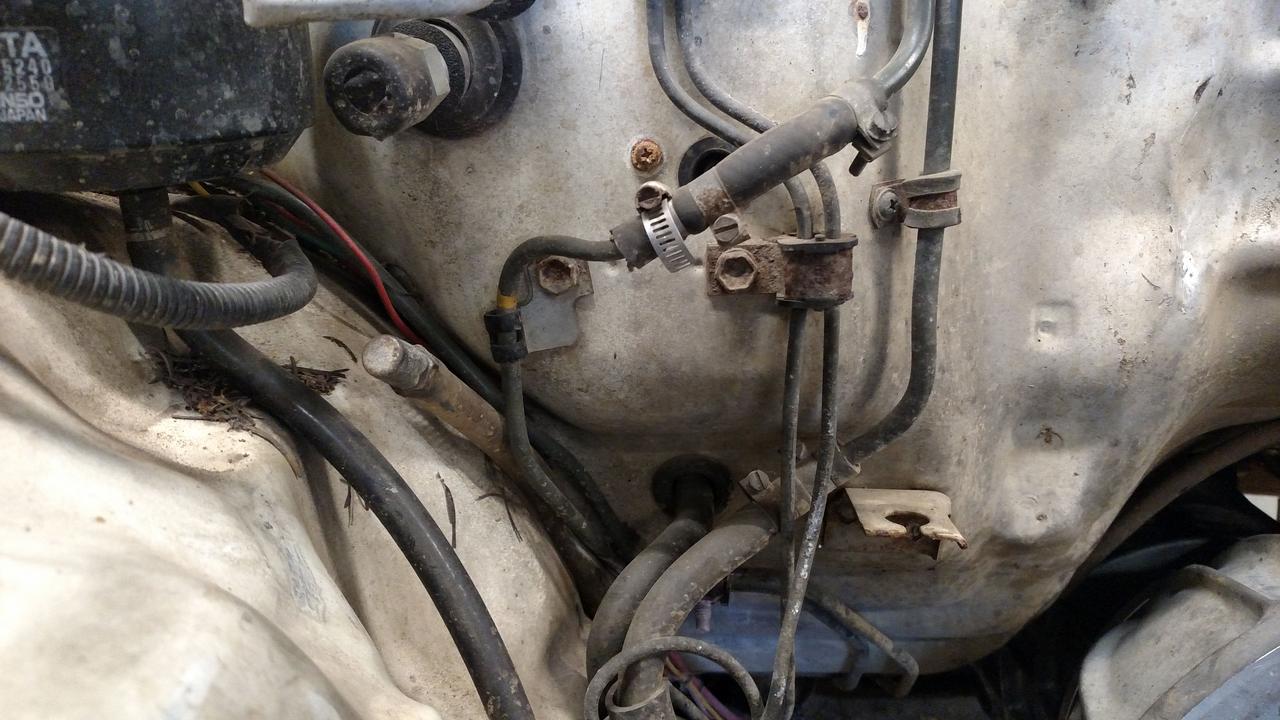
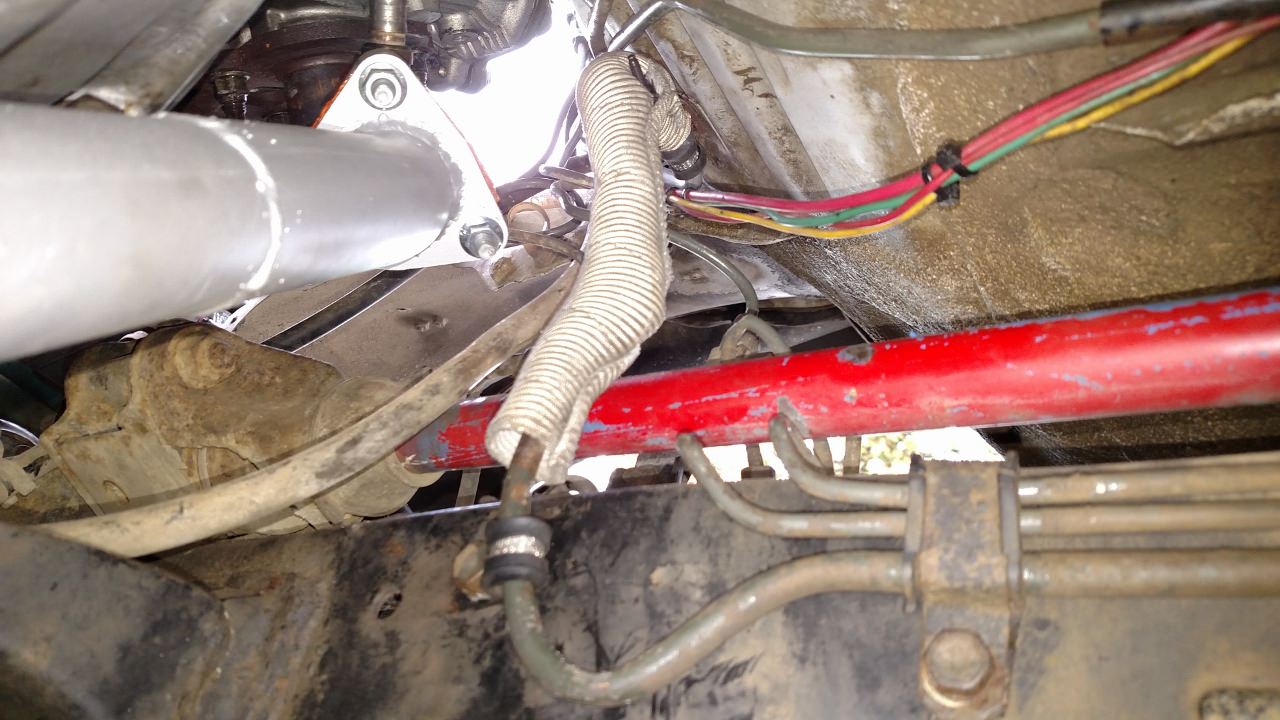
Moved the fuel supply line back a few inches to space it further from the header and added some heat shielding (from a used PS line at work)
Finished my Bussmann fuse/relay box
and made a mounting bracket to mount it back out of the way (also decided I'm gonna clean the stock 4runner harness of some unnecessary wiring, the original 22RE AFM wires, for example).
stock fuse box, fuel pressure regulator, stock starter relay (wired to B+ to avoid no-start issues), Bussmann fuse relay box w/ fuel pump resistor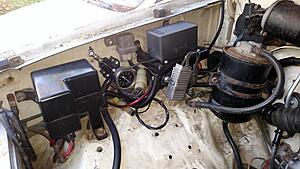
Moved the fuel supply line back a few inches to space it further from the header and added some heat shielding (from a used PS line at work)
Finished my Bussmann fuse/relay box

and made a mounting bracket to mount it back out of the way (also decided I'm gonna clean the stock 4runner harness of some unnecessary wiring, the original 22RE AFM wires, for example).
stock fuse box, fuel pressure regulator, stock starter relay (wired to B+ to avoid no-start issues), Bussmann fuse relay box w/ fuel pump resistor
 09-29-2019, 10:03 AM
#13
Registered User
Thread Starter
Frankenstein's heart is beating! I had some issues with the immobilizer - turns out the FLAT CARD KEYS WILL NOT WORK with the immobilizer. Maybe it's my JDM ECU, but I don't think so. I ended up programming a spare key from an is300 to the truck and it fired off on the first crank.
video link -->
now I'm working to tidy things up a bit, reinstall the radiator along with the rest of the cooling system, run a few ancillary wire circuits, etc. I still don't know where I want to mount the immobilizer antenna - the immobilizer chip (spare key) needs to be within 1 inch of the antenna in order to unlock the immobilizer and start the engine. I had more options if the key cards had worked
09-29-2019, 10:03 AM
#14
Registered User
Thread Starter
I've still been plugging away at this. I bought and returned 2 radiators because, apparently, it's really difficult to use a measuring tape to find dimensions. So while I lost 3 weeks to a parts hold-up, I was able to work on finishing my winch mount and some other projects.
Latest victory: getting the stock 4runner tach to work. The non-VVTi 1UZ uses a signal off one of the ignitors to trigger the tach, and these work fine. The VVTi 1UZ has a coil on plug ignition and puts a signal out from the ECU for the tach. The problem is that a ignitor based signal uses a much higher voltage than what the ECU puts out, so the tach will read ZERO with the engine running. There are several solutions. You can buy a tach signal booster - I think MSD has one, seen a few others, but didn't want to spend the money for something I could figure out myself.
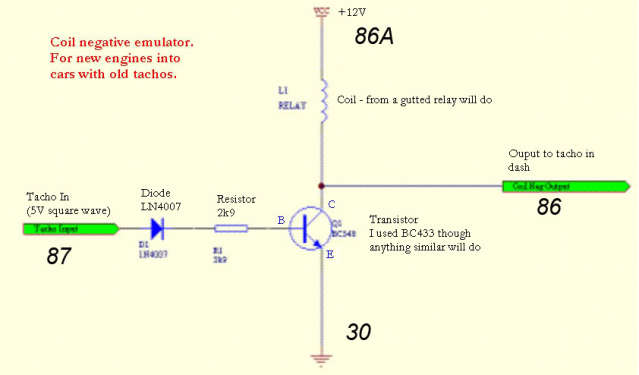
This is another option and should cost less than $10. It takes the low voltage ECU signal and uses that to trigger a transistor. The transistor energizes the relay coil and when it turns off, the relay coil induces a voltage spike (just like an ignition coil) which the tach can read.
thread with more info: http://www.toymods.org.au/forums/thr...-Tacho-Booster
I did an even simpler mod. Take a 10k ohm resistor (1/4 Watt should be fine) and solder it onto the tach circuit board, just like the 3.4L swap tach mod. I did this and it works fine, though I still have to adjust it using the stock trim pot so it reads accurately. (not my picture, but this is where the resistor goes)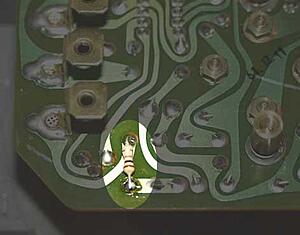
Now my tach works. I also got the "OBD" port working. Since I'm using a JDM ECU, which uses J-OBD, a normal OBDII app won't work. This is what I used with the Torque app to get it to work - now I can read/clear codes and pull all the engine sensor data from the ECU
http://www.mr2.com/forums/threads/92...BD2-on-jdm-ecu!
Latest victory: getting the stock 4runner tach to work. The non-VVTi 1UZ uses a signal off one of the ignitors to trigger the tach, and these work fine. The VVTi 1UZ has a coil on plug ignition and puts a signal out from the ECU for the tach. The problem is that a ignitor based signal uses a much higher voltage than what the ECU puts out, so the tach will read ZERO with the engine running. There are several solutions. You can buy a tach signal booster - I think MSD has one, seen a few others, but didn't want to spend the money for something I could figure out myself.
This is another option and should cost less than $10. It takes the low voltage ECU signal and uses that to trigger a transistor. The transistor energizes the relay coil and when it turns off, the relay coil induces a voltage spike (just like an ignition coil) which the tach can read.
thread with more info: http://www.toymods.org.au/forums/thr...-Tacho-Booster
I did an even simpler mod. Take a 10k ohm resistor (1/4 Watt should be fine) and solder it onto the tach circuit board, just like the 3.4L swap tach mod. I did this and it works fine, though I still have to adjust it using the stock trim pot so it reads accurately. (not my picture, but this is where the resistor goes)

Now my tach works. I also got the "OBD" port working. Since I'm using a JDM ECU, which uses J-OBD, a normal OBDII app won't work. This is what I used with the Torque app to get it to work - now I can read/clear codes and pull all the engine sensor data from the ECU
http://www.mr2.com/forums/threads/92...BD2-on-jdm-ecu!
09-29-2019, 10:04 AM
#15
Registered User
Thread Starter
As a quick follow-up to my previous post, I calibrated the tach to work with the new engine using the trim pot on the tach circuit board in the picture below. Removing the speedometer allowed me to to turn the adjustment while it while plugged in, I matched the tach reading to the OBD adapter reading and verified it matched at idle as well as at 3k rpm.
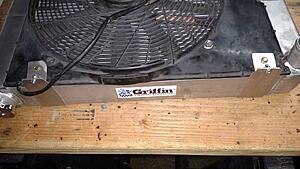
It took awhile to find a radiator which would fit. I've bought and returned 3 nice aluminum radiators in the last month before settling on running the same size I used previously - I was hoping to find something a bit taller, but using a tape measure must be difficult when writing online product descriptions. I opted for a Griffin universal Chevy style 24" wide x 16" tall radiator w/ 2 cores of 1.25" tubes (my radiator opening was cut a bit wider several years ago). My only complaint is that the tubes are epoxied into the end tanks instead of furnace brazed. Other than that, it appears to be a quality product.
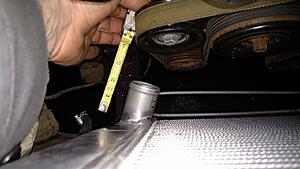
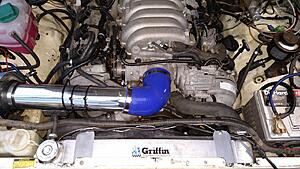
A straight lower radiator hose outlet would have worked much better, but there were none in stock and Griffin would have had to make one before I could get it. Not much clearance to be had here, especially considering that the hose is 1.75" wide and needs to make a hard 90 degree straight up. I found a hose at the local parts store which made a hard turn and cut it to work. The 90 degree piece on that outlet is joined to the smaller diameter hose (1.5") going to the thermostat outlet by a sensor adapter with the fan switch in it.
Some very minor trimming on this Mercedes electric fan and shroud and it fit the radiator perfectly, covering the entire core side to side and top to bottom (increasing the area that air is pulled through increases fan cooling). I'm not sure what this came out of, it's been on my garage shelf for years. The important part is that it measured only 2" from the radiator to the back of the fan motor, so a very slim package with factory OEM cooling abilities. Since universal radiators generally don't have a way to mount fans, and I don't have a TIG welder, I got to use my new sheet metal brake to fab up some simple brackets to hold the fan in place.
bottom brackets to support the weight and close the air gap between the shroud and the radiator core

top mounts mainly hold the fan tight to the radiator
there's not much clearance to spare, but I'm hoping there's enough that nothing touches when things start to move under load

It took awhile to find a radiator which would fit. I've bought and returned 3 nice aluminum radiators in the last month before settling on running the same size I used previously - I was hoping to find something a bit taller, but using a tape measure must be difficult when writing online product descriptions. I opted for a Griffin universal Chevy style 24" wide x 16" tall radiator w/ 2 cores of 1.25" tubes (my radiator opening was cut a bit wider several years ago). My only complaint is that the tubes are epoxied into the end tanks instead of furnace brazed. Other than that, it appears to be a quality product.
A straight lower radiator hose outlet would have worked much better, but there were none in stock and Griffin would have had to make one before I could get it. Not much clearance to be had here, especially considering that the hose is 1.75" wide and needs to make a hard 90 degree straight up. I found a hose at the local parts store which made a hard turn and cut it to work. The 90 degree piece on that outlet is joined to the smaller diameter hose (1.5") going to the thermostat outlet by a sensor adapter with the fan switch in it.

Some very minor trimming on this Mercedes electric fan and shroud and it fit the radiator perfectly, covering the entire core side to side and top to bottom (increasing the area that air is pulled through increases fan cooling). I'm not sure what this came out of, it's been on my garage shelf for years. The important part is that it measured only 2" from the radiator to the back of the fan motor, so a very slim package with factory OEM cooling abilities. Since universal radiators generally don't have a way to mount fans, and I don't have a TIG welder, I got to use my new sheet metal brake to fab up some simple brackets to hold the fan in place.
bottom brackets to support the weight and close the air gap between the shroud and the radiator core
top mounts mainly hold the fan tight to the radiator

there's not much clearance to spare, but I'm hoping there's enough that nothing touches when things start to move under load
 09-29-2019, 10:05 AM
#16
Registered User
Thread Starter
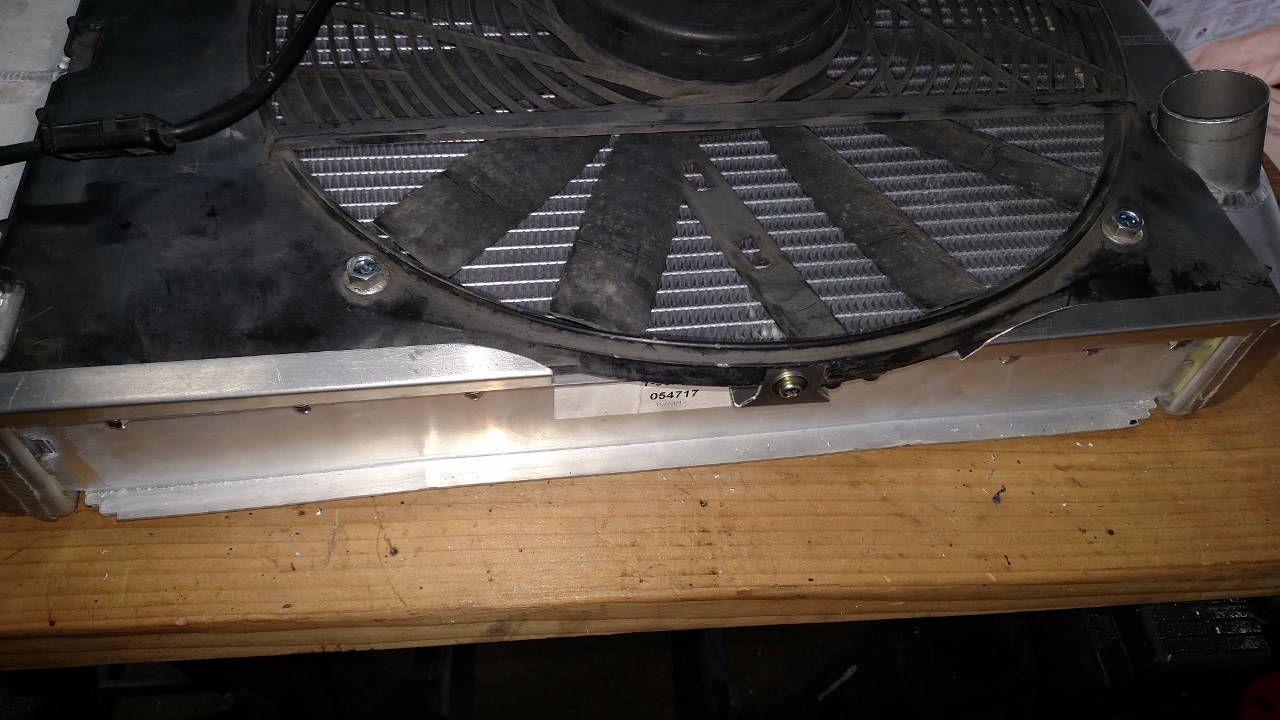
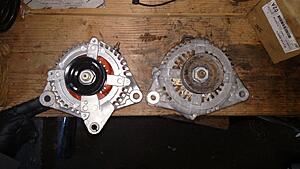
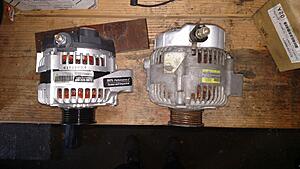
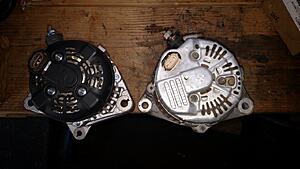
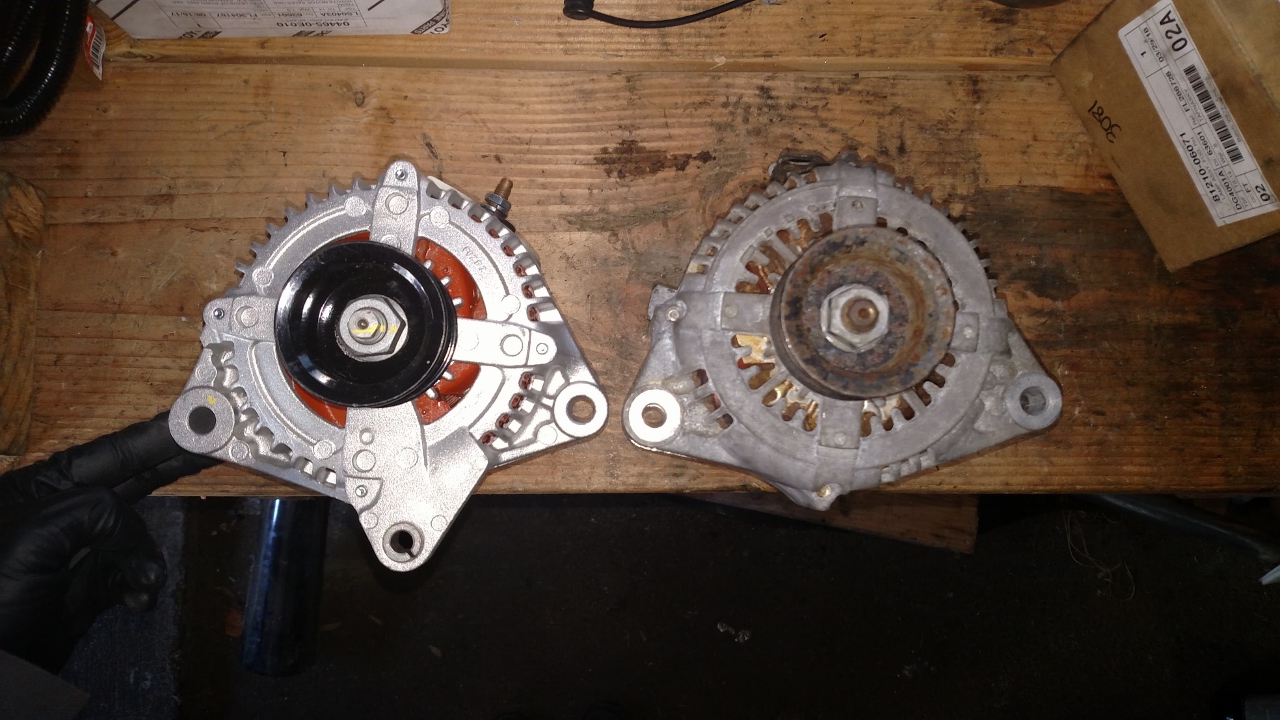
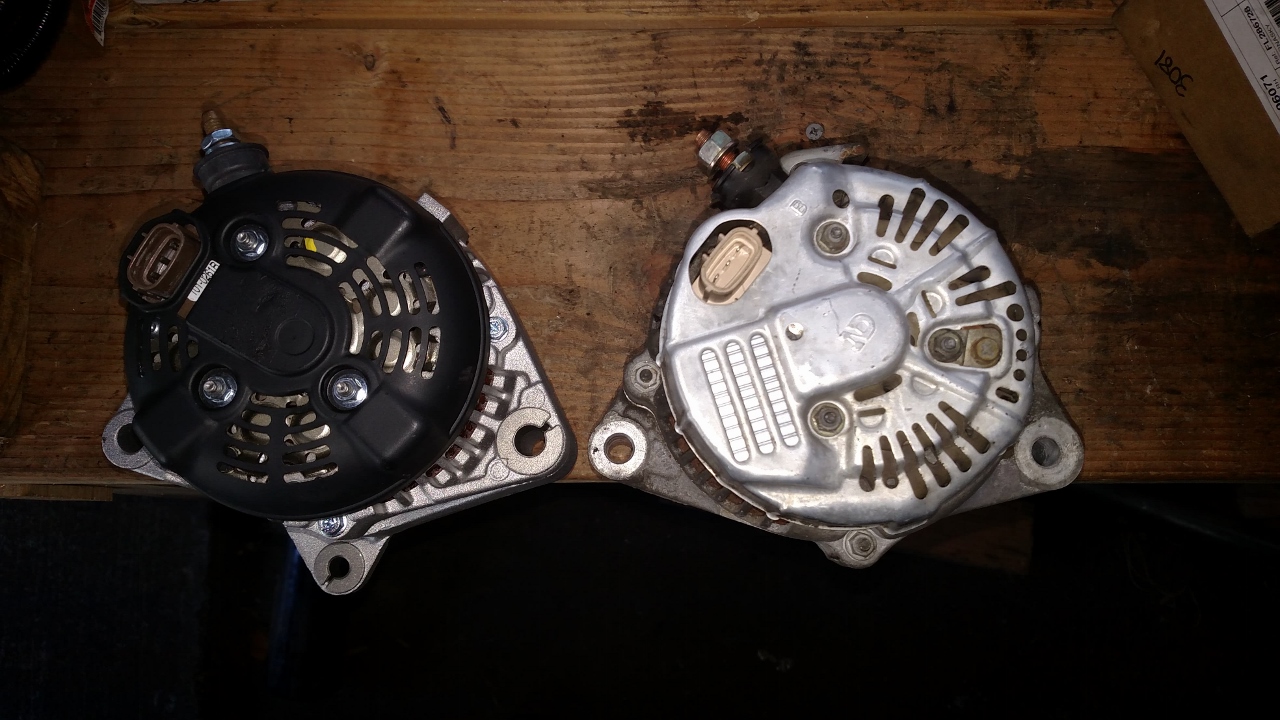
well, yep, the alternator died. luckily there's a $40 rebuild kit on Amazon which comes with both bearings, voltage regulator, and new brushes in a holder. Unluckily, it doesn't come with the diode bridge, which is what went bad on mine. So, any repair is a chance to upgrade, right? The stock 97-99 LS400 alternator is rated for 100 amps. The 01-03 LS430 alternator is rated for 130 amps, uses the same oval plug, and bolts on. In 2004, the plug on the back changed and isn't a plug in swap. I got the idea from this thread. The only real difference is that the later alternator uses a 3rd bolt, which you can buy and use (p/n 90109-08298), or ignore completely. The new alternator is also slightly smaller in size. Install was easy and I didn't even have to remove anything to drop it out the bottom. Don't forget to upgrade the battery/alternator lead if necessary and upgrade the alternator fuse. Here are some comparison pics, new one on the left
While I was warming up the engine and making sure the alternator is working properly, the lower radiator hose blew off. This happened once before, and I just tightened the hose clamp a bit. The problem is that I had to cut off the bead at the end of the pipe when I trimmed it down. $5 for a Harbor Freight pair of vice grips, a thick washer, a bit of welding and some work with the cut off wheel and I had a tool to make a new bead at the end of the pipe to help keep the hose on.
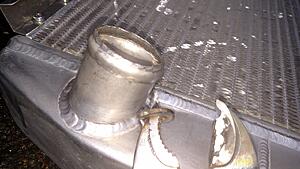

While I was warming up the engine and making sure the alternator is working properly, the lower radiator hose blew off. This happened once before, and I just tightened the hose clamp a bit. The problem is that I had to cut off the bead at the end of the pipe when I trimmed it down. $5 for a Harbor Freight pair of vice grips, a thick washer, a bit of welding and some work with the cut off wheel and I had a tool to make a new bead at the end of the pipe to help keep the hose on.
 09-29-2019, 10:05 AM
#17
Registered User
Thread Starter
I've been daily driving this beast all week, and it is an absolute blast. It accelerates like my BEAMS swapped RA64 Celica and growls like one of the new Lexus LC500s. I barely ever use 1st gear to pull out from a stop (what's the point) and can break the rear tires loose without even trying. That said, there's still more work to be done to iron out the minor details. One of the simpler things I figured out was that the 4wd shifter was just barely touching the shift boot plate, so 5 minutes spent notching it out slightly and it no longer tries to shift into 4wd when I launch the truck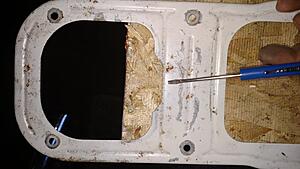
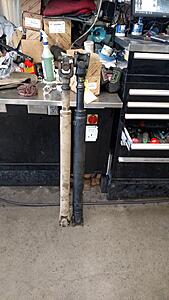
I also figured out that a GX470 driveshaft is the exact same length as my stock 22RE/W trans driveshaft, except it uses 3" tube instead of 2.5" tube - larger diameter= strength increase as well as an ability to run at higher speeds before vibration and failure creeps in (called critical speed). I also just happened to have saved one from the scrap pile at work, so, a free upgrade is nice. Note that this driveshaft uses a different flange bolt pattern than the stock 4runner. I already have a triple pattern pinion flange, so I'm just waiting for Marlin to get some triple pattern transfer case flanges back in stock so I can bolt this in.
(stock 22RE on the left, GX470 on the right)
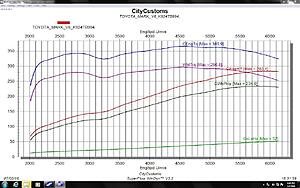
I've been using the Torque App to monitor engine vitals while driving this week. Fuel trims are off a bit, and the Check Engine Light is lit all the time. One of the main reasons for the CEL is that I never wired or installed the 2 oxygen sensors after the catalytic converter. I believe these do more than just monitor the life and effectiveness of the cat, for reasons that would take too long to explain here, I'm fairly certain they also affect fuel control at higher throttle and load conditions. 2 weld in bungs and 2 $20 oxygen sensors later and I have this, just need to run the wire yet and that will be 1/2 of the CEL concern taken care of.

The other half of the CEL concern is due to the fact that the ECM is looking for an auto trans which just isn't there. I've decided to buy the "ATEMU" from All4Swaps which simulates the auto trans with a few simple wire connections - just need to wait a couple weeks. That should take care of all the DTCs causing my CEL to come on. As an added bonus, it should also get rid of the default "limp" mode the engine has been operating under - throttle opening limited to 80% and the VVTi not operating in its full range. The non-VVTi 1UZ doesn't need this emulator. Here's an after ATEMU install dyno graph of a stock 1UZ VVTi
I also figured out that a GX470 driveshaft is the exact same length as my stock 22RE/W trans driveshaft, except it uses 3" tube instead of 2.5" tube - larger diameter= strength increase as well as an ability to run at higher speeds before vibration and failure creeps in (called critical speed). I also just happened to have saved one from the scrap pile at work, so, a free upgrade is nice. Note that this driveshaft uses a different flange bolt pattern than the stock 4runner. I already have a triple pattern pinion flange, so I'm just waiting for Marlin to get some triple pattern transfer case flanges back in stock so I can bolt this in.
(stock 22RE on the left, GX470 on the right)
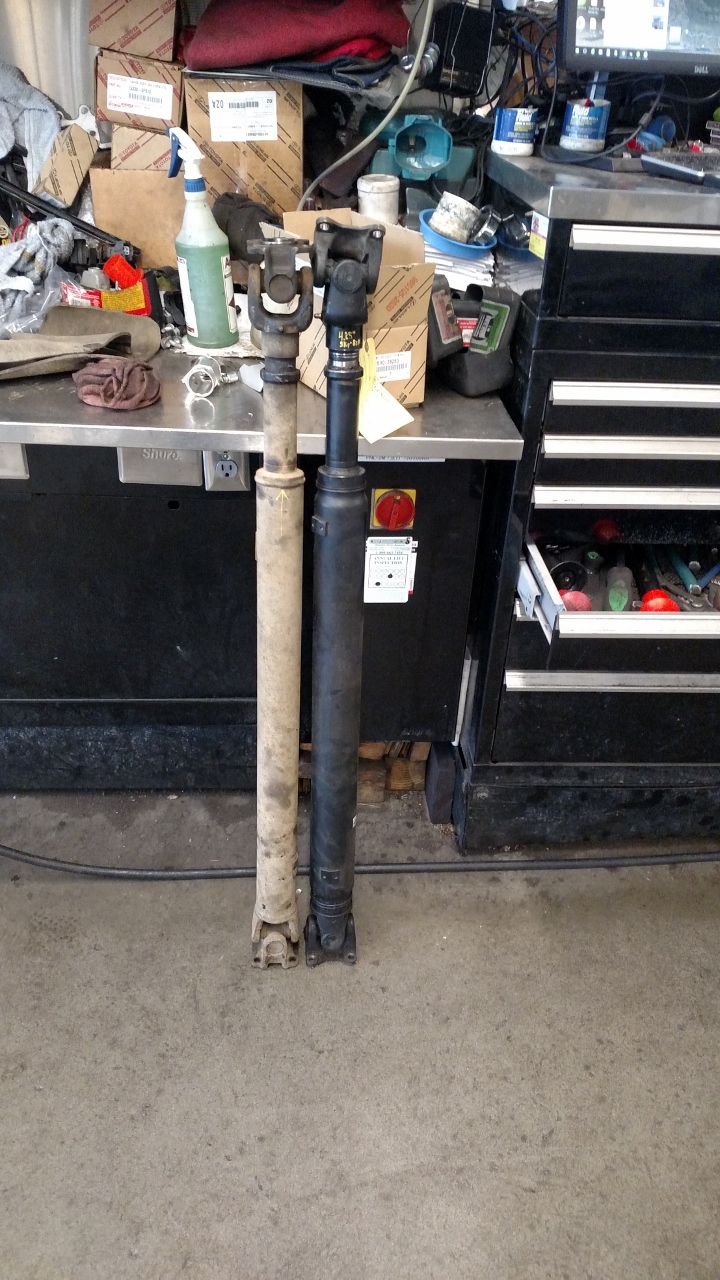
I've been using the Torque App to monitor engine vitals while driving this week. Fuel trims are off a bit, and the Check Engine Light is lit all the time. One of the main reasons for the CEL is that I never wired or installed the 2 oxygen sensors after the catalytic converter. I believe these do more than just monitor the life and effectiveness of the cat, for reasons that would take too long to explain here, I'm fairly certain they also affect fuel control at higher throttle and load conditions. 2 weld in bungs and 2 $20 oxygen sensors later and I have this, just need to run the wire yet and that will be 1/2 of the CEL concern taken care of.
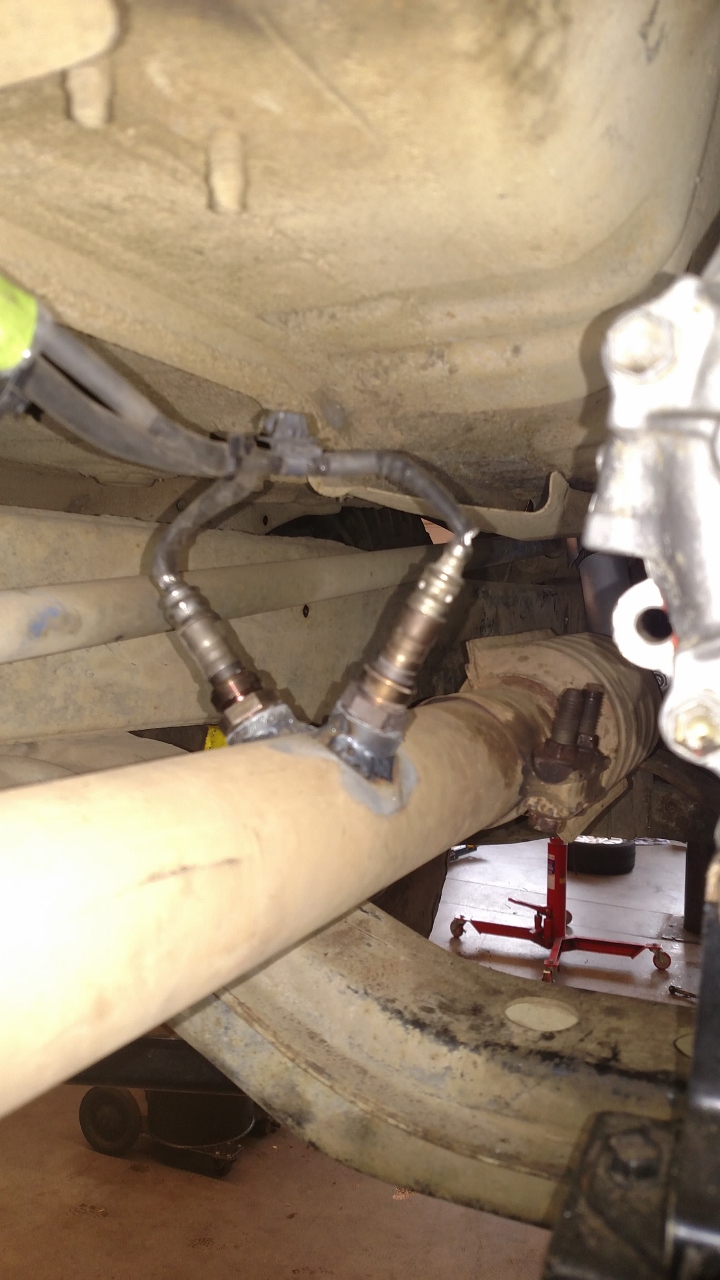
The other half of the CEL concern is due to the fact that the ECM is looking for an auto trans which just isn't there. I've decided to buy the "ATEMU" from All4Swaps which simulates the auto trans with a few simple wire connections - just need to wait a couple weeks. That should take care of all the DTCs causing my CEL to come on. As an added bonus, it should also get rid of the default "limp" mode the engine has been operating under - throttle opening limited to 80% and the VVTi not operating in its full range. The non-VVTi 1UZ doesn't need this emulator. Here's an after ATEMU install dyno graph of a stock 1UZ VVTi
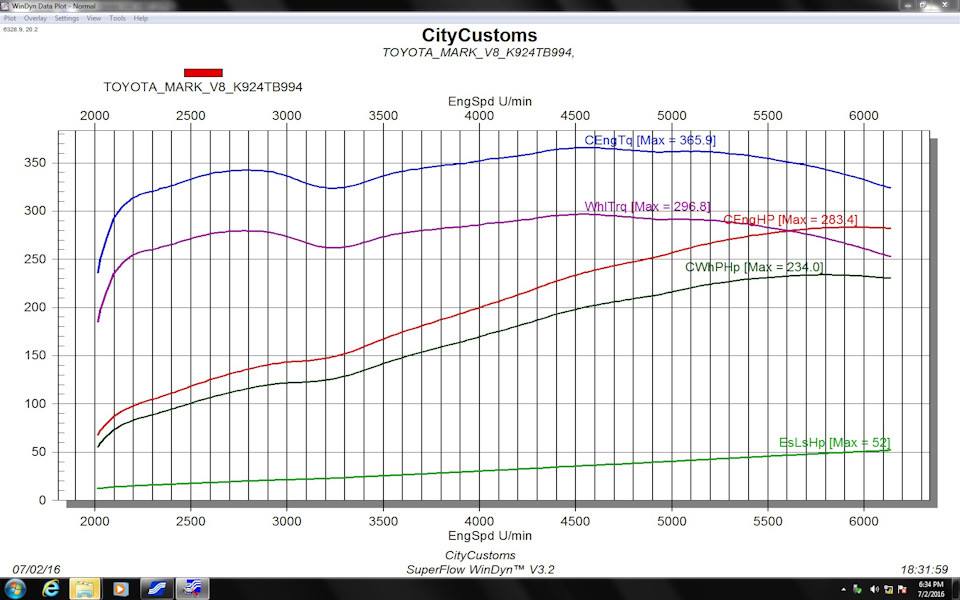 09-29-2019, 10:05 AM
#18
Registered User
Thread Starter
the problem. no matter how much I tried to clearance the trans cross member, the transfer case would still hit it
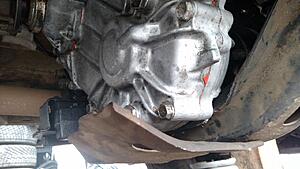
so I modified a 3.0 V6 cross member (trans mount moved 1.9" back from the stock location)

side by side comparison. 3.0 V6 chain drive transfer cross member on top, 22RE gear drive transfer case cross member on bottom. You can tell the 3.0 V6 cross member is swept forward much more, giving more room for the transfer case

much better, and a lot more room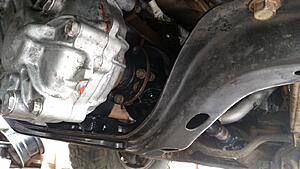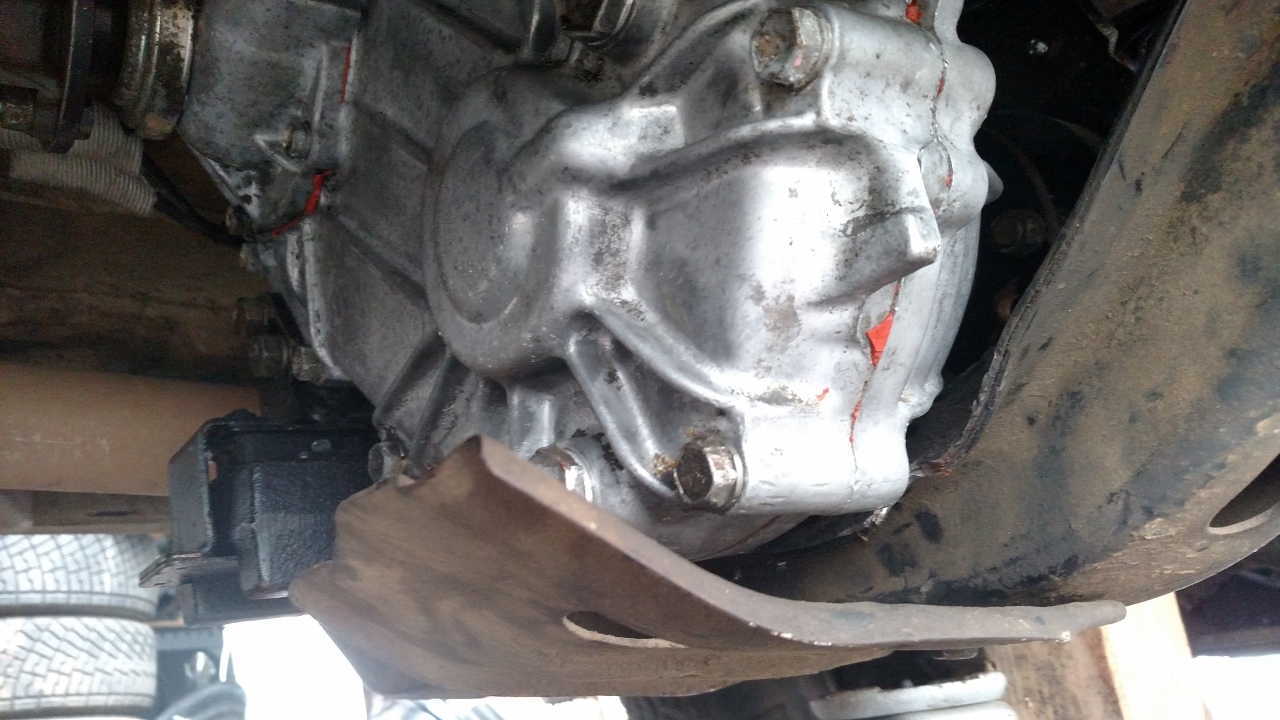
 09-29-2019, 10:06 AM
#19
Registered User
Thread Starter
I did this a little while ago, and my Check Engine Light has been off since. There are still 3 DTCs stored, mainly relating to missing CAN bus modules, but the engine is no longer in any kind of limp mode and the fuel trims are being learned/stored from one key cycle to the next instead of having to be relearned every time I start the engine. Cost for this was $105 shipped from Yuri in Moscow, Russia and is really simple to wire up (though it would have been nice if all the wire colors were different). Yuri can also bypass the immobilizer on VVTi engines so you don't have to deal with the immobilizer, but you do have to send your ECU to him.
His services and products can be found here: Toyota ECU security off, conversion adapters, parts
to show how small it is:
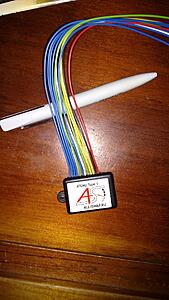
His services and products can be found here: Toyota ECU security off, conversion adapters, parts
to show how small it is:
 09-29-2019, 10:06 AM
#20
Registered User
Thread Starter
think my cheap dash cam has something loose inside it rattling around, so the audio is a bit poor, but this will give you an idea of how the swap sounds. This is a partial run of the 20 mile Nahwatzel stage from the Olympus Rally about a month ago


