When you click on links to various merchants on this site and make a purchase, this can result in this site earning a commission. Affiliate programs and affiliations include, but are not limited to, the eBay Partner Network.
Shot of the 2 inch spacer....and a little bit of the "hub centering" capability that the 2 inchers had.
edit---looking at it closer, those 1985 hubs probably had no real effect on actually helping
it "hub-center" the aluminum wheels. The 2001 IFS hubs did but not these.
Which ones to use to hold the spacers in place.....
The ones on the left are "extra thread" and bought them on ebay.....the top ones are ok to use
but no extra thread......the bottom ones are from http://lowrangeoffroad.com and
I like those alot.....a standard 13/16 spark plug socket will fit and no special socket to lose.
so how is it that your axle ever worked on an FJ60 with 15" wheels?
I understand your tires are way taller than stock so the steering box hits
but didn't FJ's come stock with 15" wheels?
Which to use to secure the spacers to the hub?
Red....Blue....or anti-seize....
anti-seize it is.
aluminum based anti-seize seems to be the best for this app.
A standard 13/16" spark plug socket fits them.. It also fits my wheel lugnuts nuts so that's even better
A quick check to see if the spacer nuts protrude too far and they do not.
All 6 of them are snugged up hand-wrist tight .....these are acorn style
so they tend to self center anyways..... so even that Ford guy on that youtube video that
had his spacers fail on him and his truck going one way and the tire going the other.....even
he could probably get these on evenly
10-25-17----reporting in 1.5 years later....they still tight. Never even had to check them really.
3-31-19-----another 1.5 years and I have not tightened them yet.
I guess that's what good USA billet aluminum is all about.
Nip 'em up and then torque them to 85ish ft/lb like I did here.
God.....I'm going Aussie.....been installing too many Harrop electric lockers.
Notice how I keep the spacer stabilized....no crowbar wedged in between 2 wheel studs....even if it is
6061 billet aluminum.
All is good so far. I am so happy that I have manual locking hubs now instead of that piece of IFS.
More anti-seize.....
hmmm....my wheels are "hub-centric" and now the wheel has to center on the lugnuts.
All 6 lugs nuts are screwed in but nut fully tightened. After they are all in and still a smidge lose
then they can be snugged up and then tightened.....tightened with a torque wrench....
I prefer to use an electric impact for these wheel lug nuts. Air impacts are too brutal on lug
nuts but electrics are safe.
ps-----just went outside with my torque wrench and they were checking in between
80 and 90 ft/lb on all lugs....you have to "know" your impact and when enough is enough.
On the trail, you may not have the luxury of a torque wrench.
so how is it that your axle ever worked on an FJ60 with 15" wheels?
I understand your tires are way taller than stock so the steering box hits
but didn't FJ's come stock with 15" wheels?
what am i missing ?
piglett
How close are the stock FJ60/62 Cruisers with stock factory steel 15" wheels? I bet they are close on ALL of them. It really comes down to their back spacing....if they are the typical 3.75" BS then they are close.
Just checked my back spacing an hour ago and my 17" aluminum wheels are right close to 5.5" BS.....that explains a few things.
Back in about 1986 and 87 is when I had the 84 longbed with 33x12.50R15's on 10" steel wheels....that was the common set-up. They all had 3.75" BS and it was also common to have the tie-rod come very close to the lead bang on weights....I had scrape marks in mine. The solution was to flapper wheel the high spot on the tie-rod or steering arm or use a 1/8"~1/4" wheel spacer(they were for that purpose)....or to go to stick-on weights.
So Piglett....basically my truck axle with 3" spacers on 5.5" Back spaced aluminum wheels is no different then other mini-trucks(with solid axle) using a tiny 1" wheel spacer and typical steel wheels(3.75" BS). Same as the guys that use steel wheels with a low 2.5" back spacing and NO spacer.
Test drove with the 3" spacers and all is like before.....Nice and stable....no vibrations.....except now
I can make a hard right turn without touching the PS box. My aluminum backspacing measures
at exactly 5 3/8" plus/minus .002" (per the tape measurer) once I realized I was measuring
BS incorrectly.
How close are the stock FJ60/62 Cruisers with stock factory steel 15" wheels? I bet they are close on ALL of them. It really comes down to their back spacing....if they are the typical 3.75" BS then they are close.
Just checked my back spacing an hour ago and my 17" aluminum wheels are right close to 5.5" BS.....that explains a few things.
Back in about 1986 and 87 is when I had the 84 longbed with 33x12.50R15's on 10" steel wheels....that was the common set-up. They all had 3.75" BS and it was also common to have the tie-rod come very close to the lead bang on weights....I had scrape marks in mine. The solution was to flapper wheel the high spot on the tie-rod or steering arm or use a 1/8"~1/4" wheel spacer(they were for that purpose)....or to go to stick-on weights.
So Piglett....basically my truck axle with 3" spacers on 5.5" BL aluminum wheels is no different then other mini-trucks(with solid axle) using a tiny 1" wheel spacer and typical steel wheels. So my scrub radius is minimal at this point.....this is good.
well 1st that chart kicks butt, thank you Zuk
i was a bit worried about the load imposed on your stock wheel studs but the setup in your pictures looks dam good so maybe i was worried about nothing, i hope that was the case. I don't want to see a news report with a white 3 wheeled yota & a big red spot on the highway
so now the question i have is will my new 33" rubber cause me have to regear, i would think my v6 would put out enough beans that it would be ok......i guess i'll see. lots of hills around here.
I'm thinking or putting my 90'gmc 2500 plow truck on tow duty.
have you ever towed with a $400 truck before?
she is more than a little rough
but i can get an AG plate for it downtown for $26
which allows me to drive 20 miles as the crow fly's
which is just about how far the scrap yard is from me
(maybe a little further but who's counting)
Thanks for the concern but the wheel studs are not seeing any real additional forces acting on them. And, the way they machined those studs into the wheel spacer is very strong also.
Here's a shot down the side with no wheel spacers......imagine the outside with another 2 inches of rubber sticking out.
The plan is to remove the 2" spacers from the front and use those in the rear. Then the new 3" in the front.
One mod leads to another....and now I need wider longer mudflaps. I was having some tire rub on the frame when
flexing and I'm pretty sure these 2" spacers will cure that.
Making sure the surface "irregularities" don't effect things in a negative way.....
The Ebay "extended thread lug nuts" are placed in the hole and they are recessed as they should be.
Verified that they are not too long on the other side and all is good.
They are acorn style but I still cinched them up almost snug before I tightened them. Anti-seize of course. 80 plus plus ft/lbs.
Looks good. And more anti-seize on these wheel studs.
Snugged up each one and backed off 1/8 turn..... after all were this way, then I tightened them up......
.,.....and final tightened them.
Final thought....the way everything bolted up and felt well centered, I have a good feeling that I
will be vibration free..........addendum---4-11-2016---Yes, verified vibration free. Ken
Note that everybody else with a 1st gen rear e-lockered Tacoma that has switched to steel wheels and
no spacers has basically exactly the same forces acting on their wheel studs as I do with my
combo of 5.5" back spacing and 2 inch spacers.(and the same exact overall width)
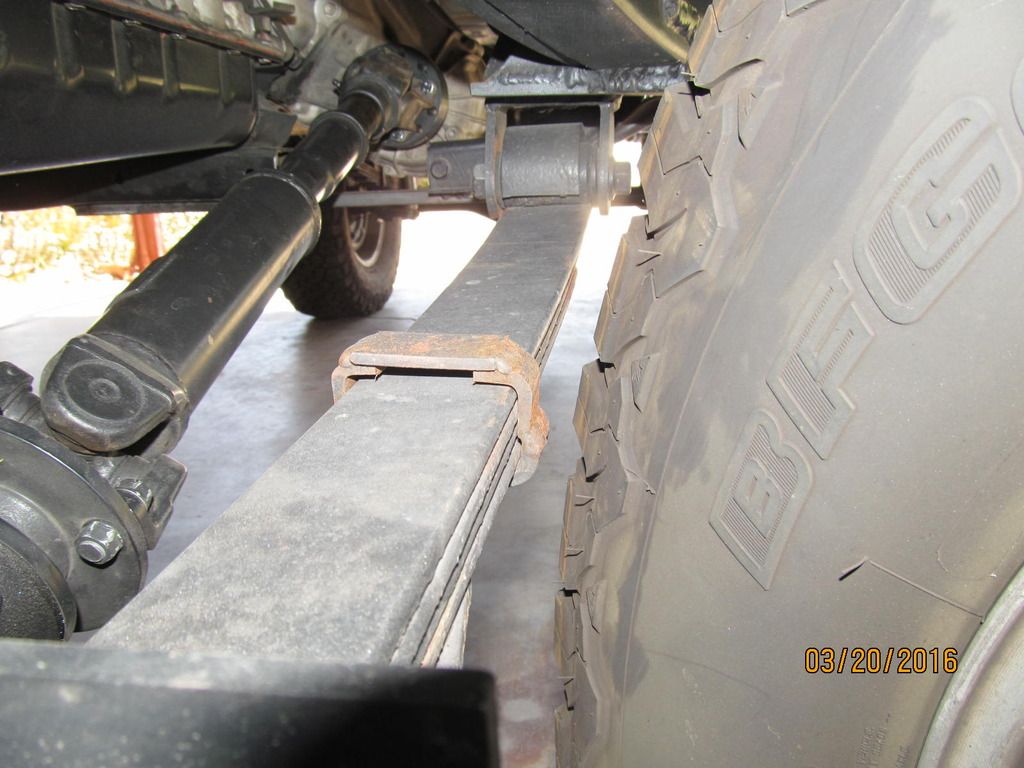
Making a new passenger side steering Y-arm that will clearance the leafpacks a lot closer
than before. Having the upper arm so high meant my compression would be severely
limited. Instead of having 4.5" compression before the draglink smashed the underside
of the frame, I will have closer to 7".
Here's the arms that I bought off of Ebay for 150. Tires are off the carpet on jackstands.
Wheels are zipped off. Shown here checking the torque on the 3" wheel spacer nuts....
I used a lugnut jammed in between
the caliper body and the hub itself. No loosening so far....80 ft/lb still.
I marked with a sharpie a reference notch at the 6 o'clock position on all 6 nuts so that
I can visually see any
loosening that might occur in the future.
Wheels are turned sharp right and I have a massive 4" clearance to the packs.
Wheels all the way to the left and about 2.5" of clearance.....the plan is to reduce that
to about 1/4" when done.
I tried reversing the castle nuts and rapping it fairly hard in an attempt to break the
tie-rods loose
and no worko.
In the end, the good ole tie-rod puller worked the best. Came off like hot butter.
Light tapping DID break the cone washers loose pretty easy
Mocking up where the draglink will be in relation to the crossrod joint.
I used the torch to heat it up and bend it straight. This is the LEFT side arm and is stamped
from the factory with a capital "L". More pics coming.
Trying to visualize the cut ....this one will be different from all other arms
....I think it's going on the side.
Cut on the 14" chopsaw....I like it!
hmmmm....up like this?
I want it on a little shorter radii....that way, the steering will be more like a sports car....hehe.
Steering used to be 4 turns lock to lock....now is 3.5 turns lock/lock.
My heavy tack weld....I rotated it a touch for better alignment at the tie rod ball.
Turning all the way to the right....nice. Tie rod is a zero angle.
All the way to the left....tie-rod is still zero degree tilt. Better than I had hoped for.
..............
...............
Maybe grind a groove and fill with weld? naaa, it's ok.
Oh ya.....a nice slot to fill on the bottomside. Good.
Done. Letting it air cool. Cryo treat? Desired but I can see that this one will be aok.
looking good!
how many amps did you have to use to get a good root on your weld?
i remember years ago some folks were flipping their arms & making home built hysteer
i think there was some machining & brazing involved if i recall.
not sure how well all of that turned out though
got my old dry-rotted 32's off my stock wheels
i put them out front of the house with a FREE sign
maybe someone needs a couple spares ?
if they are still there in a couple weeks they will head to the dump
but i think they will end up at someone house
Position #3 on the millermatic 185 so probably 120 amps using 030 wire.
So I quickly put everything back together ( I have a package to pick up at Fedex)
making sure I eyeballed everything I touched and making sure I tightened it. 4
17mm nuts on passenger upper knuckle tightened....2 castle nuts on tierods
tightened and cotter pins bent up....pitman arm nut tightened.....draglink
adjusted and large stop nuts tightened.... wheels on and impacted down.
Check and check and check. Everything tight, and road check. No
vibrations and it drives very nice. The stabilizer shock helped a lot.
Ready for the trip to Moab.
oh ya, I put the steering shock back on. Seems when I put the 3 inch spacer on
that extra 1 inch was enough to effect the scrub radius and likely responsible for
a shake at 38 mph. It was only 38 mph and was good on the highway at 70 so I
tend to eliminate the lugnut centricity thing. Is that even a word?
Nice looking work on the Y arm, thanks for posting up all the pics, they should come in handy down the road! One question, when you do the shackles up front is there a specific shackle angle to shoot for?
Look forward to seeing some pics from your Moab trip!
Hi rustED---
Thanks. The pics of the Y arm will stay on Yotatech for a long time....unless my photobucket
account gets wiped somehow.
No special angle.....I do what looks good in my mind. Shoot for less than 45 degrees and more
than 20.
Will take Moab pics and post them here probably.
mct75---dimes..... Now I'm tweaking the clearances and making sure everything clears
everything. And, as you can see, I have to "change" things and hopefully the welds are
not too robust to grind away.
Off comes the wheel again for some tweaks.
Adding rubber bumpstops.
This way not so good....
....and this way is very very good. Fits good....gives me the desired air gap to the frame.
Using the FLASH! Takes the natural look out of the pic sometimes
The fit was pretty good and the steel base tabs are lightly welded on each end.
Simple and easy....my favorite method.
Part # of the bump stops.
Now to weld some knuckle stops on and reinforce the front shackle mount.
Pics coming.
Sorry about the lack of pics in this build but my batteries aren't what they used to be.....
Not shown but I welded the steering stops on the BACKSIDE of the housing....only 1 per side.
That way they don't show as viewed from the front. I did a 50% weld. Did not weld all the
way around it....just seemed overkill.
These are available from Ebay if anyone needs them....

 03-20-2016, 11:58 AM