

 03-23-2016, 02:55 PM
Last edit by: IB Advertising
See related guides and technical advice from our community experts:
- Toyota 4Runner, Tacoma, and Tundra Paint Modifications<br>Overview of popular modifications to help you customize your Toyota.

Show us your best cheap mods!
05-22-2008, 10:33 PM
#101
Registered User
Join Date: May 2008
Location: the boonies, Alaska
Posts: 32
Likes: 0
Received 0 Likes
on
0 Posts
Re-routed the intake tube to where the drivers-side corner light was with some old vacuum cleaner hose --WIP. I did that so I can make a detachable snorkle without cutting the fenders, also going to be home made
 extended the diff. breathers. and of course taking off the rear bumber, lower valance and mud flaps.
--WIP. I did that so I can make a detachable snorkle without cutting the fenders, also going to be home made extended the diff. breathers. and of course taking off the rear bumber, lower valance and mud flaps.
Last edited by 907Toyota; 05-22-2008 at 10:34 PM.
 05-25-2008, 07:48 PM
#102
Registered User
Join Date: Jul 2006
Location: INDIANA
Posts: 2,149
Likes: 0
Received 0 Likes
on
0 Posts
I bought a old street sign and made it into a valance skid plate this weekend and cutout two spots for some cheap driving lights
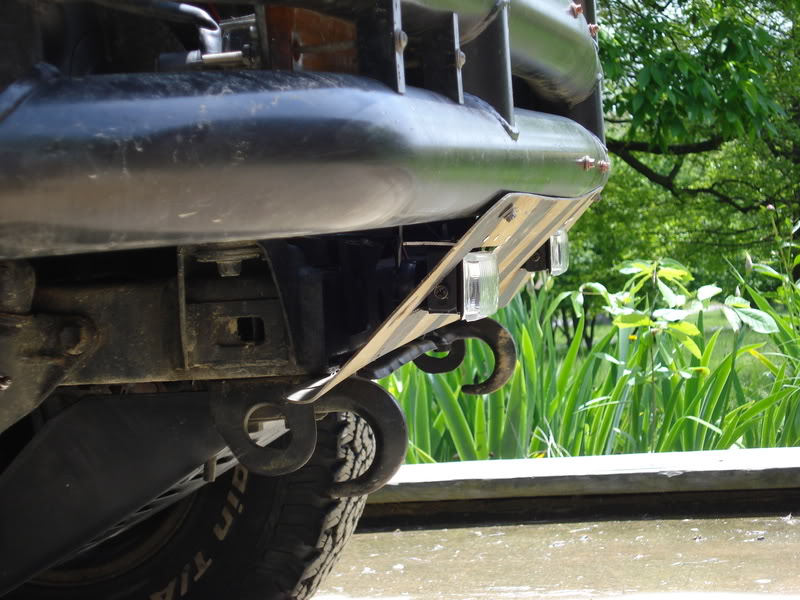
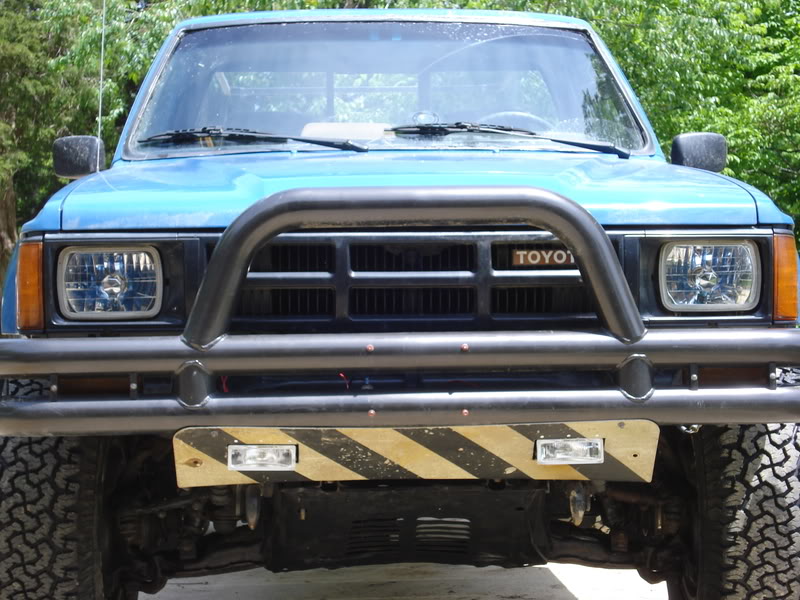
total price was 30$
I used my a/c switch for the light switch blue wire is power black gos to the lights and white is the ground so that the a/c light will light up when you turn on the lights.
total price was 30$
I used my a/c switch for the light switch blue wire is power black gos to the lights and white is the ground so that the a/c light will light up when you turn on the lights.
Last edited by CyMoN; 05-26-2008 at 10:08 PM.
 06-15-2008, 08:26 PM
#105
Registered User
Join Date: May 2008
Location: Albuquerque, NM
Posts: 3
Likes: 0
Received 0 Likes
on
0 Posts
My cheap mods on my 1st gen
I've got an '87 4Runner where I solved a problem that vexed me for a while. The pulls to release the rear seat-backs, or "plungers" as Toyota calls them, were always breaking, especially while trying to get the seats to lay flat. I thought it over a bit and came up with a solution. I bought a set of old style "security" door lock pulls, cut about 1/4 inch off the top, drilled a hole near the tip, and inserted a keychain ring. Now the seats fold flat without the pulls catching on anything, and there are no plastic bits to break. The door locks cost $5 and I had the rings and washers lying around the garage. Now I can easily lay the seat flat and sleep on the trail.
Another cheap mod I did was install a light in the rear so I can see where I'm going if I have to back out of a spot at night. I didn't want to install it on the underside of the bumper and lose clearance, or the top of the bumper and interfere with the tailgate. So logically I put it on the tailgate. I removed the tailgate cover to make sure I wouldn't interfere with the operation of the rear window and drilled a hole to mount the light. I then drilled a small hole to run the wire through. Once mounted, I ran the power for the new light through the wire harness for the rear window motor and into the cargo area, where I tied it into the power for the rear deck lamp. So not only did I not have to run a wire all the way up to the instrument panel, that light is already on a switch so I didn't have to purchase or install a new switch. I just hit the rear deck light switch and I have a nice little beam to guide my way out. And the light is hinged and can be rotated in any direction. I had everything laying around the garage so this mod cost me absolutely nothing.
Another cheap mod I did was install a light in the rear so I can see where I'm going if I have to back out of a spot at night. I didn't want to install it on the underside of the bumper and lose clearance, or the top of the bumper and interfere with the tailgate. So logically I put it on the tailgate. I removed the tailgate cover to make sure I wouldn't interfere with the operation of the rear window and drilled a hole to mount the light. I then drilled a small hole to run the wire through. Once mounted, I ran the power for the new light through the wire harness for the rear window motor and into the cargo area, where I tied it into the power for the rear deck lamp. So not only did I not have to run a wire all the way up to the instrument panel, that light is already on a switch so I didn't have to purchase or install a new switch. I just hit the rear deck light switch and I have a nice little beam to guide my way out. And the light is hinged and can be rotated in any direction. I had everything laying around the garage so this mod cost me absolutely nothing.
06-15-2008, 08:42 PM
#106
Registered User
Join Date: May 2006
Location: Lawrenceville/Statesboro, GA
Posts: 625
Likes: 0
Received 0 Likes
on
0 Posts
rain X all your windows before going out mudding and anti fog the inside windows
we have gone out the last 4 days to a friend of a friends land and they have some very wet and muddy trails first 2 nights I could not see out any window but the front and the mud was starting to cloud up it as well.
I had a bottle of rain X that I bought 5 years ago that I had never used thought I would give it a try and it worked great the mud slid right off the front window and the sides had way less stick to them as the nights before.
I also put it on my lights and it helped with no muddy water collecting on them as well.
06-16-2008, 08:00 PM
#107
Registered User
Join Date: May 2008
Location: Halifax, Nova Scotia
Posts: 107
Likes: 0
Received 0 Likes
on
0 Posts
I wish i had pics, but once i put buckets in my 82' i made a MDF console for inbetween the seats, with cupholders, 6" speaker box and a spot for a maglight and whatever else, Also a big ol' diff. breather, and right now im in the process of trying to rig up a 85' runner skidplate on it.
 09-17-2009, 02:47 AM
#111
Registered User
I made my own mud flaps a while back. They aren't pretty but they keep the police off my back. I bought a kit online that came with all the brackets for $26.00. I had my own rubber mat that I got from work. You have to do some customization since they are meant for a semi truck and start out 29" wide. They are also removable for offroading.


09-18-2009, 07:04 AM
#112
Registered User

Join Date: Jul 2009
Location: New Brunswick, Canada
Posts: 111
Likes: 0
Received 0 Likes
on
0 Posts
I picked up a set of AISIN hubs at a pick-a-part for $40 (40 Canadian, so like $3 US..) Another 8 bucks for some grease and now all i need are the gaskets. Anyone know if it's okay to just use black RTV (silicon) instead of having to wait for the dealer to get the paper gaskets in?
09-23-2009, 11:30 AM
#113
I think 90% of my mods have been in $50.
- SR5 seats
- Removed carpet
- Rear sliding window replacement (plexiglass)
- Roll Bar
- 4 "Baja" fog lights
- Complete sound system (2 amps, 4 speakers and a sub)
- Stinger fuse and wiring
- Rear tube bumper
- Front smitty built tube bumper
- Gap guards (post body lift)
- Electronic cruise control
- Remote Starter
- Brand new CAPA certified front fenders (stickers and all)
Just gotta put in your time and a little cash at Pick and Pull.
And of course, lots of sweat and blood.
10-23-2009, 09:40 AM
#114
Registered User
Join Date: Sep 2009
Location: Santee C.A.
Posts: 131
Likes: 0
Received 0 Likes
on
0 Posts

.50cal center console

with orig. top box

and a cheapo cup holder

and sense the factory switch's didn't work i relocated and wired my own for the rear window. The one on the left is for lights the right is the rear window

the radio wasn't cheap but the mount was, hell if i sell the rear view i could make money!
 10-24-2009, 07:54 PM
#116
Contributing Member
Thread Starter
Join Date: Nov 2002
Location: People's Republic of Boulder
Posts: 831
Likes: 0
Received 1 Like
on
1 Post
The only things I've done lately were mostly maintenance items. For those of you who want your plastic surfaces to be black again, the Krylon Fusion spray has worked well for me. Just be sure to follow the directions for surface prep. Same goes for metal surfaces and Hammertite spray (I think it's under the rust-oleum brand now).
One 'mod' I was glad to have done before summer was a couple of 12v fans. You can pick them up at any electronic supply store. Just wire them up for a cigarette lighter (or whatever power source you have) and place them where needed. Very low power draw so they can run a long time without draining your battery. I used extra long wires so they'll reach well outside the truck.
One 'mod' I was glad to have done before summer was a couple of 12v fans. You can pick them up at any electronic supply store. Just wire them up for a cigarette lighter (or whatever power source you have) and place them where needed. Very low power draw so they can run a long time without draining your battery. I used extra long wires so they'll reach well outside the truck.
10-24-2009, 08:31 PM
#117
Registered User
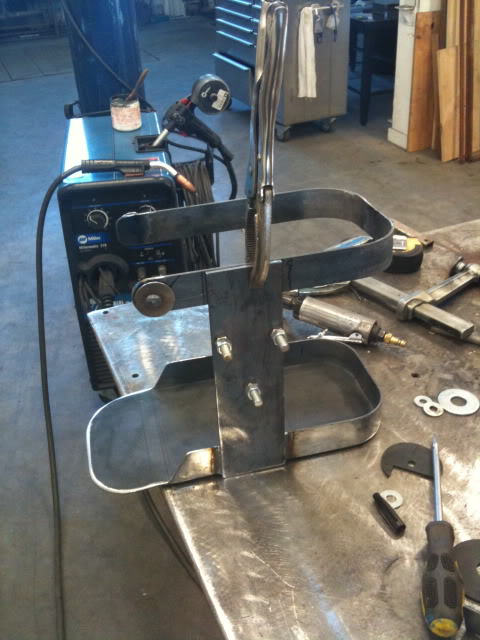
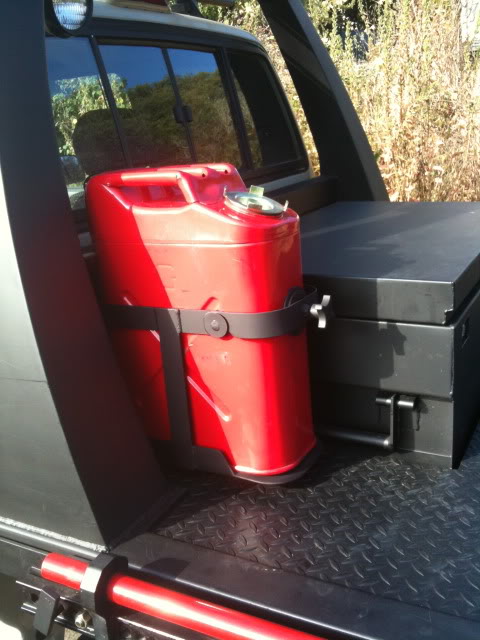
Here is a gas jerry can mod I did a few weeks ago. I started with 1" steel, 1/8" steel plate, turn knob, rubber and steel cord to lock it. The cage is mounted to the tool box with 3 3/8" bolts and is super sturdy.


10-26-2009, 07:47 PM
#118
Registered User

Join Date: Oct 2009
Posts: 6
Likes: 0
Received 0 Likes
on
0 Posts
how'd you do that? i'm trying to get some light in there cuz its frustrating to know what to do when u can't see the controls in the dark. do you have any pictures?
10-26-2009, 09:15 PM
#119
Registered User
Join Date: Oct 2009
Location: SFV, CA
Posts: 5
Likes: 0
Received 0 Likes
on
0 Posts
My truck is used mainly to haul stuff around and light towing so no off-road related mods but for I did put a few el-cheapo mods into it -
* Bought some $3 worth of U bolts and welded them on both sides of the bed of the truck, now I have plenty of places to tie stuff down.
* Modded the front bumper by removing the bottom skirt and replacing it with a deeper cut air dam.
Measured an improvement of 2 MPG on average and much improved stbility at highway speeds.
Total cost $35.
* Put a nice aluminum shift knob, just a classic satin finish ball. Feel much nicer in my hand!
Free mod 'cause I already had the knob
Moti
Last edited by Blackbird; 10-26-2009 at 09:44 PM.


