

 03-23-2016, 02:55 PM
Last edit by: IB Advertising
See related guides and technical advice from our community experts:
- Toyota 4Runner, Tacoma, and Tundra Paint Modifications<br>Overview of popular modifications to help you customize your Toyota.

Show us your best cheap mods!
 04-09-2013, 04:42 PM
#982
Registered User
iTrader: (2)
Join Date: Dec 2009
Location: Pleasanton, CA - SF Bay Area
Posts: 2,159
Likes: 0
Received 7 Likes
on
5 Posts
That skid looks BEEFY - love it!
Mine disappared when BIG O Tires installed my 4" bracket lift...they never gave it back and I didn't think about it at the time....Not that it would fit right anymore with the lift
I have a welder but yet to use it - this is on my list of things to fab some day...do you have any tips (or even a build up thread) of making this? How did you measure/do angle calulation, etc? How did you cut (I see a 4.5" angle grinder in the photo), what steel, what mounting hardware?
04-09-2013, 11:09 PM
#983
Registered User
Join Date: Nov 2012
Location: Olympia, WA
Posts: 42
Likes: 0
Received 0 Likes
on
0 Posts
That skid looks BEEFY - love it!
Mine disappared when BIG O Tires installed my 4" bracket lift...they never gave it back and I didn't think about it at the time....Not that it would fit right anymore with the lift
I have a welder but yet to use it - this is on my list of things to fab some day...do you have any tips (or even a build up thread) of making this? How did you measure/do angle calulation, etc? How did you cut (I see a 4.5" angle grinder in the photo), what steel, what mounting hardware?
Mine disappared when BIG O Tires installed my 4" bracket lift...they never gave it back and I didn't think about it at the time....Not that it would fit right anymore with the lift
I have a welder but yet to use it - this is on my list of things to fab some day...do you have any tips (or even a build up thread) of making this? How did you measure/do angle calulation, etc? How did you cut (I see a 4.5" angle grinder in the photo), what steel, what mounting hardware?
I basically checked out the different skids I liked (Relentless, Bud Built, ATO) and saw how they mounted to borrow ideas from. I had a rough sketch from a buddy with measurements for the front IFS skid, so that took a lot of the guess-work out of it.
I bought a 64" x 24" piece of 3/16" thick A36 steel and used a combination square to start marking my cuts, welds, and bends. I had never welded before, but with the help of a fellow Taco buddy, we cut out each piece with the plasma cutter, and started welding it together. We test fit each piece along the way to make sure the factory mounting holes lined up.
After we got the front skid done, we had to slot some of the holes to make it fit just right. I had originally planned to make (2) separate skids that bolted together, but simplicity and ease won in the end, and we welded them into a one-piece. I just got done mounting the whole thing up, and it was a chore. After some "persuasion" we got it mounted and it is pretty damn solid.
I guess my best advice would be to really check out your under-carriage, note what factory holes you have available, see where you need protection, and measure, measure, measure. Use a degree finder to dial in the rough angles you need to work around. Once you have the separate pieces ready to weld together, test fit them on the truck and tack weld them to each-other after confirming they line up. Remove the skid(s) and finish welding all the seams/joints.
Good luck, and I will post more pics tomorrow. It's late, it's dark and I'm tired (we also did a shackle-flip on my buddy's Taco tonight)

 04-10-2013, 01:28 PM
#985
Registered User
iTrader: (2)
Join Date: Dec 2009
Location: Pleasanton, CA - SF Bay Area
Posts: 2,159
Likes: 0
Received 7 Likes
on
5 Posts
Thanks Philbert, unfortunately I don't have a write-up for the skids (sorry). It mounts to the factory bolt holes and hardware (except for some Grade-8 nuts and bolts I picked up) and uses the transmission cross-member studs to bolt the rear into place.
I basically checked out the different skids I liked (Relentless, Bud Built, ATO) and saw how they mounted to borrow ideas from. I had a rough sketch from a buddy with measurements for the front IFS skid, so that took a lot of the guess-work out of it.
I bought a 64" x 24" piece of 3/16" thick A36 steel and used a combination square to start marking my cuts, welds, and bends. I had never welded before, but with the help of a fellow Taco buddy, we cut out each piece with the plasma cutter, and started welding it together. We test fit each piece along the way to make sure the factory mounting holes lined up.
After we got the front skid done, we had to slot some of the holes to make it fit just right. I had originally planned to make (2) separate skids that bolted together, but simplicity and ease won in the end, and we welded them into a one-piece. I just got done mounting the whole thing up, and it was a chore. After some "persuasion" we got it mounted and it is pretty damn solid.
I guess my best advice would be to really check out your under-carriage, note what factory holes you have available, see where you need protection, and measure, measure, measure. Use a degree finder to dial in the rough angles you need to work around. Once you have the separate pieces ready to weld together, test fit them on the truck and tack weld them to each-other after confirming they line up. Remove the skid(s) and finish welding all the seams/joints.
Good luck, and I will post more pics tomorrow. It's late, it's dark and I'm tired (we also did a shackle-flip on my buddy's Taco tonight)
Thanks for the explanation of your approach - it sounds like the right way to do it! I really love how yours came out and it's inspiring.
Appreciate it!
04-10-2013, 05:42 PM
#986
Registered User
Join Date: Nov 2012
Location: Olympia, WA
Posts: 42
Likes: 0
Received 0 Likes
on
0 Posts
Good luck with your skids and any other projects!
04-14-2013, 01:30 PM
#987
Registered User
get some lower door panel pockets off of a 87-95 f150 (from junk yard $5).
the front lines up perfect on the curve and just cut the rear to fit. they are deep enough to fit a pistol or a other things unlike the ones on a later 4runner
i have tried uploading to the "photos" section on yotatech but it sucks and will not upload my picts to my album. so here is what they look like on a f150

here is a pict on my half doors i found

the front lines up perfect on the curve and just cut the rear to fit. they are deep enough to fit a pistol or a other things unlike the ones on a later 4runner
i have tried uploading to the "photos" section on yotatech but it sucks and will not upload my picts to my album. so here is what they look like on a f150
here is a pict on my half doors i found
04-14-2013, 03:50 PM
#988
Registered User

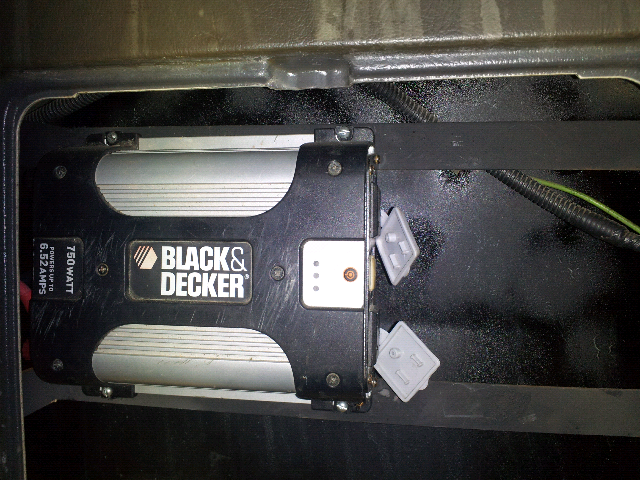
Mine was a on board air compressor and power inverter.

Both of which were free. I just used the old location of the spare to Hal the tank and the old location of the jack to hold the compressor.
Both of which were free. I just used the old location of the spare to Hal the tank and the old location of the jack to hold the compressor.
 04-22-2013, 08:26 PM
#991
Registered User
one of the best mods i did to my t100 was when my cig socket died. went to auto zone got a new universal one. had to tinker with it. basically gutted the new one out and put the guts in the old fitting cuz the new one wouldn't fit right. but i also ran a hot wire to it from the battery so now it's on without the key in. if my phone is dead i can hide it and charge it and do what i need to do and not have to babysit my truck so no one steals it. and for in the winter i can plug in my heater and have the cab all toasty by the time i have to leave for work early in the mornings :-)
04-22-2013, 08:40 PM
#992
Mine was a on board air compressor and power inverter.
Attachment 91933
Both of which were free. I just used the old location of the spare to Hal the tank and the old location of the jack to hold the compressor.
Attachment 91933
Both of which were free. I just used the old location of the spare to Hal the tank and the old location of the jack to hold the compressor.
04-28-2013, 06:11 PM
#993
Registered User
Well through compressor was a husky 1/3 hp 125 psi max. 3 gal tank. I took the 125 limit switch out and replaced it with a 150 psi switch. That gave more than enough to run air tools for short times. As for airing up tires and using a impact. As for build up time it takes about a minute or two to build up to 150 psi before it shuts off.
04-28-2013, 06:37 PM
#994
Well through compressor was a husky 1/3 hp 125 psi max. 3 gal tank. I took the 125 limit switch out and replaced it with a 150 psi switch. That gave more than enough to run air tools for short times. As for airing up tires and using a impact. As for build up time it takes about a minute or two to build up to 150 psi before it shuts off.
04-28-2013, 08:06 PM
#995
Registered User
Join Date: Feb 2012
Posts: 15
Likes: 0
Received 0 Likes
on
0 Posts
I had an issue with thefts from the truck when the top was off in the summers so I welded a steel shelf to the factory roll bar and a rocket box bolted on. The box has a half link of chain welded on to receive padlocks to secure everything.
http://s1280.photobucket.com/albums/...ps3ac1d95d.jpg
http://s1280.photobucket.com/albums/...psbd2da469.jpg
http://s1280.photobucket.com/albums/...ps3ac1d95d.jpg
http://s1280.photobucket.com/albums/...psbd2da469.jpg
05-22-2013, 06:16 PM
#996
Registered User
Join Date: Sep 2012
Location: Bay Minette AL., (Lower right limb of Alabama)
Posts: 53
Likes: 0
Received 0 Likes
on
0 Posts
I think that one of my FAVORITE all time cheap mods would be my aftermarket keyless entry system. I you install it yourself it will run you about $55 or $60.
SOOOO worth it if you have a kid.. B/C you always have your hands full... lol
--Basic keyless entry with alarm ~$35-40 (Crimestopper SP101)
-- Aftermarket door acctuators ~$6 each (need 2)
-- 5 prong relays ~$5 each (need 2)
-- I had wire laying around
Ive had mine now for about 2 months.. ITS GREAT
GREG
05-22-2013, 07:32 PM
#997
I think that one of my FAVORITE all time cheap mods would be my aftermarket keyless entry system. I you install it yourself it will run you about $55 or $60.
SOOOO worth it if you have a kid.. B/C you always have your hands full... lol
--Basic keyless entry with alarm ~$35-40 (Crimestopper SP101)
-- Aftermarket door acctuators ~$6 each (need 2)
-- 5 prong relays ~$5 each (need 2)
-- I had wire laying around
Ive had mine now for about 2 months.. ITS GREAT
GREG
SOOOO worth it if you have a kid.. B/C you always have your hands full... lol
--Basic keyless entry with alarm ~$35-40 (Crimestopper SP101)
-- Aftermarket door acctuators ~$6 each (need 2)
-- 5 prong relays ~$5 each (need 2)
-- I had wire laying around
Ive had mine now for about 2 months.. ITS GREAT
GREG
05-26-2013, 12:24 PM
#998
Registered User
Not really a mod, but it helps appearance in a jiffy. Any surface accept glass. My tail gate
is kinda faded a bit, this brightens it up. Doesn't last that long but what the hey.
Pledge with orange oil.
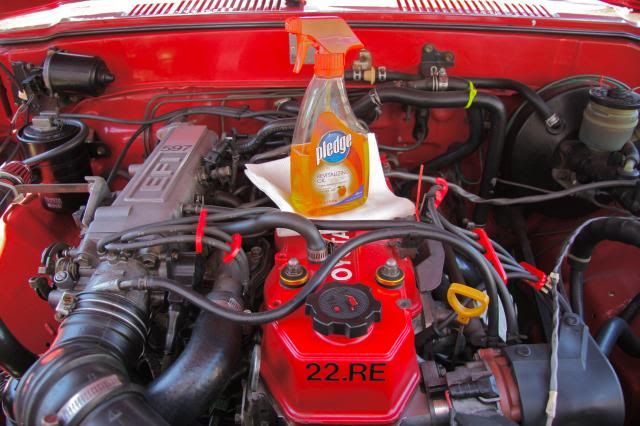
is kinda faded a bit, this brightens it up. Doesn't last that long but what the hey.
Pledge with orange oil.
06-03-2013, 07:36 AM
#999
Registered User
Join Date: Oct 2010
Location: VT
Posts: 93
Likes: 0
Received 0 Likes
on
0 Posts
Had to make liscence plate light holder somehow because cops kept pulling me over for no light on plate. Also carpet and shifts boots are crap so cut two holes in bandana and slid over.
07-05-2013, 11:01 AM
#1000
I got a rear view mirror with auto dim/compass plus a overhead console from a 96 Suburban I put in my 1st gen. Still have to put a headliner on it though:
[IMG]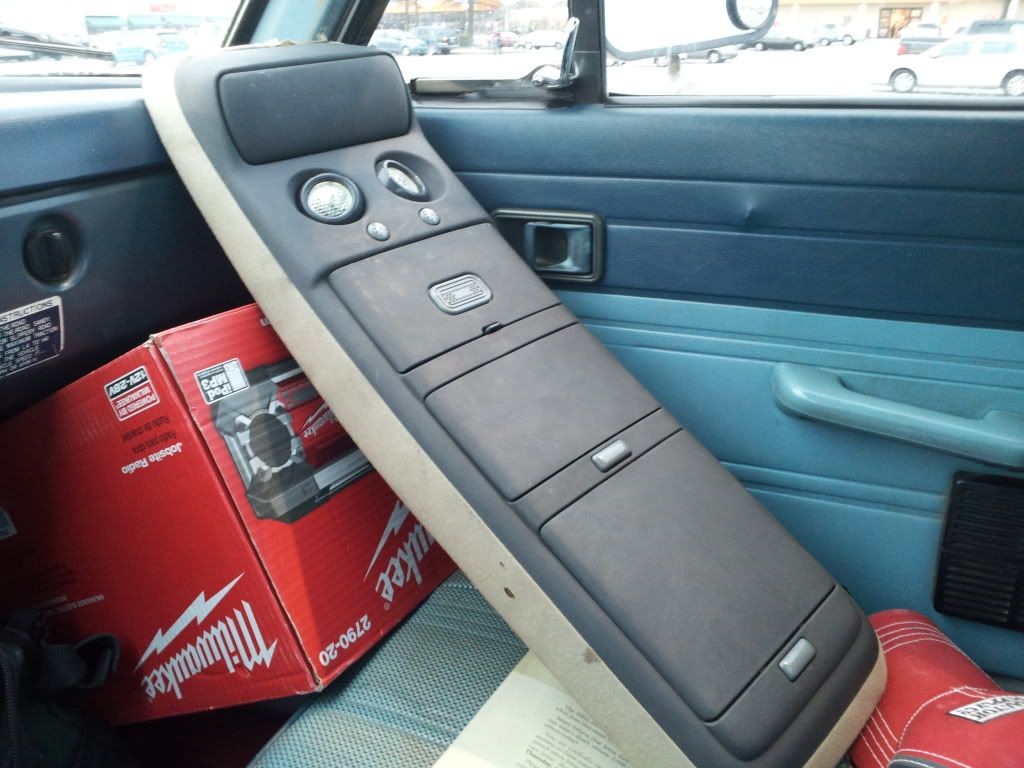 [/IMG]
put new fabric on it and painted it match my interior:
[IMG]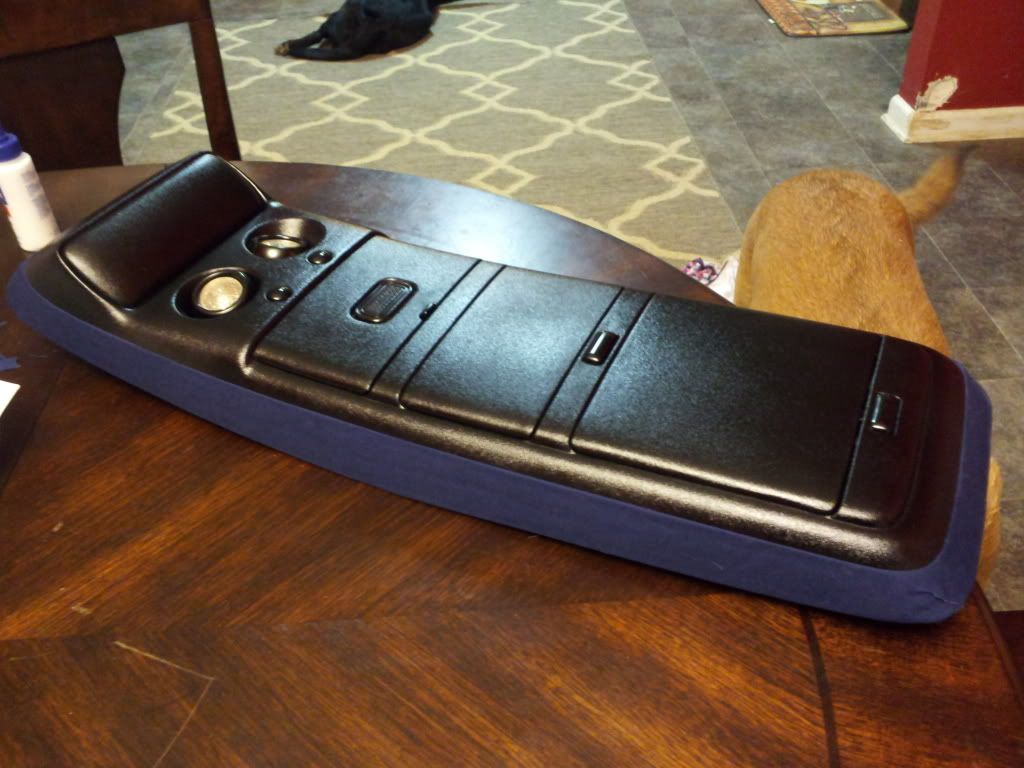 [/IMG]
[IMG]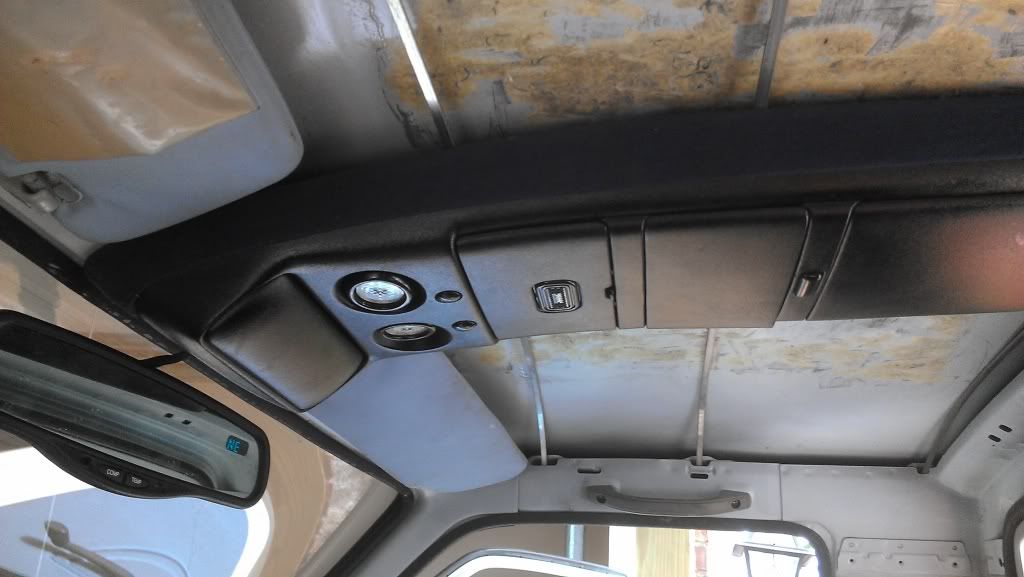 [/IMG]
[IMG]
 [/IMG]
put new fabric on it and painted it match my interior:
[IMG]
 [/IMG]
[IMG]
 [/IMG]


