

 03-23-2016, 02:55 PM
Last edit by: IB Advertising
See related guides and technical advice from our community experts:
- Toyota 4Runner, Tacoma, and Tundra Paint Modifications<br>Overview of popular modifications to help you customize your Toyota.

Show us your best cheap mods!
 04-21-2010, 03:48 PM
#202
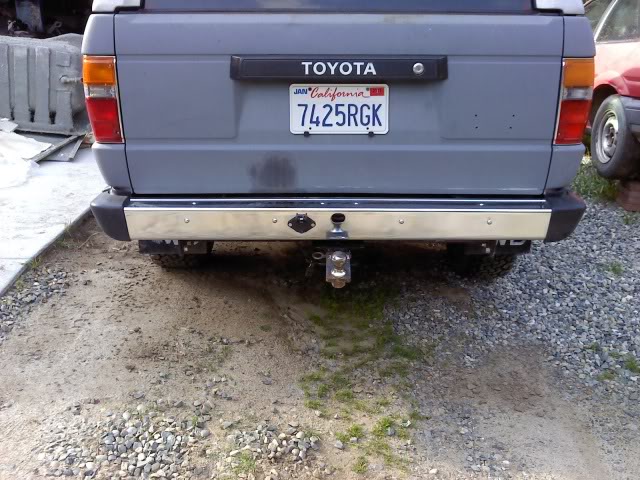
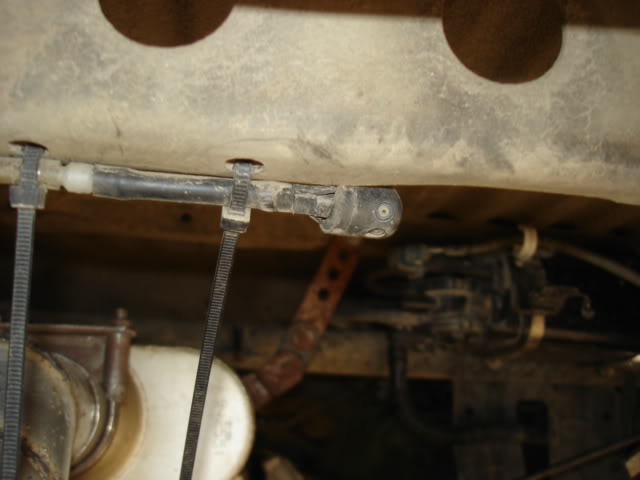
Installed a homemade boost controller. Free from years of working on autos and picking junk. About 7 ft. of 1/4" vaccuum line, a drain valve from an old radiator(brass), a 1/2" airline 3-way (tee), and two adapters for the vaccuum line to attach to the 3-way. adds a few pounds of boost. I run about 10-11 psi on an otherwise stock truck. - the cone filter. Kev
04-21-2010, 04:12 PM
#203
Registered User
I don't remember if I've posted my mods in here already. Not about to check either. Seems like this thread is moving slow as of late, so I'm sure many will read this.
Most of my mods have been electrical. One, because I love electrical. Two, because I'm a broke high school kid.
The pix will do most of the talking, but what I need to tell you:
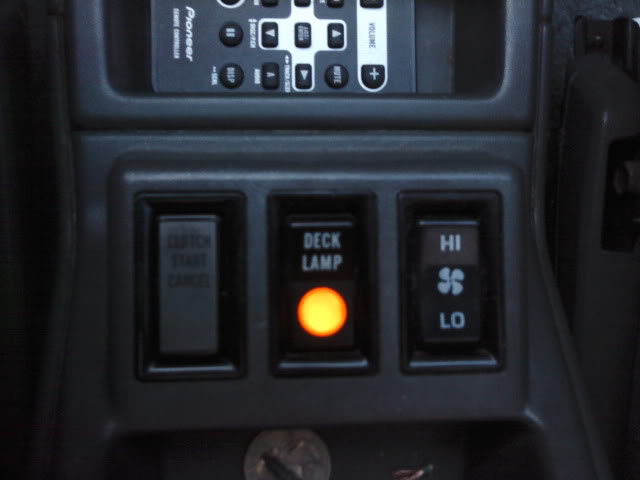
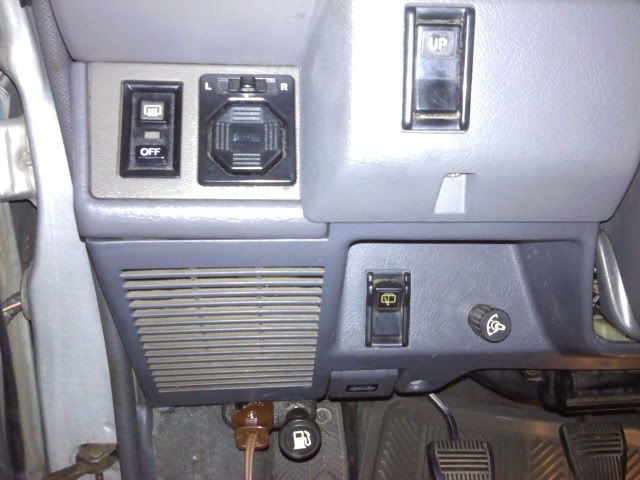
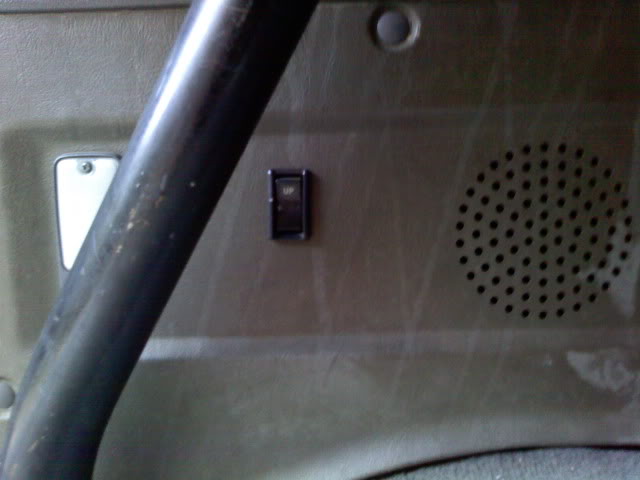
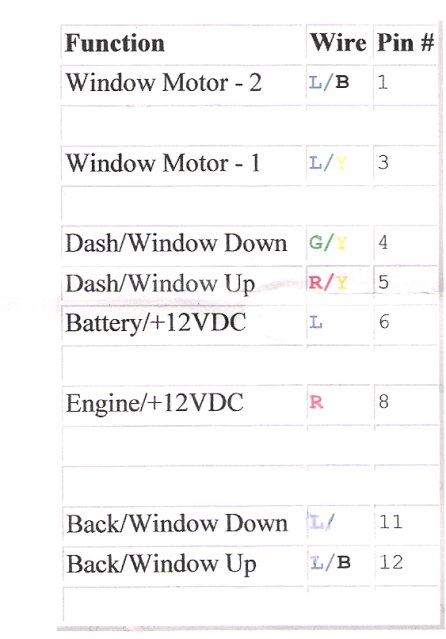
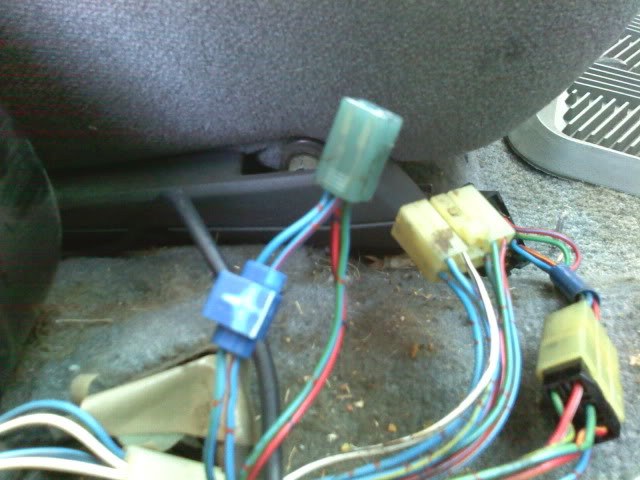
-Rear cargo window switch and driver switch are both tapped into the tailgate's wiring harness found behind the jack mounts.
-The switch for the deck light controls my KC Daylighters. (Haven't finished wiring the deck light yet.)
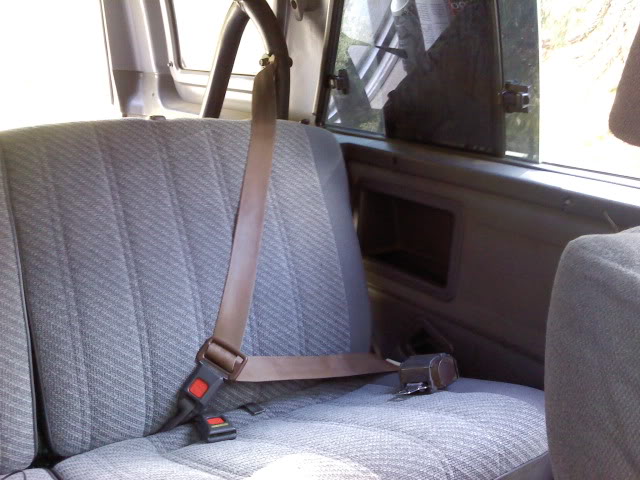
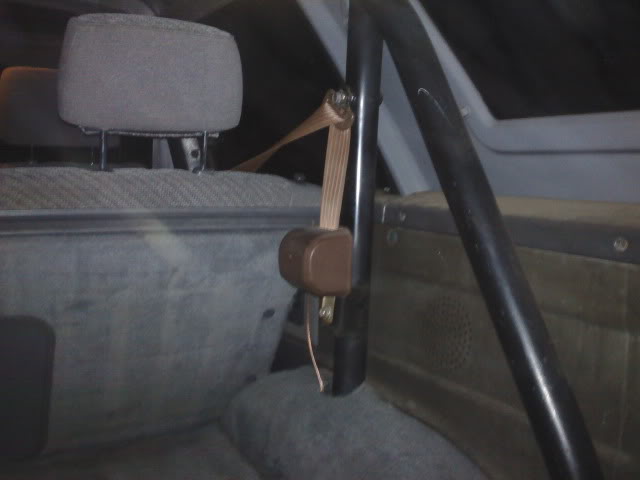
-I think the rear seat belts bolt right in.
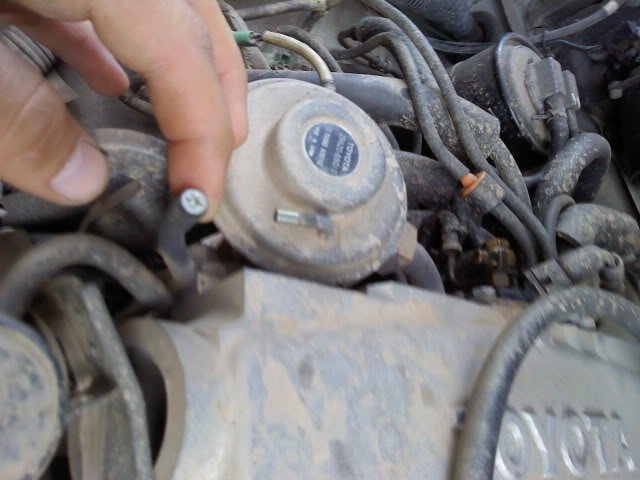
-You need a simple screw to plug the EGR vacuum.
-If you ever want to remove the rear window lock button so you can add a new switch, simply splice the pic'd two wires together, otherwise the window won't operate.
Most of my mods have been electrical. One, because I love electrical. Two, because I'm a broke high school kid.
The pix will do most of the talking, but what I need to tell you:
-Rear cargo window switch and driver switch are both tapped into the tailgate's wiring harness found behind the jack mounts.
-The switch for the deck light controls my KC Daylighters. (Haven't finished wiring the deck light yet.)
-I think the rear seat belts bolt right in.
-You need a simple screw to plug the EGR vacuum.
-If you ever want to remove the rear window lock button so you can add a new switch, simply splice the pic'd two wires together, otherwise the window won't operate.
04-25-2010, 08:50 AM
#204
Registered User
Join Date: Apr 2009
Location: British Columbia
Posts: 53
Likes: 0
Received 0 Likes
on
0 Posts
Noting to elaborate, jost a flat bottomed floor switch. Drilled and trimmed the little foot rest thing to the left of the clutch pedal to make it fit inside. Then just pinned it into the connector on the steering column... Pretty simple, and the high beam indicAtor even works!
04-26-2010, 11:24 AM
#205
Registered User
I mounted a small battery-powered thermometer with a wired remote sensor in my 1999 4runner. It's worked - eh - okay, I guess. The main problem with it was that the sensor got cooked every day when the sun hit the mounting area, so I'd get temp readings in the 130s or higher. It probably got that hot in the car, but I'd hoped to get a measure of outside air temp instead (the readout display offers a switch to show 'in' or 'out' temps). After 3 years of being in a blisteringly hot car in summer and a sub-freezing car in winter (I live in Georgia), the LCD display has finally started to give up the ghost.
Total cost: $10 at Home Depot.
Pics if anyone cares...
I mounted the remote wired sensor up above the weather strip on the driver's side rear door, where I hoped to avoid direct sunlight (doh!). It had a small sticky pad (top arrow), which detached a few years later. The sensor (bottom arrow) remains in place, however. I ran the wire down behind the weatherstripping...

...and rounded the corner to continue behind the molding on the support pillar. From there, I continued under the whats-it-called trim (kick plate?) that runs along the base of the interior driver's side door.

From there, I ran it through the handy-dandy hole in the auxillary fuse panel cover, and then popped it out again through one of the small pop-outs below the instrument cluster.

You can see the wire just peeking out from the popout panel (arrow). I mounted the actual readout display on a piece of adhesive-backed velcro and mounted it right on one the popout panels. The velcro adhesive is a little loose now due to the regular high heat, but it's stuck on there very well for three years of 120+ degree heat in summertime (in the car). You can see on the readout that the LCD is finally going. Oh well, fun while it lasted.

Total cost: $10 at Home Depot.
Pics if anyone cares...
I mounted the remote wired sensor up above the weather strip on the driver's side rear door, where I hoped to avoid direct sunlight (doh!). It had a small sticky pad (top arrow), which detached a few years later. The sensor (bottom arrow) remains in place, however. I ran the wire down behind the weatherstripping...
...and rounded the corner to continue behind the molding on the support pillar. From there, I continued under the whats-it-called trim (kick plate?) that runs along the base of the interior driver's side door.
From there, I ran it through the handy-dandy hole in the auxillary fuse panel cover, and then popped it out again through one of the small pop-outs below the instrument cluster.
You can see the wire just peeking out from the popout panel (arrow). I mounted the actual readout display on a piece of adhesive-backed velcro and mounted it right on one the popout panels. The velcro adhesive is a little loose now due to the regular high heat, but it's stuck on there very well for three years of 120+ degree heat in summertime (in the car). You can see on the readout that the LCD is finally going. Oh well, fun while it lasted.
Last edited by pendrag; 04-26-2010 at 11:26 AM.
04-29-2010, 10:42 AM
#206
Registered User
Join Date: Jun 2009
Location: Chattanooga, TN
Posts: 104
Likes: 0
Received 0 Likes
on
0 Posts
First: Emergency tag for cops being more forgiving with my speeding habits. Cost - Free (from my uncle)

Second: Painted the stripes and tailgate flat black. Cost - around 8$ for paint.

looking for a skull template to spray paint "TOY" on the tailgate; The skull being the O.

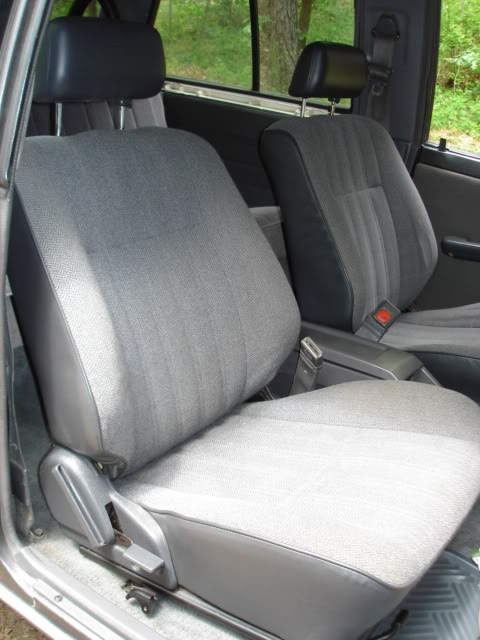
Third: 92 SR5 4Runner seats (Best investment so far) Cost - 75$ from junkyard

Fourth: CB and CD Player Cost - CD Player was 75 from Craigslist and the CB was free from my dad.

Last but not least: My awesome sound system, Cost - Free

(They are only temporary while i am building a box for this):

Second: Painted the stripes and tailgate flat black. Cost - around 8$ for paint.
looking for a skull template to spray paint "TOY" on the tailgate; The skull being the O.
Third: 92 SR5 4Runner seats (Best investment so far) Cost - 75$ from junkyard
Fourth: CB and CD Player Cost - CD Player was 75 from Craigslist and the CB was free from my dad.
Last but not least: My awesome sound system, Cost - Free
(They are only temporary while i am building a box for this):
04-29-2010, 03:23 PM
#207
Registered User
 Don't you ever use that footrest?
04-30-2010, 08:19 PM
Don't you ever use that footrest?
04-30-2010, 08:19 PM
#209
Registered User
Join Date: Apr 2009
Location: British Columbia
Posts: 53
Likes: 0
Received 0 Likes
on
0 Posts
Ha! I've spent thousands and thousands of dollars on mods for this ol' truck of mine so the $23 seems fairly minimal for the convenience of not having to re-locate my hand on the wheel to turn off my highbeams. Roads are super windy where I live, so it's nice to be able to switch to low beams at the tap of a toe when an oncoming vehicle sneaks up on you around a blind corner...
04-30-2010, 09:06 PM
#210
Registered User
True...but if you're driving safely, both your hands are already on the wheel. I was just curious though, so I asked. Wasn't meaning to demean your mod or anything.
06-02-2010, 03:41 PM
#211
Registered User
Join Date: May 2010
Location: Albuquerque, (Corrales) New Mexico
Posts: 91
Likes: 0
Received 0 Likes
on
0 Posts
I have a decent collection of cheap mods (under $40) in my build thread.
Did them all on my 3rd gen. Most can be used on other models.
See my signature for link
Did them all on my 3rd gen. Most can be used on other models.
See my signature for link
06-04-2010, 08:46 AM
#212
Registered User
Join Date: May 2010
Location: Albuquerque, (Corrales) New Mexico
Posts: 91
Likes: 0
Received 0 Likes
on
0 Posts
Edit to above post:
Here are some of the mods you can find there.
Andymod 2.0 (Disable VSC/ TRAC)
Black Emblems Mod
The Ashtray Mod
Deck plate mod
Disable DRL's
Disable Keyless Entry Chirp
Grip Tape door sills
LED Dome Lights
Mud Flap Mod
Post-It Note Mod
Rear Differential Breather Mod
Here are some of the mods you can find there.
Andymod 2.0 (Disable VSC/ TRAC)
Black Emblems Mod
The Ashtray Mod
Deck plate mod
Disable DRL's
Disable Keyless Entry Chirp
Grip Tape door sills
LED Dome Lights
Mud Flap Mod
Post-It Note Mod
Rear Differential Breather Mod
06-08-2010, 02:26 PM
#213
Contributing Member
Join Date: May 2010
Location: Rogue Valley OR
Posts: 83
Likes: 0
Received 0 Likes
on
0 Posts
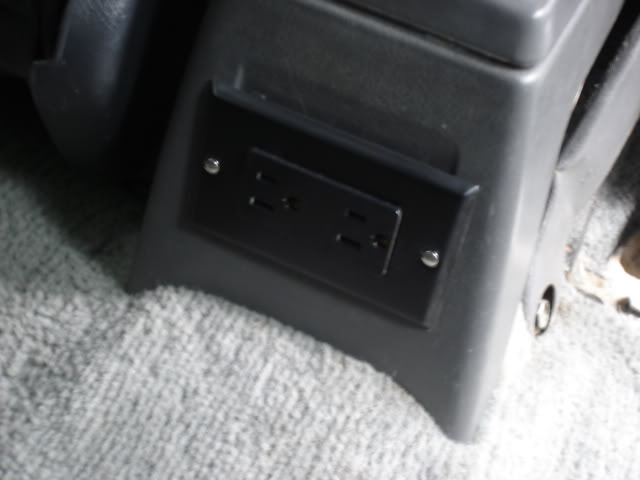
110v outlet in ashtray pocket ran from my inverter in the side P/S rear cubby: $3.29 outlet, $1.99 metal plate, bout $15.00 in wire and plugs=$20 or so..
Front ash tray mod, sheetmatal was leftovers, switches $2.49ea @ O'Reilly, LEDs $1.99 @ Radio Shack, bolts $.35 ea=$14-15 bucks...
Corolla seat mod from an early 90's 4 door. Hug you alot better. Track width was perfect, mounting brackets needed to be cut and welded further apart (front to back) on the track..10ea/seat=$20....
And last but not least, (my favorite) "Get off my arse" tail-gater deterent. Pulled a rear window squirter and plumbed it to my rear washer tank, and filled it with some very light oil. When somebody decides to ride in my backseat on the highway I hit the pump and "oops I'm leaking oil". I get some on my inner bumper, but way worth it. Squirter- $5=priceless...
06-08-2010, 03:14 PM
#214
Registered User
Join Date: Apr 2010
Location: Kingston, Ontario CANADA
Posts: 815
Likes: 0
Received 0 Likes
on
0 Posts
Now that looks great. I really wish I could work metal and weld!
06-08-2010, 03:17 PM
#215
Registered User
Join Date: May 2008
Location: Kennesaw, GA
Posts: 97
Likes: 0
Received 0 Likes
on
0 Posts
And last but not least, (my favorite) "Get off my arse" tail-gater deterent. Pulled a rear window squirter and plumbed it to my rear washer tank, and filled it with some very light oil. When somebody decides to ride in my backseat on the highway I hit the pump and "oops I'm leaking oil". I get some on my inner bumper, but way worth it. Squirter- $5=priceless...

06-08-2010, 03:40 PM
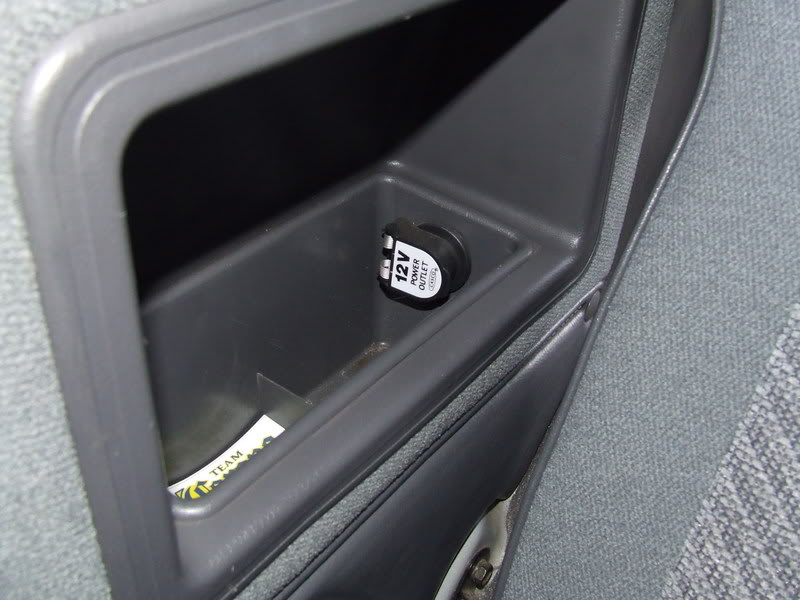
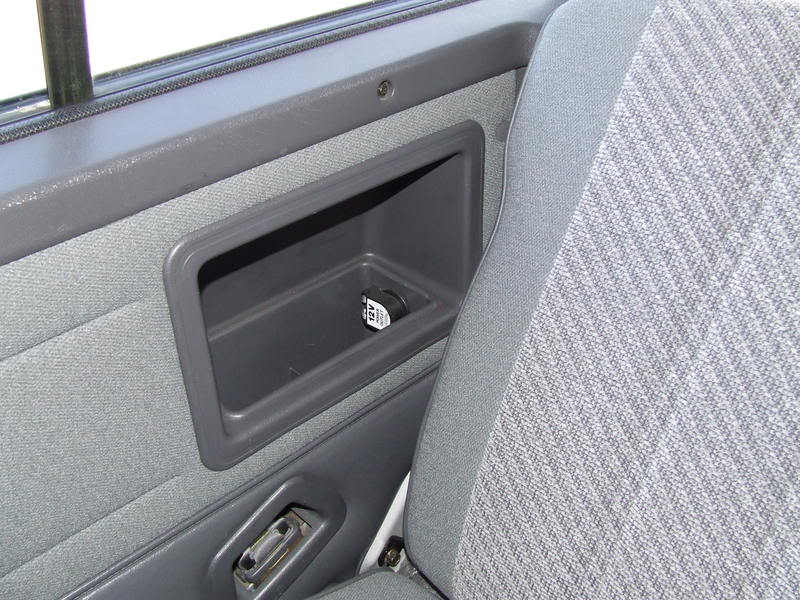
#216
Registered User
I picked up this brand new 12 volt socket at a garage sale. I installed it in the passenger side rear pocket. Wired it direct to the battery. Usable with back seat up or down.
.
.
Last edited by Scenic WonderRunner; 06-08-2010 at 03:41 PM.
06-08-2010, 04:14 PM
#218
Registered User
Join Date: Apr 2010
Location: Kingston, Ontario CANADA
Posts: 815
Likes: 0
Received 0 Likes
on
0 Posts
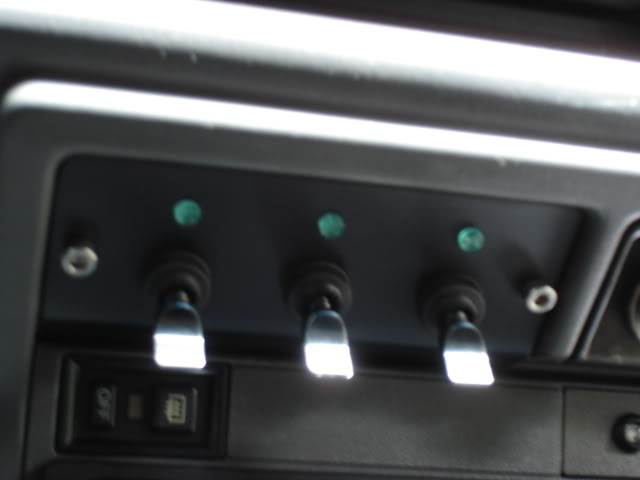
So this is what I've done in the cheapest of ways to make MY life that much easier;
(1) used the little compartment under the radio that I've seen lots of you use to put your CBs in, and put all my 'extra' lights switches in. Little piece of tin that was laying around the garage - $0, screws - $0, switches - $6;
(2) installed a 7" wide 'overhead' metal shelf that I picked up through JC Whitney about 19 years ago because we all know how much room we have in the glove box. Approx $50 (ok, not so cheap); and
(3) using a little spring-like clip, this holds my flashlight to the dash. $0.
06-08-2010, 06:52 PM
#220
Registered User
well lets see here
i used 16 gauge wire to hold my mudflaps on
[IMG]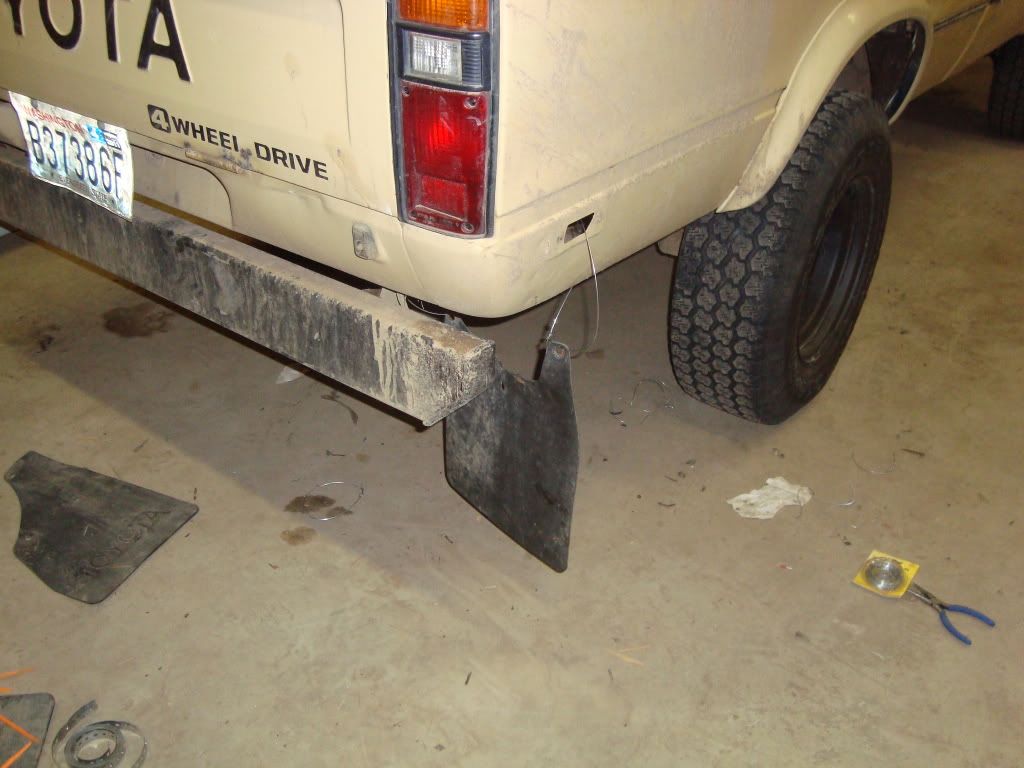 [/IMG]
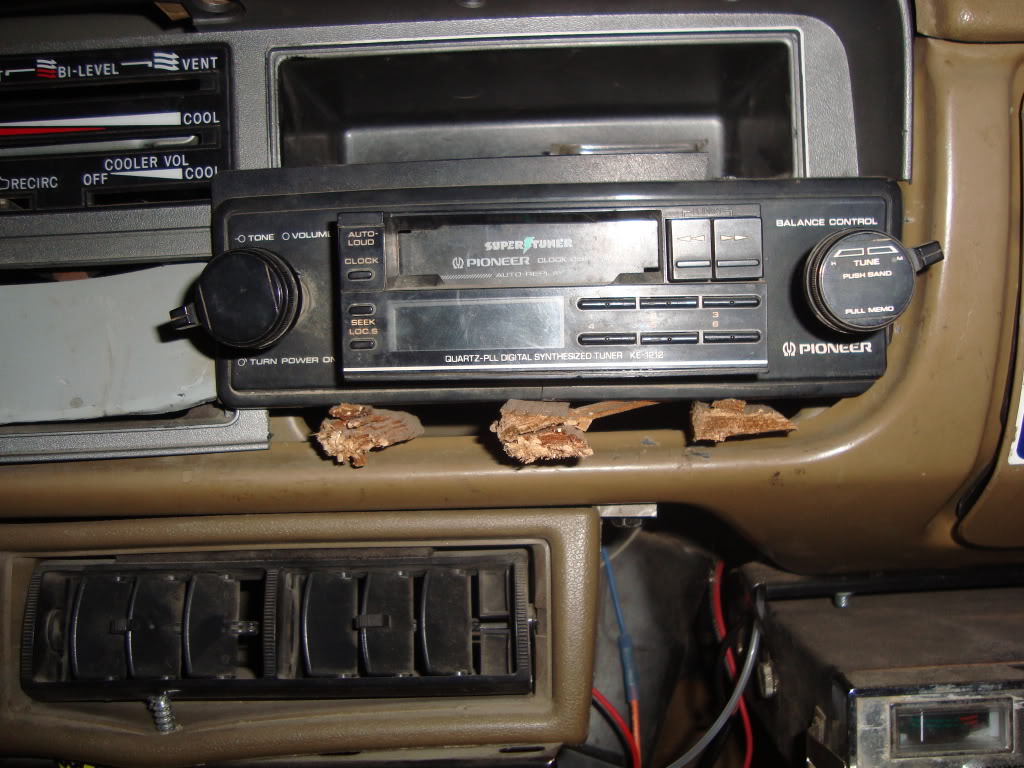
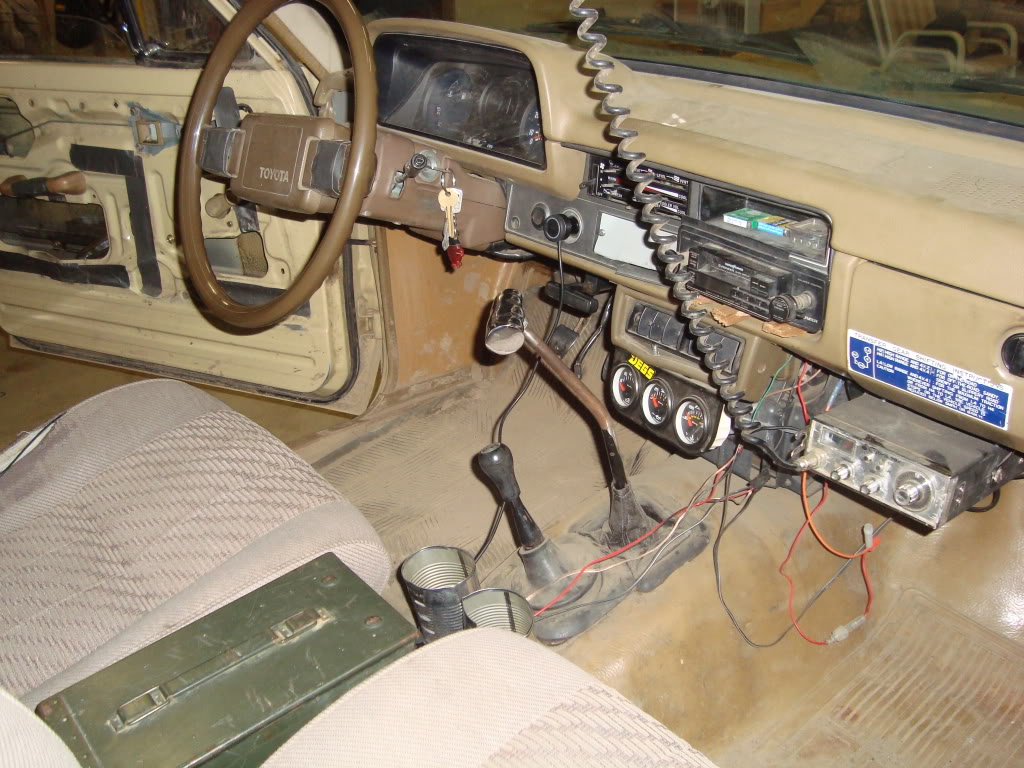
ceder shims to hold my radio in
50 cal ammo can center consle and tin can cup holders that work great just a lil tall
bordum makes for some great ideas
i used 16 gauge wire to hold my mudflaps on
[IMG]
[/IMG]ceder shims to hold my radio in
50 cal ammo can center consle and tin can cup holders that work great just a lil tall
bordum makes for some great ideas


