
well I just finishing installing lift.
 06-30-2009, 05:46 PM
#1
Registered User
Thread Starter
Join Date: Mar 2009
Location: Gray,GA
Posts: 196
Likes: 0
Received 0 Likes
on
0 Posts
well I just finishing installing lift.
hey all i just finished my 3 inch body lift from 4crawler.I have a 90 ext cab auto 4x4 truck so it had all that extra crap that it needed.It said average time was 2-4 hrs well i had my cousin help and it ended up being 11 hrs of work and still not finished.The instructions I got with the kit were black and white on the pics and the description wasn't as nice as i would like.I mean the stuff is quality no doubt but with his site down and black and white pics that junk blows!!!it took us over and hr to get the 4x4 junk working.and its still not working good I can't go to 4hi without going to 4 low first.I had to do all kinds of jerry rigging to get my shift lever set up to look like his in the pics.However the gear shifter didn't need any adjusting at all.The radiator was a pita but got it in about a hr.Idk maybe I got a fubered set of bumper brackets but i cant get my bumper to sit right anymore.One side lines up perfect and the other is horrible.Had to do some jerry rigging there as well lol.The most disappointing of all is the steering extender the instructions make absolutely no sense and the picture looks completely different from my set up.So if someone could please explain where the extender goes ill love you forever  Driving with what feels like no power steering sucks balllllllls.
Over all tho Im still happy because my truck is finally as tall as me
Driving with what feels like no power steering sucks balllllllls.Over all tho Im still happy because my truck is finally as tall as me
 06-30-2009, 06:47 PM
#3
OK. Ill try to snap a picture tomorrow of my extender and where it goes. Its on the end where the shaft goes into the gear box. Be sure that when you loosen the bolts on the steering union clamps, to take them out. I loosened them enough but not enough to fall out and the shaft would not budge. As far as the directions go mine SUCKED!! The performance Accessories BL did not have any pics at all. Let me know if you need anything else
06-30-2009, 06:50 PM
#4
Oh yeah, When you are taking out the shaft you have to push it up into the cab first. But the directions say to remove it completely, but I just pushed it up enough to get it out of the gearbox and get the extension on and put it right back it. And the bumper brackets are kind of tricky. I had to put the drivers side on different fron the passenger side. Ill try and get some pics of that as well. I hope this helps
 06-30-2009, 09:21 PM
#7
Registered User
Join Date: May 2007
Location: Denver metro area-CO
Posts: 2,175
Likes: 0
Received 2 Likes
on
2 Posts
I believe Roger of 4crawler would likely welcome constructive criticism of the directions provided.
I realize a big project like this sometimes has hidden side distractions-if his instructions could be more complete and cover some of those side issues, I bet he would welcome your thoughts.
I have always found him to be a man of much integrity, if the directions could be improved then let him know please.
I feel confident he would listen politely to your suggestions, you seem to have some specific pointers and tips that would help the next person to purchase one and install it more easily.
Personally I would never even attempt something such as this and admire those of you that have these kind of skills.
Trending Topics
07-01-2009, 12:53 PM
#9
Registered User
Thread Starter
Join Date: Mar 2009
Location: Gray,GA
Posts: 196
Likes: 0
Received 0 Likes
on
0 Posts
I believe Roger of 4crawler would likely welcome constructive criticism of the directions provided.
I realize a big project like this sometimes has hidden side distractions-if his instructions could be more complete and cover some of those side issues, I bet he would welcome your thoughts.
I have always found him to be a man of much integrity, if the directions could be improved then let him know please.
I feel confident he would listen politely to your suggestions, you seem to have some specific pointers and tips that would help the next person to purchase one and install it more easily.
Personally I would never even attempt something such as this and admire those of you that have these kind of skills.
I realize a big project like this sometimes has hidden side distractions-if his instructions could be more complete and cover some of those side issues, I bet he would welcome your thoughts.
I have always found him to be a man of much integrity, if the directions could be improved then let him know please.
I feel confident he would listen politely to your suggestions, you seem to have some specific pointers and tips that would help the next person to purchase one and install it more easily.
Personally I would never even attempt something such as this and admire those of you that have these kind of skills.
I completely agree with this and will send him a email once i get some time to retype some directions that would make a whole lot more sense.
07-01-2009, 01:23 PM
#10
Sorry about the site being down the last few days. You can thank some unknown jerk who sucked up well over an average months bandwidth a few weeks ago before he was discovered and blocked. But as a result, that pushed the site over it's allotted bandwidth limit for the month.
You can either download the PDF file to a laptop for full color, high res. images, or those are available on-line as well.
- http://www.4crawler.com/4x4/ForSale/...Lift_HowTo.pdf
- http://www.4crawler.com/4x4/ForSale/...ft_HowTo.shtml
Having a color version of the installation notes would run about $15-20 and I doubt many folks would be willing to pay that.
Steering extension installation as noted, remove two short bolts, insert extension and insert two long bolts:
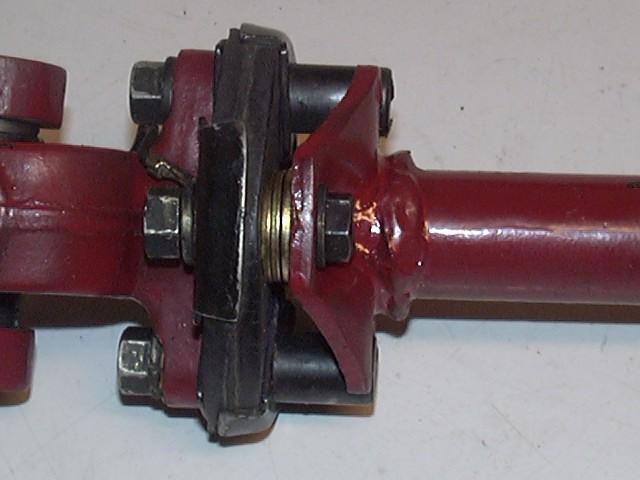
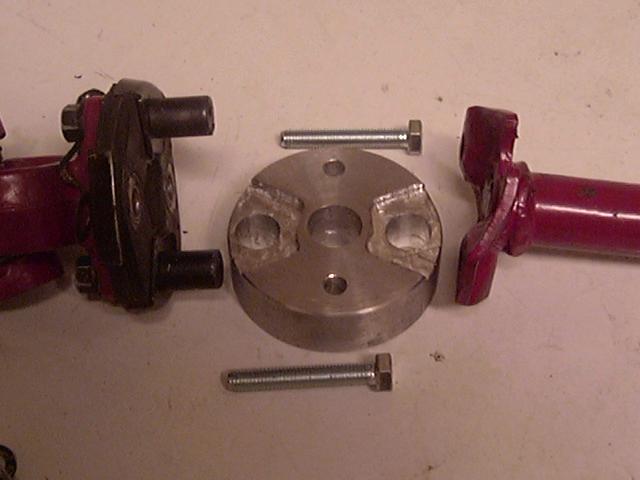
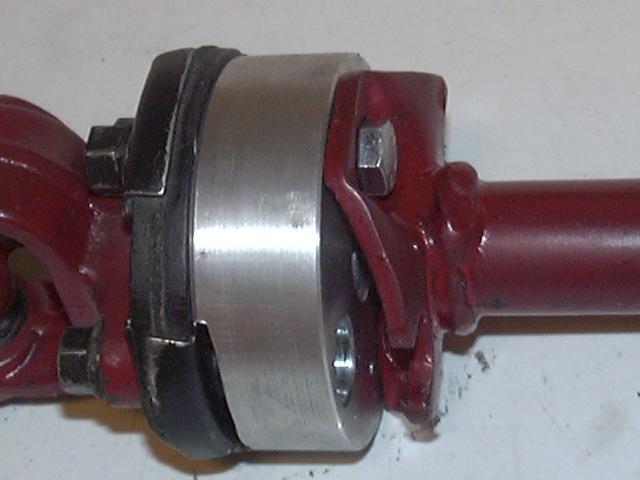
Is your steering shaft terribly different than that? Post some pictures of where you are running into trouble.
You can always contact 4Crawler Offroad with installation questions. And as noted at the top of the installation notes page:
You can either download the PDF file to a laptop for full color, high res. images, or those are available on-line as well.
- http://www.4crawler.com/4x4/ForSale/...Lift_HowTo.pdf
- http://www.4crawler.com/4x4/ForSale/...ft_HowTo.shtml
Having a color version of the installation notes would run about $15-20 and I doubt many folks would be willing to pay that.
Steering extension installation as noted, remove two short bolts, insert extension and insert two long bolts:
Is your steering shaft terribly different than that? Post some pictures of where you are running into trouble.
You can always contact 4Crawler Offroad with installation questions. And as noted at the top of the installation notes page:
Preface:
These instructions are intended to cover most aspects of the 4Crawler Offroad body lift kits on a variety of vehicles. Also included below are links to vehicle-specific installation write-ups. Feel free to browse those links for additional information. Also, if you run across other web write-ups that you find useful or you have specific suggestions for improving the installation notes on this web site, please forward that information to 4Crawler Offroad. This document is constantly evolving based upon user feedback, so if there is anything you would like to see improved, clarified, etc. send it on!
These instructions are intended to cover most aspects of the 4Crawler Offroad body lift kits on a variety of vehicles. Also included below are links to vehicle-specific installation write-ups. Feel free to browse those links for additional information. Also, if you run across other web write-ups that you find useful or you have specific suggestions for improving the installation notes on this web site, please forward that information to 4Crawler Offroad. This document is constantly evolving based upon user feedback, so if there is anything you would like to see improved, clarified, etc. send it on!
Last edited by 4Crawler; 07-01-2009 at 01:28 PM.
07-01-2009, 01:34 PM
#12
Registered User
Sometimes I get in over my head too, but I understand it's mistakes that teach me what's up. Honestly, everyone is different when it comes to understanding written directions. They are written at a basic level and assume the person has a basic understanding of the overall subject.
 07-01-2009, 05:07 PM
#14
Registered User
Thread Starter
Join Date: Mar 2009
Location: Gray,GA
Posts: 196
Likes: 0
Received 0 Likes
on
0 Posts
Sorry about the site being down the last few days. You can thank some unknown jerk who sucked up well over an average months bandwidth a few weeks ago before he was discovered and blocked. But as a result, that pushed the site over it's allotted bandwidth limit for the month.
You can either download the PDF file to a laptop for full color, high res. images, or those are available on-line as well.
- http://www.4crawler.com/4x4/ForSale/...Lift_HowTo.pdf
- http://www.4crawler.com/4x4/ForSale/...ft_HowTo.shtml
Having a color version of the installation notes would run about $15-20 and I doubt many folks would be willing to pay that.
Steering extension installation as noted, remove two short bolts, insert extension and insert two long bolts:
Is your steering shaft terribly different than that? Post some pictures of where you are running into trouble.
You can always contact 4Crawler Offroad with installation questions. And as noted at the top of the installation notes page:
but first,I just installed the steering extension and boy oh boy what a pita mine was.I will tell you my steps you tell me what I did wrong and how to fix it.first I lifted the front end of the ground to be able to turn the shaft to get to the second bolt all went well,then as Im pulling the bolts out one gets stuck so I figured i could push the shaft back to the cab well i did that and reached for the extender them BAM!!the steering shaft flew forward roughly 5-8 inches.It came out of the steering wheel like I could spin the wheel around and nothing would hold it at all like a free wheel.do I call my dad from some assistance.we get the shaft back in the steering wheel by pushing
it up in the cab well ol nosy me had to look deeper so i remove all the lower dash and steering wheel covers not the wheel its self but the top and bottom of it.I discovered that the the shaft is pushing down on the firewall im like wtf so I put the extension in and bolted it in place and what do you know the steering wheel has came back out of place. so we start looking around at why it could be doing this we came up with nothing and do not under stand it but the lower shaft that is on the splines below the extension was all the way back against it so I was like lets move this forward some and it seems to have fixed the problem with the steering popping out of place,however the shaft is still pushing down on the firewall and we believe that is the reason its so damn hard to turn the wheel and the steering wheel has roughly a inch of play could be from the shaft on the firewall idk but I need it fixed asap its my dd
so if anyone has any ideas how to fix it im down to try anything!!!!
roger and if you don't mind i would like to talk to you on the phone about the problem please contact me for my number
 07-01-2009, 07:30 PM
#16
There is about 4 pages worth below:
- http://www.4crawler.com/4x4/ForSale/...#SteeringShaft
- http://www.4crawler.com/4x4/ForSale/...#SteeringShaft
07-01-2009, 07:38 PM
#17
Take the PDF file over to the local office supply store and they will print you up a copy in full color.
Sounds like you did not loosen the top clamp or the bottom bolts before doing the lift. That is done to let the lifting separate the shaft for you, instead of doing it after the lift and having all that built up stress in the shaft let go.
Not sure there, should not need to do anything inside the cab unless this is a 4th gen 4Runner or FJ Cruiser. You may need to relocate the plate where the shaft passes through the firewall. Most folks do not need to do anything there, but on some vehicles you might need to. Usually adjustable and held in place with 3 bolts. Loosen bolts, adjust plate and snug them up and it is good to go. If not, enlarge the holes a little and repeat.
You should have the contact phone number on the order confirmation e-mail as well as on the invoice sent with the kit.
I will type up some directions that will include things that I had to do that were not mentioned at all.
but first,I just installed the steering extension and boy oh boy what a pita mine was.I will tell you my steps you tell me what I did wrong and how to fix it.first I lifted the front end of the ground to be able to turn the shaft to get to the second bolt all went well,then as Im pulling the bolts out one gets stuck so I figured i could push the shaft back to the cab well i did that and reached for the extender them BAM!!the steering shaft flew forward roughly 5-8 inches.It came out of the steering wheel like I could spin the wheel around and nothing would hold it at all like a free wheel.do I call my dad from some assistance.we get the shaft back in the steering wheel by pushing
but first,I just installed the steering extension and boy oh boy what a pita mine was.I will tell you my steps you tell me what I did wrong and how to fix it.first I lifted the front end of the ground to be able to turn the shaft to get to the second bolt all went well,then as Im pulling the bolts out one gets stuck so I figured i could push the shaft back to the cab well i did that and reached for the extender them BAM!!the steering shaft flew forward roughly 5-8 inches.It came out of the steering wheel like I could spin the wheel around and nothing would hold it at all like a free wheel.do I call my dad from some assistance.we get the shaft back in the steering wheel by pushing
it up in the cab well ol nosy me had to look deeper so i remove all the lower dash and steering wheel covers not the wheel its self but the top and bottom of it.I discovered that the the shaft is pushing down on the firewall im like wtf so I put the extension in and bolted it in place and what do you know the steering wheel has came back out of place. so we start looking around at why it could be doing this we came up with nothing and do not under stand it but the lower shaft that is on the splines below the extension was all the way back against it so I was like lets move this forward some and it seems to have fixed the problem with the steering popping out of place,however the shaft is still pushing down on the firewall and we believe that is the reason its so damn hard to turn the wheel and the steering wheel has roughly a inch of play could be from the shaft on the firewall idk but I need it fixed asap its my dd
so if anyone has any ideas how to fix it im down to try anything!!!!
roger and if you don't mind i would like to talk to you on the phone about the problem please contact me for my number
roger and if you don't mind i would like to talk to you on the phone about the problem please contact me for my number
07-01-2009, 07:41 PM
#18
Registered User
Thread Starter
Join Date: Mar 2009
Location: Gray,GA
Posts: 196
Likes: 0
Received 0 Likes
on
0 Posts
wow I see the problem here my set of instructions is missing pages 11 and 12 which is front and back ahhhhh dang all this time lol.
I wanna thank you for taking the time and helping me out with my problems.and your right I did forget undo the extension before lifting the truck. I was so happy to put it on I only took off the things I knew was gonna be a problem.
I wanna thank you for taking the time and helping me out with my problems.and your right I did forget undo the extension before lifting the truck. I was so happy to put it on I only took off the things I knew was gonna be a problem.
Last edited by 1990mudslut; 07-01-2009 at 07:46 PM.
07-01-2009, 07:50 PM
#19
Generally the plate is movable, held in place with 3 bolts typically. Sorry don't have any pictures because I have never run into a vehicle that needed to have it moved and it is darn near impossible to photograph in place.
Sorry about the missing pages, some times the printer jams up mixes a few pages up. I generally try and spot check the copies but evidently don't catch them all. That is an advantage of downloading and/or printing your own copy.
Sorry about the missing pages, some times the printer jams up mixes a few pages up. I generally try and spot check the copies but evidently don't catch them all. That is an advantage of downloading and/or printing your own copy.
07-01-2009, 08:06 PM
#20
Registered User
Thread Starter
Join Date: Mar 2009
Location: Gray,GA
Posts: 196
Likes: 0
Received 0 Likes
on
0 Posts
don't worry about it man Ill take pictures and everything for you even a few better pics of some you have already taken that will help a few people out like me who have to see something to understand. I went outside and dropped the lower dash and found your three bolts you was talking about.it was raining so I didn't mess with them but I have identified them.
Your parts are quality no doubt if installed correctly there is no reason they shouldn't work.
I do have one mroe question tho,You don't think that the steering shaft will pop back out of place in the steering wheel do you?is there a way I can check this?
Your parts are quality no doubt if installed correctly there is no reason they shouldn't work.
I do have one mroe question tho,You don't think that the steering shaft will pop back out of place in the steering wheel do you?is there a way I can check this?


