
Toyota Long Travel

 09-20-2009, 07:43 PM
#102
Registered User
I cant wait for the action pics, this really doesn't seem like a bad kit. I would like it simply on the fact that I can relax my torsion bars with this and still not have to run drop brackets. Right now I run cranked bars which obviously ride harsh and BJ spacers just because I like not having the drop brackets sitting supper low to get hung up on the mud in. Any videos of this kit in action? Im not looking to really run fiber fenders either so how far will the wheels stick out compared to stock controls?
09-21-2009, 01:18 AM
#103
Registered User
Join Date: Dec 2007
Location: Pitt Meadows, BC
Posts: 261
Likes: 0
Received 0 Likes
on
0 Posts
While the TC LT kit is definitely pricey given the travel gains, also consider that beyond the travel and ride height changes it's also replacing the t-bars with a coilover setup.
The cost of the coilovers themselves makes up a huge chunk of that particular setup as well.
The cost of the coilovers themselves makes up a huge chunk of that particular setup as well.
09-21-2009, 08:44 AM
#104
Registered User
Join Date: May 2009
Posts: 128
Likes: 0
Received 0 Likes
on
0 Posts
Actually that's the price of the torsion bar Gen 1 kit when I estimated it out. There is also the Gen 1 with uniballs or the Gen 2 which uses coil-overs. Gen 2 costs a bit more than the TB Gen 1, but the cost of coilovers verses the cost of shocks + TB's would probably end up being near the same. So I spend over $5000 for 3" of travel and I actually forgot to add in that I would need to buy new torsion bars before. I just can't justify ever spending that much for 3" of travel and still having TB's. I would rather do this kit, have money for my rear, money for an engine, and money for gas and insurance and repairs.
09-21-2009, 09:53 AM
#105
Registered User
The new site looks good. Can't wait to see a video of this kit!!
I was thinking and I saw a guy get 12-13" out of stock width arms but he used Rancho UCA's. I was thinking that if you did exactly what he did and then bolted on the extended LCA and bolt on UCA extension onto the Rancho arm if you could get quite a bit more? Probably around 14-15" I think?
I was thinking and I saw a guy get 12-13" out of stock width arms but he used Rancho UCA's. I was thinking that if you did exactly what he did and then bolted on the extended LCA and bolt on UCA extension onto the Rancho arm if you could get quite a bit more? Probably around 14-15" I think?
Last edited by BlazeN8; 05-18-2010 at 10:06 PM.
09-21-2009, 10:23 AM
#106
Registered User
Yep, the Rancho arms are weak. I broke one and cracked welds on another back in 2002 Baja 250 pre-run. I would NEVER try bolting a Blazeland UCA extension bracket onto a Rancho arm. I did it, but only to develop the geometry to build a whole new set of arms. If you were to do this, ditch the torsion bars and go coil over. The TBs on the Rancho design dictate that TBs move up in down with the UCA to some degree. Its better to utilize the stock cross shaft configuration if you want to run with TBs. The extra length Rancho gen II UCAs just put too much load on the TBs and related componants. With a coil over conversion the loads holding up the weight of the truck are transfered to the LCAs letting the UCAs concentrate on a different set of forces.
09-21-2009, 02:47 PM
#110
Registered User
Another thing about the Blazeland LT is it retains the factory wheel stops located on the LCAs. These wheel stops will protect Inner and Outer Tie Rod Ends, Idler Arm, Pitman Arm, and Centerlink integrity during impacts to the steering mechanism. Think of them as bump stops for the steering. The stops are adjustable at the spindle too! You can set the stops to prevent stuff from rubbing. The plastic caps on the stops fall off or wear out quickley and that is why so many of these generation yotas make such annoying sounds as you make full cock turns. Is cock the correct term..... or is it chock? Anyway just some more food for though!
09-21-2009, 02:49 PM
#111
Registered User

 09-21-2009, 03:47 PM
#114
Registered User
The gen II rancho kit was sort of a one off. It is a prototype that I still may develop but it would be expensive to re-produce the Rancho stuff and then build the custom UCAs. You would have to buy the Blazeland LCAs and an even longer set of custom Tie Rod adjusting sleeves. As a coil over conversion you would be required to spend another thousand on shocks and springs! All that expense for one more inch of travel, that you couldn't even use unless you were into 2WD wheeling. If your looking for that next level of performance you should just suck it up and fork over the cash for TC gen II or III, that way its not a prototype but a well tested proven system. If your still interested make me an offer offline outside the public forum.
09-21-2009, 04:41 PM
#115
Registered User
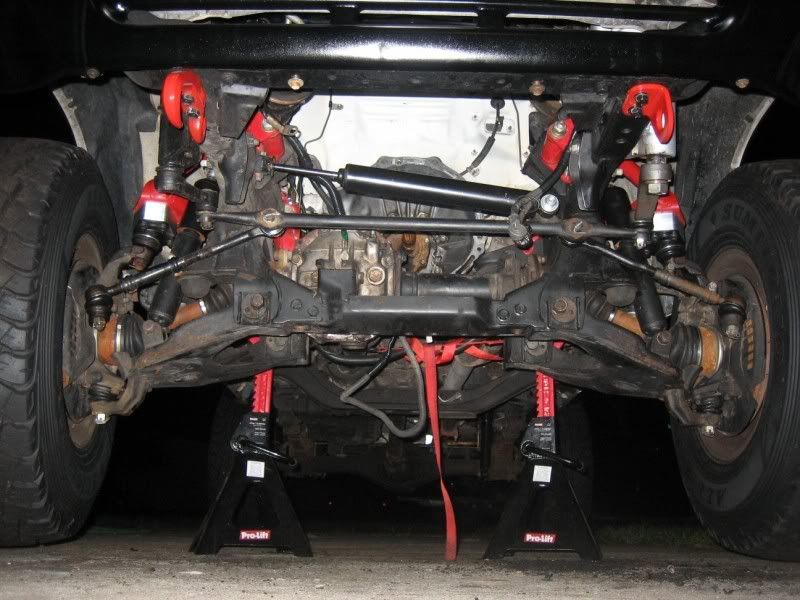
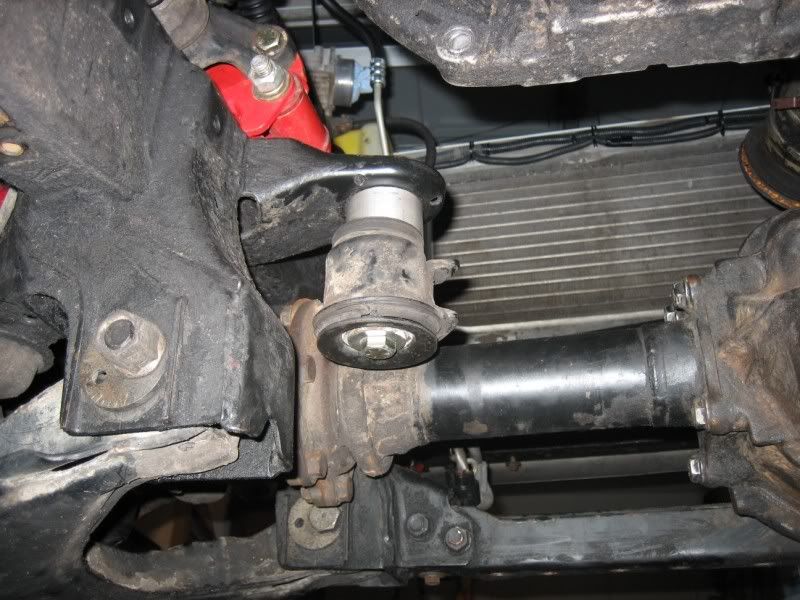
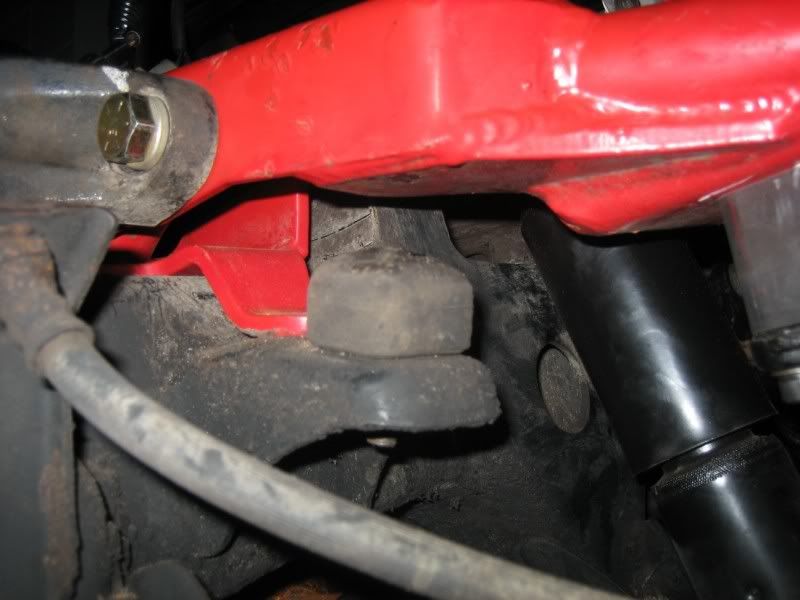
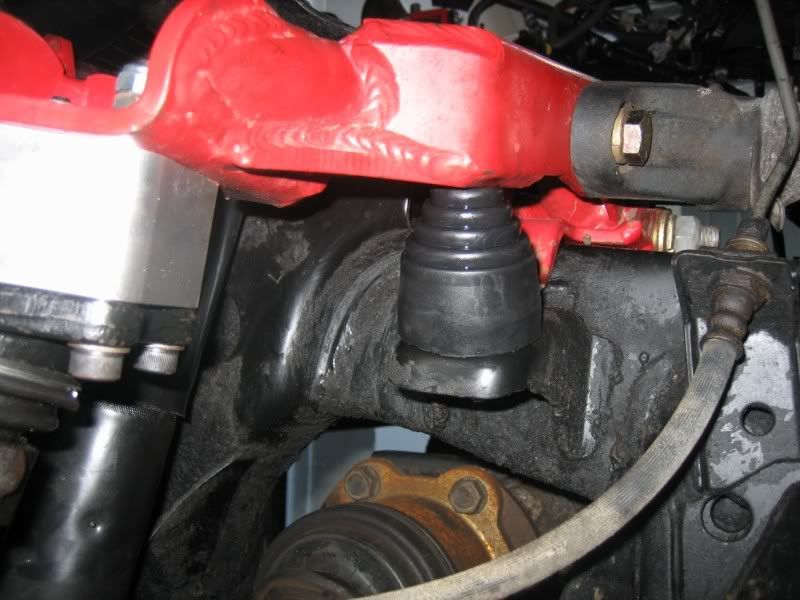
The first problem I see is you are using a stock centerlink. The UCA pivot points are moved inward of the frame with the Rancho configuration so the pivot points on the centerlink need to be adjusted as well. You need to find a Rancho centerlink.
The second concern I see is that your shocks are way to small to attain full range. Those shocks probably only have 4-5" of travel. You would need at least 6" if not more.
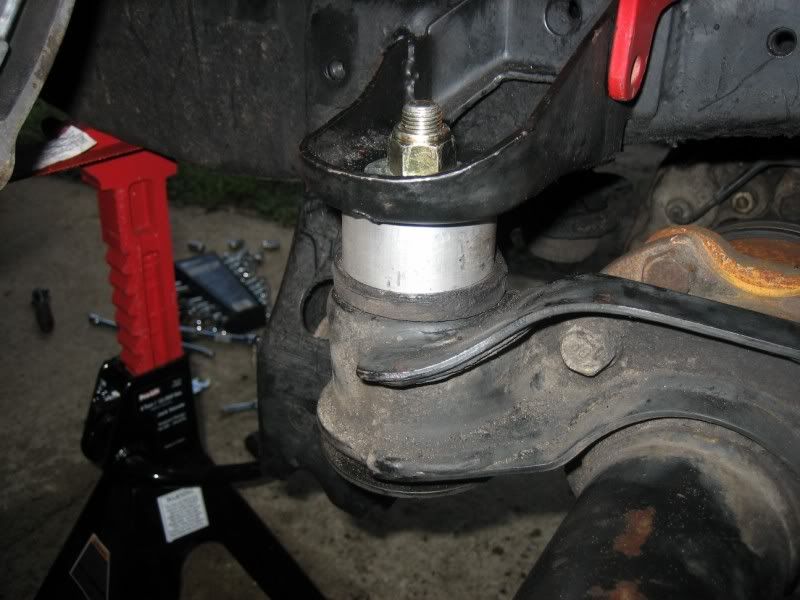
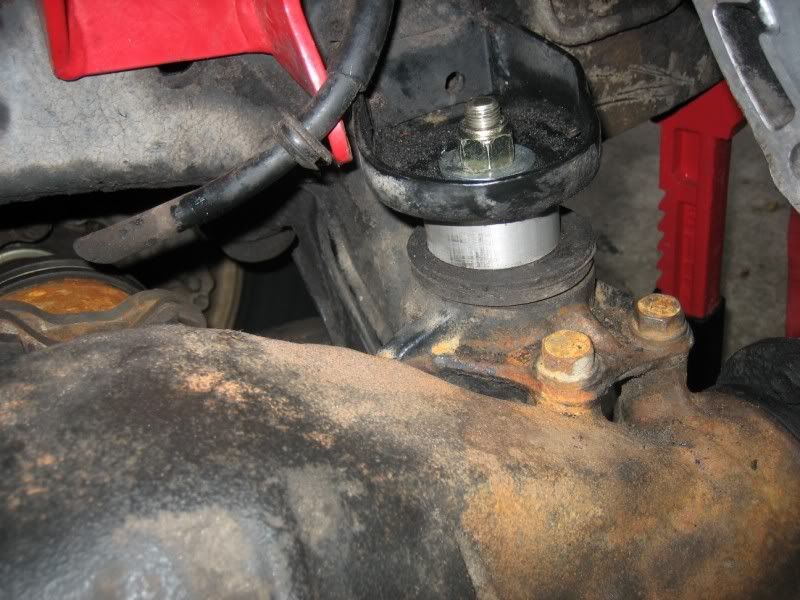
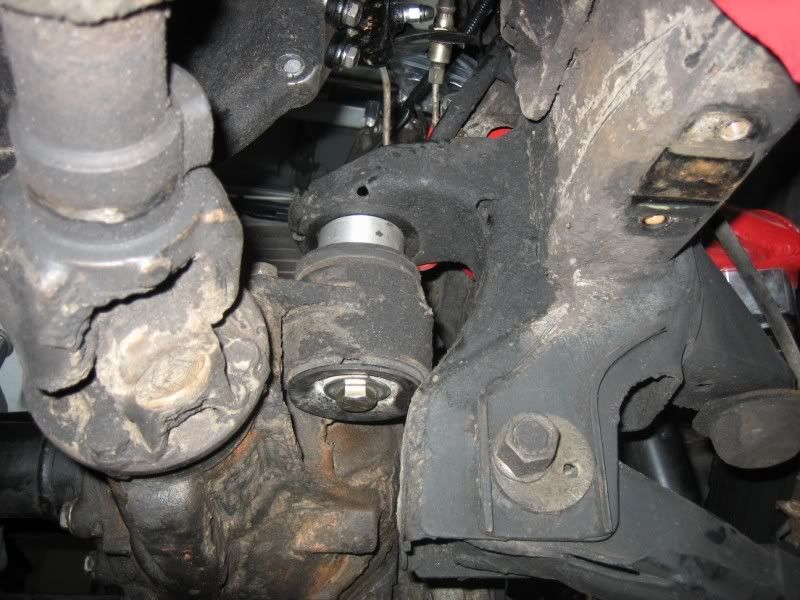
The third concern that comes to mind is that you are not using Rancho's bracketry to lower the front diff. The Rancho arms increase droop about 3" over stock. Without dropping the front diff the CV axels will bind. Downey made some spicer slip yoke axel shafts (see attached photo) to use with the Rancho kit when you didn't drop the front diff. With the slip Yoke axels things will work fairly well. Since you have added an addition 2" of droop with the BJ spacers I think the axels would bind even with slip yokes. I noticed your doop stops are super tall and thick. This is defeating the purpose of the BJ spacers. Why extend the ball joint only to limit the travel with thick droop stops?
The fourth concern is (if you had a Rancho centerlink) finding longer tie rod adjusting sleeves. The Rancho kit came with a custom heavy duty longer tie rod adjusting sleeve. So does Blazeland, so did Downey, so does TC. These are expensive to machine and need to be turned on a lathe. Since the 14mm LH tap is a custom made cutting tool it will cost a couple hundred bucks.
And lastly, like we discussed earlier, the Rancho UCAs are week. If your not extending the length of the arms (like bolting on my Blazeland UCA extension bracket) you are fine for trails and mild desert stuff. Unless you are hammering through the whoops or jumping, the Rancho kit (in its complete form) is pretty good. If you have the Rancho / Downey kit (which you almost do) even better.
You have some valuable parts. The Rancho UCAs and pivot brackets are the main items, but without the Rancho centerlink its going to be difficult to get things working correctly. If you can find that, then I can help you with everything else.
Last edited by BlazeN8; 01-24-2011 at 08:27 PM.
09-21-2009, 04:49 PM
#116
Registered User
Join Date: May 2009
Posts: 128
Likes: 0
Received 0 Likes
on
0 Posts
Hey N8, this is the guy I was talking about who had a highly modified Rancho system. I dunno if it's still you cause he lives in Texas, but he has a rad setup.
http://forum.ih8mud.com/79-95-toyota...936-rotbw.html
http://forum.ih8mud.com/79-95-toyota...936-rotbw.html
09-21-2009, 05:41 PM
#117
Registered User
Hey N8, this is the guy I was talking about who had a highly modified Rancho system. I dunno if it's still you cause he lives in Texas, but he has a rad setup.
http://forum.ih8mud.com/79-95-toyota...936-rotbw.html
http://forum.ih8mud.com/79-95-toyota...936-rotbw.html
09-21-2009, 06:17 PM
#119
Contributing Member
diff is dropped 1" curtisy of 4Crawler 
definately not the drop attained with all of the components from the Rancho kit, but all that I was able to get from the kit was the UCA's and t-bars (which BTW I'm still using the stock t-bars, purly for ride quality, lol, and it rides quite nice even if the fron end does dip down under hard braking
  )
)
and yeah the shocks are limiting the travel a good bit
but even with the diff drop, I had to install taller droop bump-stops to keep the CV's from binging at full droop, cause the stockers were just a bit too short
but, it still works pretty decent

definately not the drop attained with all of the components from the Rancho kit, but all that I was able to get from the kit was the UCA's and t-bars (which BTW I'm still using the stock t-bars, purly for ride quality, lol, and it rides quite nice
even if the fron end does dip down under hard braking )and yeah the shocks are limiting the travel a good bit
but even with the diff drop, I had to install taller droop bump-stops to keep the CV's from binging at full droop, cause the stockers were just a bit too short
but, it still works pretty decent
09-21-2009, 08:15 PM
#120
Registered User
Hmmm, I like your creativity and ability to mix components around. Seriously thats a compliment. Look at my previous post to see what is included in the full Rancho kit.
The first problem I see is you are using a stock centerlink. The UCA pivot points are moved inward of the frame with the Rancho configuration so the pivot points on the centerlink need to be adjusted as well. You need to find a Rancho centerlink.
The second concern I see is that your shocks are way to small to attain full range. Those shocks probably only have 4-5" of travel. You would need at least 6" if not more.
The third concern that comes to mind is that you are not using Rancho's bracketry to lower the front diff. The Rancho arms increase droop about 3" over stock. Without dropping the front diff the CV axels will bind. Downey made some spicer slip yoke axel shafts (see attached photo) to use with the Rancho kit when you didn't drop the front diff. With the slip Yoke axels things will work fairly well. Since you have added an addition 2" of droop with the BJ spacers I think the axels would bind even with slip yokes. I noticed your doop stops are super tall and thick. This is defeating the purpose of the BJ spacers. Why extend the ball joint only to limit the travel with thick droop stops?
The fourth concern is (if you had a Rancho centerlink) finding longer tie rod adjusting sleeves. The Rancho kit came with a custom heavy duty longer tie rod adjusting sleeve. So does Blazeland, so did Downey, so does TC. These are expensive to machine and need to be turned on a lathe. Since the 14mm LH tap is a custom made cutting tool it will cost a couple hundred bucks.
And lastly, like we discussed earlier, the Rancho UCAs are week. If your not extending the length of the arms (like bolting on my Blazeland UCA extension bracket) you are fine for trails and mild desert stuff. Unless you are hammering through the whoops or jumping, the Rancho kit (in its complete form) is pretty good. If you have the Rancho / Downey kit (which you almost do) even better.
You have some valuable parts. The Rancho UCAs and pivot brackets are the main items, but without the Rancho centerlink its going to be difficult to get things working correctly. If you can find that, then I can help you with everything else.


