
in to the shop
 10-24-2007, 10:19 AM
#61
Registered User
Join Date: Sep 2007
Location: Richmond , Va / Henrico Co.
Posts: 1,059
Likes: 0
Received 0 Likes
on
0 Posts
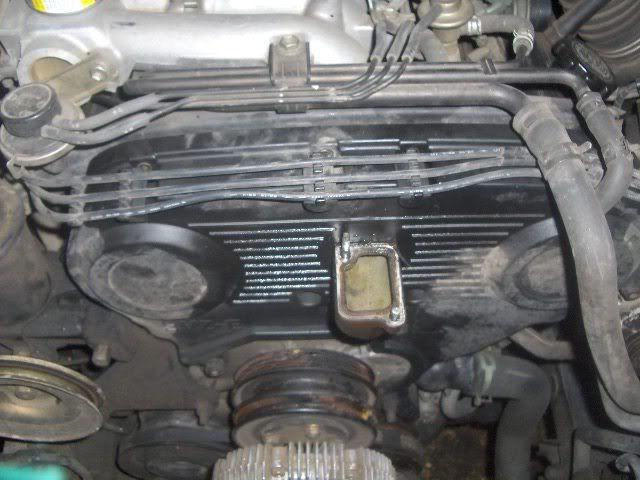
For the love of Pete, his fan clutch isn't part of the problem. The fan attaches to the fan clutch. The fan clutch and the pulley bolt together to the FAN BRACKET ASSEMBLY. This is an oddity; most engines don't have this piece. Most engines have the fan bolted to the water pump. The 3VZ and 5VZ both use a 'dummy' water pump snout- essentially a cast aluminum bracket that attaches to the front of the motor and positions the fan/clutch/belts. It has a permanently set bearing and cannot be replaced. It is confusing unless you have actually taken one apart. 

I was so confused
 , this steak to rice diet change is hard on a old guy
 10-24-2007, 10:24 AM
#62
Registered User
Join Date: Sep 2007
Location: Richmond , Va / Henrico Co.
Posts: 1,059
Likes: 0
Received 0 Likes
on
0 Posts
n4yn and will thanks for your guys' help
and will now it all makes perfect sense, cuz i was confused about how the pulley was messed up and the water pump was still working and i can drive but it still gets hot cuz the fan isnt turning and etc
now it makes sense
and that mechanic was telling me it was an odd part but he didnt say it was a pretty limited part to toyota
thank you guys for your help its starting to come together for me
as for the estimate
perfect timing on that part hahah
thanks for giving me that link
ill have to buy that and get in on!
)
10-24-2007, 10:31 AM
#63
Registered User
Join Date: Sep 2007
Location: Richmond , Va / Henrico Co.
Posts: 1,059
Likes: 0
Received 0 Likes
on
0 Posts
Glad we're all clear now. I hope, in light of the above explanation and pic, nobody recommends another fan clutch, flex-a-lite fan, or electric fan to this guy again. If they do, it means they didn't read through this post or they're too inept to comprehend the issue. Not trying to sound like a douche but this is the reason Pirate successfully keeps good tech and weeds out the bad. Uniformed suggestions tend to run rampant without some sort of intervention.
Also learning about this truck also as it is the first one I have ever owned (Yota Trk that is , rice diet) .
Last edited by n4ynu1010; 10-24-2007 at 10:35 AM.
10-24-2007, 10:37 AM
#64
Registered User
Join Date: Nov 2003
Location: St Louis
Posts: 178
Likes: 0
Received 0 Likes
on
0 Posts
 10-24-2007, 01:50 PM
#65
Registered User
Thread Starter
hahah at all your guys' post
i have a 93 3vze
i already contacted mtsumedi about his and it looks like thats gonna work
and i get what your saying about the dealership piece, i didnt think that the part deals w/ the timing belt?? i hope not cuz thats more stuff to worry about on the install haha
and i've heard aobut the place in rancho cordova
im gonna keep that number but i think im gonna be ok w/o them this time around
ill def. hit that place up soon tho
thanks for the help
sounds like this $1011 project is gonna come in at under $100 with belts
try and stiff a yotatech member
10-24-2007, 02:16 PM
#66
Registered User
Join Date: Sep 2007
Location: Richmond , Va / Henrico Co.
Posts: 1,059
Likes: 0
Received 0 Likes
on
0 Posts
hahah at all your guys' post
i have a 93 3vze
i already contacted mtsumedi about his and it looks like thats gonna work
and i get what your saying about the dealership piece, i didnt think that the part deals w/ the timing belt?? i hope not cuz thats more stuff to worry about on the install haha
and i've heard aobut the place in rancho cordova
im gonna keep that number but i think im gonna be ok w/o them this time around
ill def. hit that place up soon tho
thanks for the help
sounds like this $1011 project is gonna come in at under $100 with belts
try and stiff a yotatech member
i have a 93 3vze
i already contacted mtsumedi about his and it looks like thats gonna work
and i get what your saying about the dealership piece, i didnt think that the part deals w/ the timing belt?? i hope not cuz thats more stuff to worry about on the install haha
and i've heard aobut the place in rancho cordova
im gonna keep that number but i think im gonna be ok w/o them this time around
ill def. hit that place up soon tho
thanks for the help
sounds like this $1011 project is gonna come in at under $100 with belts
try and stiff a yotatech member
ROFLOL
10-24-2007, 02:19 PM
#67
Registered User
Thread Starter
hahah yea, we all get to use that money to chip in for groceries, gas and maybe even begin to build up the sas process!
hey tonight drinks on me, so grab a brew from the fridge and congradulate yourselves on a job well done!
hey tonight drinks on me, so grab a brew from the fridge and congradulate yourselves on a job well done!
10-24-2007, 02:34 PM
#68
Registered User
Join Date: Sep 2007
Location: Richmond , Va / Henrico Co.
Posts: 1,059
Likes: 0
Received 0 Likes
on
0 Posts
10-29-2007, 04:15 PM
#69
Registered User
Thread Starter
Follow up
im getting close
i can almost taste it
unfortunately i have the stud bolts in the way
i read that the easiest way is to put the nut on and pry up, but the metal is old and kinda just bends the nut
and the other one....
just have a look ;-)
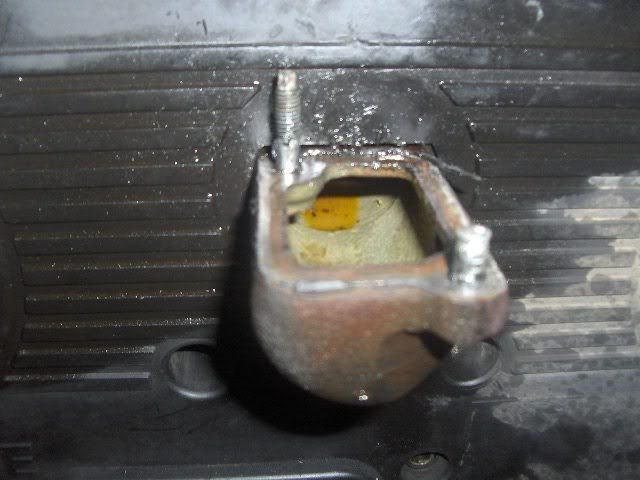
is there an easy way to remove these? and how the hell do i put them back on!
im getting close
i can almost taste it
unfortunately i have the stud bolts in the way
i read that the easiest way is to put the nut on and pry up, but the metal is old and kinda just bends the nut
and the other one....
just have a look ;-)
is there an easy way to remove these? and how the hell do i put them back on!
10-29-2007, 05:33 PM
#70
Registered User
Join Date: Nov 2003
Location: St Louis
Posts: 178
Likes: 0
Received 0 Likes
on
0 Posts
Dude, that's looking ugly already. You should've double-nutted the studs and backed them out. You basically tighten one nut against another in the middle of the stud, then loosen the stud using the bottom nut while applying tension to the top nut. Check this link for clarity-
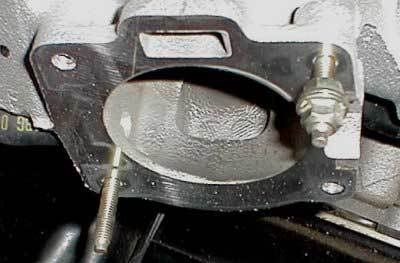
You can still double-nut the stud that's intact, but the broken one will need attention from a sturdy pair of well placed vice-grips. A little love from Mr. propane torch always helps too.
You can still double-nut the stud that's intact, but the broken one will need attention from a sturdy pair of well placed vice-grips. A little love from Mr. propane torch always helps too.
Last edited by Willcipher; 10-29-2007 at 05:37 PM.
10-29-2007, 06:37 PM
#72
Registered User
Join Date: Nov 2003
Location: St Louis
Posts: 178
Likes: 0
Received 0 Likes
on
0 Posts
Yes it will work fine. The point is to force one nut against the other; effectively locking the nuts to the stud. Where they're positioned on the stud is irrelevant, as long as both nuts are on the threaded portion of the stud
10-29-2007, 07:21 PM
#73
Registered User
Thread Starter
thanks for the info! ill be able to try tomorrow i guess, will this work w/ the opposite way as for putting it back in?
im gonna have to figure out how to get the other one out too
but thanks for the help
i should have my baby running by this weekend!
im gonna have to figure out how to get the other one out too
but thanks for the help
i should have my baby running by this weekend!
10-29-2007, 07:32 PM
#74
Registered User
Join Date: Nov 2003
Location: St Louis
Posts: 178
Likes: 0
Received 0 Likes
on
0 Posts
10-30-2007, 08:16 AM
#75
Registered User
Thread Starter
ill have to look into those tools, the back one isnt too beaten up alot of it is just the left over sealant that i havent taken all the way off, but they are old, so i probably will buy new ones
thanks for the advice, after class im gonna get on that
thanks for the advice, after class im gonna get on that
10-30-2007, 09:18 AM
#76
Registered User
Join Date: Sep 2007
Location: Richmond , Va / Henrico Co.
Posts: 1,059
Likes: 0
Received 0 Likes
on
0 Posts
Broken Stud
Also remember if you are going to chase the threads to clean them up and the threaded hole is not thru and thru then you will need a "Bottom Tap" to clean the threads down to the bottom
or to properly tap the hole to the proper depth (bottom) .Heli-coils would be a good way to repair , if you have to just bond it and the stud with blue locktite
Last edited by n4ynu1010; 10-30-2007 at 09:25 AM.

 10-30-2007, 12:13 PM
#80
Registered User
Thread Starter
i tried the 2 bolts idea, worked like a champ, took about 30 seconds, haha
it really isnt that hard, but im such a novice im tryin to learn every bit i can, im about done, just gotta take one nut off and the part is out, and then re assemble, work in an hour tho so its time to clean up. everyones been a help, i think i will head down to 4wparts or something and get that fan tho, she'll def. be running by this weekend, w/ all new belts and possibly a new fan! (sucks being a full time student part time bagger and not have a running truck, tough to get enough time to fix my truck, that and its halloween week, geeze)
oh and n4y ill probably just wind up getting 2 new studs, i live like 2 seconds away from a hardware parts store, so im sure they can help me out
btw i dont think id ever wanna work on an econline, the engine bay has to be about this big | |. Even tho thats about the same size as a 4runner...


