
Replacement Of Head With Pictures
 09-17-2009, 04:24 PM
#41
Registered User
Thread Starter

Join Date: Sep 2009
Location: Fontana ca
Posts: 68
Likes: 0
Received 0 Likes
on
0 Posts
well its beefed up but its not a problem for me because I know 3 smog stations that will pass any car any condition for 100 bucks. as a matter of fact I dont have to take the truck just my paper work. pretty cool hu?

 09-17-2009, 04:37 PM
#43
Registered User
Thread Starter
Join Date: Sep 2009
Location: Fontana ca
Posts: 68
Likes: 0
Received 0 Likes
on
0 Posts
hey well i did what you guys told me I WENT on ebay and I saw his rating and read the comments ppl left he has a 110 perscent and ppl say its a real good price with good quality parts and will be buying again,
09-17-2009, 06:57 PM
#45
Registered User
Join Date: Feb 2009
Location: Miami, Florida
Posts: 498
Likes: 0
Received 0 Likes
on
0 Posts
Im guessing hes talking bout the Jap guy.. Even though engnbldr has an ebay store too.. Good luck on your rebuild Ill be doing the same thing with my 3.0 Im going with Engnbldr's stuff though..
09-18-2009, 05:20 PM
#46
YotaTech Milestone-Two Millionth Post
good job, you did your research so likewise please post your progress. i'm still in the beginning stages of mine and i've never done any of this before.
09-20-2009, 04:00 PM
#47
Registered User
Thread Starter
Join Date: Sep 2009
Location: Fontana ca
Posts: 68
Likes: 0
Received 0 Likes
on
0 Posts
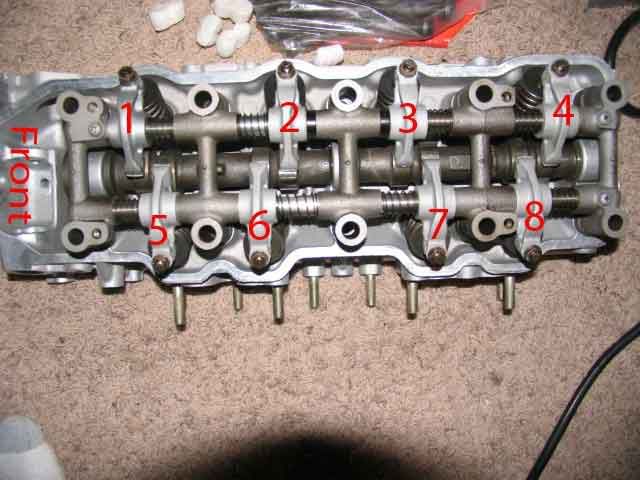
Ok i went to pick up what I needed Ok ready this is what I bought I bought brand new complete head with camshaft, new rocker arm, new head bolts, head gasket kit, timing kit, timing cover gasket. I got all of this for 496 dollars. Isnt that good or what? Another thins I was reading in the book on how to adjust the valves. ok well it says "Check that the rocker arms on the No 1. cylinder are loose and the rockers on No.4 are tight. Now on the rocker arms which ones would pertain to cylinder 1? Ive labeled on this picture 1-8 can you guys tell me which rocker arms would be for cylinder 1 and for cylinder 4?
09-20-2009, 05:14 PM
#48
Registered User
Do not try to adjust the valves before you install the head, can't be done. and from front to back. Your 1 is intake on one, your 2 is intake on two, Your 3 is intake on three and your 4 is intake on four. 5 is exhaust on one, 6 is exhaust on two, 7 is exhaust on three and 8 is exhaust on 4.
Make sense?
Make sense?
09-21-2009, 08:20 AM
#52
Registered User
 Memory fading quickly.
09-21-2009, 11:03 AM
Memory fading quickly.
09-21-2009, 11:03 AM
#54
Registered User
Follow the book...Like I said memory is fading it's been almost 8 months... My thinking was if cylinder 1 is all closed then 3 would be as well so set those two. Then cylinder 2 and 4 would be closed. But ya my mistake follow the book when setting them.
I do recall that you want just a wee bit of drag on the feeler gauge...not too much though.
I do recall that you want just a wee bit of drag on the feeler gauge...not too much though.
09-21-2009, 11:30 AM
#55
Registered User

Join Date: Feb 2007
Location: South Carolina
Posts: 38
Likes: 0
Received 0 Likes
on
0 Posts
Ok i went to pick up what I needed Ok ready this is what I bought I bought brand new complete head with camshaft, new rocker arm, new head bolts, head gasket kit, timing kit, timing cover gasket. I got all of this for 496 dollars. Isnt that good or what? Another thins I was reading in the book on how to adjust the valves. ok well it says "Check that the rocker arms on the No 1. cylinder are loose and the rockers on No.4 are tight. Now on the rocker arms which ones would pertain to cylinder 1? Ive labeled on this picture 1-8 can you guys tell me which rocker arms would be for cylinder 1 and for cylinder 4?
So did you get the head from engbilder off ebay or somewhere else....kinda hard to follow..........
09-21-2009, 06:58 PM
#56
Registered User
Thread Starter
Join Date: Sep 2009
Location: Fontana ca
Posts: 68
Likes: 0
Received 0 Likes
on
0 Posts
Oh I got the head from somewhere Else. Its here near my house, Yea it looks pretty good its japan made.
Ok guys I ve taken everything apart already I will post pictures on here to show you what it looks like tommorrow its cause I ran out of daylight so by tomorrow i will be postin pics up ok,.also ony question. ok on the Timing Cover you know the place where the crankshaft goes? ok I unscrewed the 3 bolts and pulled it apart then i put it back will this of had affected anything?cause inside it looked weird like a little gear so im not sure if i can just put it back any way or is there a specific way it goes back it? im gonna take a picture of what Im talking about so i can be more clear, ok well talk to you guys later k,
Ok guys I ve taken everything apart already I will post pictures on here to show you what it looks like tommorrow its cause I ran out of daylight so by tomorrow i will be postin pics up ok,.also ony question. ok on the Timing Cover you know the place where the crankshaft goes? ok I unscrewed the 3 bolts and pulled it apart then i put it back will this of had affected anything?cause inside it looked weird like a little gear so im not sure if i can just put it back any way or is there a specific way it goes back it? im gonna take a picture of what Im talking about so i can be more clear, ok well talk to you guys later k,
09-22-2009, 06:21 AM
#58
Registered User
Thread Starter
Join Date: Sep 2009
Location: Fontana ca
Posts: 68
Likes: 0
Received 0 Likes
on
0 Posts
oh ok i just realized that its the oil pump i was talking about well i took it off the timing cover is there a certain way that this goes back in? or it doesnt matter how it goes in as long as it sits in smoothly ?
09-22-2009, 06:30 AM
#60
Registered User
I have not messed with them at all (yet). You do wan to make sure the timing marks are in the correct position, I think the cover only goes on one way. I'm assuming it just goes on, I don't think the inner gear matters. What you do want to do with this is pack it with Petroleum jelly to prime it. If not you will not get any oil pressure. I'm not sure what else to use but I have read in more than one post that's what they have used.
I think the big bolt maybe to help prime the pump. I don't rightly know though.
I think the big bolt maybe to help prime the pump. I don't rightly know though.


