
Rear Window Switch in Cargo Area
 06-11-2009, 08:15 PM
#1
Registered User
Thread Starter
Join Date: Mar 2009
Location: S.R., PA
Posts: 118
Likes: 0
Received 0 Likes
on
0 Posts
Rear Window Switch in Cargo Area
I've been searching and reading, reading and searching the last couple of days on information to install a window switch for the rear window in the cargo area. I have a stock switch like the one in the center console that I would like to use. I would like to install it either by the rear dome light or inside the cubby on the driver's side. I've taken apart the tailgate and pulled the side panels to get an idea of where all the components, wires, etc.. are located.
I've seen the write up that taps into the wires from the key switch, but because of where I want the switch, I think I'll be tapping into the wires at the rear window/rear wiper relay. Can anyone tell me, in simple terms, which wires from the switch I'll need to connect to which wires from the relay harness? I've seen the schematics and they confuse my simple mind .....I'm no engineer.
The switch has 5 wires. Red/blue stripe, green/yellow, solid blue, Red/yellow,and Green/blue
I think red/yellow is "up", green/yellow is "down", and solid blue is power? Is that right? And, are the other 2 wires not used?
Sorry for the compound questions.....I don't want to hack up my electrical without a little confidence that I'm doing it right. Thanks.
I've seen the write up that taps into the wires from the key switch, but because of where I want the switch, I think I'll be tapping into the wires at the rear window/rear wiper relay. Can anyone tell me, in simple terms, which wires from the switch I'll need to connect to which wires from the relay harness? I've seen the schematics and they confuse my simple mind
.....I'm no engineer.
The switch has 5 wires. Red/blue stripe, green/yellow, solid blue, Red/yellow,and Green/blue
I think red/yellow is "up", green/yellow is "down", and solid blue is power? Is that right? And, are the other 2 wires not used?
Sorry for the compound questions.....I don't want to hack up my electrical without a little confidence that I'm doing it right. Thanks.
 06-11-2009, 08:22 PM
#2
Registered User
Join Date: Mar 2008
Location: Temecula Valley, CA
Posts: 12,723
Likes: 0
Received 5 Likes
on
5 Posts
So you want to move the switch from the stock location to a new one?
... or install a second switch?
Either way, "easiest" would be to tap into the existing wiring and extend the wires to the new switch.
... or install a second switch?
Either way, "easiest" would be to tap into the existing wiring and extend the wires to the new switch.
Last edited by abecedarian; 06-11-2009 at 08:24 PM.
06-11-2009, 09:30 PM
#3
Registered User
Thread Starter
Join Date: Mar 2009
Location: S.R., PA
Posts: 118
Likes: 0
Received 0 Likes
on
0 Posts
I want to add a 2nd switch. I know I need to tap into the existing wiring, but I'm trying to figure out exactly which of the wires I need to tap into. More specifically using an additional stock window switch as opposed to an aftermarket toggle switch.
06-16-2009, 05:05 PM
#6
Registered User
Thread Starter
Join Date: Mar 2009
Location: S.R., PA
Posts: 118
Likes: 0
Received 0 Likes
on
0 Posts
Well, my searches continually brought up the same crap time and time again and very little of it was useful, so I just figured it out on my own.

Last edited by T4L; 06-16-2009 at 05:09 PM.
Trending Topics
06-16-2009, 05:47 PM
#8
Registered User
Wow that is great. I wanna do that for my runner.
Good job.
Oh yea, your truck is the same color as mine, and it doesnt have those stripes on it too. Just like mine ha.
Good job.
Oh yea, your truck is the same color as mine, and it doesnt have those stripes on it too. Just like mine ha.
06-16-2009, 06:38 PM
#9
Registered User
Thread Starter
Join Date: Mar 2009
Location: S.R., PA
Posts: 118
Likes: 0
Received 0 Likes
on
0 Posts
The p.o. stripped the stripe off of the driver's side only. The passenger side still has one. I'll get around to it one of these days. That was your thread with that rubber wheel for removing the stripe wasn't it?
06-16-2009, 06:43 PM
#10
Registered User
Join Date: May 2007
Location: Denver metro area-CO
Posts: 2,175
Likes: 0
Received 2 Likes
on
2 Posts
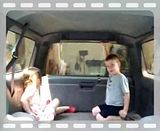
very cool video- that is nicely done with the kids asking questions in the background
Switch location looks stock-Toyota should have put one there also.
nicely done sir.
I agree when you wake up in the AM and have to exit the vehicle that makes a lot of sense-or to get into the back (bed) the night before.
Switch location looks stock-Toyota should have put one there also.
nicely done sir.
I agree when you wake up in the AM and have to exit the vehicle that makes a lot of sense-or to get into the back (bed) the night before.
06-16-2009, 06:57 PM
#11
Registered User
Thread Starter
Join Date: Mar 2009
Location: S.R., PA
Posts: 118
Likes: 0
Received 0 Likes
on
0 Posts
very cool video- that is nicely done with the kids asking questions in the background
Switch location looks stock-Toyota should have put one there also.
nicely done sir.
I agree when you wake up in the AM and have to exit the vehicle that makes a lot of sense-or to get into the back (bed) the night before.
Switch location looks stock-Toyota should have put one there also.
nicely done sir.
I agree when you wake up in the AM and have to exit the vehicle that makes a lot of sense-or to get into the back (bed) the night before.
 06-16-2009, 07:18 PM
#12
Registered User
06-16-2009, 07:21 PM
#13
Registered User
Join Date: May 2007
Location: Denver metro area-CO
Posts: 2,175
Likes: 0
Received 2 Likes
on
2 Posts
that one does not quite play right but the meaning is still clear. Thanks for sharing with all of us.
Good lookin' family you have there and I miss when mine were that size in my old 2nd gen. At 19 and 16 they don't play much in the back of my 3rd gen now.
Please be careful with those Crocs shoes- I read too many stories of them getting caught on escalators and other stuff and hurting folks.
My company builds Water play structures for kids and kids are always getting hurt in the most bizarre ways.
Keep em safe.
 07-17-2009, 07:19 PM
#15
Registered User
Thread Starter
Join Date: Mar 2009
Location: S.R., PA
Posts: 118
Likes: 0
Received 0 Likes
on
0 Posts
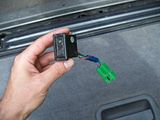
I trialed and errored the wires and lucked out on the 2nd or 3rd try. If you look at the back of a stock switch, there are 5 wires in a straight line. Cap off the outer wires. The remaining 3 are a power supply, an up, and a down. I wired to the harness on the key tumbler in the tailgate. Performed the tedious task of routing the wires with the rest behind the bumper and into the drivers side rear fender cavity. I just hid the (3)wires behind trim up to where the rear dome light is. I cut a rough hole for the switch with a utility knife and used the same knife to carve/fine tune the hole. I would have to venture back into the tailgate to tell you which wires connected to what....maybe take picture or 2.
07-17-2009, 07:21 PM
#16
Registered User

Join Date: Feb 2009
Posts: 590
Likes: 0
Received 0 Likes
on
0 Posts
I trialed and errored the wires and lucked out on the 2nd or 3rd try. If you look at the back of a stock switch, there are 5 wires in a straight line. Cap off the outer wires. The remaining 3 are a power supply, an up, and a down. I wired to the harness on the key tumbler in the tailgate. Performed the tedious task of routing the wires with the rest behind the bumper and into the drivers side rear fender cavity. I just hid the (3)wires behind trim up to where the rear dome light is. I cut a rough hole for the switch with a utility knife and used the same knife to carve/fine tune the hole. I would have to venture back into the tailgate to tell you which wires connected to what....maybe take picture or 2.
Awesome. I didn't think you would actually reply with a how-to.
 07-17-2009, 07:26 PM
#17
Registered User
Thread Starter
Join Date: Mar 2009
Location: S.R., PA
Posts: 118
Likes: 0
Received 0 Likes
on
0 Posts
07-17-2009, 09:49 PM
#19
Registered User

Join Date: Oct 2007
Posts: 162
Likes: 0
Received 0 Likes
on
0 Posts
*Bump*
Nice! Sweet!! Someone else did the "Obiyashi Mod"..thanks for the video, I'm going to email him and see how he feels knowing someone else used the idea.
~Obiyashi would be a certain tech guy elsewhere online known by another name now..same guy who originated the 2nd-gen 4Runner ECT Mod for the center console and the dash like the '96 and newer versions.
Last edited by KelleyC; 07-17-2009 at 09:55 PM.
12-29-2009, 08:35 AM
#20
Registered User
every time i see this mod, the wires for the new switched are tapped all the way from the tailgate. i didnt need to touch my tailgate. all i did was open up the rear storage compartment (driver's side), found the tailgate harness that goes out behind the wheel well to the tailgate, and just used 6 vampire taps. 3 to tap into the harness (not, up, down) and then to tap the switch into my new wires. there are 5 wires, but you only need three: hot, up, down. one of the others is for the illumination (when parking/head lighs are on), and i think the other is for the window lock button. if you still havent gotten around to doing this mod, i can get u my wire color codings. (you have to match different color wires to each other.) altho mine is a first gen, so wires may be different. hope i helped.


