
Philbert's 87 4Runner Head Gasket & head replacement - take II

 03-18-2013, 10:08 AM
#142
Registered User
Thread Starter
iTrader: (2)
Join Date: Dec 2009
Location: Pleasanton, CA - SF Bay Area
Posts: 2,159
Likes: 0
Received 7 Likes
on
5 Posts
Thanks guys for the kudos - much of what I learned I did from 92 TOY's (Jerry's) write ups on the subject.
Jerry has me worried, with that mention of lubing the head bolts when installing/torquing....thought I was supposed to keep the head bolts and threaded holes CLEAN before torquing....should I have lubed first before re-installing (after cleaning of course)?
Jerry has me worried, with that mention of lubing the head bolts when installing/torquing....thought I was supposed to keep the head bolts and threaded holes CLEAN before torquing....should I have lubed first before re-installing (after cleaning of course)?
03-18-2013, 11:32 AM
#143
Registered User

Join Date: Sep 2007
Location: San Francisco East Bay
Posts: 8,299
Likes: 0
Received 841 Likes
on
661 Posts
Well, you're in luck. The manual for the 3VZE says:
"(a) Apply a light coat of engine oil on the threads and under the heads of the cylinder head bolts."
But the manual for the 22re doesn't say anything about that.
Okay, I'm sure that's just an inadvertent omission for the 22re; you should have lightly lubed the threads. But what are you going to do about it? You could take the engine apart and start over, but that doesn't sound too wise. You could retorque the head bolts after a while (which is something you can't do with a 3VZE).
But if it was me, I'd just lose sleep over it and let it go at that.
03-18-2013, 11:50 AM
#144
I did stalube/light coat on the head bolts. BUT, did not on the white 4runner and 120k later, when I wrecked, no HG leak to that date. Some will become lubed, and 2 or so will remain dry.....
Can u pull and retorque lightly oiled bolts w/out too much effort? Strap head down as I did when doing the cam swap at 1200 miles into that first motor? That way the hg-head mating doesn't move........ THATS IF u just can't take it w/out going nuts with worry.....But, ...I think ur ok man. .. Most don't, I'd bet u.
Great work so far bubba! Hope to wheel with ya some day!
03-18-2013, 12:17 PM
#145
Registered User
Thread Starter
iTrader: (2)
Join Date: Dec 2009
Location: Pleasanton, CA - SF Bay Area
Posts: 2,159
Likes: 0
Received 7 Likes
on
5 Posts
Thanks Mark and scope!
Come to think of it, the engbldr bolts I got seemed to be lightly coated in something on the threads....maybe I am finem. I am going to leave as is.
Come to think of it, the engbldr bolts I got seemed to be lightly coated in something on the threads....maybe I am finem. I am going to leave as is.
03-18-2013, 02:39 PM
#146
Registered User
Thread Starter
iTrader: (2)
Join Date: Dec 2009
Location: Pleasanton, CA - SF Bay Area
Posts: 2,159
Likes: 0
Received 7 Likes
on
5 Posts
Great reference for water pump bolts
Co_94_PU posted this diagram in another thread and I wanted to "pin" it here for later reference - thanks for the image!

 03-18-2013, 03:54 PM
#148
Registered User
Thread Starter
iTrader: (2)
Join Date: Dec 2009
Location: Pleasanton, CA - SF Bay Area
Posts: 2,159
Likes: 0
Received 7 Likes
on
5 Posts
That photo is from LC engineering, from this post, there is also some more bolt torque talk on the page that follows that post.
Did you just now add your build thread link to your signature?
 03-18-2013, 09:17 PM
#149
Nah it's been there, think I did the sig change right after starting the thread definately by the time I posted the headliner howto but after I'd been here awhile not sure if it added them retroactivly to posts or not.
Thanks for droping by over there, and I'm always glad to help only thing better than helping is learning something new.
For posting all the pictures of the progress, they are good references and informative. Thank you sir!

Thanks for droping by over there, and I'm always glad to help only thing better than helping is learning something new.
For posting all the pictures of the progress, they are good references and informative. Thank you sir!
03-18-2013, 09:56 PM
#150
Ahhh, I've always gone to 4Crawlers Template.... that's a good one to have, Thanks from me as well, CO
Man, .... I'm amazed how almost equally excited I get to see others stuff come together.... Especially someone who's consistently as helpful as you, Phil! Gonna be nice to hear it purr.
April it is haha.
Man, .... I'm amazed how almost equally excited I get to see others stuff come together.... Especially someone who's consistently as helpful as you, Phil! Gonna be nice to hear it purr.
April it is
haha.
03-20-2013, 09:59 PM
#153
Registered User

Join Date: Feb 2013
Posts: 11
Likes: 0
Received 0 Likes
on
0 Posts
i think my files are too large to post all my pictures here.
Last edited by IB Mila; 04-12-2013 at 10:16 AM. Reason: Removed broken image
03-20-2013, 10:07 PM
#154
Registered User
Join Date: Feb 2013
Posts: 11
Likes: 0
Received 0 Likes
on
0 Posts
Last edited by IB Mila; 04-12-2013 at 10:43 AM. Reason: Removed broken image, page 7 not loading
03-21-2013, 11:54 AM
#157
Can't read whatever you posted, DC.... But I COULD see 92Toy's(Jerry) post on my mobile app popup summary thing.... "Can't load page 7", sure enough. After I posted to Fish, I then saw Fish post a response with a long IMG link.... Right then and there, ....NO MO-PHIL! lol.... GAWD I hope this isn't the "Report" you're talking about that I accidentally did with my Note2...  .... I would feel terrible!
.... I would feel terrible!
03-31-2013, 02:26 PM
#158
Registered User
Thread Starter
iTrader: (2)
Join Date: Dec 2009
Location: Pleasanton, CA - SF Bay Area
Posts: 2,159
Likes: 0
Received 7 Likes
on
5 Posts
Philbert's 87 4Runner Head Gasket & head replacement - take II
Hi All,
I'm starting this thread since my existing thread seems to keep crashing for anyone trying to post on it, or to view the last page of the thread. I sent a message to Corey so hopefully we can merge these threads later. Here's the original:
https://www.yotatech.com/forums/f116...thread-265657/
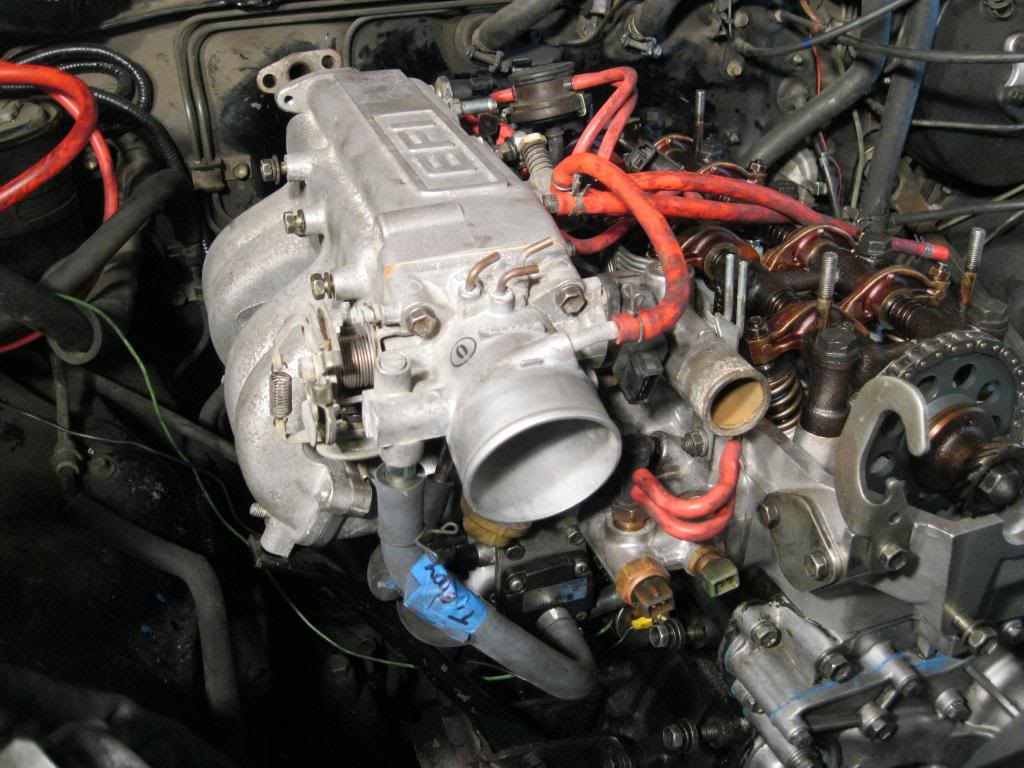
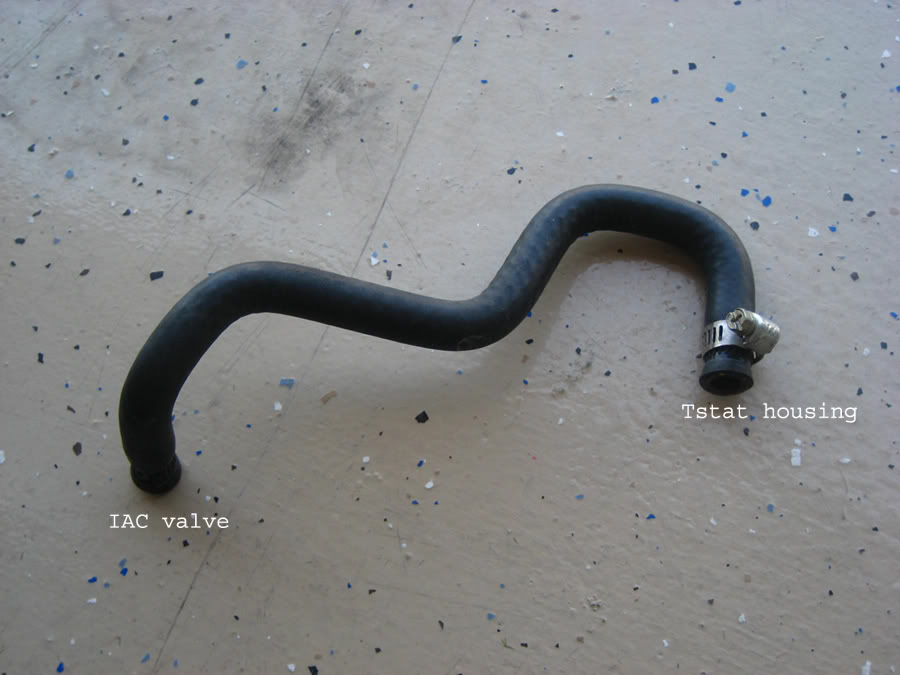
And now I have the new head and gasket on and am buttoning things up on the intake side....but I'm finding some vacuum and coolant hoses that are puzzling me, despite take tons of photos and documenting as I go....
I think I have this right but want to get some other opinions - there is a valve with 4 hoses going in/coming out, that bolts to the bottom of the lower intake manifold (Valve 22230 in this diagram):

Here is how I hooked up the new hoses I bought:
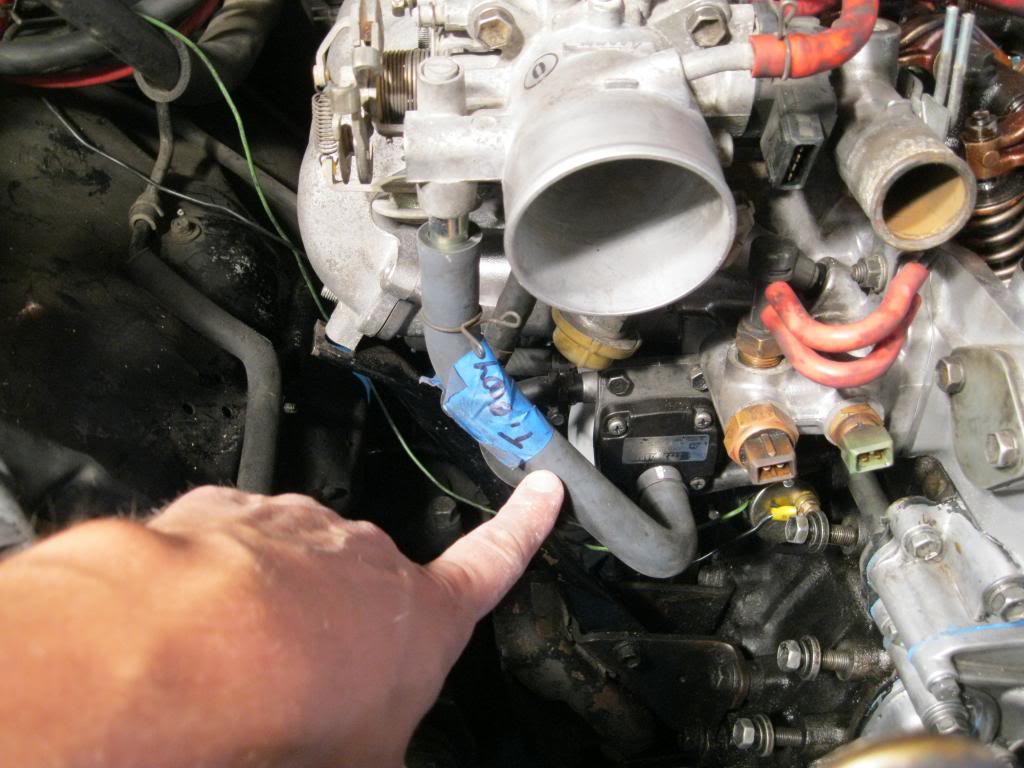
The one coming out of the front of that valve goes to the bottom of the throttle body:
The one coming out of the front passenger side goes to the side outlet on the passenger side water pipe, on the back of the timing cover:
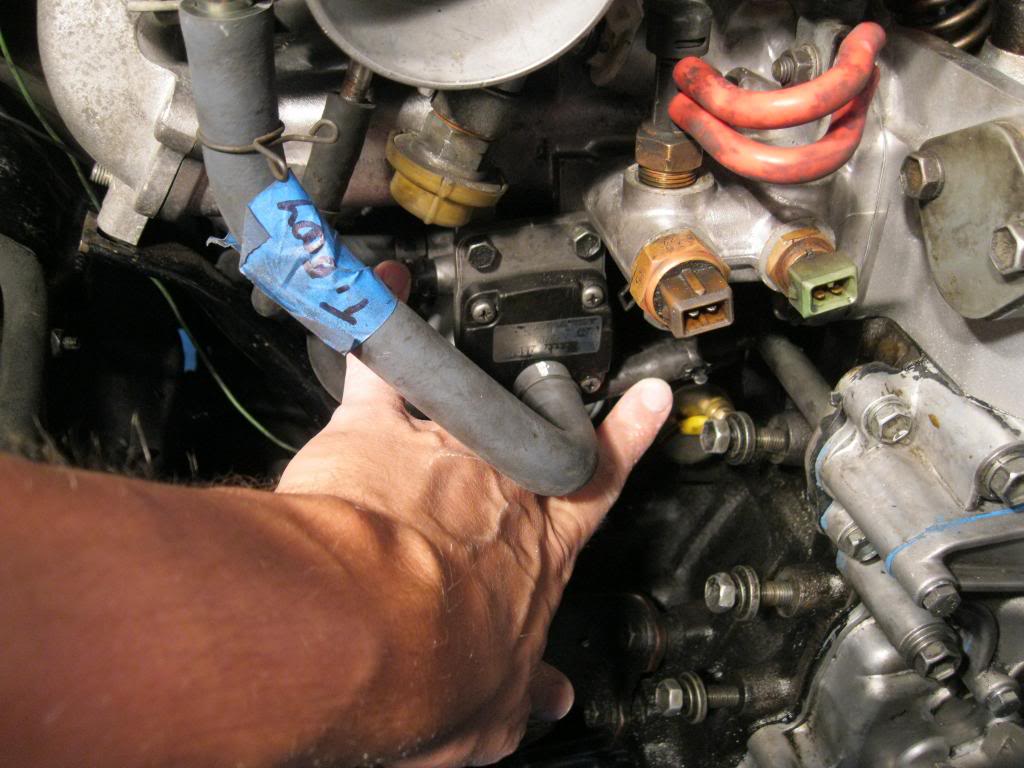
The one coming out of the rear passenger side goes to a smaller pipe on the rear bottom of the throttle body:

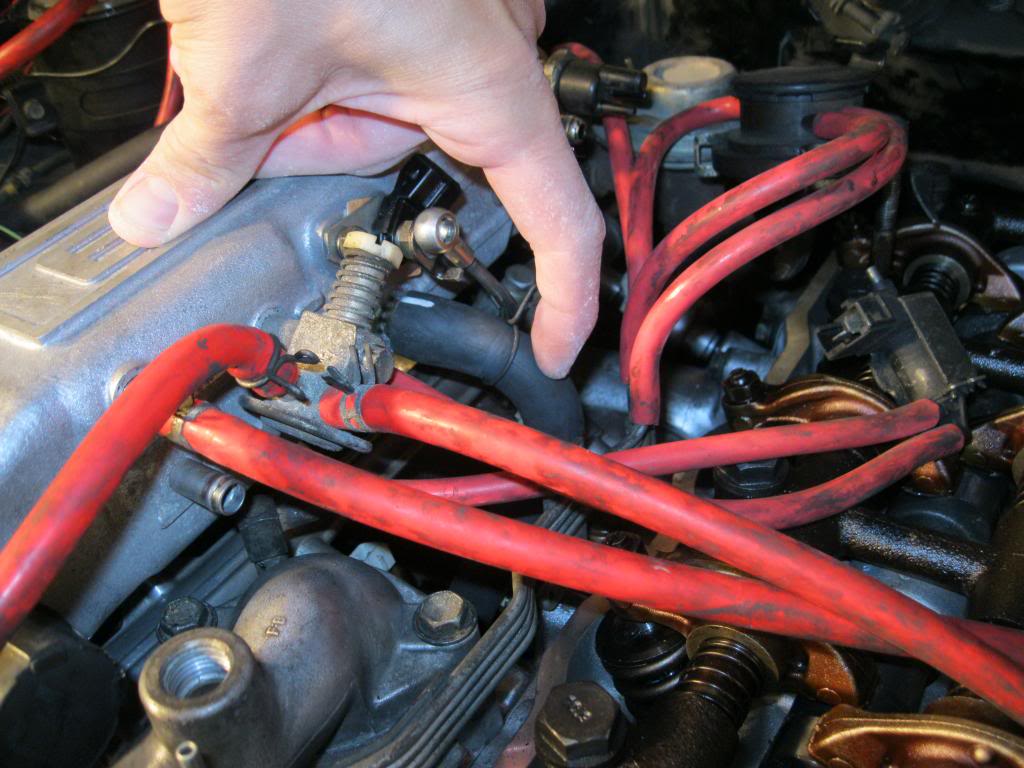
And the larger one coming out of the rear of the valve comes up between the upper/lower intake manifold and plugs into the drivers side of the manifold, just under teh cold start injector:
I have an "L" shaped coolant pipe missing its hose, and its destination - where the heck does it go and what hose do I use?
Here it is on the parts when I removed them:

And here is where it sits today when putting it all back together:

I think it's hose "22210D" in the diagram above? But if so, the hose terminates pointing straight down, whereas with the "L" mystery pipe, it would need to have run parallel to the ground in order to mate up??
I want to sort out these hoses and where they go before I tackle the rats nest of the harness
Thanks!
I'm starting this thread since my existing thread seems to keep crashing for anyone trying to post on it, or to view the last page of the thread. I sent a message to Corey so hopefully we can merge these threads later. Here's the original:
https://www.yotatech.com/forums/f116...thread-265657/
And now I have the new head and gasket on and am buttoning things up on the intake side....but I'm finding some vacuum and coolant hoses that are puzzling me, despite take tons of photos and documenting as I go....
I think I have this right but want to get some other opinions - there is a valve with 4 hoses going in/coming out, that bolts to the bottom of the lower intake manifold (Valve 22230 in this diagram):
Here is how I hooked up the new hoses I bought:
The one coming out of the front of that valve goes to the bottom of the throttle body:
The one coming out of the front passenger side goes to the side outlet on the passenger side water pipe, on the back of the timing cover:
The one coming out of the rear passenger side goes to a smaller pipe on the rear bottom of the throttle body:
And the larger one coming out of the rear of the valve comes up between the upper/lower intake manifold and plugs into the drivers side of the manifold, just under teh cold start injector:
I have an "L" shaped coolant pipe missing its hose, and its destination - where the heck does it go and what hose do I use?
Here it is on the parts when I removed them:
And here is where it sits today when putting it all back together:
I think it's hose "22210D" in the diagram above? But if so, the hose terminates pointing straight down, whereas with the "L" mystery pipe, it would need to have run parallel to the ground in order to mate up??
I want to sort out these hoses and where they go before I tackle the rats nest of the harness
Thanks!
03-31-2013, 02:38 PM
#159
Registered User
On mine, that L shape plug is a coolant hose and it goes from there, wraps around and then underneath the water outlet pipe and then to underneath the throttle body.
Mine looks something like this
Mine looks something like this
Last edited by BK2TFUTURE; 03-31-2013 at 02:51 PM.


