
Paint Prep on 1st Gen 4Runner removable top
 07-20-2010, 05:24 AM
#21
Registered User
iTrader: (1)
Join Date: Dec 2005
Location: Washington, NC
Posts: 104
Likes: 0
Received 0 Likes
on
0 Posts
I rolled on Rustoleum Satin Black, available at Home Depot and numerous other places. I thought it would be the closest to the factory finish. I didn't sand, but just used a scrub brush and soapy water to remove loose paint and dirt. Then followed with a good wipe of mineral spirits. Taped off all trim and other things. I rolled on Rustoleum primer then the satin paint, 2 coats. It's been holding up great for 2-3 years.
It's cheap, easy, and durable. Look fine too.
It's cheap, easy, and durable. Look fine too.
 07-20-2010, 06:12 AM
#22
You mentioned that you thought it would be closest to factory finish. May I ask how it turned out? Are you happy with it? Pics would be awesome, also, if you had to do it again, would you choose the same paint? Thanks!
07-20-2010, 06:23 PM
#23
Registered User
iTrader: (1)
Join Date: Dec 2005
Location: Washington, NC
Posts: 104
Likes: 0
Received 0 Likes
on
0 Posts
Hey Thinsley,
It turned out great. My top was faded in many places as well, this was a major improvement. I don't have a photo account at the moment, I'll see what I can do about posting something. I say it's close to the factory finish because it's a satin paint, not totally flat and not glossy. I didn't want to sand off the texture that came on the top from the factory. I used a small foam roller, about 6 inches long, pretty dense foam. It helped maintain the factory texture/look.
It turned out great. My top was faded in many places as well, this was a major improvement. I don't have a photo account at the moment, I'll see what I can do about posting something. I say it's close to the factory finish because it's a satin paint, not totally flat and not glossy. I didn't want to sand off the texture that came on the top from the factory. I used a small foam roller, about 6 inches long, pretty dense foam. It helped maintain the factory texture/look.
07-21-2010, 06:16 PM
#25
Registered User
Rust free L trim has rust, if you remove the black coating. I put paint stripper on my perfect set and found small snow flake rust spots. Here's the thread on mine.
https://www.yotatech.com/forums/f116...ration-147974/
https://www.yotatech.com/forums/f116...ration-147974/
08-04-2010, 06:01 AM
#26
Ok, thanks to everyone's help, I started my top last night. Cross your finger that the weather app on my iphone is correct and it's gonna be sunny again today. I'm taking pics along the way, so I'll have a write up later this week. So far, removed the top, cleaned it, gave it a quick mineral spirits bath, taped it all off and primed it last night. I'll get the first coat on tonight. So far, looking good and feeling good about it. Thanks again to everyone who has offered input and experience! Cross your fingers for me!
08-09-2010, 10:14 AM
#27
My 89 4Runner Top Refinish
Finally finished painting the top thjis weekend. I'd been wanting to do this for a while now. I know absolutely nothing about painting. Other than what I'd read on here, I went into it just like any other "Joe".
So first things first, I bought the materials:
2 cans Rustoleum Satin
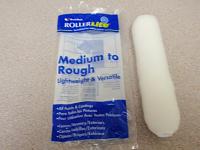
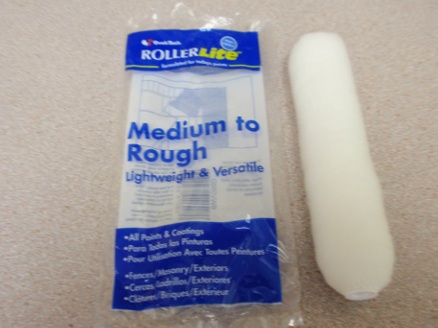
4x 6" paint rollers. I'll show you the pic in a sec. Originally I bought 2 different kinds of rollers. I bought the "High Density" roller and the "Medium to Rough". I ened up going with the "Medium to Rough" as it seemed to work better and keep the texture better.
Here's a pic of the roller for your reference. Like I said, this is what I found worked best for me. YRMV.
And of course the basics, tape, mineral spirits, scrubbers, etc.
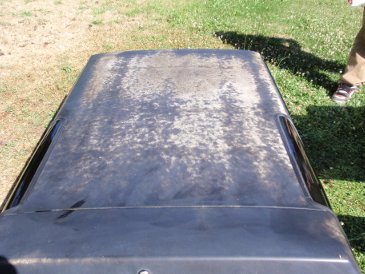
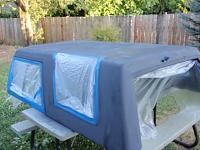
Here's a "Before" pic so you'll know what I had going on.

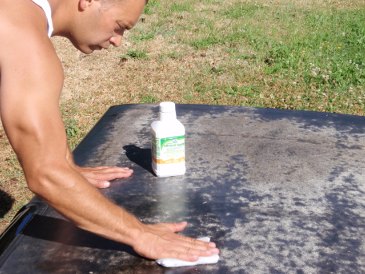
First things first, clean her up. I used mineral spirits, soap and water. That was it. I didn't want to sand it, because I was worried that it would lose texture, etc. So I gave it a quick scrub, then wipe down with mineral spirits.

to be continued....
So first things first, I bought the materials:
2 cans Rustoleum Satin
4x 6" paint rollers. I'll show you the pic in a sec. Originally I bought 2 different kinds of rollers. I bought the "High Density" roller and the "Medium to Rough". I ened up going with the "Medium to Rough" as it seemed to work better and keep the texture better.
Here's a pic of the roller for your reference. Like I said, this is what I found worked best for me. YRMV.
And of course the basics, tape, mineral spirits, scrubbers, etc.
Here's a "Before" pic so you'll know what I had going on.
First things first, clean her up. I used mineral spirits, soap and water. That was it. I didn't want to sand it, because I was worried that it would lose texture, etc. So I gave it a quick scrub, then wipe down with mineral spirits.
to be continued....
08-09-2010, 10:17 AM
#28
My 89 4Runner Top Refinish cont...
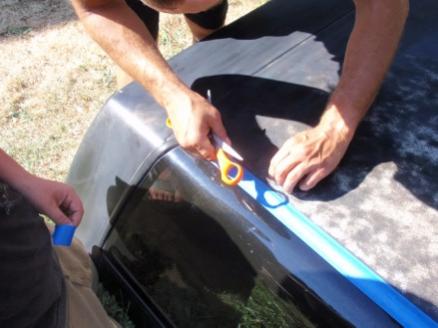
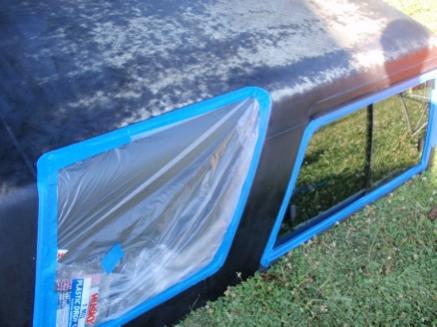
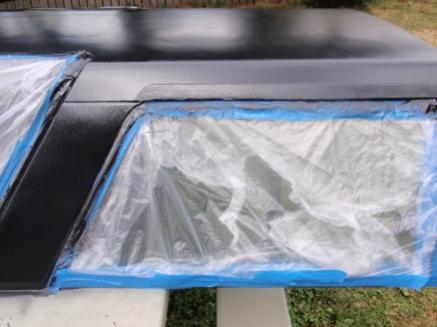
After I cleaned it all up, of course I started taping...

I am certainly no expert, so if it looks sloppy, etc you'll know why.

And finally all taped up...

continued....
I am certainly no expert, so if it looks sloppy, etc you'll know why.
And finally all taped up...
continued....
08-09-2010, 10:20 AM
#29
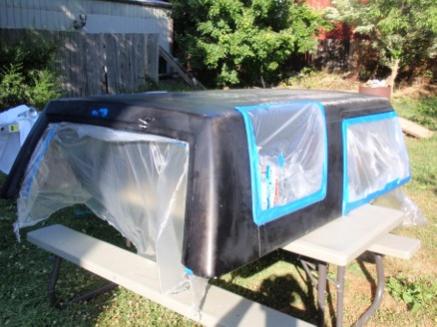
My 89 4Runner Top Refinish cont...
So after I got it all taped up, it was time to prime! Here's the primer I used.
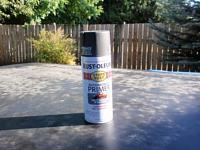
I only used 1 can. in hindsight, I'd get another can and give it another coat of primer. I didn't have any troubles, but the one can *barely* covered the top. I think I just would have felt better had I primed it a little more. Again, I didn't see any problems. I just would have preferred another coat of primer.
All primed...
cont...

I only used 1 can. in hindsight, I'd get another can and give it another coat of primer. I didn't have any troubles, but the one can *barely* covered the top. I think I just would have felt better had I primed it a little more. Again, I didn't see any problems. I just would have preferred another coat of primer.
All primed...

cont...
08-09-2010, 10:27 AM
#30
My 89 4Runner Top Refinish...
So it was primed and ready to paint! When I applied the first coat, I used the High Density roller. I wasn't happy with this and switched to the Medium to Rough for the rest of hte coats. Also, On my second coat, I was in a hurry cuz it was getting later. I wanted to get the coat on before the night ended and didn't stir the paint well. In the morning when I went to check on it, parts were satin, and parts were flat. It looked like crap. Needless to say, I stirred the crap outta the paint after that and didn't have any additional problems.
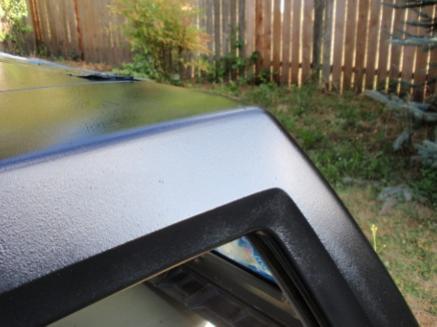
Here's a couple pics.

another angle

A little closer
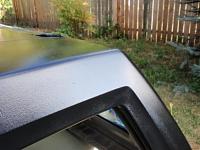
cont...
Here's a couple pics.
another angle

A little closer
cont...
08-09-2010, 10:34 AM
#32
My 89 4Runner Top Refinish...
I did 5 coats total! I know, it's a lot, but I didn't feel that 3 was enough, especially after I'd had the second coat problems. It took 2 cans of the Rustoleum, but at 8.56 a can, I didn't feel too bad about it.
Here it is mounted again.

I finished just in time, on Saturday night we got just a tiny bit of rain. The top was dry enough that it didn't mess anything up. I'm sure it will take a while to fully cure, but I'm pretty happy with my $20.00 paint job.

Like I said, I'm no painter by any means. This was all done this weekend, by myself and my 17yr old son. Neither of us have any experience so I'm not dissapointed.
In hindsight, there are a couple things I would do differently.
1. 2 cans of primer instead of one. Like I said, I'd just feel better about it.
2. L-Trim at the same time. I now have to go back and do the L-Trim, shoulda just done it while I was at it all.
3. Start with the right roller. I wasn't happy with the High Density and switched to the Medium to Rough after 2 coats. I'd just start with the Medium next time.
That's about it. I don't know how I avoided bird crap the entire weekend. No joke, as soon as I installed the top back, not an hour later a bird marked his territory. I swore if it happened while I was painting, I was gonna buy a bb gun and make it my mission to send a message to very bird within a 5 mile radius. Thankfully, I didn't have to.
So there you have it. Hopefully this may help the next guy. I know this post helped me get the parts and info I needed. Thanks again for everyone's help. If you have any questions, just let me know!
Here it is mounted again.

I finished just in time, on Saturday night we got just a tiny bit of rain. The top was dry enough that it didn't mess anything up. I'm sure it will take a while to fully cure, but I'm pretty happy with my $20.00 paint job.
Like I said, I'm no painter by any means. This was all done this weekend, by myself and my 17yr old son. Neither of us have any experience so I'm not dissapointed.
In hindsight, there are a couple things I would do differently.
1. 2 cans of primer instead of one. Like I said, I'd just feel better about it.
2. L-Trim at the same time. I now have to go back and do the L-Trim, shoulda just done it while I was at it all.
3. Start with the right roller. I wasn't happy with the High Density and switched to the Medium to Rough after 2 coats. I'd just start with the Medium next time.
That's about it. I don't know how I avoided bird crap the entire weekend. No joke, as soon as I installed the top back, not an hour later a bird marked his territory. I swore if it happened while I was painting, I was gonna buy a bb gun and make it my mission to send a message to very bird within a 5 mile radius. Thankfully, I didn't have to.
So there you have it. Hopefully this may help the next guy. I know this post helped me get the parts and info I needed. Thanks again for everyone's help. If you have any questions, just let me know!
09-20-2010, 07:59 PM
#33
Registered User
Thread Starter

Join Date: Feb 2009
Posts: 19
Likes: 0
Received 0 Likes
on
0 Posts
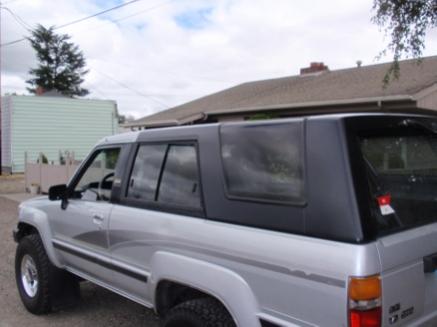
I did 5 coats total! I know, it's a lot, but I didn't feel that 3 was enough, especially after I'd had the second coat problems. It took 2 cans of the Rustoleum, but at 8.56 a can, I didn't feel too bad about it.
Here it is mounted again.
Attachment 83629
I finished just in time, on Saturday night we got just a tiny bit of rain. The top was dry enough that it didn't mess anything up. I'm sure it will take a while to fully cure, but I'm pretty happy with my $20.00 paint job.
Attachment 83630
Like I said, I'm no painter by any means. This was all done this weekend, by myself and my 17yr old son. Neither of us have any experience so I'm not dissapointed.
In hindsight, there are a couple things I would do differently.
1. 2 cans of primer instead of one. Like I said, I'd just feel better about it.
2. L-Trim at the same time. I now have to go back and do the L-Trim, shoulda just done it while I was at it all.
3. Start with the right roller. I wasn't happy with the High Density and switched to the Medium to Rough after 2 coats. I'd just start with the Medium next time.
That's about it. I don't know how I avoided bird crap the entire weekend. No joke, as soon as I installed the top back, not an hour later a bird marked his territory. I swore if it happened while I was painting, I was gonna buy a bb gun and make it my mission to send a message to very bird within a 5 mile radius. Thankfully, I didn't have to.
So there you have it. Hopefully this may help the next guy. I know this post helped me get the parts and info I needed. Thanks again for everyone's help. If you have any questions, just let me know!
Your end results look great and very similar to mine. I just lightly sanded everything w 320 grit and filled any dings with filler and used 2 coats Krylon black primer and 4 coats Krylon satin black. I rattle-canned the whole lot for about $35. The L-trim got sanded to mostly bare metal (sponge sanding pads work well here) and primed/repainted in place with semi-gloss Rustoleum and 2 coats of Dupli-color clear. I painted it all with the top mounted on the truck. Masking everything meticulously was probably the biggest headache, but was well worth the effort. Laying down even coats on the very top was interesting while standing on a ladder, but it turned out nice, I went very slowly.
After a year now, the black has dulled a bit, but still looks good and even. Dirt sticks to it very well, but also comes-off easily. I am thinking I should have shot a coat or two of clear on it. The repainted top now makes the body paint look really ghetto, but I am still chasing rust out of tiny little dings in the body and need to patch a serious rust hole in the passenger rear quarter panel before I can finish-prep and take her to a real paint shop.
I've since done the interior quarter panel restoration as well:
https://www.yotatech.com/forums/f116...on-how-167686/
I also did the dash cap restoration like in this thread:
https://www.yotatech.com/forums/f116/dash-cap-202311/
The gray bumper paint from the quarter panel restoration thread is a good match for painting the dash cap (they are black plastic) and I highly recommend removing the dash pad completely so you can fit and glue the cap on perfectly and apply paint outside of your truck. Removing the passenger side vent assembly is tricky. I took the air compressor to the dash while I had it all apart and blew out 22 years of accumulated dust from the ducts and behind the pad and instrument cluster. Hopefully all that dust wasn't holding anything together, but the whole dash shines now.
Sorry folks, no pics, but maybe when the exterior is all done I will borrow a camera and go through everything.
09-21-2010, 06:31 AM
#34
Funny that you mention those two threads. I bought that exact dash cap and paint BECAUSE of those threads! HAHAH! I'll post pics once I finally get it finished. Been trying to work on the bike a bit as well. Too many projects!
09-21-2010, 06:57 AM
#35
Registered User
wow thats a great finish!
i think ill be doing mine soon... im going to use rockliner/bedliner in a can.. did my sliders and inside my truck with it and it leaves a great texture finish on it when it dries.
i think ill be doing mine soon... im going to use rockliner/bedliner in a can.. did my sliders and inside my truck with it and it leaves a great texture finish on it when it dries.

Thread
Thread Starter
Forum
Replies
Last Post
Gene
Off Road Trip Planning, Expeditions, Trips, & Events
19
06-03-2002 07:07 PM


