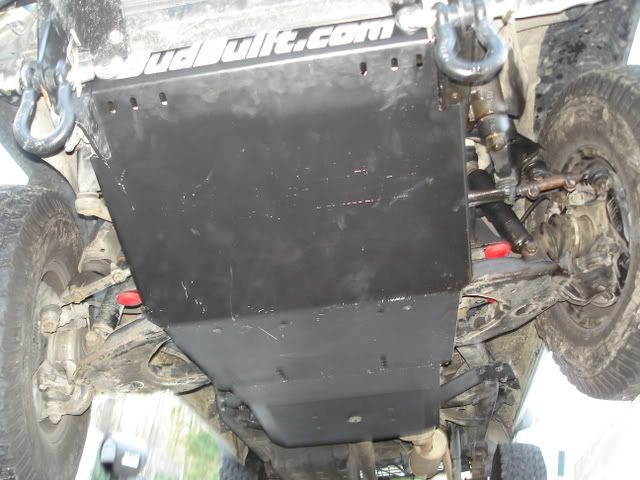
New BudBuilt 1st Gen 4Cyl Belly Pan!
#1
New BudBuilt 1st Gen 4Cyl Belly Pan!
BudBuilt now has a new design for 1st Gen IFS 4-Cyl belly pans. They integrate well with his crossmembers and IFS skid plates. I just got mine. It fits very nice.
Here's how it was shipped:

This is looking from the T/C side of it:

This is what the bottom looks like:

BudBuilt logo laser-etched in the surface that faces back:

Test fit with the BudBuilt skid & crossmember. Now you can see where the logo shows up.

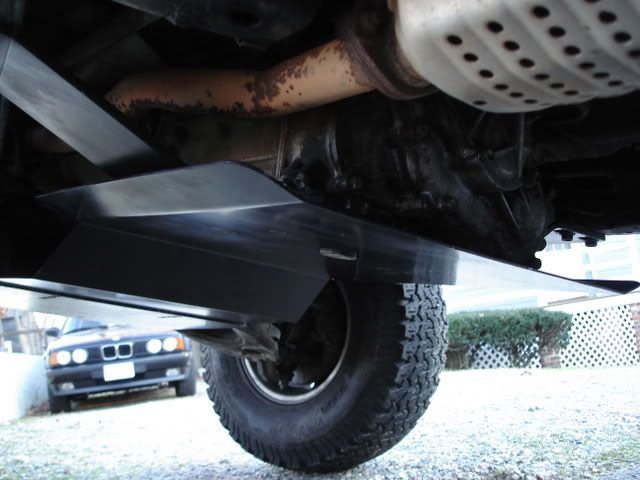
Due to the way the crossmember is intentionally twisted, the bellypan slopes down toward the rear. It's still about as high as the gas tank skid tho'.:

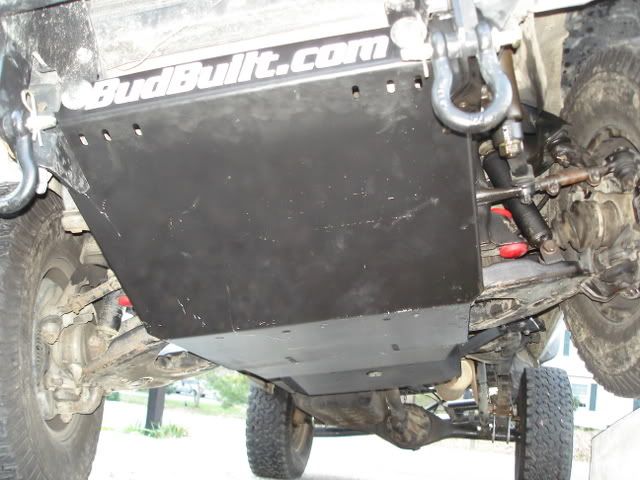
The front of the belly (slots) bolts into the back of the BudBuilt skid, but doesn't get in the way of putting a Sonoran Steel IFS brace, or in the way of the LCA movement.

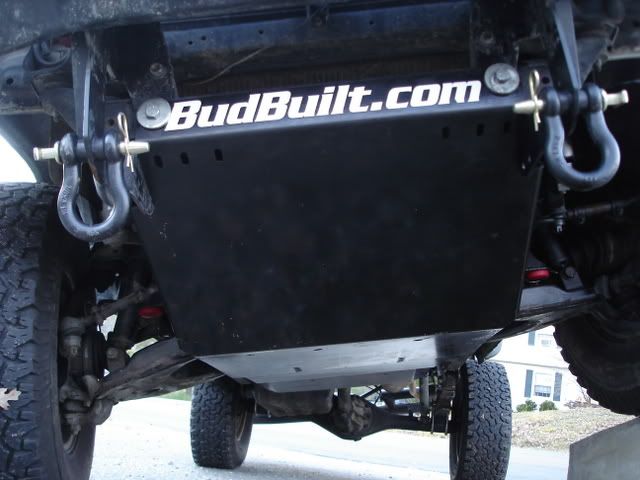
Looking toward the front of the vehicle. Again you can see the logo and how the T/C is well protected.

The bellypan sticks out on the side a little from the crossmember. If I were to change anything, it might be to narrow down the bellypan to where it is only as wide as the lower part of the crossmember.

Now to get it etched & painted!!
Here's how it was shipped:
This is looking from the T/C side of it:
This is what the bottom looks like:
BudBuilt logo laser-etched in the surface that faces back:
Test fit with the BudBuilt skid & crossmember. Now you can see where the logo shows up.
Due to the way the crossmember is intentionally twisted, the bellypan slopes down toward the rear. It's still about as high as the gas tank skid tho'.:
The front of the belly (slots) bolts into the back of the BudBuilt skid, but doesn't get in the way of putting a Sonoran Steel IFS brace, or in the way of the LCA movement.
Looking toward the front of the vehicle. Again you can see the logo and how the T/C is well protected.
The bellypan sticks out on the side a little from the crossmember. If I were to change anything, it might be to narrow down the bellypan to where it is only as wide as the lower part of the crossmember.
Now to get it etched & painted!!
Last edited by 86Original; 08-29-2006 at 09:05 PM. Reason: added links.
#3
Finally painted and mounted
Been doing a bunch of repairs on the front end, so hadn't put it on yet. I primed it with POR-15, and will probably leave it that way, since it will get very little UV underneath my rig.  Unfortunately, the digicam is with the wife in Sicily at the moment
Here's a pic taken with the phone:

It's doing a great job of covering my Marlin single 4.7 case...


 Unfortunately, the digicam is with the wife in Sicily at the moment
Here's a pic taken with the phone:

It's doing a great job of covering my Marlin single 4.7 case...


Last edited by 86Original; 10-08-2006 at 09:47 PM.
#4
That looks nice and well protected. I'm going to eventually do those same skids on my truck. If I can't do them all at once what sucession do you recommend? I was thinking Crossmember, IFS skid, and bellypan in that order. Is that the way to go? It seems like that since it looks like the bellypan will only bolt to the ifs skid... I'm thinking of getting the crossmember soon to get rid of that stupid stock skid that hangs down 

#7
This is a bomber unit from Bud. If you're thinking about armor for your 86-89 IFS truck or 4Runner, I think it's worth it to get the whole package from Bud!
As you can see in my avatar and profile page linked in my sig, this rig has taken me on some of the toughest trails in the Rocky Mountain region, and the armor has done wonders for me.
BTW, I have yet to meet another IFS rig on the harder trails that I've run: Blanca, Moab Rim, Boulder Carnage, Poison Spider / Golden Spike / Gold Bar Rim, Hell's Revenge, Kelly Flats Chutes, Pearl Pass... FWIW
Last edited by 86Original; 12-07-2006 at 11:01 AM.
Trending Topics
#12
#13
You might even be able to use my original one. It's yours if you'll pay shipping. You'll need a BB crossmember, tho'. It's been painted with POR-15 undercoat and scratched & bent a little, no extra charge
 . OTOH, it probably wouldn't work, because the holes probably wouldn't align.
#14
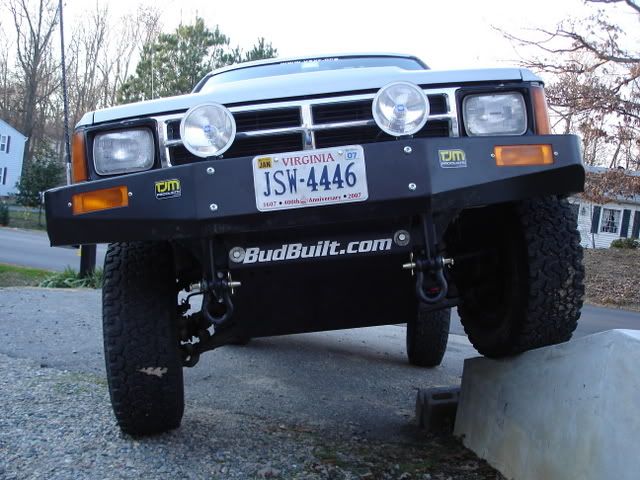
Very nice! You almost have a duplicate of mine 
 Replace the lights with a winch & you're there!
Did you ream out the TJM mounting brackets to put the D-shackles (clevis) on? Did you weld on some more beef to the brackets where the clevises mount?
Not sure I'd trust the clevises with the spring pin retainer as much as the screw-in kind like Warn sells. Under heavy load, I could see where the retainer pin could get loaded and fail. OTOH, the screw-in kind could come unscrewed...

 Replace the lights with a winch & you're there!
 Did you ream out the TJM mounting brackets to put the D-shackles (clevis) on? Did you weld on some more beef to the brackets where the clevises mount?
Not sure I'd trust the clevises with the spring pin retainer as much as the screw-in kind like Warn sells. Under heavy load, I could see where the retainer pin could get loaded and fail. OTOH, the screw-in kind could come unscrewed...
Last edited by 86Original; 12-08-2006 at 12:29 PM.
#15
Very nice! You almost have a duplicate of mine 
 Replace the lights with a winch & you're there!
Did you ream out the TJM mounting brackets to put the D-shackles (clevis) on? Did you weld on some more beef to the brackets where the clevises mount?
Not sure I'd trust the clevises with the spring pin retainer as much as the screw-in kind like Warn sells. Under heavy load, I could see where the retainer pin could get loaded and fail. OTOH, the screw-in kind could come unscrewed...

 Replace the lights with a winch & you're there!
 Did you ream out the TJM mounting brackets to put the D-shackles (clevis) on? Did you weld on some more beef to the brackets where the clevises mount?
Not sure I'd trust the clevises with the spring pin retainer as much as the screw-in kind like Warn sells. Under heavy load, I could see where the retainer pin could get loaded and fail. OTOH, the screw-in kind could come unscrewed...
 . I didn't have to ream out the brackets for the shackles, just got some that fit the hole (7/8 if I remember right). I hate how low the shackles and brackets hang and I have already bent them once (had the bumper since October
  ). I want to beef them up and figure out a way to move them up more. We'll see how that goes. Did you have to alter the front skid any to work with the TJM? I had to notch mine just a little bit.
On the spring pins, I have seen more of the screw mount ones come apart than the spring mount ones. I hate those screw mount ones.
#16
Yeah, I had to notch my skid out as well to work with the TJM. My mounts are slightly bent also. I've thought of improving my approach angle by rebuilding the mounts, but so far it hasn't caused enough problem to warrant the amount of work it would take. Can't even get done what I've already started...
What did you use to paint yours?
What did you use to paint yours?
#18
Ok, I just wanted to post up and publicly thank Bud for saving my front diff and transfer case  . I went wheeling at Crozet, VA this Saturday and I completely beat on my truck. I tackled trails that were much harder than I should have with my truck (31s, no real lift, rear locker). It was my first time out with the skids and locker and I wanted to do some harder stuff and see what I needed to improve next. The pics below were after SEVERE abuse of landing on rocks, riding the skids over rocks, etc. I am shocked that I didn't break anything. Normal wheeling will not get you these results.. This is from big rocks, little tires, little ground clearance, and momentum
  . As bad as they look they did their job beautifully. I had no mechanical damage whatsoever and the only real problems I had with the skids was I bent the belly pan up into the front driveshaft (it rubbed for a bit but I was able to pry it back down) and they are now vibrating because they are no longer flat with the mounts. I will be pulling them off to straighten them a bit and weld in some more supports as I seem to be a special case
  . I highly recommend these skids to anyone who really wheels their truck! (BTW: These skids looked the same as the pics in my post above Saturday morning):


 . I went wheeling at Crozet, VA this Saturday and I completely beat on my truck. I tackled trails that were much harder than I should have with my truck (31s, no real lift, rear locker). It was my first time out with the skids and locker and I wanted to do some harder stuff and see what I needed to improve next. The pics below were after SEVERE abuse of landing on rocks, riding the skids over rocks, etc. I am shocked that I didn't break anything. Normal wheeling will not get you these results.. This is from big rocks, little tires, little ground clearance, and momentum
  . As bad as they look they did their job beautifully. I had no mechanical damage whatsoever and the only real problems I had with the skids was I bent the belly pan up into the front driveshaft (it rubbed for a bit but I was able to pry it back down) and they are now vibrating because they are no longer flat with the mounts. I will be pulling them off to straighten them a bit and weld in some more supports as I seem to be a special case
  . I highly recommend these skids to anyone who really wheels their truck! (BTW: These skids looked the same as the pics in my post above Saturday morning):


