
How to Install A/C in a 1st Gen 4Runner/Pickup
 05-28-2020, 09:23 AM
#1
Registered User
Thread Starter
Join Date: Mar 2018
Posts: 11
Likes: 0
Received 0 Likes
on
0 Posts
How to Install A/C in a 1st Gen 4Runner/Pickup
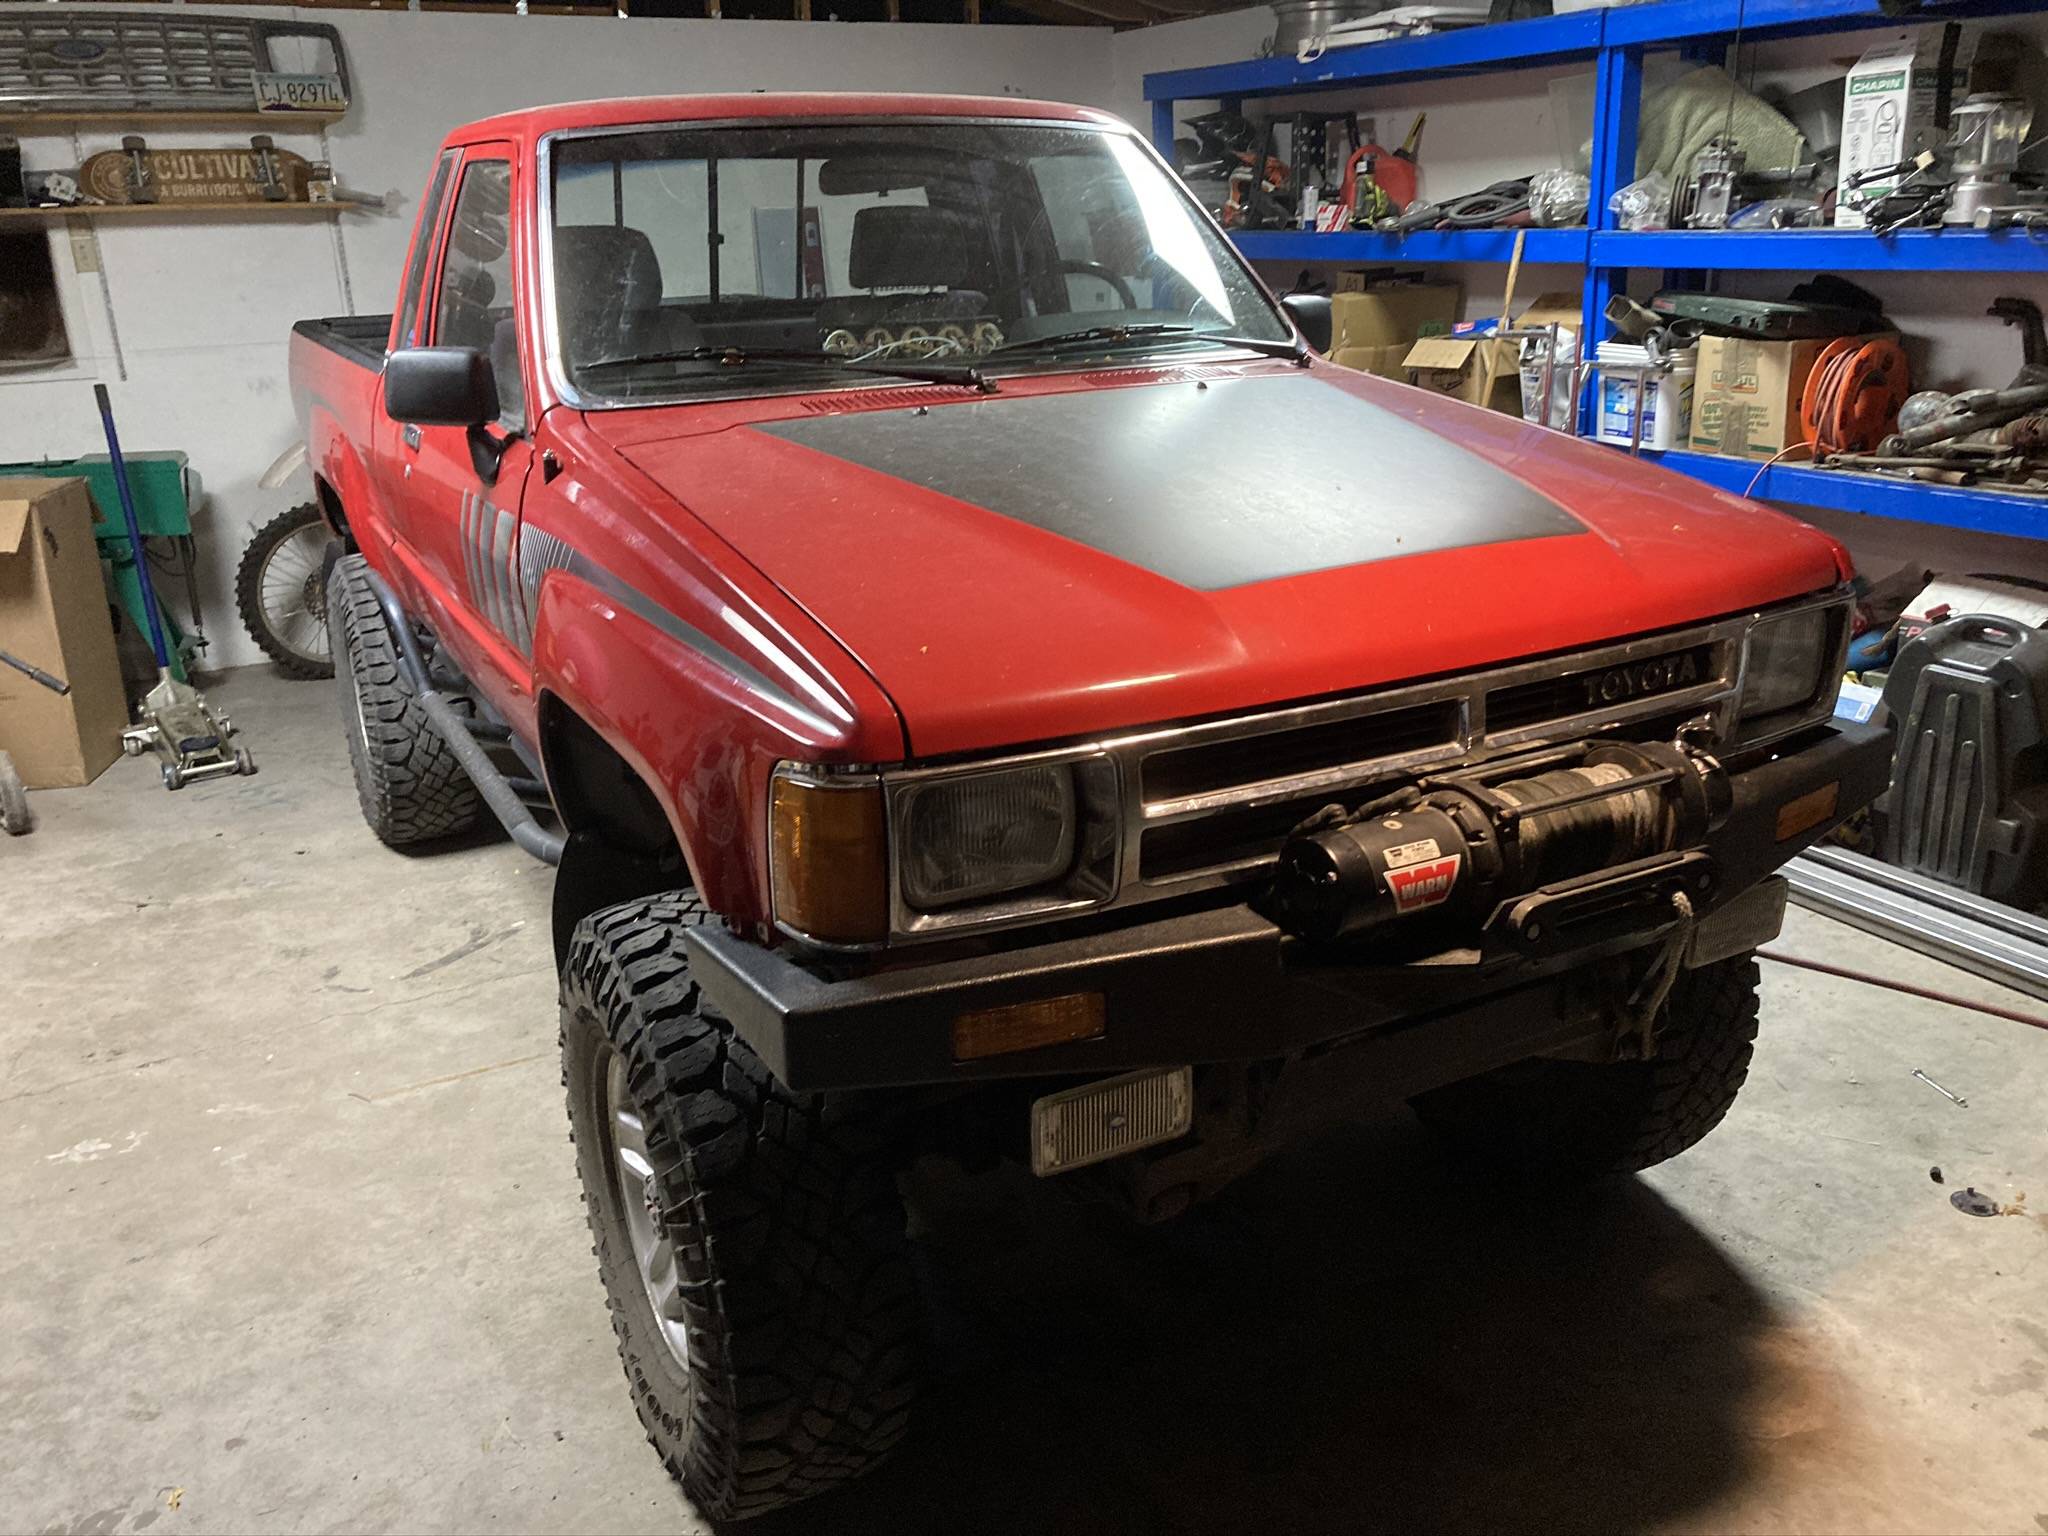
Hi Guys! I'm not as active here on Yotatech as I am on Ih8mud, but I just retrofitted my 1987 Toyota pickup with A/C and thought I'd share my writeup here as well. If anyone has questions on this, let me know.
Here it is! The much anticipated (much dreaded for me) writeup of how to install AC into a 1st generation 4Runner or pickup.
I�m going to warn that this is going to be a very long, extensive, boring, picture heavy writeup where I�m going to compile all the research I have done and the entire process from beginning to end.
I�m going to break down this writeup into 5 parts which are:
-Getting started and finding the parts
-Evaporator
-Compressor
-Condenser/Drier
-Hooking it all up
Getting started
So you want to add AC to your 1st gen 4Runner/Pickup? It�s definitely doable and not too troublesome once you have everything you need. The best way to get all the parts you need is to find a donor vehicle � which is easier said than done. If you can � great! You�re ready to go. If not, these are the parts you�re going to have to hunt down.
-Evaporator box
-Evaporator
-A/C Wiring harness
-A/C compressor bracket & idler
-A/C lines (including those on the condenser)
-Condenser
-A/C switch for in cab
-Drier
-Thermal expansion valve
-Low pressure switch
-Thermistor
-A/C Belt
-Idle up solenoid & VSV
-O-Rings & Pag Oil
You do have the option to buy many of the main components new, but at the very least you need to buy a new drier & expansion valve before you do your install. I would recommend ponying up the coin to get a new compressor as well since original ones tend to leak from time. Unfortunately finding a lot of the A/C lines can be a pain so if you can find a donor vehicle, all the better.
Evaporator
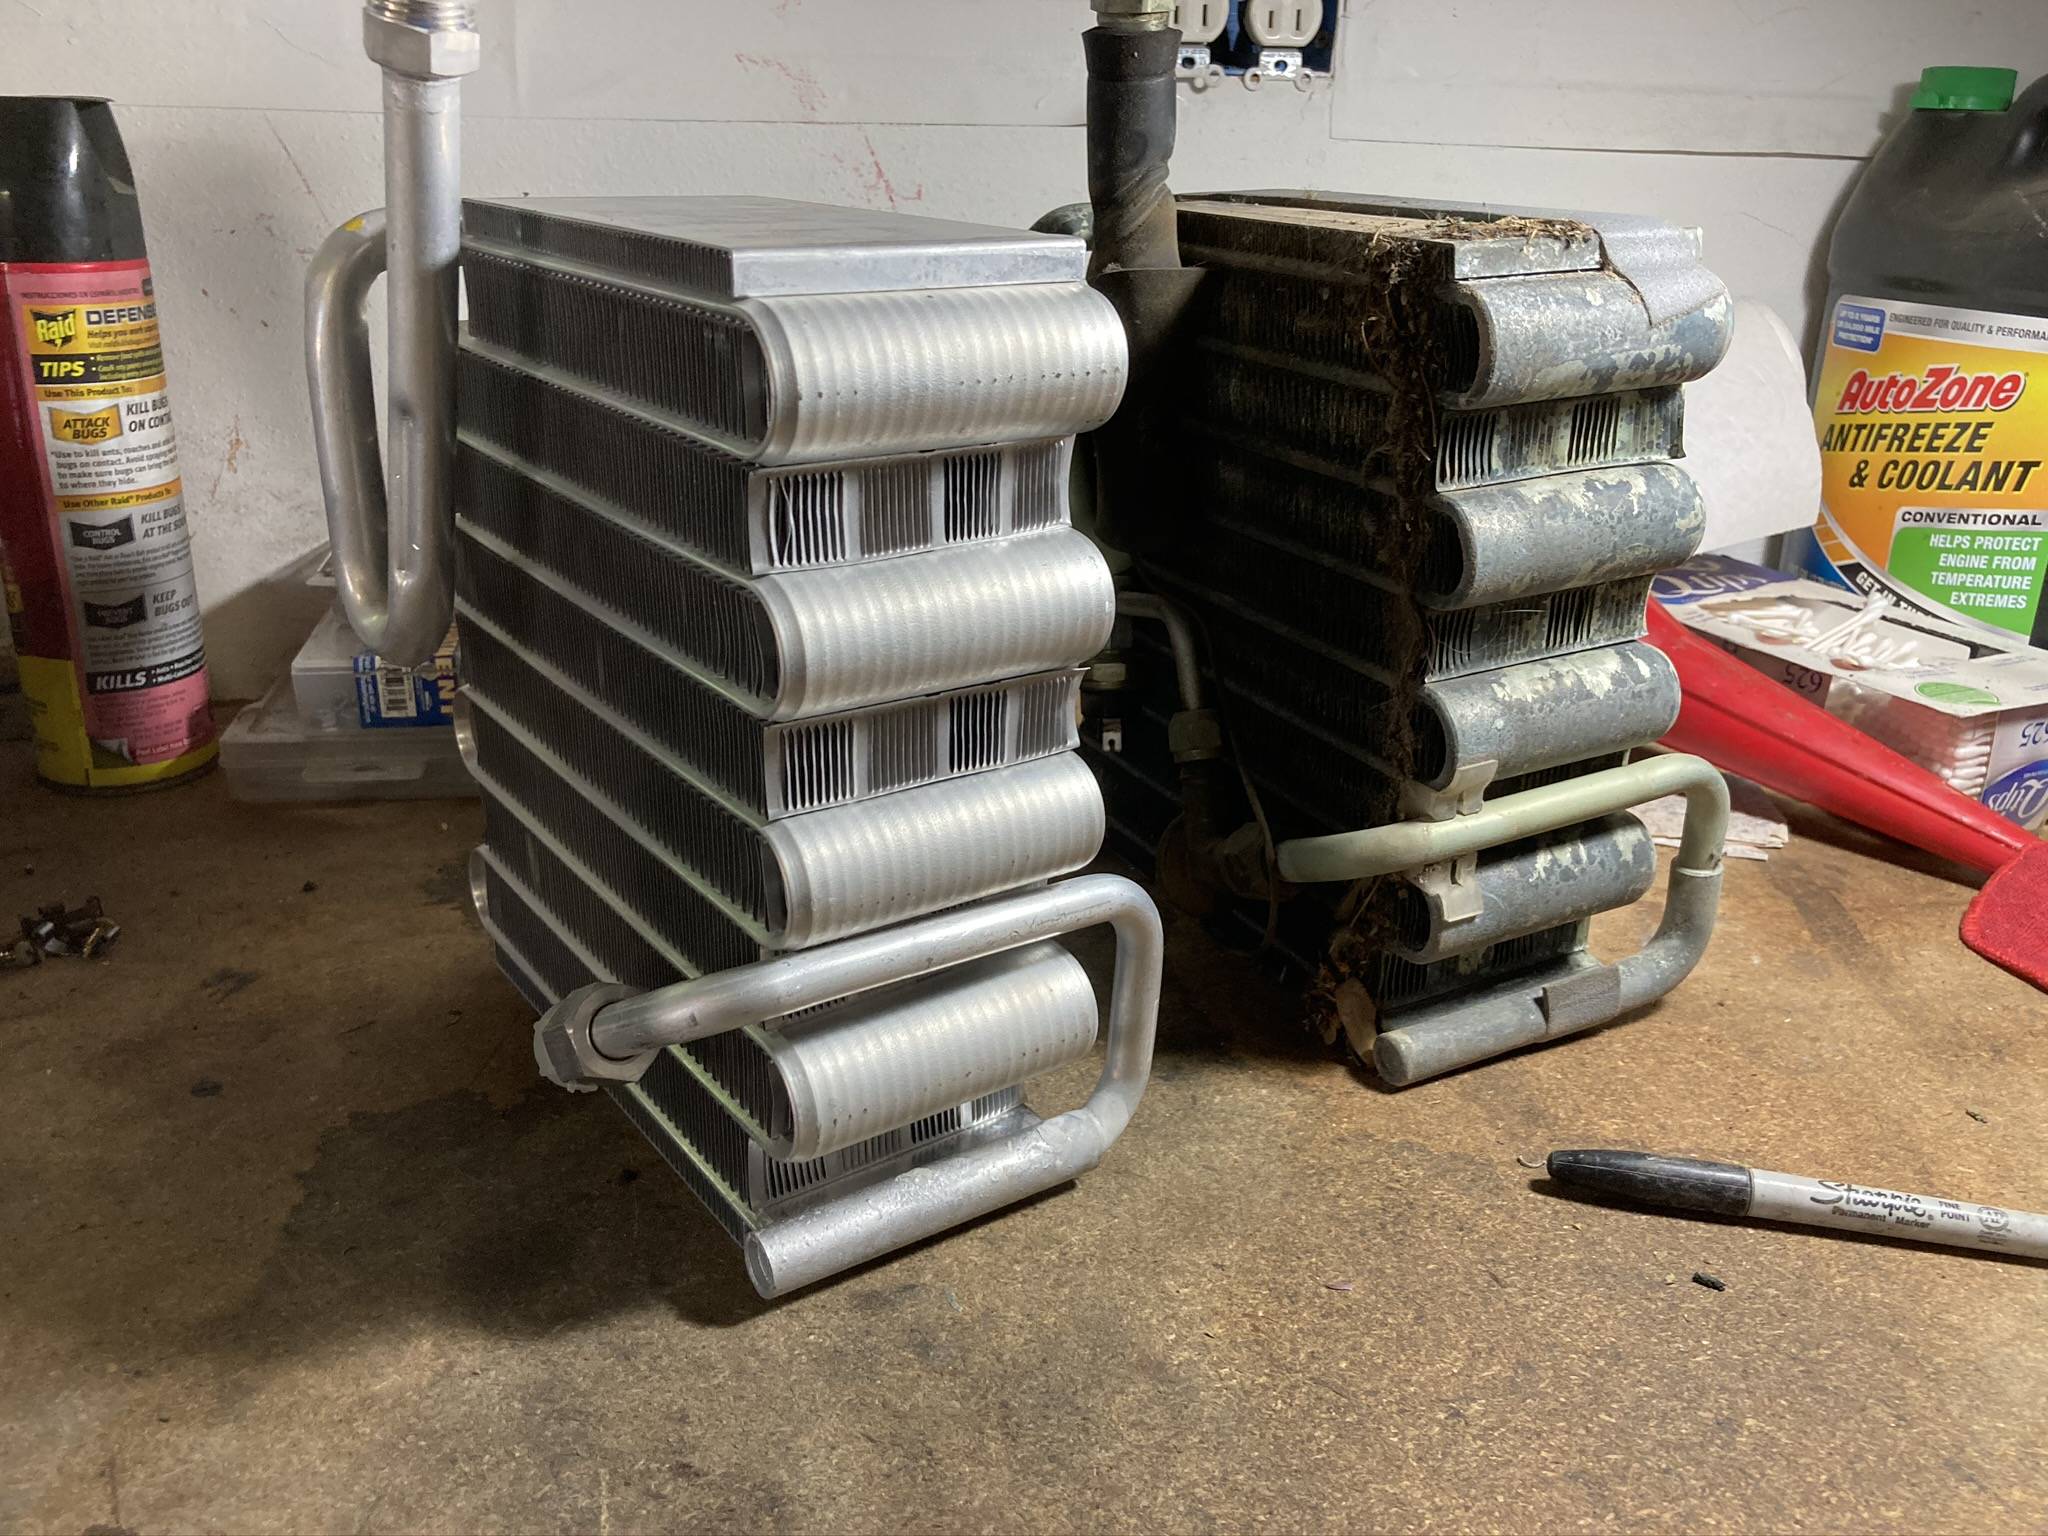
I went ahead and bought all new parts for my truck where I could. I probably didn�t need to replace the evaporator, but I decided that I don�t want to mess with this system for a long time.

Inside the evaporator box is the evaporator, expansion valve, low pressure switch & thermistor. There is also a small A/C line that goes off the expansion valve and to the outside of the box which you need to have.
The box can be taken apart by removing the 4 screws and clamps on the sides of it. The box will split in half where you will see the evaporator and all it�s components. Compare the old evaporator with your new one to make sure they are the same.

Unplug the low pressure switch & remove the thermistor.
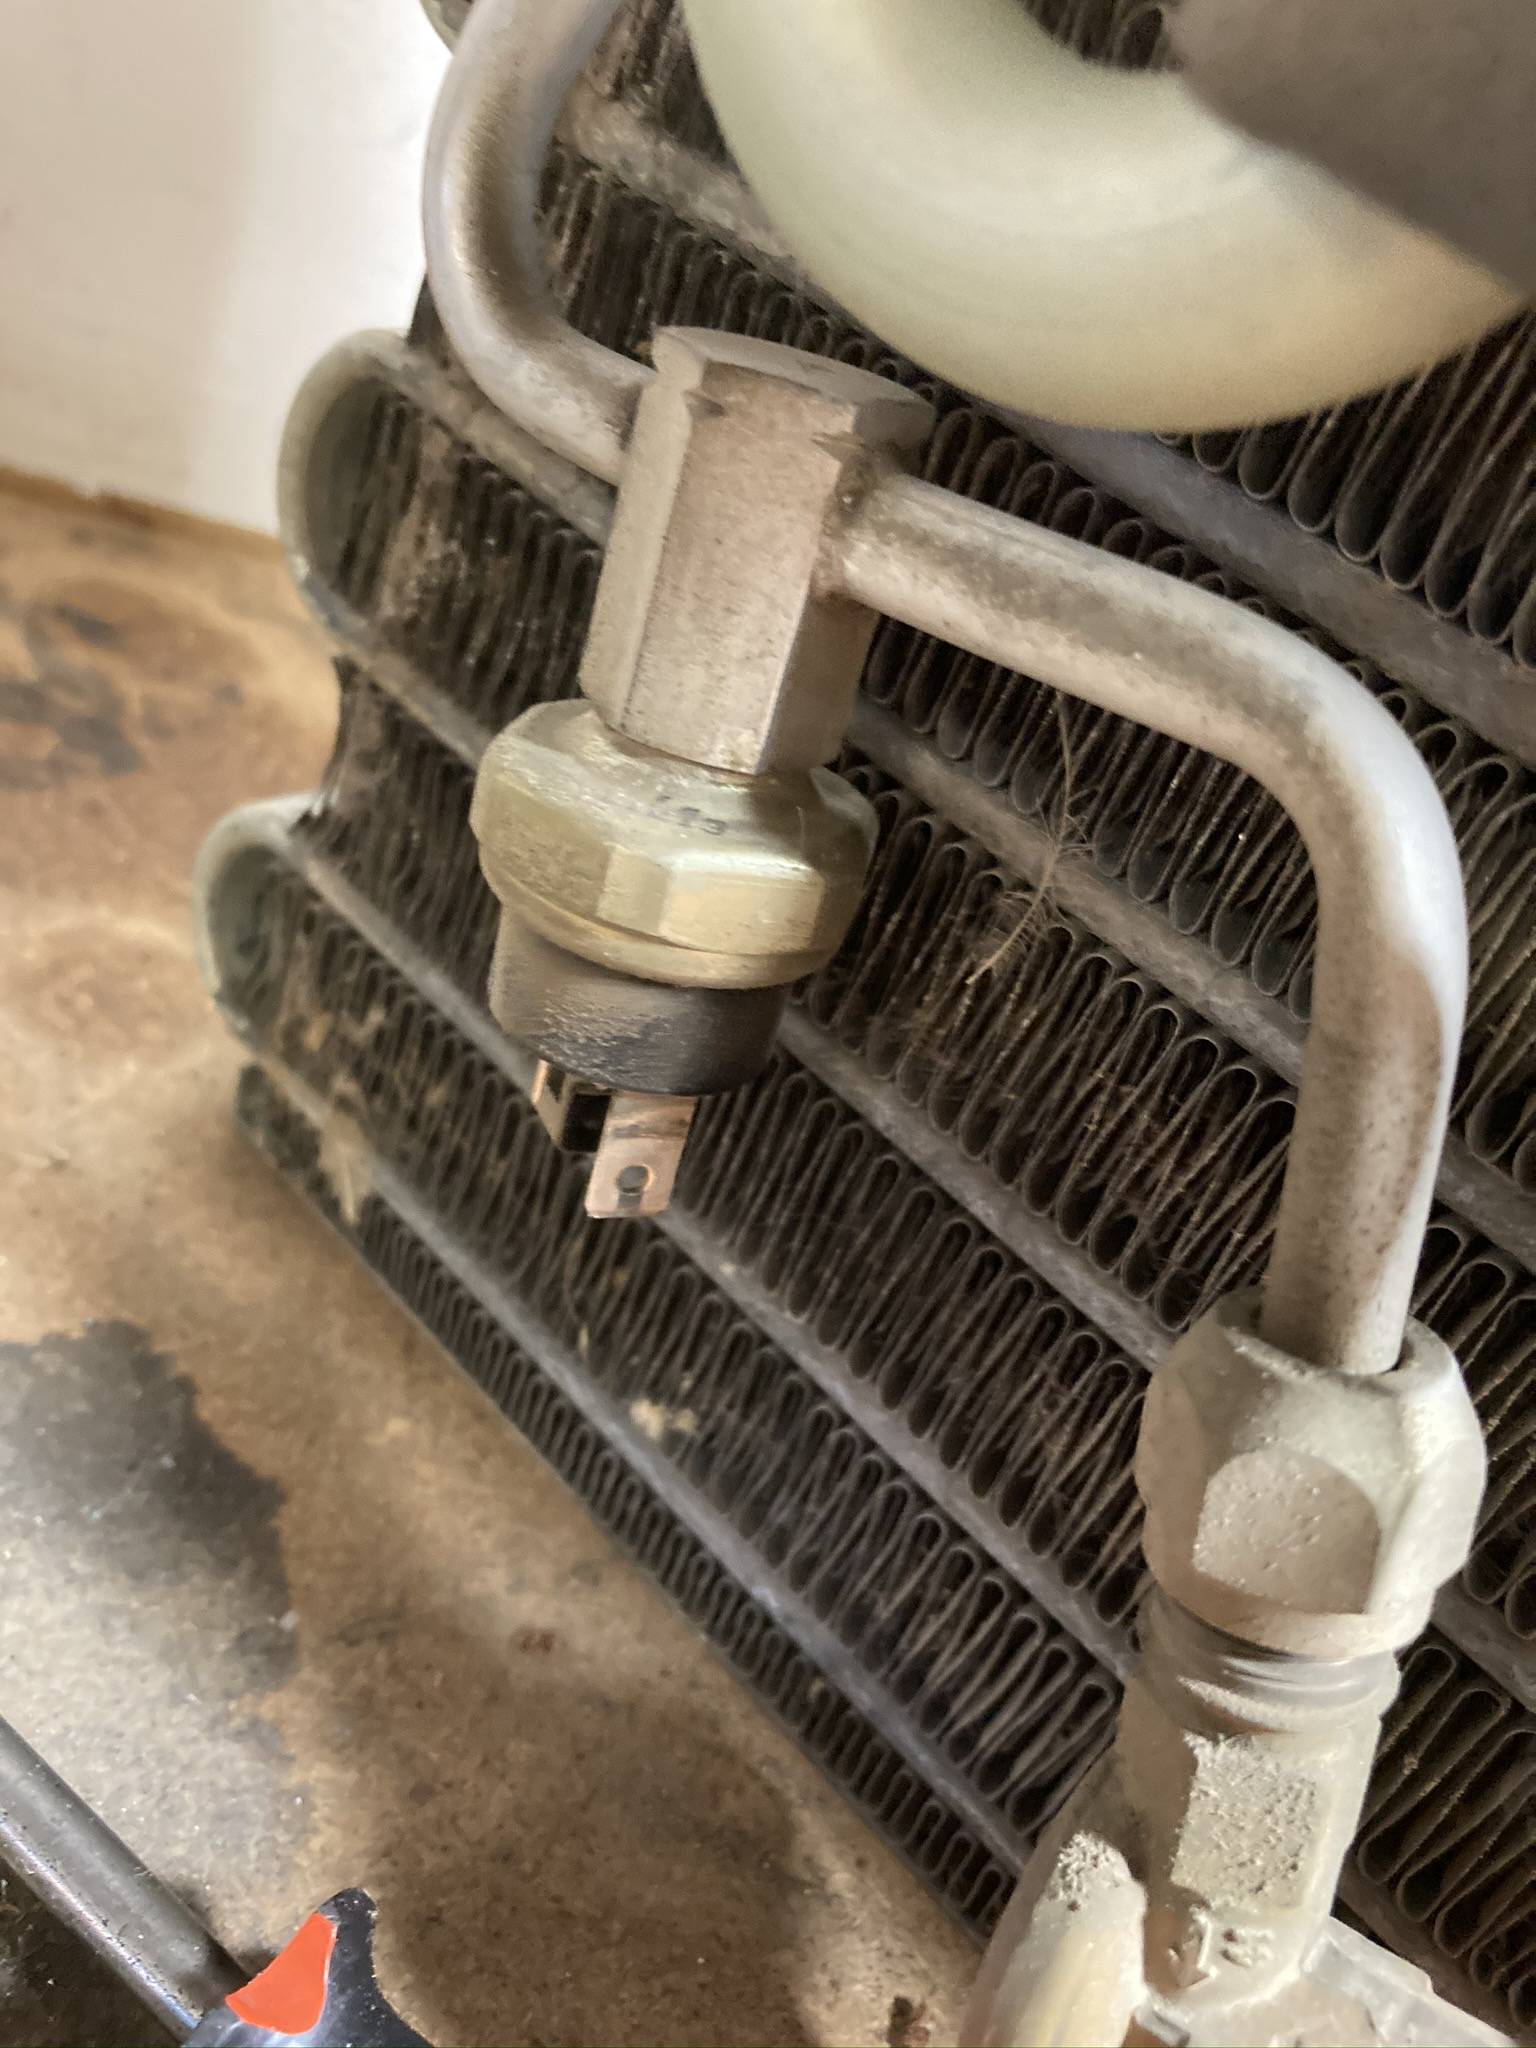
Disconnect the metal hard line from the expansion valve. With the line disconnected you can easily remove the pressure switch.
Remove the foam around the larger hard line and remove the clip that holds the probe off of the old expansion valve.

Install the new expansion valve onto the new evaporator and attach the probe to the large hardline of the evaporator. The one that I ordered did not have any protection on the probe and the old one did (to protect it from rubbing through the A/C line) so I just put some heatshrink on it and clamped it in.
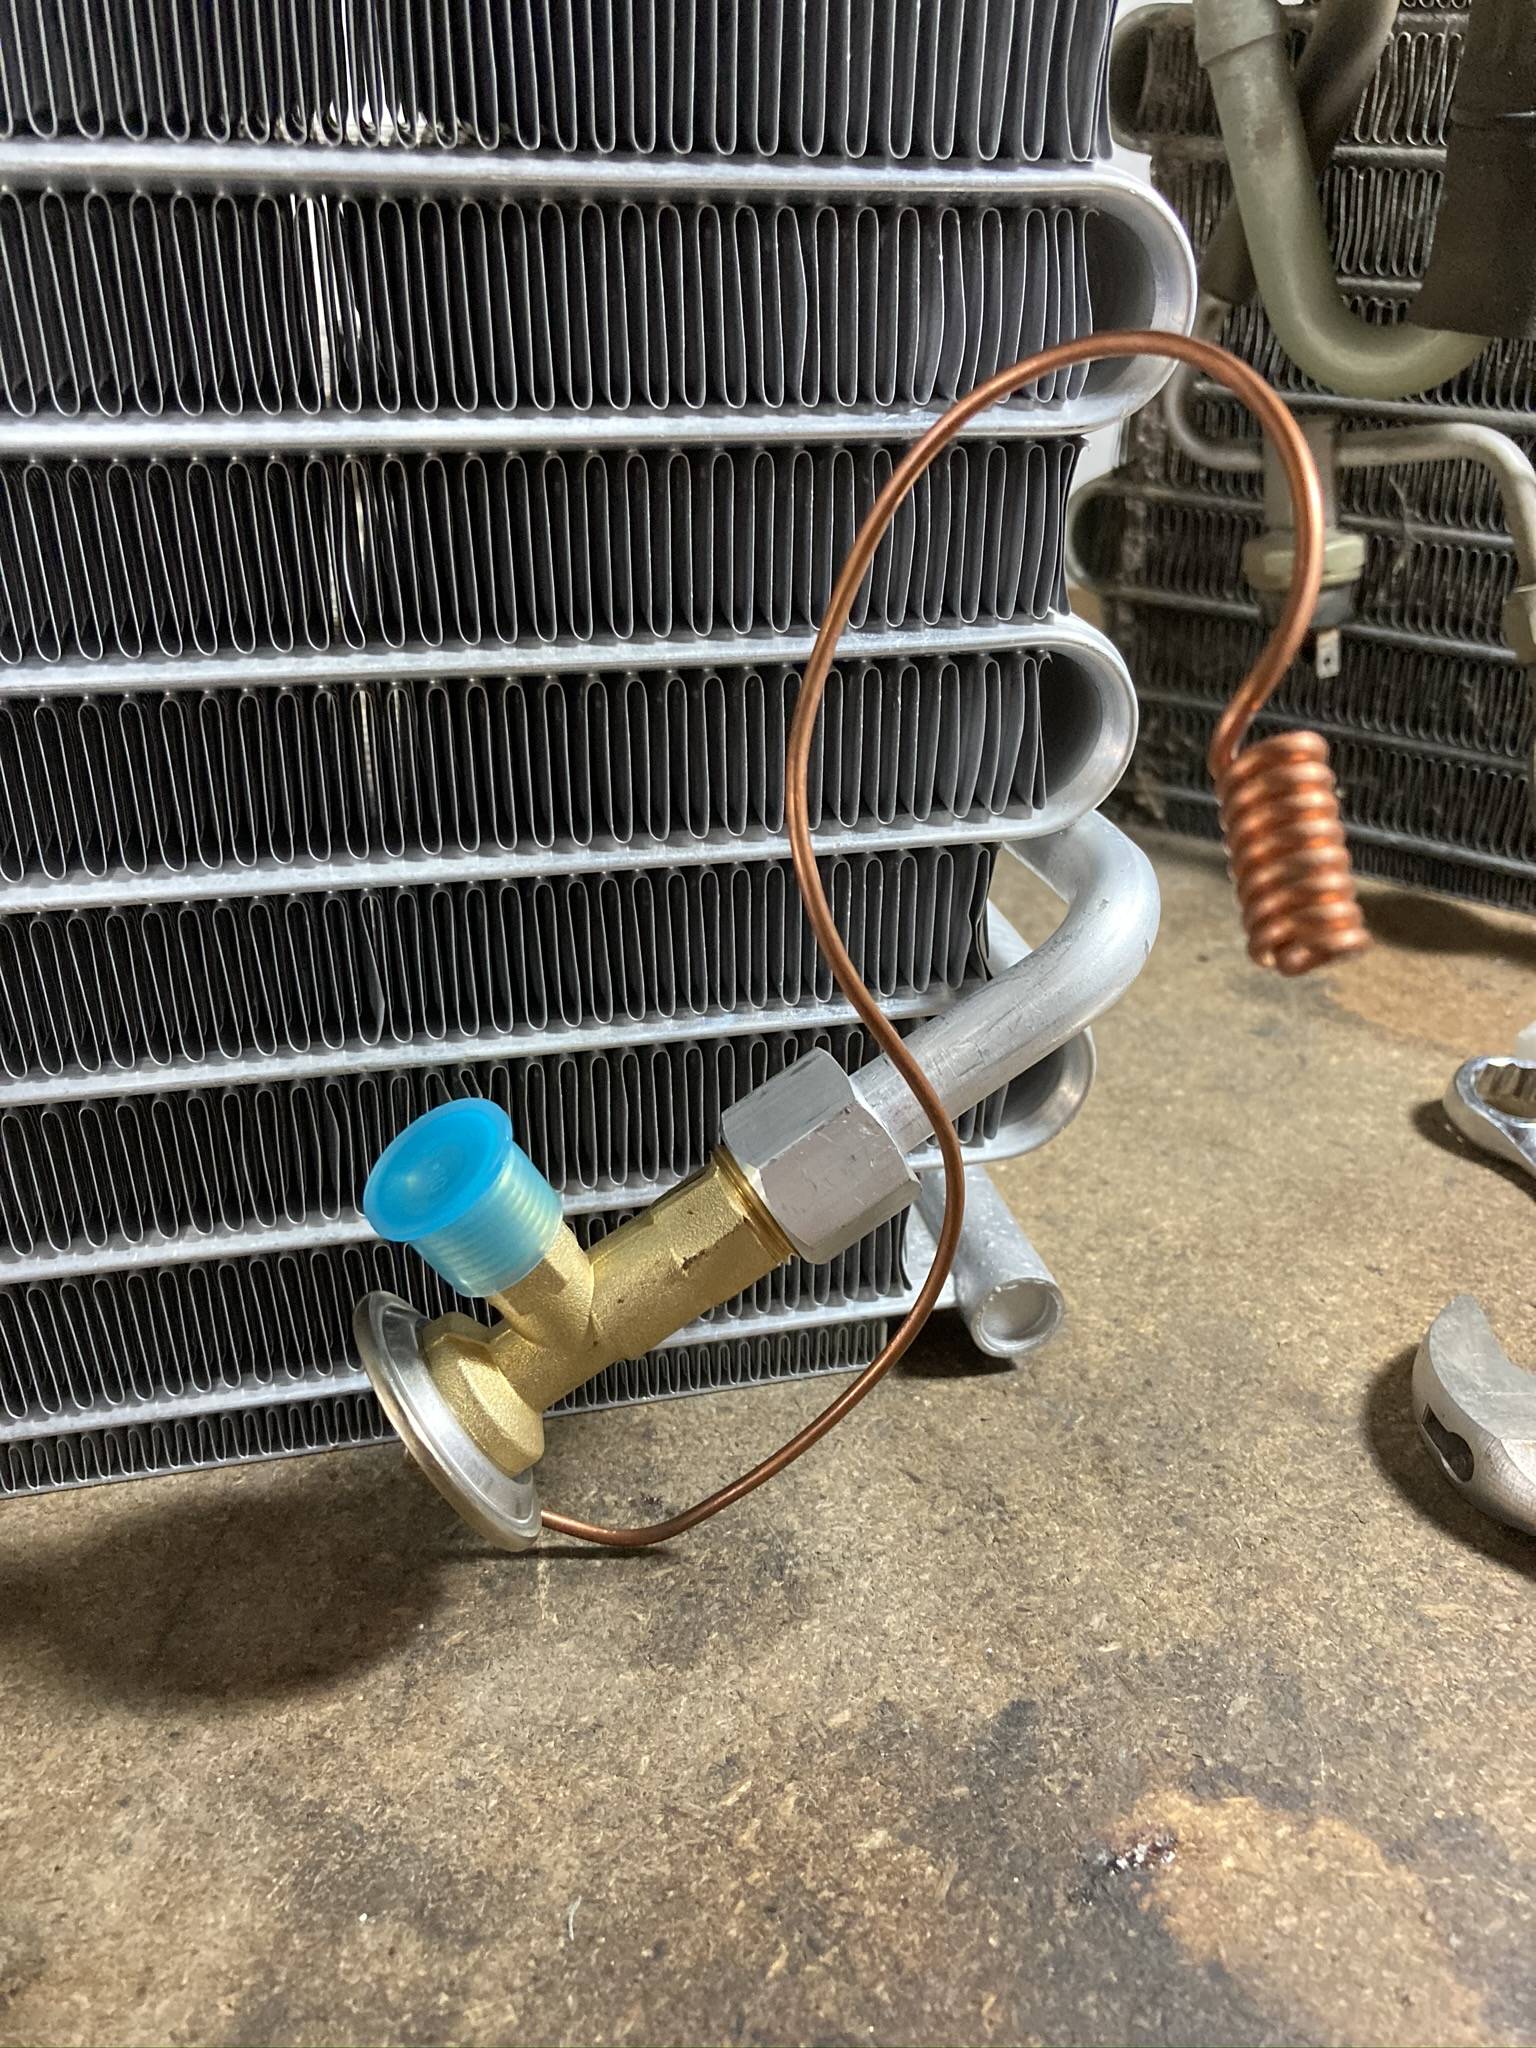

I also had an adapter that came with the expansion valve to fit onto the small hard line that holds the pressure switch which was also replaced. (You can see it above). Clean the inside of the plastic evaporator box and remove the amplifier on top of the box and check to make sure there is nothing wrong with it.
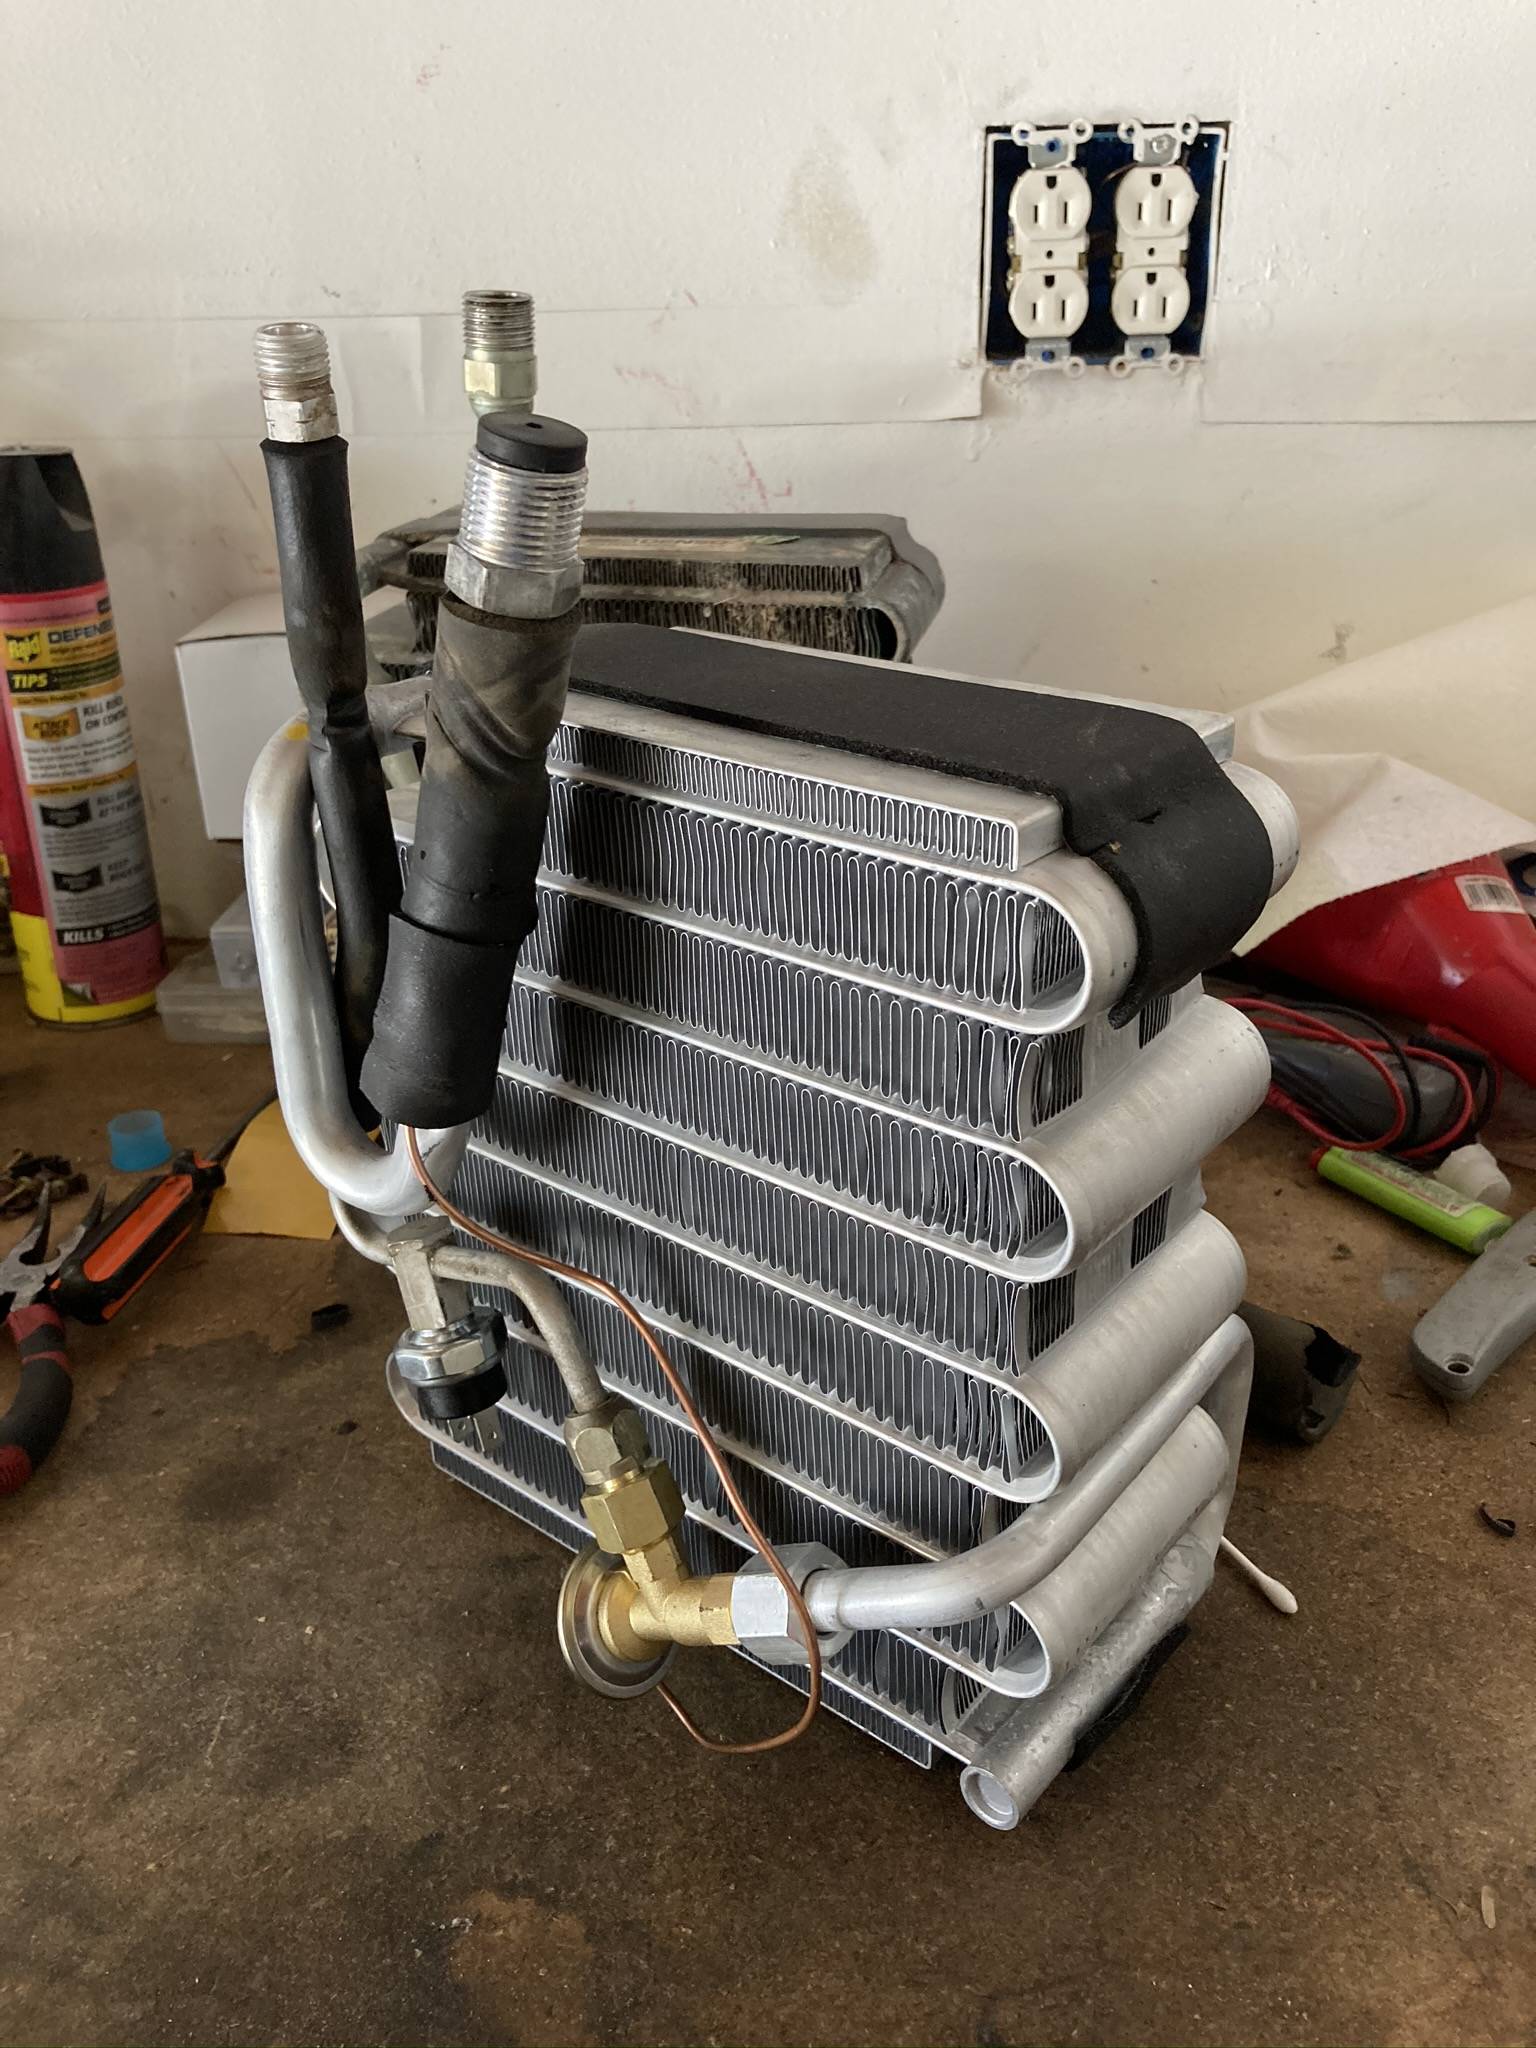
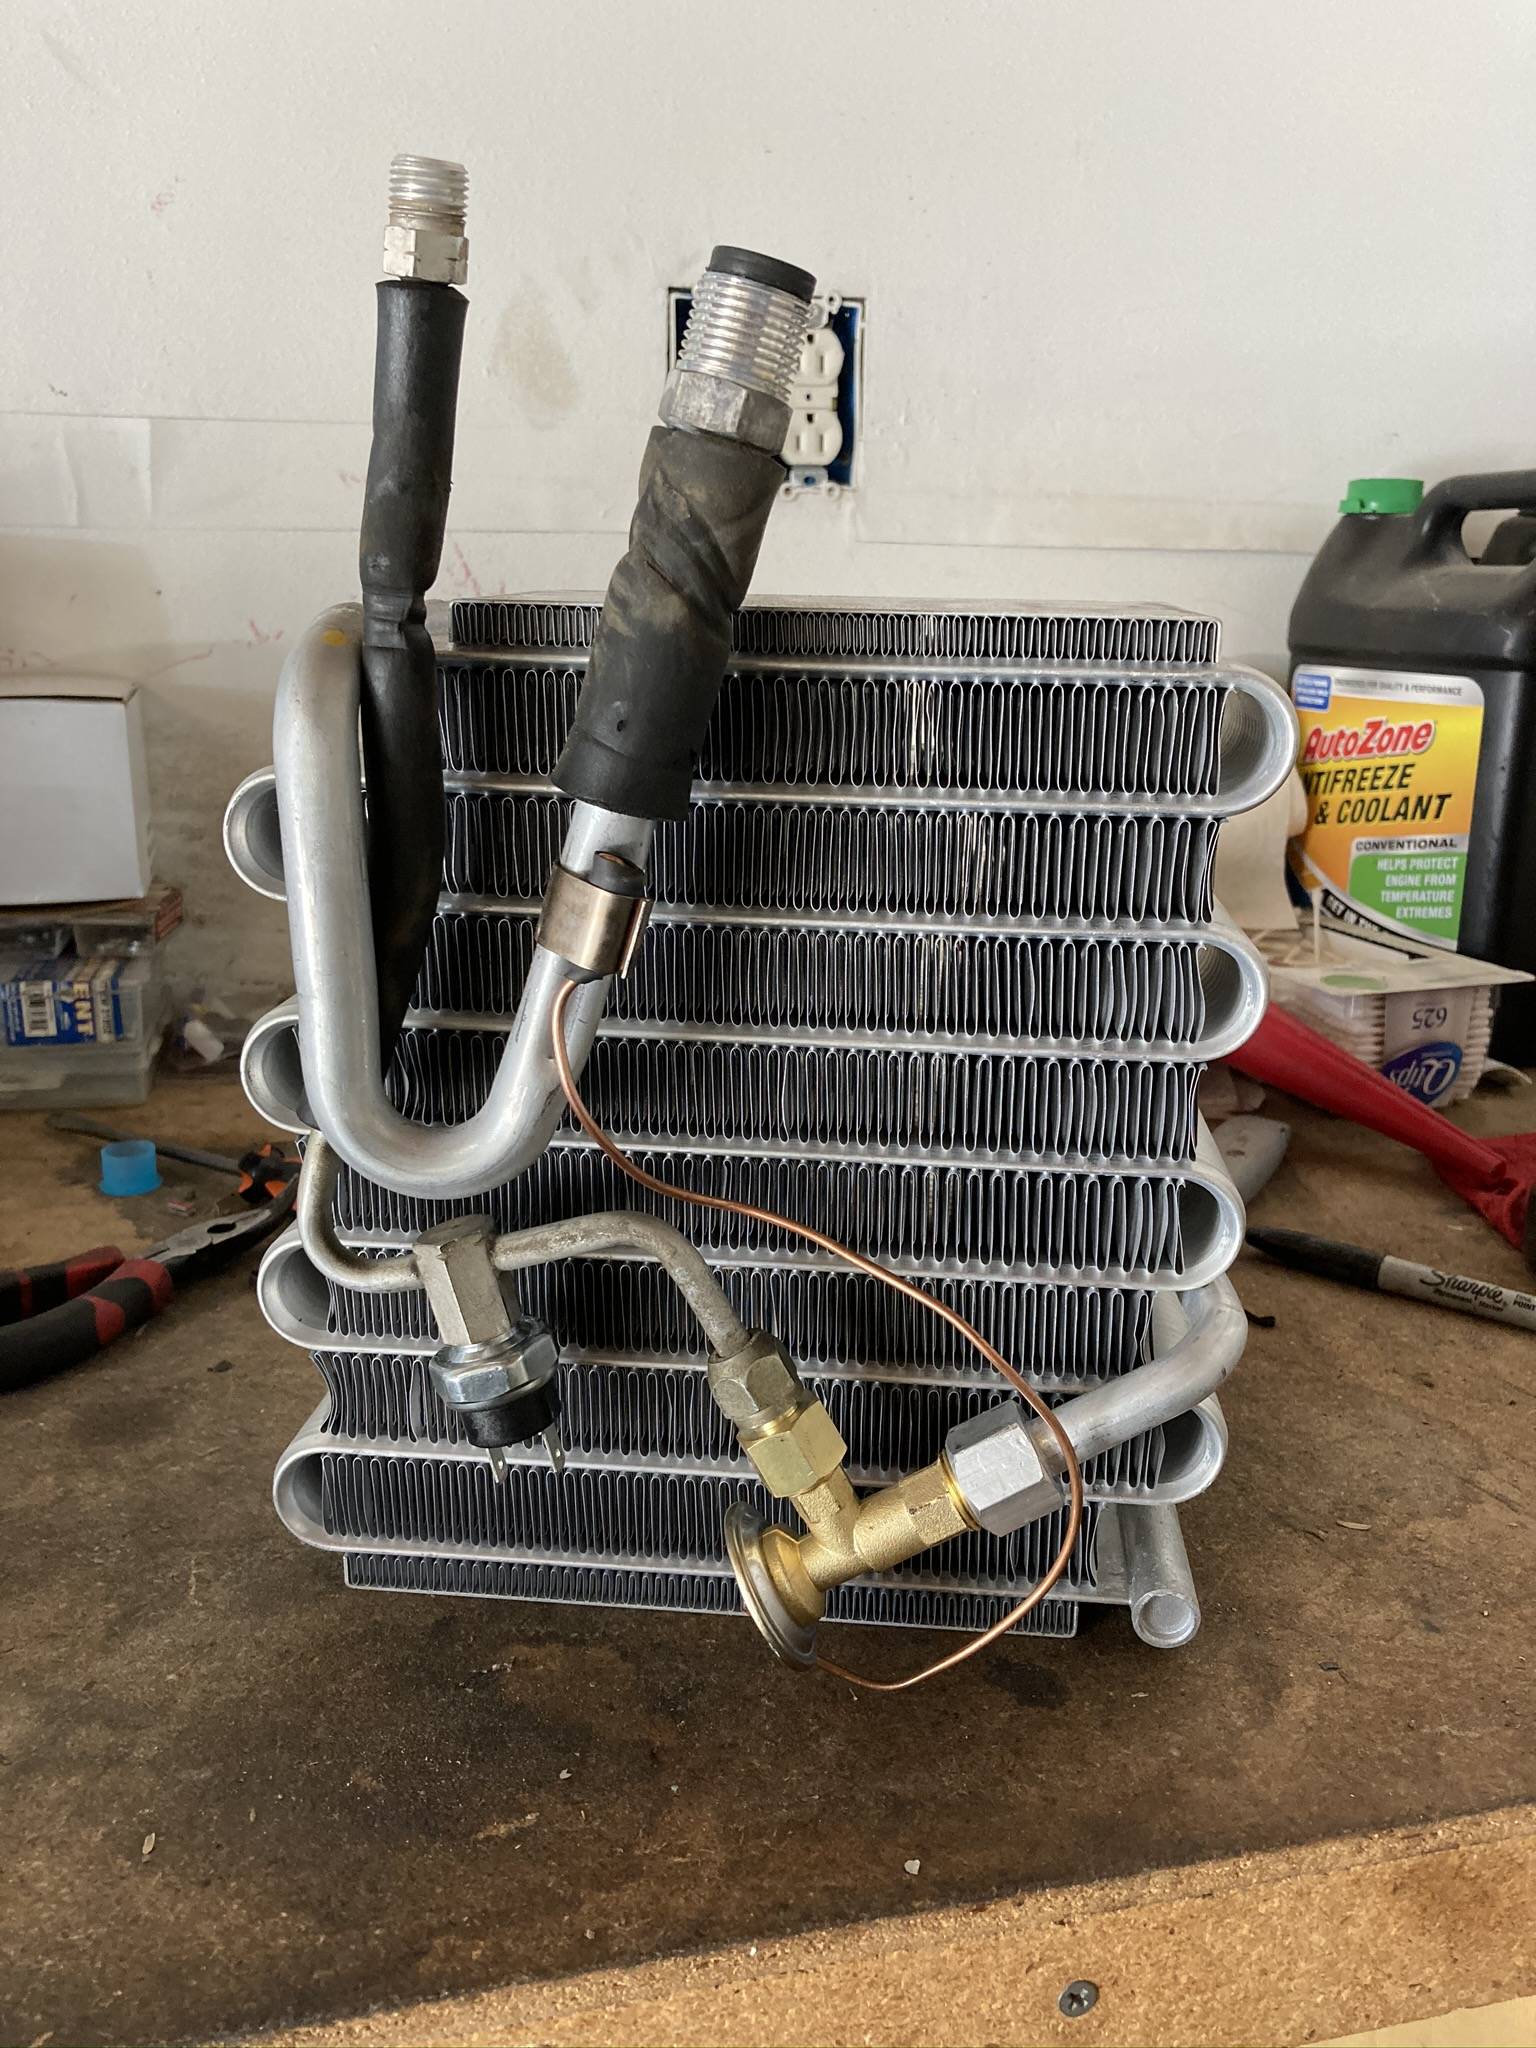
I put new foam on the top and the bottom of the evaporator and also re-foamed the hard line with the expansion valve probe. From here you just need to put it back together and get it ready to install the truck.
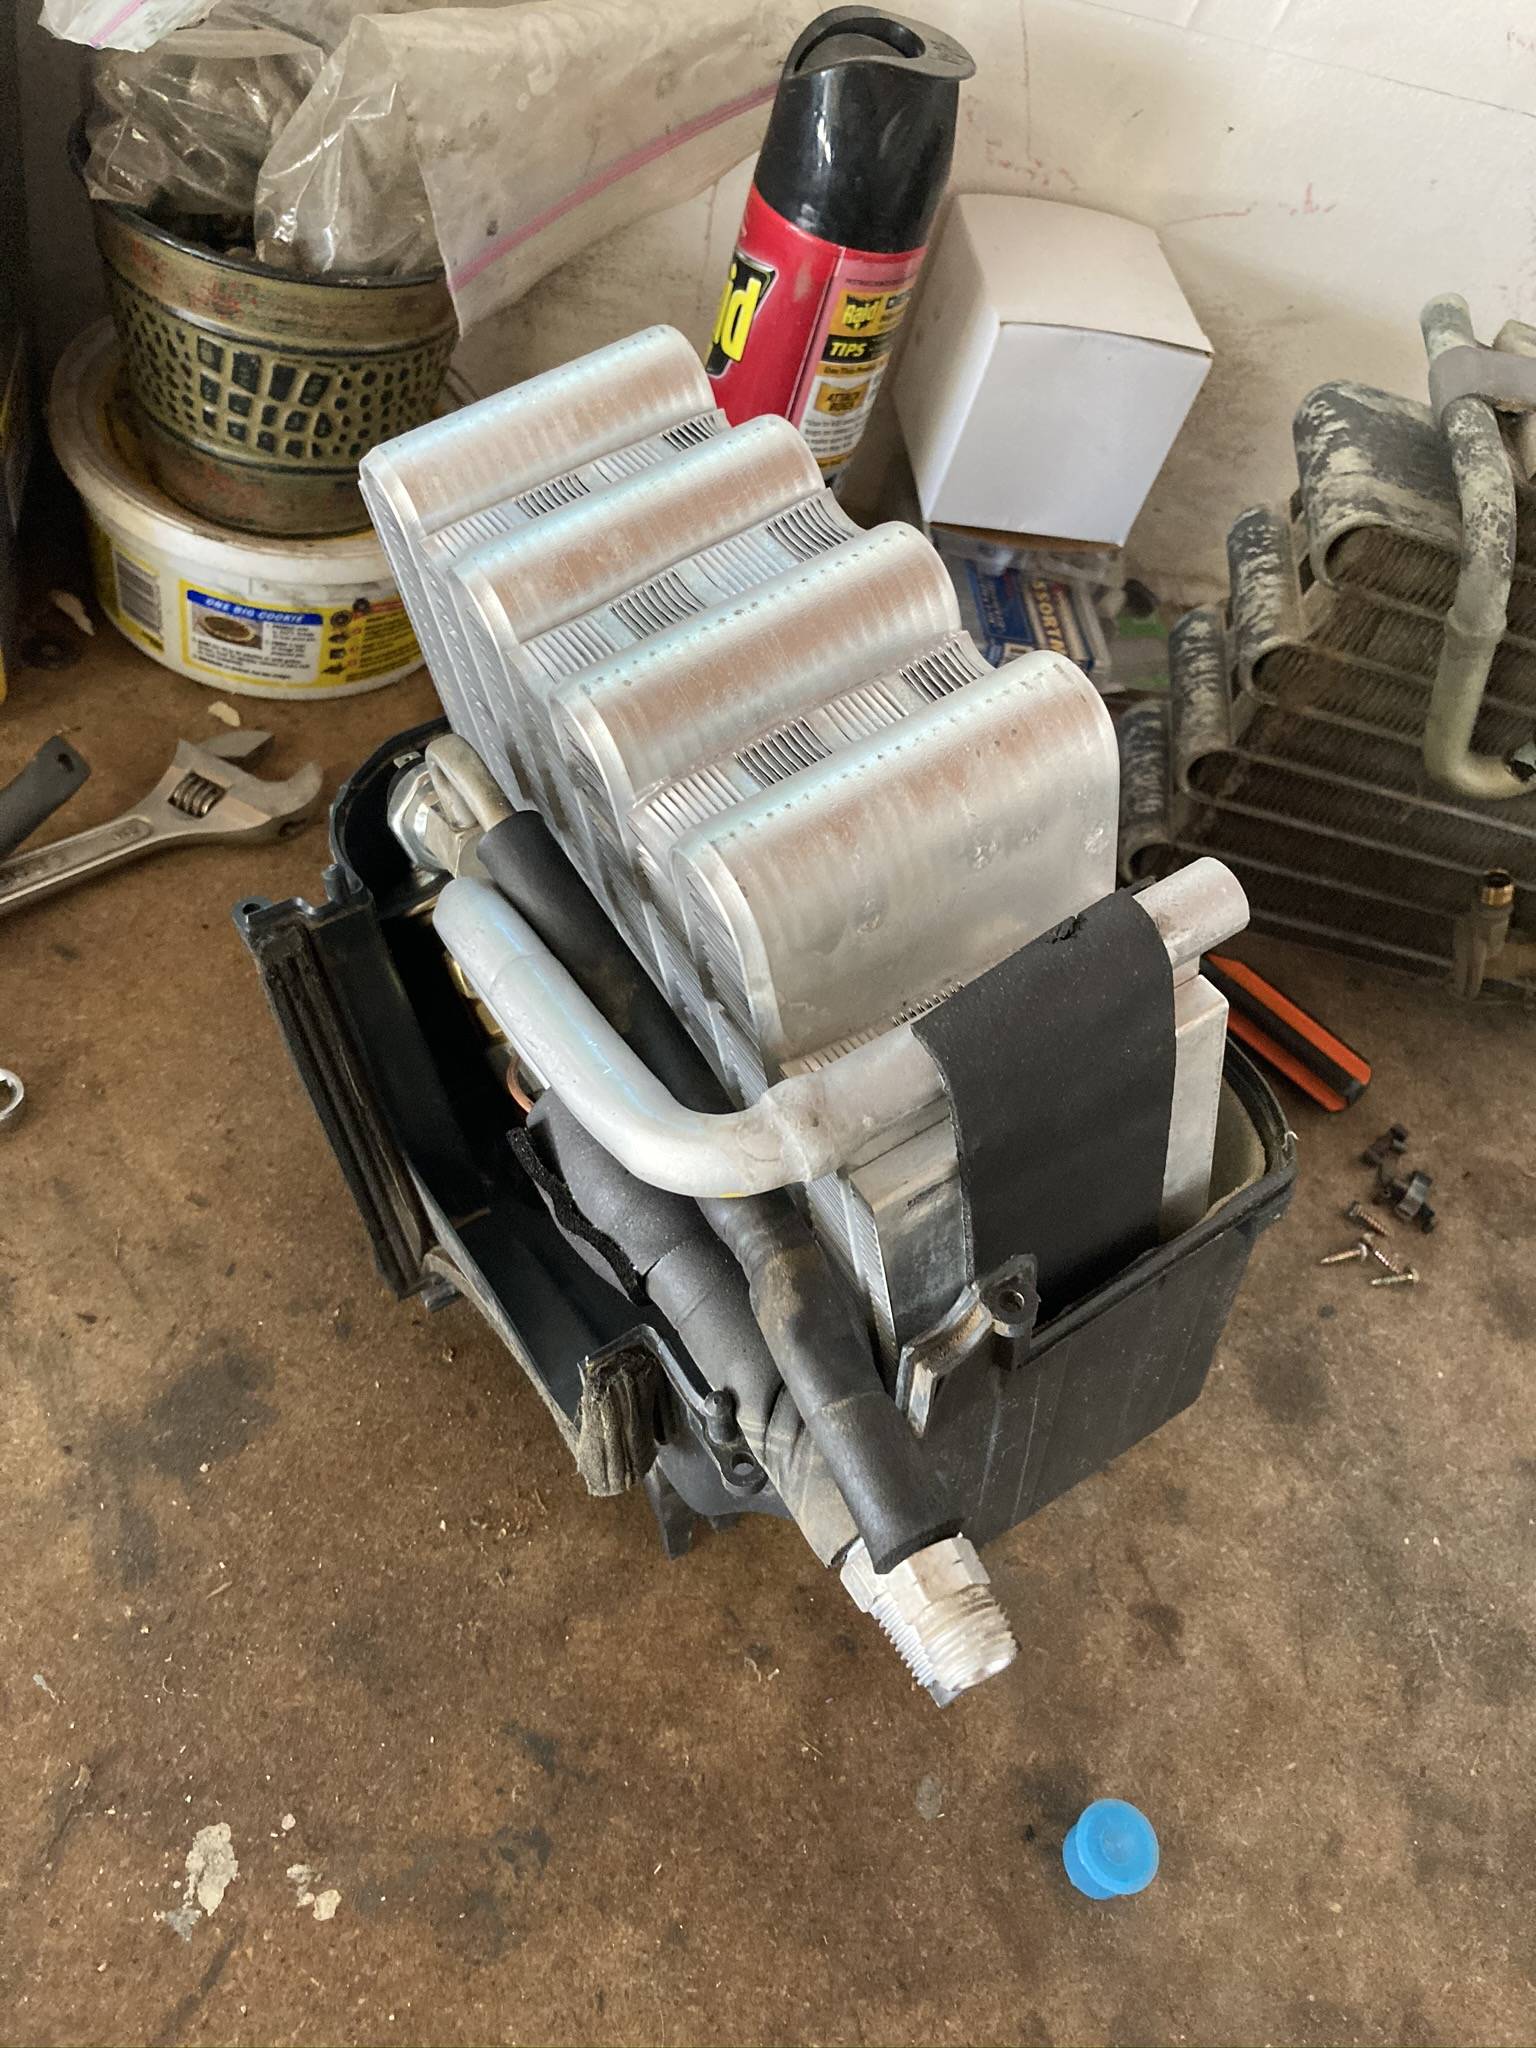
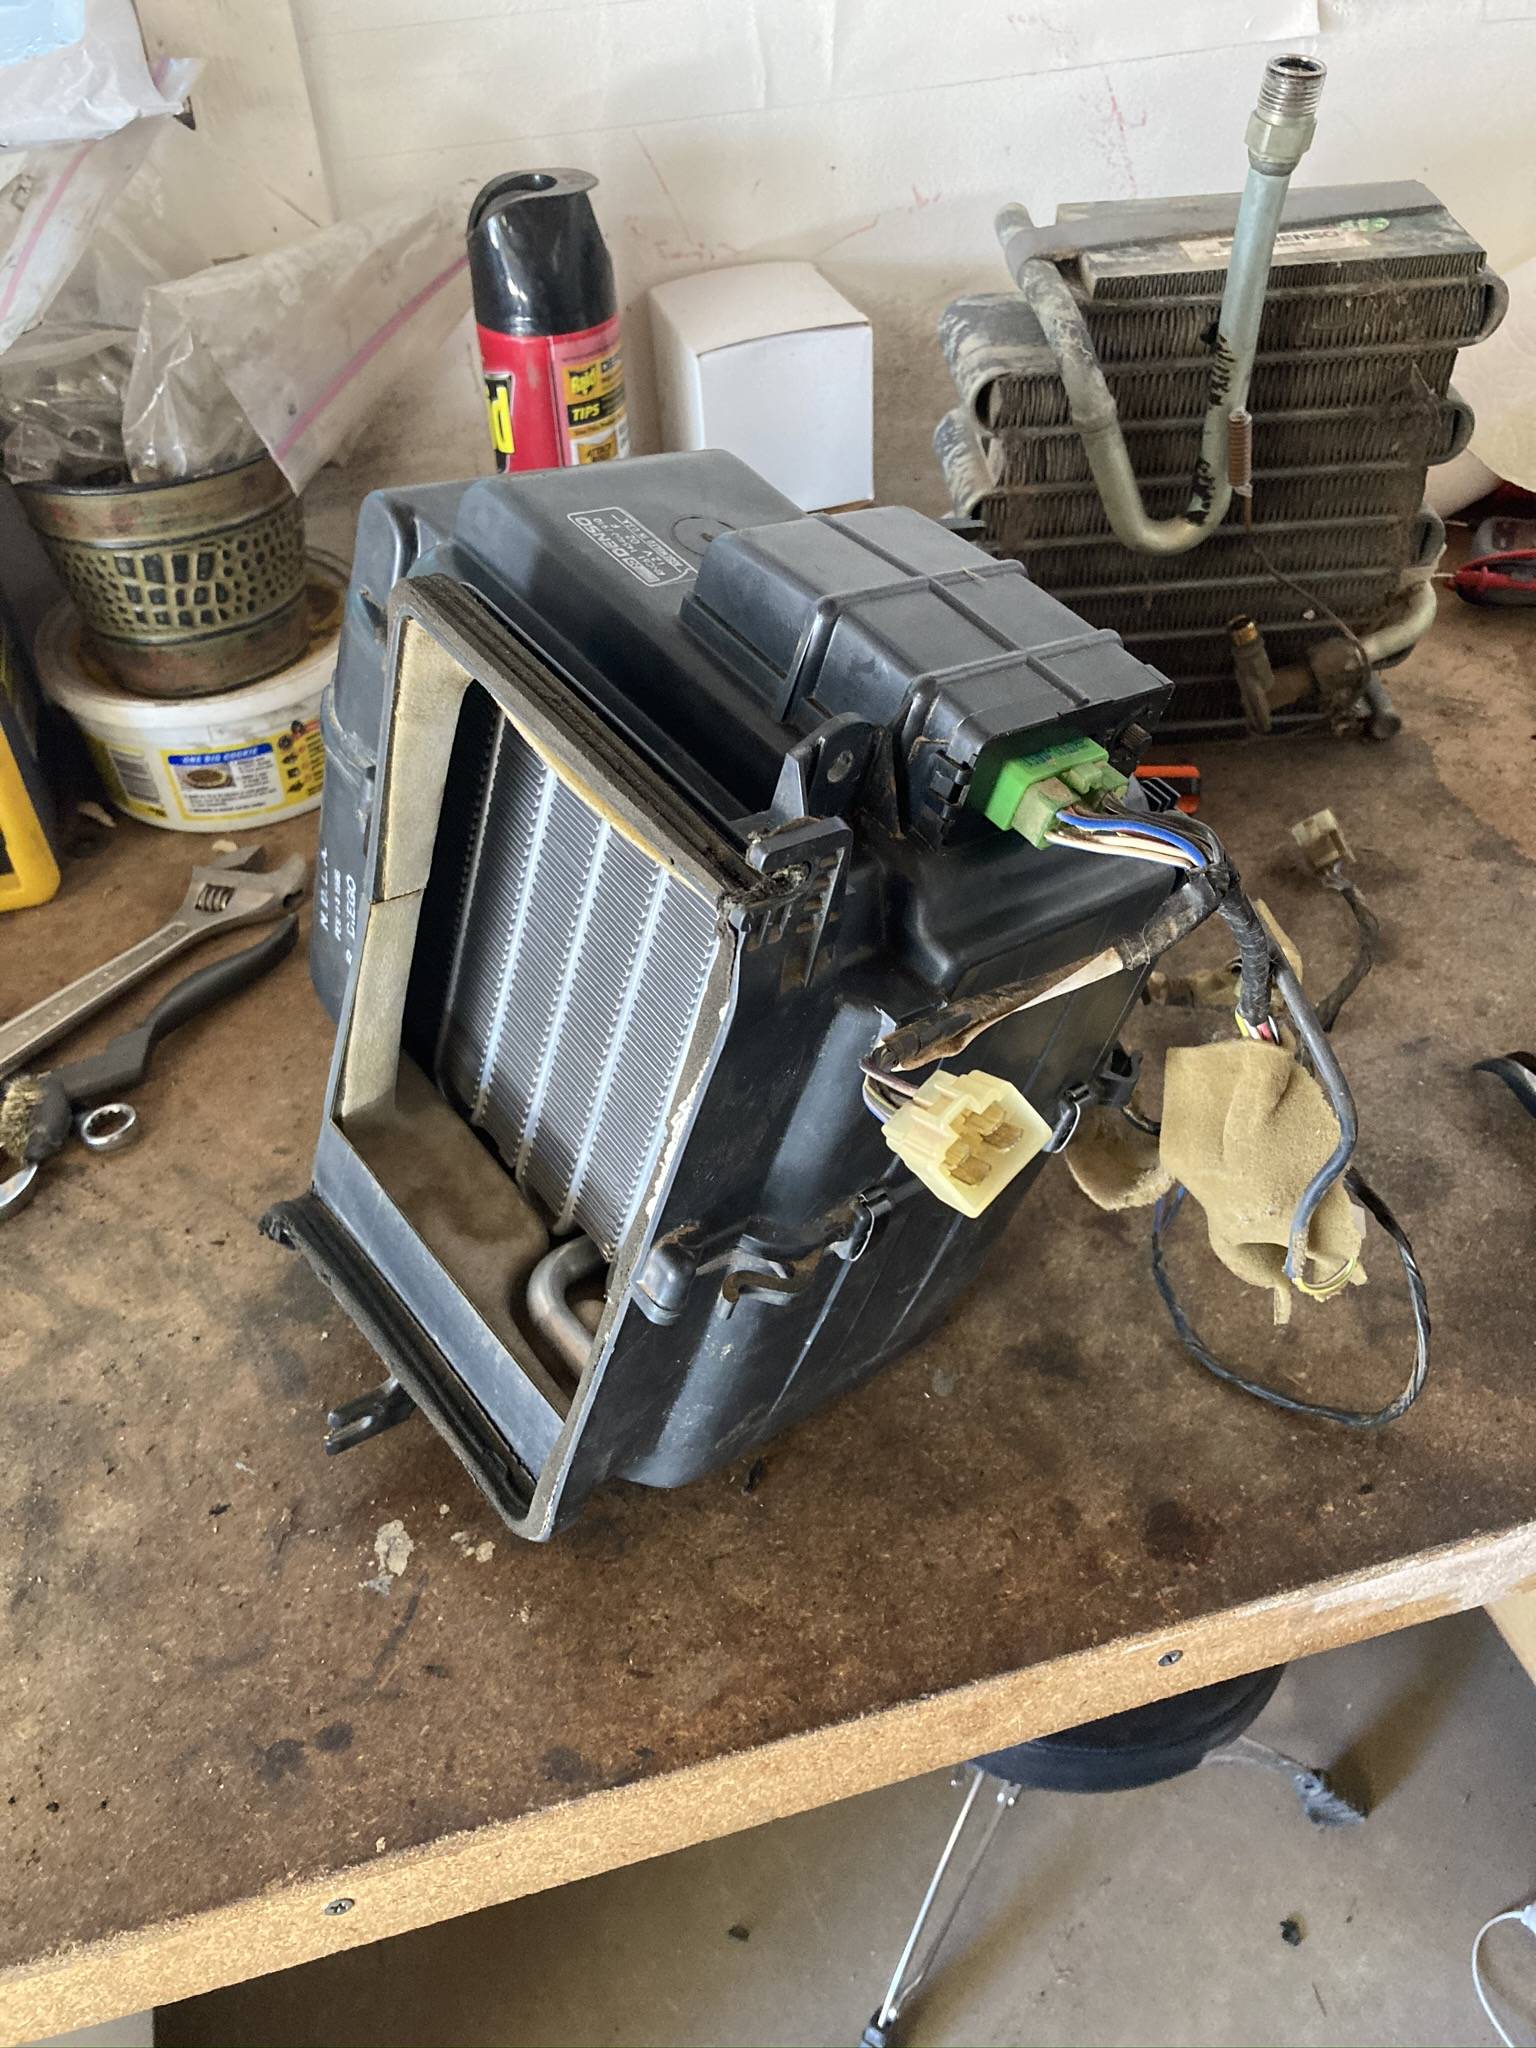
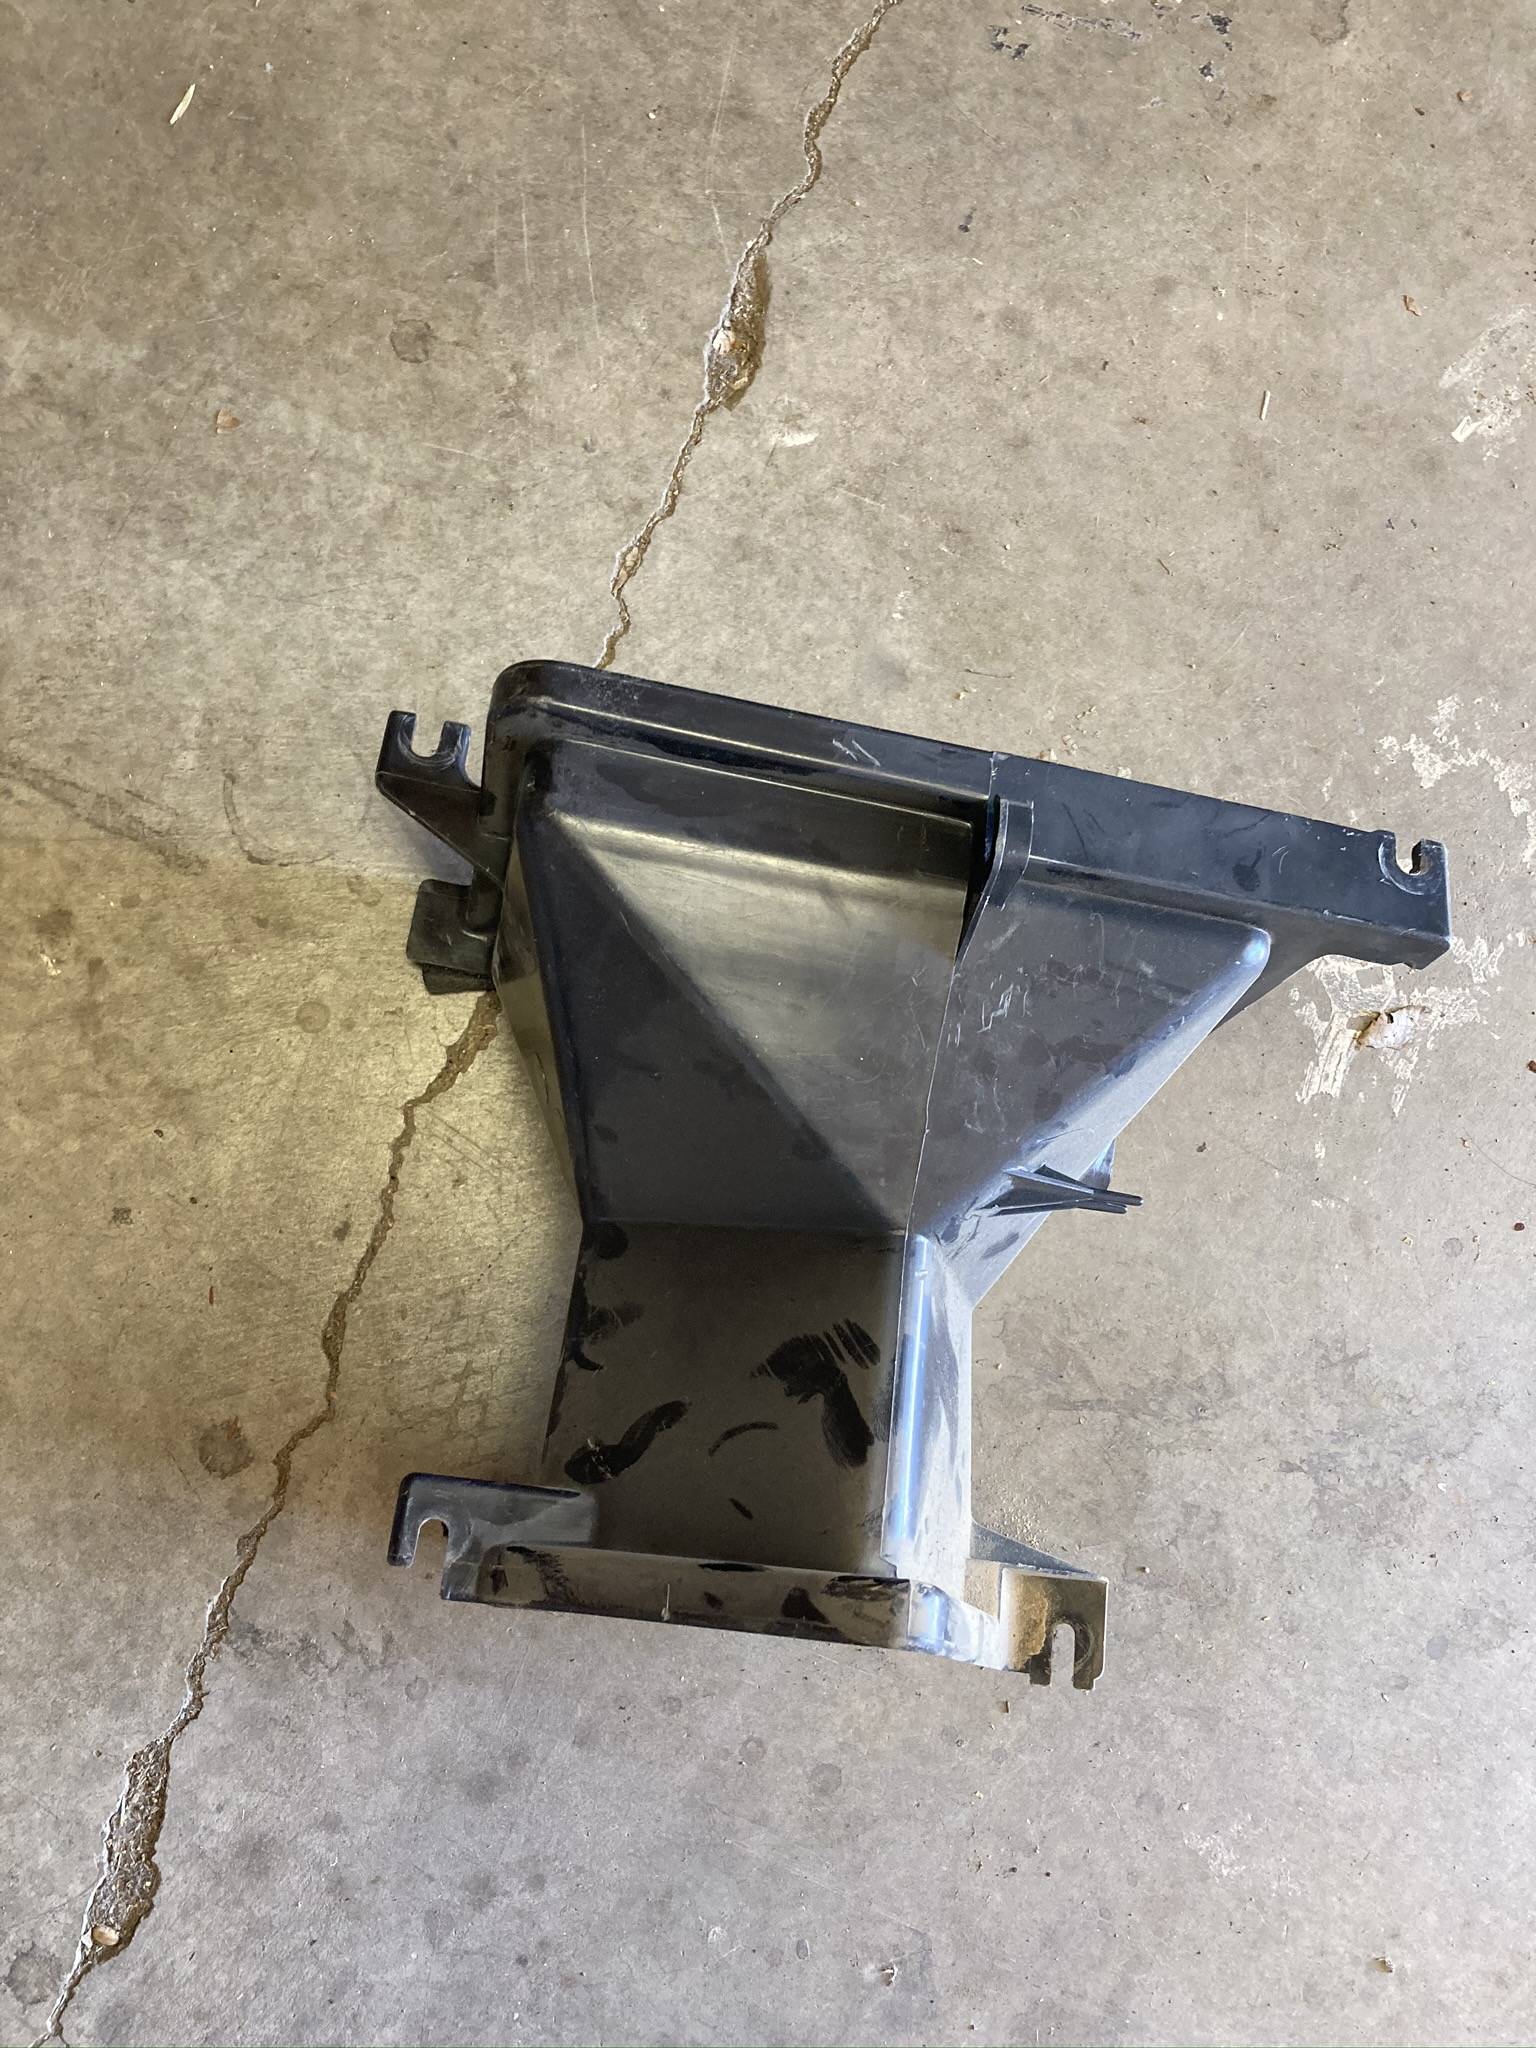
Inside the truck there is a small piece of duct work that connects the blower motor and the heater core. The new evaporator will replace that piece and sit inbetween the two.
To get to this ductwork the glovebox & glovebox support needs to be removed.
Remove the ductwork with 4 screws. It should look like this when out of the truck.
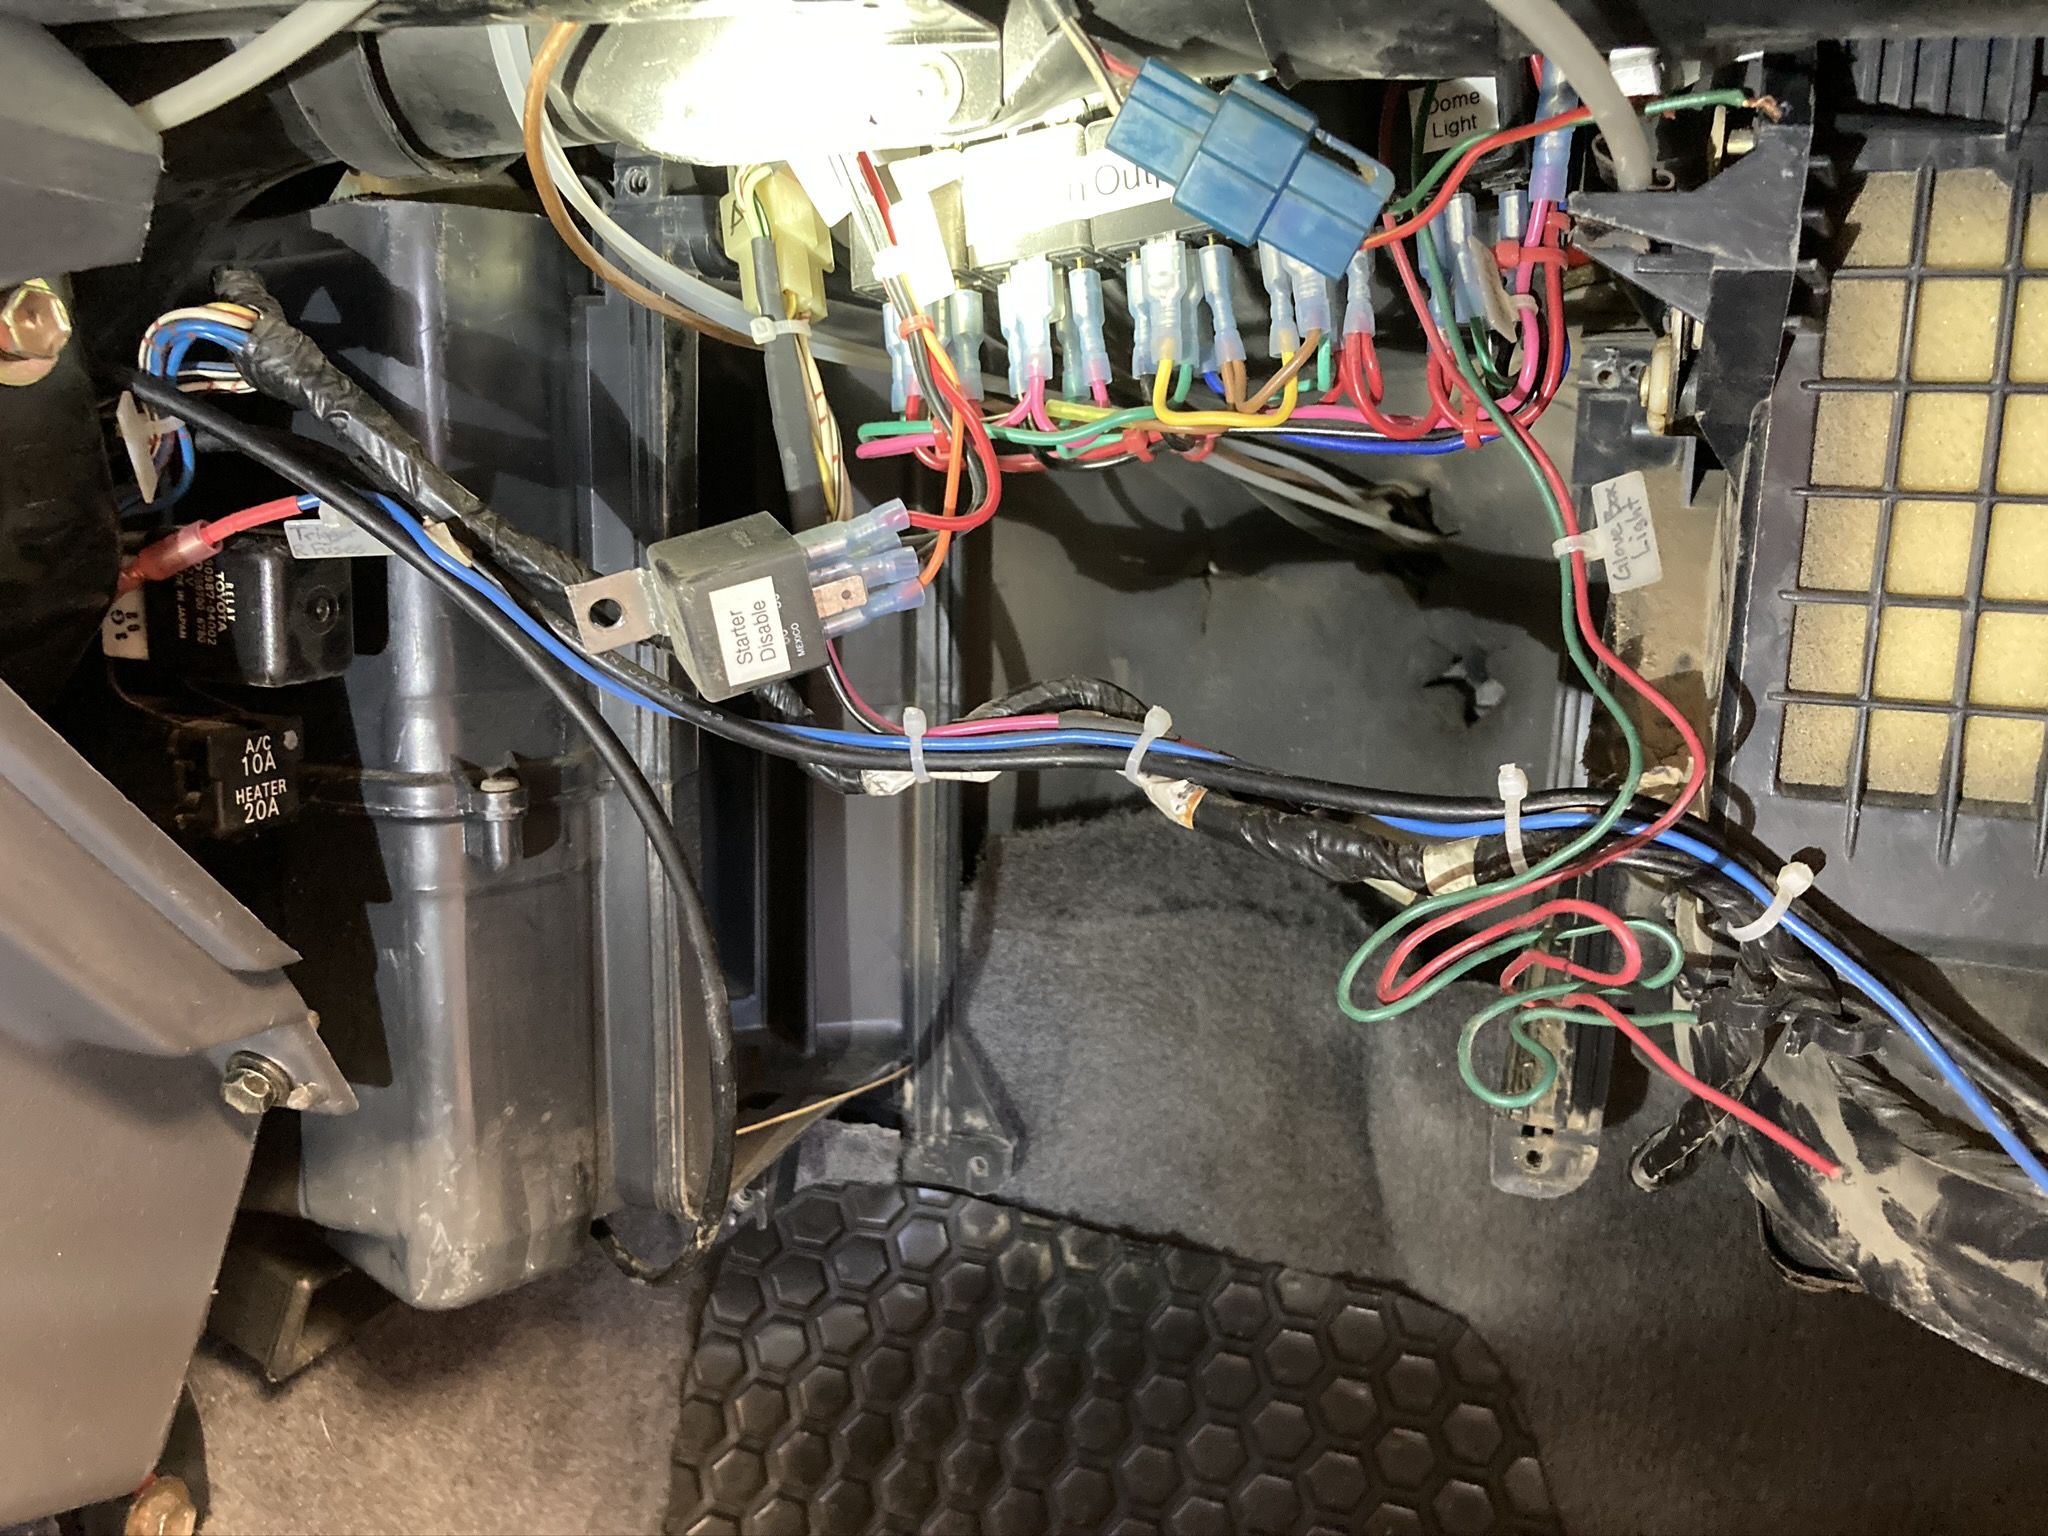
My truck used to have AC but was removed with the idea of an on board air system in it�s place. If your truck never had A/C you�re going to need to drill three holes � two for the evaporator & one for the condensate drain. There are factory dimples in all locations so you can center your hole drill. From the installation manual attached the hole should all be 32mm (1 ��).
Install the evaporator through your new holes & attach the condensate drain. Install grommets to keep everything sealed. I had to re-route all of the mechanical gauges since they were installed through the original evaporator hole. Unless this has been done on your truck too, then you can skip this step.
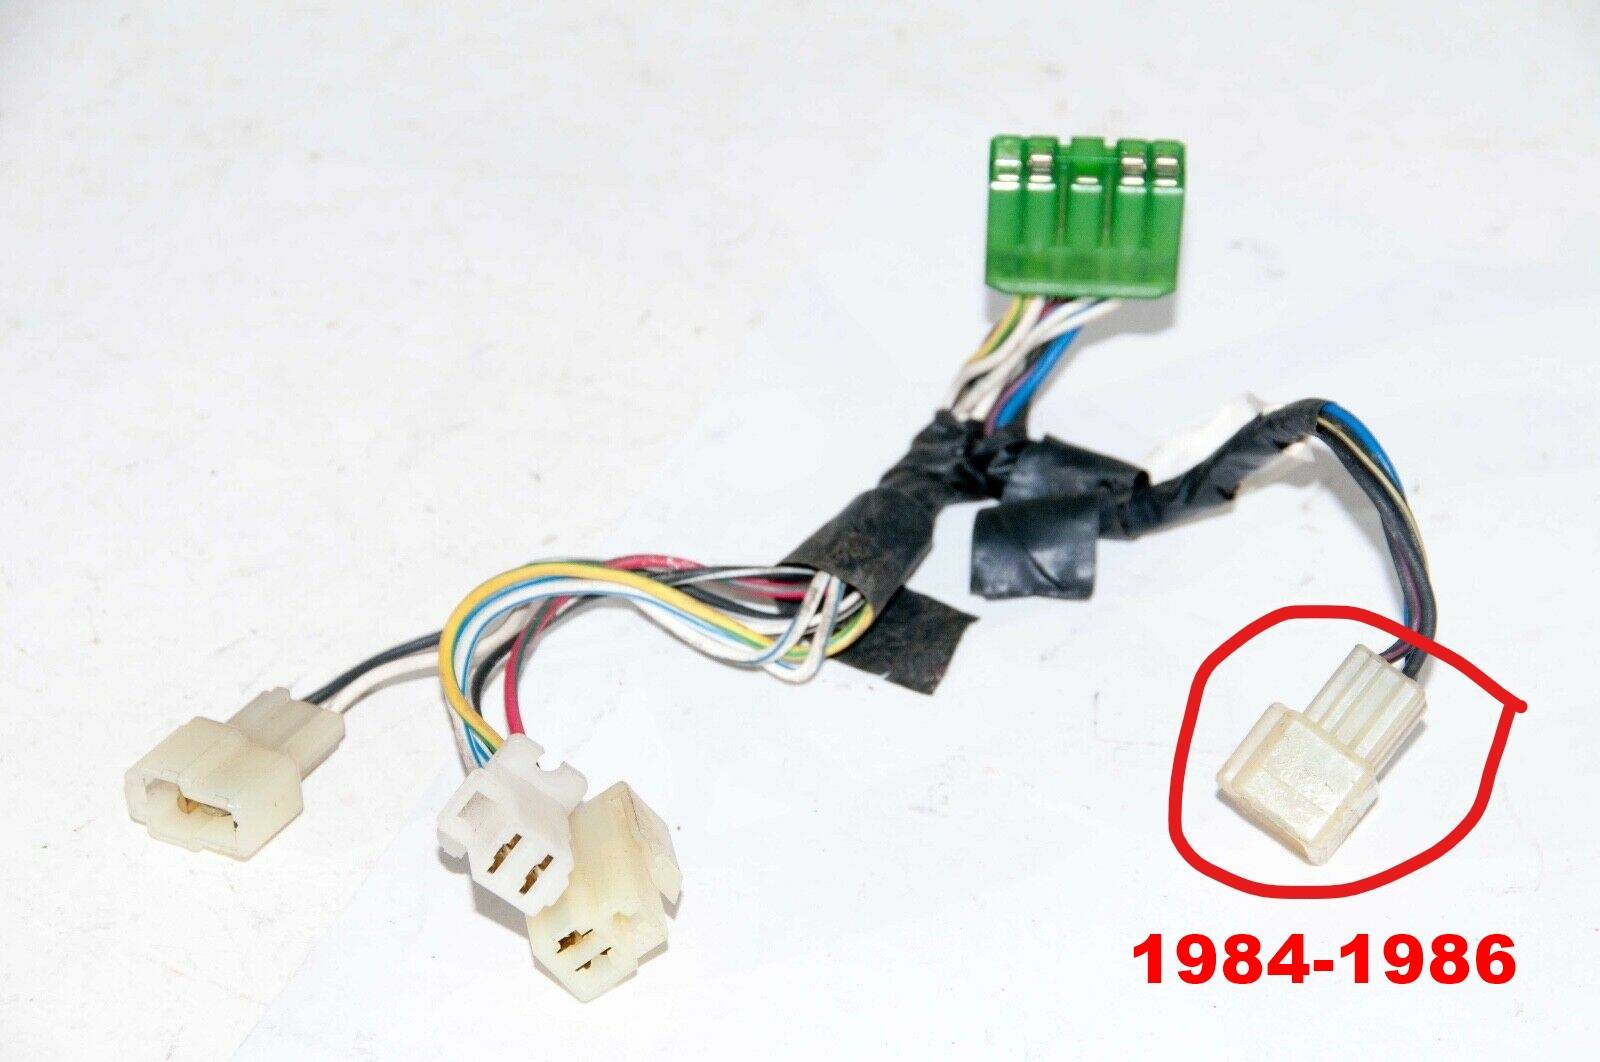
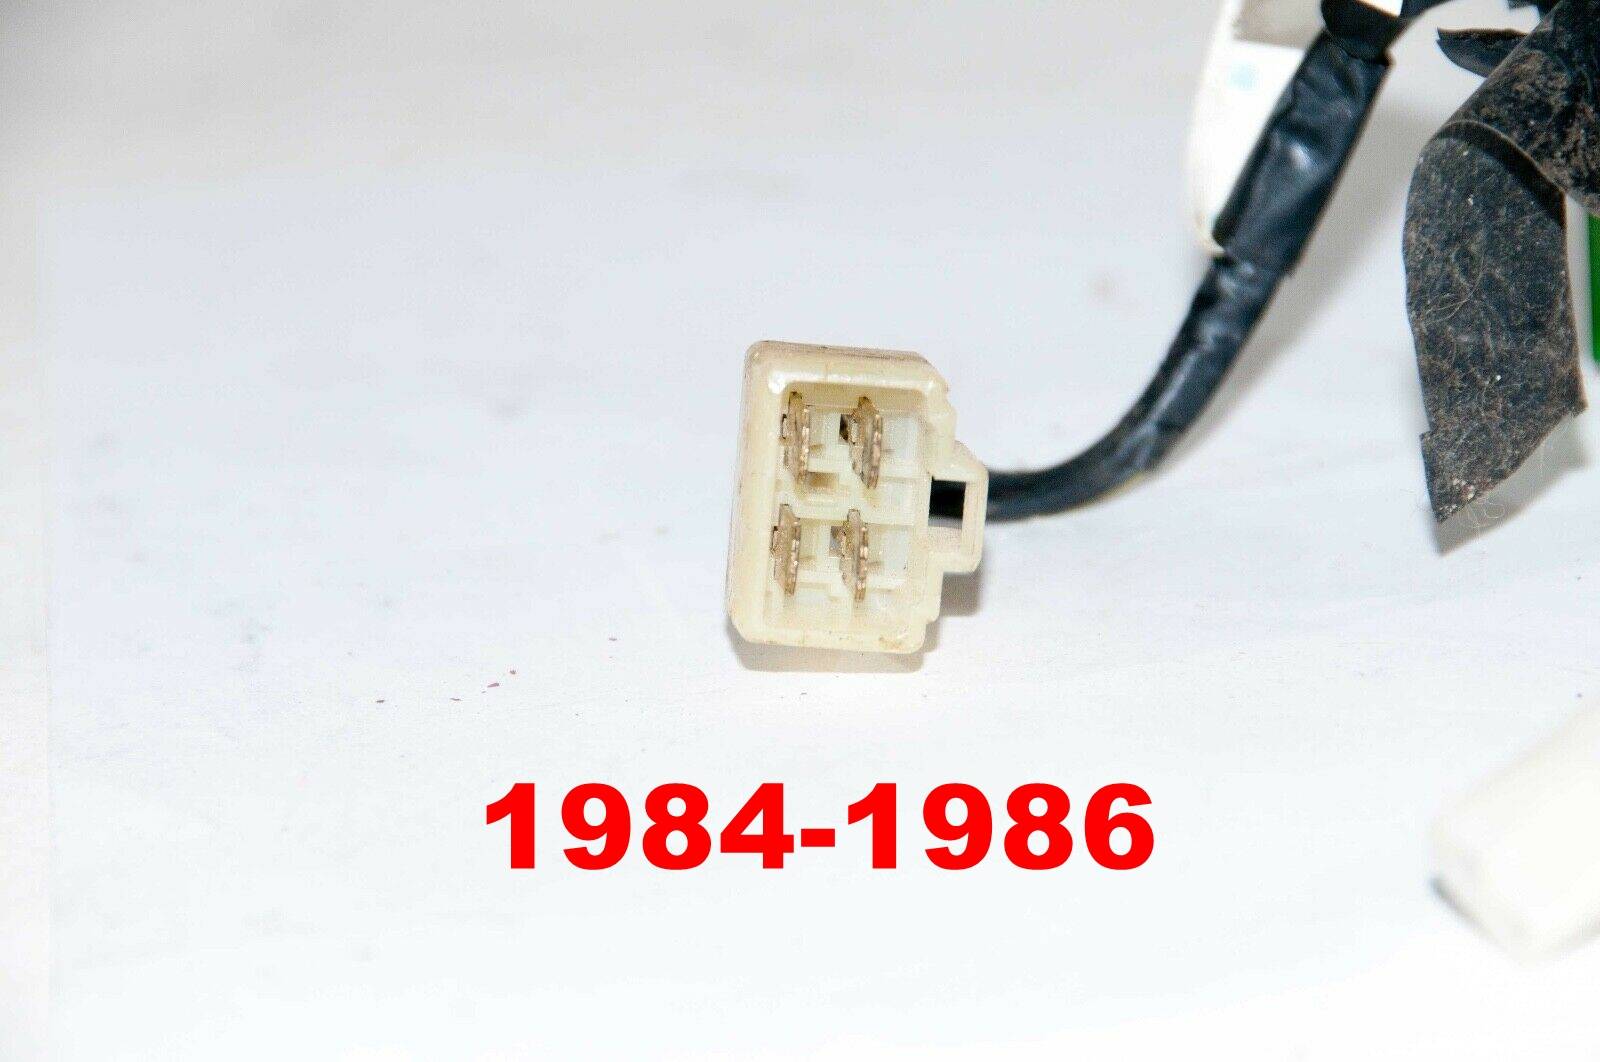
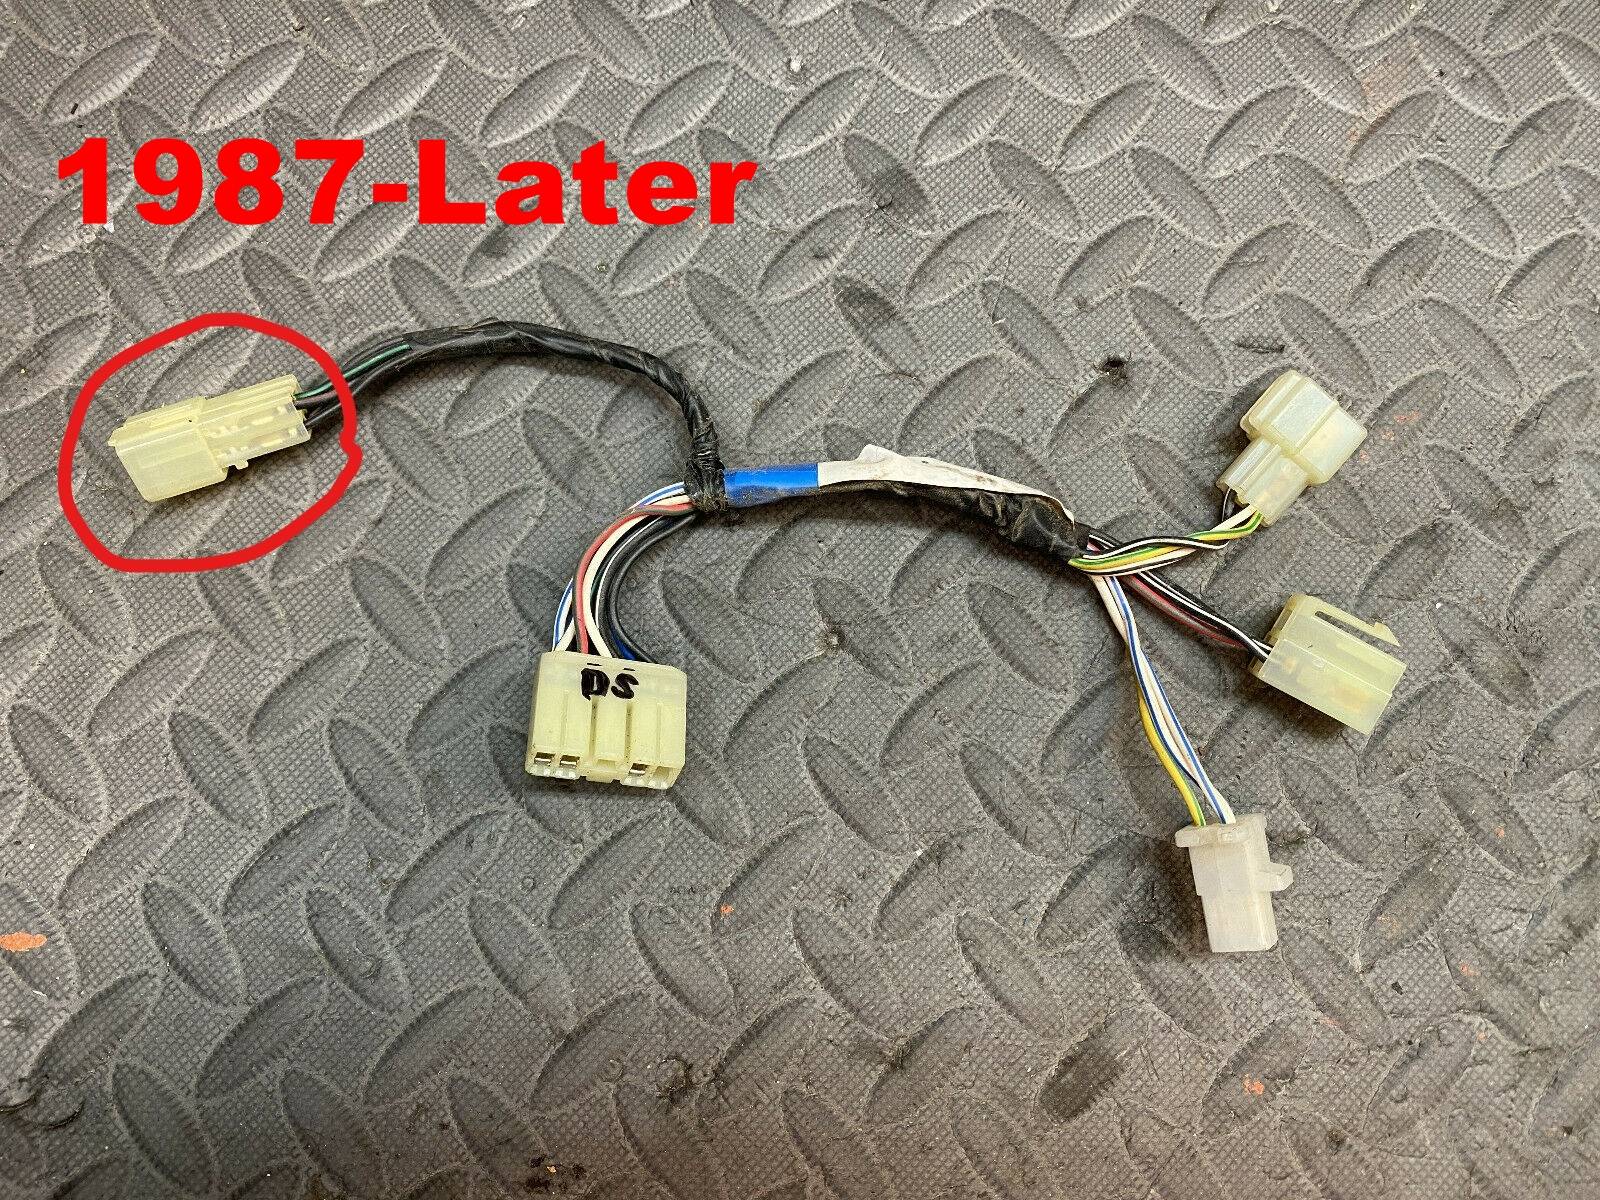
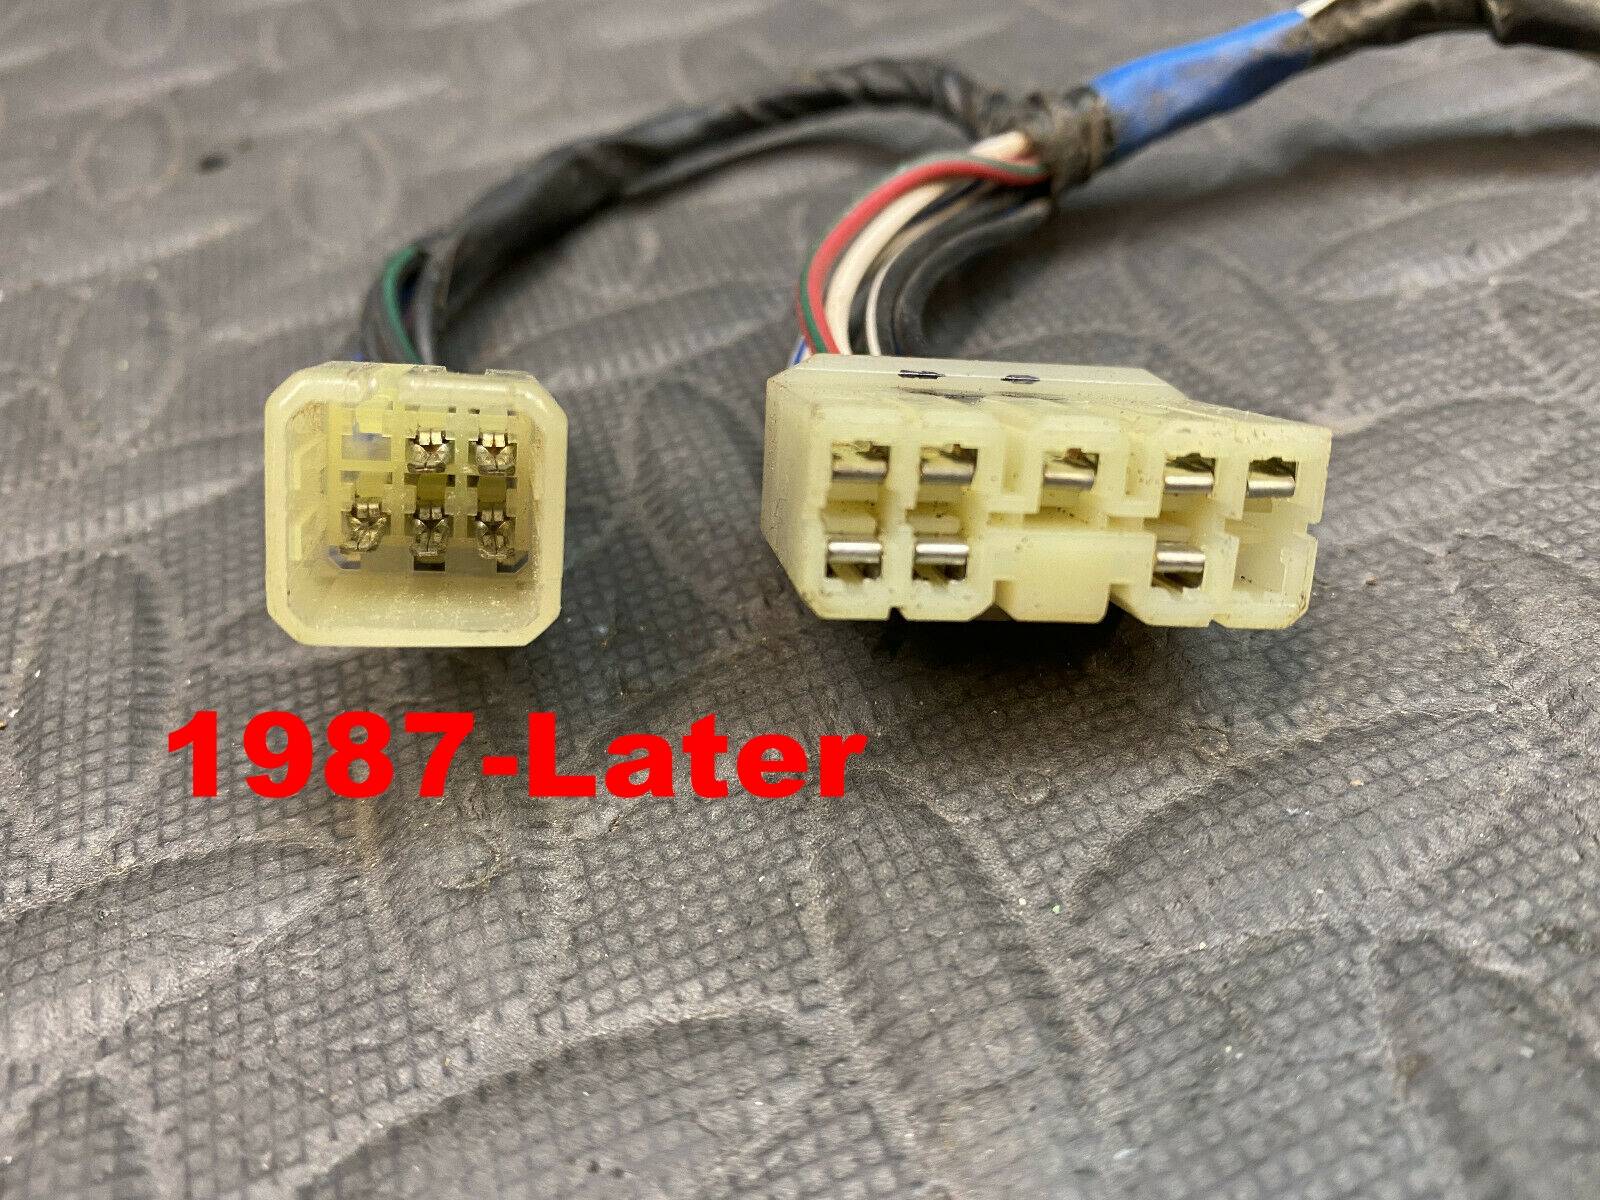
A huge concern I had with the entire A/C conversion was wiring it all up. All Toyotas came with the wiring to install factory A/C, but you need a smaller A/C harness to plug into your main harness. It looks like this:

Toyota changed the connector that plugs into the main harness in 1987. From 1984-1986 the connector was a 4 pin. From 1987 (and later I assume?) the connector changed to a 5 pin. Make sure you get the correct one for your truck. The parts truck all the A/C stuff came from was a 1986, so the harness did not work on my truck. I was lucky enough to find one on eBay. Here are the two harnesses below with the connectors circled that are different. You can find the other end of it under the dash above where the evaporator is going to sit. Install the A/C switch on the dash and plug that into your existing harness as well.
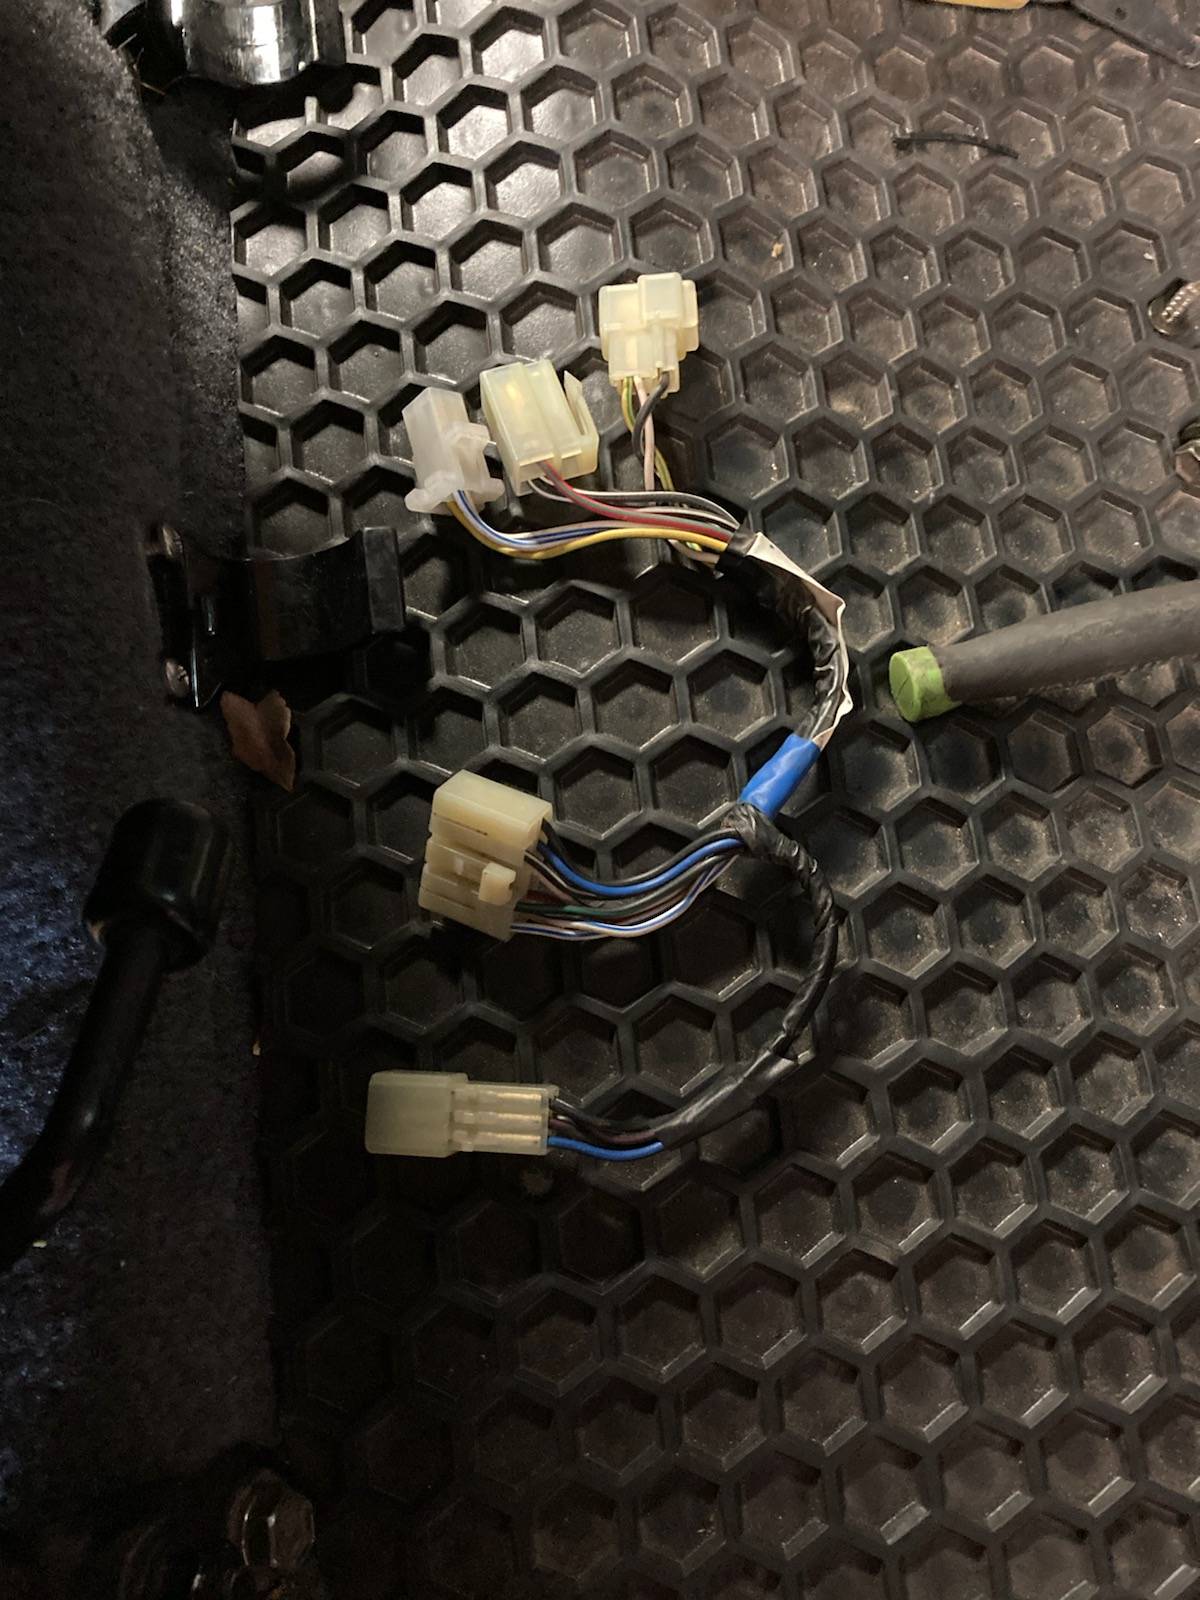
The A/C harness will plug into the main harness, thermistor, low pressure switch and another plug on off of the harness that the blower motor and resistor are run on. I will post pictures of where they go once I get mine in.
I got my wiring harness in last night and went ahead and plugged it in. Here's the harness again:
The 5 pin plug (or 4 pin if you're truck is a 1986 or older) plugs into this plug out of the main harness to the right of A. Then plug the larger plug into the A/C amplifier.
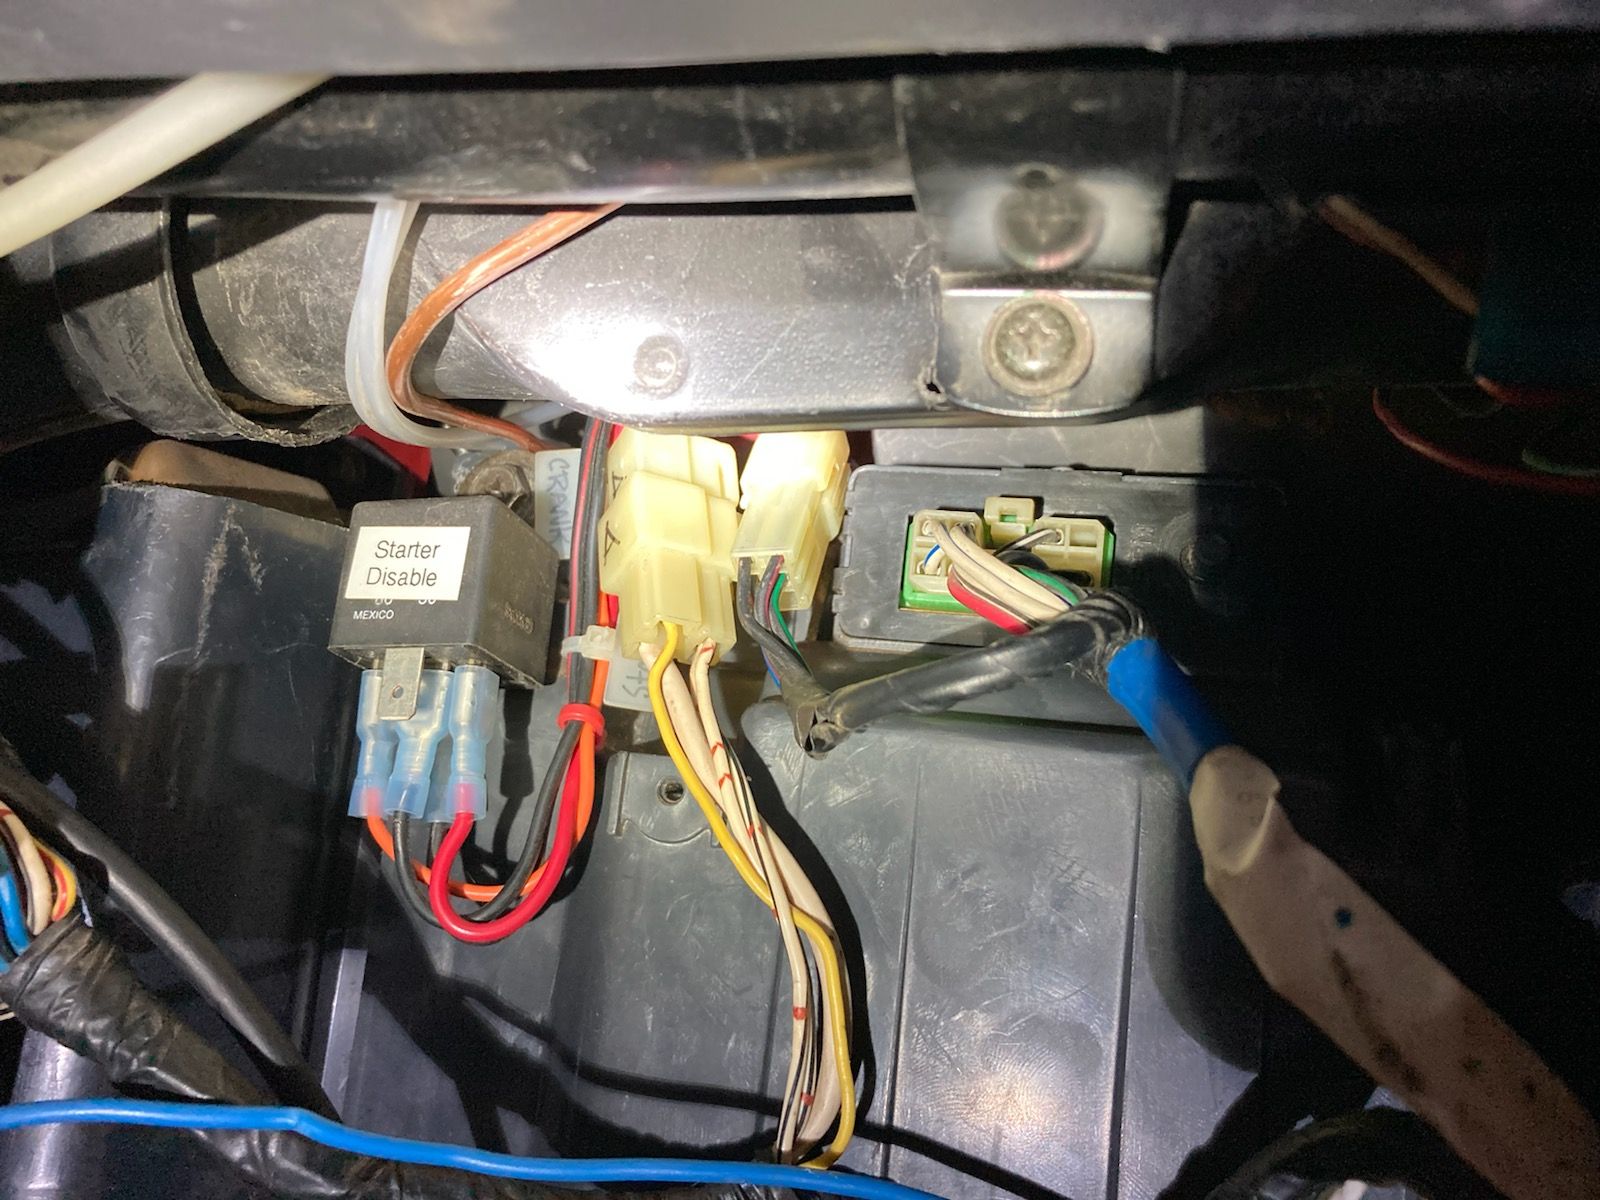
2 plugs go into the low pressure switch and thermistor whereas the third plugs into the harness that runs the blower motor and resistor.

Once this is in you're all done under the dash!
Compressor
I highly recommend buying a new/re manufactured compressor if you�re going to be doing this install. It would be horrible to go through all this work only to find out the compressor you have is leaking. I bought mine at AutoZone, and since I got the A/C install kit which came with the drier, expansion valve, and A/C schrader valves I qualify for a lifetime warranty on it � which is awesome!
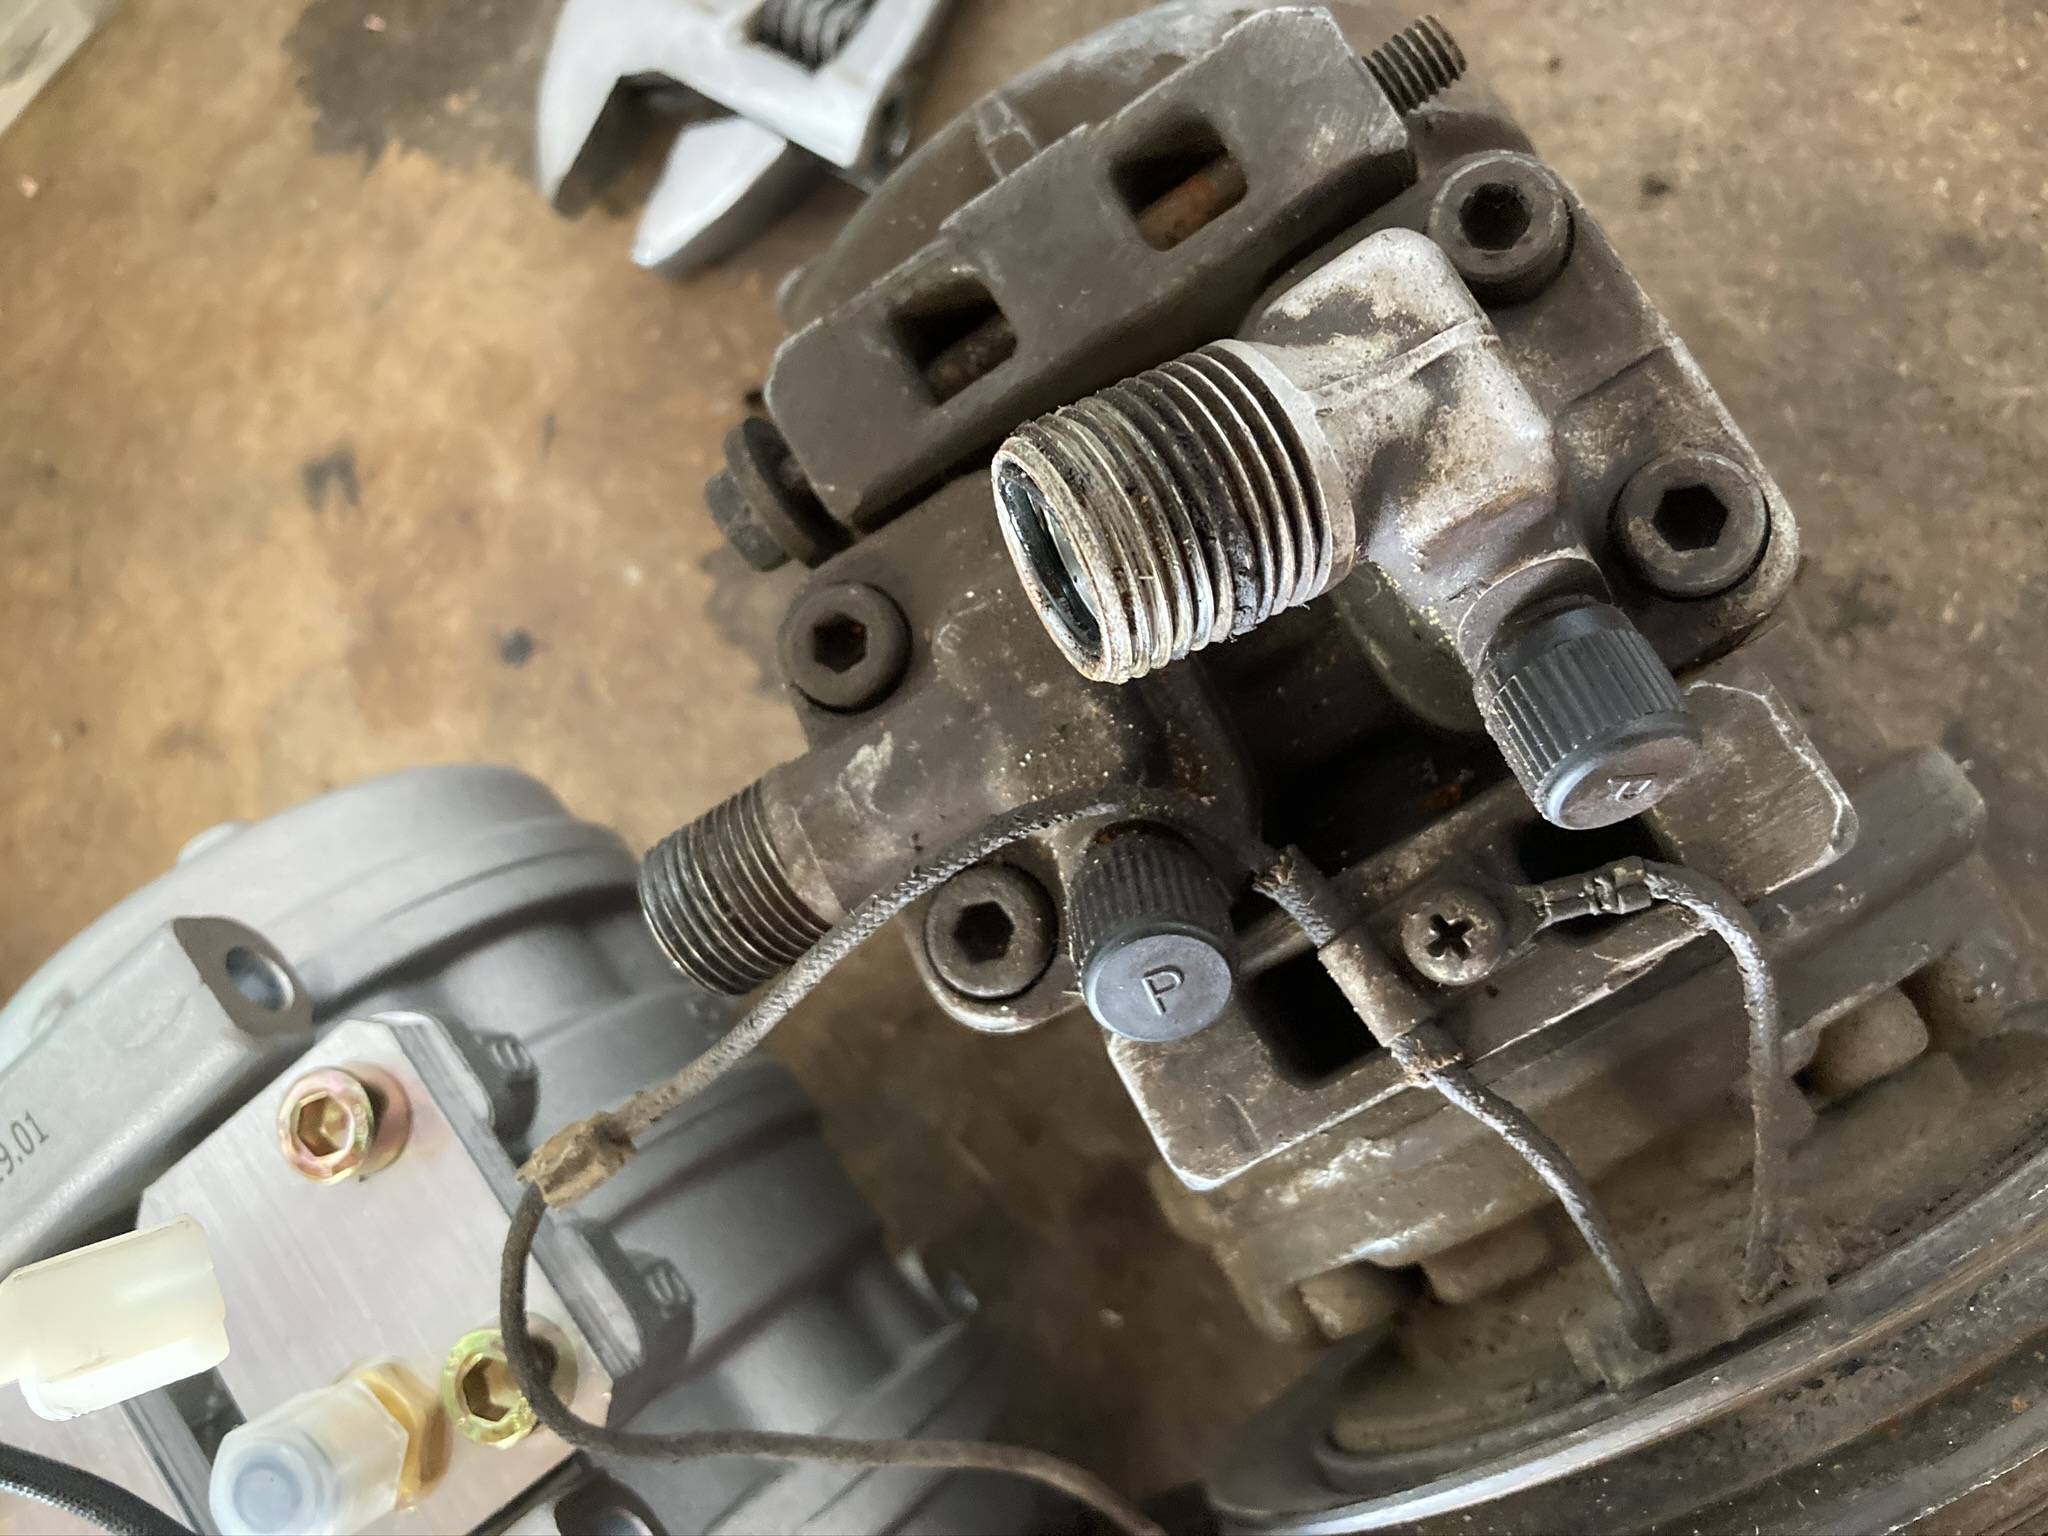
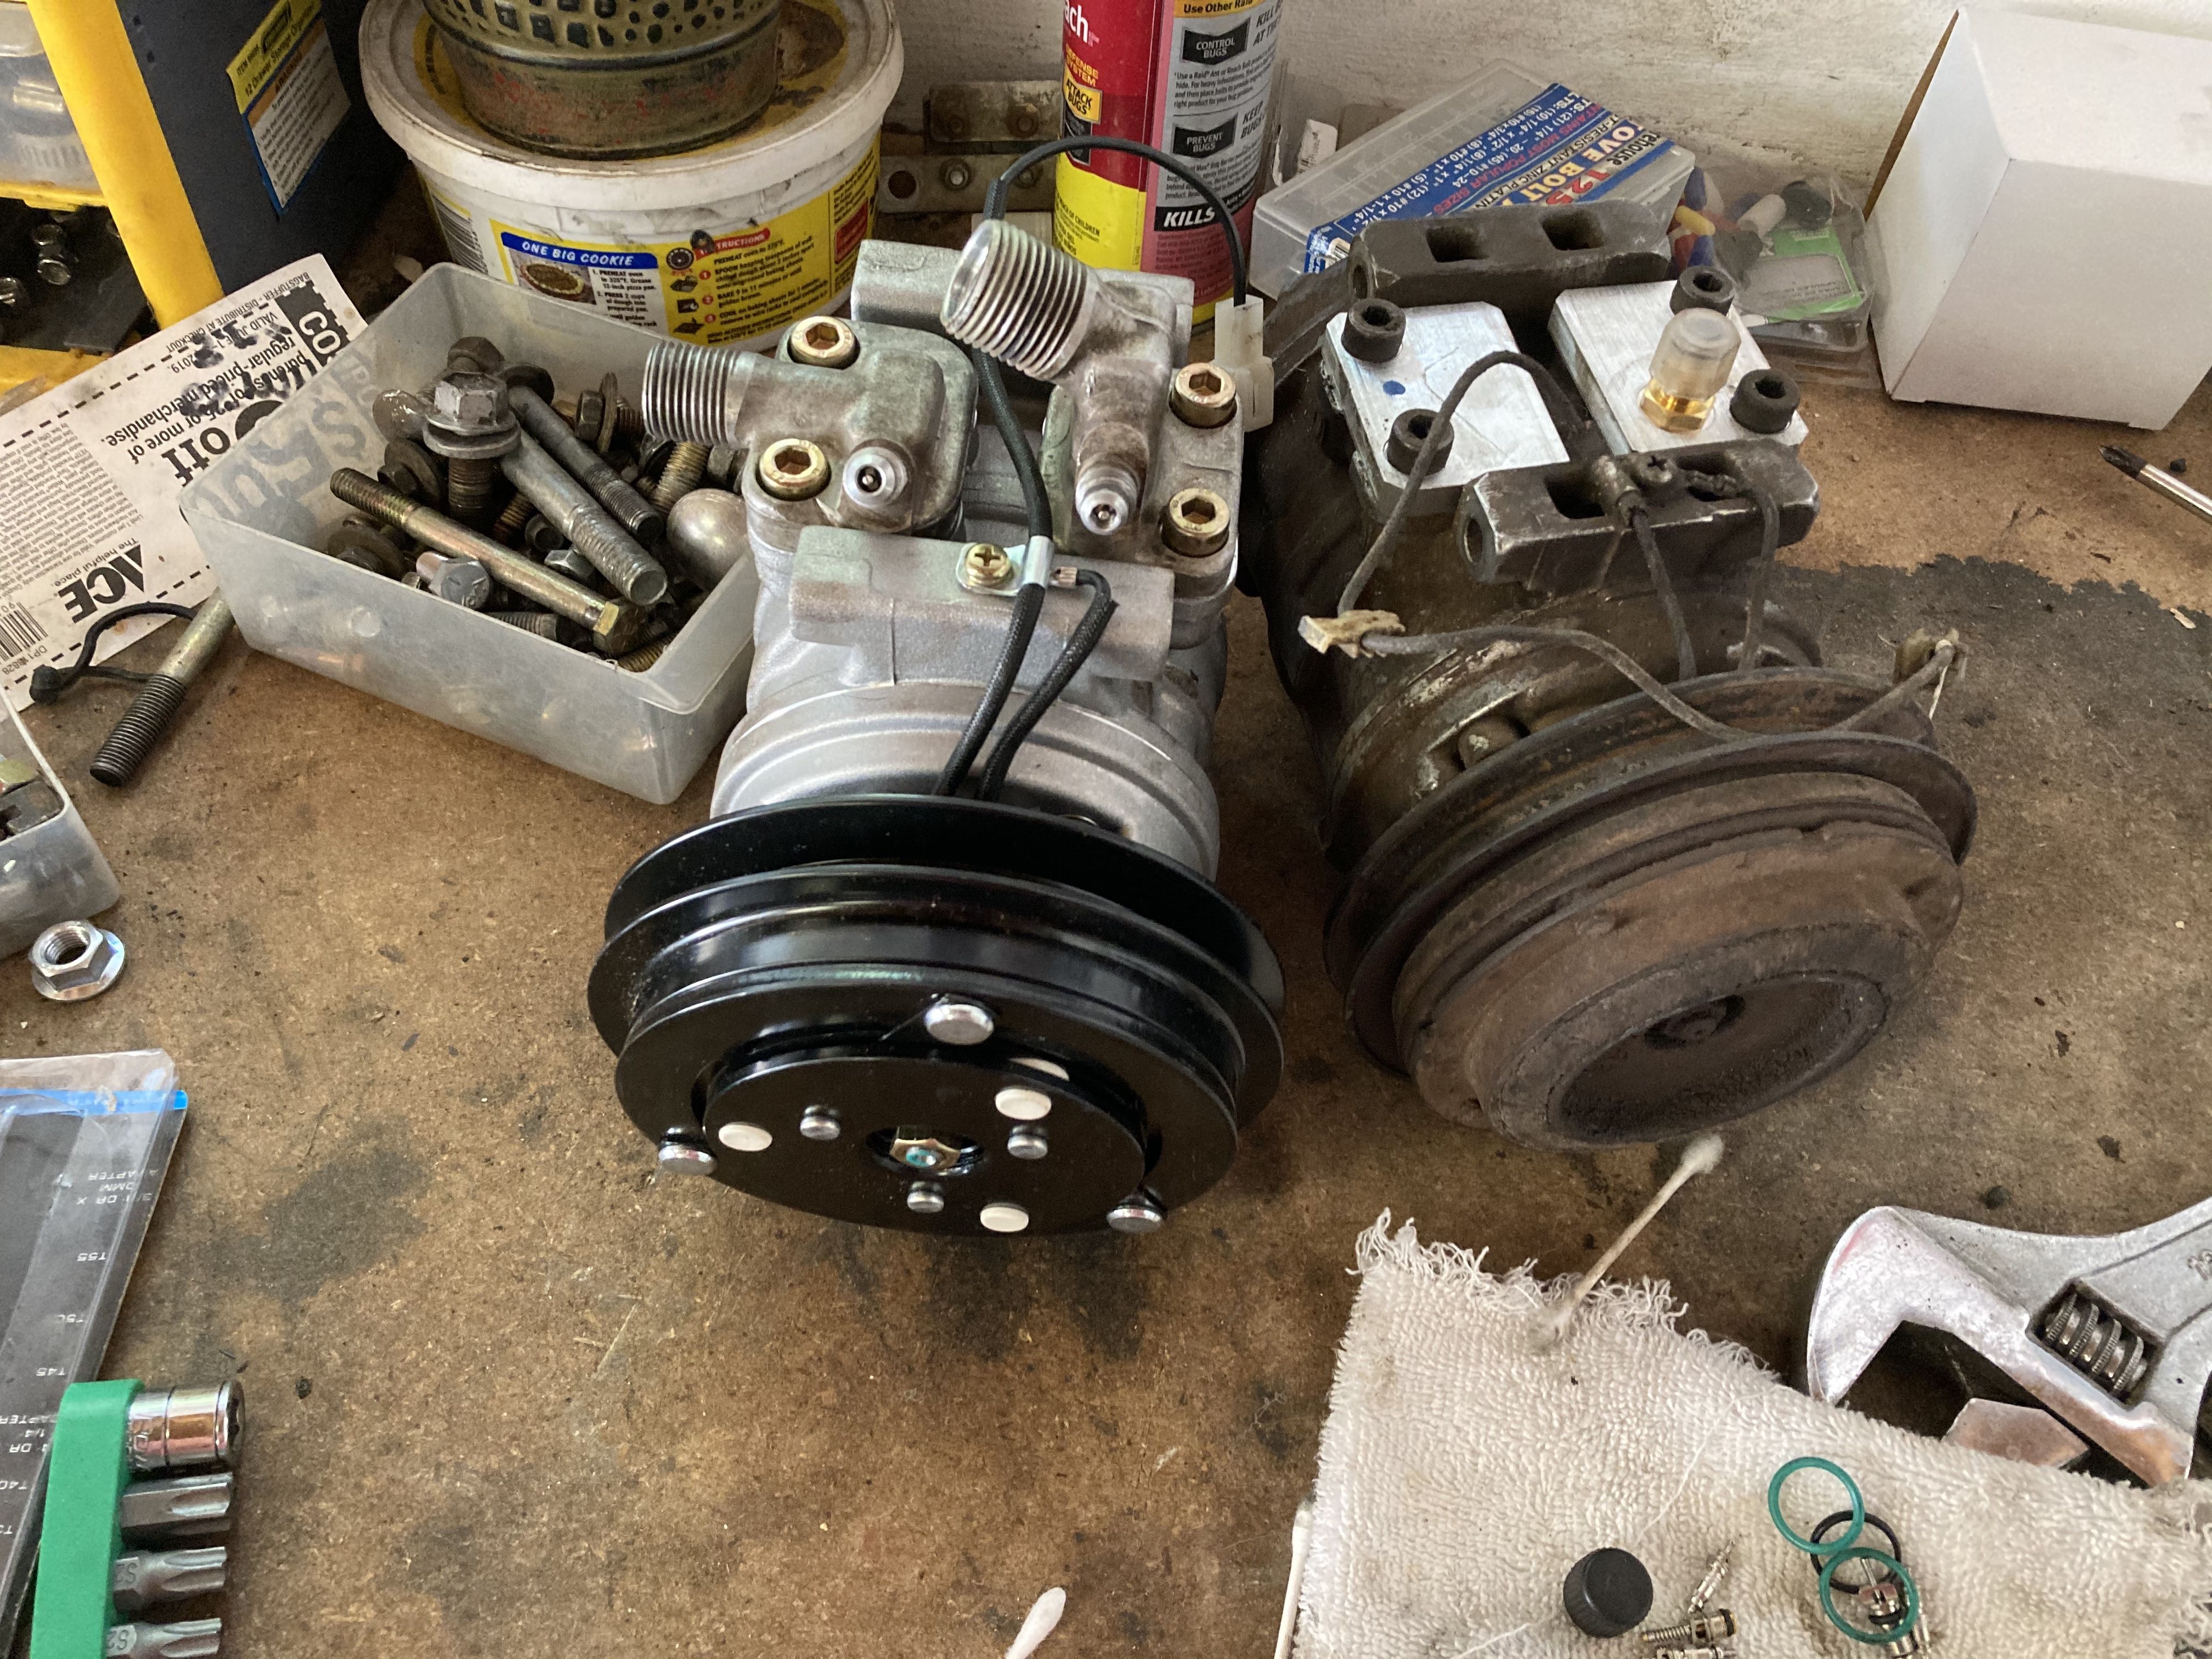
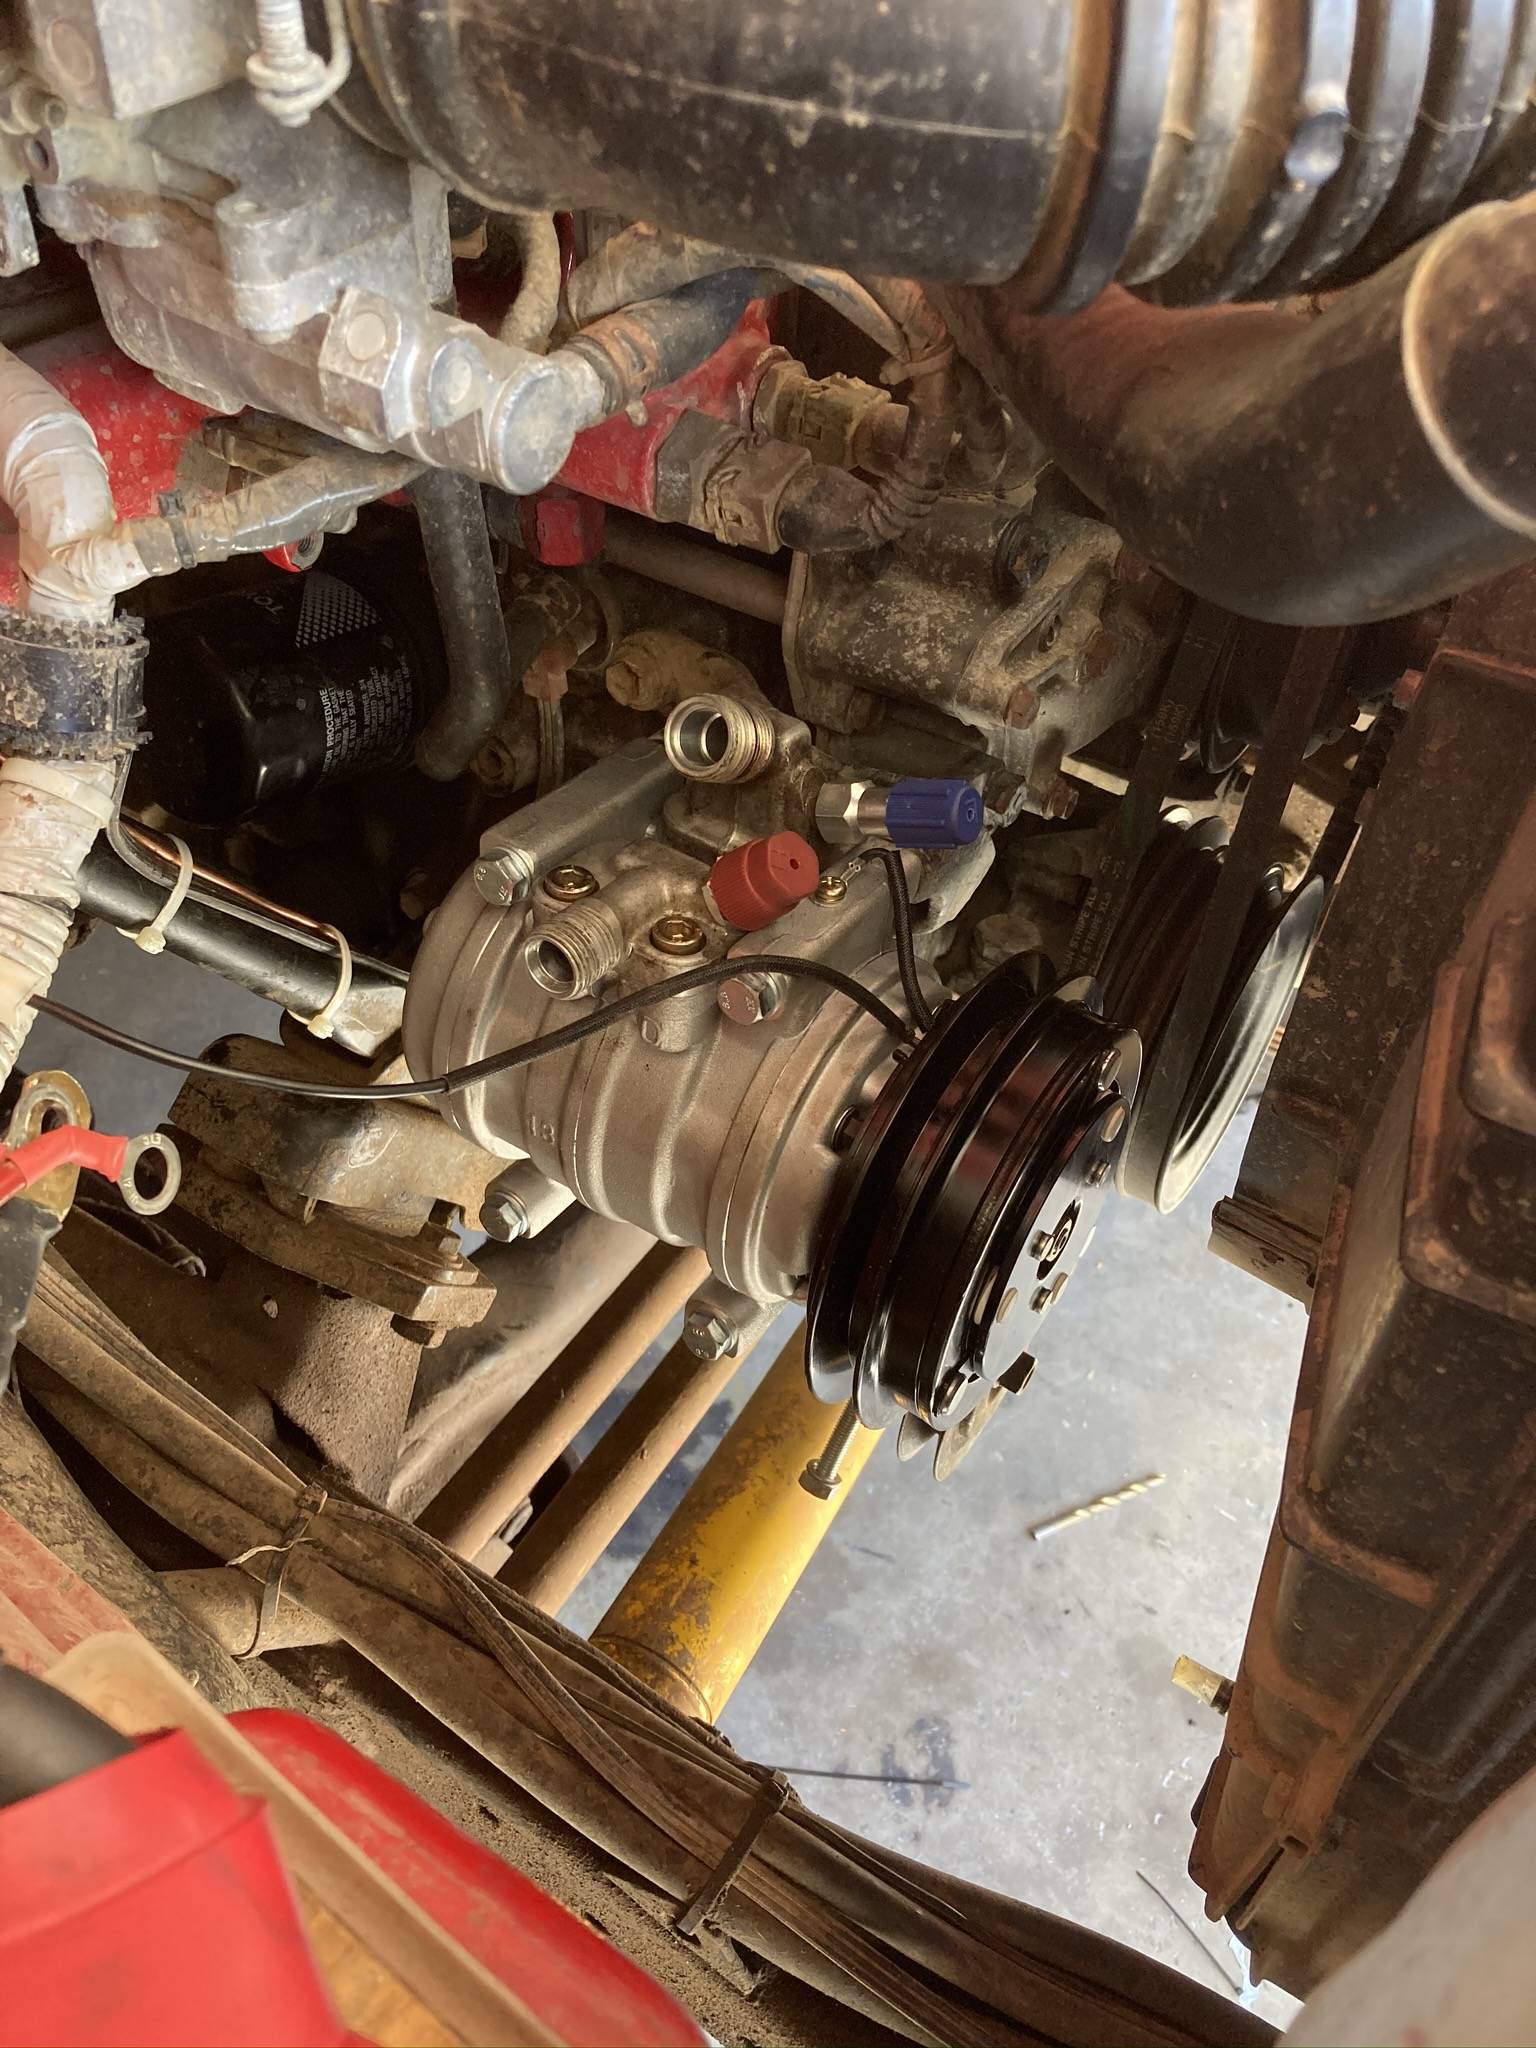
When you buy your new compressor put it next to your old one so you can make sure it�s the same. You�re going to notice that your new compressor doesn�t have the fitting for the A/C lines to go.
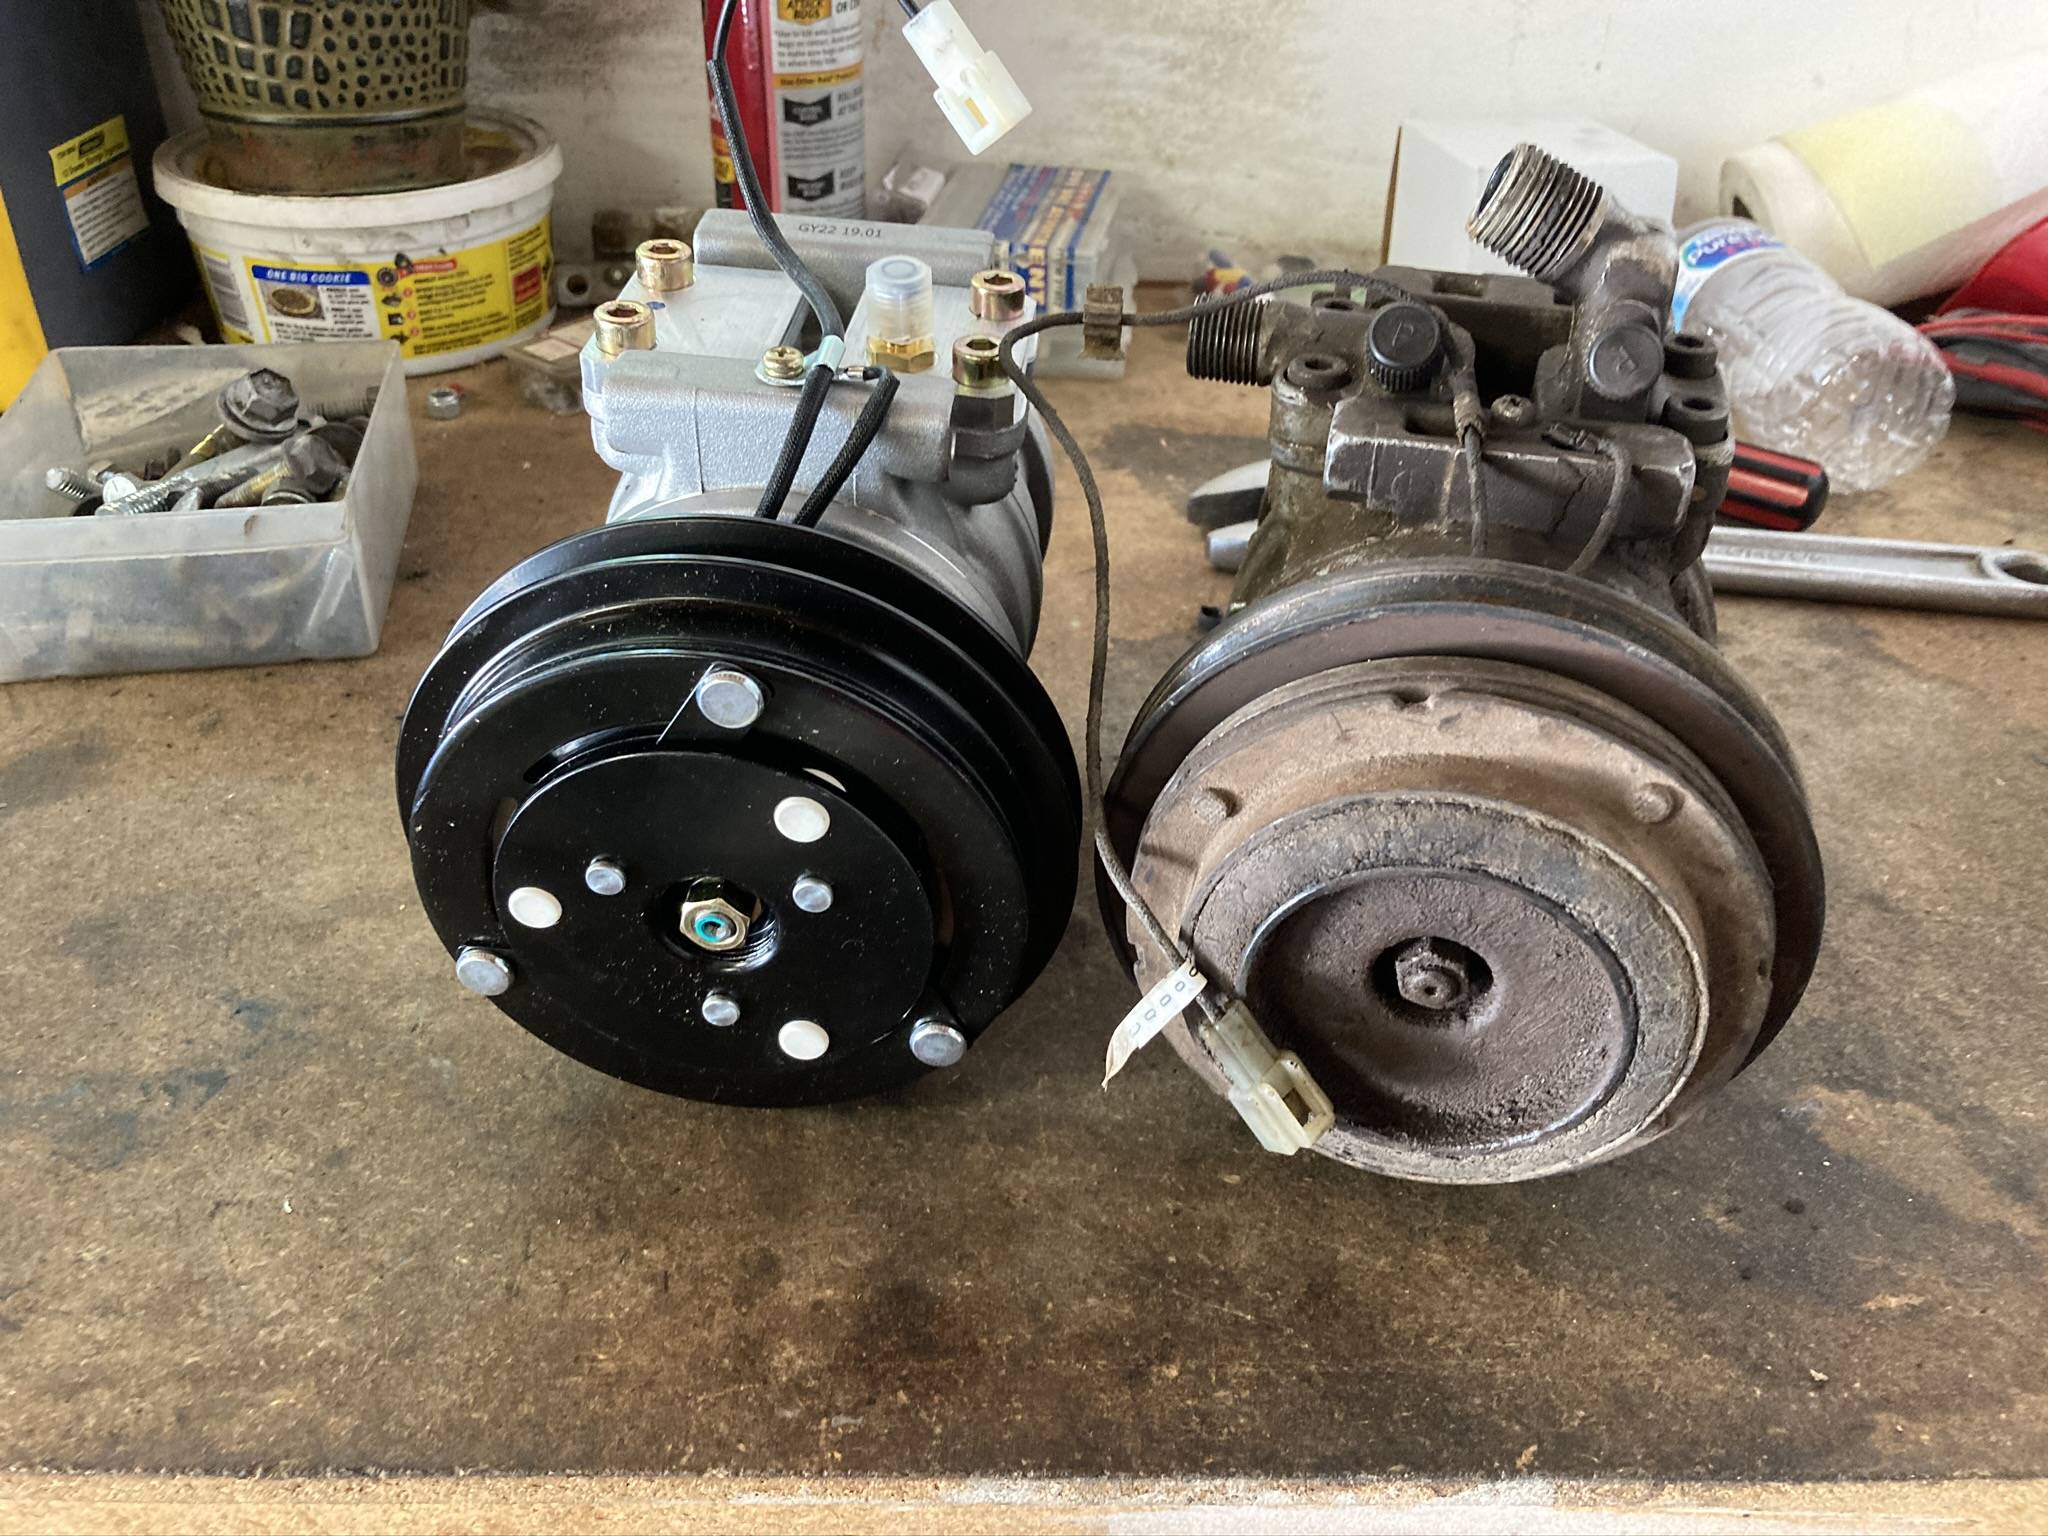
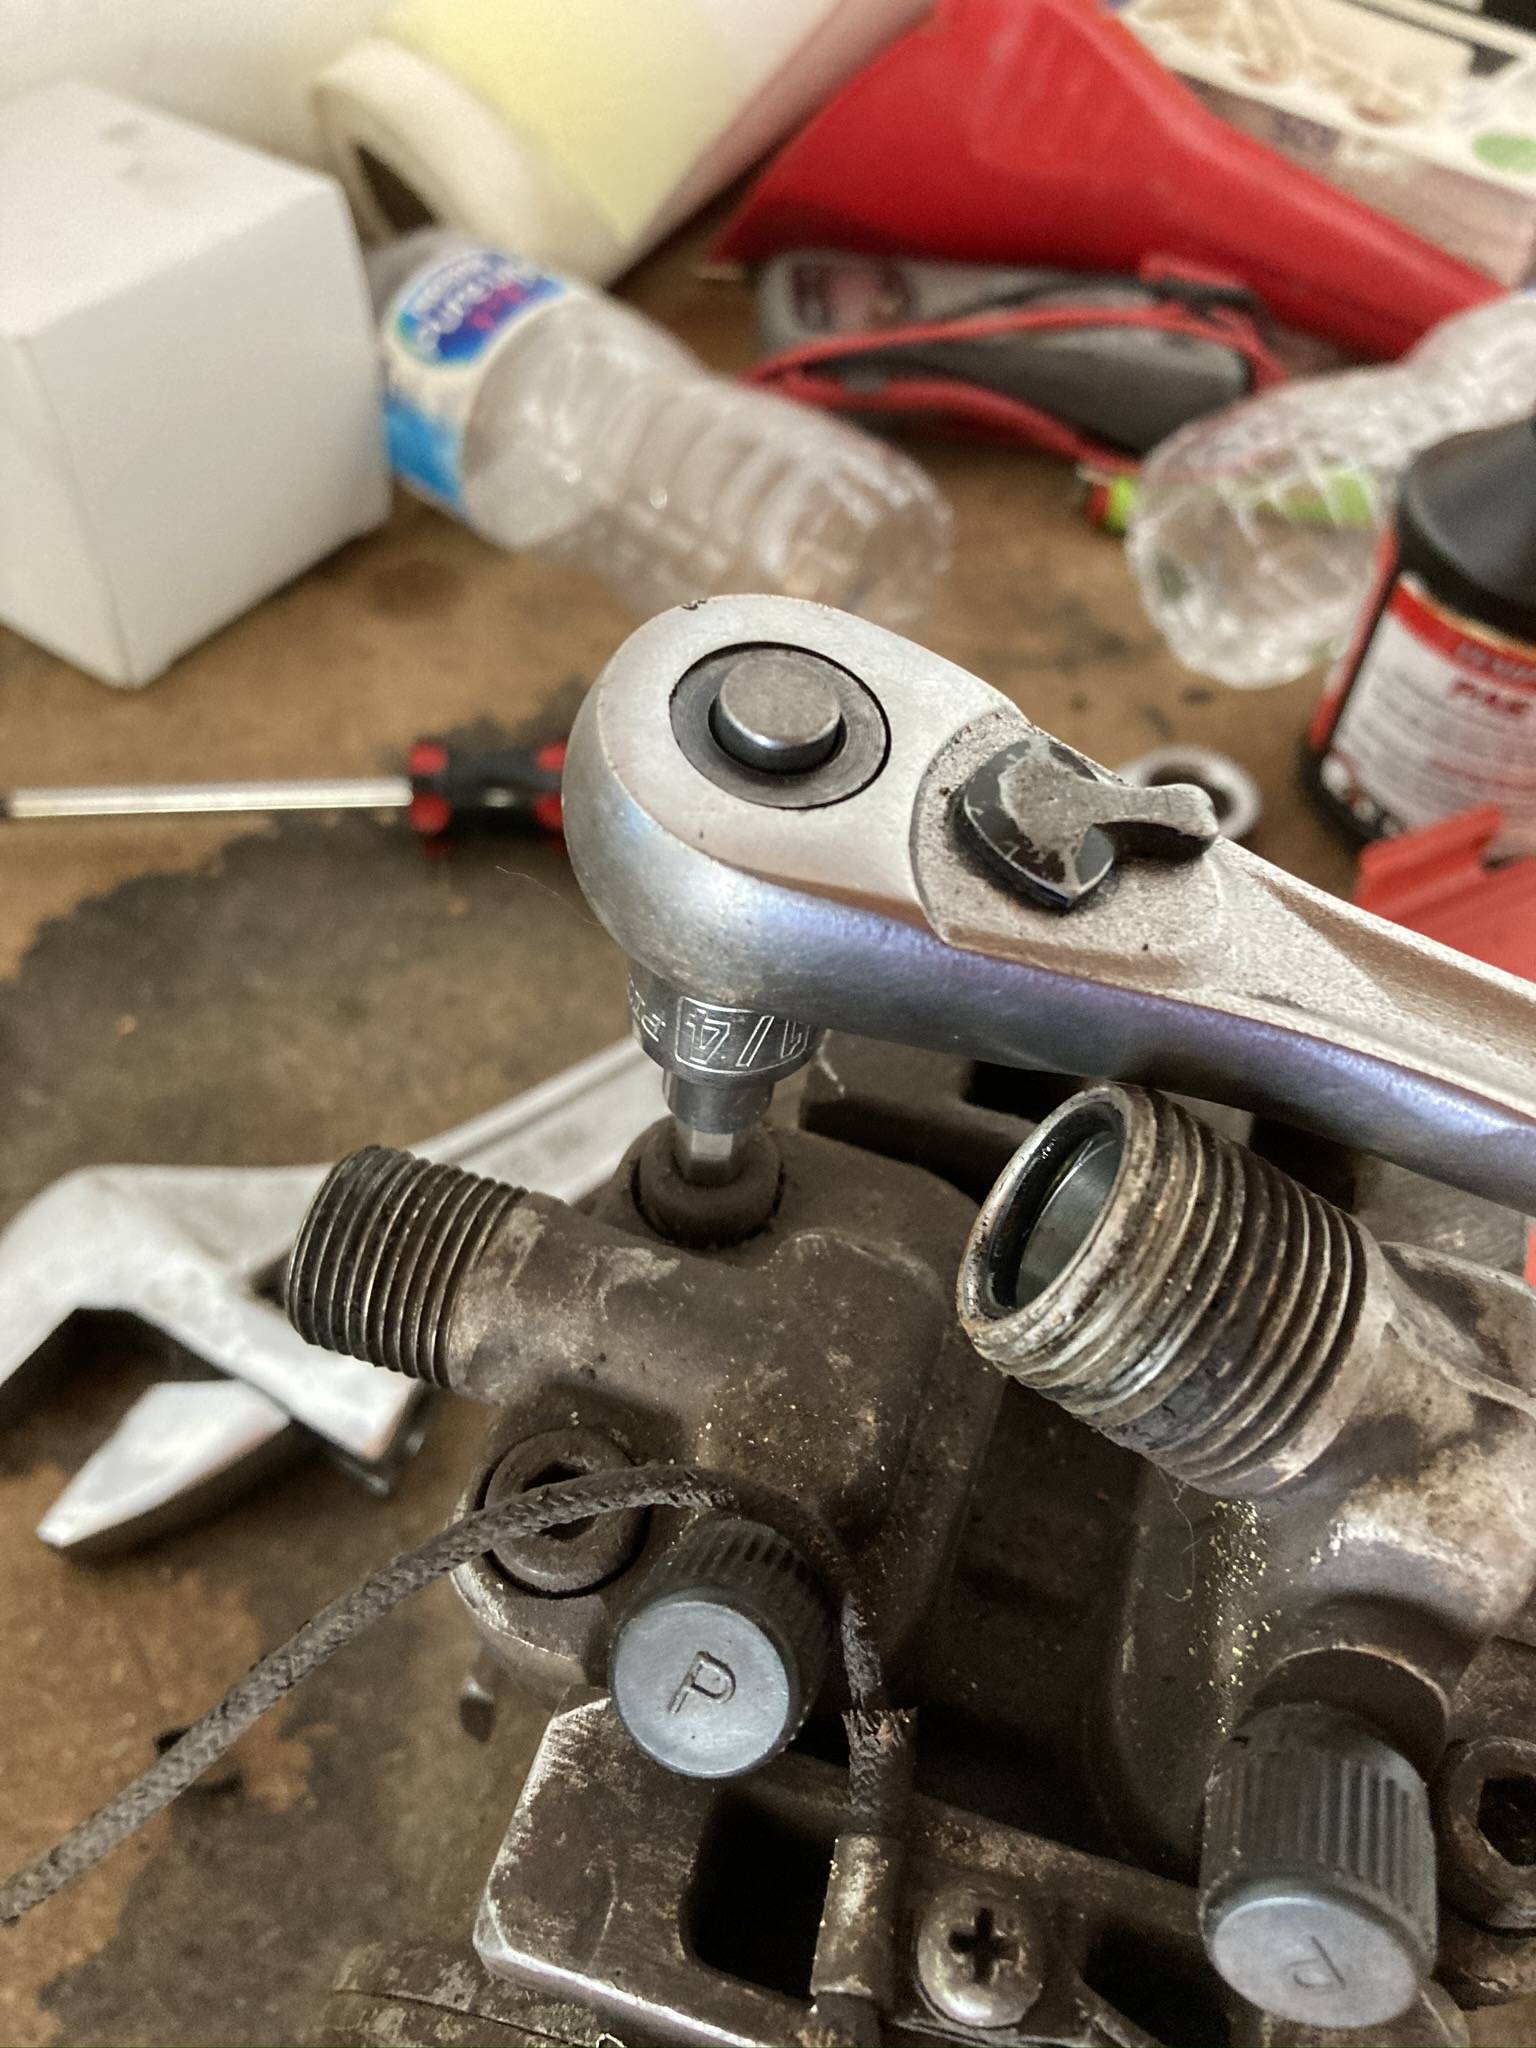
You�re going to need to remove those fitting off of the old compressor and install them on the new one. To remove them you�re going to need a #7 metric allen key and a socket to break those screws loose. Once they�re loose, take them out and they�re going to pop right off the old compressor. You�re also going to remove the caps on the new compressor.
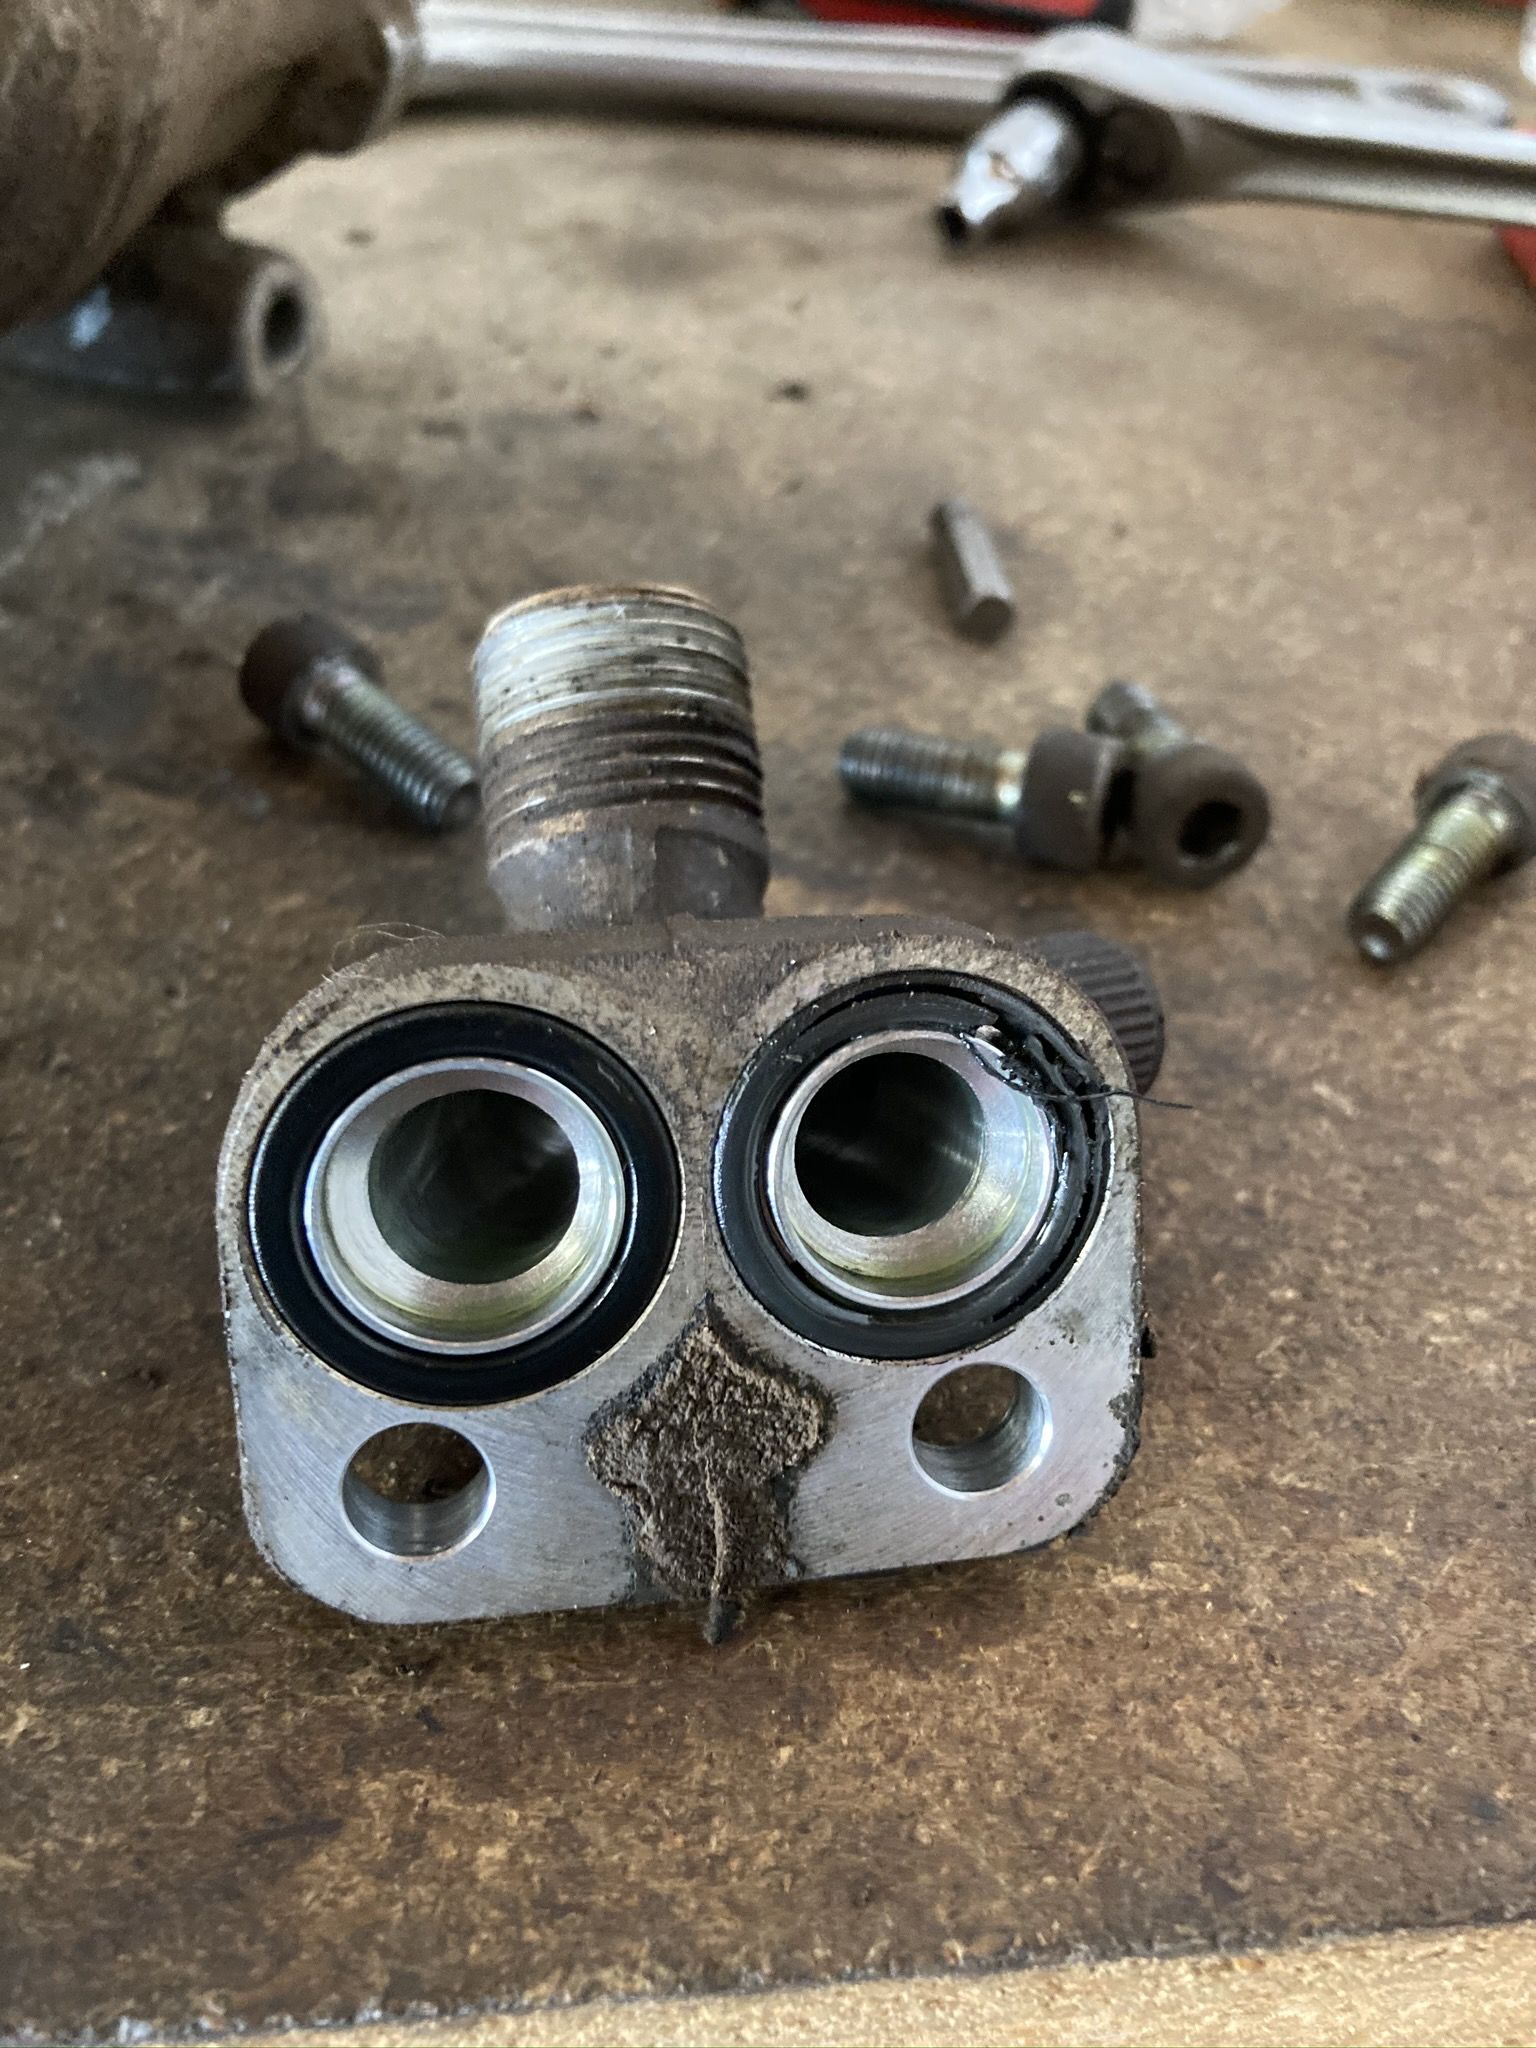

With these fittings off I cleaned them off with some brake cleaner and a rag. DO NOT use any type of brush to clean these. You don�t want to scuff the mating surface where they meet the new compressor. Replace the O-Rings on these and reinstall them on your new compressor.
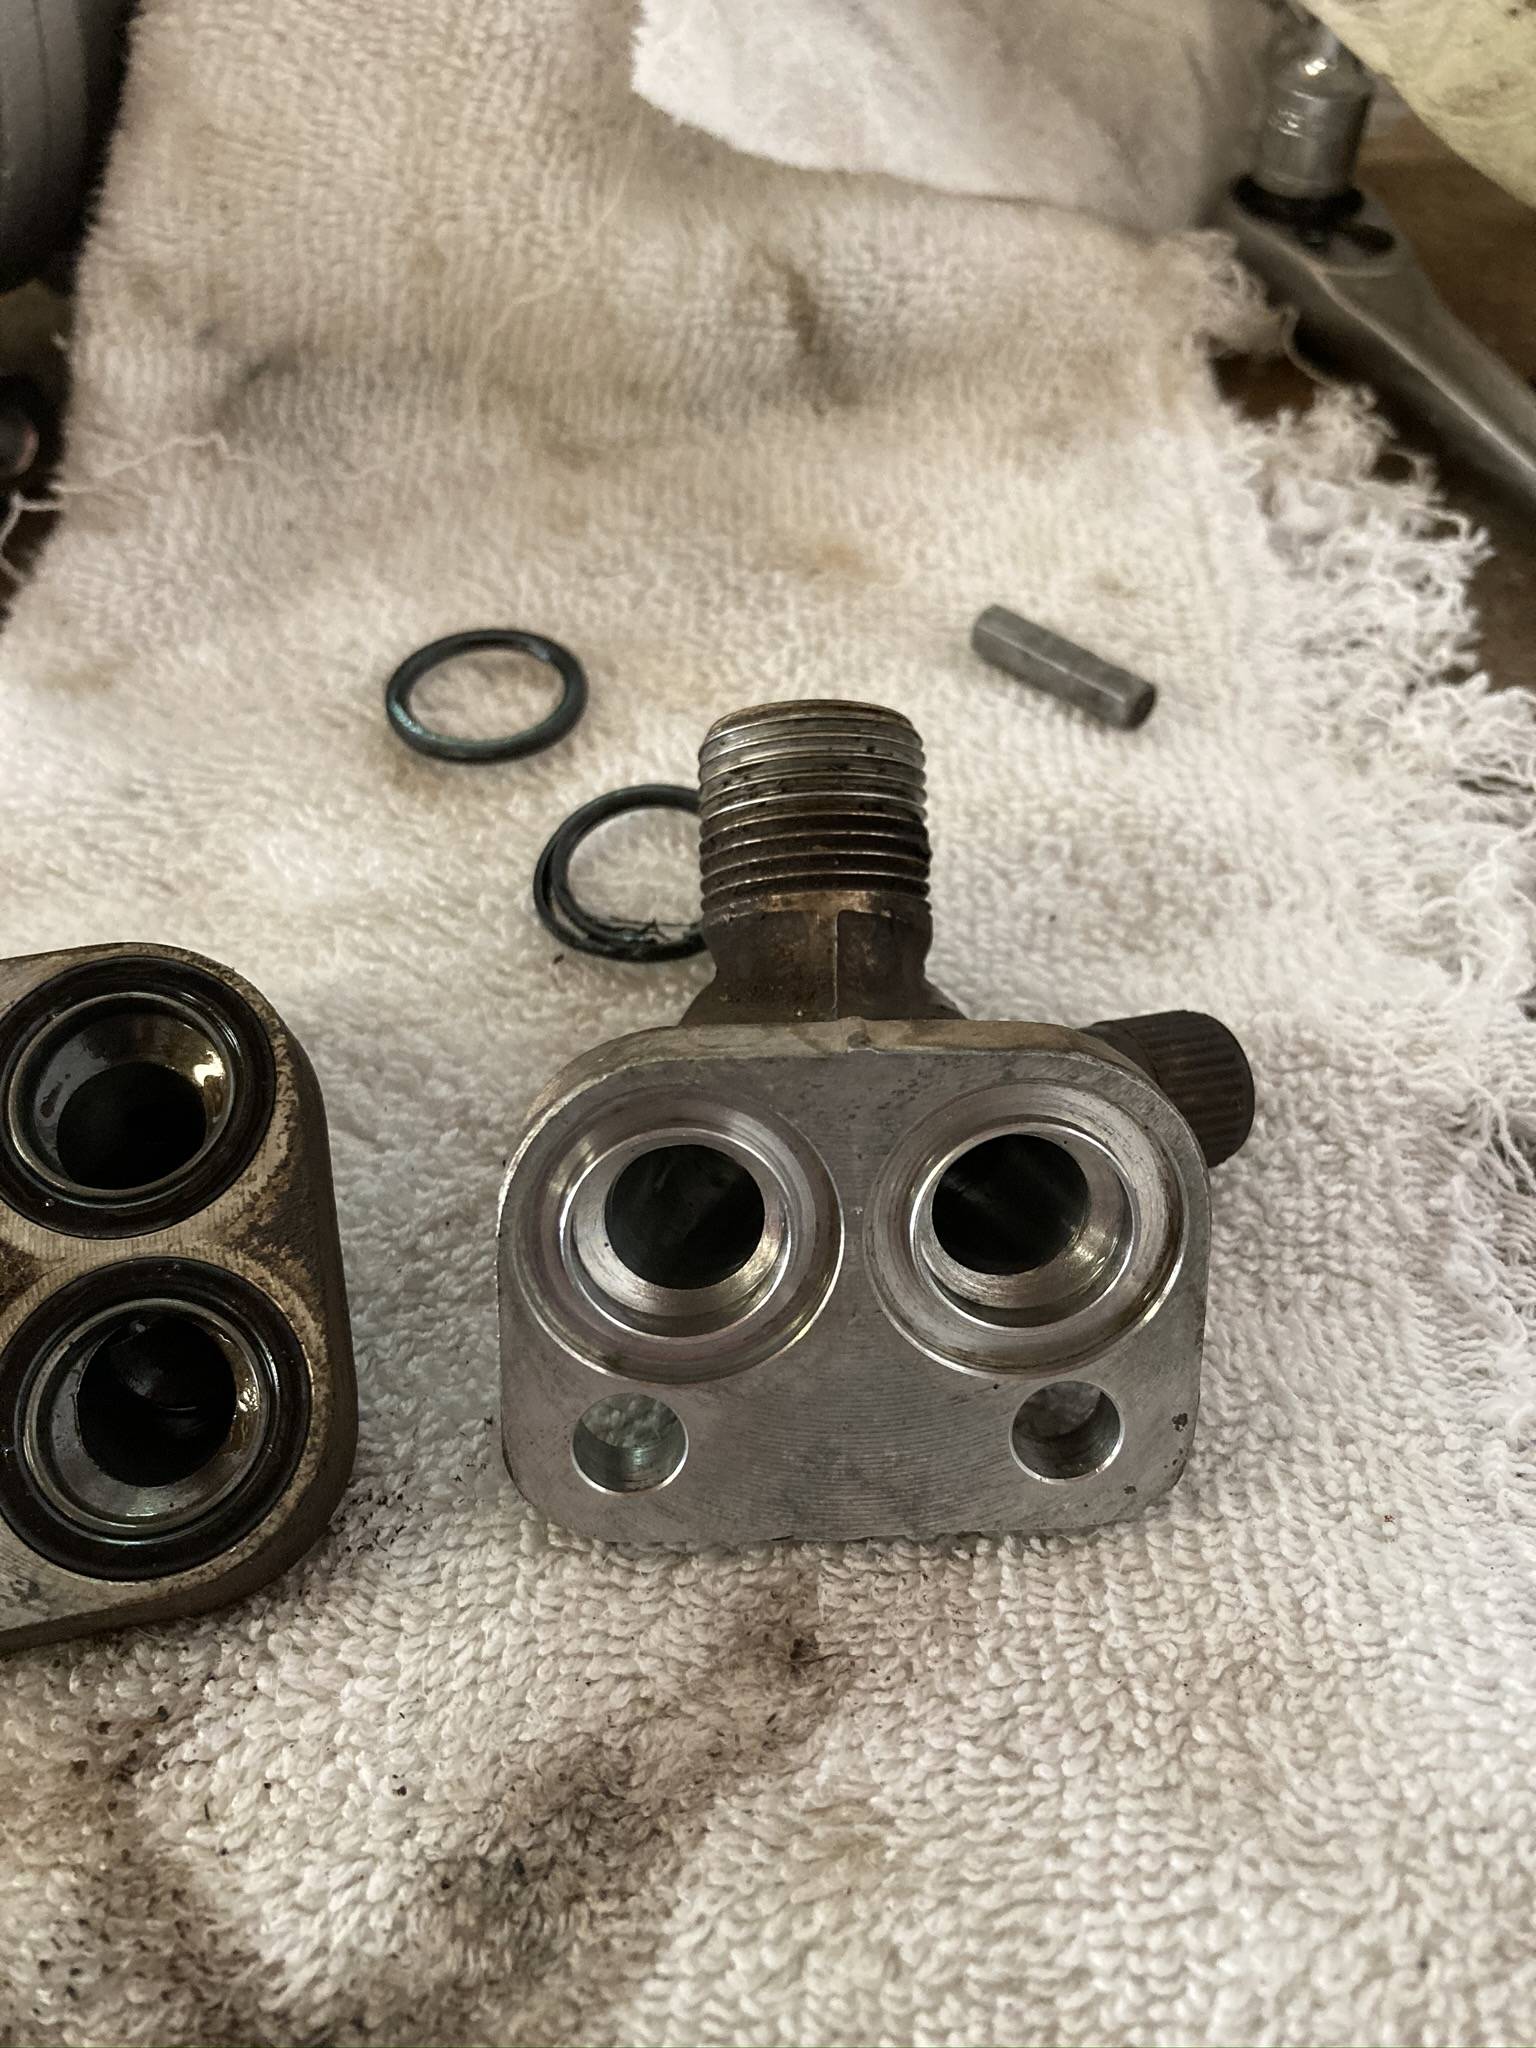
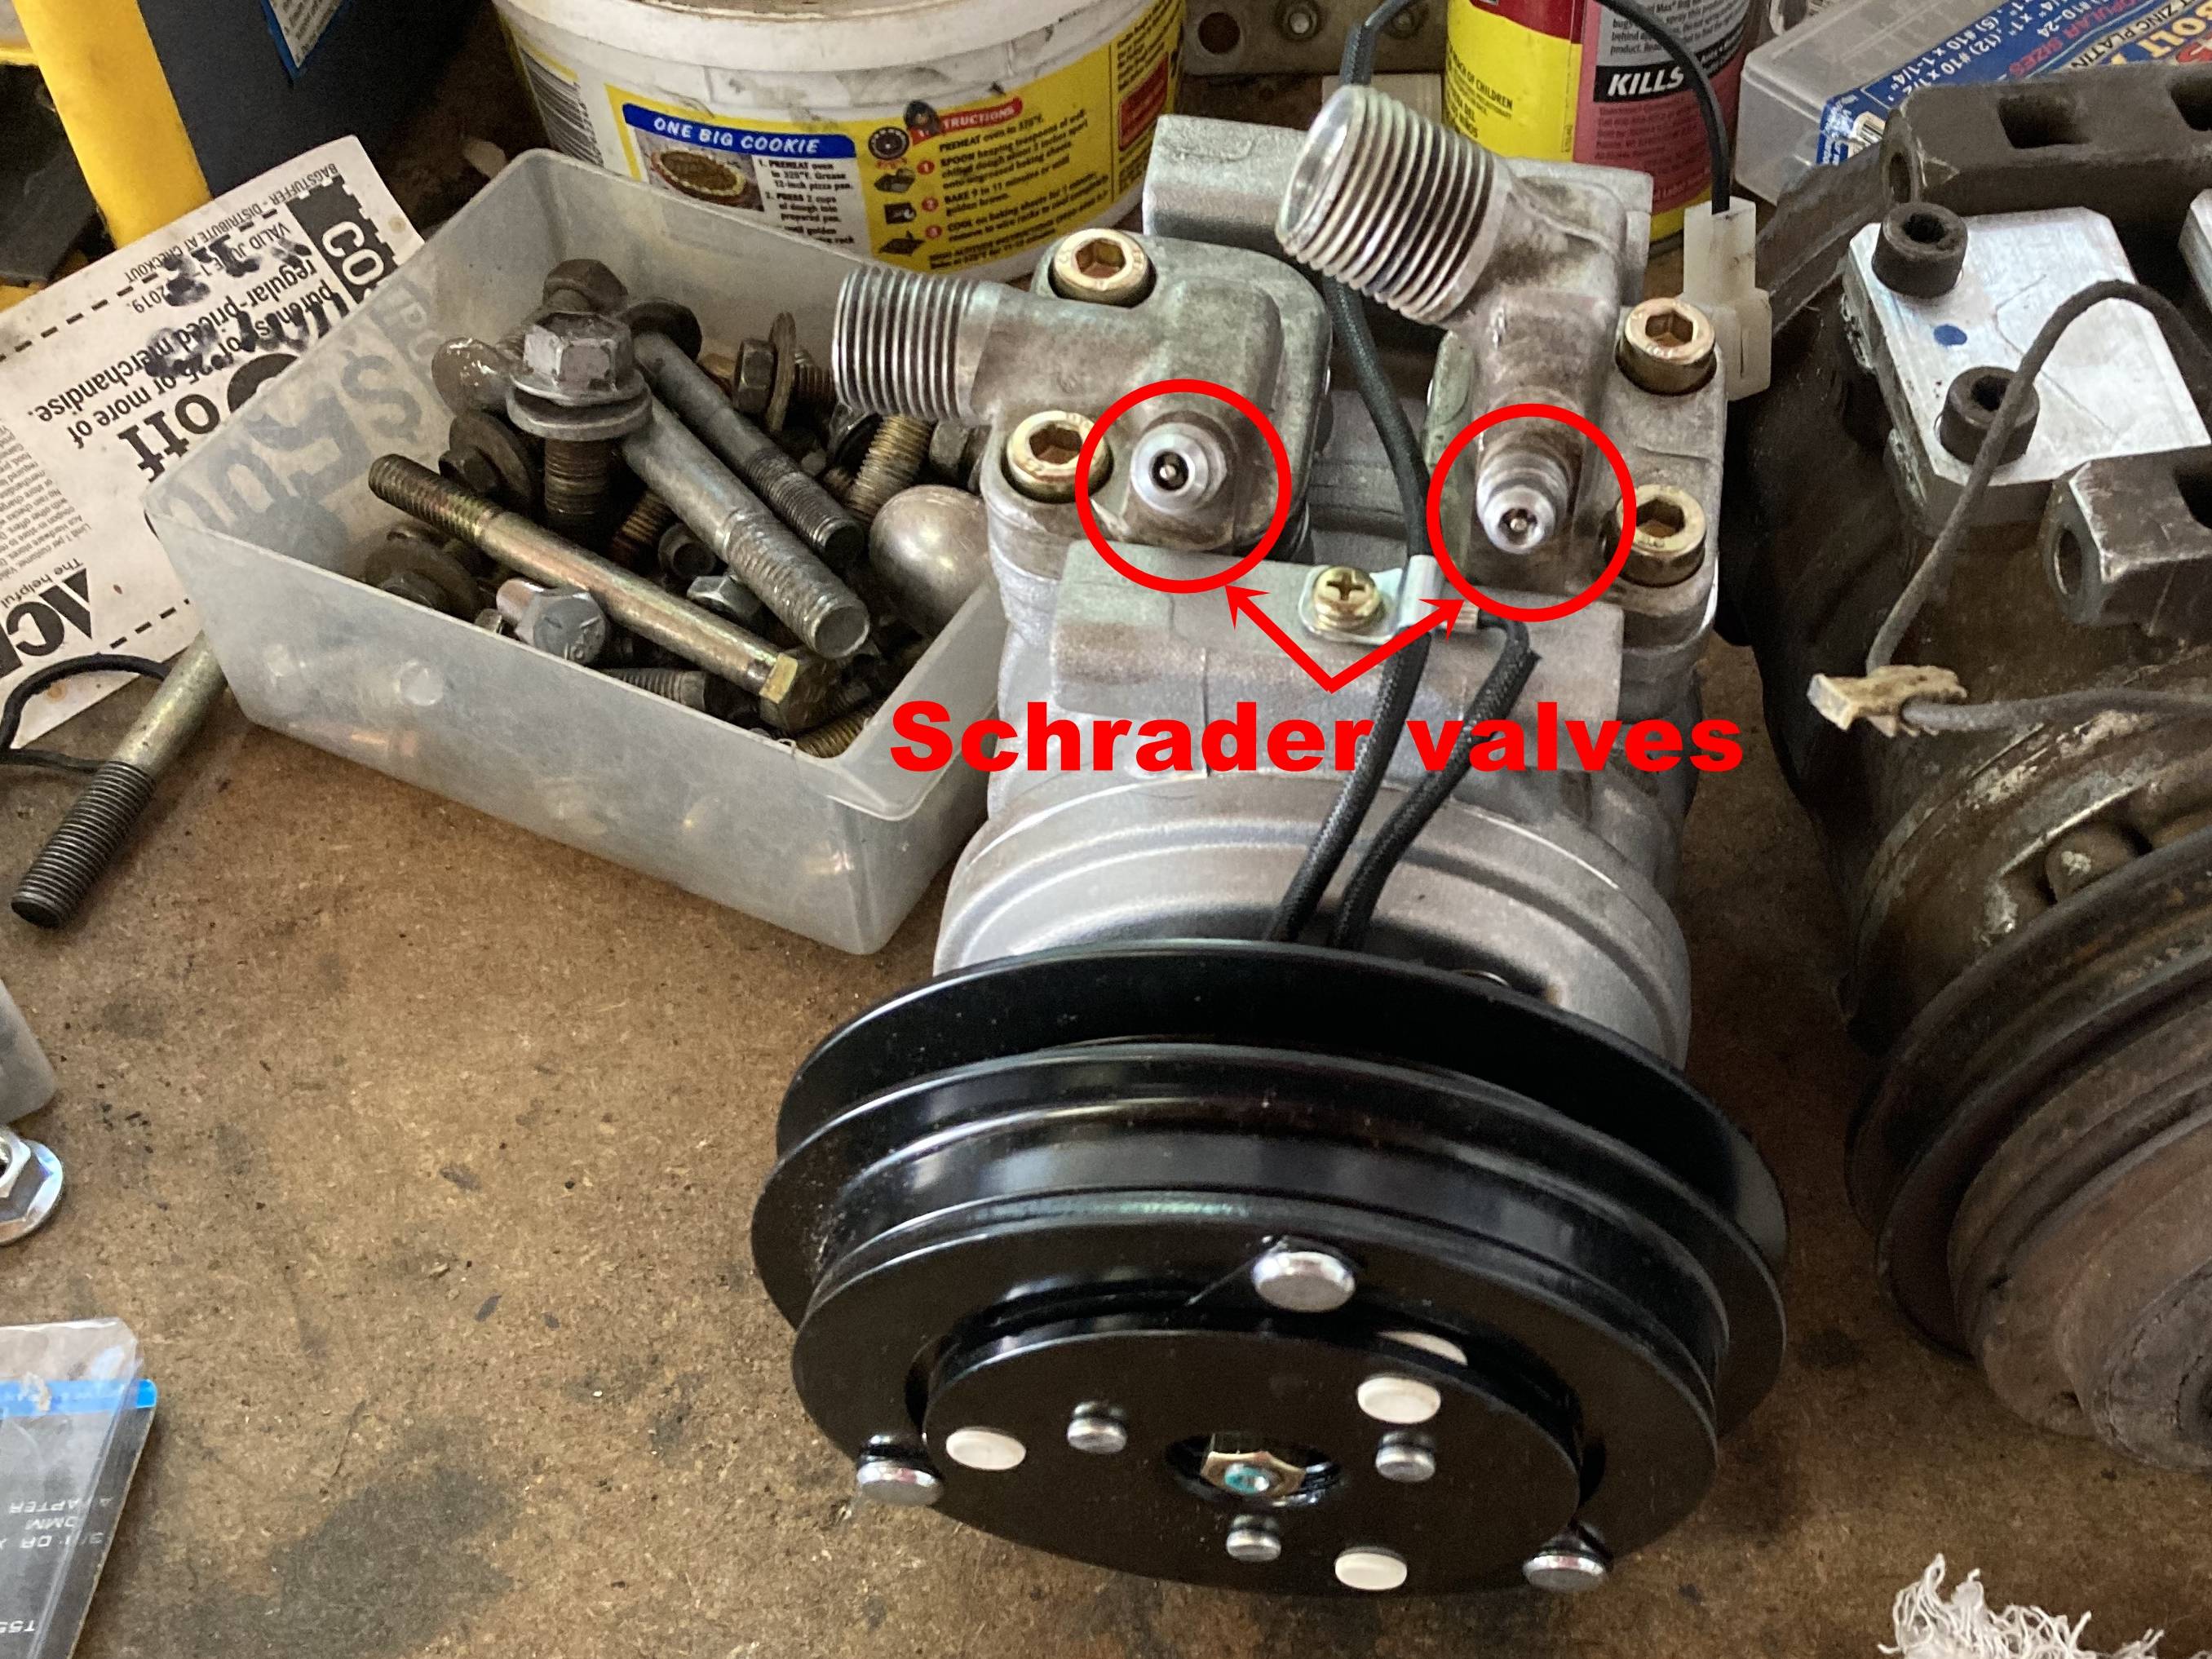
Also on the line fittings are two valves which are used to charge the system with Freon. Using a valve core removal tool remove these valves and replace them with the ones provided in the kit. I also installed my R134a conversion fittings on the compressor as well.
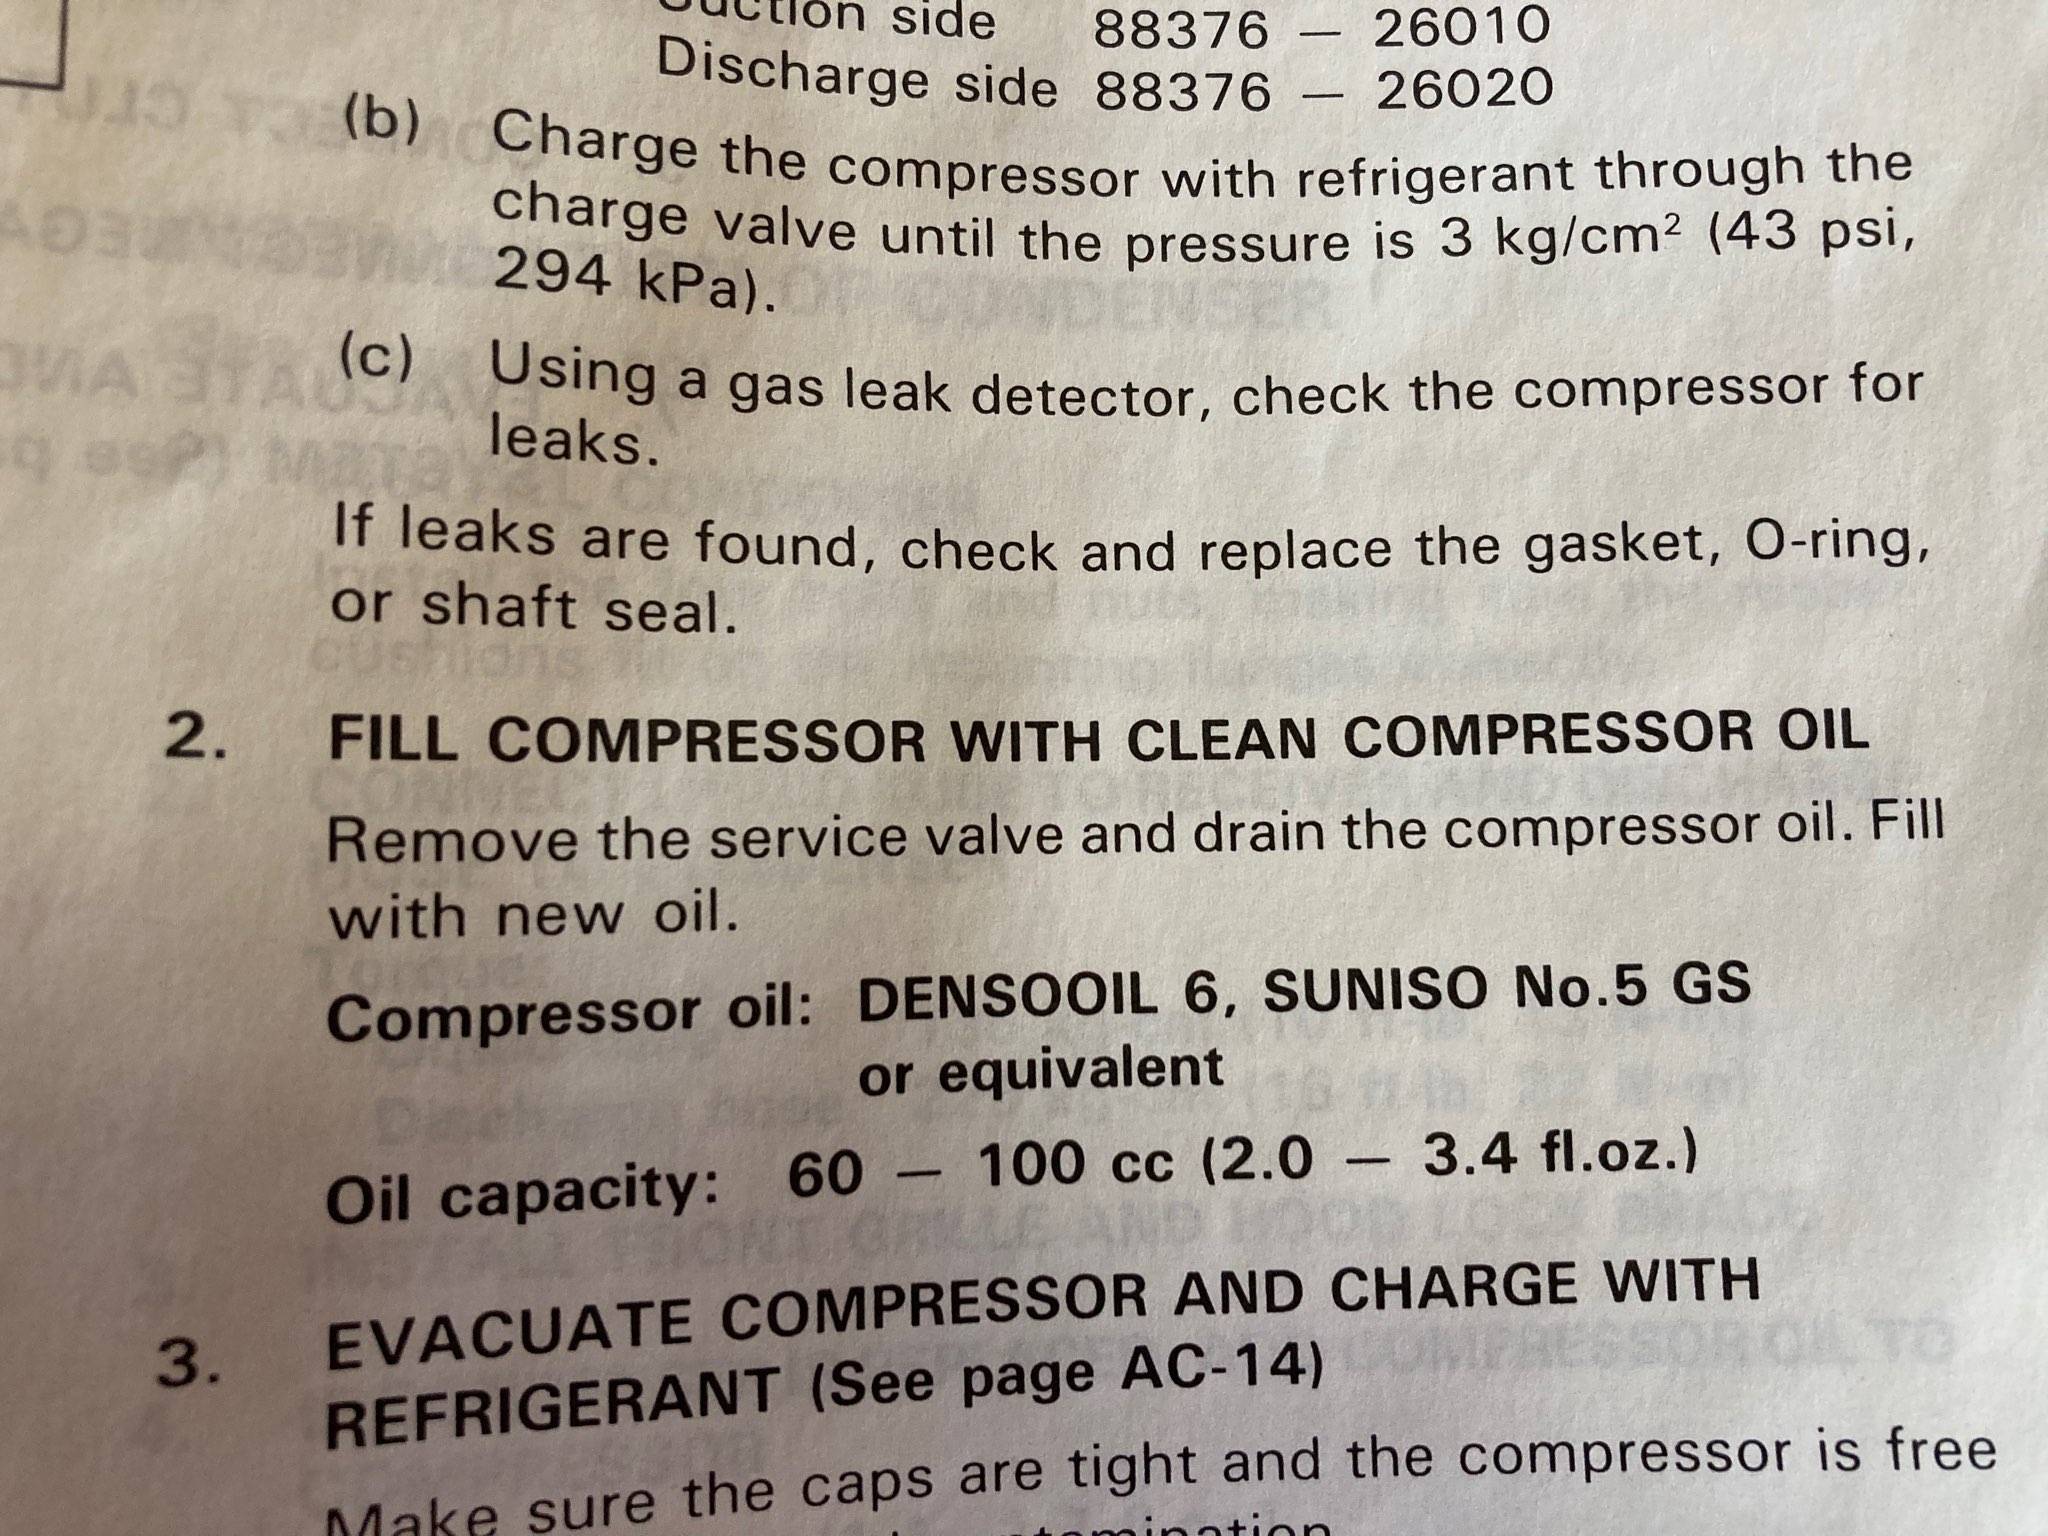
The compressor that I bought had no oil inside of it. After reading the FSM it calls for 2.0 � 3.4 fl oz of PAG oil in the system. I�m going to be putting in 2.9 oz (86 ml) of oil in my system as I feel that should be sufficient. Using a ML pouring cup I poured 40 ML into the suction side of the compressor and turned the clutch. The compressor has markings on each side so you know which is which. I�m going to put the remaining 46 ML of PAG oil in the drier to ensure that the system is properly lubricated per the compressor manufacturer�s instructions.
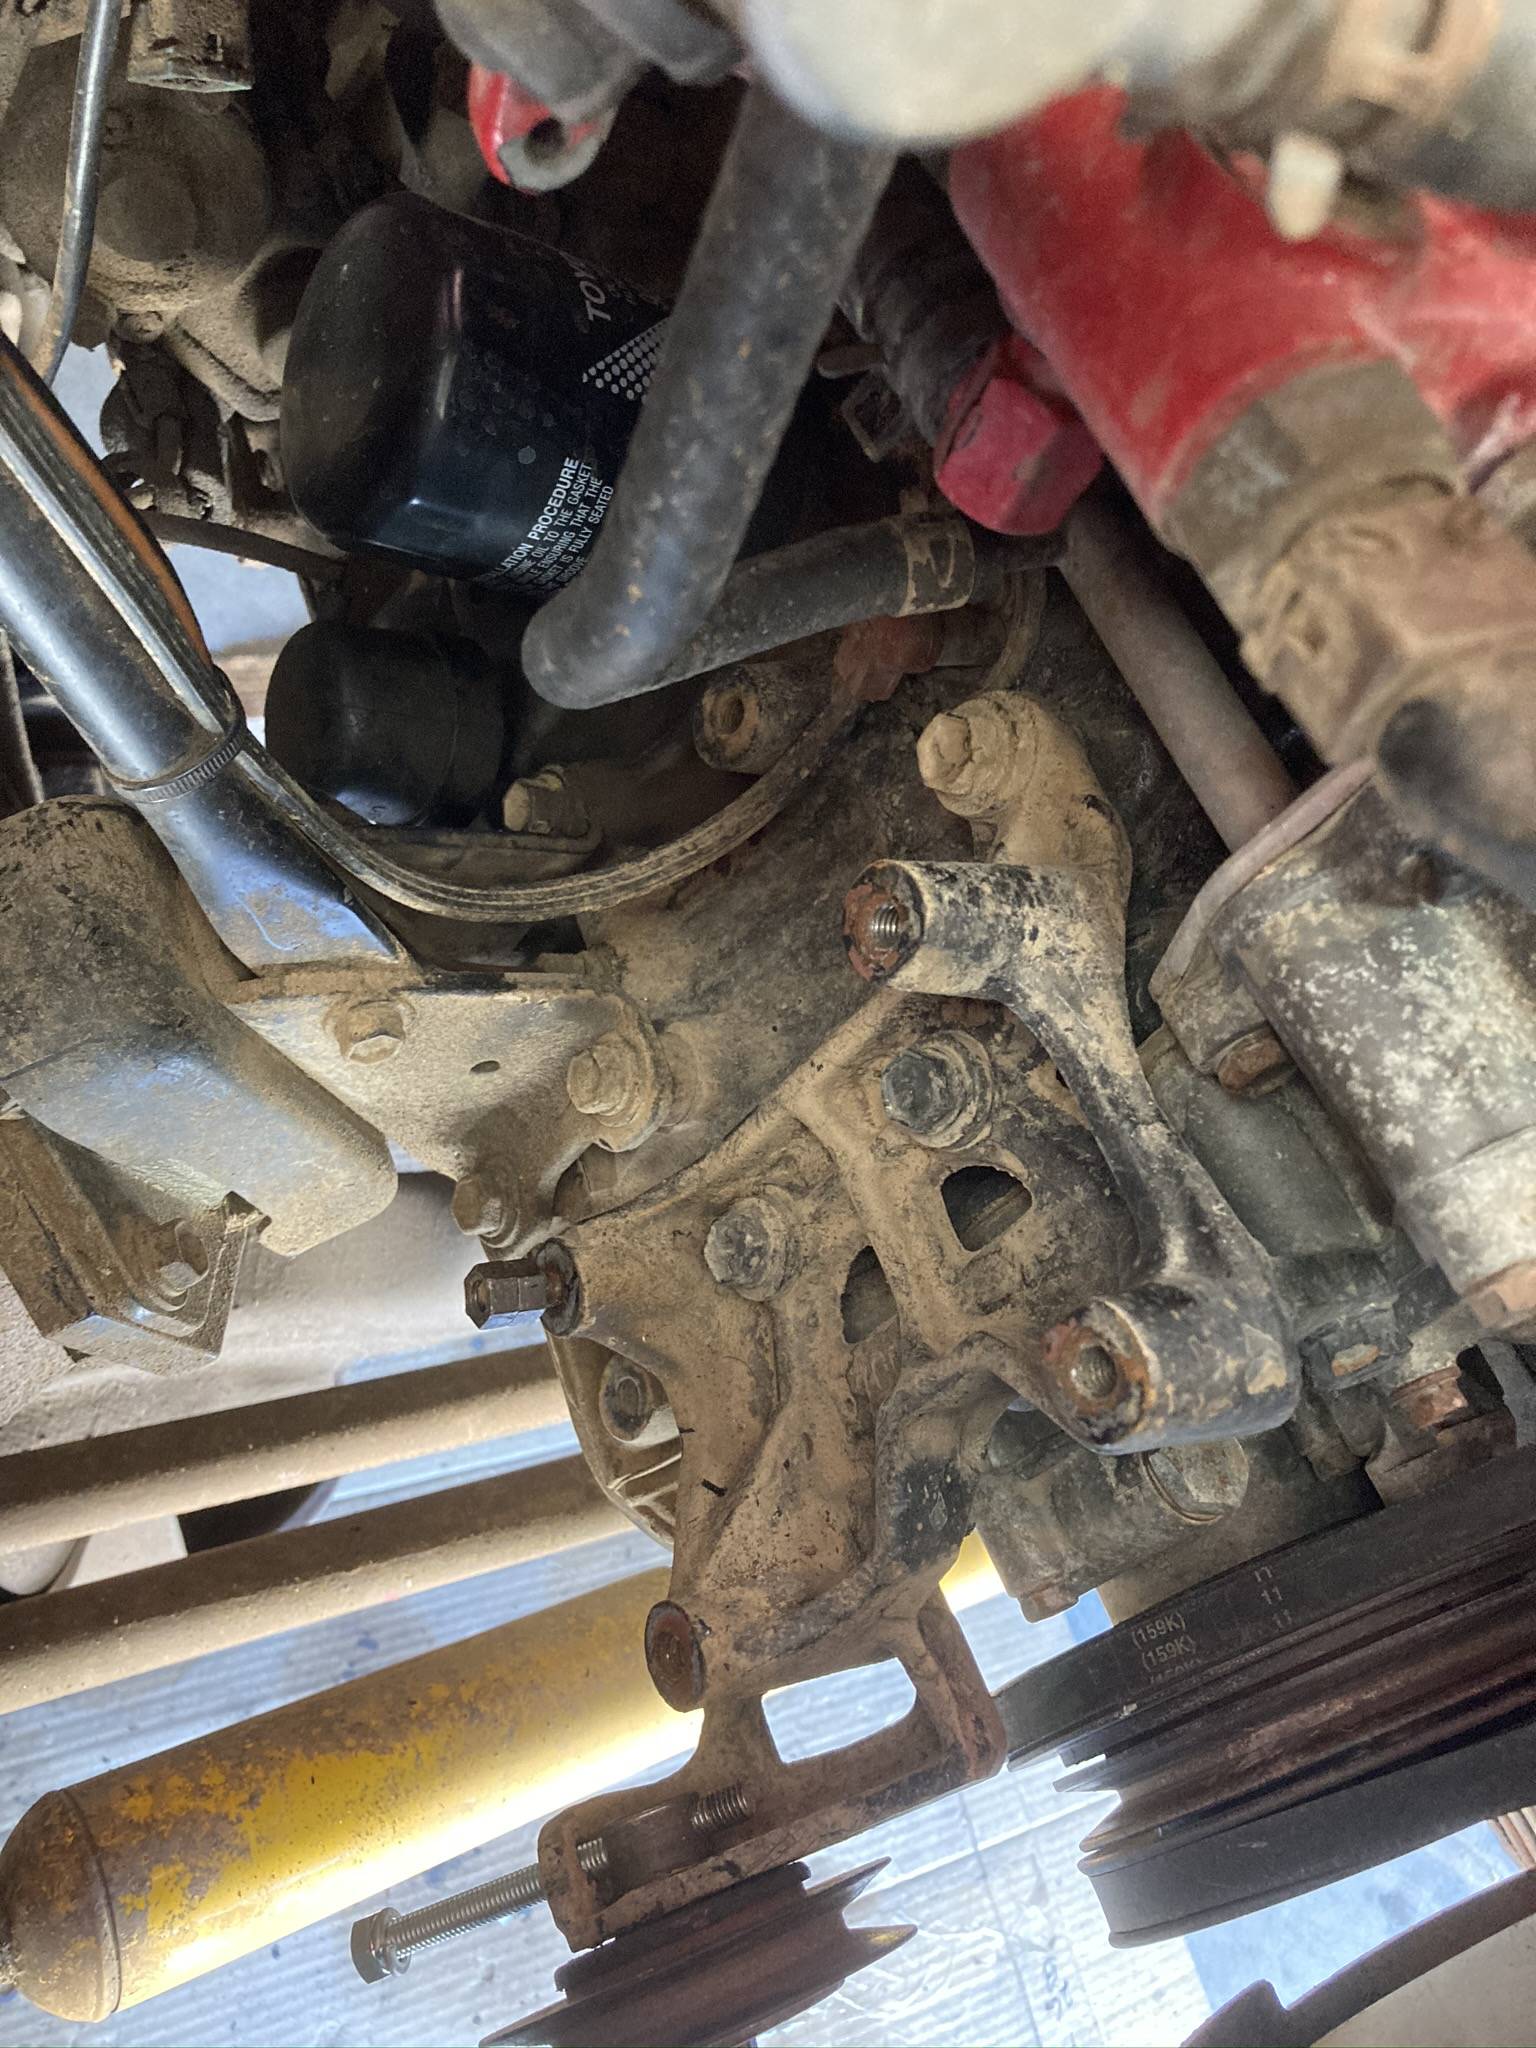
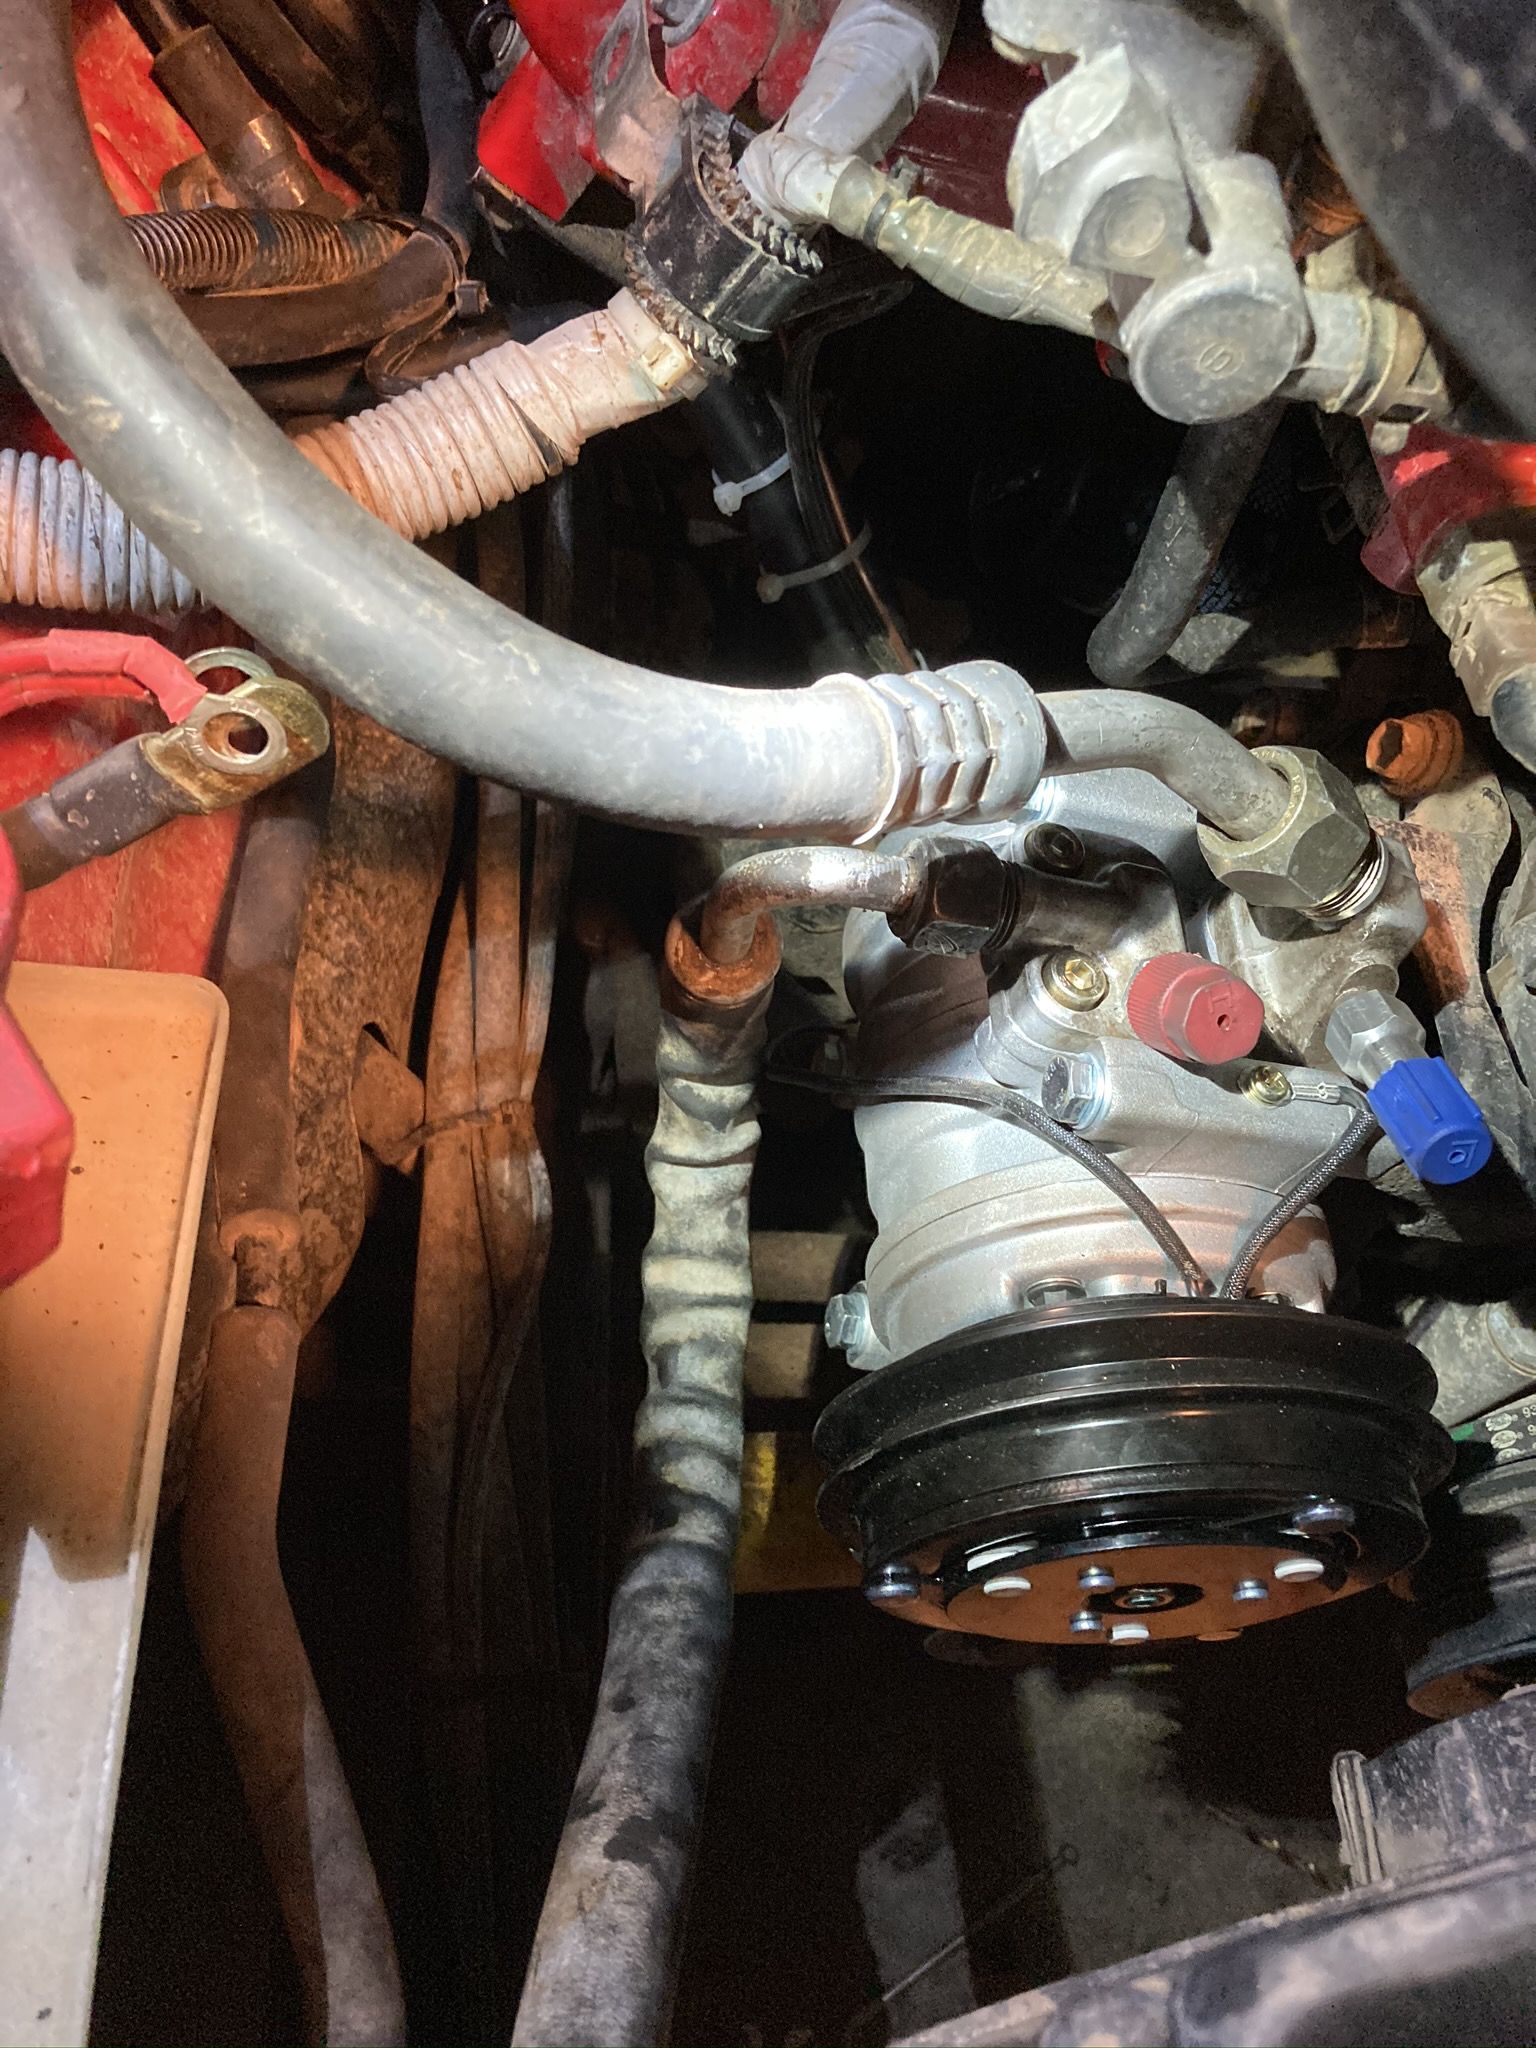
Once the compressor is oiled and everything is good to go, attach it to the A/C bracket on the side of the engine block using 4 M8 x 1.25 x 90 bolts with a washer. KLF kept the original A/C bracket on the engine and had it fitted with a custom bracket for the York compressor he was going to use on his OBA system. I had to remove some studs on the bracket before I was able to bolt on my compressor. If your truck never had A/C, you�re going to need to install the correct bracket on your engine block. The bracket that I have on my 22RE has the idler pulley right below it.
Once you�ve bolted on the compressor, you�re ready to move on to installing the condenser.
Condenser/Drier
I originally had bought a Spectra condenser from AutoZone and it didn�t work because the fitting on the line going to the drier was too big. All in all it was just a POS � the quality just wasn�t there.
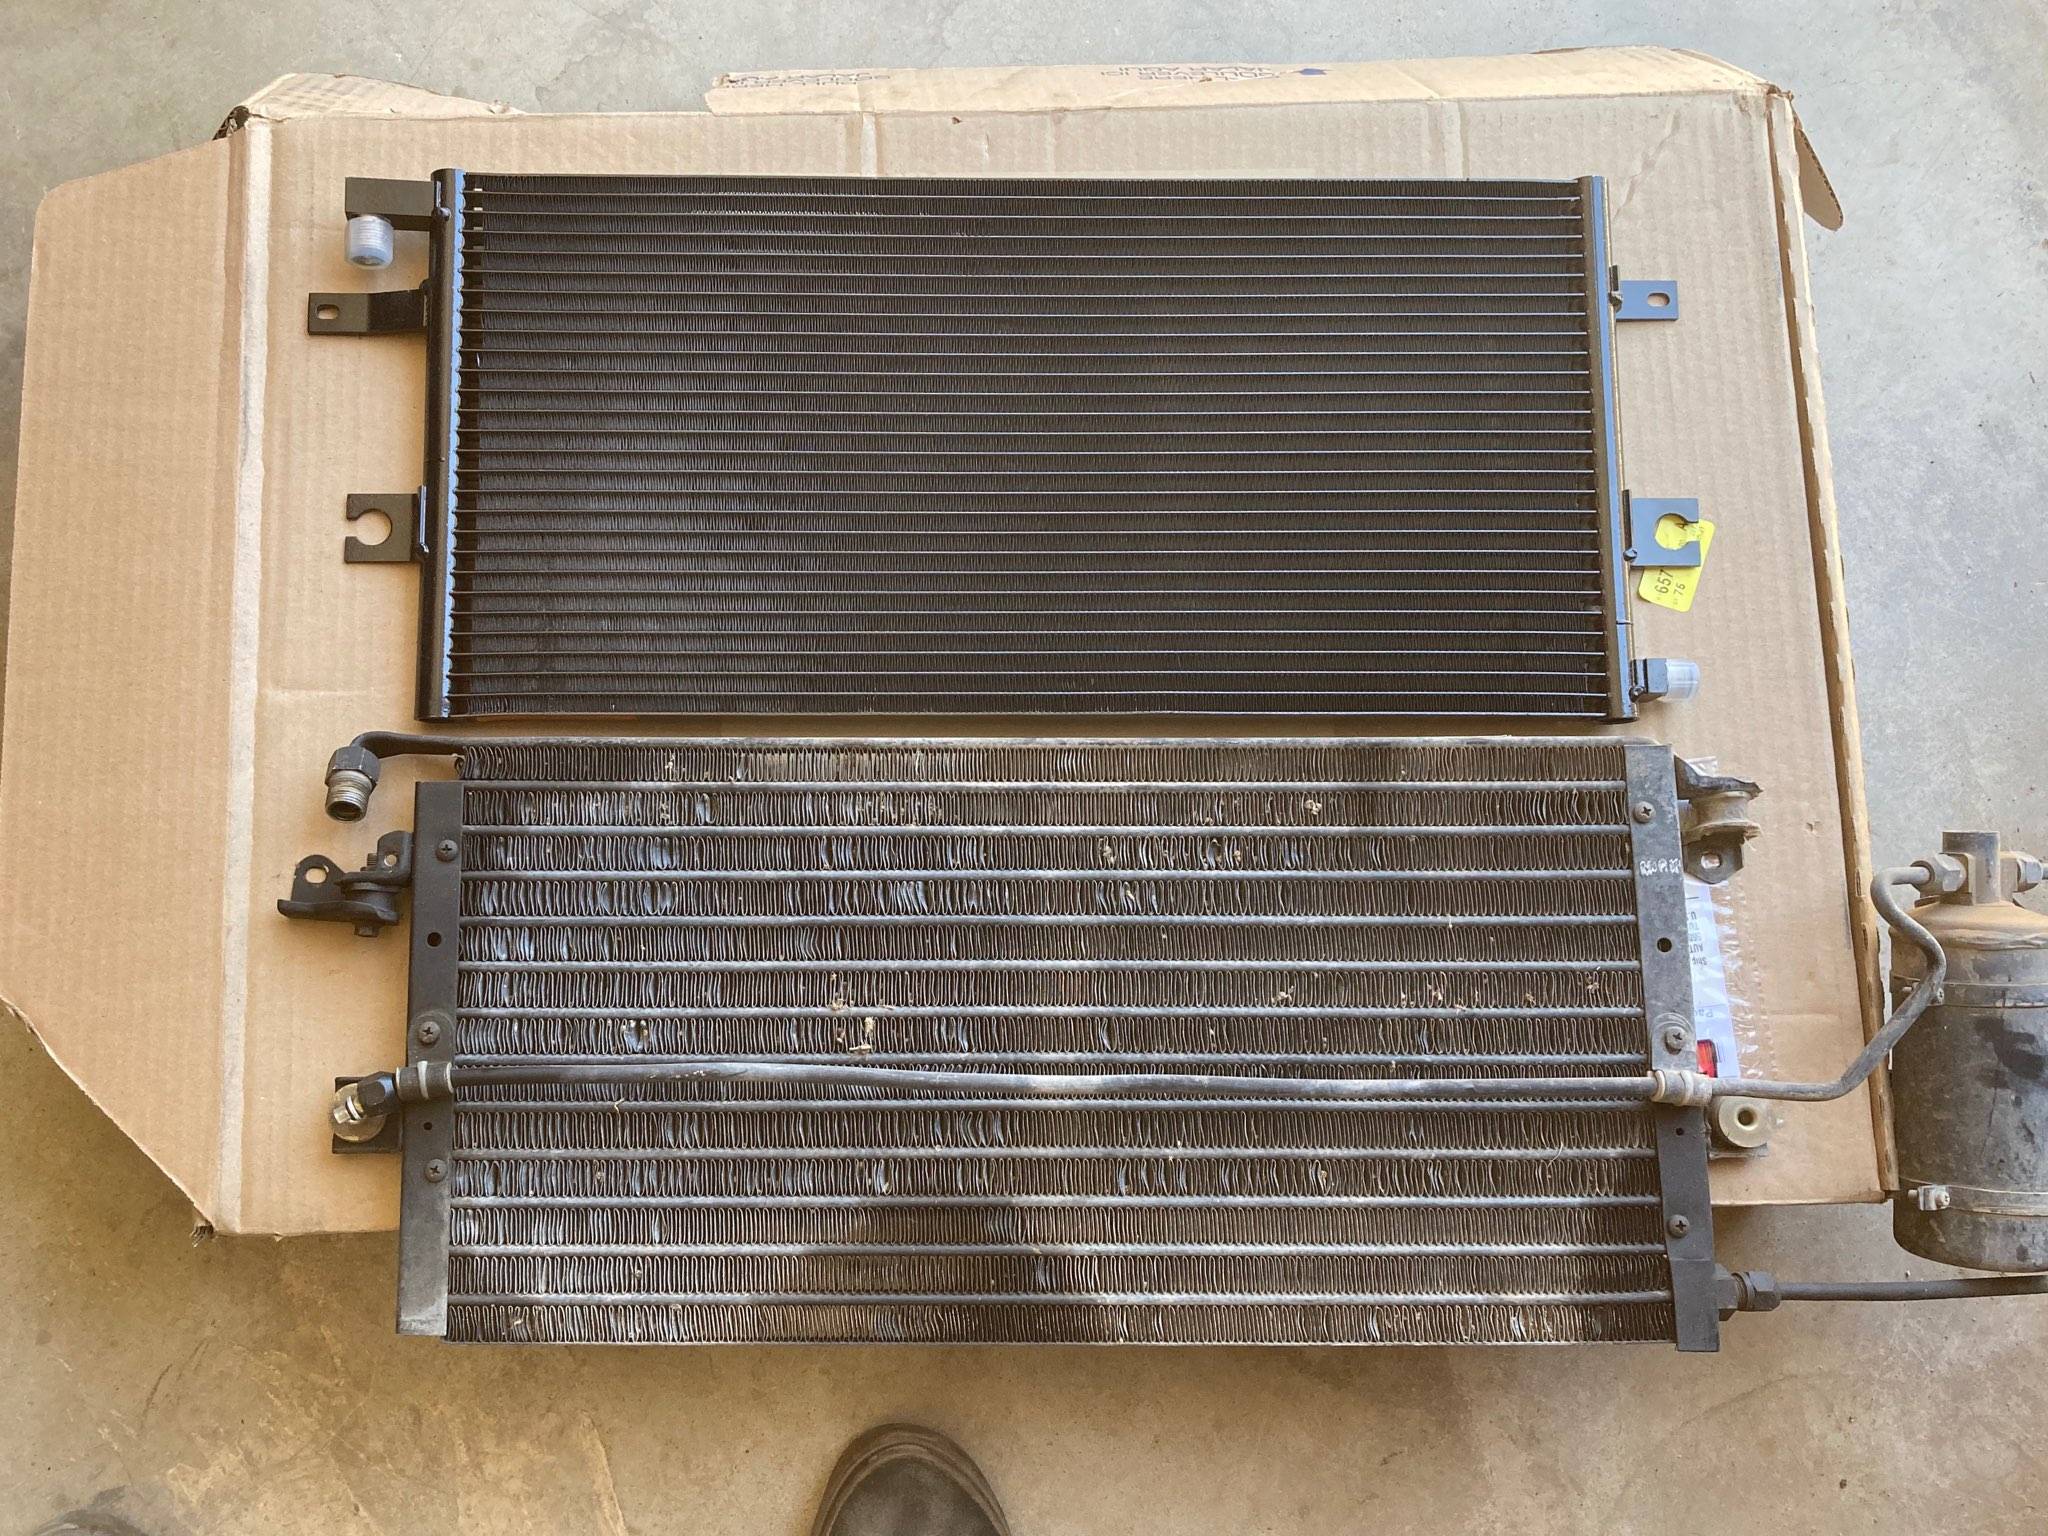
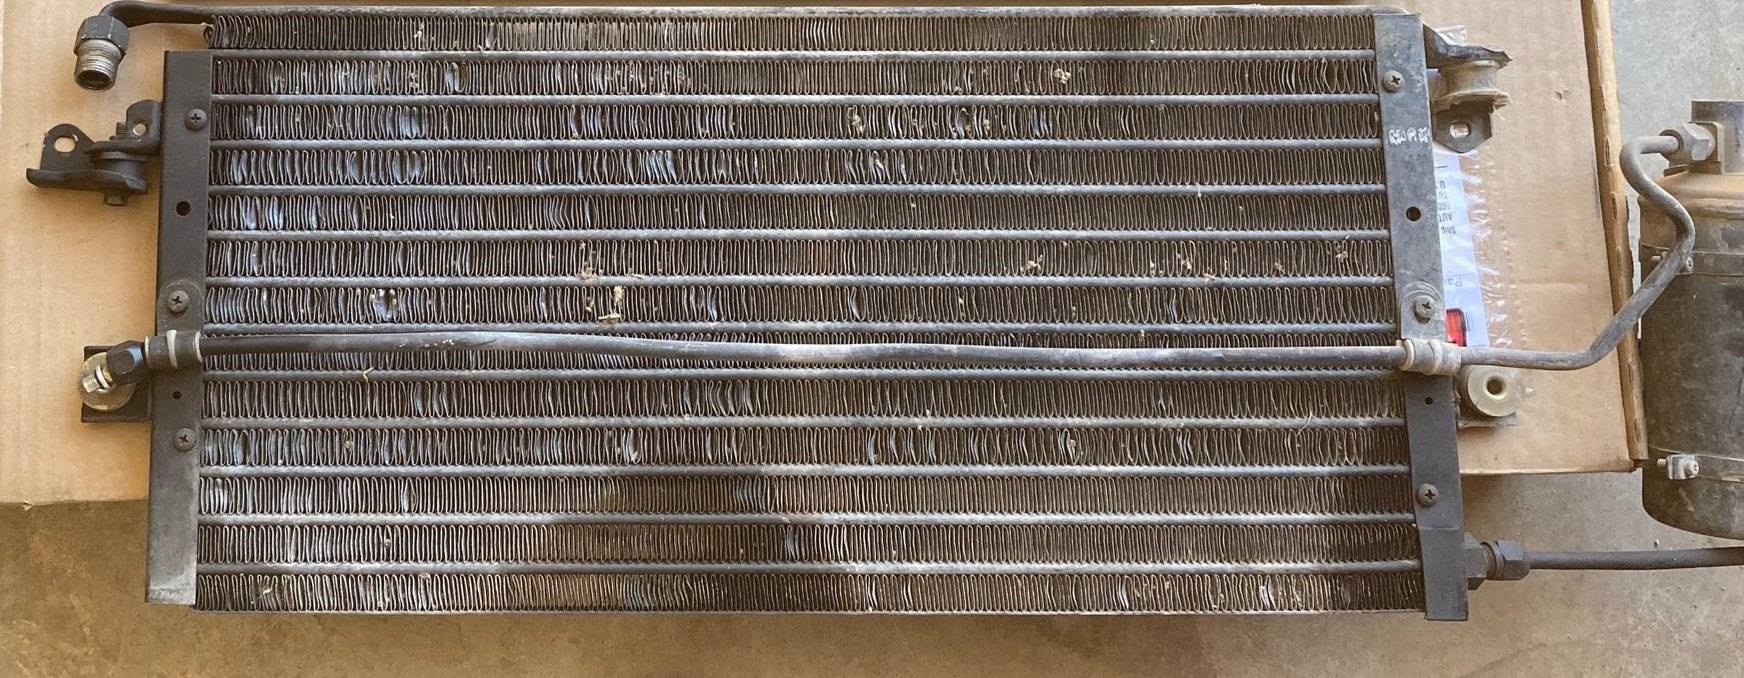
I ended up ordering a brand new Denso (OEM) condenser for a 1987 4Runner. The 4Runner condensers have a smaller condenser in front of them to make up for the extra cab space in the 4Runner. Since I�m converting this system to R134a having a bigger condenser doesn�t hurt. The parts truck where I got all my A/C stuff from was a 1986 pickup, so I did have to find some things to make the 4Runner condenser work. You can see the condensers are exactly the same minus the smaller condenser on the 4Runner's.
Swap over everything from your parts condenser (if you have one) over to your new one. This will include two brackets and two bushings that slip into the new one.
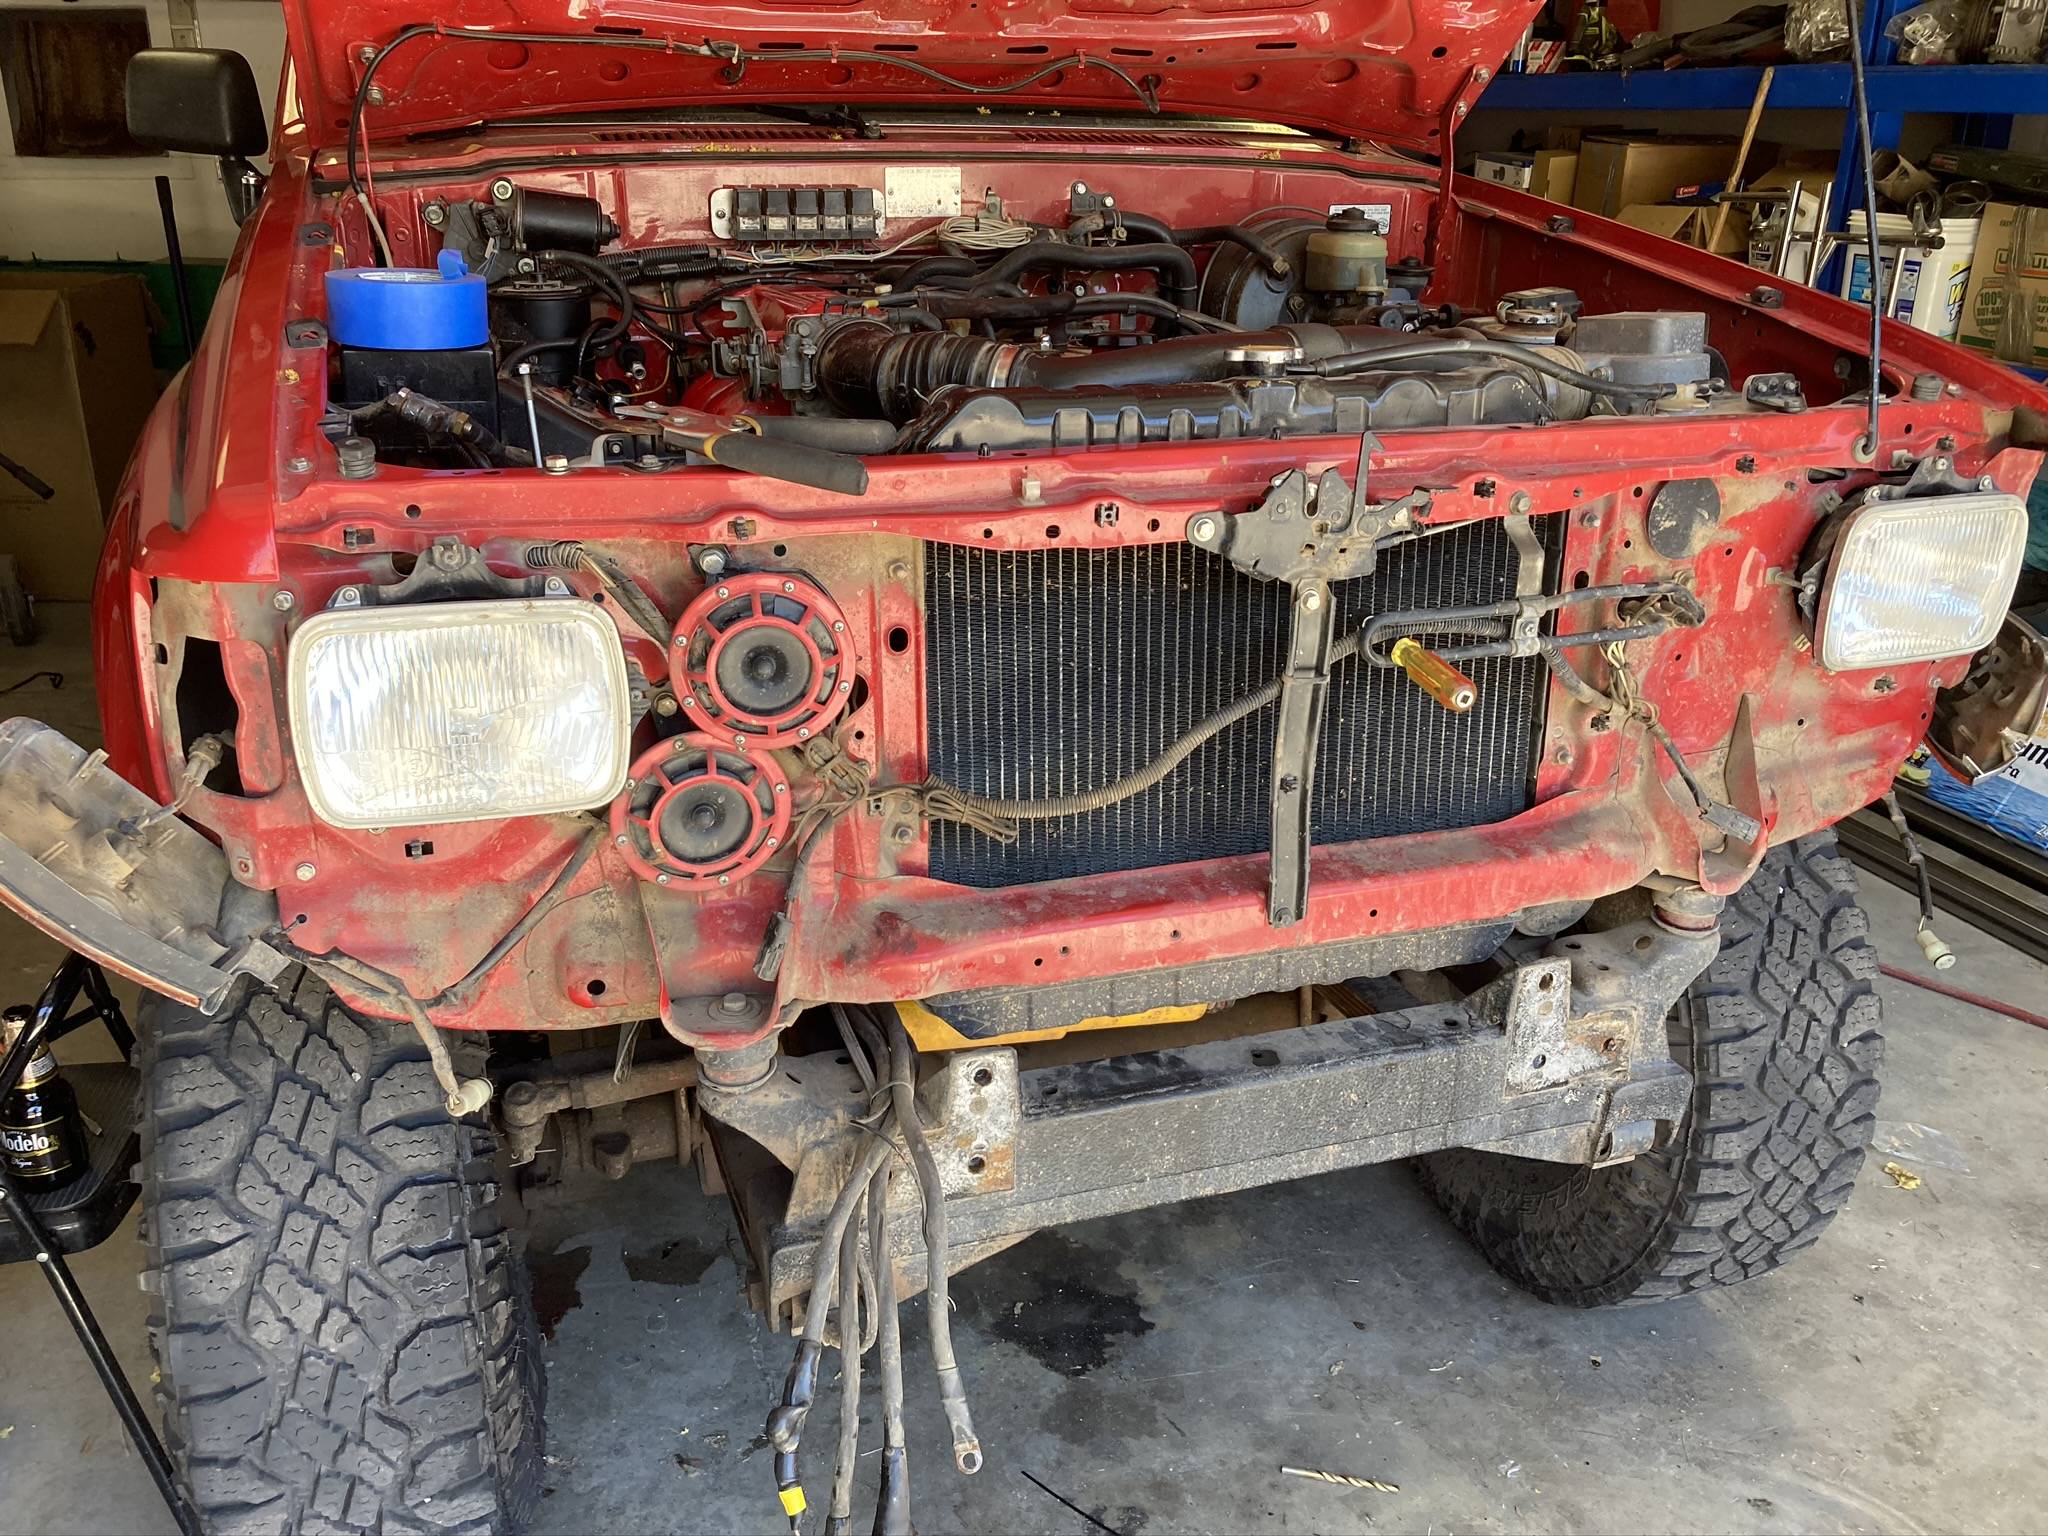
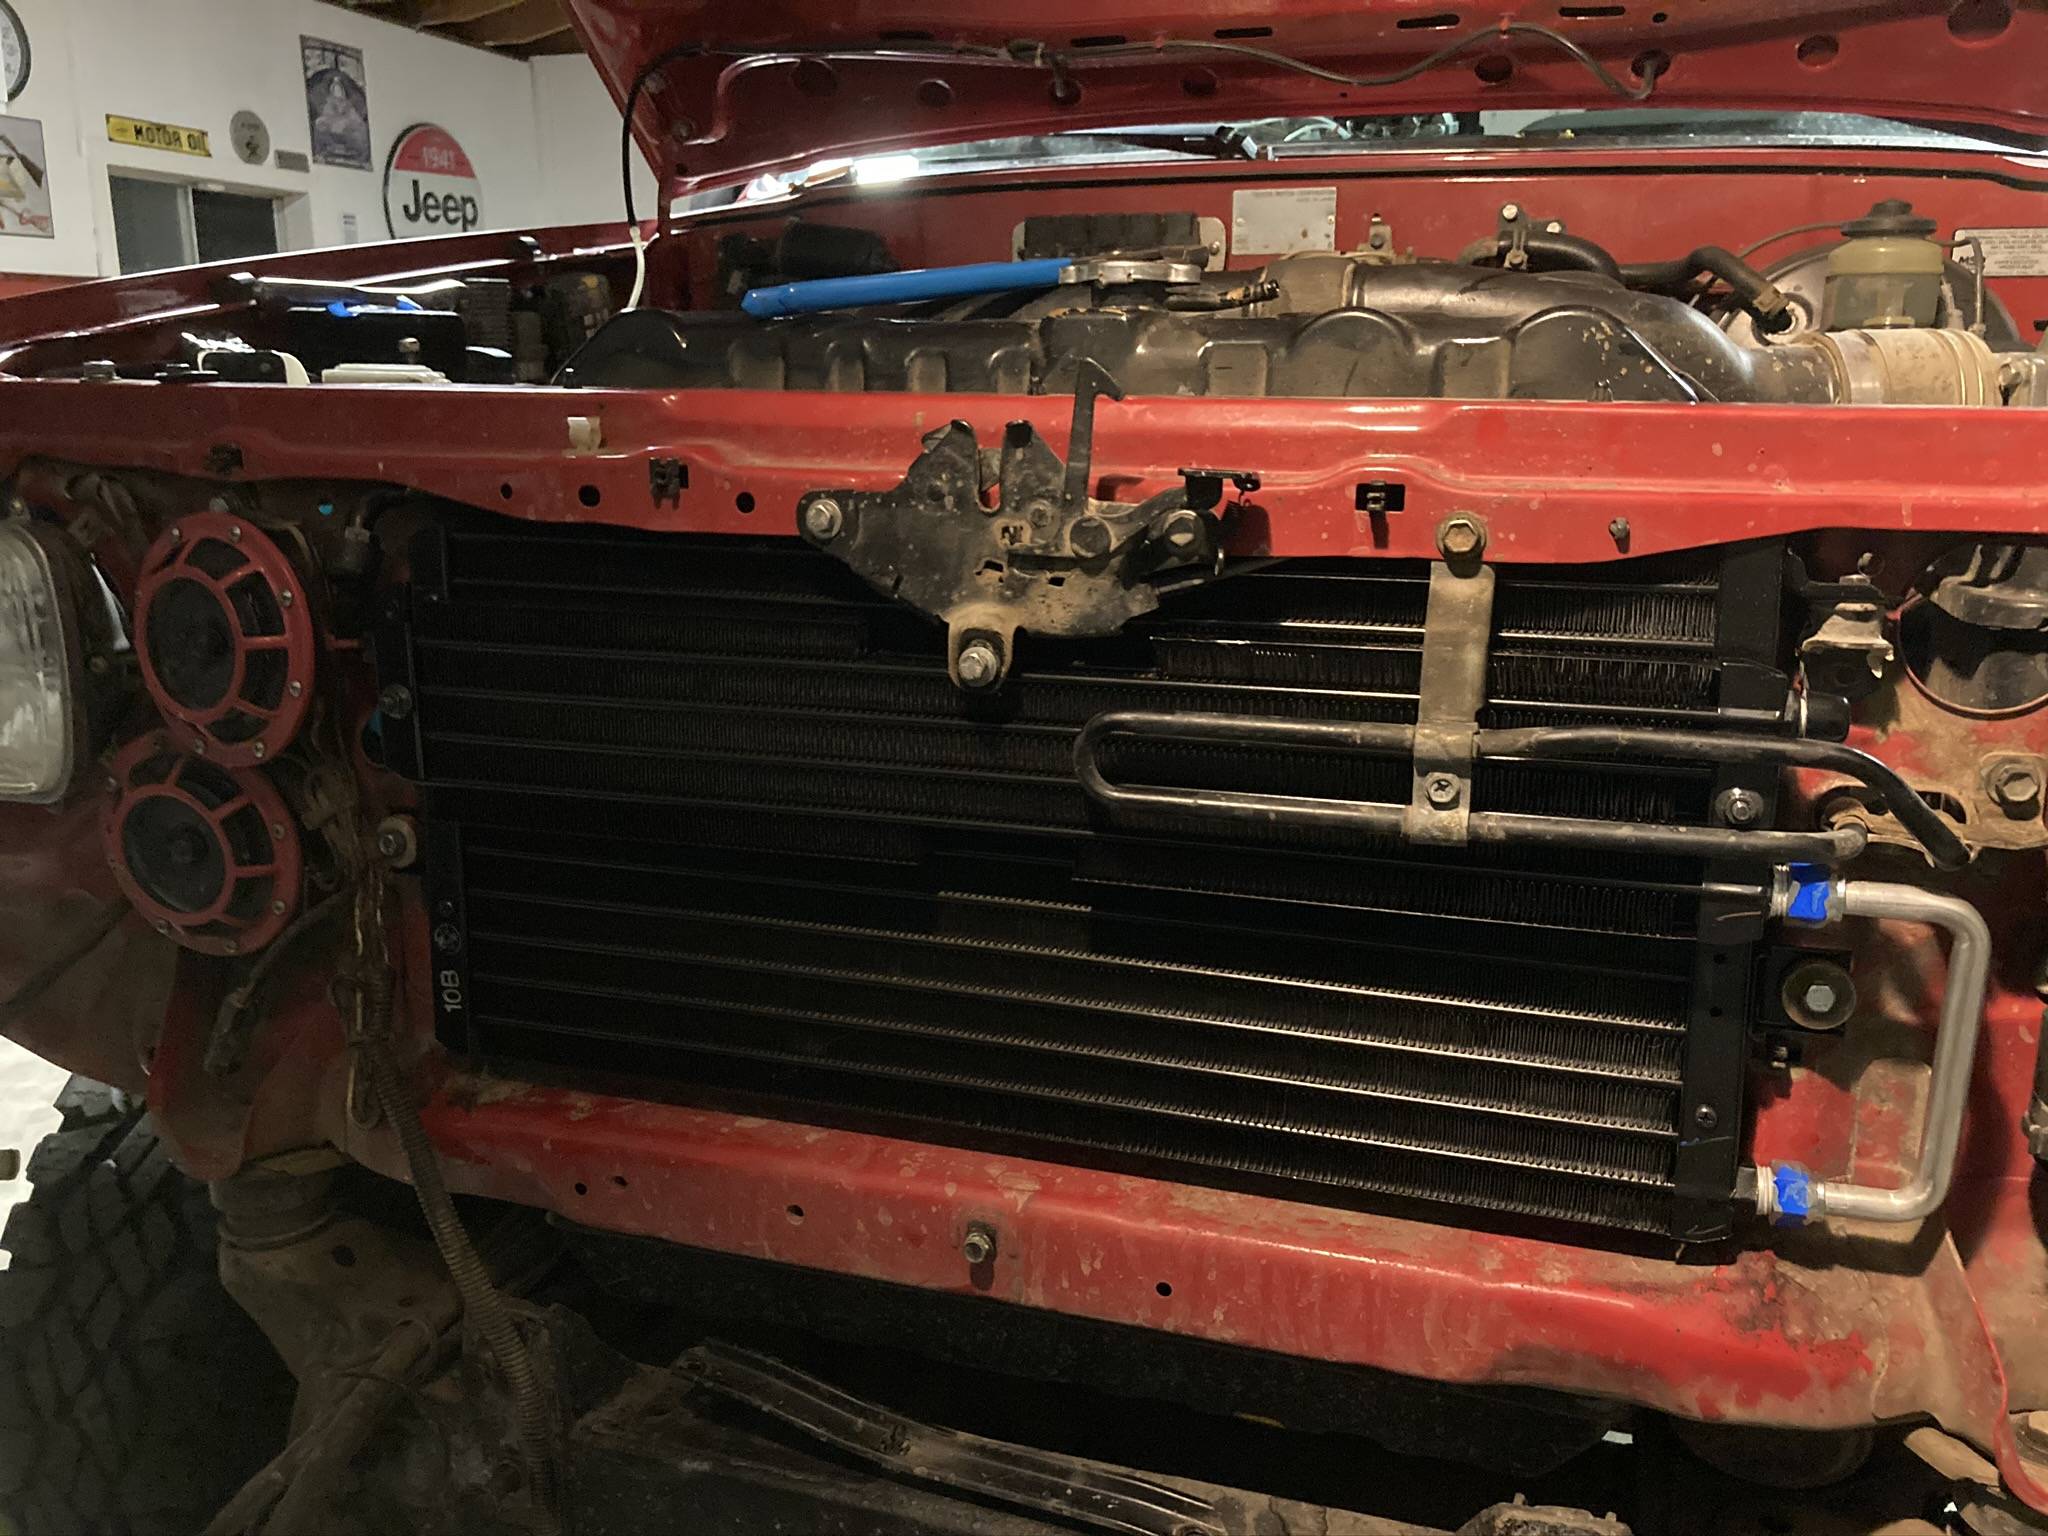
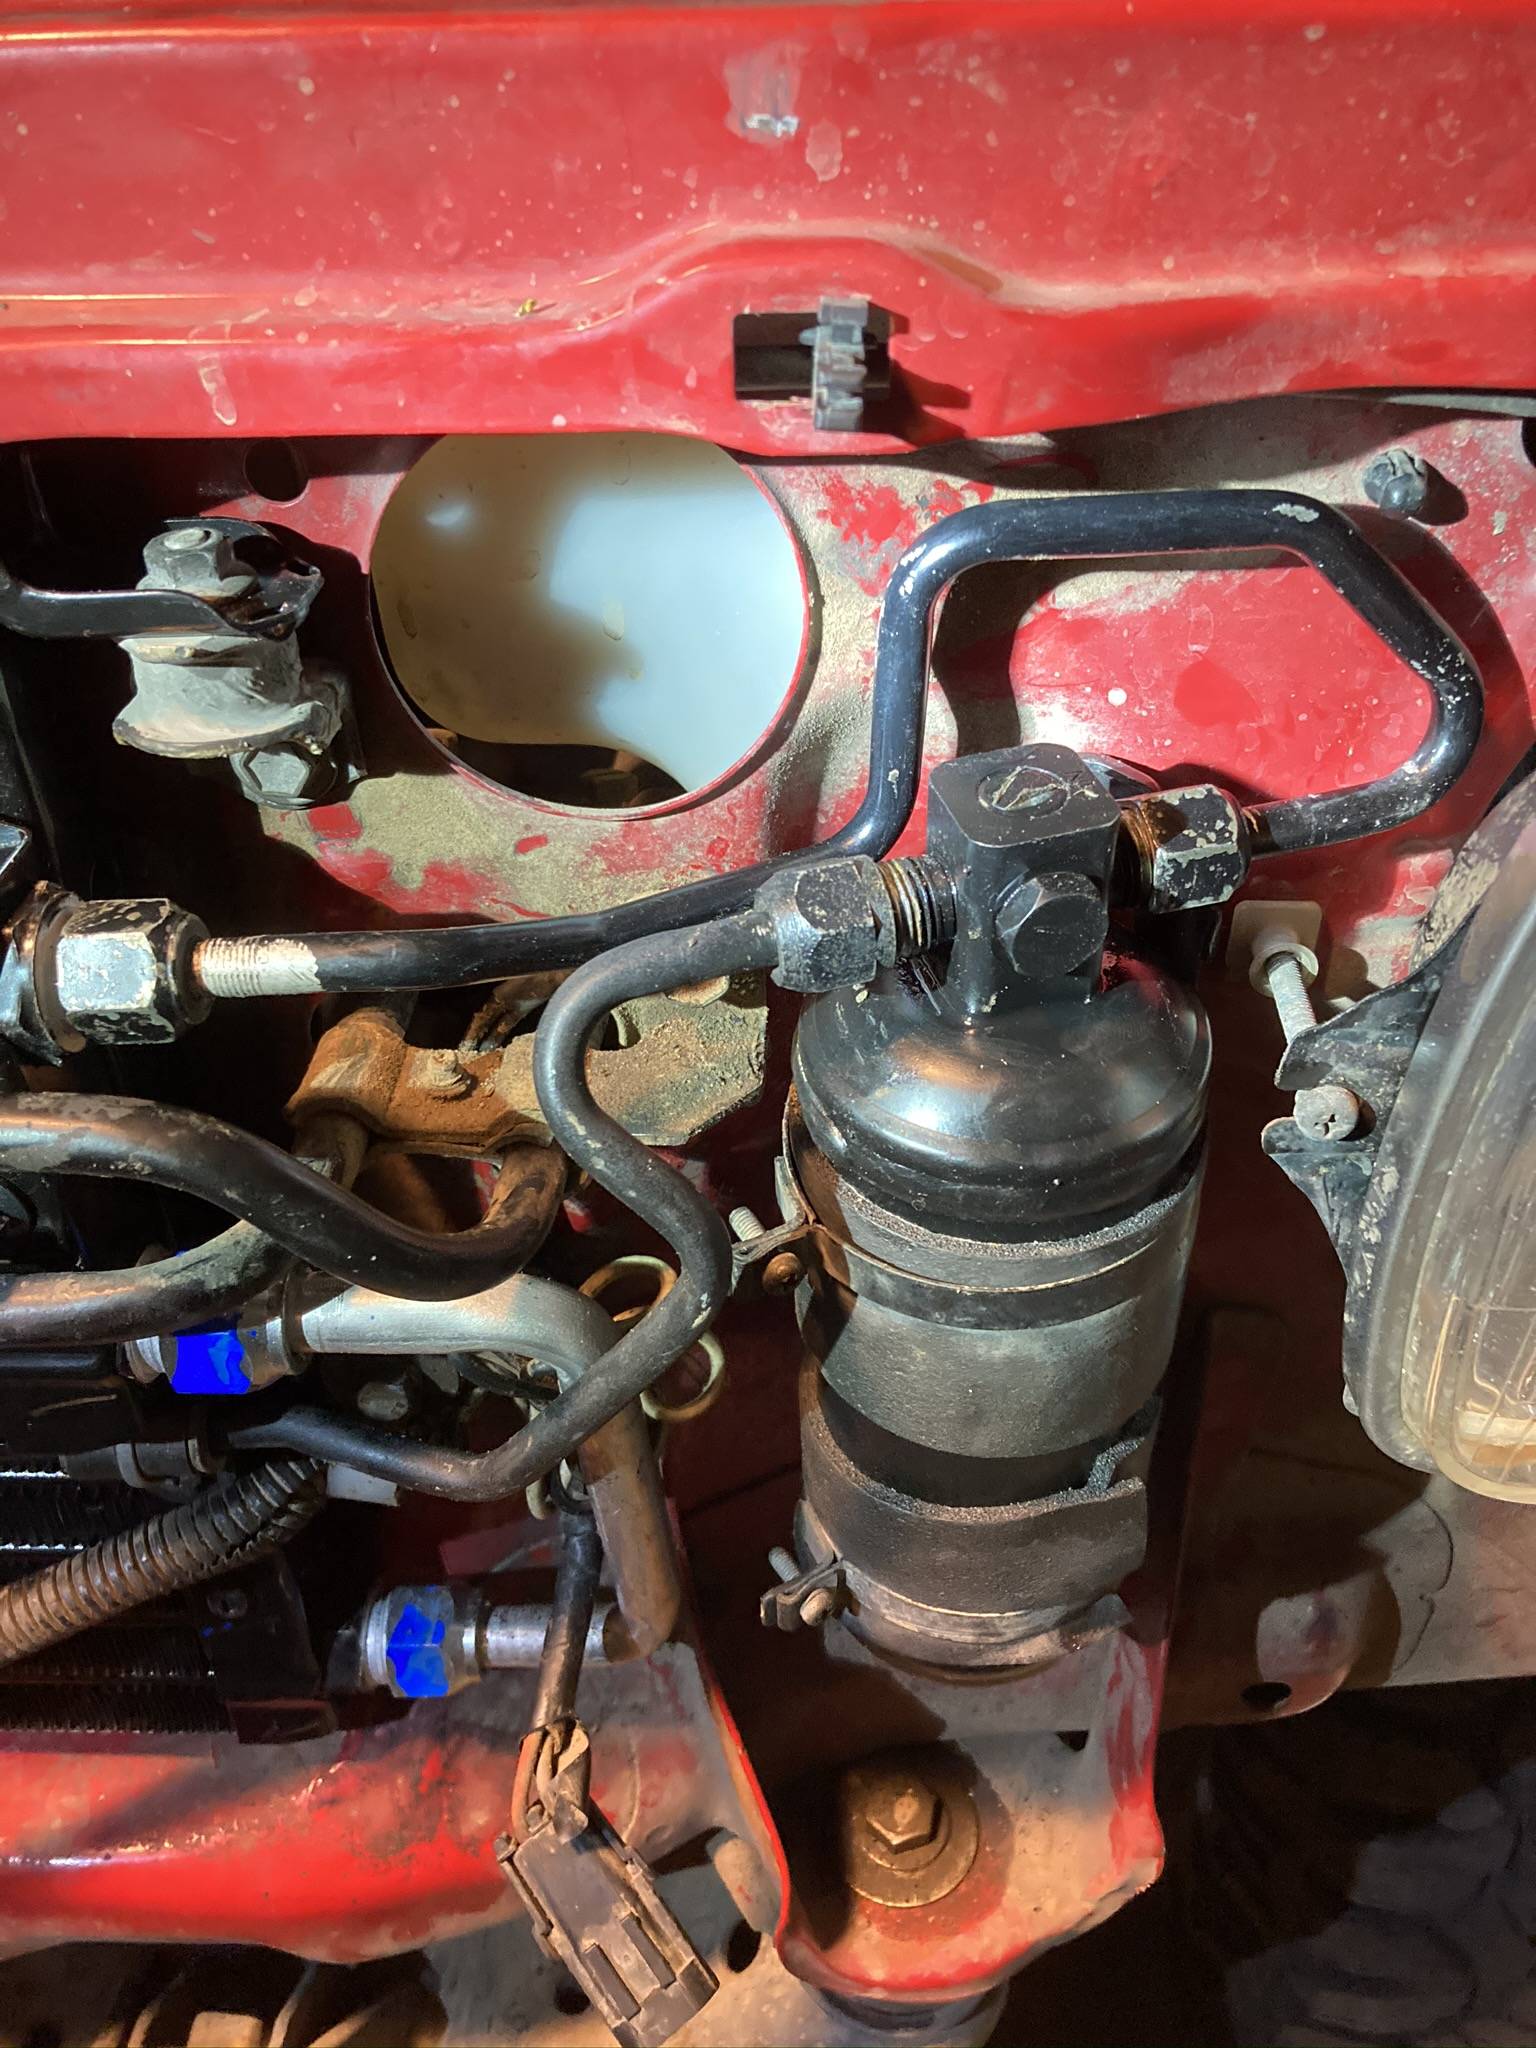
To access where the condenser and drier mount, you need to remove the front bumper and grille. I don�t have any pictures of how to remove a stock front bumper or grille, but it shouldn�t be too difficult. Once you have it off it should look like this.
There are two threaded holes where the condenser mounts with M6 bolts. There are two additional holes to mount it where the brackets go that you�ve just installed that use short M6 bolts with nylock nuts. The drier has it�s own separate mount where there are two holes behind the coolant reservoir. Before I installed my drier I remembered to put 46 ML of oil in it to ensure the system is properly lubricated per the instructions of the compressor manufacturer.
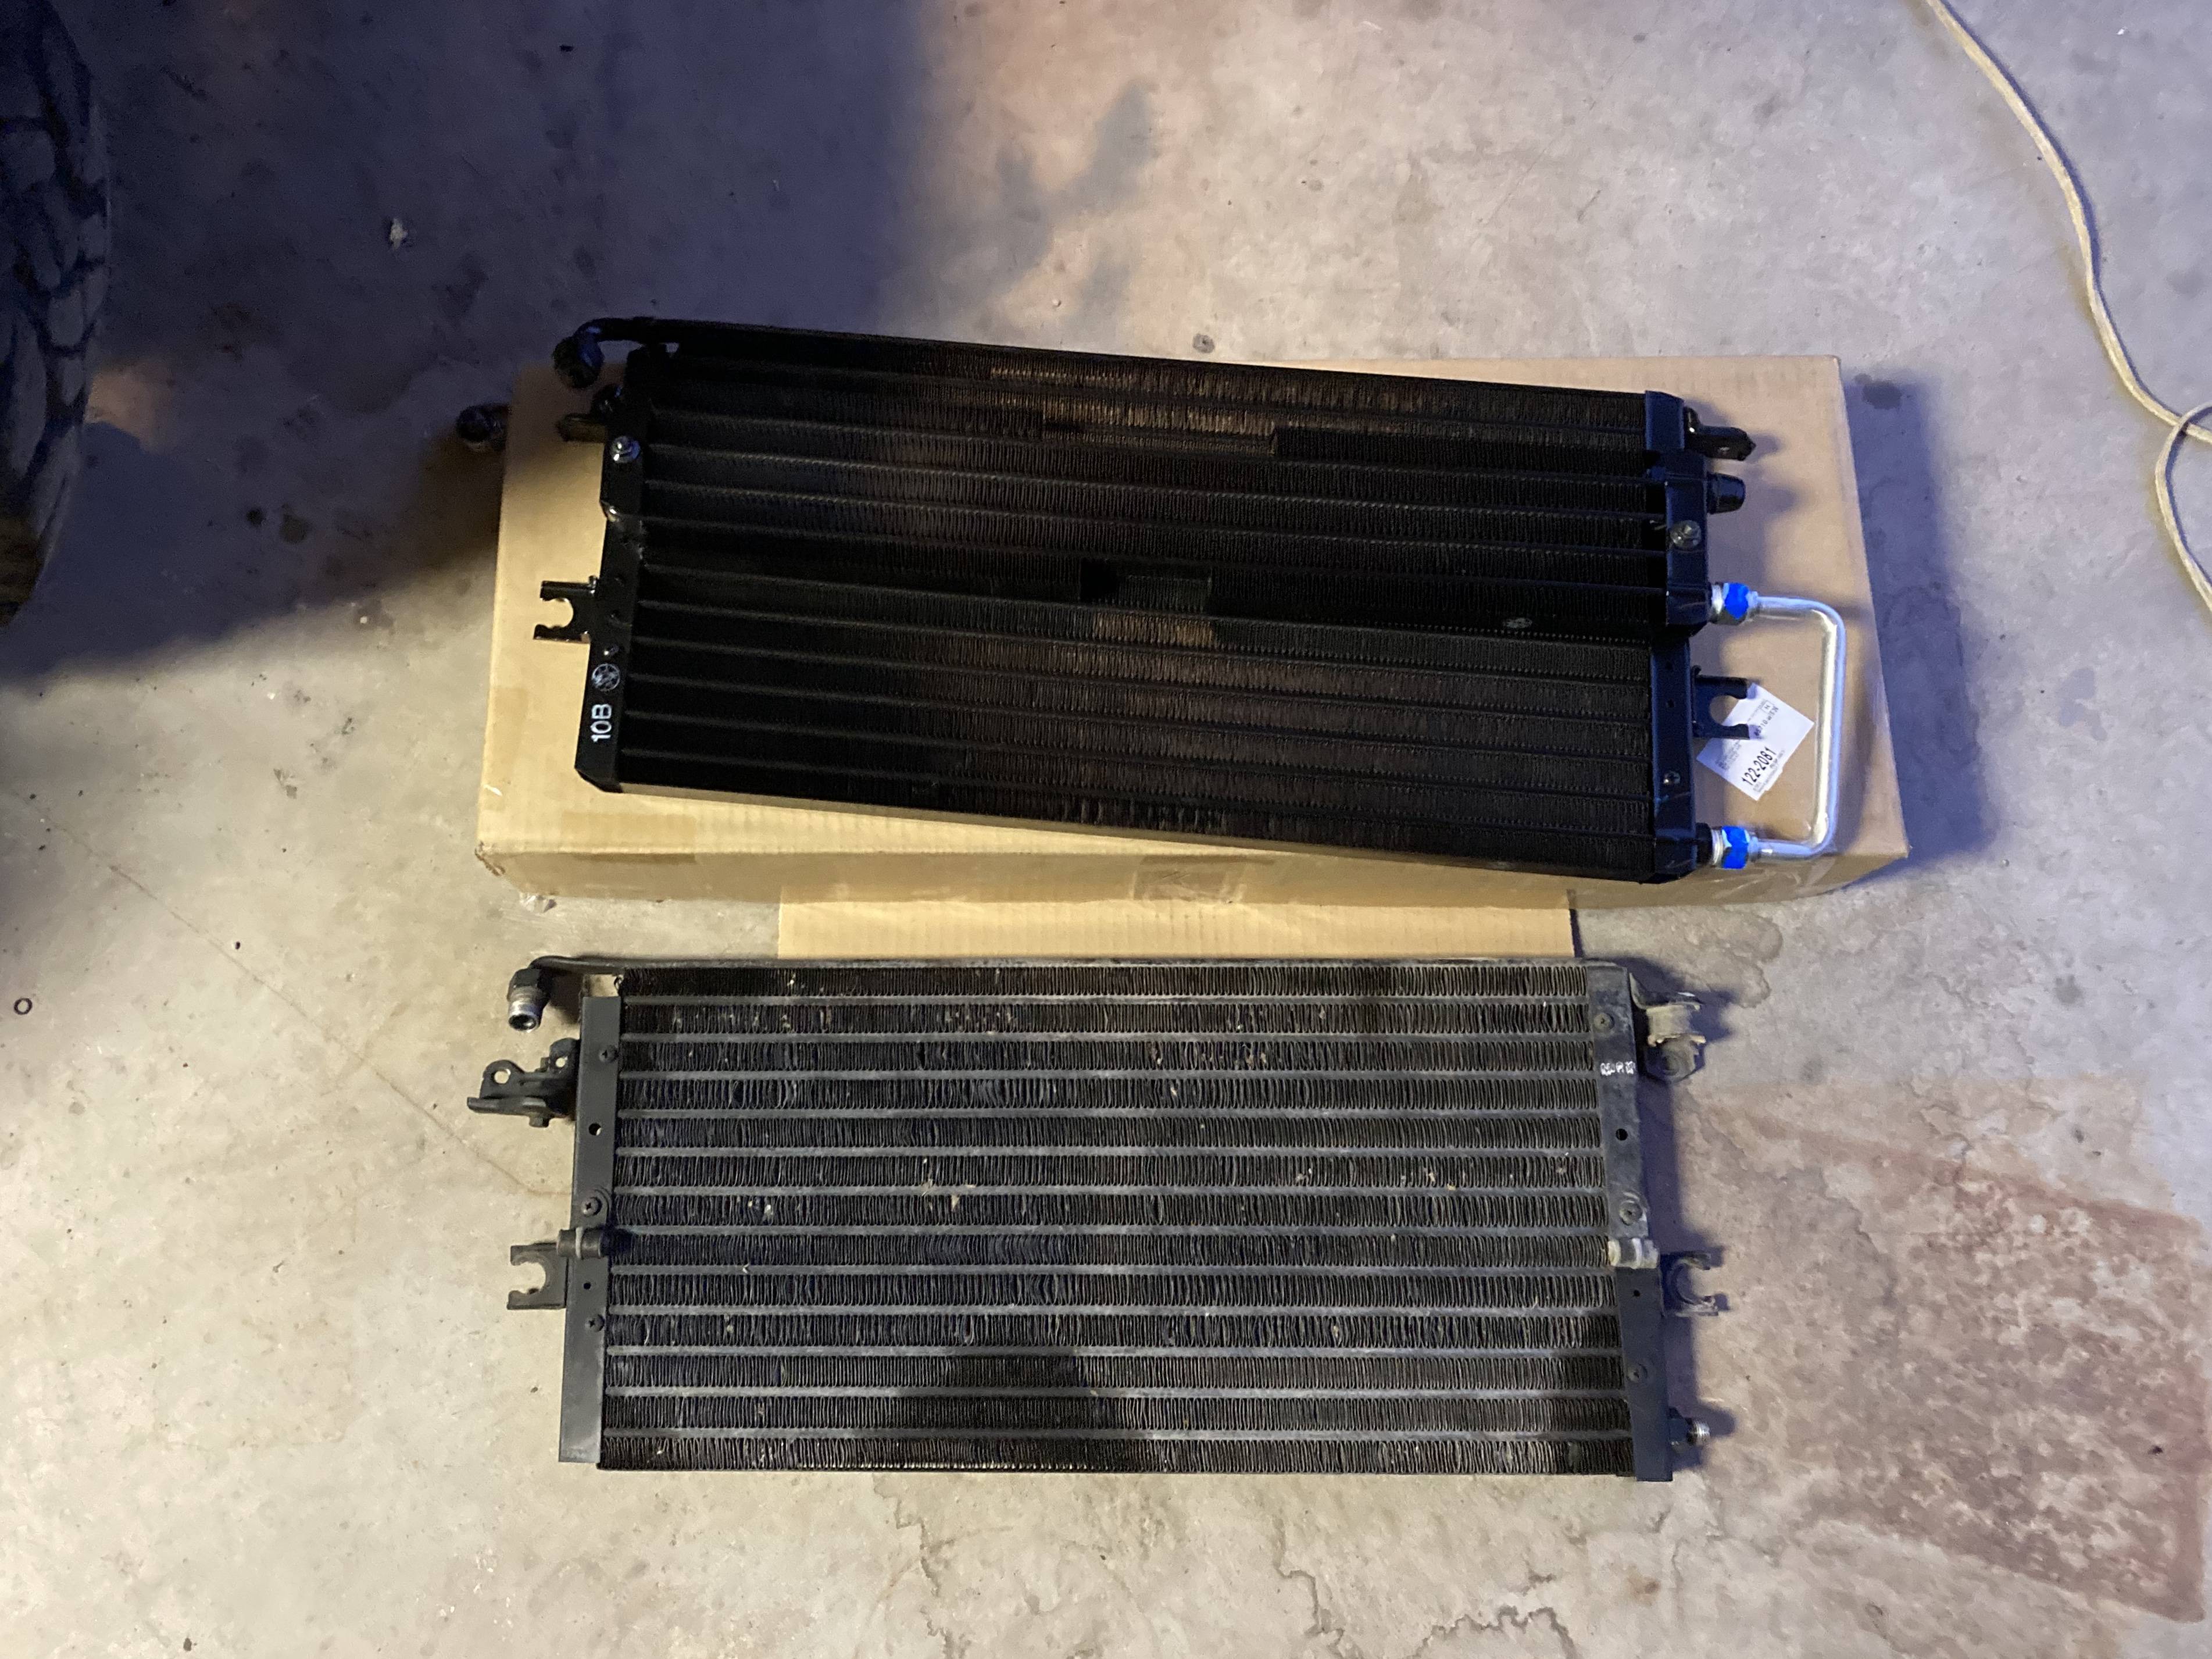
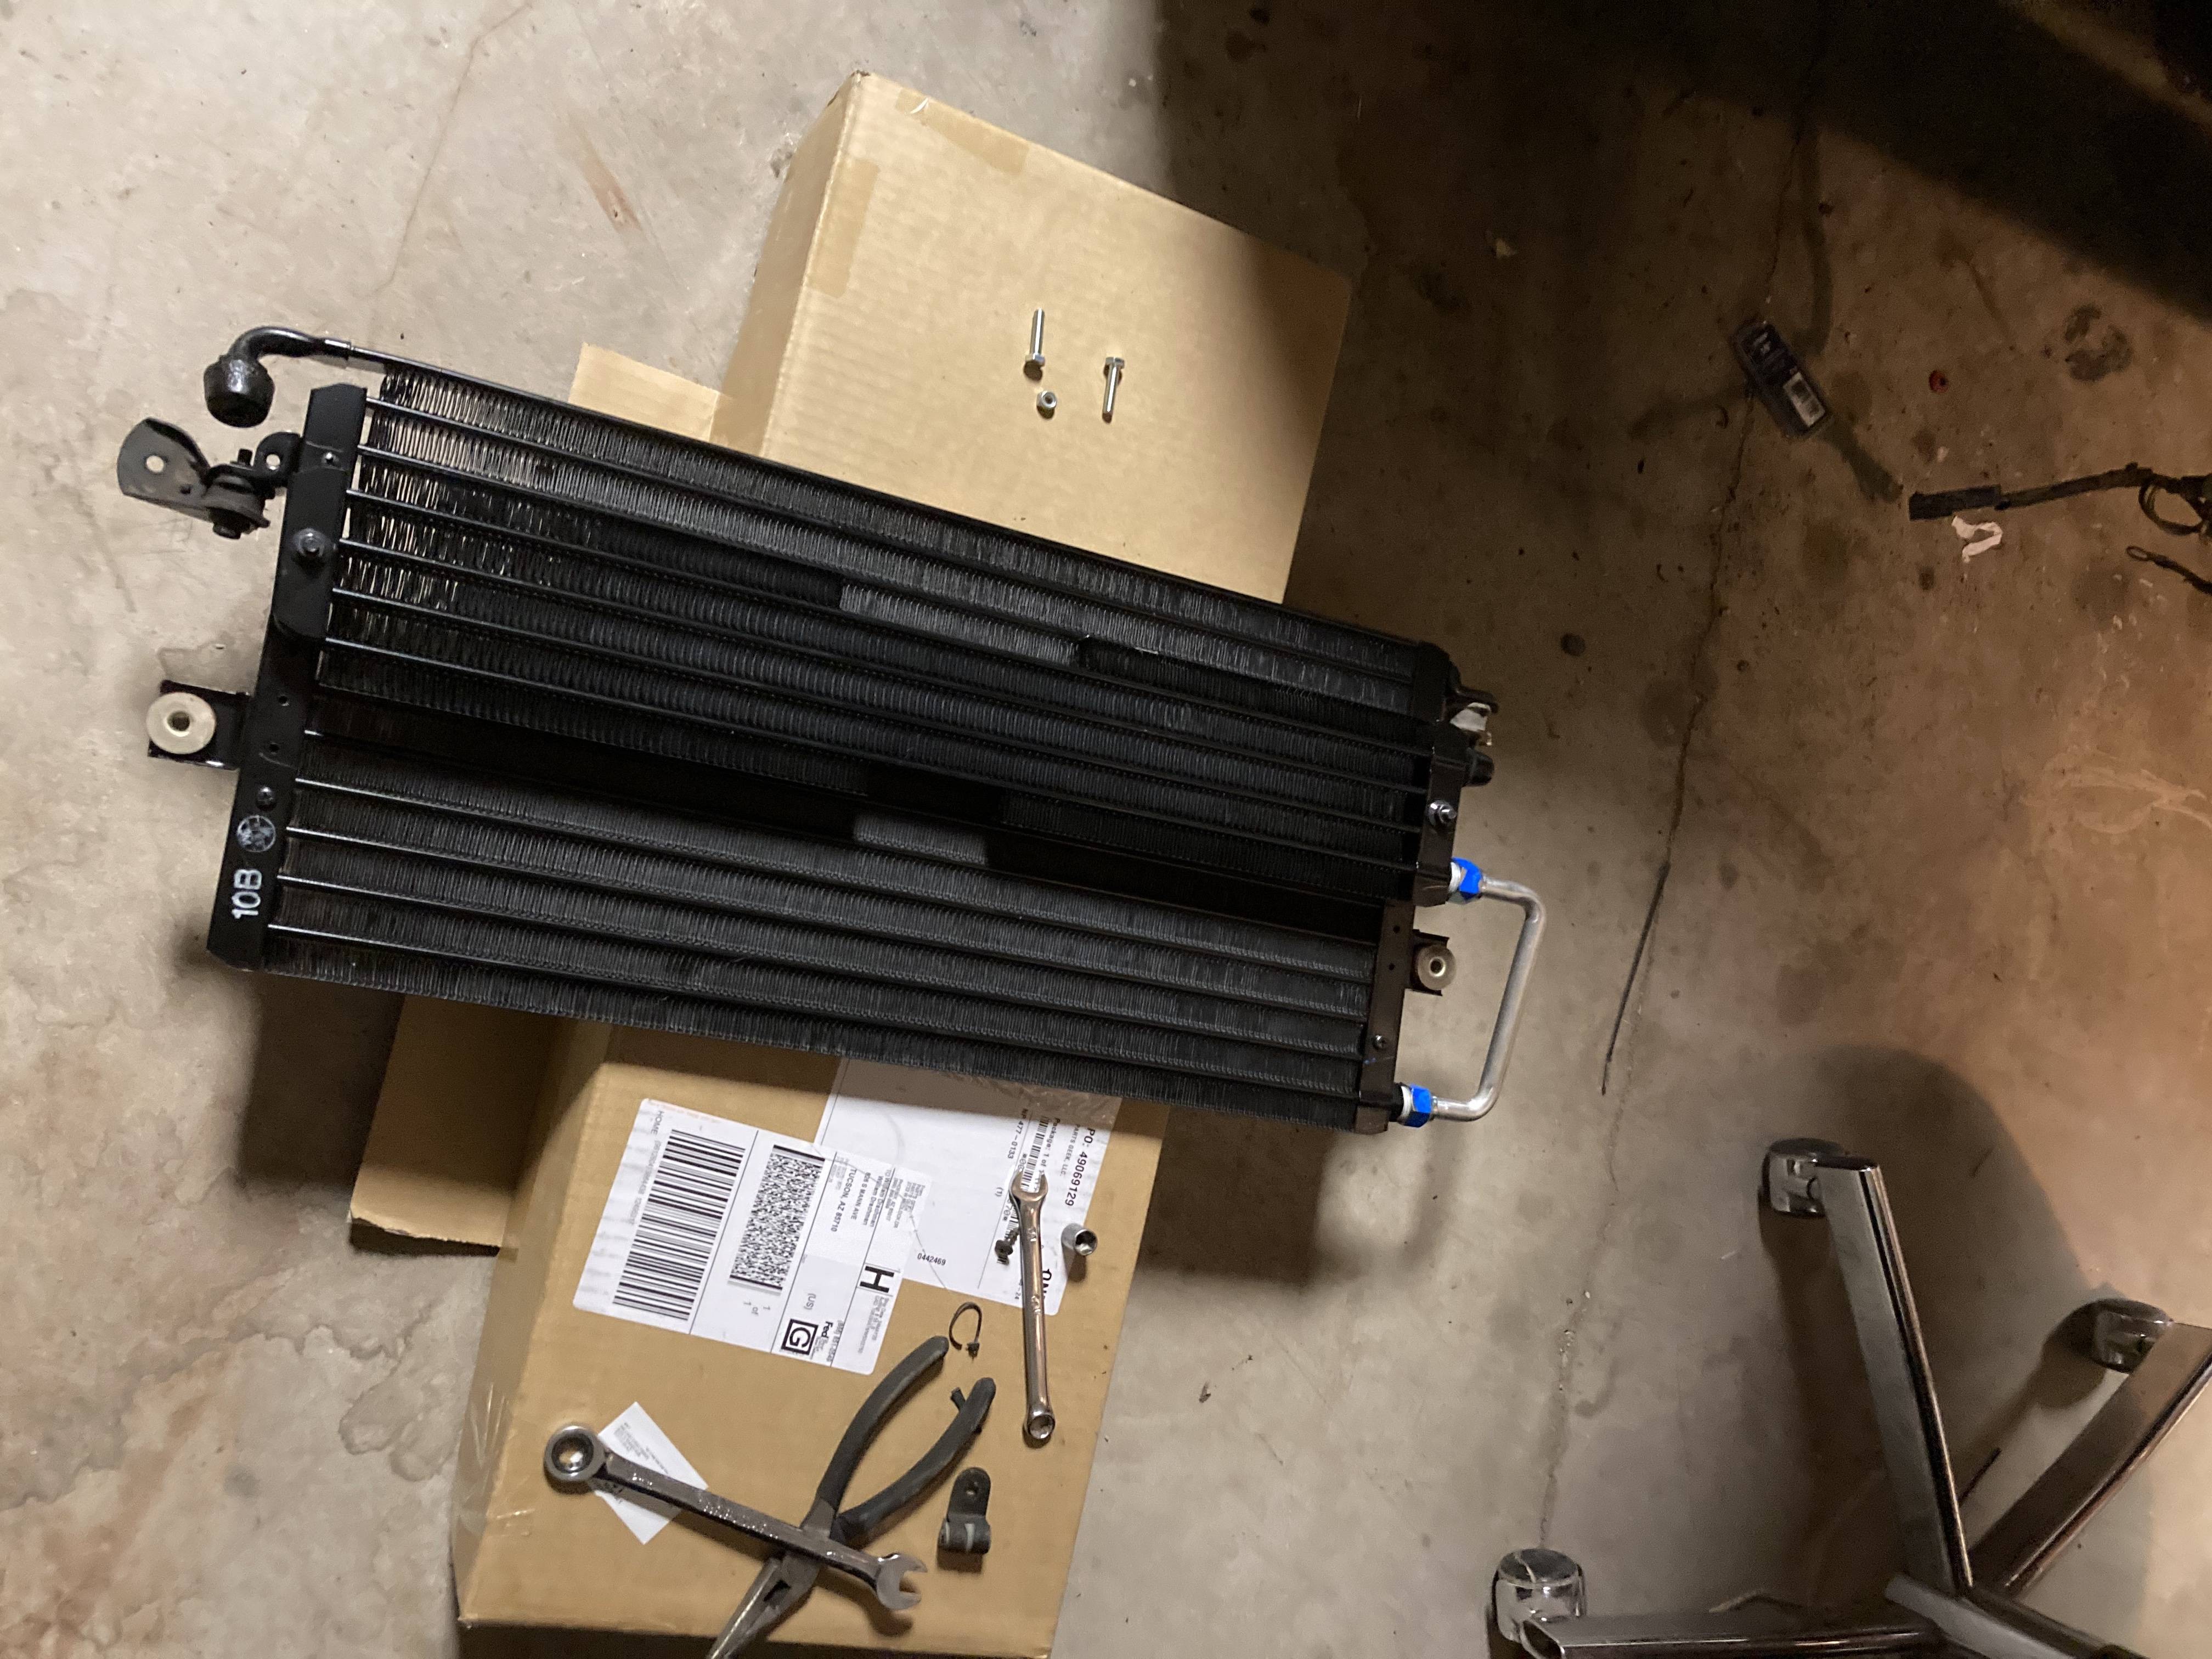
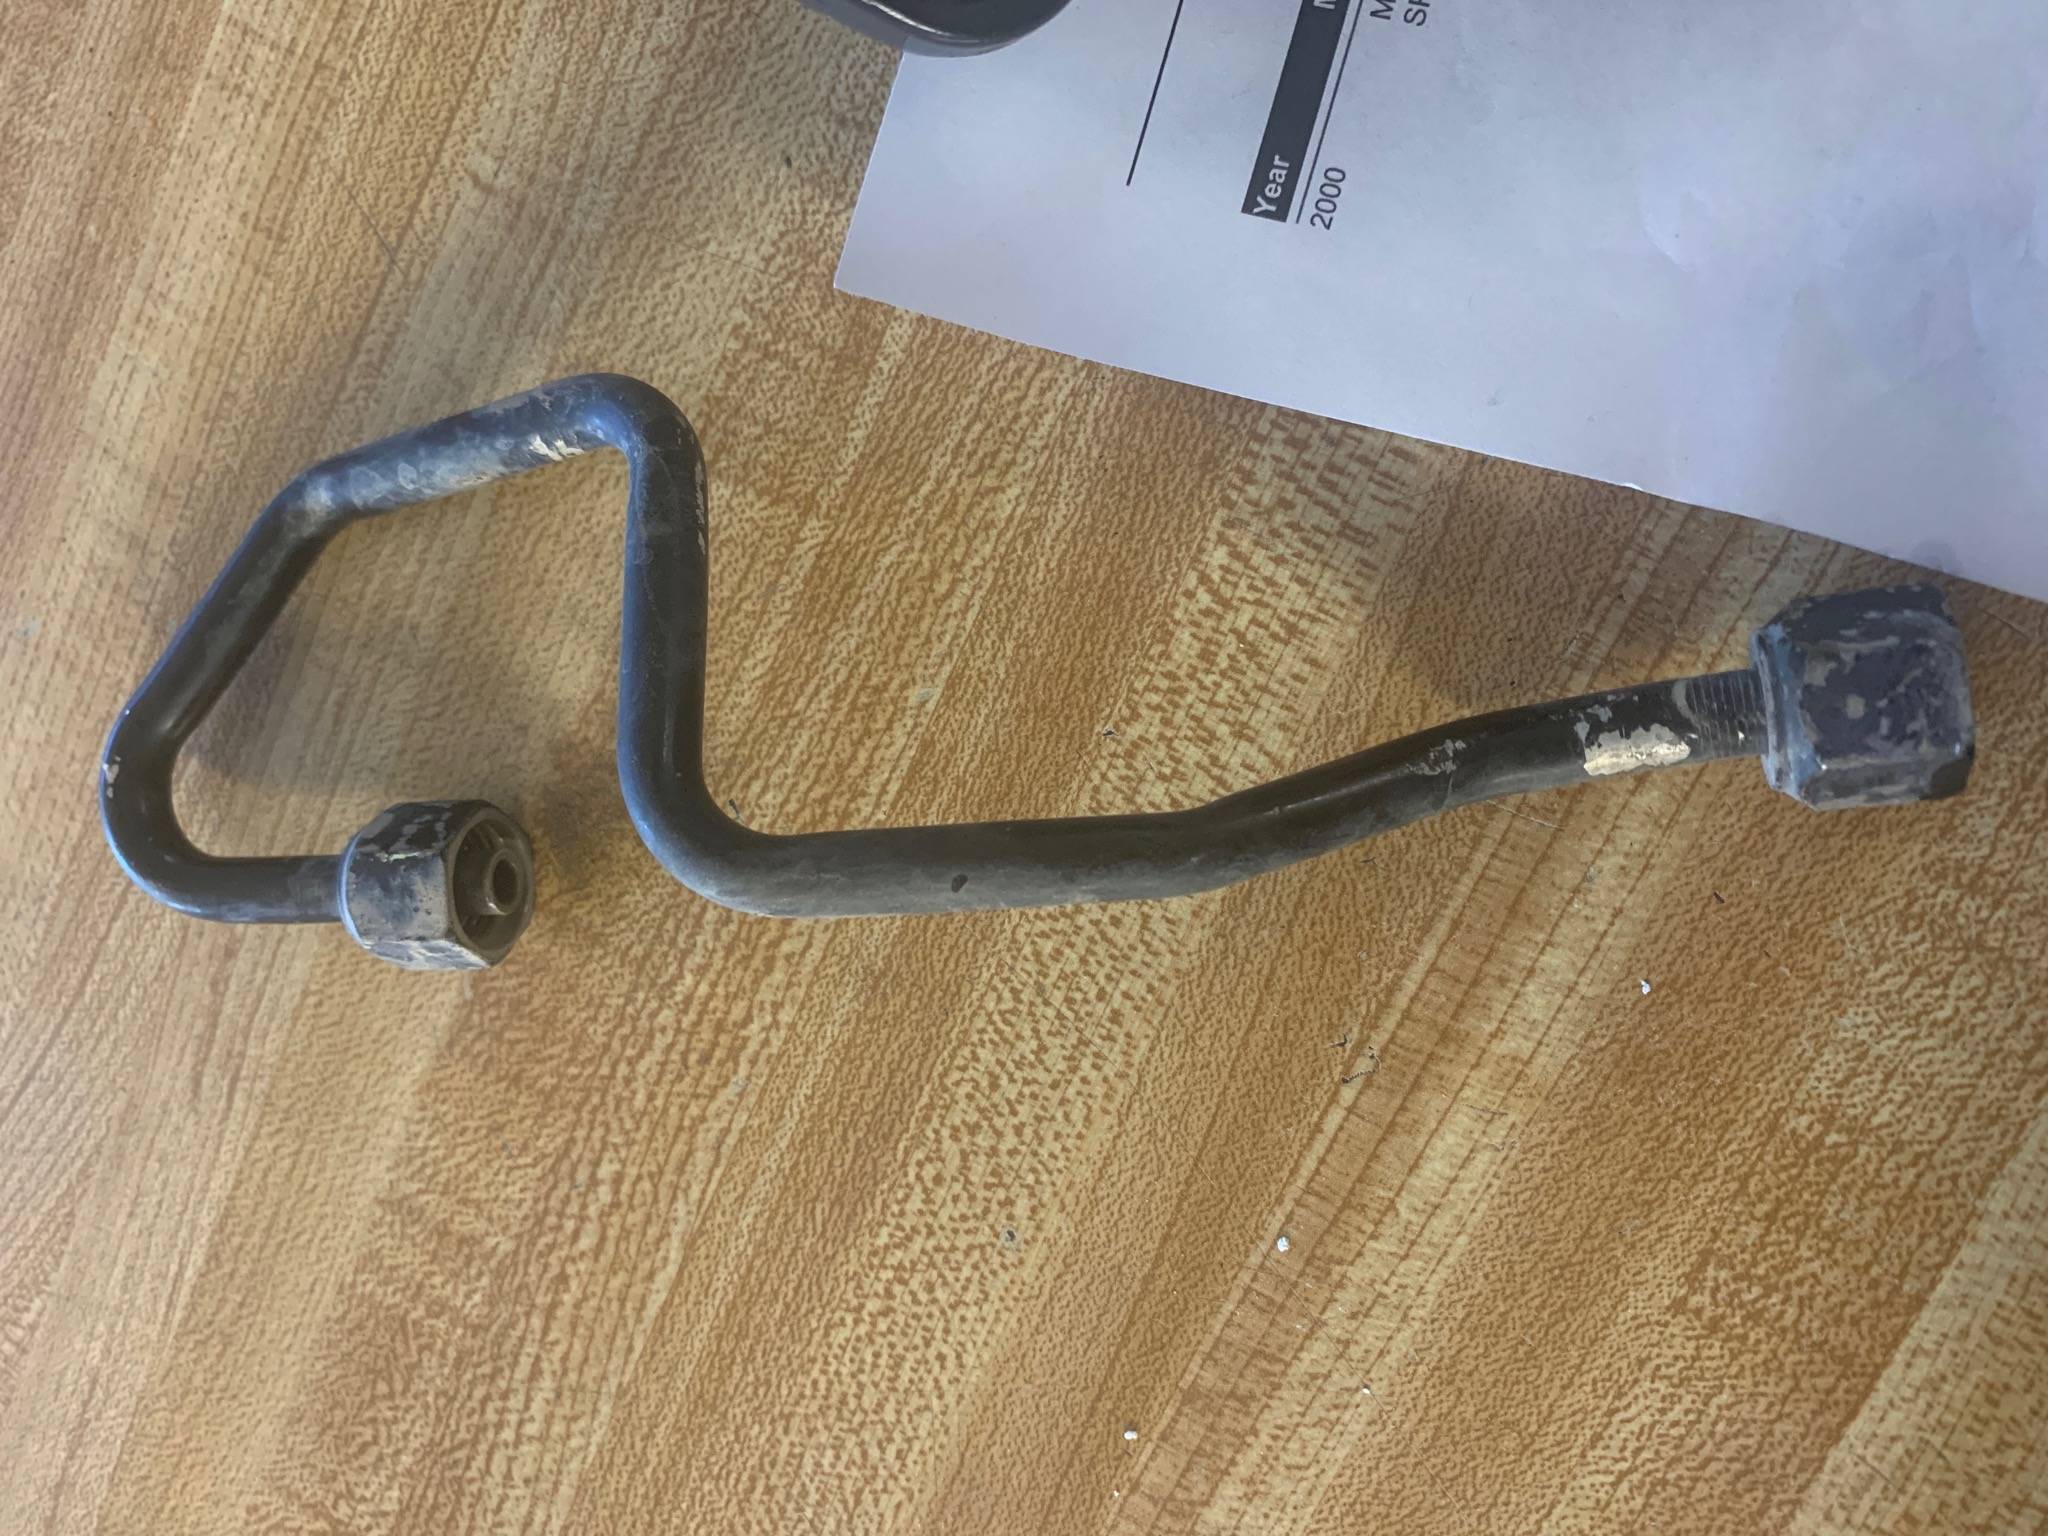
Since the 4Runner and pickup condensers are different they have different hard lines that go to the drier. The 4Runner has a small line that goes from the smaller condenser to the drier. Here are the two different styles of lines. The top is for the 4Runner whereas the bottom one is for the pickup.

It is possible to just remove the smaller condenser in front and you will have the exact same condenser as a pickup if you can�t seem to find the lines out of a 4Runner.
There is also another line that goes from the output side of the drier that runs across the condenser. This seems to be the same between the 4Runner and pickup but I�m not 100% sure. I was able to use the one I got from the 1986 pickup. You can see it below:
Hooking It All Up
Including the two lines going from the condenser to the drier there are five lines for the A/C system.
-From condenser to input side of drier
-From output side of drier to the end of condenser
-From output drier line to evaporator
-From compressor to condenser
-From compressor to evaporator
The lines in bold are hard lines whereas the others are regular rubber A/C lines. I unfortunately did not take pictures of them before I installed them, but I really believe the only way you�re going to find these is to get them from a donor truck. I checked on eBay and could not find any of them. You can get the two rubber lines new on eBay, but the hard lines are nowhere to be found.
Condenser to drier
Compressor to condenser & drier to evaporator (below)

Condenser & evaporator to compressor
Condenser to evaporator (smaller line) & compressor to evaporator
Here are a few pictures of the line connections on all parts of the system. When installing the lines I cleaned them out with brake cleaner and compressed air. It is also very important that you replace every O-Ring in the system and lube them with PAG oil.
Reinstall your bumper and grille and now you're ready to charge the system!
Here it is! The much anticipated (much dreaded for me) writeup of how to install AC into a 1st generation 4Runner or pickup.
I�m going to warn that this is going to be a very long, extensive, boring, picture heavy writeup where I�m going to compile all the research I have done and the entire process from beginning to end.
I�m going to break down this writeup into 5 parts which are:
-Getting started and finding the parts
-Evaporator
-Compressor
-Condenser/Drier
-Hooking it all up
Getting started
So you want to add AC to your 1st gen 4Runner/Pickup? It�s definitely doable and not too troublesome once you have everything you need. The best way to get all the parts you need is to find a donor vehicle � which is easier said than done. If you can � great! You�re ready to go. If not, these are the parts you�re going to have to hunt down.
-Evaporator box
-Evaporator
-A/C Wiring harness
-A/C compressor bracket & idler
-A/C lines (including those on the condenser)
-Condenser
-A/C switch for in cab
-Drier
-Thermal expansion valve
-Low pressure switch
-Thermistor
-A/C Belt
-Idle up solenoid & VSV
-O-Rings & Pag Oil
You do have the option to buy many of the main components new, but at the very least you need to buy a new drier & expansion valve before you do your install. I would recommend ponying up the coin to get a new compressor as well since original ones tend to leak from time. Unfortunately finding a lot of the A/C lines can be a pain so if you can find a donor vehicle, all the better.
Evaporator
I went ahead and bought all new parts for my truck where I could. I probably didn�t need to replace the evaporator, but I decided that I don�t want to mess with this system for a long time.
Inside the evaporator box is the evaporator, expansion valve, low pressure switch & thermistor. There is also a small A/C line that goes off the expansion valve and to the outside of the box which you need to have.
The box can be taken apart by removing the 4 screws and clamps on the sides of it. The box will split in half where you will see the evaporator and all it�s components. Compare the old evaporator with your new one to make sure they are the same.
Unplug the low pressure switch & remove the thermistor.
Disconnect the metal hard line from the expansion valve. With the line disconnected you can easily remove the pressure switch.
Remove the foam around the larger hard line and remove the clip that holds the probe off of the old expansion valve.
Install the new expansion valve onto the new evaporator and attach the probe to the large hardline of the evaporator. The one that I ordered did not have any protection on the probe and the old one did (to protect it from rubbing through the A/C line) so I just put some heatshrink on it and clamped it in.
I also had an adapter that came with the expansion valve to fit onto the small hard line that holds the pressure switch which was also replaced. (You can see it above). Clean the inside of the plastic evaporator box and remove the amplifier on top of the box and check to make sure there is nothing wrong with it.
I put new foam on the top and the bottom of the evaporator and also re-foamed the hard line with the expansion valve probe. From here you just need to put it back together and get it ready to install the truck.
Inside the truck there is a small piece of duct work that connects the blower motor and the heater core. The new evaporator will replace that piece and sit inbetween the two.
To get to this ductwork the glovebox & glovebox support needs to be removed.
Remove the ductwork with 4 screws. It should look like this when out of the truck.
My truck used to have AC but was removed with the idea of an on board air system in it�s place. If your truck never had A/C you�re going to need to drill three holes � two for the evaporator & one for the condensate drain. There are factory dimples in all locations so you can center your hole drill. From the installation manual attached the hole should all be 32mm (1 ��).
Install the evaporator through your new holes & attach the condensate drain. Install grommets to keep everything sealed. I had to re-route all of the mechanical gauges since they were installed through the original evaporator hole. Unless this has been done on your truck too, then you can skip this step.
A huge concern I had with the entire A/C conversion was wiring it all up. All Toyotas came with the wiring to install factory A/C, but you need a smaller A/C harness to plug into your main harness. It looks like this:
Toyota changed the connector that plugs into the main harness in 1987. From 1984-1986 the connector was a 4 pin. From 1987 (and later I assume?) the connector changed to a 5 pin. Make sure you get the correct one for your truck. The parts truck all the A/C stuff came from was a 1986, so the harness did not work on my truck. I was lucky enough to find one on eBay. Here are the two harnesses below with the connectors circled that are different. You can find the other end of it under the dash above where the evaporator is going to sit. Install the A/C switch on the dash and plug that into your existing harness as well.
The A/C harness will plug into the main harness, thermistor, low pressure switch and another plug on off of the harness that the blower motor and resistor are run on. I will post pictures of where they go once I get mine in.
I got my wiring harness in last night and went ahead and plugged it in. Here's the harness again:
The 5 pin plug (or 4 pin if you're truck is a 1986 or older) plugs into this plug out of the main harness to the right of A. Then plug the larger plug into the A/C amplifier.
2 plugs go into the low pressure switch and thermistor whereas the third plugs into the harness that runs the blower motor and resistor.
Once this is in you're all done under the dash!
Compressor
I highly recommend buying a new/re manufactured compressor if you�re going to be doing this install. It would be horrible to go through all this work only to find out the compressor you have is leaking. I bought mine at AutoZone, and since I got the A/C install kit which came with the drier, expansion valve, and A/C schrader valves I qualify for a lifetime warranty on it � which is awesome!
When you buy your new compressor put it next to your old one so you can make sure it�s the same. You�re going to notice that your new compressor doesn�t have the fitting for the A/C lines to go.
You�re going to need to remove those fitting off of the old compressor and install them on the new one. To remove them you�re going to need a #7 metric allen key and a socket to break those screws loose. Once they�re loose, take them out and they�re going to pop right off the old compressor. You�re also going to remove the caps on the new compressor.
With these fittings off I cleaned them off with some brake cleaner and a rag. DO NOT use any type of brush to clean these. You don�t want to scuff the mating surface where they meet the new compressor. Replace the O-Rings on these and reinstall them on your new compressor.
Also on the line fittings are two valves which are used to charge the system with Freon. Using a valve core removal tool remove these valves and replace them with the ones provided in the kit. I also installed my R134a conversion fittings on the compressor as well.
The compressor that I bought had no oil inside of it. After reading the FSM it calls for 2.0 � 3.4 fl oz of PAG oil in the system. I�m going to be putting in 2.9 oz (86 ml) of oil in my system as I feel that should be sufficient. Using a ML pouring cup I poured 40 ML into the suction side of the compressor and turned the clutch. The compressor has markings on each side so you know which is which. I�m going to put the remaining 46 ML of PAG oil in the drier to ensure that the system is properly lubricated per the compressor manufacturer�s instructions.
Once the compressor is oiled and everything is good to go, attach it to the A/C bracket on the side of the engine block using 4 M8 x 1.25 x 90 bolts with a washer. KLF kept the original A/C bracket on the engine and had it fitted with a custom bracket for the York compressor he was going to use on his OBA system. I had to remove some studs on the bracket before I was able to bolt on my compressor. If your truck never had A/C, you�re going to need to install the correct bracket on your engine block. The bracket that I have on my 22RE has the idler pulley right below it.
Once you�ve bolted on the compressor, you�re ready to move on to installing the condenser.
Condenser/Drier
I originally had bought a Spectra condenser from AutoZone and it didn�t work because the fitting on the line going to the drier was too big. All in all it was just a POS � the quality just wasn�t there.
I ended up ordering a brand new Denso (OEM) condenser for a 1987 4Runner. The 4Runner condensers have a smaller condenser in front of them to make up for the extra cab space in the 4Runner. Since I�m converting this system to R134a having a bigger condenser doesn�t hurt. The parts truck where I got all my A/C stuff from was a 1986 pickup, so I did have to find some things to make the 4Runner condenser work. You can see the condensers are exactly the same minus the smaller condenser on the 4Runner's.
Swap over everything from your parts condenser (if you have one) over to your new one. This will include two brackets and two bushings that slip into the new one.
To access where the condenser and drier mount, you need to remove the front bumper and grille. I don�t have any pictures of how to remove a stock front bumper or grille, but it shouldn�t be too difficult. Once you have it off it should look like this.
There are two threaded holes where the condenser mounts with M6 bolts. There are two additional holes to mount it where the brackets go that you�ve just installed that use short M6 bolts with nylock nuts. The drier has it�s own separate mount where there are two holes behind the coolant reservoir. Before I installed my drier I remembered to put 46 ML of oil in it to ensure the system is properly lubricated per the instructions of the compressor manufacturer.
Since the 4Runner and pickup condensers are different they have different hard lines that go to the drier. The 4Runner has a small line that goes from the smaller condenser to the drier. Here are the two different styles of lines. The top is for the 4Runner whereas the bottom one is for the pickup.
It is possible to just remove the smaller condenser in front and you will have the exact same condenser as a pickup if you can�t seem to find the lines out of a 4Runner.
There is also another line that goes from the output side of the drier that runs across the condenser. This seems to be the same between the 4Runner and pickup but I�m not 100% sure. I was able to use the one I got from the 1986 pickup. You can see it below:
Hooking It All Up
Including the two lines going from the condenser to the drier there are five lines for the A/C system.
-From condenser to input side of drier
-From output side of drier to the end of condenser
-From output drier line to evaporator
-From compressor to condenser
-From compressor to evaporator
The lines in bold are hard lines whereas the others are regular rubber A/C lines. I unfortunately did not take pictures of them before I installed them, but I really believe the only way you�re going to find these is to get them from a donor truck. I checked on eBay and could not find any of them. You can get the two rubber lines new on eBay, but the hard lines are nowhere to be found.
Condenser to drier
Compressor to condenser & drier to evaporator (below)
Condenser & evaporator to compressor
Condenser to evaporator (smaller line) & compressor to evaporator
Here are a few pictures of the line connections on all parts of the system. When installing the lines I cleaned them out with brake cleaner and compressed air. It is also very important that you replace every O-Ring in the system and lube them with PAG oil.
Reinstall your bumper and grille and now you're ready to charge the system!
 05-29-2020, 11:01 AM
#4
Registered User
This looks like it will be a great thread. Thank you. The pictures aren't working. Does anyone have a link to the thread in IH8Mud?
05-29-2020, 12:37 PM
#5
Registered User
Until the pictures are fixed here, I found the IH8MUD Thread (with pictures!): https://forum.ih8mud.com/threads/how...unner.1210923/
Fantastic writeup!

Fantastic writeup!
The following users liked this post:
SomedayJ (05-30-2020)
08-22-2021, 10:39 AM
#6

Just an FYI
You mention the 4 and 5 pin connectors. It is possible that there could be a difference in years, but according the 88 Shop Manual schematic the difference are 22r, 22re, and 22re with towing package.
I'm doing an AC install on an 87 22r. It has a 4 pin.
You mention the 4 and 5 pin connectors. It is possible that there could be a difference in years, but according the 88 Shop Manual schematic the difference are 22r, 22re, and 22re with towing package.
I'm doing an AC install on an 87 22r. It has a 4 pin.
08-22-2021, 11:06 AM
#7

ac compressor and VSV harness (right behind battery)
ac amp harness (behind glovebox, right on blower motor housing)
ac fuse/relay harness (the glovebox harness plugs into this one and has all of those connector differences) - it seems like this one is often missed. I'm not sure but maybe all trucks had this harness? I haven't researched it too far.
I've figured out the pin outs pretty well, I'm pretty sure the newer harness/ac amp can be used on older trucks. I didn't look if the opposite was possible or not though, but I'd think so. I have a thread on the topic of the ac related harnesses. I'll probably be posing better details once I get my wire in so I can build some of the sub harnesses. Seems like there isn't much interest in running a newer and more available AC amp (it just basically kicks the ac compressor on and off), but I'm sure the harness details would be handy for people.
https://www.yotatech.com/forums/f116...ss-etc-313985/
Trending Topics
08-22-2021, 11:41 AM
#8
I also just redid the AC in my 86 22r. I'm seeing no difference from my 86 and 87 AC connectors.
The 88 Shop manual schematic does show a 6 pin for 22re.
The 85 shop manual schematic shows 4 pin for both 22r and 22re. A 5 pin connector for 22re w/ towing package.
So there are 4,5, and 6 pin connectors (3 different harnesses as you mention). According to my shop manuals this is my assumption....
4 pin: 85-88 22r, 85-86 22re
5 pin: 85-86 22re w/ towing package
6 pin: 87-88 22re
Those AC amplifiers are also particular to Carb and EFI models.
08-22-2021, 12:06 PM
#9
The 87's had both 6 (smaller, only 5 pins used) and 4 pin options, 22r had 4 pin and 22RE and 22RTE (turbo) had the 6 pin style. The actual ac amp changed slightly too for which package it came with. The older style 22R ones have a green connector, newer has white (86 22r truck vs 22re 87 truck I have on hand).
More info in this thread.
https://www.yotatech.com/forums/f116...nnector-313937
More info in this thread.
https://www.yotatech.com/forums/f116...nnector-313937
Last edited by atcfixer; 12-15-2021 at 08:56 AM.

Thread
Thread Starter
Forum
Replies
Last Post
1995-4WD
95.5-2004 Tacomas & 96-2002 4Runners (Build-Up Section)
4
01-26-2013 08:56 PM
kevino
86-95 Trucks & 4Runners (Build-Up Section)
4
08-19-2011 09:56 AM
Brend2b
95.5-2004 Tacomas & 96-2002 4Runners (Build-Up Section)
8
06-23-2010 06:55 AM


