crossover eliminator for the DIY
#1
crossover eliminator for the DIY
So as I am rebuilding my 3.0 I was looking at that crossover for the exhaust and I realized that I will really wanted to eliminate it so I searched long and hard for an alternative that didn't cost an arm and a leg and I could do myself. Come to find out there isn't one, I could buy headers for 500-900 dollars or go to an exhaust shop for 350-450 dollars and that was just out of my price range with the rebuild I was doing so I decided what the heck lets see if I can do it myself.
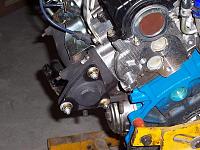
So the goal was to keep it under $100 and use off the shelf parts that I could find at my local napa. So that is just what I did. First thing I did was to cut the ends off the old crossover and weld a cap on the drivers side to cap that off pictured here
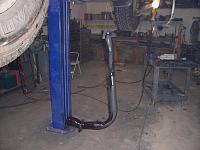
Then you cut the other one off and turn it 90 and you can weld a pipe on to that, I used two 1 3/4 tailpipe turndowns to get the right angle to fit past the passenger side firewall that gave me plenty of clearance for all the gas and brake lines, then I dumped that into a 2" 90 degree and then I welded a 2" tailpipe turndown into that and a 2 1/4 inch header collector on to that because I wanted to be able to break that connection if I needed to do any kind of service. Here is what the crossover looks like.
 ]
]
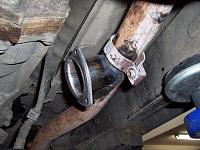
The reason I used the 2" turndown was because I welded the other 2 1/4" collector to the exhaust pipe coming down on the drivers side which looks like this
[
This turn down had the perfect angle to match up with what I needed so it worked perfectly. I will post more later as time permits.
So the goal was to keep it under $100 and use off the shelf parts that I could find at my local napa. So that is just what I did. First thing I did was to cut the ends off the old crossover and weld a cap on the drivers side to cap that off pictured here

Then you cut the other one off and turn it 90 and you can weld a pipe on to that, I used two 1 3/4 tailpipe turndowns to get the right angle to fit past the passenger side firewall that gave me plenty of clearance for all the gas and brake lines, then I dumped that into a 2" 90 degree and then I welded a 2" tailpipe turndown into that and a 2 1/4 inch header collector on to that because I wanted to be able to break that connection if I needed to do any kind of service. Here is what the crossover looks like.
 ]
]The reason I used the 2" turndown was because I welded the other 2 1/4" collector to the exhaust pipe coming down on the drivers side which looks like this
[

This turn down had the perfect angle to match up with what I needed so it worked perfectly. I will post more later as time permits.
Last edited by lonecountryboy; 12-08-2009 at 11:21 AM.
#2
welll...you should upload your pics to photobucket and copy/paste the IMG code..that way we can see the pics..lol
my exhaust shop quoted me abut $100 to redo my crossover..im gonna run mine under my tranny and go into a dual inlet and single outlet muffler
my exhaust shop quoted me abut $100 to redo my crossover..im gonna run mine under my tranny and go into a dual inlet and single outlet muffler

#3
sorry about that having problems with the upload. Anyway when it is all done it looks like this.
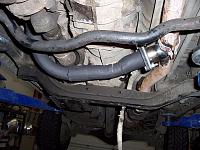
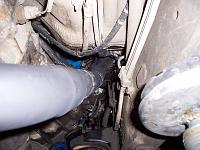
I achieved my goal of spending less than $100 and it only took an afternoon of farting around to make and it eliminates one of the biggest headaches of this motor. The reason the exhaust shop wanted more than $100 was because I wanted a way to unbolt the crossover from the main pipe so that was the extra cost, I just used a die grinder and sawzall to notch the pipe and the collector and welded them up. I am no great fabricator but with a little patience and little bit of thinking it was a low cost way to get rid of the crossover. Oh and here is a picture of the new motor ready to go in.
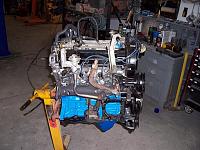


I achieved my goal of spending less than $100 and it only took an afternoon of farting around to make and it eliminates one of the biggest headaches of this motor. The reason the exhaust shop wanted more than $100 was because I wanted a way to unbolt the crossover from the main pipe so that was the extra cost, I just used a die grinder and sawzall to notch the pipe and the collector and welded them up. I am no great fabricator but with a little patience and little bit of thinking it was a low cost way to get rid of the crossover. Oh and here is a picture of the new motor ready to go in.

Trending Topics
#8
camo... so you're gonna run your exhaust under your tranny? have you ever pulled a tranny out of an older F350 where the exhaust is under the bellhousing? if not, don't. it's a nightmare. I think you should reconsider that, if you ever had to pull the tranny, it's another thing that makes the job more miserable than it needs to be. just my 2cents, good luck.
great cost efficient mod countryboy
great cost efficient mod countryboy
#9
i bought thorley headers, the pipe runs under the tranny, after i welded the y-pipes up i sat there and realized.... @#$%... that 5spd tranny swap is going to be a biotch now lol. wasn't exactly good planning on my part...
#10
Thats why I put the flange in there, so if I had to I could unbolt that section of exhaust and it would be easy to pull out the transmission. Plus I wanted the crossover to be in front of the O2 sensor if you run the crossover all the way back behind the xfer case it will be behind the O2 sensor, I suppose with some more screwing around I could have done it but it is way to cold and I like the way this turned out for me.
#11
Thats why I put the flange in there, so if I had to I could unbolt that section of exhaust and it would be easy to pull out the transmission. Plus I wanted the crossover to be in front of the O2 sensor if you run the crossover all the way back behind the xfer case it will be behind the O2 sensor, I suppose with some more screwing around I could have done it but it is way to cold and I like the way this turned out for me.

#14
tranny problems are ALOT less common than sayyyyy.....U-Joint problems...
mine is ran above my front driveshaft (for access to do u-joints, grease and such) and below my tranny, my tranny seems to be in perfect working order, so i'm not too worried about it....and if something goes wrong, i can very easily cut the pipe, no biggie.
Bolt on would be best though, just have to worry about it leaking.
#15
nice job on exhuast ..
but what i really want to know is how you were able to upload this clickable thumbnails to yotatech at 2 or 3 kb each and stilll have decent size pics show up ..
ive tried at the max 48 kb and the pics are still to small .
but what i really want to know is how you were able to upload this clickable thumbnails to yotatech at 2 or 3 kb each and stilll have decent size pics show up ..
ive tried at the max 48 kb and the pics are still to small .
#16
I've been looking for a post like this for hours! I was planning on putting a little money into my exhaust and thought of your idea but wanted to see if anyone had done it all ready. How has this mod effected your high/low end power and fuel economy?
#17
bump to the thread and previous question about power. Also, can this be done without removing the engine? I'm looking at the cheapest and easist way of fixing the crossover issue. I'd prefer to just go underneath, cap off the driver side, and weld in past the O2 sensor. I have removed all other emissions devices so I already run a good bit of codes.
Thanks. And the more pictures and details the better.
Thanks. And the more pictures and details the better.
#20
If you look behind the motor the exhaust from the passenger side crosses over to the driver side and then in to the exhaust pipe. therefore too much heat collects on the driver side of the motor right behind the head and causing head gasket issues and burnt #6 exhaust valves. this splits the heat and hopefully eliminating the HG issues. Its on my to do list for sure


 lol
lol


