
BIG problem with BJ spacer write ups
 09-18-2008, 05:33 PM
#1
Registered User
Thread Starter
Join Date: Jun 2008
Location: Washougal
Posts: 71
Likes: 0
Received 0 Likes
on
0 Posts
BIG problem with BJ spacer write ups
I recently (past month) purchased a ToyTech BJ 2" BJ spacer lift. I looked at alot of write-ups on this site as well as others. Also had the instructions the lift came with. Everything was pretty straight foreward. Except for a couple of things.
#1. Lifting the front-end.
It seemed simple enough. I also checked out Djlarroc's write up, https://www.yotatech.com/forums/f116...riteup-145471/, and found that I was suppost to lift it a certain way. But even lifting the front end that way wasn't enough. I had to replace the wheels and everything because I didn't have enough room to squeeze an angle grinder, less the spacer inbetween the balljoint and UCA. So I put jackstands on either side of the frame about 2 feet behind the front rotors.
#2. Block in-between bumpstop?
The instructions said to put a block inbetween the bumpstop, as did alot of the write-ups. This did absolutely nothing.
#3. Grinding/Spacer
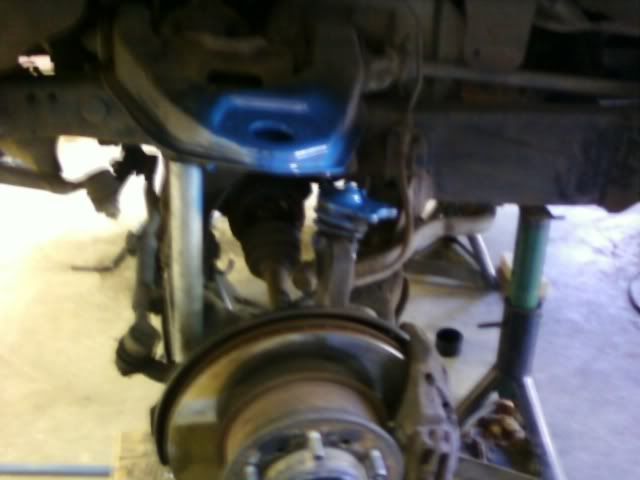
I couldn't even get the balljoint out from underneith the UCA. I thought to myself, "How the hell am I suppost to squeeze the grinder in-between the balljoint and UCA?". The answer came to me after an hour of staring at it. I had to get the following items: 2 foot long piece of steel pipe, 6 inch long 2x6, and floor jack. Then I placed the block on the floor jack, as to not let the pipe slip, and placed the piece of pipe on top of the block, under the UCA, and inbetween the steering components and sway bar. (The pipe had to be about 1 inch in diameter due to the very small space.) And crank that S.O.B. UCA up. The first attempt I failed misserably, as the pipe slipped and flew out at a thousand MPH. The next time I was more carefull, and jacked the UCA three inches up. I finally had some room to grind. However, this was so dangerous, that, had the pipe slipped again, I probably wouldn't be here today to talk about it.
Heres a pic, see the pipe of the left of the rotor.
#4. Positioning BJ
How was I suppost to hold the rotor up, position the balljoint underneith the UCA with the spacer on top, AND put the bolts underneith it all by myself?? The write-ups said it was possible to do with one person. I highly, extemely, absolutely doubt that. I had to inquire the help of my younger brother to get that S.O.B. in there.
Overall, I hope that somebody will someday do a good, accurate write up in the future. And hopefully some of my experience here helps others.
Also, if anybody has some information or experience in this and thinks they know if I did something wrong, please tell me. I would dearly like to know how this could have been easier.
#1. Lifting the front-end.
It seemed simple enough. I also checked out Djlarroc's write up, https://www.yotatech.com/forums/f116...riteup-145471/, and found that I was suppost to lift it a certain way. But even lifting the front end that way wasn't enough. I had to replace the wheels and everything because I didn't have enough room to squeeze an angle grinder, less the spacer inbetween the balljoint and UCA. So I put jackstands on either side of the frame about 2 feet behind the front rotors.
#2. Block in-between bumpstop?
The instructions said to put a block inbetween the bumpstop, as did alot of the write-ups. This did absolutely nothing.
#3. Grinding/Spacer
I couldn't even get the balljoint out from underneith the UCA. I thought to myself, "How the hell am I suppost to squeeze the grinder in-between the balljoint and UCA?". The answer came to me after an hour of staring at it. I had to get the following items: 2 foot long piece of steel pipe, 6 inch long 2x6, and floor jack. Then I placed the block on the floor jack, as to not let the pipe slip, and placed the piece of pipe on top of the block, under the UCA, and inbetween the steering components and sway bar. (The pipe had to be about 1 inch in diameter due to the very small space.) And crank that S.O.B. UCA up. The first attempt I failed misserably, as the pipe slipped and flew out at a thousand MPH. The next time I was more carefull, and jacked the UCA three inches up. I finally had some room to grind. However, this was so dangerous, that, had the pipe slipped again, I probably wouldn't be here today to talk about it.
Heres a pic, see the pipe of the left of the rotor.
#4. Positioning BJ
How was I suppost to hold the rotor up, position the balljoint underneith the UCA with the spacer on top, AND put the bolts underneith it all by myself?? The write-ups said it was possible to do with one person. I highly, extemely, absolutely doubt that. I had to inquire the help of my younger brother to get that S.O.B. in there.
Overall, I hope that somebody will someday do a good, accurate write up in the future. And hopefully some of my experience here helps others.
Also, if anybody has some information or experience in this and thinks they know if I did something wrong, please tell me. I would dearly like to know how this could have been easier.

 09-18-2008, 05:47 PM
#3
Contributing Member
I had to get the following items: 2 foot long piece of steel pipe, 6 inch long 2x6, and floor jack. Then I placed the block on the floor jack, as to not let the pipe slip, and placed the piece of pipe on top of the block, under the UCA, and inbetween the steering components and sway bar. (The pipe had to be about 1 inch in diameter due to the very small space.) And crank that S.O.B. UCA up. The first attempt I failed misserably, as the pipe slipped and flew out at a thousand miles per hour. The next time I was more carefull, and jacked the UCA three inches up. I finally had some room to grind. However, this was so dangerous, that, had the pipe slipped again, I probably wouldn't be here today to talk about it.
Last edited by iamsuperbleeder; 09-18-2008 at 06:00 PM.
09-18-2008, 05:58 PM
#5
Contributing Member
I just did mine and the first side took me about two hours. The second side took about thirty minutes. Yeah it was a pain but I think your average mechanically inclined noob could handle it!
09-18-2008, 06:03 PM
#6
Registered User
09-18-2008, 06:04 PM
#7
Registered User
Thread Starter
Join Date: Jun 2008
Location: Washougal
Posts: 71
Likes: 0
Received 0 Likes
on
0 Posts
Trending Topics
09-18-2008, 06:06 PM
#8
Registered User
Thread Starter
Join Date: Jun 2008
Location: Washougal
Posts: 71
Likes: 0
Received 0 Likes
on
0 Posts
09-18-2008, 06:09 PM
#9
Contributing Member
Ha no I am sorry for the mis understanding.
I sort of just jumped into mine with out really reading anything. I found that using the block of wood helped but it was still a pain. The UCA is really hard to move.
I sort of just jumped into mine with out really reading anything. I found that using the block of wood helped but it was still a pain. The UCA is really hard to move.
09-18-2008, 06:12 PM
#10
Registered User
Thread Starter
Join Date: Jun 2008
Location: Washougal
Posts: 71
Likes: 0
Received 0 Likes
on
0 Posts
yeah, when i tried jacking it up with the pipe it went up about 1.5 inches then started lifting the entire truck, but i kept cranking the crap out of it and eventually it got about 3 inches of room.
09-18-2008, 07:36 PM
#12
Registered User
Thread Starter
Join Date: Jun 2008
Location: Washougal
Posts: 71
Likes: 0
Received 0 Likes
on
0 Posts
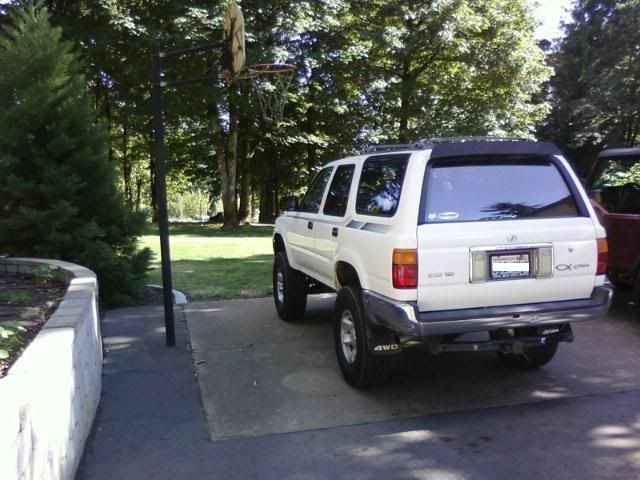
Before
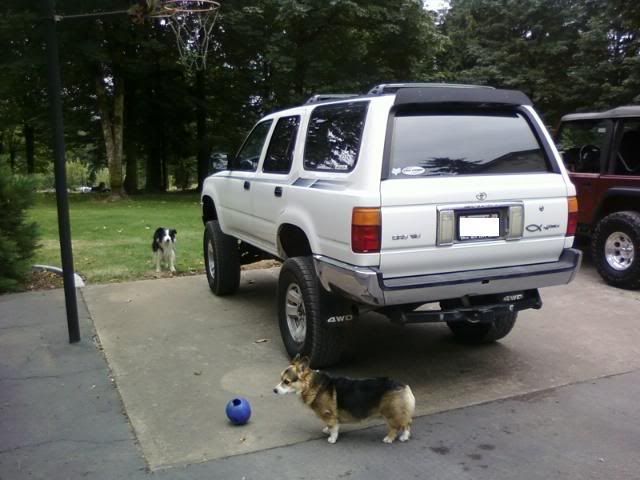
After
 09-18-2008, 07:57 PM
#13
Registered User

Join Date: Dec 2007
Location: Kingston, Washington
Posts: 169
Likes: 0
Received 0 Likes
on
0 Posts
I took my upper arms off. I am doing a frame up build, though. It was very easy to assemble with the torsion bars out, maybe if the bars were relaxed it would be easier.
09-18-2008, 08:00 PM
#14
Registered User
Thread Starter
Join Date: Jun 2008
Location: Washougal
Posts: 71
Likes: 0
Received 0 Likes
on
0 Posts
doubt it. they were relaxed pretty good. besides, taking the UCA off would be the biggest pain ever. worse than a body lift... ugh...
09-18-2008, 08:01 PM
#15
Contributing Member
I mean, it's not like you have to worry about screwing up the alignment... that'll have to be done anyway...
09-18-2008, 08:05 PM
#17
Registered User
Or you could no tried to kill yourself and taken the torsion bars off and the UCA's off and done it on the bench.
I used a piece of wood, not a block to jack the upper UCA after un-torquing the Torsions (as opposed to what i just said, taking them completely off) The UCA has it's own pre-load but it'll move easily if you take down force off them by the Torsions.
The writeups are accurate IMO. I didn't have any issues doing mine a few years ago.
with any mechanical undertaking, expect the unexpected. Expect it to take longer than it should. Expect to find problems while fixing a problem. Don't expect a writeup to have all the answers.... Gotta think outside the box and just go with the flow.
09-18-2008, 08:06 PM
#18
Contributing Member
Join Date: Dec 2005
Location: Los Osos, CA (we can't agree on crap!)
Posts: 2,124
Likes: 0
Received 0 Likes
on
0 Posts
Wow, that was really dangerous. There are many writeups on this.
I did it by myself and so have many others. Like said before the first one took awhile and the second one was a breeze.
I jacked up the one side removed the tire and put a jackstand under the front crossmember.
To get the upper arm up, I first put a floor jack right under the bottom balljoint and jacked it up till the arm no longer went up and started lifting the 4runner off the jack stand.
Then I took the stock bottlejack and put it upside down between the upper arm and the top of the bottom bumpstop mount. I used that to crank the arm up off the balljoint. This will get it up plenty high to put a block in there.
Cut the stuff out. I have a 4.5" angle grinder which doesn't fit in there too well, so I put a 4" wheel on it which fit much better.
Put the spacer on, pull the block, and start cranking the bottle jack down slowly and guide it onto the bjspacer and bolts.
Remember the bottle jack trick because you will need it if you ever have to change a cv while you have bjspacers.
09-18-2008, 08:12 PM
#19
Contributing Member
Wow, that was really dangerous. There are many writeups on this.
I did it by myself and so have many others. Like said before the first one took awhile and the second one was a breeze.
I jacked up the one side removed the tire and put a jackstand under the front crossmember.
To get the upper arm up, I first put a floor jack right under the bottom balljoint and jacked it up till the arm no longer went up and started lifting the 4runner off the jack stand.
Then I took the stock bottlejack and put it upside down between the upper arm and the top of the bottom bumpstop mount. I used that to crank the arm up off the balljoint. This will get it up plenty high to put a block in there.
Cut the stuff out. I have a 4.5" angle grinder which doesn't fit in there too well, so I put a 4" wheel on it which fit much better.
Put the spacer on, pull the block, and start cranking the bottle jack down slowly and guide it onto the bjspacer and bolts.
Remember the bottle jack trick because you will need it if you ever have to change a cv while you have bjspacers.
I did it by myself and so have many others. Like said before the first one took awhile and the second one was a breeze.
I jacked up the one side removed the tire and put a jackstand under the front crossmember.
To get the upper arm up, I first put a floor jack right under the bottom balljoint and jacked it up till the arm no longer went up and started lifting the 4runner off the jack stand.
Then I took the stock bottlejack and put it upside down between the upper arm and the top of the bottom bumpstop mount. I used that to crank the arm up off the balljoint. This will get it up plenty high to put a block in there.
Cut the stuff out. I have a 4.5" angle grinder which doesn't fit in there too well, so I put a 4" wheel on it which fit much better.
Put the spacer on, pull the block, and start cranking the bottle jack down slowly and guide it onto the bjspacer and bolts.
Remember the bottle jack trick because you will need it if you ever have to change a cv while you have bjspacers.
BOTTLE JACKS yall... get yer mind outta the gutter...
they come in handy a lot, like this for instance, or widening the rear LCA mounts to stock position, or using it as dead weight to hit on a wrench to break a rusty bolt loose (that's usually how I use mine
 300k on a truck, you gotta use tricks like that for the stubborn things)
sorry, off topic, I know...
09-18-2008, 08:12 PM
#20
Registered User
Thread Starter
Join Date: Jun 2008
Location: Washougal
Posts: 71
Likes: 0
Received 0 Likes
on
0 Posts
Or you could no tried to kill yourself and taken the torsion bars off and the UCA's off and done it on the bench.
I used a piece of wood, not a block to jack the upper UCA after un-torquing the Torsions (as opposed to what i just said, taking them completely off) The UCA has it's own pre-load but it'll move easily if you take down force off them by the Torsions.
The writeups are accurate IMO. I didn't have any issues doing mine a few years ago.
with any mechanical undertaking, expect the unexpected. Expect it to take longer than it should. Expect to find problems while fixing a problem. Don't expect a writeup to have all the answers.... Gotta think outside the box and just go with the flow.
I used a piece of wood, not a block to jack the upper UCA after un-torquing the Torsions (as opposed to what i just said, taking them completely off) The UCA has it's own pre-load but it'll move easily if you take down force off them by the Torsions.
The writeups are accurate IMO. I didn't have any issues doing mine a few years ago.
with any mechanical undertaking, expect the unexpected. Expect it to take longer than it should. Expect to find problems while fixing a problem. Don't expect a writeup to have all the answers.... Gotta think outside the box and just go with the flow.
Last edited by aviator; 09-19-2008 at 12:13 PM.


