
Beware Of Clutch Bracket Fatigue!
 05-27-2013, 01:15 PM
#121
Registered User

Join Date: Mar 2013
Location: Logandale NV
Posts: 19
Likes: 0
Received 0 Likes
on
0 Posts
This is why I cruise these forums! My clutch pedal has been making a annoying pop ever time its depressed and I could not trace it down! Now I have an idea of where to start looking!
Thanks yotatech!
Thanks yotatech!
 05-27-2013, 03:14 PM
#122
Registered User

Join Date: May 2013
Location: Vancouver, Wa
Posts: 78
Likes: 0
Received 0 Likes
on
0 Posts
I had this problem with a civic that I previously owned.
I welded it back together, and it felt like a new car! I now will go out and check my yota as my clutch feels weak. I dont get the pop though.
I welded it back together, and it felt like a new car! I now will go out and check my yota as my clutch feels weak. I dont get the pop though.
08-20-2013, 01:57 PM
#123
Registered User
Join Date: Jul 2013
Posts: 21
Likes: 0
Received 0 Likes
on
0 Posts
I was told the metal was to thin to weld I was surprised when they said that what amperage are u using and yes removing the lower part of the dash help a lot just keep track of your nuts and bolts
11-26-2013, 05:10 PM
#124
Registered User

Join Date: Oct 2012
Posts: 127
Likes: 0
Received 0 Likes
on
0 Posts
Don't know if this has been posted, but the reason mine cracked was cause the mount which is welded to the cowl broke allowing the perch to flex and crack the bracket. So it left a noticeable crack in the cowl. Please remove the vowel cover and pull the strainer on the furthest driver side opening and check if yours is cracked. Can't believe they made the firewalls on these so thin. Just a heads up for everyone.
01-16-2014, 10:33 AM
#126
Registered User
Join Date: Oct 2012
Posts: 127
Likes: 0
Received 0 Likes
on
0 Posts
Always better safe than sorry. Check your cowl too.
I added a brace from clutch to brake perch cause when it breaks it's cause the flex from clutch Tword brake in a forward right hand motion.
I added a brace from clutch to brake perch cause when it breaks it's cause the flex from clutch Tword brake in a forward right hand motion.
01-26-2014, 08:57 AM
#127
Registered User

Join Date: Mar 2010
Location: CA
Posts: 4
Likes: 0
Received 0 Likes
on
0 Posts
Broke this week
Thanks to all these posts, I've been able to kill 3 birds with one stone.
Clutch pedal broke in the same spot as others. I removed the steering column to get the bracket out. As others have said, PITA but the bracket came out easy this way. The only thing now, is I forgot to mark where the clamp and set screw went on the steering column shaft.
The plastic piece behind the ignition switch was loose, so tightened up that one screw.
Working on my starter now that is covered in oil. Gotta do some work. Not sure where all the oil is coming from.
Gabe
Clutch pedal broke in the same spot as others. I removed the steering column to get the bracket out. As others have said, PITA but the bracket came out easy this way. The only thing now, is I forgot to mark where the clamp and set screw went on the steering column shaft.

The plastic piece behind the ignition switch was loose, so tightened up that one screw.
Working on my starter now that is covered in oil. Gotta do some work. Not sure where all the oil is coming from.
Gabe
01-28-2014, 06:35 AM
#129
Registered User

Join Date: Dec 2013
Posts: 20
Likes: 0
Received 0 Likes
on
0 Posts
Gabe, how many miles on your truck?
Thanks to all these posts, I've been able to kill 3 birds with one stone.
Clutch pedal broke in the same spot as others. I removed the steering column to get the bracket out. As others have said, PITA but the bracket came out easy this way. The only thing now, is I forgot to mark where the clamp and set screw went on the steering column shaft.
The plastic piece behind the ignition switch was loose, so tightened up that one screw.
Working on my starter now that is covered in oil. Gotta do some work. Not sure where all the oil is coming from.
Gabe
Clutch pedal broke in the same spot as others. I removed the steering column to get the bracket out. As others have said, PITA but the bracket came out easy this way. The only thing now, is I forgot to mark where the clamp and set screw went on the steering column shaft.
The plastic piece behind the ignition switch was loose, so tightened up that one screw.
Working on my starter now that is covered in oil. Gotta do some work. Not sure where all the oil is coming from.
Gabe
01-31-2014, 08:17 AM
#130
Registered User

Join Date: Jan 2014
Location: Nanaimo, BC
Posts: 3
Likes: 0
Received 0 Likes
on
0 Posts
I went the route of removing the steering column. Made the job reasonably easy. I couldn't fully remove it due to aftermarket wiring, but was able to hold it up and out of the way with one hand while removing/reinstalling the bracket with the other. Hang it by the top 2 nuts when you don't need it out of the way. Also make sure your brake booster is fully out of the way. You might need to block it up to hold it while the studs are out of the fire wall.
I went with a new OEM bracket ($140 plus shipping) and had a brace welded on and the far left spot welds reinforced (professionally, $40). The brace made a big difference, I could flex it by hand before, but not after. Pics below.
Also not mentioned anywhere that I've seen, there's supposed to be a plastic bushing to make the pin-hole in the pedal tight and silent. Toyota P/N is 9038904002. That should help against the pin and hole wearing out of round, like mine did. I fixed the out of round pin-hole by filling the worn area with JB Weld. Used a round file to make it roughly the right shape after filling, then conveniently the brake pedal pin is exactly the right size to drive the hole back to perfectly round. Worked like a charm.
Old and new frames:

Pedal hole JB Weld repair and new bushing:

I went with a new OEM bracket ($140 plus shipping) and had a brace welded on and the far left spot welds reinforced (professionally, $40). The brace made a big difference, I could flex it by hand before, but not after. Pics below.
Also not mentioned anywhere that I've seen, there's supposed to be a plastic bushing to make the pin-hole in the pedal tight and silent. Toyota P/N is 9038904002. That should help against the pin and hole wearing out of round, like mine did. I fixed the out of round pin-hole by filling the worn area with JB Weld. Used a round file to make it roughly the right shape after filling, then conveniently the brake pedal pin is exactly the right size to drive the hole back to perfectly round. Worked like a charm.
Old and new frames:
Pedal hole JB Weld repair and new bushing:
01-31-2014, 08:22 AM
#131
Registered User
Join Date: Jan 2014
Location: Nanaimo, BC
Posts: 3
Likes: 0
Received 0 Likes
on
0 Posts
Guess google drive doesn't work for embedding photos here... The full set should be available here for anyone who's interested: https://drive.google.com/folderview?...UE&usp=sharing
01-31-2014, 09:49 AM
#132
Registered User
Join Date: Aug 2010
Location: Oregon, USA
Posts: 2,027
Likes: 0
Received 0 Likes
on
0 Posts
You can embed any image from anywhere, as long as you can get the direct link to it. On your link above (using Firefox), click on a picture to open the preview, then right-click > copy image location. Then come here and type [IMG]link.you.copied[/IMG]. Internet Explorer is a little different...either right-click > copy or right-click > properties and copy the URL.
Here's one as an example:

Here's one as an example:
01-31-2014, 10:55 AM
#133
Registered User
Mine completely broke, as in the pedal fell on the floor broke.
I took mine to a fabrication shop and had it welded back on for $125 at a local fabrication shop. It's never coming off again (for good or for bad) and I didn't have to do any of the work myself. Just a thought for those who have this problem.
I took mine to a fabrication shop and had it welded back on for $125 at a local fabrication shop. It's never coming off again (for good or for bad) and I didn't have to do any of the work myself. Just a thought for those who have this problem.
 02-24-2014, 03:10 PM
#138
Registered User
Clutch Bracket Gave Up Yesterday
Exactly the same scenario as many others; driving down the road, shifting gears, *CRACK*, hard to shift, oh &%$#!
Thanks to a quick search on Yotatech I knew exactly where to look to confirm a cracked clutch/brake bracket and get lots of tips on how to repair. What a great community!
I removed the drivers seat , lower dash, heater ducts and steering wheel (all pretty quick and makes the job way easier). Be sure to mark the splines on the steering shaft to get the right alignment on reassembly.
Removed the 4 bolts holding brake booster on (they go through the clutch/brake bracket, and through the firewall). In the engine compartment I removed the 2 nuts from the clutch master cylinder and the bolt on the left side of the booster holding the brake hardlines to the firewall. This allowed backing out the master cylinder and the booster to get the clutch/brake bracket out.
Removed the connecting pins from the brake and clutch actuators, disconnected all electrical wiring and the remaining bolts from the bracket. A bit of wiggling and it was out.
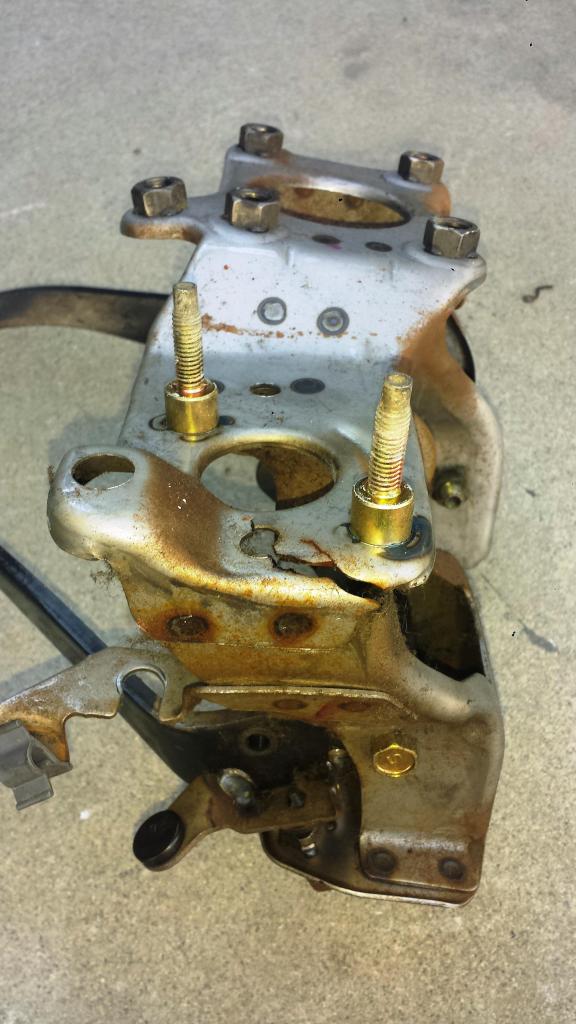
You can see from the pics what I found; typical metal fatigue. Since I have a basic MIG welder I figured the fastest/cheapest solution would be to fab a strengthening brace and weld it in.
More in following post...
Thanks to a quick search on Yotatech I knew exactly where to look to confirm a cracked clutch/brake bracket and get lots of tips on how to repair. What a great community!
I removed the drivers seat , lower dash, heater ducts and steering wheel (all pretty quick and makes the job way easier). Be sure to mark the splines on the steering shaft to get the right alignment on reassembly.
Removed the 4 bolts holding brake booster on (they go through the clutch/brake bracket, and through the firewall). In the engine compartment I removed the 2 nuts from the clutch master cylinder and the bolt on the left side of the booster holding the brake hardlines to the firewall. This allowed backing out the master cylinder and the booster to get the clutch/brake bracket out.
Removed the connecting pins from the brake and clutch actuators, disconnected all electrical wiring and the remaining bolts from the bracket. A bit of wiggling and it was out.
You can see from the pics what I found; typical metal fatigue. Since I have a basic MIG welder I figured the fastest/cheapest solution would be to fab a strengthening brace and weld it in.
More in following post...
02-24-2014, 03:12 PM
#139
Registered User
Clutch bracket fix continued,,
I cut a 2" x 1" piece of steel about the same gauge as the bracket and trimmed/bent it until it fit snugly. A bit of sloppy but effective welding, grind down the nasty bits, spray everything with a bit of rust paint and ... DONE!
Another couple of hours to carefully put everything back together (no leftover bits - woohoo!) and she shifts better than ever. If the original lasted me 23 years lets hope the repair lasts half that!
Thanks again to all those who have gone down this path before me!
Jim G.
03-02-2014, 10:28 AM
#140
Registered User

Yours is probably fine because you are one of the few that has a master and slave in proper working order. (bled properly and not neglected) Also your clutch fork and release bearing are greased properly.


