
Another 88 rebuild/questions thread (in Hawaii)
 03-24-2010, 04:34 AM
#101
YotaTech Milestone-Two Millionth Post
absolutely keep those bolts in order.
here's what i did....basically freehanded a drawing to match roger's(4crawler's) pic and poked holes in a pizza box

here's what i did....basically freehanded a drawing to match roger's(4crawler's) pic and poked holes in a pizza box
 03-24-2010, 01:15 PM
#103
Registered User
Thread Starter
Join Date: Jul 2005
Location: Currently Hilo Hawaii, Saipan 670 Is Home
Posts: 195
Likes: 0
Received 0 Likes
on
0 Posts
haha! I wasn't trying to offend you 92! I was just saying our boats are similar. Hawaii is -10gmt in saipan it's +10 gtm so if I'm behind in hawaii but ahead in saipan. So going from hawaii to saipan I lose two days (leave 24-arrive 26) but going from saipan to hawaii I gain a day (leave 24 arrive 24) Yeah time travel gets old.
I was talking to my dad (not a gear head and has no appreciation for it, total think tank) and telling him about what i'm doing. he said "you better not screw up" I said "hey you should be thrilled about this, I'm saving up to 1400 buck in labor alone" He said "that's nice"
So those foil looking passages are NOT supposed to be Plugged? I wonder how my truck was running so well with them clogged?
Thanks for the template lumpy. I have another timing cover so I'm gonna take every screw out of the old one and put it in the corresponding hole on the new one. I figure that's the smart thing to do.
03-24-2010, 01:32 PM
#104
YotaTech Milestone-Two Millionth Post
like i said, i have no clue what those are all for, but right now, mine are cleaned out.
you are saving a big chunk of money and learning alot along the way.
you are saving a big chunk of money and learning alot along the way.
03-24-2010, 01:38 PM
#105
Registered User
Thread Starter
Join Date: Jul 2005
Location: Currently Hilo Hawaii, Saipan 670 Is Home
Posts: 195
Likes: 0
Received 0 Likes
on
0 Posts
I am for sure! I pray that the crank pulley doesn't give me a hard time. I don't have a puller so I'm worried now.
03-24-2010, 01:41 PM
#106
YotaTech Milestone-Two Millionth Post
here's what i did, not sure it's the right thing to do. i took the breaker bar handle and did a little here and a little there and little more here and a little more there until i saw it moving and then i was able to walk it off with my hands without damage.
03-24-2010, 01:44 PM
#107
Registered User
Thread Starter
Join Date: Jul 2005
Location: Currently Hilo Hawaii, Saipan 670 Is Home
Posts: 195
Likes: 0
Received 0 Likes
on
0 Posts
Sounds like a plan! What keeps haunting me is the vaccum tubes I gotta reconnect. I have a feeling that is going to come back and haunt me... Just wait I'll be posting a bunch of "where does this tube go to?" "where do I plug this?" How much more do you have to go 92?
03-24-2010, 01:47 PM
#108
YotaTech Milestone-Two Millionth Post
LOTS!
i've been talked into taking my valves apart.....oh well, would regret not doing it.
I took lots of pictures, but i'm sure i'll need a picture of something i didn't think of.
cost is prohibitive right now....even buying a G-D $20 tool is a humongous burden.
i've been talked into taking my valves apart.....oh well, would regret not doing it.
I took lots of pictures, but i'm sure i'll need a picture of something i didn't think of.
cost is prohibitive right now....even buying a G-D $20 tool is a humongous burden.
03-24-2010, 03:41 PM
#109
Registered User
Thread Starter
Join Date: Jul 2005
Location: Currently Hilo Hawaii, Saipan 670 Is Home
Posts: 195
Likes: 0
Received 0 Likes
on
0 Posts
ok so I got the timing cover off. the driver's side guide is gone! the part that rubs the chain broke off completely, just the part that attaches to the front remains. I'm having a hard time taking the pan out. I guess I didn't get the diff low enough. I gotta figure out how to get it lower (read 92's oil pan thread again)
My goals for today:
- get the oil pan off
- clean the oil pan.
-clean timing cover surface.
If time permits-
Start reassembling timing components and cover
My goals for today:
- get the oil pan off
- clean the oil pan.
-clean timing cover surface.
If time permits-
Start reassembling timing components and cover
03-24-2010, 03:45 PM
#110
YotaTech Milestone-Two Millionth Post
you didn't take off the crossmember yet right?..maybe that makes a difference...i wasn't sure if it would or not.
can you get it off but not out or not off at all?
can you get it off but not out or not off at all?
03-24-2010, 03:48 PM
#111
Registered User
Thread Starter
Join Date: Jul 2005
Location: Currently Hilo Hawaii, Saipan 670 Is Home
Posts: 195
Likes: 0
Received 0 Likes
on
0 Posts
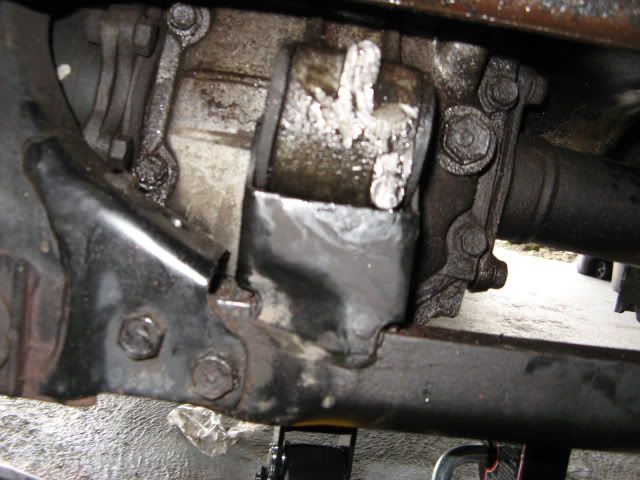
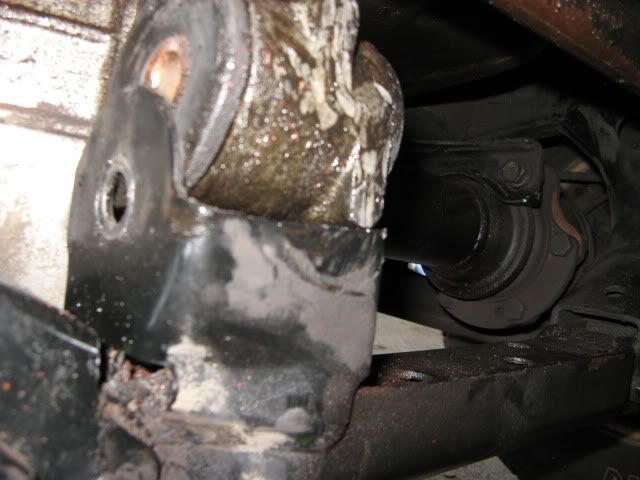
I got the pan off but it's not going anywhere. The front diff is blocking it. I think I gotta take that cross member off. Looks difficult to remove too..
03-24-2010, 03:51 PM
#112
YotaTech Milestone-Two Millionth Post
 03-24-2010, 04:42 PM
#117
YotaTech Milestone-Two Millionth Post
take off the 4 bolts (2 each side) bolts


Last edited by 92 TOY; 03-24-2010 at 04:46 PM. Reason: edit......wrong bolts
03-24-2010, 04:44 PM
#119
YotaTech Milestone-Two Millionth Post
take the jack and jack up the diff and be careful NOT TO DRIVE IT INTO THE PAN!!!
that should likely remove it from that rounded brace part......then with an LFS (little sledge) apply some downward convincing to the area just above the yellow arrow,,,,,,that's what I did.
that should likely remove it from that rounded brace part......then with an LFS (little sledge) apply some downward convincing to the area just above the yellow arrow,,,,,,that's what I did.


