
92 TOY's 22re / crapped out / gotta start somewhere / thread
 02-12-2010, 08:59 AM
#881
YotaTech Milestone-Two Millionth Post
Thread Starter
 02-14-2010, 07:17 PM
#882
Registered User
Join Date: Jan 2010
Location: Sonora, CA (Central Sierra)
Posts: 447
Received 0 Likes
on
0 Posts
New head?
What's the justification for the new head? Is it because of the condition of the valves? When you say "the valves look like crap", do you mean because of carbon deposits? If you are already considering buying a new head anyways, why not try to take that one apart, clean it, and re-lap the valves? I know that you are nervous, but this is a job that can be done in one brew-filled evening. Besides, if you mess up, you haven't lost anything anyways, as you are considering replacing it.
Pros:
1) Cheap. Lapping compound = 3$, lapping tool = 4$, big c-clamp or valve spring compressor = 18$ or less. Valve seals will come with just about any complete head gasket kit. Pay shipping, and I'll send you a spare set that I have, if you like.
2) Easy. Pull out one valve at a time, scrub the carbon off with solvent and a toothbrush, install new valve seal, reinstall valve and re-compress spring.
3) Fast. As stated earlier, this is one evening and a six-pack's worth of work.
Besides, you have to remember: this is a 22-RE. You can build them cheap, solid, or high(er)-power, pick two. This is probably never going to be fast or powerful, and unless your head is failed, or you are dumping lots of cash into a high-performance offroad machine, the extra money spent on a new head just isn't worth it. If you clean and re-lap your existing valves, you will see about a 5 horse difference, possibly some better gas mileage, and you will most likely get another 100k+ out of that head. True, you will get these things out of a new head, but for 350$ more.
At the least, re-build the head, and try a "beaker test". Flip the head cylinder side up, and pour water in each combustion chamber, and see how quickly it leaks out. You can do this before cleaning and lapping as well, but small pieces of carbon caught in the valve seat may skew the results of this test. Your head should take 5 minutes plus to empty the water out of each chamber completely.
Carbon buildup itself does not spell the end of that head or its valves or valve seats. Save yourself some money for the small stuff that stacks up and for more important modifications.
Have you done something about the state of your oil pan yet? I can't stress enough how important it is to get a good coat of fresh oil on all of your engines internals. Oil, water, and ethylene glycol don't normally mix, they separate. The reason that the stuff in your oil pan looks like mocha is because your motor was forcing and churning that oil/water/antifreeze mix through every oil port in your motor. That means that your pistons, crank, crank bearings, etc. have had water sitting in them for the duration of this project. Ideally, if you had known that this project would be this lengthy, you would have wanted to drain the oil, drain the coolant, disconnect the water hoses, pour several quarts of new oil down the head, disconnect the coil wire (to keep the engine from firing), and cranked the motor over for a while to re-coat everything with a new protective coat of oil. As it stands, I am super nervous for you that you are going to fail to investigate that fully and correctly, button everything back up, spend a bunch of money on shinies, and have a major failure either on startup or a few hundred miles down the line when the heat and debris that the rust on your crank and crank bearings causes your crank to seize.
I'll add my wishes to the wishes that others have stated, I wish I was a little bit closer than Cali. With just a little bit of help, you could do all of the work that you need to yourself, for 2-300$.
Ok, I'll stop with the beating now
Some resources:
This is a very informative video. It shows an eclipse motor, but the principles are still the same.
http://www.youtube.com/watch?v=Ls7TCQ0U2Pg
Here is a step by step how to, with pics:
http://www.v6z24.com/howto/valvelapping
Good luck!
02-14-2010, 07:38 PM
#883
Registered User
Join Date: Jan 2010
Location: Sonora, CA (Central Sierra)
Posts: 447
Received 0 Likes
on
0 Posts
Crap, I just went back and saw that a lot of this info is already posted...
Dude, your valves look like they are in GREAT shape! On the last rebuild, my valves had a lot more carbon on them than that, I just cleaned the carbon off and didn't even re-lap them. My 22-R holds 130 PSI in every cylinder...
I know this is nerve-wracking to do your first time through, but it really is very easy...
Try the beaker test. If your valves hold water for over a minute, proceed with the re-lap. 25$ spent for a 350$ savings, with a good chance of success is a REALLY good gamble. Once you do it, you will wonder why you put it off for so long.
 02-16-2010, 03:29 AM
#885
YotaTech Milestone-Two Millionth Post
Thread Starter
NO $$$$$$$$$
Crap, I just went back and saw that a lot of this info is already posted...
Dude, your valves look like they are in GREAT shape! On the last rebuild, my valves had a lot more carbon on them than that, I just cleaned the carbon off and didn't even re-lap them. My 22-R holds 130 PSI in every cylinder...
I know this is nerve-wracking to do your first time through, but it really is very easy...
Try the beaker test. If your valves hold water for over a minute, proceed with the re-lap. 25$ spent for a 350$ savings, with a good chance of success is a REALLY good gamble. Once you do it, you will wonder why you put it off for so long.
Dude, your valves look like they are in GREAT shape! On the last rebuild, my valves had a lot more carbon on them than that, I just cleaned the carbon off and didn't even re-lap them. My 22-R holds 130 PSI in every cylinder...
I know this is nerve-wracking to do your first time through, but it really is very easy...
Try the beaker test. If your valves hold water for over a minute, proceed with the re-lap. 25$ spent for a 350$ savings, with a good chance of success is a REALLY good gamble. Once you do it, you will wonder why you put it off for so long.
My thinking was that with the extra $$$$$ I am getting I was just going to get a head. MORE likely will NOT be doing that and instead will be reusing my head.
That tool for doing the valves (looks like a suction cup) probably won't get a seal because of the carbon build up.
I was just thinking lazy...because the head looks OK, was OK and like I said the truck never so much as had a miss or anything. I guess I was just thinking wastefully.
Anyway, hopefully, and I pray, my refund will be available today....payday is still 2 days away and I am absolutely broke...so if I do get it, I will order the stuff from engnbldr since that's the biggest expense...approx $300 for what I listed.
I won't get a new head or cam and just will work forward to getting this back together.
PUMPKINYOTA...
I thoroughly appreciate your input and it sounds like you have a "been there, done that" kinda stance and that's very valuable to me but, still,I have no plan of pulling the block while it's still not an absolute necessity...and by that I mean I haven't put a rod through the block YET.
every time I felt like I was getting somewhere on this I got stopped by something stupid. When I last touched the truck, I stopped because I broke all 4 bolts on the swaybar mounts and can't get the disconects disconnected and will have to sawzall them....that oil pan is a royal pain in the nuts and in my opinion and the opinions of the rest, it's not optional to NOT remove it....so besides ordering parts I will be focusing my efforts on that.
Again, as far as the head goes, I will be reusing mine. the exhaust manifold was on there just fine wih a broken stud and no leaks so I'm going to hope it stays just fine too. It's not like anyting could have physicaly changed with it while it was sitting there.
although the head and valves aren't shiny and new like I would like, apparently they aren't bad either so they should serve me just fine.....I WILL re-tap the one spark plug and will have to go back on this thread and find the post about the tap. Likewise, I am going to search for info on what to use to clean out the head bolt holes on the block.....cutting a bolt doesn't seem like an option for me either unless someone could really dummy it down to explain what I do. No air tools here either.
anyway, that's it for now. Hopefully soon, there will be some news.
thanks for all the input, everyone. I very much appreciate it. The ball busting is OK too.
Last edited by 92 TOY; 02-16-2010 at 03:32 AM.
02-16-2010, 05:13 AM
#886
Registered User
The suction cup thingy will work for lapping the valves which you really should. Take a tooth brush and some brake cleaner to clean the carbon off and you're good to go.
Everything else seems like you have it in order...
Everything else seems like you have it in order...
02-16-2010, 05:19 AM
#887
YotaTech Milestone-Two Millionth Post
Thread Starter
when I get my desktop hooked back up when i get it back from the geek that was working on it (haha), i will be able to upload pics once again and show some god pics of the valves.
they are like coarse sandpaper after a green scrubbie pad with brake and carb cleaner.
honestly, at this point, I think the valves are the least of my worries right now.
they are like coarse sandpaper after a green scrubbie pad with brake and carb cleaner.
honestly, at this point, I think the valves are the least of my worries right now.
02-16-2010, 05:40 AM
#888
Super Moderator
Staff
iTrader: (1)
Join Date: Aug 2008
Location: Anderson Missouri
Posts: 11,788
Likes: 0
Received 25 Likes
on
22 Posts
Hello 92, I just got done reading your post over a period of a couple of weeks. This brings back memories of my first major motor work. Sometime I was thinking "what have I gotten into." Just want to keep encouraging you. Between this site an a few manuals you can do it and the sense of accomplishment is great afterwards. You will have a greater appreciation of your truck and what makes it tick. Just hang in there. I cant wait till I can work on mine again.
02-16-2010, 05:56 AM
#890
YotaTech Milestone-Two Millionth Post
Thread Starter
Hello 92, I just got done reading your post over a period of a couple of weeks. This brings back memories of my first major motor work. Sometime I was thinking "what have I gotten into." Just want to keep encouraging you. Between this site an a few manuals you can do it and the sense of accomplishment is great afterwards. You will have a greater appreciation of your truck and what makes it tick. Just hang in there. I cant wait till I can work on mine again.
hey thanks man, again, feel sorry for ya reading this...hahahaha
I've done plenty on non-job-related things in my life, mostly small and medium general construction kinda work / landscaping, plumbing, electrical etc and each with no formal training and tremendously good outcomes. I like to do THAT kind of stuff, but the whole mechanic thing (Like LUMPY said, pulll it apart, see what ya have)...is new to me.
But just from being on this site a little over a year, I know I have the knowledge to help other people too....just want to be able to say that I successfully rebuilt mine, once....hahaha
02-16-2010, 06:53 AM
#891
Super Moderator
Staff
iTrader: (1)
Join Date: Aug 2008
Location: Anderson Missouri
Posts: 11,788
Likes: 0
Received 25 Likes
on
22 Posts
You are going about it the way that I did. Car broke and needed it fixed but not by a mechanic. It is a good feeling to be able to help someone elses with theirs. But look at it this way, to get to the point where you are at now again, I bet alot of your fears wouldnt be there. Besides this is a good experience for the kiddos. I got one that likes to get into stuff like this but the other one, hmmm???
02-16-2010, 06:56 AM
#892
YotaTech Milestone-Two Millionth Post
Thread Starter
You are going about it the way that I did. Car broke and needed it fixed but not by a mechanic. It is a good feeling to be able to help someone elses with theirs. But look at it this way, to get to the point where you are at now again, I bet alot of your fears wouldnt be there. Besides this is a good experience for the kiddos. I got one that likes to get into stuff like this but the other one, hmmm???
 02-16-2010, 09:15 AM
#893
Registered User
Join Date: Jan 2010
Location: Sonora, CA (Central Sierra)
Posts: 447
Received 0 Likes
on
0 Posts
Yeah, you can also use hot water (boiling) with a little bit of citrus based degreaser (like simple green), and a brass bristle or fine steel bristle wire brush. I have found that these two methods (brake cleaner, or hot water) work the best, and when one doesn't, the other usually will.
02-16-2010, 09:59 AM
#894
Registered User
Join Date: Jan 2010
Location: Sonora, CA (Central Sierra)
Posts: 447
Received 0 Likes
on
0 Posts
every time I felt like I was getting somewhere on this I got stopped by something stupid. When I last touched the truck, I stopped because I broke all 4 bolts on the swaybar mounts and can't get the disconects disconnected and will have to sawzall them....that oil pan is a royal pain in the nuts and in my opinion and the opinions of the rest, it's not optional to NOT remove it....so besides ordering parts I will be focusing my efforts on that.
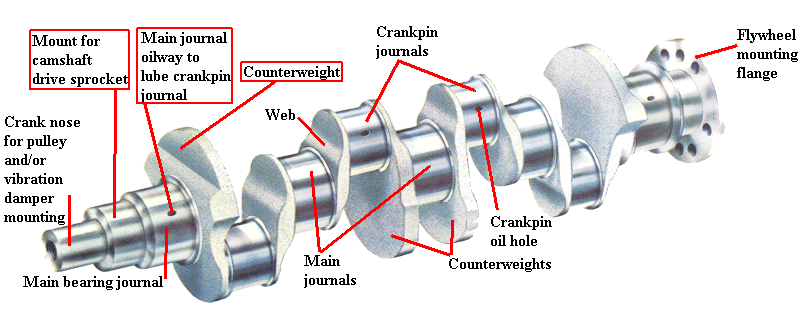
Finish the cutting, demolishing, removal, etc. that you need to in order to remove the oil pan. Get under the rig with a high-power light, and make sure there is no apparent major surface rust in the crankcase, specifically in the areas around the crank bearings and journals. If there is surface rust in the crankcase, but not in the journal areas, remove it with a wire brush. If there is rust around the crank bearings and journals, your project just got larger.
Once this is done, re-install the oil pan, add 1-2 qts of 10w-30, and use the starter motor to turn the engine over a few times to try to circulate some of this oil. You may want to put just a touch of that oil on the cylinder walls before doing this, to be nice to your rings. This might get a little messy, and dribble or squirt some oil, so be prepared for that. One way or the other, once this project is complete and the motor is buttoned up and running again, you will want to replace your break-in oil and filter in 3-500 miles to remove any rust, particulate matter, or contaminates from the re-build.
although the head and valves aren't shiny and new like I would like, apparently they aren't bad either so they should serve me just fine.....I WILL re-tap the one spark plug and will have to go back on this thread and find the post about the tap. Likewise, I am going to search for info on what to use to clean out the head bolt holes on the block.....cutting a bolt doesn't seem like an option for me either unless someone could really dummy it down to explain what I do. No air tools here either.

You are going to try to make your existing head bolt look like this, by using a cutting or grinding implement of some sort to remove "channels" from the bolt. You don't need to cut in 4 individual grooves, like there would be on a tap, just one will do. You can use any grinding implement to make this work, like a bench grinder, a dremel, a right angle grinder, or a drill and grinding wheel. If you don't have any of these, you are better off just buying a cheap tap at a hardware store. If you do this, make sure you bring your head bolt along to make sure you get he correct size. It will be a metric tap, I believe it is an M12 (not positive), and make sure that the thread pitch is the same (metric usually has three different thread pitches for each stud diameter, a course, a standard, and a fine).
02-16-2010, 10:08 AM
#895
Registered User
Join Date: Oct 2009
Location: Downtown Heckronto, Ontario, Soviet Canuckistan
Posts: 1,499
Likes: 0
Received 1 Like
on
1 Post
For example my front bumper, I got a Warn brush guard/winch mount that goes over the stock bumper, both of which I intend on giving a nice coating of bed liner, but when I went to take the stock bumper off, the passenger-side mounting bracket for that rubber clip-on thing is rotted and needs some replacing, though the clip on the body is in perfect shape, while the opposite is true on the driver's side, mounting bracket is perfect while the mount on the body is rotted off. Naturally instead of painting them last weekend, I spent the time doing jack diddley trying to figure out how I'd fix the bracket on the bumper without destroying it care of my (lack of) welding ability, gotta hunt down replacement mounting hardware to.
92 TOY: Once again I express my astonishment at the fact your garage hasn't been broken into by any "Good Samaritan" types wanting to see this rebuild done! Oh well, maybe you'll finish by the time I start rebuilding my 22R so I can reference this thread for it.
02-16-2010, 10:11 AM
#896
YotaTech Milestone-Two Millionth Post
Thread Starter
Honestly, what I'm nervous about with making my own tab is changing or damaging the matching thrad surface inside the block and screwing myself really hard by doing that. so i would rather buy a tap and do it like that.
thanks for the advice about looking at the crank....don't worry, i will and i will post up pics. when i'm done, this will be the best pictoral ever (I hope, and i hope i get done)
thanks for the advice about looking at the crank....don't worry, i will and i will post up pics. when i'm done, this will be the best pictoral ever (I hope, and i hope i get done)
02-16-2010, 11:08 AM
#897
Registered User
Join Date: Jan 2010
Location: Sonora, CA (Central Sierra)
Posts: 447
Received 0 Likes
on
0 Posts
Honestly, what I'm nervous about with making my own tab is changing or damaging the matching thrad surface inside the block and screwing myself really hard by doing that. so i would rather buy a tap and do it like that.
thanks for the advice about looking at the crank....don't worry, i will and i will post up pics. when i'm done, this will be the best pictoral ever (I hope, and i hope i get done)
thanks for the advice about looking at the crank....don't worry, i will and i will post up pics. when i'm done, this will be the best pictoral ever (I hope, and i hope i get done)
1/2 hr jury rigging, for a 12$ tool = 24$ an hour, and my time is worth a hell of a lot more than that
 02-16-2010, 11:25 AM
#898
YotaTech Milestone-Two Millionth Post
Thread Starter


