
91 Pickup headlight retrofit to HID projectors

 12-19-2011, 02:55 PM
#24
Registered User
Join Date: May 2009
Location: Thunder Bay, Ontario, Canada
Posts: 113
Likes: 0
Received 0 Likes
on
0 Posts
Yeah, I thought about the clear lens upgrade but went with 55w ballasts and bulbs so I figure I would be alright. Do you think that it would really make that big of a difference? Is it worth buying?
I too have noticed that the blue cut off is gone with the headlight lens on. I wonder if the plastic covers would remedy this. I currently have one with the lens off and one with the lens on. The one with the lens on has a yellow cut off rather than blue.
Thanks for the information!
I too have noticed that the blue cut off is gone with the headlight lens on. I wonder if the plastic covers would remedy this. I currently have one with the lens off and one with the lens on. The one with the lens on has a yellow cut off rather than blue.
Thanks for the information!
As for the lens upgrade, it would help with intensity and clarity, especially in the cutoff - but the glass ebay headlight lenses are the real bottleneck in your setup ... Look into lexan - just take your bezel that holds the headlight to the bucket and trace it onto some lexan and cut it out ... That'll be my next step with my lights..
If I were you I'd actually email Matt at TRS and ask him a few questions - dude is extremely knowledgeable and helpful - pointed me in the right direction a couple times with my retro..
12-19-2011, 05:04 PM
#25
Registered User
Thread Starter
Join Date: Jul 2009
Location: Denver, Colorado
Posts: 319
Likes: 0
Received 0 Likes
on
0 Posts
EBay headlights with clear glass - 25 a pair X3 since I have broken 3 and had to order another set to finish the one left
EBay Gatling gun shrouds - 25 for both
Ballasts and HID kit - 80
HID relay kit for lights - 10
Miscellaneous supplies - 30-40
For a grand total of about $300
Keep in mind that I could have kept it at $250 if I wouldn't have broken the glass on 3 of the headlights.
No pics of the finished product yet because it's not quite done. I should be getting the lens on Wednesday. I will either finish Wednesday night or Thursday morning. I'll be sure to update when I do.
Last edited by 93YotaGuy; 12-19-2011 at 05:13 PM.
12-19-2011, 05:12 PM
#26
Registered User
Thread Starter
Join Date: Jul 2009
Location: Denver, Colorado
Posts: 319
Likes: 0
Received 0 Likes
on
0 Posts
When doing this would it just be to remedy the cut off and help it go back to blue or would it intensify the light output? Also, I think it would be tough to make it look as clean as the glass helps the headlight to look.
Last edited by 93YotaGuy; 12-19-2011 at 05:16 PM.
12-20-2011, 10:48 AM
#27
Matt at TRS is awesome, I would x2 recommend him and their stuff. I'm also rockin' some morimoto 55's, love 'em like no other. I think TRS does free shipping for life once you buy one of their kits if I remember right. woo hoo!
HIDplanet forums is also a good place to look, tons of retrofits on there to look at, even some old yotas. Worth taking a look there to see other's problems/solutions.
HIDplanet forums is also a good place to look, tons of retrofits on there to look at, even some old yotas. Worth taking a look there to see other's problems/solutions.
12-23-2011, 05:51 AM
#28
Registered User
Thread Starter
Join Date: Jul 2009
Location: Denver, Colorado
Posts: 319
Likes: 0
Received 0 Likes
on
0 Posts
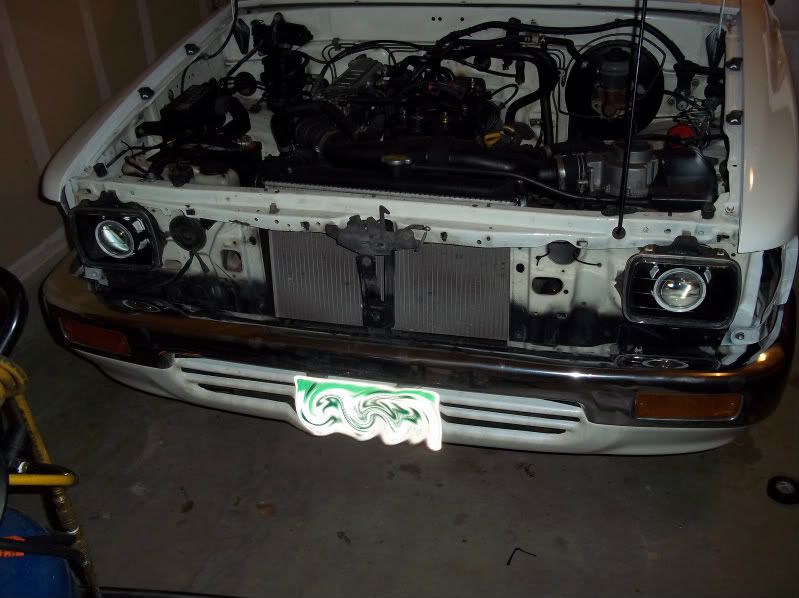
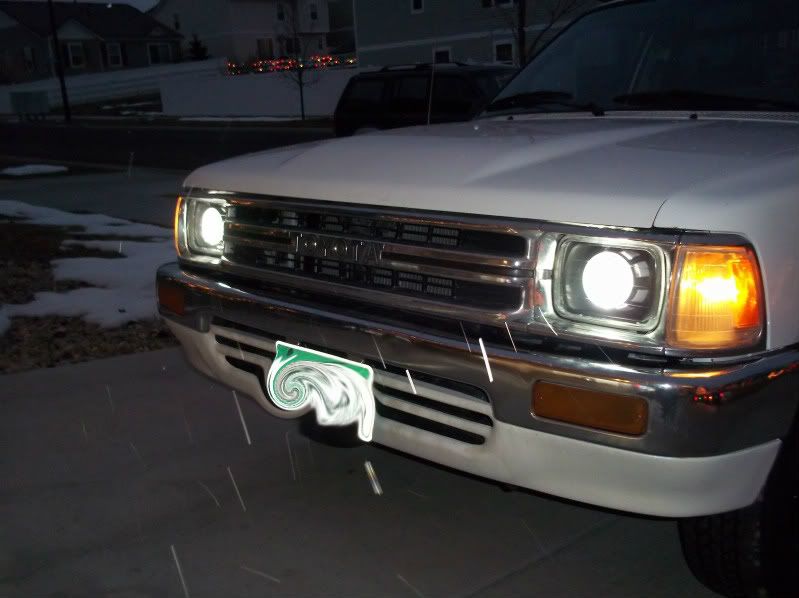
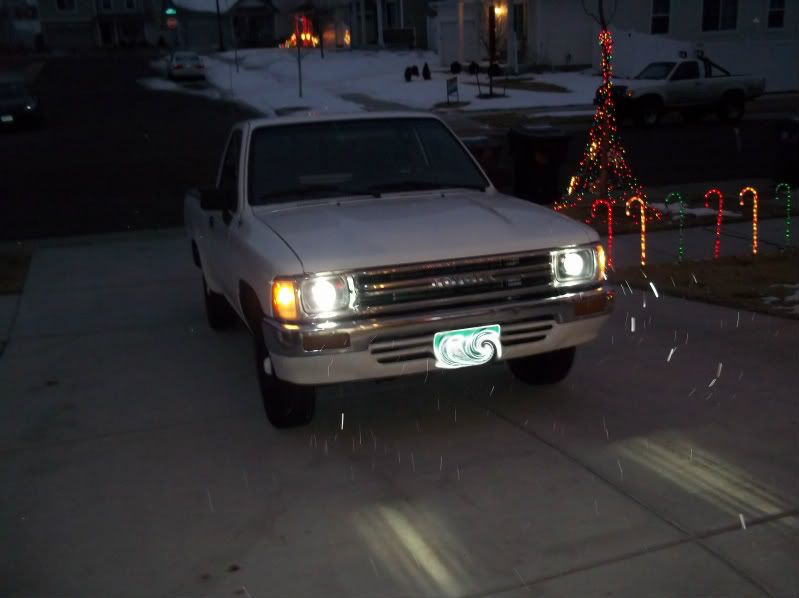
So I finished it! Well, kinda... I still have to aim the lights. I attempted to the other night but was having a little trouble getting the adjustment screws to move the light were it needed to go. I'll probably work on it again today or tomorrow and post some pics as to what the real light output is like. For now I have this...
Surprisingly enough I got it in the first time without breaking the lens. Here it is on the truck.
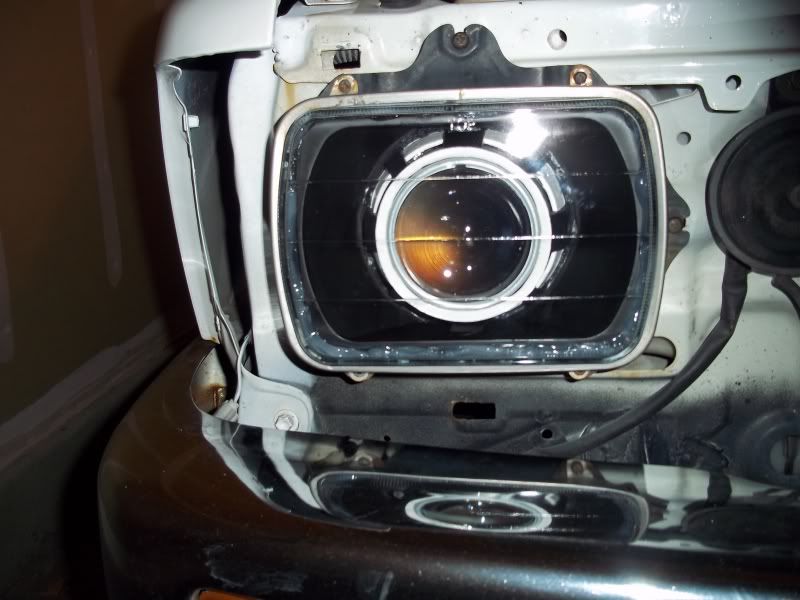
Like the christmas lights?
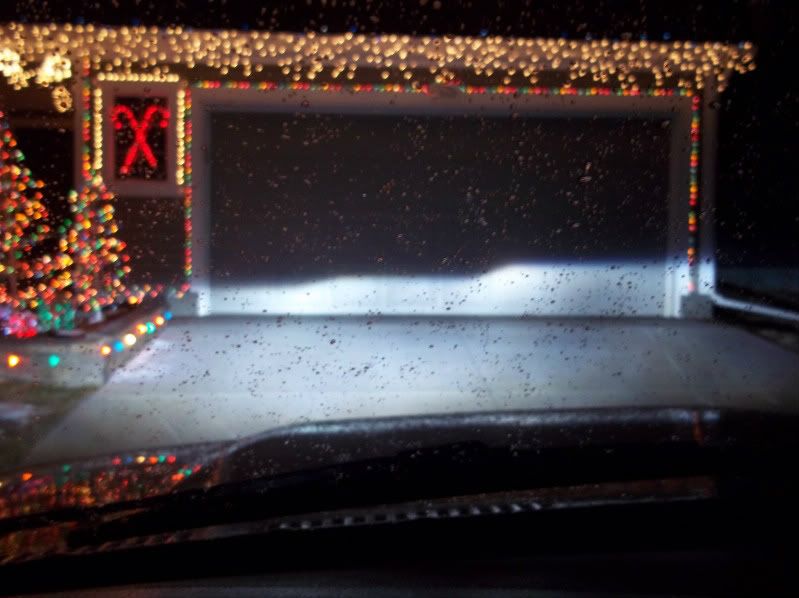
Here are a few pictures of what the light output looks like without the adjustment. Pretty pleased. I had a hard time keeping the photo adjusted because of the snow so i'll post some more on a clear night.
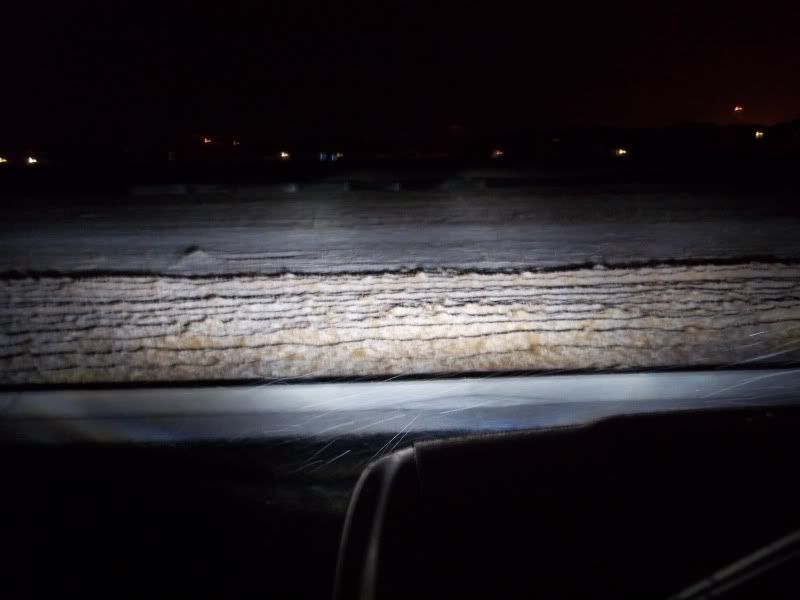

Surprisingly enough I got it in the first time without breaking the lens. Here it is on the truck.
Like the christmas lights?
Here are a few pictures of what the light output looks like without the adjustment. Pretty pleased. I had a hard time keeping the photo adjusted because of the snow so i'll post some more on a clear night.
Last edited by 93YotaGuy; 12-23-2011 at 05:55 AM.
 12-23-2011, 07:57 PM
#30
Registered User

:highfive:
While I'd have chosen different projectors, you did a pretty darn good job. Thanks for not slapping a PnP HID kit in halogen housings and then boasting about your awesome (dripping with sarcasm) output!
Amazing what a proper retrofit will do, eh?
While I'd have chosen different projectors, you did a pretty darn good job. Thanks for not slapping a PnP HID kit in halogen housings and then boasting about your awesome (dripping with sarcasm) output!
Amazing what a proper retrofit will do, eh?
12-24-2011, 06:51 AM
#31
Registered User
Thread Starter
Join Date: Jul 2009
Location: Denver, Colorado
Posts: 319
Likes: 0
Received 0 Likes
on
0 Posts
I am very impressed with the light output. Seems like my lights currently blow other vehicles lights out of the water.
12-25-2011, 06:52 PM
#32
Registered User
I hear ya. However now you've got to figure out a high beam setup. For less than double the price of your X5 projectors, you could have used FXr projectors: http://www.theretrofitsource.com/pro...roducts_id=101
Those have low beam and high beam, are super easy to retrofit, and put out incredible light. They're also very easy to wire up for high beams, it's just two wires to a solenoid. I did what we call a TFX retrofit on my M3 (OEM FX35 bixenon projectors, TSX clear lenses, modded and blacked out shields, etc...) and the output is amazing.
Even still, I commend you for doing it right. With a decent set of halogen highs you'll have plenty of great, usable light!
12-26-2011, 06:40 AM
#33
Registered User
Thread Starter
Join Date: Jul 2009
Location: Denver, Colorado
Posts: 319
Likes: 0
Received 0 Likes
on
0 Posts
I hear ya. However now you've got to figure out a high beam setup. For less than double the price of your X5 projectors, you could have used FXr projectors: http://www.theretrofitsource.com/pro...roducts_id=101
Those have low beam and high beam, are super easy to retrofit, and put out incredible light. They're also very easy to wire up for high beams, it's just two wires to a solenoid. I did what we call a TFX retrofit on my M3 (OEM FX35 bixenon projectors, TSX clear lenses, modded and blacked out shields, etc...) and the output is amazing.
Even still, I commend you for doing it right. With a decent set of halogen highs you'll have plenty of great, usable light!
Those have low beam and high beam, are super easy to retrofit, and put out incredible light. They're also very easy to wire up for high beams, it's just two wires to a solenoid. I did what we call a TFX retrofit on my M3 (OEM FX35 bixenon projectors, TSX clear lenses, modded and blacked out shields, etc...) and the output is amazing.
Even still, I commend you for doing it right. With a decent set of halogen highs you'll have plenty of great, usable light!
I do want to keep the light color the same and came across these on ebay.
They are 6000k bulbs with ballasts and I would end up wiring them to come on when I run my high beams. They run about 80-100 bucks depending on who you buy it from.
I did a quick paint scheme as to how it would look. I originally thought about putting them in the grill next to my headlights but thought that it would look to cluttered. I like this idea a little better. What do you think?
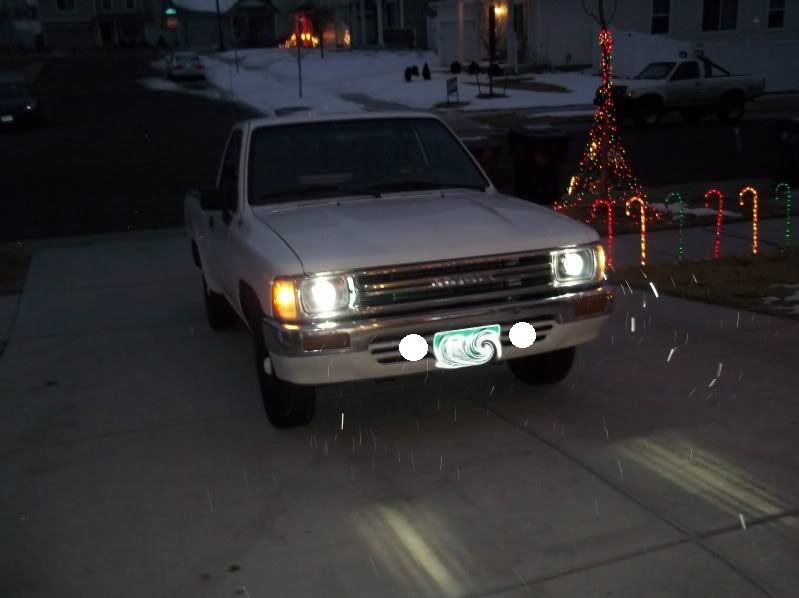
They would obviously be tucked in and I would have to figure a way to mount them.
Or maybe even finding/making an hid light setup that would fit in the housing where the blinkers are. If I were to do that I would simply integrate the blinkers to work off of the corner lights. Hmmmmm what to do?
Last edited by 93YotaGuy; 12-26-2011 at 06:54 AM.
12-26-2011, 07:30 AM
#34
Registered User
Join Date: May 2009
Location: Thunder Bay, Ontario, Canada
Posts: 113
Likes: 0
Received 0 Likes
on
0 Posts
Anything you put in the lower valence wont work as well as you would want for a high beam.. Especially in a 2wd where you're low already. Especially a spot light pattern like the lights you posted, you'll just have 2 orbs of light.
I'd honestly run a halogen high and run them off the bumper, like hella 500's or something.. Instant on like halogens are awesome compared to the slow warm up time of hids, especially for high beams..
Also take note that if you hit your high beams, your low beams turn off. So if you have your ballasts wired to the low beams I would either make a switch to run the ballasts off the parking lights and then run your high beams to auxiliary lights.. You can run a diode and relay/dual relay setup to have it all work a little cleaner but it's a pain in the ass on our trucks..
12-26-2011, 08:04 AM
#35
Registered User
Thread Starter
Join Date: Jul 2009
Location: Denver, Colorado
Posts: 319
Likes: 0
Received 0 Likes
on
0 Posts
I like the hella 500's but want it to look as clean as possible and have people think it is the way the truck was made. Any fool can drill holes and mount lights. The real task is making it work and keeping it clean.
Also take note that if you hit your high beams, your low beams turn off. So if you have your ballasts wired to the low beams I would either make a switch to run the ballasts off the parking lights and then run your high beams to auxiliary lights.. You can run a diode and relay/dual relay setup to have it all work a little cleaner but it's a pain in the ass on our trucks..
Basically in the stock lights you would have your low beam running off of your switch. When you hit the high beams the ground is switched to the other part of the headlight that has a higher intensity filament. Thus, you have a high beam or more light.
What I've done as a temporary fix, until I figure out the high beam, is wired the two grounds together. Now if I accidently hit the high beam switch while trying to hit my blinker I don't have to worry about my lights shutting off. When I run the new high beams, I will simply have to run a ground from the headlights to the body. The switching ground that is already in place will act as my switch for the high beam and will allow me to keep my headlights on while the high beam is lit.
Last edited by 93YotaGuy; 12-26-2011 at 08:12 AM.
12-26-2011, 08:55 AM
#36
Registered User
I have a set of Caddi projectors with the HID's and it has a single filament bulb. The high beam is set by activating a mechanical alteration to the housing. There is a flap that provides the "cut off" (the straight line between light and dark when your head lights are pointed at a wall) and when HI is turned on, it moves the flap down to allow more of the light to pass through.
12-26-2011, 11:54 AM
#37
Registered User
Thread Starter
Join Date: Jul 2009
Location: Denver, Colorado
Posts: 319
Likes: 0
Received 0 Likes
on
0 Posts
I have a set of Caddi projectors with the HID's and it has a single filament bulb. The high beam is set by activating a mechanical alteration to the housing. There is a flap that provides the "cut off" (the straight line between light and dark when your head lights are pointed at a wall) and when HI is turned on, it moves the flap down to allow more of the light to pass through.
What you have is referred to as bi-xenon projectors. Keep in mind that mine are single beam projectors and do not have the flap.
Last edited by 93YotaGuy; 12-26-2011 at 11:58 AM.
12-26-2011, 01:24 PM
#38
Registered User
93YotaGuy is spot on. HID's have no filaments.
On that note, YotaGuy, steer clear of HID high beams. Just get good halogens, wire them up with 12awg wire, and use some good bulbs like Osram Nightbreaker +90, or Phillips Extreme power, etc...
As I said above, did a retrofit on my M3, and I'm running that bulb setup in the OEM high beam location with the wiring setup stated above and the color is very, very close. Full wattage on a good halogen bulb will produce light that appears very similar to HID, just without the width of a proper HID projector.
It's nice to see more and more people doing proper retrofits and actually know what they're talking about!
12-26-2011, 03:59 PM
#40
Registered User
Thread Starter
Join Date: Jul 2009
Location: Denver, Colorado
Posts: 319
Likes: 0
Received 0 Likes
on
0 Posts


