When you click on links to various merchants on this site and make a purchase, this can result in this site earning a commission. Affiliate programs and affiliations include, but are not limited to, the eBay Partner Network.
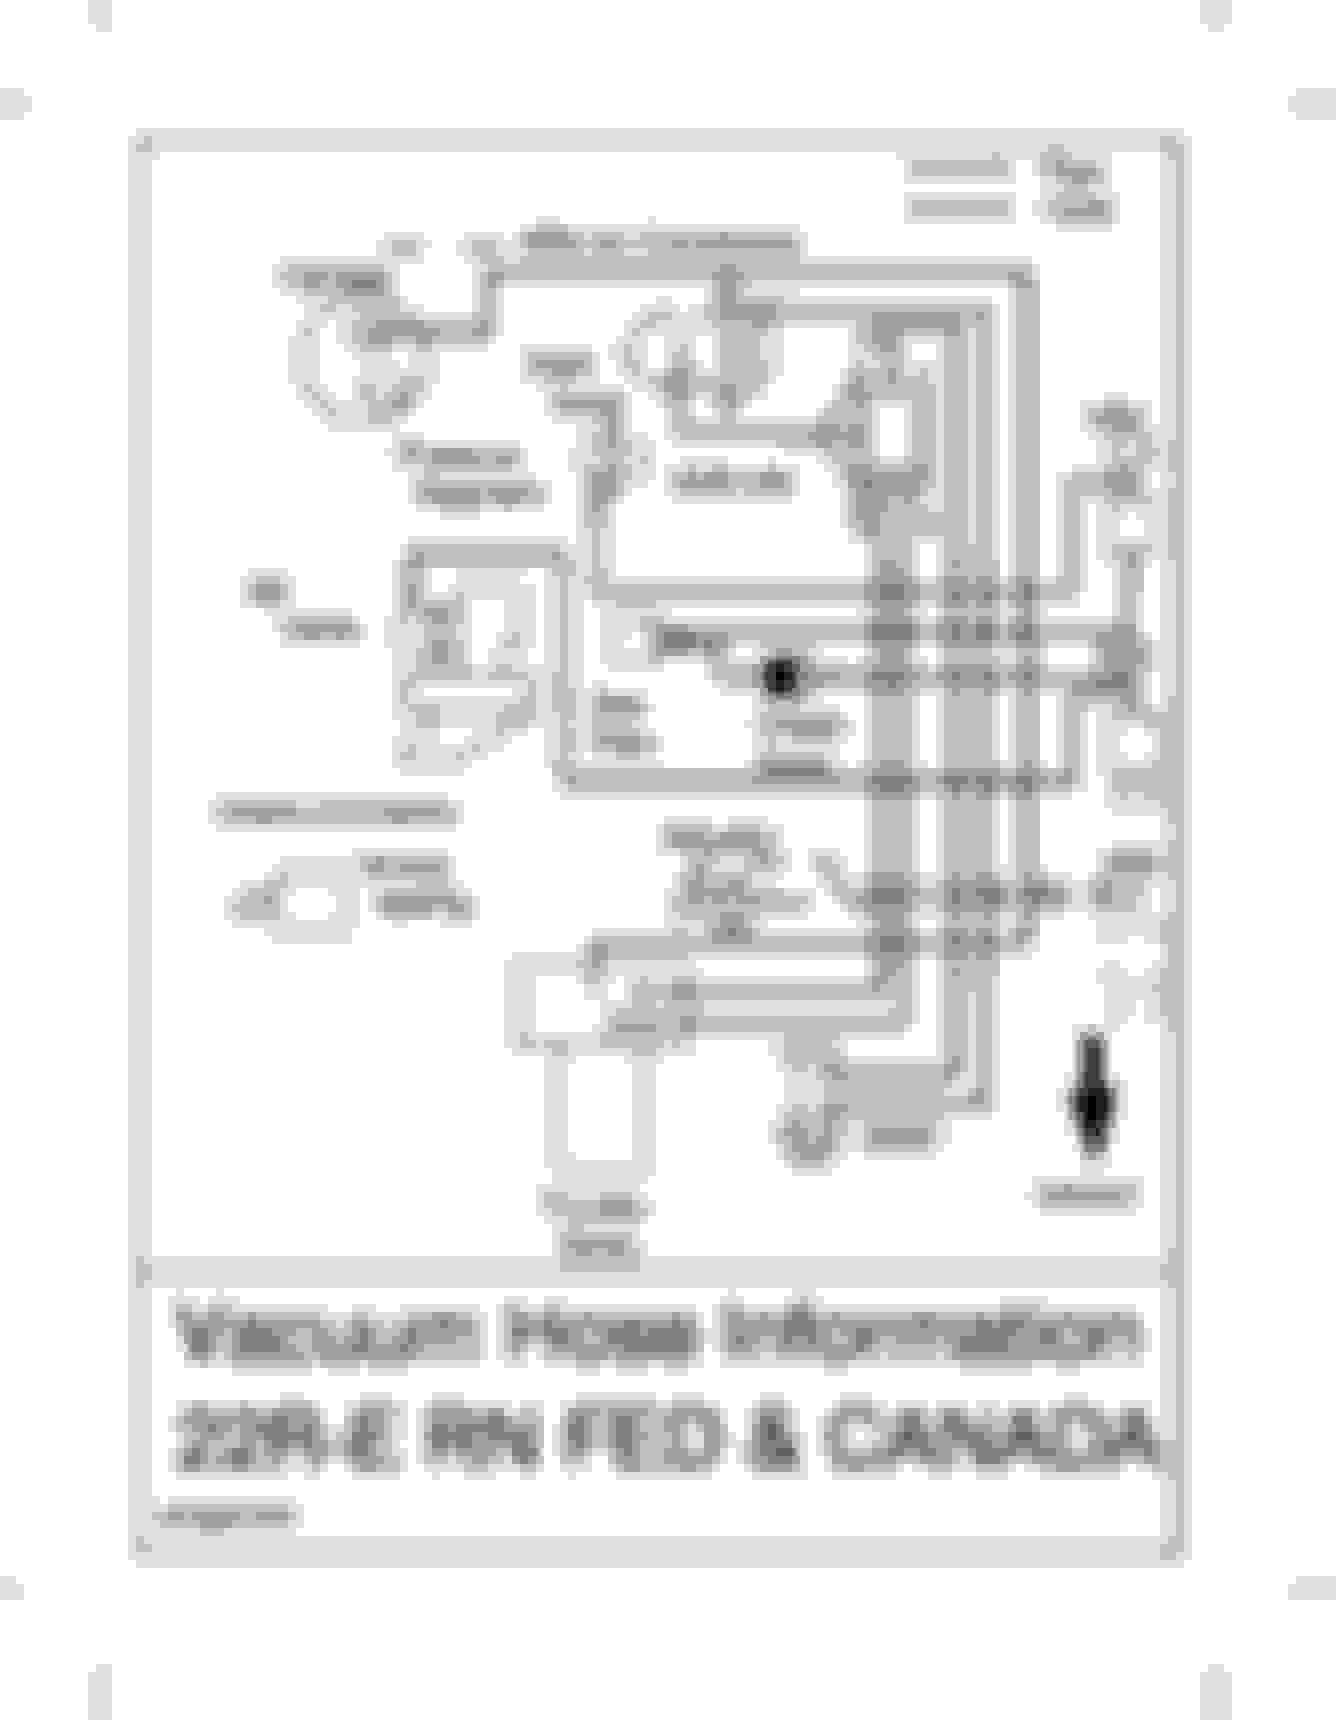
Would anyone have a link to these? Google is NOT my friend here: I searched and searched for them, but can't find ones that match. They're either different years (and thus different arrangements), or for entirely different engines. (Why does it return lots of 3vze hits when I specifically tell it not to?) Mine has two vacuum valves mounted to the exhaust side of the valve cover.
And before anyone makes fun of me for not labelling things when I took the engine apart, I DID. I carefully labelled all the hoses with tape. Problem is, due to weather and delays getting parts, the job has taken almost 3 months, and the writing on those labels has mostly disappeared. So for future use, if anyone knows some way of permanently labelling things, I'd be grateful.
Sorry, can't tell you which year this is for:
Marking all those lines with tape is not only a thankless job, it's doomed to failure. Even if all the writing survives the "weather," (were they stored outside?) trying to install them while protecting the flapping tags is pretty taxing. Instead, draw yourself a diagram, just like the one above. If you don't leave the drawing outside where the squirrels can get to it, you'll be good to go for a very long time.
[Same advice for removing a head. Where do all those bolts go? You can carefully reinsert the bolts into the head as you remove the attachments, but you don't want to send your heads to the machine shop with a bunch of bolts that can come loose. Just draw a box and mark each location with the fastener that goes there ("M8-1.25 x 45 Flanged"). You might have to draw 5 boxes (one for each exposed side), but it's strictly work that a 3d-grader could do.]
Thanks, that diagram will help. But what helped more was your mention of drawing diagrams. That knocked loose a few stubborn brain cells, and I remembered that I took pictures!
Guess I'm not quite as dumb as I thought, even though for the last week I've been kicking myself for not having taken pictures, 'cause they weren't on the cell phone. Totally forgot that I used a camera :-( Yet another reason to hate those jobs that get stretched from a few days to several months.
A picture may be worth a thousand words, and they're trivially easy to make (if you don't forget where you put them), but looking at a picture of "black spaghetti" is a lot less useful than you might think. Consider making your diagram now as you're putting it together. Yes, you will need it again sometime, and you'll be glad you have it.
I did give some thought to colored vacuum tubing (though it seems kinda pricy), then paint the things the hoses go to. But with the black spaghetti pictures, I just used GIMP to draw colored lines on the different ones.
Now if I can just find the wire that goes to the cold start injector, I'll be fine, I know it's got to be down in there somewhere :-)
Great picture! Wish I'd had it a week ago. But I got everything hooked up this weekend, and a few last things installed today. Started right up, and seems to run ok. Still need to set the timing &c.
Definitely saving it for future use.
Though mine doesn't have the VSV and lines for A/C, even though it has A/C. And there are a couple of lines going to the power steering pump that aren't shown. Have always wondered what the heck they're for...
The ones going to the PS pump will up the idle when the pump is under significant load (near full lock) to get the pulley moving faster. I'd also check that your idle doesn't dip when the AC turns on, I believe that one does a similar thing. Wonder why you don't have a VSV there?
I'd also check that your idle doesn't dip when the AC turns on...
Of course that assumes that your A/C actually works :-) Mine doesn't. I imagine it's just a case of the fluid having leaked out over time, but it's the older style that you can't recharge yourself. Not really been a problem, since I seldom use the truck in the summer.

 03-10-2022, 02:26 PM