3vze head gasket replacement : my turn
#1
Hi everyone, i've been lurking this forum HARD ever since the HG blew in my 93 3vze. Faced with a potential $3k charge to have a local shop do this job I did some googling and landed on this incredible forum where reading your threads has convinced me that I can tackle this job myself. I'm ok with the wrench but I've never done anything this advanced before. Along with replacing the HG, I will replace the timing belt, all timing belt pulleys, tensioner, water pump and will likely have the valves done as well. This thread's purpose is for me to post the progress I make and ask questions along the way...
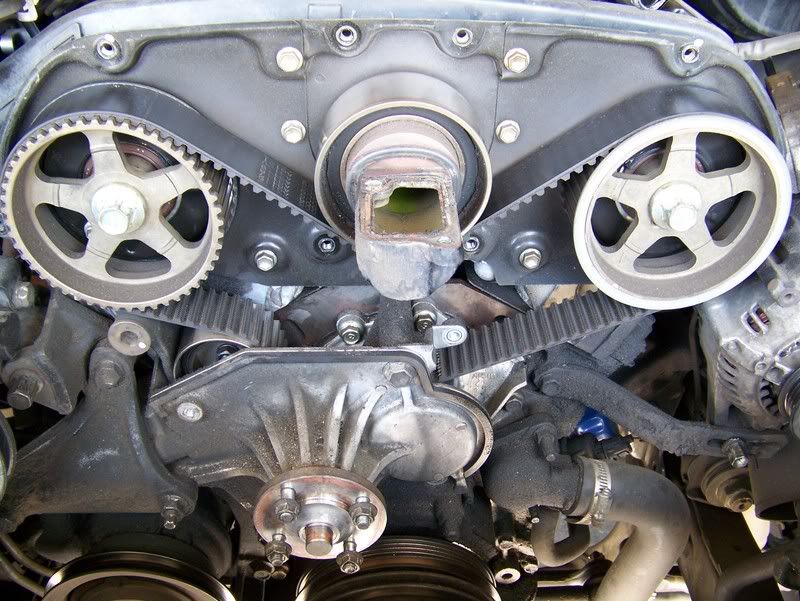
Here's a pic of how far I've gotten to this point (I've since removed the fan bracket):

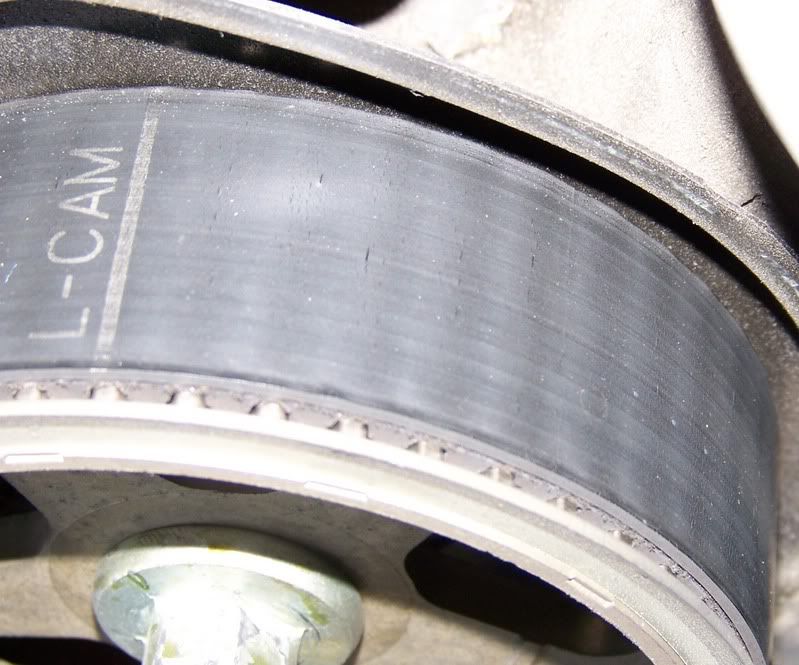
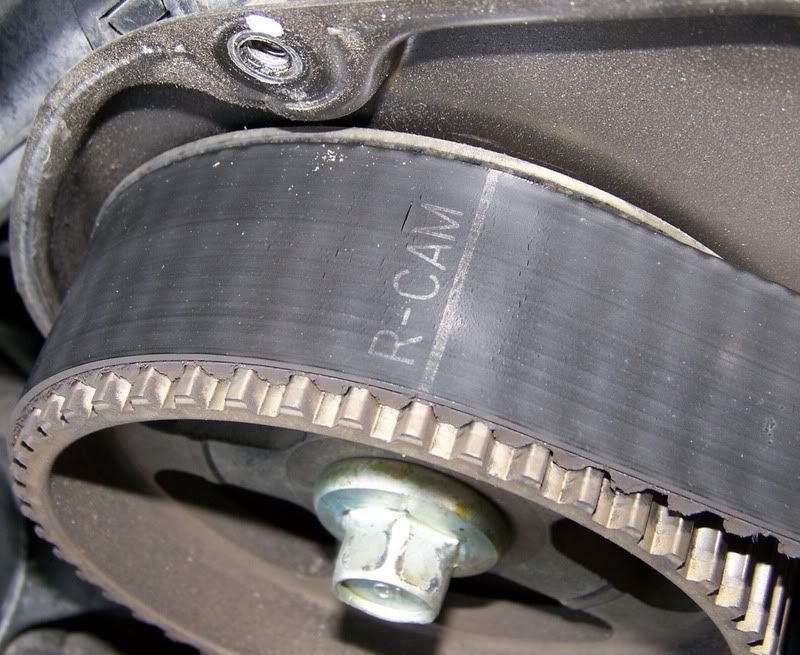
Here are a couple shots of the existing timing belt, notice the nasty cracks. Who knows how long that sucker would have lasted. As far as I know it is original.


The existing belt has marks for the cams/crank alignment points. I bought a new belt from the local Toyota dealer and it didn't have any marks, weird. The parts guy said I wouldn't have to worry about it. Is he right?
While at the dealer I also picked up the pulleys, tensioner, water pump and a tube of FIPG. I'm waiting on engnbldr to get some TTY head bolts in, when he does I'll grab the head gaskets and all other gaskets needed for this job.
My next step is to remove the cam sprockets. Is there harm in attempting to do this with an impact wrench while the old belt is on? I've read the horror stories about getting these off and thought while the timing belt is tight, it might be worth a shot. If not, i'll rig up a SST something like others have made to get these off.
Thanks for reading this and wish me luck! Any words of wisdom while I'm at this point in the game?
Here's a pic of how far I've gotten to this point (I've since removed the fan bracket):

Here are a couple shots of the existing timing belt, notice the nasty cracks. Who knows how long that sucker would have lasted. As far as I know it is original.


The existing belt has marks for the cams/crank alignment points. I bought a new belt from the local Toyota dealer and it didn't have any marks, weird. The parts guy said I wouldn't have to worry about it. Is he right?
While at the dealer I also picked up the pulleys, tensioner, water pump and a tube of FIPG. I'm waiting on engnbldr to get some TTY head bolts in, when he does I'll grab the head gaskets and all other gaskets needed for this job.
My next step is to remove the cam sprockets. Is there harm in attempting to do this with an impact wrench while the old belt is on? I've read the horror stories about getting these off and thought while the timing belt is tight, it might be worth a shot. If not, i'll rig up a SST something like others have made to get these off.
Thanks for reading this and wish me luck! Any words of wisdom while I'm at this point in the game?
#6
My only advice i can give is fit extractors while the heads are off and replace the knock sensor and wire, mine has 'let go' and it retards the timing every time i drive it, its located in the valley of the V6, and the inlet manifold has to come off to get to it. Not cheap though, $236 aus$
Last edited by Emms4runner; 05-11-2007 at 02:04 AM.
#7
Contributing Member
Joined: Apr 2006
Posts: 4,787
Likes: 34
From: TENN Native Languishing in Virginia
Replace both ilder pulleys while you're in there. Mine sounded like they had sand in them. Are you going to get the engnbldr full gasket kit as well?
Check my HG (well, that's what is started out as) replacement as well: https://www.yotatech.com/forums/f116/crap-head-gasket-giving-up-ghost-108156/
Check my HG (well, that's what is started out as) replacement as well: https://www.yotatech.com/forums/f116/crap-head-gasket-giving-up-ghost-108156/
Trending Topics
#8
Replace both ilder pulleys while you're in there. Mine sounded like they had sand in them. Are you going to get the engnbldr full gasket kit as well?
Check my HG (well, that's what is started out as) replacement as well: https://www.yotatech.com/forums/showthread.php?t=108156
Check my HG (well, that's what is started out as) replacement as well: https://www.yotatech.com/forums/showthread.php?t=108156
#10
Registered User
Joined: Sep 2005
Posts: 8,656
Likes: 16
From: NW Ark on wooded ten acres...Ozarks at large!
yeah all pulleys are going to be replaced. I've read your thread a few times, it played a major part in my deciding to do this job. I don't need the full engnbldr kit as I'm only doing the top half, hopefully he'll get the TTY bolts in soon so I can place one order for the HG and everything else.
Also, when did engnbldr start offering torque to yield headbolts? The one's I got are reusable.
#11
we exchanged e-mails a couple weeks ago and he said he carries the head bolts but is currently out of them. just about everyone has recommended replacing them, better safe than sorry.
#12
Contributing Member
Joined: Apr 2006
Posts: 4,787
Likes: 34
From: TENN Native Languishing in Virginia
They are headbolt WASHERS; never heard them called spacers. And you are right, they do NOT come with Ted's head bolts.
I was told that Ted's headbolts are NOT TTY and ARE reuseable; maybe Burr is confused about the TTY part....?
#13
is it safe to use non TTY head bolts? i always thought it was TTY or bust?
#15
Registered User
Joined: Sep 2005
Posts: 8,656
Likes: 16
From: NW Ark on wooded ten acres...Ozarks at large!

I had considered that Blurr was confusing the two types, but I figured it was possible Ted started offering a TTY headbolt and I didn't know.
#16
Contributing Member
Joined: Apr 2006
Posts: 4,787
Likes: 34
From: TENN Native Languishing in Virginia
So why does a head bolt need a "spacer" anyways? I can see the slippage part for torquing the head but I would think a thinner one would give you more threads/more resistant to stripping..why so thick?
(sorry 'bout the hijack, Blurr!)
(sorry 'bout the hijack, Blurr!)
#17
Registered User
Joined: Sep 2005
Posts: 8,656
Likes: 16
From: NW Ark on wooded ten acres...Ozarks at large!
I really don't know. All I can figure is that the bolt is a definite length and there is a definite thread depth in the block. I suppose there is a potential for a TTY headbolts stretching enough that it could bottom out in the block without enough of a spacer thickness. But, I'm just guessing as I really don't know.
#18
#19
Registered User
Joined: Sep 2005
Posts: 8,656
Likes: 16
From: NW Ark on wooded ten acres...Ozarks at large!
Another thing about the spacers/washers.....it's possible (again, I'm only guessing) with a thinner one the amount of torque on the headbolt along with constant expansion and contraction might cause a thinner one to buckle or distort between that much psi and the soft aluminum.
Regardless...
Blurr, when you install your new headbolts with your original thingamajigs (spacers..hehe) make sure you lube not only the hb threads but the spacers as well.
And, to answer a question, it's true....it doesn't matter if the new timing belt has marks on it. But, when you go to install it, make sure when you have the cam gears and crank pulley all lined up on the compression stroke at cyl. #1 that you get as much slack out of the belt as possible while you're laying the belt notches across the cam gears. Start by pulling the belt up from the crank, then over the right hand (driver side) cam, under the idler pulley, then stretching over the land hand cam. Then, the tensioner will take up the rest of the slack on the remaining portion. Then, make some marks at that point so you have a reference IF the belt happens to slip a tooth in the whole process. Hope you followed that.
Last edited by thook; 05-11-2007 at 09:29 PM.
#20
Contributing Member
Joined: Feb 2007
Posts: 9,055
Likes: 9
From: maple ridge, British Columbia, Canada
No wonder my truck didn't want to start  We went over the damn truck with a fine tooth comb and couldn't figure it out.
Then I found the interent!!!
but it was after I payed a guy 500 bucks to replace it.. I felt like a damn fool after that one..
On a side note, I had a dream last night... I was driving down a dark road, for some reason I had it pegged at 6,500rpm and getting higher, then I felt a massive jerk and a loud bang followed by tons of white smoke.. followed with a sudded wake up covered in sweat.. jesus!!
My toyota gives me nightmares now!!!
 We went over the damn truck with a fine tooth comb and couldn't figure it out.
 Then I found the interent!!!
but it was after I payed a guy 500 bucks to replace it.. I felt like a damn fool after that one..
On a side note, I had a dream last night... I was driving down a dark road, for some reason I had it pegged at 6,500rpm and getting higher, then I felt a massive jerk and a loud bang followed by tons of white smoke.. followed with a sudded wake up covered in sweat.. jesus!!
My toyota gives me nightmares now!!!


