
22RE keeps having overheating issues


The following users liked this post:
raguvian (05-12-2020)

 05-12-2020, 07:24 PM
#65
YT Community Team
I know this hurts, but if it were me I’d pull it and install a helicoil.
And I’d do it right away, before I had too long to stew on it and get bummed.
but let’s see what others offer.
And I’d do it right away, before I had too long to stew on it and get bummed.
but let’s see what others offer.
 05-12-2020, 07:50 PM
#66
Registered User
Thread Starter

Also, is there any reason I wouldn't be able to just drill the hole out and helicoil with the timing cover in place? I have a small drill that will fit, and I'd just need to widen the hole in the block a little bit to fit the helicoil in. I could even widen the timing cover bolt hole slightly as well if needed. I'd rather just do that than have to redo everything I've just finished.
Some people on the facebook group were saying that it should be fine since the bolt is at the upper right side of the timing cover and theoretically under the least amount of pressure. I'm tempted to just run straight distilled water and see if I get any leakages, and helicoil the timing cover in place when possible (looks like 2+ weeks to get the helicoil kit from amazon).
05-12-2020, 09:53 PM
#67
YT Community Team
Since you’re so far along in the process you could just finish and see what happens.
i don’t think trying to helicoil with the cover in place would work well. But one possibility is to tap the hole with a slightly larger standard tap and install a standard bolt instead of metric.
if you went that route you could always drill out the hole install a metric helicoil in the future if you ever have to.
05-13-2020, 12:06 PM
#68
Registered User
Thread Starter
Since you�re so far along in the process you could just finish and see what happens.
i don�t think trying to helicoil with the cover in place would work well. But one possibility is to tap the hole with a slightly larger standard tap and install a standard bolt instead of metric.
if you went that route you could always drill out the hole install a metric helicoil in the future if you ever have to.
Again, I'm not trying to argue, especially since your advice has been extremely helpful so far, just curious as to why it wouldn't work.
05-13-2020, 12:57 PM
#69
YT Community Team
Drilling out the hole big enough to tap and install the helicoil also means drilling out the cover, too.
I thought tapping out the hole to take a standard bolt, maybe 7/16 20NF, might be less invasive and easier. And if it didn’t work you always had the helicoil as option B.
i glanced at my tap set and quickly guessed at the standard size that was slightly bigger. I’d want to look a bit more before committing.
Considering that bolt hole helps support the alternator I think it’s important to have a solid bolt there, oil leaking aside.
05-13-2020, 01:00 PM
#70
Registered User
Thread Starter
Drilling out the hole big enough to tap and install the helicoil also means drilling out the cover, too.
I thought tapping out the hole to take a standard bolt, maybe 7/16 20NF, might be less invasive and easier. And if it didn�t work you always had the helicoil as option B.
i glanced at my tap set and quickly guessed at the standard size that was slightly bigger. I�d want to look a bit more before committing.
Considering that bolt hole helps support the alternator I think it�s important to have a solid bolt there, oil leaking aside.
I don't want to undo everything in case something else decides to mysteriously strip out.
05-13-2020, 01:34 PM
#71
YT Community Team
It’s 1.25
The following users liked this post:
raguvian (05-13-2020)
 05-15-2020, 09:33 AM
#73
YT Community Team
We all have tap and dies to fix our mistakes. Along with helicoil sets, smoked drill bits, and abused vise grips. It just happens. Almost everything is fixable, thank god.
05-15-2020, 09:37 AM
#74
Registered User
Thread Starter
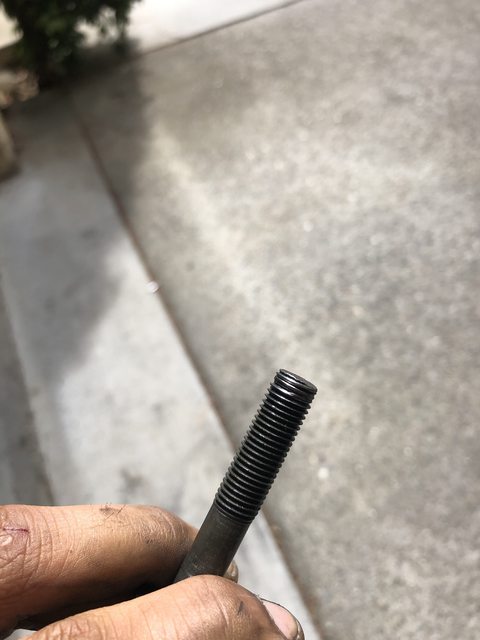
Well, this project has unfortunately stalled due to lack of any tools in stock nearby. I want to try tapping the hole first before drilling it out. I actually tried to "tap" the hole out with a bolt and a lot of oil and carb cleaner and air and got it to torque down to 15 lb ft before I got scared and gave up, but it feels like the threads are still kind of there?
If that doesn't work, I'll try to helicoil it. I'm not sure how it will work with the timing cover in place but might as well try. If I do have to pull the cover off, would I have to pull the head off again? I'm just worried about stripping more holes at this point (especially the head bolts) and wanted to keep the disassembly to a minimum.
If that doesn't work, I'll try to helicoil it. I'm not sure how it will work with the timing cover in place but might as well try. If I do have to pull the cover off, would I have to pull the head off again? I'm just worried about stripping more holes at this point (especially the head bolts) and wanted to keep the disassembly to a minimum.
05-17-2020, 12:53 PM
#75
Registered User
Thread Starter
Well, some good news! I was able to borrow an M10x1.25 tap and ran it all the way down. I noticed the hole went a lot further down than the length of the bolt, so I replaced the 60mm bolt with a 75mm one and was able to torque it down to 29 lb ft without any issue.
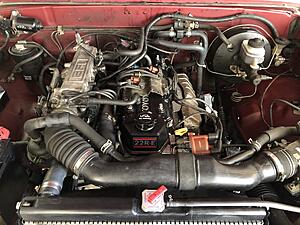
The engine is mostly back together now (just have to tighten the belt and replace the fuel filter and add fluids), but to be honest this is the biggest job I've ever done and I'm pretty nervous to even turn it on. I keep having a recurring dream that the temp gauge will end up shooting past halfway again...
The engine is mostly back together now (just have to tighten the belt and replace the fuel filter and add fluids), but to be honest this is the biggest job I've ever done and I'm pretty nervous to even turn it on. I keep having a recurring dream that the temp gauge will end up shooting past halfway again...

The following users liked this post:
old87yota (05-17-2020)
05-17-2020, 03:03 PM
#77
YT Community Team
The wire set is Denso👍🏼
If the temp gauge goes much beyond half I’d think the only thing left to scrutinize is the radiator.
If the temp gauge goes much beyond half I’d think the only thing left to scrutinize is the radiator.
The following 2 users liked this post by wallytoo:
old87yota (05-17-2020),
RAD4Runner (05-22-2020)
05-19-2020, 01:15 PM
#79
Registered User
Thread Starter
Well, bad news. I filled it up yesterday, water started pouring out the intake side of the head. I read the Haynes manual and it said both sides had to be perfectly clean and gave a torque value and sequence and to rtv the gasket. I just slapped a new gasket in without cleaning anything and didn't torque them, just snugged them in a random order. Oops.
Intake came back off, I cleaned everything and wiped with carb cleaner, RTV'd the gasket, torqued to proper value using proper sequence, no leaks. I then put oil in, cranked it without the EFI fuse for a bit to build/circulate oil, then started it. It was a little smoky out the tail pipe (figured due to the silicone spray I sprayed on the piston walls), and then cleared up. No water bubbles or anything in the radiator (using my funnel attachment), heater blew hot, and yet it still overheats... I shut it off when the gauge went past halfway.
Smokiness aside, it seemed to run perfectly fine and cranked right up and idled fine. I didn't see any leaks anywhere either, but the upper radiator hose stayed cool. I also used my infrared thermometer on the thermostat housing and it showed only 135 F, so the thermostat still isn't opening. I'm not sure if I still have a bubble of doom trapped in the cooling system, or if I screwed up the headgasket installation, or if the headgasket was never the issue in the first place, but I'm still very stumped.
I did see some wax crud on the thermostat when I was reinstalling it, so I cleaned it up, but I wonder if overheating it repeatedly prior to the headgasket job screwed up the thermostat as well.
05-19-2020, 01:45 PM
#80
Registered User
That sucks man :/
Have you looked at your Rad at all? I couldn't find you mentioning it anywhere in the thread. It could have a blockage of some sort in it. When I was having over heating issues, the Rad was the last thing I looked at, because the PO said it was brand new, and I did run water through it and it appeared that it flowed decently out of the other end. When I finally pulled my Rad, there was a dark spot in one of the bottom corners that I couldn't see while it was mounted. Replaced the Rad and my temp has never gone past about 40% on the gauge since.
Just a thought from my experiences.
Last edited by 5 Fists; 05-19-2020 at 01:46 PM.
The following users liked this post:
raguvian (05-19-2020)


