
22RE keeps having overheating issues
 05-06-2020, 10:01 AM
#41
YT Community Team
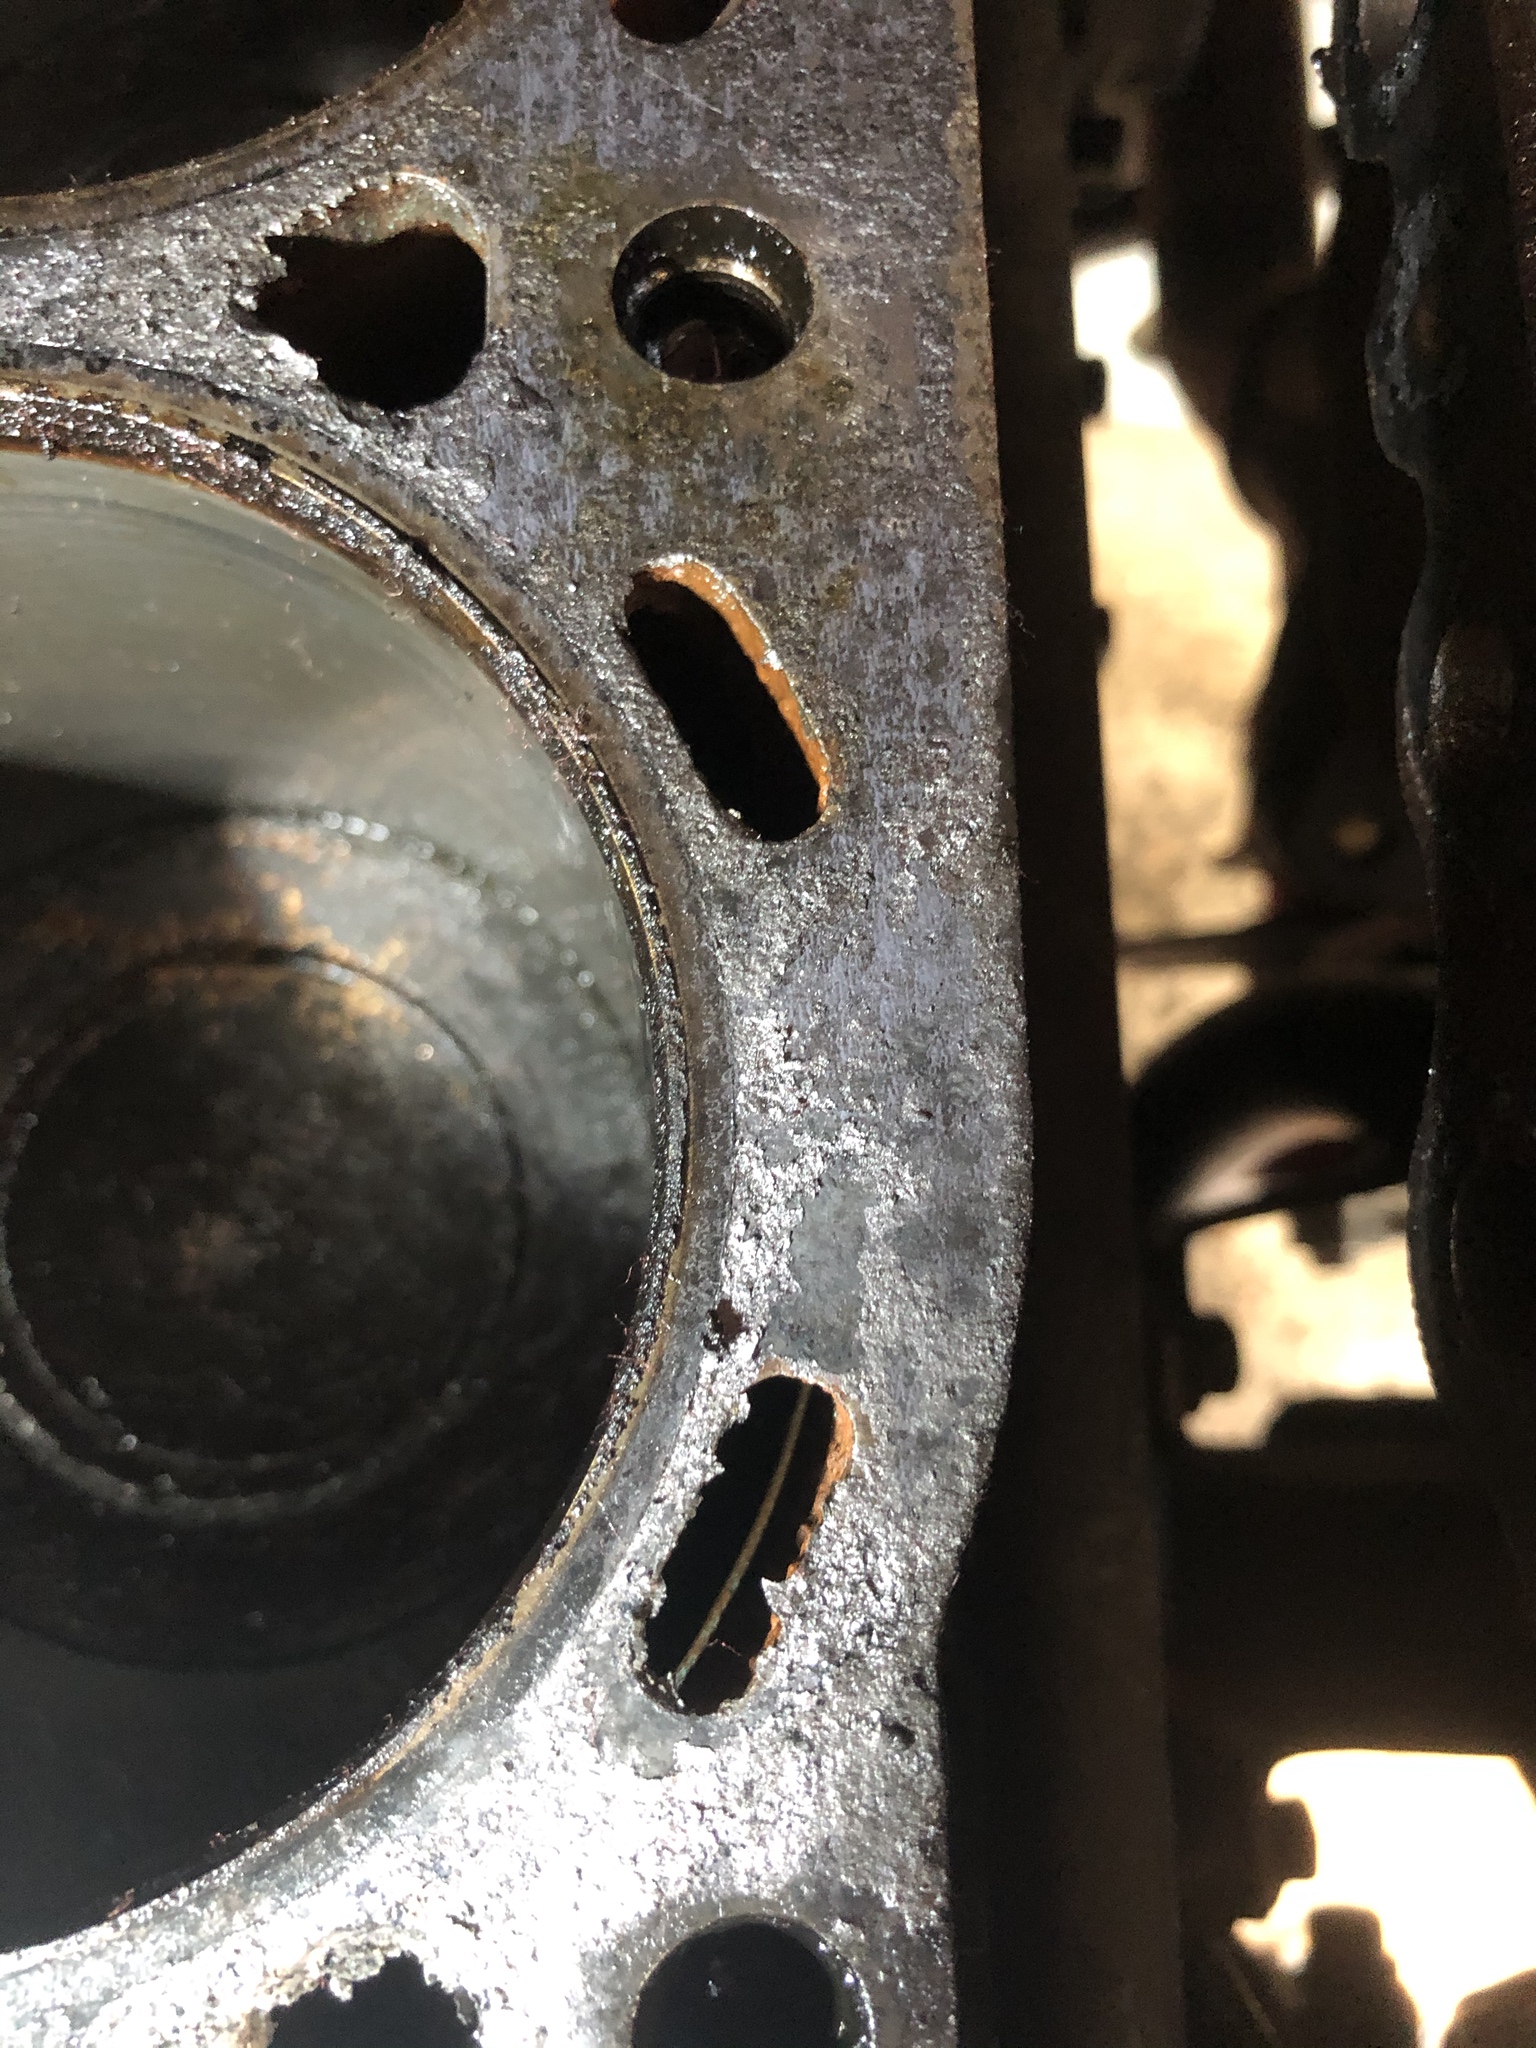
It was hard to tell by the one photo if there was something in the water jjackets. A few did look odd towards the rear, but closer photos of the gasket and the block surface before cleaning would be nice.

The following users liked this post:
raguvian (05-06-2020)
05-06-2020, 02:37 PM
#42
Registered User
When I replaced the head on my 4Runner, I sprayed WD40 in the pistons after I had hone the cylinders. It kept them nice and clean, but when I started it the first time after I got everything done, it belched huge clouds of white smoke for a few seconds. It cleared up before I did anything else, and the thing has run great eversince.
Just be ready. You put anything other than gasoline and air in the cylinder, you'll know about it. No matter HOW well you wipe it down before you start it.
I wish you the very best of luck!
Pat☺
Just be ready. You put anything other than gasoline and air in the cylinder, you'll know about it. No matter HOW well you wipe it down before you start it.
I wish you the very best of luck!
Pat☺
 05-06-2020, 06:48 PM
#43
Registered User
Thread Starter


It still needs some cleaning for sure:
Unfortunately the oil pan is stuck on there super well from when I removed it and put FIPG sealant. I couldn't get it off today so I'm hoping I can somehow pry it off tomorrow.
When I replaced the head on my 4Runner, I sprayed WD40 in the pistons after I had hone the cylinders. It kept them nice and clean, but when I started it the first time after I got everything done, it belched huge clouds of white smoke for a few seconds. It cleared up before I did anything else, and the thing has run great eversince.
Just be ready. You put anything other than gasoline and air in the cylinder, you'll know about it. No matter HOW well you wipe it down before you start it.
I wish you the very best of luck!
Pat☺
Just be ready. You put anything other than gasoline and air in the cylinder, you'll know about it. No matter HOW well you wipe it down before you start it.
I wish you the very best of luck!
Pat☺
The following users liked this post:
5 Fists (05-06-2020)
05-06-2020, 07:02 PM
#44
YT Community Team
Those passages look ok. As a side note from what I can see the cross-hatching on the cylinder walls look very good. I can’t see the thrust side, but still.
The following users liked this post:
raguvian (05-07-2020)
05-07-2020, 11:24 AM
#45
Registered User
A note: Be VERY careful when cleaning the remains of the head gasket off the block!
You have to be certain NOT to do any sort of damage to the metal of the block. I only used plastic brushes/scrapers when I did mine. At worst, brass brushes, but delicately, and only for grossly stubborn places, where the head gasket remains are just stuck on, and thick. Even then, caution is vital. Luke taping off the area around the most stubborn areas to prevent any damage, or contamination down water passages and so on. You wouldn't think a steel block could be all that delicate, but a small scratch on the mating surface can have some very detrimental effects. Plug all the passages down into the block to keep trash out as you clean. Put a cloth or paper towels down into the open cylinders to keep stuff out too.
Honestly, it seems like the prep to clean the block can take longer than the actual cleaning But it's well worth the effort.
Get the water out of the head bolt holes too. Any rust in there is a very not good thing!
Good luck to ya!
Pat☺
You have to be certain NOT to do any sort of damage to the metal of the block. I only used plastic brushes/scrapers when I did mine. At worst, brass brushes, but delicately, and only for grossly stubborn places, where the head gasket remains are just stuck on, and thick. Even then, caution is vital. Luke taping off the area around the most stubborn areas to prevent any damage, or contamination down water passages and so on. You wouldn't think a steel block could be all that delicate, but a small scratch on the mating surface can have some very detrimental effects. Plug all the passages down into the block to keep trash out as you clean. Put a cloth or paper towels down into the open cylinders to keep stuff out too.
Honestly, it seems like the prep to clean the block can take longer than the actual cleaning
But it's well worth the effort.Get the water out of the head bolt holes too. Any rust in there is a very not good thing!
Good luck to ya!
Pat☺
Last edited by 2ToyGuy; 05-07-2020 at 11:26 AM.
The following users liked this post:
raguvian (05-07-2020)
05-07-2020, 02:57 PM
#46
Registered User
Thread Starter
Thanks for the advice (and the fact that my cylinder walls look good!)!
I will just use brake cleaner and some rags to get the majority of the stuff off the block and tape off all the smaller holes and put rags in the piston bores.
I'm just curious though, would a shop end up taking that much care or spend that much time cleaning and making sure the head and block are perfect when they do a head gasket job? They're on the clock so I would assume no.
Also, I went back at the oil pan today with a putty knife and mallet. I had to remove the lower radiator hose to timing chain cover coolant pipe (and hit myself in the face with a splash of coolant in the process) but was able to get enough access to go around the pan and slice through the FIPG. Now the next hard part I'll have to figure out is how to get the FIPG off the pan and block. That stuff is much more stubborn than the original gasket maker I pulled off last time.

The following 2 users liked this post by tng2000:
RAD4Runner (05-09-2020),
raguvian (05-07-2020)
05-08-2020, 08:41 AM
#48
YT Community Team
True technicians take great pride in their craft and their own personal level of performance. They typically have very little tolerance for their fellow tech who is performing at a subpar level. They know their co-worker’s bad work in some ways reflects upon them.
if you employ a tech that you wouldn’t let work on one of your own family member’s vehicle you need to rethink that relationship. If it’s a “knowing” issue than you need to get them to more factory classes. If it’s a “doing” issue than you need to counsel them, but termination is often the end result.
Last edited by Jimkola; 05-08-2020 at 12:22 PM.
The following 2 users liked this post by Jimkola:
RAD4Runner (05-09-2020),
raguvian (05-08-2020)
05-08-2020, 11:44 AM
#49
Registered User
I'm just curious though, would a shop end up taking that much care or spend that much time cleaning and making sure the head and block are perfect when they do a head gasket job? They're on the clock so I would assume no.
Pat☺
05-08-2020, 06:37 PM
#50
Registered User
Thread Starter
Thanks for the insight! I definitely have a ton of respect for technicians who can get this done in a few hours.
I was able to get the oil pan clean with a wire wheel and also cleaned up the timing chain cover and removed the block drain plug (thankfully it wasn't plugged up and a quite a bit of coolant came out).
Some dumb questions:
1. What should I use to clean the block surface? I got some blue Scotchbrite (no scratch supposedly, so not as aggressive as the normal green stuff, I think it's equivalent to 1000 grit sandpaper) and brake cleaner on a corner of the block, and it took a LOT of time to get through any of the old gasket material. It would take me a couple days to clean the block off at that rate. Is there anything else I can use? I don't want to use sandpaper or a razor either.
2. I mock fitted the timing cover back on, and can't figure out how to put the timing chain and sprocket back onto the cam shaft once the head is installed. I thought there would be a gap or something that I could reach my fingers into to push the tensioner back in, but the timing cover covers everything, and it doesn't look like there's a lot of room to push the tensioner in from the top. I'll have to do more research on that one but any advice would be appreciated! Last time I replaced the timing chain I didn't remove the head so it was very easy to just push the tensioner in and get everything lined up.
05-08-2020, 07:58 PM
#51
YT Community Team
I usually use brake cleaner or solvent and a razor blade to clean gasket material off. For the final cleaning wet/dry paper on a block of wood with a penetrating oil would work. You just want to clean enough to get the old Gasket material off.
The trick to getting the top sprocket onto the cam:
You’ll need a socket for the crank pulley bolt with a fairly long handle. In this case, one that doesn’t ratchet is needed.
A pry bar , or something similar that’s about 18” long.
Take the bar and put the one end into the cam hole on the upper sprocket, using the 1/2 moon hole on the front of the head to cradle the bar. You’ll use this hole to help leverage the sprocket up the cam in a minute.
So, while you’re applying just enough downward pressure on the bar to hold the sprocket, take your socket and put on crank bolt. Move the pulley a little bit clockwise, then reverse and go counter-clockwise the same amount(this is why non-ratcheting is needed). Do this a few times, just going back and forth. Pretty soon the tensioner should lose pressure and collapse, and once this happens the sprocket will rise enough where you can easily slide it on.
hpefully I worded this well. If not lmk.
Last edited by Jimkola; 05-08-2020 at 08:01 PM.
The following 2 users liked this post by Jimkola:
RAD4Runner (05-09-2020),
raguvian (05-08-2020)
05-08-2020, 09:21 PM
#52
Registered User
Thread Starter
I usually use brake cleaner or solvent and a razor blade to clean gasket material off. For the final cleaning wet/dry paper on a block of wood with a penetrating oil would work. You just want to clean enough to get the old Gasket material off.
The trick to getting the top sprocket onto the cam:
You�ll need a socket for the crank pulley bolt with a fairly long handle. In this case, one that doesn�t ratchet is needed.
A pry bar , or something similar that�s about 18� long.
Take the bar and put the one end into the cam hole on the upper sprocket, using the 1/2 moon hole on the front of the head to cradle the bar. You�ll use this hole to help leverage the sprocket up the cam in a minute.
So, while you�re applying just enough downward pressure on the bar to hold the sprocket, take your socket and put on crank bolt. Move the pulley a little bit clockwise, then reverse and go counter-clockwise the same amount(this is why non-ratcheting is needed). Do this a few times, just going back and forth. Pretty soon the tensioner should lose pressure and collapse, and once this happens the sprocket will rise enough where you can easily slide it on.
hpefully I worded this well. If not lmk.
05-09-2020, 06:52 AM
#53
YT Community Team
The important thing is to make sure enough tension stays on the chain so it doesnt fall off the bottom sprocket. You can fix the top one even after the timing cover is reinstalled, but if the bottom comes off you're back to square one.
05-10-2020, 07:30 PM
#54
Registered User
Thread Starter
Sorry for the constant questions. I've been scraping at the block all weekend, and this is about as good as I can get it:

However, online and in YT videos I see people getting an almost machined like finish, while mine looks pretty horrible still. The surface of the block itself looks a little bumpy, so I can't get everything off without cutting into the metal itself. The surface feels very smooth to the touch and I can't catch a fingernail anywhere, but I'm not quite sure if the surface is clean enough to put the head back on.
Either way, I'm tempted to just go over it one more time with a razor blade to see if I missed any obvious spots, then clean it with some alcohol and put the head gasket on. I'm not sure if there's anything more I can do myself at this point without resorting to power tools (which may do more harm than good).
05-10-2020, 07:56 PM
#55
YT Community Team
Sorry for the constant questions. I've been scraping at the block all weekend, and this is about as good as I can get it:

However, online and in YT videos I see people getting an almost machined like finish, while mine looks pretty horrible still. The surface of the block itself looks a little bumpy, so I can't get everything off without cutting into the metal itself. The surface feels very smooth to the touch and I can't catch a fingernail anywhere, but I'm not quite sure if the surface is clean enough to put the head back on.
Either way, I'm tempted to just go over it one more time with a razor blade to see if I missed any obvious spots, then clean it with some alcohol and put the head gasket on. I'm not sure if there's anything more I can do myself at this point without resorting to power tools (which may do more harm than good).
It looks like you�re past the scraping stage. At this point you could use 400/600 wet dry paper on a sanding block with some WD40 or PB Blaster as a wetting agent. In our shop we used strip emery cloth on wood blocks, but I�d imagine sourcing wet dry would be easier. And remember to fill the cylinders with cloth rags to keep debris from getting down to the pistons rings. And keep in mind, your goal is to get it clean, not trying to make it look like it was resurfaced at a machine shop. Big difference.
The following users liked this post:
raguvian (05-10-2020)
05-10-2020, 08:15 PM
#56
Registered User
Thread Starter
yeah, I�ve seen some of those YouTube videos, not sure I�d embrace some of those techniques they�re using, at least not on a Toyota block.
It looks like you�re past the scraping stage. At this point you could use 400/600 wet dry paper on a sanding block with some WD40 or PB Blaster as a wetting agent. In our shop we used strip emery cloth on wood blocks, but I�d imagine sourcing wet dry would be easier. And remember to fill the cylinders with cloth rags to keep debris from getting down to the pistons rings. And keep in mind, your goal is to get it clean, not trying to make it look like it was resurfaced at a machine shop. Big difference.
It looks like you�re past the scraping stage. At this point you could use 400/600 wet dry paper on a sanding block with some WD40 or PB Blaster as a wetting agent. In our shop we used strip emery cloth on wood blocks, but I�d imagine sourcing wet dry would be easier. And remember to fill the cylinders with cloth rags to keep debris from getting down to the pistons rings. And keep in mind, your goal is to get it clean, not trying to make it look like it was resurfaced at a machine shop. Big difference.
I did have rags in the pistons, but just decided to vacuum out the pistons and wipe down the block as much as I could. I also blew out all the galleys and water jackets with compressed air to clean them out (figured since there's no oil or water pump on the block, all the air would push anything in there out of the block).
05-11-2020, 11:07 AM
#57
Registered User
Thread Starter
One more question - Toyota FSM and Haynes manual says 58 ft-lb for the head bolts, but LC Engineering and other sources (including threads here) say 62 lb-ft.... I'm a little confused what I should torque the bolts to.
05-11-2020, 04:57 PM
#58
YT Community Team
the difference between the two is fairly nominal. With new head bolts it maybe worth going to 62 ft lbs to swag for first-time stretching. But really, anywhere between the two will be fine.
The following users liked this post:
raguvian (05-11-2020)
05-11-2020, 07:35 PM
#59
Registered User
Thread Starter
Hopefully I can get everything else back on and figure out the jumble of smog pumps and hoses tomorrow.
Thanks for the help so far!
05-12-2020, 05:25 PM
#60
Registered User
Thread Starter
I've been putting the truck back together and ran into a huge problem... I removed the upper right timing cover bolt (the 14mm that gets torqued to 29 lb ft) to put the alternator bracket back on. I removed it with a 1/4" ratchet and hand threaded it back in most of the way. When I went to torque it, it barely took any torque before it stripped and just spins. I'm guessing the timing cover is going to leak like crazy, right? And I'm not sure how to tap that hole without removing the timing cover, which would mean undoing everything I've already done (removing the head, etc).
Or can I run it and be OK (I'm guessing no)?
Or can I run it and be OK (I'm guessing no)?


