
22R Rebuild
 12-10-2009, 01:04 PM
#161
Registered User

Join Date: Apr 2009
Location: Salt Lake City UT
Posts: 89
Likes: 0
Received 0 Likes
on
0 Posts
If you know where to buy seals in your area, you can take it to them and they can mic it and hook you up with seal. How fast will depend if it's a common seal, or if it's kinda a odd ball. One place that I normally go here in Salt Lake is a outfit called Kaman, not sure if they have a branch in your area or not. Any outfit that handles a lot of bearings will normally have seals as well.
 12-10-2009, 02:21 PM
#162
Registered User
Thread Starter

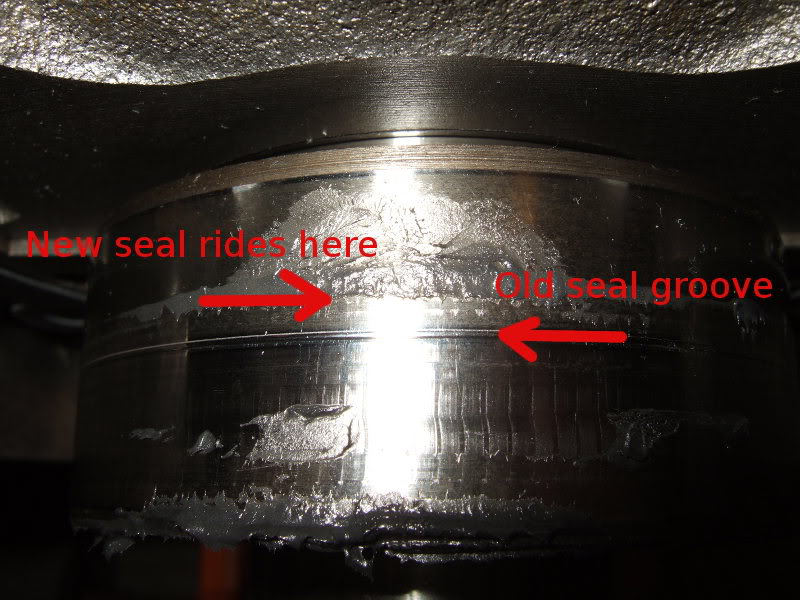
Napa had a thin seal for $8. It was made in Japan and is even a little thinner than the Toyota 90311-80010.
Napa seal on left, ruined Toyota on right.
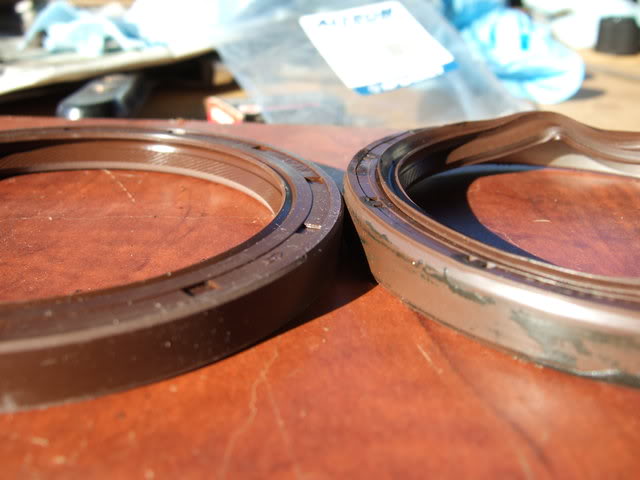
The seal from Napa, my old seal on the right, and thick one from Engnbldr at top.

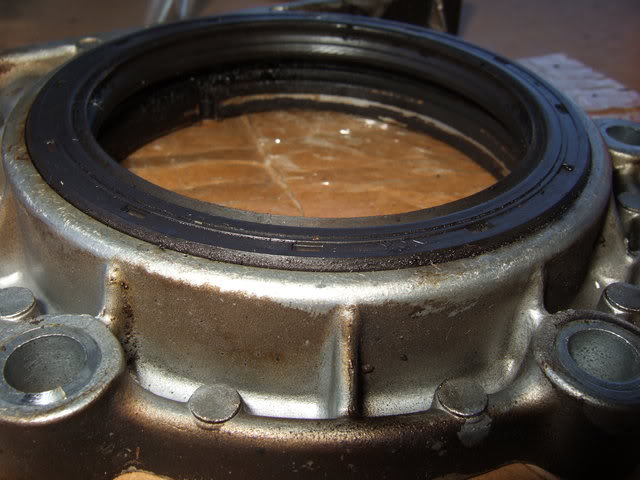
Here's my original seal in the housing. It wasn't seated very deep.
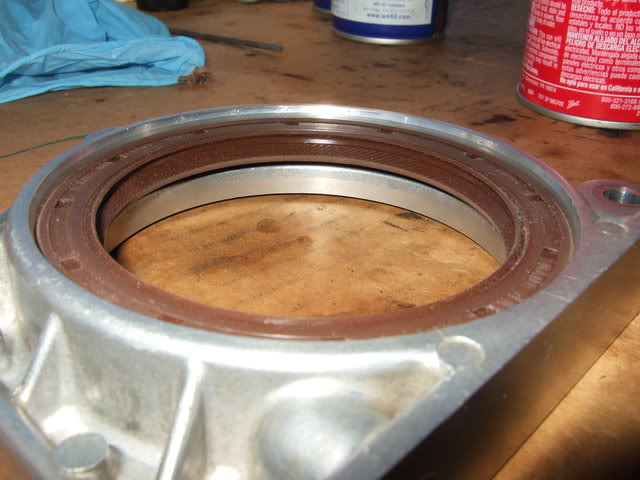
New seal seated in all the way, enough to ride on a fresh part of the crank. When I put the crank in I'll check how much farther in the new seal is.
Napa seal on left, ruined Toyota on right.
The seal from Napa, my old seal on the right, and thick one from Engnbldr at top.
Here's my original seal in the housing. It wasn't seated very deep.
New seal seated in all the way, enough to ride on a fresh part of the crank. When I put the crank in I'll check how much farther in the new seal is.
Last edited by flyingbrass; 12-10-2009 at 02:28 PM.
12-10-2009, 02:34 PM
#163
Registered User
Thread Starter
Ted doesn't mind me posting his e-mails, and there's some good info in this one. Maybe I'll open my top ring gaps up a tad more.
-------------------------------------
Morning!
Thanks for keeping me posted, I am at our Newport ranch and it's dialup here or nothing so I can't get Yotatech open from this location. Plus the wife and I are taking turns guarding the water pipes all night, it's 11� here. We breaking cold temp records by almost 20�, ain't global warming neat?...*LOL**..
I looked at your specs, I say put her together. LIGHTLY buff back any sharp edges left from the filing. One thing I do want to mention is filing rings is such a rare event inhouse that I usually start measuring pistons and bore sizes if I see one come out off spec. Our Rock rings are just NPR brand in the box, and NPR makes the original equipment for Toyota and a bunch of other brands, too.
*Including..us.
My files show defects in the last thousand sets or so are...well...zero.
I see you have a manual with the correct specs, one of the Factory service manuals had a typo, man do I get a lot of emails from folks wanting to know about the 2nd ring since it reads specs of .024"-.032" instead of metric .24mm-.32mm.
*Here are MY specs, then you can just tear that page out of the book! Oil, anywhere between .008" and .018, 2nd, anywhere between .010" and .020", top, anywhere between .012 and .022". That is for a normal bolt up and go, and the reason for the variation is stock bores will be worn, and larger after honing so the ring end gap will increase of course. Same with a fresh bore, the oversize pistons sets will vary by .0015" or so over a production run as tooling takes a set so the tail end of a run of pistons will be as much as .0015" larger than at the start of the run. Even though the final machining on pistons is done with diamonds, they wear slightly over time. When you realize the factory may cut as many as 10,000 pistons on a run using the same machine, that explains that.
*Course neat things happen like Joe is busy cutting pistons on a Friday, thinking of his date that night with Mary Lou from accounting that has the big...*uhh..."house", ....and a bearing is going out on his machine that controls the skirt cam grinding? yep, there is that, which is why we check.
Then add in that the piston maker, ring maker and machinist are a few thousand miles apart, one is measuring a piston and the other is making a hole and some others are making rings and they need to get within fractions of a thousandth inch of each other so the ring takes up the slack? Yep, sometimes we get to file slightly, or sometimes we get to deal with a tad more end gap than we would like.
The real worry with rings is that they might be too tight. Too tight means you get to do it over.. Too loose might mean you will use a tablespoon full of oil each month more than you want to, unless it is just plain silly loose. That .012" top end gap is actually very close to zero when the engine gets warmed up.
I like .020" myself, but then everyone knows I am crazy..
Questions: Yep, the top ring is the silver colored one, you can't reverse those anyway because there are two different ring land depths so the top ring can be put in the 2nd groove but the 2nd can't be put in the top one. (Well, unless the block is so loose you can throw a Cat down there alongside)..I know of just one gentleman that managed to do that,...AND got it together...AND running.
(My phone rang...*).... ...I had his prob figured out before he finished the first sentence when he told me he had to "pound" the pistons in and the short block was "real" tight.......
Here is the actual install technique: Oil the bores. Compress the ring slightly, slip it in. Do not twist it, do NOT break it. Use the head of the piston to press the ring in about an inch or so to be sure it is dead square. measure, the blade that barely fits without moving anything is the gap. There is no such thing as a "tight" or "loose sliding" fit, or one that "barely" holds the feeler. It is a feeler guage, not a prybar. I just put my glasses on and look, I don't even use a feeler guage.
As far as changing the ring set to a better one? You WILL end up with the exact same measurement, assuming no one got there first. I had a set that had just ONE top ring with a .024" gap, someone had tried to file one, messed it up, did a GREAT job of sealing the pack and sending them back to try again with another set. Back on the shelf and on to me. (GRRRR!)...*LOL**..."Defective" as to size is unheard of, modern ring makers get with 5 decimal points, then the sealed package is weighed to .001 of a gram before they go in the box, I have stood there and watched that....still, we get a call once in awhile that the set was "short" one ring, no prob, we keep spares around.
Hey, Jay! Will you please put this old girl together? I want to know if it will run... *Sounds to me like you got her handled..
--------------------------------------------
-------------------------------------
Morning!
Thanks for keeping me posted, I am at our Newport ranch and it's dialup here or nothing so I can't get Yotatech open from this location. Plus the wife and I are taking turns guarding the water pipes all night, it's 11� here. We breaking cold temp records by almost 20�, ain't global warming neat?...*LOL**..
I looked at your specs, I say put her together. LIGHTLY buff back any sharp edges left from the filing. One thing I do want to mention is filing rings is such a rare event inhouse that I usually start measuring pistons and bore sizes if I see one come out off spec. Our Rock rings are just NPR brand in the box, and NPR makes the original equipment for Toyota and a bunch of other brands, too.
*Including..us.
My files show defects in the last thousand sets or so are...well...zero.
I see you have a manual with the correct specs, one of the Factory service manuals had a typo, man do I get a lot of emails from folks wanting to know about the 2nd ring since it reads specs of .024"-.032" instead of metric .24mm-.32mm.
*Here are MY specs, then you can just tear that page out of the book! Oil, anywhere between .008" and .018, 2nd, anywhere between .010" and .020", top, anywhere between .012 and .022". That is for a normal bolt up and go, and the reason for the variation is stock bores will be worn, and larger after honing so the ring end gap will increase of course. Same with a fresh bore, the oversize pistons sets will vary by .0015" or so over a production run as tooling takes a set so the tail end of a run of pistons will be as much as .0015" larger than at the start of the run. Even though the final machining on pistons is done with diamonds, they wear slightly over time. When you realize the factory may cut as many as 10,000 pistons on a run using the same machine, that explains that.
*Course neat things happen like Joe is busy cutting pistons on a Friday, thinking of his date that night with Mary Lou from accounting that has the big...*uhh..."house", ....and a bearing is going out on his machine that controls the skirt cam grinding? yep, there is that, which is why we check.
Then add in that the piston maker, ring maker and machinist are a few thousand miles apart, one is measuring a piston and the other is making a hole and some others are making rings and they need to get within fractions of a thousandth inch of each other so the ring takes up the slack? Yep, sometimes we get to file slightly, or sometimes we get to deal with a tad more end gap than we would like.
The real worry with rings is that they might be too tight. Too tight means you get to do it over.. Too loose might mean you will use a tablespoon full of oil each month more than you want to, unless it is just plain silly loose. That .012" top end gap is actually very close to zero when the engine gets warmed up.
I like .020" myself, but then everyone knows I am crazy..
Questions: Yep, the top ring is the silver colored one, you can't reverse those anyway because there are two different ring land depths so the top ring can be put in the 2nd groove but the 2nd can't be put in the top one. (Well, unless the block is so loose you can throw a Cat down there alongside)..I know of just one gentleman that managed to do that,...AND got it together...AND running.
(My phone rang...*)....
...I had his prob figured out before he finished the first sentence when he told me he had to "pound" the pistons in and the short block was "real" tight.......Here is the actual install technique: Oil the bores. Compress the ring slightly, slip it in. Do not twist it, do NOT break it. Use the head of the piston to press the ring in about an inch or so to be sure it is dead square. measure, the blade that barely fits without moving anything is the gap. There is no such thing as a "tight" or "loose sliding" fit, or one that "barely" holds the feeler. It is a feeler guage, not a prybar. I just put my glasses on and look, I don't even use a feeler guage.
As far as changing the ring set to a better one? You WILL end up with the exact same measurement, assuming no one got there first. I had a set that had just ONE top ring with a .024" gap, someone had tried to file one, messed it up, did a GREAT job of sealing the pack and sending them back to try again with another set. Back on the shelf and on to me. (GRRRR!)...*LOL**..."Defective" as to size is unheard of, modern ring makers get with 5 decimal points, then the sealed package is weighed to .001 of a gram before they go in the box, I have stood there and watched that....still, we get a call once in awhile that the set was "short" one ring, no prob, we keep spares around.
Hey, Jay! Will you please put this old girl together? I want to know if it will run...
*Sounds to me like you got her handled.. --------------------------------------------
12-11-2009, 10:37 PM
#164
Registered User
Thread Starter
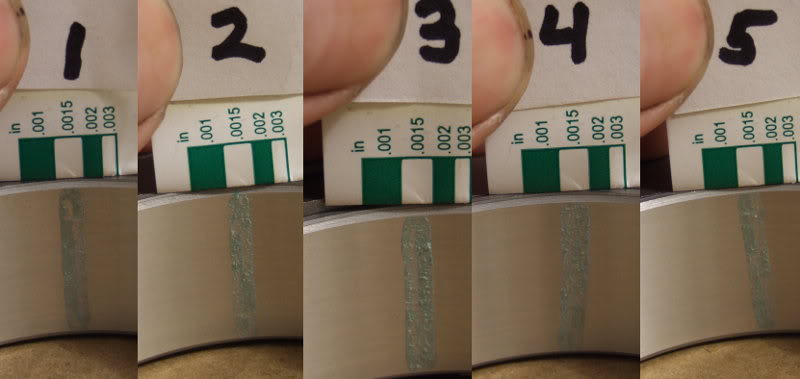
I plastigaged my main bearings. I don't know how others go about it, but I did them all at once. Dry and torqued to 70 ft/lbs. My manual says spec is .0010" to .0022", with a max of .0031".
My camera's flash interfered with taking decent pics of the journals. Some plastigage also stuck to the bearings, which were more photogenic.
My camera's flash interfered with taking decent pics of the journals. Some plastigage also stuck to the bearings, which were more photogenic.
Last edited by flyingbrass; 12-12-2009 at 01:05 PM.
12-12-2009, 07:02 AM
#165
Registered User
Join Date: Sep 2009
Posts: 31
Likes: 0
Received 0 Likes
on
0 Posts
Did you do this to the old bearings to see if you could reuse them or to new ones to check before reassembly. I'm guessing these bearings are something you automatically replace while everything is apart, at least I was going to.
Haven't had time to look closley at my disassembled engine yet, some welcome overtime work came my way. Hope to check things out next weekend. Think the head gasket in my suby, my DD, is on the way out too. Timeing is everything. Until I get back to my
22r, I'll wrench vicariously through you!
Haven't had time to look closley at my disassembled engine yet, some welcome overtime work came my way. Hope to check things out next weekend. Think the head gasket in my suby, my DD, is on the way out too. Timeing is everything. Until I get back to my
22r, I'll wrench vicariously through you!
12-12-2009, 07:15 AM
#166
Registered User
Thread Starter
These are new standard size bearings. My crank wasn't turned, only polished.
Bearings are cheap enough that I'd replace them when torn down that far unless they're already fairly new and look perfect.
Bearings are cheap enough that I'd replace them when torn down that far unless they're already fairly new and look perfect.
12-13-2009, 08:01 AM
#167
Registered User
Join Date: Apr 2009
Location: Salt Lake City UT
Posts: 89
Likes: 0
Received 0 Likes
on
0 Posts
From the nearest I can tell from here, You have a nice even .0015 clearance all the way across the mains. Your machine shop seams to have done you right there.
What did you decide to do with the rear main seal?
What did you decide to do with the rear main seal?
 12-13-2009, 07:56 PM
#169
Registered User
Thread Starter
Thanks, ShortMag.
I used a thin seal from Napa seated all the way down in the housing. See the comparison pics a few posts back. I wiped some grease on the crank and slid the seal housing on almost all the way. The lip is well away from the old groove.
The crank is in. The tang in the rear thrust washer rotates in the cap as far as it can side to side when I turn the crank back and forth. I presume that's normal? I'll get to the pistons later tonight or tomorrow.
I had to remove one of the engine stand mounts to fit the seal housing in. I put the gasket on dry. I hope that's ok. The gasket on Stace's spare housing is RTV'd.
Last edited by flyingbrass; 03-24-2010 at 09:38 PM.
12-14-2009, 12:50 AM
#170
Registered User
Thread Starter
One step forward, two steps back.
I had asked earlier if I should wash or otherwise clean the crank, including removing the oil plugs. Was advised to put it in as is.
Earlier I looked in a couple main oil holes and they seemed pretty clean. The journals were spotless. So, I wiped off the journals just to make sure and figured it was good to go.
After my crank was in, I noticed some of the rod oil holes have crap in them. Looks like a combination of globs of rust (that look like they'd flake off quickly and go straight into the bearings) and whatever other semi-loose crud. So, I pulled the crank back out. About 3 top bearings came out with it, one of them clanking to the floor. I managed to keep them in order. Assembly lube is sticky stuff.
How should I clean the crank? Pull the plugs or just scrub what I can reach and flush everything with a can or two of brake cleaner? Soap and a spray nozzle on the garden hose? I had asked the machinist whether I should remove the plugs, and he said I'd probably run into problems. Do people usually pull them? If so, do they tend to be stubborn or need loctite or staking when reinstalled? Could really use some advice here.
Another fun thing I noticed is the cap nuts on my rods are on apparently at full torque. Maybe that's typical. I don't know why, but I assumed they weren't on very tight. Had I known or thought to check, I would have removed them before installing the pistons. I guess the best thing to do is clamp the ends in a vise between blocks of wood. Not sure my dinky little vise will work.
Re: the thrust washers, I noticed Chilton's says to torque all caps except the center, then pry the crank back and forth to align the thrust washers. Hold the crank forward while tightening. The FSM doesn't say anything about prying. Is this what is generally done -- one of those things assumed to be known by mechanics?
Last edited by flyingbrass; 12-14-2009 at 12:53 AM.
12-14-2009, 03:59 AM
#171
Registered User
Join Date: Nov 2009
Location: Tn USA
Posts: 51
Likes: 0
Received 0 Likes
on
0 Posts
IM not sure, my guess wouls be to put center bearing in and check clearances on both side. Im thinking id run it down the center. In my friends haines maual it has a pick of a feeler gauge being slid in between crank and bearing to check clearances. Does anyone know for sure what to do here?
Im not talking where you plastigauge, I guess crank lobe and crank retainer lol
Im not talking where you plastigauge, I guess crank lobe and crank retainer lol
Last edited by The84toyota; 12-14-2009 at 04:03 AM.
12-14-2009, 11:31 AM
#172
Registered User
Join Date: Jun 2009
Location: Iowa City, IA
Posts: 66
Likes: 0
Received 0 Likes
on
0 Posts
One step forward, two steps back.
How should I clean the crank? Pull the plugs or just scrub what I can reach and flush everything with a can or two of brake cleaner? Soap and a spray nozzle on the garden hose? I had asked the machinist whether I should remove the plugs, and he said I'd probably run into problems. Do people usually pull them? If so, do they tend to be stubborn or need loctite or staking when reinstalled? Could really use some advice here.
How should I clean the crank? Pull the plugs or just scrub what I can reach and flush everything with a can or two of brake cleaner? Soap and a spray nozzle on the garden hose? I had asked the machinist whether I should remove the plugs, and he said I'd probably run into problems. Do people usually pull them? If so, do they tend to be stubborn or need loctite or staking when reinstalled? Could really use some advice here.
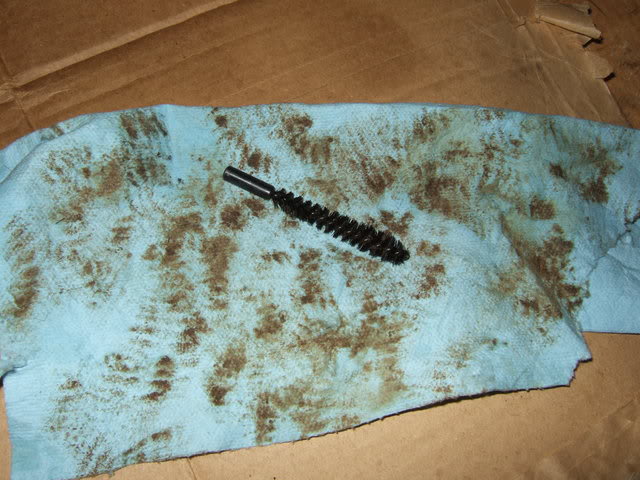
I didn't use diesel fuel (none handy) but instead used brake cleaner. I picked up a set of 3 simple pipe brushes at the hardware store for like $1.39 and one was sized perfectly for scrubbing the oil channels.
Mine were pretty clean, but better safe than sorry!
12-14-2009, 12:13 PM
#173
Registered User
Thread Starter
I notice my two inside oil plugs are staked. One is mashed in so much that there's no way a hex driver will fit. Might be able to pound a driver into the other, but banging on a crank doesn't seem like a good idea.
I couldn't get enough grip on my rods in my little vise to break the nuts free. I don't want to hurt them. Tried just holding a rod in my hand while using an impact gun. Didn't work.
I couldn't get enough grip on my rods in my little vise to break the nuts free. I don't want to hurt them. Tried just holding a rod in my hand while using an impact gun. Didn't work.
12-15-2009, 04:27 PM
#174
Registered User
Thread Starter
Thanks. This seems to be another area where opinions differ. Putney's removes the plugs to clean the crank. LCE sells replacement plugs and suggests they should be removed. However, Gnarly's guy and the shop I used both say leave them alone. I asked the machinist again today when I stopped by to have him take off my rod caps. He reiterated that removing those plugs can cause the journals to go out of round.
I left mine in. I brushed the journal holes using a nylon brush and WD-40, then soaked the internal passages as best I could and let sit overnight.
This was just from wiping off the brush.
Today I flushed the holes and passages out with brake cleaner as best I could, then briefly scrubbed the crank with soapy water (dish soap). I hosed it off and shot water through the inside passages by using a finger to plug holes to direct the water. Got some good geyser action.
I blew off most of the water with compressed air, hit everything with WD-40, and continued blowing, again blocking different holes to get air through the inside. I cleaned the journals with brake cleaner before installing.
I still haven't found out about centering the thrust washers. My crank turns harder than I think it should. Requires two hands to get it started, then I can turn it with one, though not easily. I can't feel or measure any play fore to aft. I found a couple small slivers of metal by a thrust washer.
I'm thinking the middle cap may not be centered, causing the top and bottom halves of the thrust washers to not quite line up. I saw a thread where someone assembling a non-Toyota engine ran into that. At first he thought his thrust washers were too thick.
12-15-2009, 04:37 PM
#175
Registered User
LCE's replacement plugs I believe are the oil galley plugs in the block not the crank, crank plugs should be taken out before the crank is hot dipped to clean out the inside better. Which is also recommended by ENGNBLDR.
I think also depending on the type of grease used during assembly affects the turn-ability of the engine. Can't remember though where I saw or heard that. When cleaning a brand new crank it is recommended to use mineral spirits to clean it. Not sure if the same goes for an old one. I would have saved my self some trouble and had the machine shop dip the crank with the block.
I think also depending on the type of grease used during assembly affects the turn-ability of the engine. Can't remember though where I saw or heard that. When cleaning a brand new crank it is recommended to use mineral spirits to clean it. Not sure if the same goes for an old one. I would have saved my self some trouble and had the machine shop dip the crank with the block.
12-15-2009, 05:40 PM
#176
Registered User
Thread Starter
I think the shop dipped my crank, though they didn't take the plugs out. From what I've gathered, modern hot tanking doesn't do much compared to the old days when better stuff was available.
LCE sells crank plugs too. Search their catalog for "Crank Oil Galley Plug." They list small, medium and large ($2- $3 each) for 20R/22R's.
I'm using Lucas assembly lube. It's thick, sticky and surely would cause more drag than something lighter like engine oil. However, the problem here has something to do with the thrust washers. Either I don't have them centered or the new ones are too thick.
I'll try centering them by putting the middle cap on ever so slightly to the rear and bumping the crank forward before tightening. If that doesn't work I'll probably use my old ones instead of sanding these down.
E-mail from Engnbldr about this:
-------------------------------
The shaft should spin easily, there should be no sticking or binding at all.
I always turn the shaft after full torque on the center one. The thrsut centers pretty easily, I just set the cap on, bump the rear of the shaft forward with a rubber hammer or block of wood. Then torque it up.
Measure with a feeler, clearence should be about .003-.008"
-----------------------------------
My FSM says .0008" to .0087". Ted cautioned that too tight will cause the thrust washers to burn up.
12-15-2009, 06:37 PM
#177
Registered User
Join Date: Apr 2009
Location: Salt Lake City UT
Posts: 89
Likes: 0
Received 0 Likes
on
0 Posts
Trust washers can be a pain. At least you don't have to set it with shims behind the flywheel like a air cooled VW. The amount of torque need on the gland nut is stupid!
12-15-2009, 06:44 PM
#178
Registered User
For some reason they say crank galley, but its the oil galley for the motor. There is only 5 needed for the crank and they are all the same size. They are nice, I recommend them being bought by everyone that is doing a rebuild. They already have the thread sealer on the threads. No guessing on what to use as sealer and how much.
Last edited by xxxtreme22r; 12-15-2009 at 06:46 PM.
12-15-2009, 07:00 PM
#179
Registered User
Thread Starter
My most trying ordeal with a bug was removing an axle nut that had been on for 20+ years. Jumping on the end of a 6' cheater pipe didn't work. Tried some heat, but not glowing hot out of fear I might ruin the hardness of the axle. Ended up drilling and chiseling the nut until it split.
I tried resetting the center cap. The crank feels about the same, and even my smallest feeler gauge (.002") still will not fit between washer and crank when pressing the crank from the front and measuring at the rear.
My manual says .0008" to .0087" for thrust clearance. Ted says .003" minimum, so even splitting the two I'd need to at least get a .002" feeler in to feel comfortable. I wonder how much difference the assembly lube makes that I dabbed on the uppers to hold them in.
12-15-2009, 07:11 PM
#180
Registered User
Thread Starter
Those I know for a fact are the ones for the engine and cyl head, I just ordered them form my rebuild For some reason they say crank galley, but its the oil galley for the motor. There is only 5 needed for the crank and they are all the same size.
They are nice, I recommend them being bought by everyone that is doing a rebuild. They already have the thread sealer on the threads. No guessing on what to use as sealer and how much.
For some reason they say crank galley, but its the oil galley for the motor. There is only 5 needed for the crank and they are all the same size. They are nice, I recommend them being bought by everyone that is doing a rebuild. They already have the thread sealer on the threads. No guessing on what to use as sealer and how much.
There's a galley plug in the head? I haven't taken my new one out of the package yet, nor have I looked my old one over very closely.


