
22R Rebuild
 12-03-2009, 05:21 PM
#141
Registered User
Thread Starter

Mine says (in the back under specs) a standard cylinder bore is 92.00 - 92.03 mm (3.6220 - 3.6232 inches)
In the section for checking things out, it says maximum diameters are:
standard: 92.03 mm (3.6232")
.50 oversize (which is mm, so ~.020" over): 92.53 mm (3.6429")
1.0 oversize (~.040"): 93.03 mm (3.6626")
Those are maximums. I don't know what is ideal. Plus, you have out of round and taper limits to consider. I figure stuff like this is best left to a machinist.
Last edited by flyingbrass; 12-03-2009 at 05:33 PM.
 12-03-2009, 08:15 PM
#143
Registered User
Thread Starter
Thanks, broncbob. I hope documenting this rebuild helps others. Many questions I had (and still have) aren't answered in repair manuals.
I got the pistons put on the rods. As I mentioned before, the wrist pins wouldn't go in even after heating the pistons with a hair dryer. I brought distilled water up to a slow boil in an old pot. Distilled probably isn't necessary, but the water here is quite hard and I didn't want scum on my pistons.
I bent some copper wire into a loop with the ends jutting out to fit into the pin holes in the pistons. I applied assembly lube to the inside of the rod bushings. After dunking the pistons in the hot water the wrist pins slid right in. It's amazing how much difference heat makes.
My cylinders had already been cleaned somewhat from the washing and wiping down with WD-40 afterward, but today I wiped them out well using a terry cloth towel and ATF (transmission fluid). I cleaned until no more crud could be seen on the white towel.
I checked my ring gaps. Got the rings started, then pressed them in using a piston to slightly below the depth of the piston. Measuring the gaps is more difficult than it sounds because you're reaching in a hole and it's easy to jostle the ring ends out of alignment if you try to squeeze in too big of a feeler.
My #1 ring gaps are all about .010" (.011" wouldn't fit), which is a little too small. The book says .0138" to .0224". Should I file them? If so, any tips on doing that?
#2 ring gaps are all also about .010". Spec is .0098" to .0185", so they are ok.
I only checked 4 oil rings. They were somewhere around .013". Spec is .008" to .032", so no problem there.
Last edited by flyingbrass; 12-03-2009 at 11:23 PM.
12-03-2009, 08:24 PM
#144
Registered User

Join Date: Apr 2009
Location: Salt Lake City UT
Posts: 89
Likes: 0
Received 0 Likes
on
0 Posts
The only way I have fitted rings is with a ring filer. It's the wheel with a crank that holds the ring.
I bet you can do it with a bit of high grit paper. Just take it slow, and make sure you sand it square. Don't forget to stone a slight bevel on the outside edge at the ring gap so you don't hook a ring and break one.
I bet you can do it with a bit of high grit paper. Just take it slow, and make sure you sand it square. Don't forget to stone a slight bevel on the outside edge at the ring gap so you don't hook a ring and break one.
12-03-2009, 08:26 PM
#145
Registered User
Join Date: Apr 2009
Location: Salt Lake City UT
Posts: 89
Likes: 0
Received 0 Likes
on
0 Posts
Here is some break in info for you. I have used this method on a few hot rod 4 stroke 4 wheelers with 0 problems.
http://mototuneusa.com/break_in_secrets.htm
http://mototuneusa.com/break_in_secrets.htm
12-03-2009, 09:25 PM
#146
Registered User
Join Date: Nov 2009
Location: Tn USA
Posts: 51
Likes: 0
Received 0 Likes
on
0 Posts
Ok so with rings and pistons .040 oversized you cylinder should measure 93.03? Thanks much ppl!!!!
Would there be any room for variance here?
if your gonna sand the rings down id do the inside a hair to dont wanna hook it to the piston i would think? right ppl?
Would there be any room for variance here?
if your gonna sand the rings down id do the inside a hair to dont wanna hook it to the piston i would think? right ppl?
Last edited by The84toyota; 12-06-2009 at 09:18 PM.
12-07-2009, 07:22 AM
#147
Registered User
Join Date: Sep 2009
Posts: 31
Likes: 0
Received 0 Likes
on
0 Posts
Fun project huh? I'm doing the same to my '83 22r. What did you do about your gunked up EGR valve? New ones are pretty spendy, I don't really trust used ones. Is there a way to test the valve when it is off the engine? Can the inside of the tubes be cleaned. Thanks, and good luck.
Kevin
Kevin
12-08-2009, 10:06 AM
#148
Registered User
Thread Starter
I haven't cleaned the EGR valve and tube yet. Carb cleaner, brushes and elbow grease I presume.
So far, I have 2 of the top rings opened up to .014" gap, measured pushed in to the bottom of the piston skirt. I don't like filing rings, and the manual says not to.
I've been using a flat needle file, similar to a points file, clamped flat to a workbench so it sticks out over the edge. Hold one end of the ring as true as possible against the file, making the file strokes from the outside of the ring to the inside. I very lightly take off any burrs using a ceramic sharpening stick.
I can't get perfectly flat ends. Close, but a little light shows through with the ends pressed together.
Last edited by flyingbrass; 12-08-2009 at 10:08 AM.
12-08-2009, 05:54 PM
#149
Registered User
Thread Starter
I don't know why (other rings put in and taken out so many times, more practice measuring or ?), but my 2nd ring gaps now measure:
#1: .013"
#2: .014"
#3: .014"
#4: .014"
My manual says they should be .0098" to .0185", which puts these right in the middle. These are Rock parts, so who knows what is ideal. The rings didn't come with any instructions or gap suggestions.
The general guideline for ring gaps for non-racing average engines is somewhere around .004" per inch of cylinder diameter. I haven't found much about relative gaps between top and second rings other than some racers like the bottom gap to be slightly bigger than the top for running at high RPM.
I wish I had been as lucky with top ring fit. BTW, to make doubly sure I'm not backwards and for others wondering, the "1st" rings -- the shiny ones -- go in the first groove at the top of the piston, correct? I'm pretty sure that's right, but a person could interpret "1st" as being the first compression ring installed after the oil rings.
Measuring ring gaps isn't easy, IMO. Getting the feeler at just the right angle down in a hole can be frustrating. What worked best for me was having the block rotated slightly on the stand. I put the gauge in from the bottom and used a finger on the other hand to press it into the gap.
Going for just a "slight drag" on feelers wasn't consistent. On my top rings at least, pressing in a snug feeler would open the gap slightly from what it had been originally. I saw one engine rebulding guide where the guy said he considered a gap to be right when the proper size feeler would fit snugly enough to barely hold the gauge in place.
My top ring gaps all started around .011". After filing and checking and filing and checking and filing and... I ended up with the top ring gaps measuring:
#1: ~.015" (.016" won't fit)
#2: .014" - .015" (.015" squeezes in)
#3: .014" (same, but tighter)
#4: .014" (.015" won't fit)
My manual says top ring gap should be .0138" to .0224". Of course, it also says if the gaps aren't right to replace the rings, don't file them. Why is that? Since my 2nd ring gaps fell right in the middle, I'm wondering if maybe I got a slightly odd-sized batch of top rings. I haven't seen any others here mention needing to trim them.
Last edited by flyingbrass; 12-08-2009 at 06:01 PM.
12-09-2009, 05:47 PM
#150
Registered User
Thread Starter
Today sucked. I cut my thumb with a misplaced hammer swing and ruined my Toyota rear seal. Great progress.
The seal was a &!@^# to get in. Hammering on a block of wood around the edges didn't work (yes, the outside of the seal was lubed), so I put a block of wood over the whole seal and wailed on it. That finally got it in about flush, though doing so created some small cracks around the extra outside lip (double lipped seal).
The seal was narrow enough to set deeper in the housing, which would put the sealing surface in far enough to be away from the groove in my crank. I don't have anything the right size to seat it deeper. So, I tried an allen head driver on the end of a socket extension. Went 'round and 'round.
That seated the seal deeper. And bent in its sides. And made gouges in the seal housing.
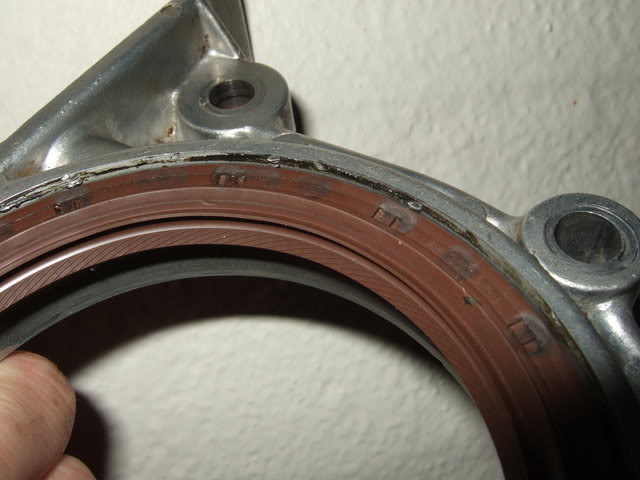
So, now I don't know what to do. Use a seal from Engnbldr and cross my fingers? Sleeve the crank and use a seal from Engnbldr? Pay $30 or so for another Toyota seal and pay a shop to put it all the way in the housing (assuming they don't F it up too)?
Frustrating.
The seal was a &!@^# to get in. Hammering on a block of wood around the edges didn't work (yes, the outside of the seal was lubed), so I put a block of wood over the whole seal and wailed on it. That finally got it in about flush, though doing so created some small cracks around the extra outside lip (double lipped seal).
The seal was narrow enough to set deeper in the housing, which would put the sealing surface in far enough to be away from the groove in my crank. I don't have anything the right size to seat it deeper. So, I tried an allen head driver on the end of a socket extension. Went 'round and 'round.
That seated the seal deeper. And bent in its sides. And made gouges in the seal housing.
So, now I don't know what to do. Use a seal from Engnbldr and cross my fingers? Sleeve the crank and use a seal from Engnbldr? Pay $30 or so for another Toyota seal and pay a shop to put it all the way in the housing (assuming they don't F it up too)?
Frustrating.
Last edited by flyingbrass; 12-09-2009 at 05:48 PM.
12-09-2009, 07:01 PM
#151
Registered User
Join Date: Sep 2009
Posts: 31
Likes: 0
Received 0 Likes
on
0 Posts
Bummer about the seal. Sounds like you at least got your rings on. I finally finished fully disassembling my 22r a few days ago, get to takeing a closer look at it this weekend. I've learned alot from your thread, most of all stay away from Rock products! Keep a Hawkeye on your machinist, and inspect all parts that come in the mail. Good luck and remember, your going to need an empty box sooner than later and its always noon somewhere!
12-09-2009, 07:51 PM
#152
Registered User
Thread Starter
Good luck to you too, krj. Post pictures of your parts. How bad is the seal groove on your crank?
I haven't put the rings on my pistons yet, but I bought a ring expander. Not sure if I'll use it.
One of these days I'll get a new (to me) intake manifold. The existing one will do for now. Here's a picture of the odd eroded spot where the metal coolant pipe screws into the "water bypass plate" on the bottom of the intake manifold (shown in the last pic in post #21). The plate could be replaced.
The rest of the plate inside is actually quite good. The picture is deceiving. Ignore the gasket debris.
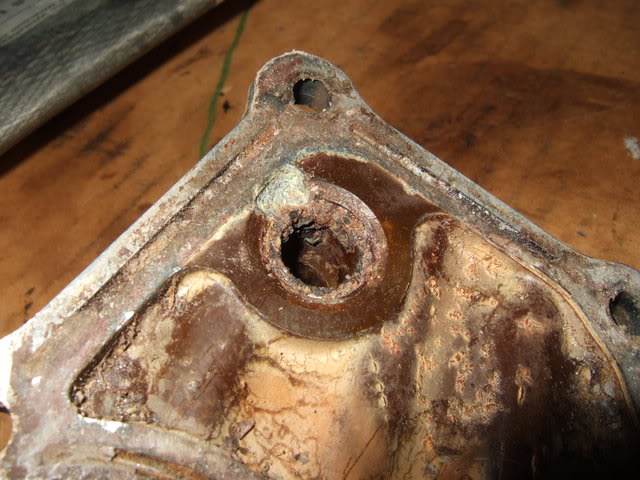
The eroded thermostat ledge can't be swapped out.

Most corrosion seems to be where coolant has been trapped between surfaces -- where hoses slip on, around the t-stat gasket, passages around the head gasket, etc.
I haven't put the rings on my pistons yet, but I bought a ring expander. Not sure if I'll use it.
One of these days I'll get a new (to me) intake manifold. The existing one will do for now. Here's a picture of the odd eroded spot where the metal coolant pipe screws into the "water bypass plate" on the bottom of the intake manifold (shown in the last pic in post #21). The plate could be replaced.
The rest of the plate inside is actually quite good. The picture is deceiving. Ignore the gasket debris.
The eroded thermostat ledge can't be swapped out.
Most corrosion seems to be where coolant has been trapped between surfaces -- where hoses slip on, around the t-stat gasket, passages around the head gasket, etc.
Last edited by flyingbrass; 12-09-2009 at 08:13 PM.
12-09-2009, 10:33 PM
#153
Registered User
Thread Starter
I'm kicking myself for not thinking of this earlier when hunting through everything else on hand. This plate fits in almost perfectly with a little less than 1/16" clearance around the edge. It's almost disgusting how nice it should work. The seal driver kits I've seen don't go this big.
It still may have ruined the outer "double lip" on the Toyota seal. I'm not sure. For that, I think ideally you'd want something like an appropriately sized pipe.
The seals Engnbldr supplies don't have that outer lip, but they are thicker (deeper), so would need the back side sanded down some to be able to fit in deep enough to go past my existing crank groove. How to do that evenly, and without going too far, will require some more thought. Or I could pay $35 for another Toyota seal.
The Toyota seals are thinner, but are metal lined inside. I don't see any metal in the Viton from Engnbldr. Thinning one down may compromise its rigidity.
Last edited by flyingbrass; 12-09-2009 at 11:28 PM.
 12-10-2009, 06:53 AM
#158
Registered User
Join Date: Apr 2009
Location: Salt Lake City UT
Posts: 89
Likes: 0
Received 0 Likes
on
0 Posts
I have never done the seal in question, but a seal is a seal right? If you think you hosed your Toyota seal, then replace it. It will drive you insane and keep you up at night if you don't. You should be able to save the housing, as it just appears to be nicked around the very lip. Just lightly sand the ridges off the nicks, but don't try and sand them all the way out. You just want to make it smooth for the new seal to go in. If there is a seal number on that seal, you may be able to call around and find the same seal for less, it just won't say Toyota on it.
That plate looks like it would drive the seal nicely, The big head ache will be getting it to go in even. A press would work the best, but any thing that would press it evenly will work, Like a bottle jack.
That plate looks like it would drive the seal nicely, The big head ache will be getting it to go in even. A press would work the best, but any thing that would press it evenly will work, Like a bottle jack.
 12-10-2009, 12:24 PM
#160
Registered User
Thread Starter
I got the seal back out and the burrs filed down. They were only on the chamfer, not the inside seal surface.
My original 1986 seal says NOK AH3730F. The new 90311-80010 double lipped Toyota seal says NOK AH3732P. A search on that doesn't turn up a useful model number.
My original 1986 seal says NOK AH3730F. The new 90311-80010 double lipped Toyota seal says NOK AH3732P. A search on that doesn't turn up a useful model number.


