
22R Rebuild

 11-28-2009, 07:12 PM
#122
Registered User
Thread Starter

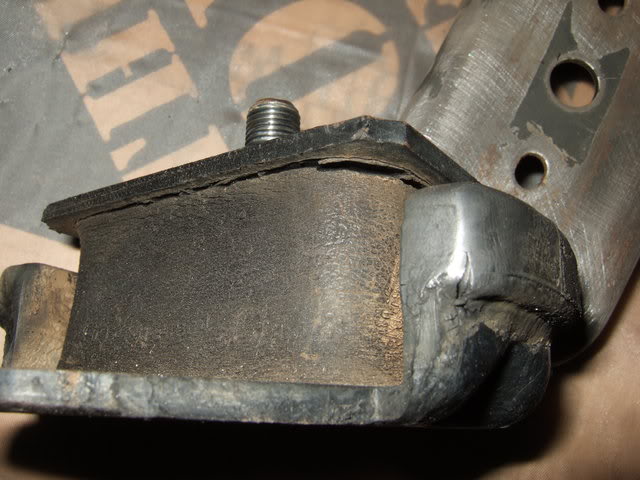
There was too much wind and dust today to put in the crank, so I cleaned some other parts. My driver's side motor mount is starting to go. That's a crack, not a shadow.
Components of the mounts (saw a few guys asking for pics in older threads):
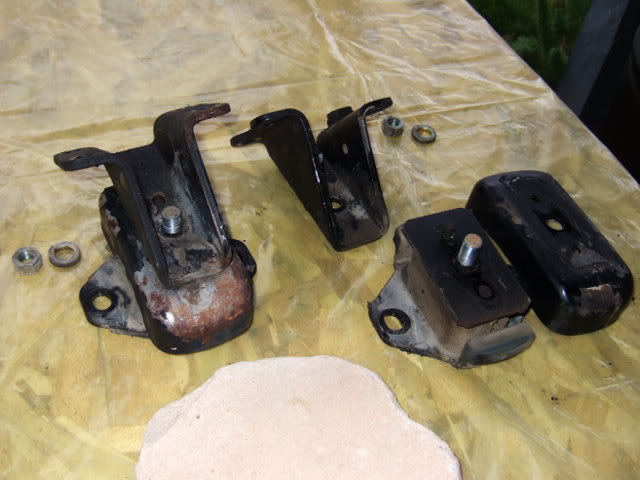
I've heard Toyota OEM mounts are far better than cheapy aftermarket replacements, but Toyota seems to want an arm and a leg. Does anyone have the part number for just the part with the rubber, not the whole bracket assembly? Toyodiy doesn't show it separate, or if they do I'm either misunderstanding or not looking in the right place.
Any recommendations for aftermarket mounts? Toyota doesn't make the ones they sell. Maybe another brand is the same exact thing but costs less?
Components of the mounts (saw a few guys asking for pics in older threads):
I've heard Toyota OEM mounts are far better than cheapy aftermarket replacements, but Toyota seems to want an arm and a leg. Does anyone have the part number for just the part with the rubber, not the whole bracket assembly? Toyodiy doesn't show it separate, or if they do I'm either misunderstanding or not looking in the right place.
Any recommendations for aftermarket mounts? Toyota doesn't make the ones they sell. Maybe another brand is the same exact thing but costs less?
Last edited by flyingbrass; 11-28-2009 at 07:23 PM.
11-28-2009, 10:55 PM
#123
Registered User
Join Date: Jan 2005
Location: Leadville Colorado
Posts: 1,600
Likes: 0
Received 0 Likes
on
0 Posts
I just did both of mine in August when I bought the truck and ordered these and they were at my door in a few days and are solid.
http://www.jtoutfitters.com/engine-m...r-p-18281.html
http://www.jtoutfitters.com/engine-m...r-p-18281.html
Last edited by pruney81; 11-28-2009 at 10:59 PM.

 11-29-2009, 04:53 PM
#126
Registered User
Thread Starter
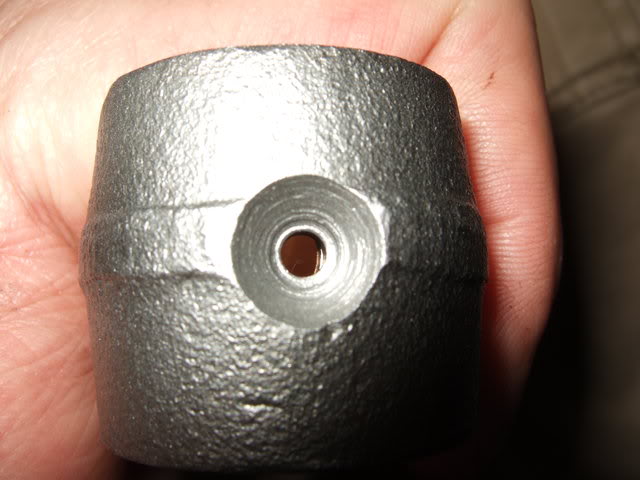
Uh oh. Just noticed this. I'll take it back tomorrow. There's no excuse for such shoddy work. The other three are ok. Two are centered. The other is off, but not quite enough to block the hole.

Last edited by flyingbrass; 11-29-2009 at 05:32 PM.
 THANKS
12-01-2009, 10:35 AM
THANKS
12-01-2009, 10:35 AM
#129
Registered User
Join Date: Oct 2009
Location: NW Phoenix
Posts: 134
Likes: 0
Received 0 Likes
on
0 Posts
If those were my mounts, and I was on a budget, I'd put the cracked mount on the passenger side. That side doesn't work or stretch as much as the drivers' side. Then I'd chain them down. Cheap trick I have on my drivers side, still looks great.
12-01-2009, 10:53 AM
#130
Registered User
both sides would work the same??..if the torque of the motor twists it one way..then the other side is going to twist the opposite way just as much..
like if it twists down towards the ground on the driverside..then on the passenger side it's gonna twist it up towards the sky..LMAO...atleast that's what i get out of it lol
Parts Dinosaur has rods for cheap....but be sure and inspect them GOOD then ya get em...make sure you have the CORRECT rods..i had to send mine back because they weren't right lol
12-01-2009, 11:20 AM
#131
Registered User
I just picked up a set of rods from www.japanengine.com for around $100. Plasigauged good. The guys there seem to be pretty good, also gave me a good deal when i had to order a second crank after i toasted their brand new one. They come with new bushings already installed.
I ordered the galley plugs from lce, no sealant required, they already have them on the threads. I also got the header stud kit from them as well.
I ordered the galley plugs from lce, no sealant required, they already have them on the threads. I also got the header stud kit from them as well.
Last edited by xxxtreme22r; 12-01-2009 at 11:25 AM.
12-01-2009, 12:26 PM
#133
Registered User
Thread Starter
Originally Posted by Staceman1
If those were my mounts, and I was on a budget, I'd put the cracked mount on the passenger side. That side doesn't work or stretch as much as the drivers' side. Then I'd chain them down. Cheap trick I have on my drivers side, still looks great.
Another way to deal with keeping a mount together or repairing a broken one (what Marlin does) is cut off the threaded stud and drill a 1/2" hole where the stud was all the way through the mount. Put in a bolt. At the end of the bolt use some sort of semi-cushy spacer followed by a lockwasher and locknut. Tighten just enough to prevent the mount from overly flexing.
I got the rod back today with a new bushing. Yesterday I took in one of Stace's spares. The machinist said it was too close to finished size to begin with and ended up slightly tapered after honing (and he had trued his hone first). So, he used a different bushing. I don't know if that package of bushings was Rock or ITM brand. I guess there's some variation. Looked the same to me.
I asked what clearance he set my bushings at. He said .0003", which sounds good since the book calls for .0002" to .0004".
Right now I'm waiting for the primer on my oil pan to dry. I'll hit it with some paint and then see about getting the screws out of my rocker assembly. They wouldn't budge using a screwdriver, so I bought an impact driver.
Later I'll put the pistons on the rods and check ring gaps -- been waiting until pistons are on so I have something to push the rings in with.
Last edited by flyingbrass; 12-01-2009 at 12:28 PM.
12-01-2009, 01:42 PM
#134
Registered User
Join Date: Oct 2009
Location: NW Phoenix
Posts: 134
Likes: 0
Received 0 Likes
on
0 Posts
They wouldn't budge using a screwdriver, so I bought an impact driver
My bushings came from EB by the way. Glad one came in handy for you.
12-01-2009, 04:08 PM
#135
Registered User
Thread Starter
A must is right. How did I live without an impact driver all these years? $10 at Autozone. Well worth it. Harbor Freight sells some drivers also, but their reversible one doesn't come with a #3 Phillips needed for the rocker screws.
Got most of the scum off the rocker parts. Tomorrow I'll finish brushing everything out and do some final cleaning. Carb cleaner (I used Gumout) and a soft brush works fairly well for removing the varnish. Kept tearing my gloves and finally gave up on them. Between paint fumes earlier, brake cleaner for some other parts, and bathing in and breathing carb cleaner, I've had enough for the day.
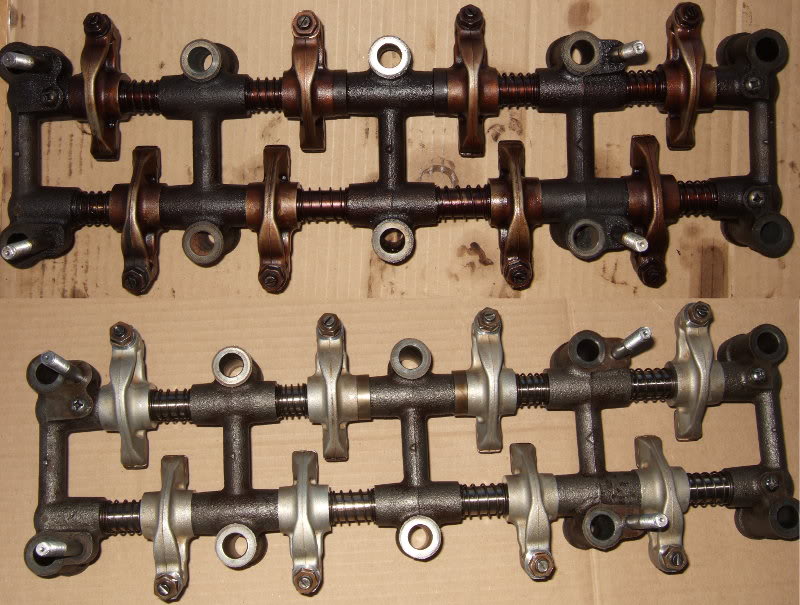
I'm keeping all the rocker parts in order. I numbered the towers with an electric engraver before realizing they are already numbered. Edit to add: No, they all aren't, and the numbers that exist can be confusing. 2 and 3 (from the front) could be easily confused. Switching those will screw you.
Got most of the scum off the rocker parts. Tomorrow I'll finish brushing everything out and do some final cleaning. Carb cleaner (I used Gumout) and a soft brush works fairly well for removing the varnish. Kept tearing my gloves and finally gave up on them. Between paint fumes earlier, brake cleaner for some other parts, and bathing in and breathing carb cleaner, I've had enough for the day.
I'm keeping all the rocker parts in order. I numbered the towers with an electric engraver before realizing they are already numbered. Edit to add: No, they all aren't, and the numbers that exist can be confusing. 2 and 3 (from the front) could be easily confused. Switching those will screw you.
Last edited by flyingbrass; 12-02-2009 at 07:12 PM.
12-02-2009, 05:24 AM
#136
Registered User

Join Date: Oct 2009
Posts: 30
Likes: 0
Received 0 Likes
on
0 Posts
I just wanted to mention that I am changing my cylinder head gasket atm ... your pictures helped me a lot to get rid of my head. Unfortunately I do not have the possibility to get my engine out ... so the block is still inside.
Today I removed the head and I had even water in my clinders ... baaah ... hopefully I can get my head shaved, otherwise I would have to buy a new one. It is looking really nasty...
OR: Does anybody of you readers have a spare R22 around in the area of Perth, Australia?
Today I removed the head and I had even water in my clinders ... baaah ... hopefully I can get my head shaved, otherwise I would have to buy a new one. It is looking really nasty...
OR: Does anybody of you readers have a spare R22 around in the area of Perth, Australia?
12-02-2009, 09:00 AM
#137
Registered User
Join Date: Oct 2009
Location: NW Phoenix
Posts: 134
Likes: 0
Received 0 Likes
on
0 Posts
Today I removed the head and I had even water in my clinders
12-02-2009, 03:13 PM
#138
Registered User
Thread Starter
Not spotless, but much better. The passages inside are clean. I put in new adjusting screws.
Last night I half heartedly tried to put my pistons on the rods. I chilled the wrist pins in the freezer and heated a piston up using a hair dryer. Wasn't enough. I'll find a pot I can use to heat the pistons in water.
My 1200 lb. clutch, clutch master cylinder and clutch slave cylinder from Marlin arrived today. That was quick considering they were closed last Friday when I ordered. 5 days to my door.
Last edited by flyingbrass; 12-02-2009 at 07:33 PM.
12-02-2009, 10:45 PM
#139
Registered User
Join Date: Nov 2009
Location: Tn USA
Posts: 51
Likes: 0
Received 0 Likes
on
0 Posts
Does any know how many mm a cylinder should be for a .040 oversized piston and rings? And what do you do if yo need bigger pistons than that? If you know answer for .030 and .010 this would be help to. THANKS ROBERT


