
22R Rebuild
 11-15-2009, 06:10 AM
#101
Registered User
Thread Starter

Hempleman Auto Parts & Machine. It's the Napa at 61st Ave. and Grand in Glendale. They've been in business since the '40's or '50's.
Not much info is available online about experiences with various machine shops. I'm half considering starting a shop review site/forum.
Not much info is available online about experiences with various machine shops. I'm half considering starting a shop review site/forum.
 11-15-2009, 07:06 AM
#102
Registered User
Thread Starter
Looking good.
What did you end up having to get from TOYOTA?
I am not doing my block, just head and timing cover etc...I am making a list of things to order from the dealer (crankshaft bolt, FIPG,short hose from water pump to block,allen bolt from under thermostat and ????). Just curious if there is anything else I should remember.
I'll probably order a few more items later, but this round was:
upper and lower exhaust studs and nuts
intake studs
intake bolts
rocker arm adjusting screws
FIPG
coolant hose that runs under intake (bypass hose) -- cheaper than at Autozone
clutch fork boot
rear main seal (90311-80010)
oil dipstick
I debated whether to buy a head gasket from Toyota or use the Rock that came in Engnbldr's kit. I'm still not 100% settled, but I'll probably use the Rock.
My radiator hoses are only about a year old, so they'll stay. I'll get new belts, but I wasn't sure which Toyota part numbers I need. Might get them at Autozone or Checker.
I still need to order a clutch kit and clutch master and slave cylinders. Will probably also replace the hose between them. Wabfab sells an OEM clutch. Marlin's 1200 lb. kit is $30 more. I haven't decided which to get.
11-18-2009, 04:25 PM
#103
Registered User
Thread Starter
Yeah, I'm leaning toward Wabfab.
I need to scrub the block thoroughly with soap and water. I'm waiting until Saturday when a friend will bring over his air compressor. Bare metal rusts quickly -- best to blow everything dry and get some protectant on the critical parts ASAP.
He also has some hex head sockets, which I'm hoping will work better than a pipe on a little L-shaped allen wrench for re-removing the oil galley plugs. The shop had them out, but really cranked them back in there.
What's best for sealing the galley plugs? The shop used teflon tape.
In the meantime I'm cleaning other parts.
I sent the Rock oil pump back to Engnbldr for exchange. Got the replacement yesterday. It's an Aisin. Haven't measured the clearances, but it looks a lot better.
11-18-2009, 08:35 PM
#104
Registered User
Join Date: Jan 2003
Location: Sunny with a continued chance of hot, AZ
Posts: 424
Likes: 0
Received 0 Likes
on
0 Posts
Yeah, I'm leaning toward Wabfab.
I need to scrub the block thoroughly with soap and water. I'm waiting until Saturday when a friend will bring over his air compressor. Bare metal rusts quickly -- best to blow everything dry and get some protectant on the critical parts ASAP.
He also has some hex head sockets, which I'm hoping will work better than a pipe on a little L-shaped allen wrench for re-removing the oil galley plugs. The shop had them out, but really cranked them back in there.
What's best for sealing the galley plugs? The shop used teflon tape.
In the meantime I'm cleaning other parts.
I sent the Rock oil pump back to Engnbldr for exchange. Got the replacement yesterday. It's an Aisin. Haven't measured the clearances, but it looks a lot better.
I need to scrub the block thoroughly with soap and water. I'm waiting until Saturday when a friend will bring over his air compressor. Bare metal rusts quickly -- best to blow everything dry and get some protectant on the critical parts ASAP.
He also has some hex head sockets, which I'm hoping will work better than a pipe on a little L-shaped allen wrench for re-removing the oil galley plugs. The shop had them out, but really cranked them back in there.
What's best for sealing the galley plugs? The shop used teflon tape.
In the meantime I'm cleaning other parts.
I sent the Rock oil pump back to Engnbldr for exchange. Got the replacement yesterday. It's an Aisin. Haven't measured the clearances, but it looks a lot better.
Get a Marlin clutch. No offense toward Brian, the Marlin clutch is super smooth and grippy.
Sealing galley plugs? You can't get them out with a regular hex key? That ain't good. This machine shop is sounding more and more shady as the build goes on. Teflon tape? That's for installing a bath fixture, it has no place on this engine. At this point, go find someone that works at a machine shop and borrow a dial bore or two, a couple micrometers and measure all your stuff.
East valley, B&B Machine. South of Main, west of Alma School.
BTW, FIPG is an elastomeric. Right Stuff is perfectly equivalent.
11-19-2009, 05:42 AM
#105
Registered User
Join Date: Jun 2009
Location: Iowa City, IA
Posts: 66
Likes: 0
Received 0 Likes
on
0 Posts
Prior to soap and water my machinist also had me scrub the oil channels with diesel fuel and gun cleaning brushes to remove any particulates.
11-19-2009, 02:00 PM
#106
Registered User
Thread Starter
I spent some time reading. Teflon tape isn't necessarily bad. Many shops and mechanics use it. If you do, it's important to start the tape a couple threads back from the end of the plug, and wrap it in the right direction so the tape doesn't try to unwrap as you install the plug.
Some say don't use teflon tape on engines, period. The problem is that if not applied properly pieces of it can come loose and plug up important things. Since alternatives exist, I'm siding with those who say don't use it.
Overall, with the exception of improperly applied tape, it doesn't seem to matter much which sealant is used. I bought a tube of Permatex High Temperature Thread Sealant. Permatex lists oil galley plugs under its applications.
I'd like to measure the bores and pistons (and everything else too really, because I'm curious), but at this point I can't justify paying another shop to check things out. I doubt any shop would lend me the tools.
Karlton, what did you use in place of Three Bond 1324? I'm sure many things would work, but I'm curious what is supposed to be used. Looks like Loctite 542 or 567 are roughly equivalent. I haven't seen either of those locally.
I'll scrub out the passages with gun cleaning brushes and solvent before washing.
11-19-2009, 05:48 PM
#107
Registered User
Join Date: Jun 2009
Location: Iowa City, IA
Posts: 66
Likes: 0
Received 0 Likes
on
0 Posts
From the Permatex website:
Suggested Applications: Head bolts into through holes, oil PSI sending units and sensors, oil and coolant lines, fuel fittings, rear axle fill plug, brake and power steering fittings.
Hope this helps.
11-19-2009, 06:51 PM
#108
Registered User
Thread Starter
That's the stuff I got today for the oil galley plugs. It's for tapered thread fittings, essentially pipe dope.
Similar to what you'd do when using teflon tape, the instructions on the Permetex sealant say to apply it on the 2nd thread back from the end. And to not use very much, only a line about 3/4 around the circumference of the plug/bolt.
I asked Engnbldr what he recommends using on the oil pump through bolt. He said RTV. So, probably most anything works there too, as long as something is used. An EGR valve bolt also extends through and needs some sealant.
Something not mentioned in the manual, in timing chain replacement write-ups, and only rarely on forums, several sources have advised applying sealant to the "hidden" bolt on top of the timing chain cover -- the one under the timing gear. I don't know why. Maybe leakage there is only a problem in certain situations? I'm thinking some sealant there can't hurt, and if it has the potential for avoiding a headache later, go for it.
Something more important that isn't mentioned in the manual is tightening head bolts to 64 ft/lbs instead of 58 when using newer style head gaskets and 10.9 grade bolts. I haven't ask Engnbldr about this myself, but here is a quote of his post 2 years ago at 4x4wire (http://www.4x4wire.com/forums/showth...087&page=&vc=1):
>>>*I do understand that everyone has their way, if it works, don't change. But I say to lube the threads with normal motor oil. The bolt hole threads should be chased out, also (NOT tapped!)..We use an old head bolt, and cut a groove with a hacksaw, they make a perfect chaser.
Then be sure the bolt hole is cleansed completely, note using compressed air without FAIL will get you in the eye so use safety glasses...
*Ask me how I know....*LOL**
THEN: lightly oil the threads, DO NOT install them dry, that simply INCREASES friction and contributes to false torque readings...Just MHO, I HATE to redo anything....A slight overtorque normally hurts nothing, an undertorque creates "defective" head gaskets.....
Spin the bolt in all the way and back out with your fingers, if the bolt feels sticky at any point you WILL have a false torque reading. If you feel that, rechase and reclean them.
Then install the bolts, snug them to 50%, back them off 1/4 turn...Yes in sequence. Do NOT be in a hurry here, you are saving yourself time and troubles. Then to 75%, back off 1/4 turn, then 100% and good to go. (Yes, even with used head bolts, unless you DID reinstall each bolt in it's original position using an unsurfaced head and block???)
All we are doing here is mating thread imperfections, they are always there.
Remember to retorque with the engine warm, if you got her right, none of them will move...PIA, do it anyway, if you do you eliminate a few hours of work in a few weeks or months down the road...
*Shortcuts? No prob, they take a tad more time and cost a tad more money...No prob, you DO have a cell phone, right?
Someone will probably come and get you....
Recheck hot after runin when you adjust the valves for the final setting. Uniform and even clamping forces means that 10 years from now you are still starting her up and going down the road, uneven means that the head gasket was "defective" and you don't get to go fishing that weekend.
One discovery we made, the 58# the factory calls for is fine for the composition gasket (asbestos impregnated) used originally by the factory. The new 10.9 grade bolts out now call for 64#, because most quality suppliers are now selling the new metal lined gaskets. The older style composition also work fine, too, the new stuff is just better. Even most Toyota dealerships now supply the new metal lined piece, those are pretty good gaskets..
But the metal lined gaskets (NOT MLS, different stuff there) are needing a bit more clamping force to compress properly, I discovered this while testing some items.. Note here I am old and could be wrong but I ain't...
Gasket failure using these procedures are almost unheard of unless some kind of upset condition exists, in which case it will fail no matter what you do. In fact, the gasket is the weak link, designed to fail in upset/mis-tuned conditions, and save other expensive engine parts......*EB
Last edited by flyingbrass; 11-19-2009 at 08:43 PM.
11-20-2009, 09:28 AM
#110
Registered User
Thread Starter
I e-mailed Ted. 64 lbs for the bolts he sells. Stick with 58 for others.
I think I advised using 64 lbs ft on OUR new head bolts, I would stay at 58# with the stock ones or most aftermarket. This of course assumes a block in good condition. Clamping force is a completely different thing than "torque", the clamping force is just a mathematical guess from the suggested torque load. Errors there are probably the number one cause of "defective" head gaskets.
 11-24-2009, 03:48 PM
#112
Registered User
Thread Starter
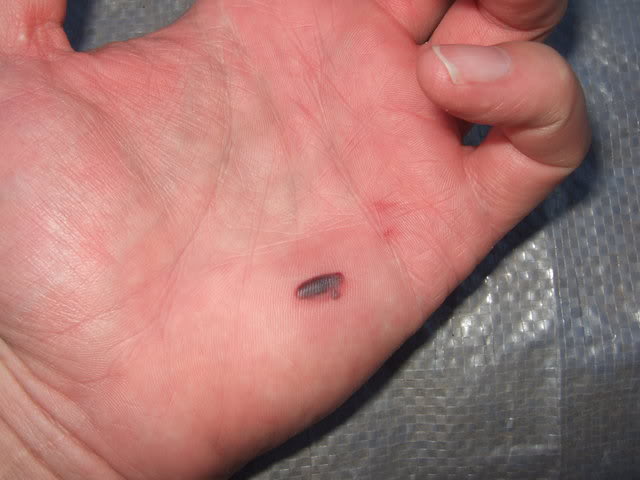
I cut some slots in an old head bolt and chased the holes. Used a little PB Blaster in the stubborn ones. Later, I cleaned the holes using brake cleaner and compressed air.
I took out the oil galley plugs and cleaned the passages using gun cleaning rods, bore brushes and solvent. There weren't any huge chunks or blockages, but enough crud that it was well worth the effort.
I washed the block with soapy water, scrubbing inside and out as best I quickly could. Hosed it off good and blew dry with compressed air. I wiped down critical surfaces with WD-40. Didn't get very much extra flash rusting on the outside from washing -- not noticeably more than was there before.
Before washing I cleaned the freeze plug holes with sandpaper. Still had some gunk remaining, so I hit them with a wire brush in a Dremel. That cleaned them up nicely. Wiped out residue with brake cleaner.
This was my first time installing freeze plugs. I smeared a very thin coat of gray Permatex around the outside of the plug and used the biggest socket I had that wasn't too big, in this case a 24mm deep impact socket (slightly larger would have been better). They required a fair amount of persuasion to go in. A normal claw hammer wasn't enough. I used a 4 lb. sledge.
This doesn't look like much, but $%&! it hurt. Gotta be careful not to catch skin between hammer and socket.
The block was too rusty to suit me. I hit a few small areas with a wire brush in a Dremel, which kicked up rusty dust. I couldn't bring myself to paint over that, so I spent some time today wire wheeling the block. A steel cup brush in a Dremel worked pretty well. A bigger cup brush in a drill didn't. Got it closer to how it should have been in the first place. It was brown and dull before with obvious rust spots in places.

I'll probably wash the outside again with soap and water because brushing left behind a lot of dust.
I bought a can of Duplicolor engine enamel. Is one can enough? Also got some Duplicolor engine enamel primer, which the instructions say to use first, but the instructions on the primer are the same as the paint. WTF? Do you prime a coat or two, then do 2-3 coats of paint, all within an hour?
I took out the oil galley plugs and cleaned the passages using gun cleaning rods, bore brushes and solvent. There weren't any huge chunks or blockages, but enough crud that it was well worth the effort.
I washed the block with soapy water, scrubbing inside and out as best I quickly could. Hosed it off good and blew dry with compressed air. I wiped down critical surfaces with WD-40. Didn't get very much extra flash rusting on the outside from washing -- not noticeably more than was there before.
Before washing I cleaned the freeze plug holes with sandpaper. Still had some gunk remaining, so I hit them with a wire brush in a Dremel. That cleaned them up nicely. Wiped out residue with brake cleaner.
This was my first time installing freeze plugs. I smeared a very thin coat of gray Permatex around the outside of the plug and used the biggest socket I had that wasn't too big, in this case a 24mm deep impact socket (slightly larger would have been better). They required a fair amount of persuasion to go in. A normal claw hammer wasn't enough. I used a 4 lb. sledge.
This doesn't look like much, but $%&! it hurt. Gotta be careful not to catch skin between hammer and socket.
The block was too rusty to suit me. I hit a few small areas with a wire brush in a Dremel, which kicked up rusty dust. I couldn't bring myself to paint over that, so I spent some time today wire wheeling the block. A steel cup brush in a Dremel worked pretty well. A bigger cup brush in a drill didn't. Got it closer to how it should have been in the first place. It was brown and dull before with obvious rust spots in places.
I'll probably wash the outside again with soap and water because brushing left behind a lot of dust.
I bought a can of Duplicolor engine enamel. Is one can enough? Also got some Duplicolor engine enamel primer, which the instructions say to use first, but the instructions on the primer are the same as the paint. WTF? Do you prime a coat or two, then do 2-3 coats of paint, all within an hour?
Last edited by flyingbrass; 11-24-2009 at 04:00 PM.
11-24-2009, 04:54 PM
#114
Registered User
Join Date: Sep 2009
Location: Sarasota, Florida
Posts: 126
Likes: 0
Received 0 Likes
on
0 Posts
I cut some slots in an old head bolt and chased the holes. Used a little PB Blaster in the stubborn ones. Later, I cleaned the holes using brake cleaner and compressed air.
I took out the oil galley plugs and cleaned the passages using gun cleaning rods, bore brushes and solvent. There weren't any huge chunks or blockages, but enough crud that it was well worth the effort.
I washed the block with soapy water, scrubbing inside and out as best I quickly could. Hosed it off good and blew dry with compressed air. I wiped down critical surfaces with WD-40. Didn't get very much extra flash rusting on the outside from washing -- not noticeably more than was there before.
Before washing I cleaned the freeze plug holes with sandpaper. Still had some gunk remaining, so I hit them with a wire brush in a Dremel. That cleaned them up nicely. Wiped out residue with brake cleaner.
This was my first time installing freeze plugs. I smeared a very thin coat of gray Permatex around the outside of the plug and used the biggest socket I had that wasn't too big, in this case a 24mm deep impact socket (slightly larger would have been better). They required a fair amount of persuasion to go in. A normal claw hammer wasn't enough. I used a 4 lb. sledge.
This doesn't look like much, but $%&! it hurt. Gotta be careful not to catch skin between hammer and socket.

The block was too rusty to suit me. I hit a few small areas with a wire brush in a Dremel, which kicked up rusty dust. I couldn't bring myself to paint over that, so I spent some time today wire wheeling the block. A steel cup brush in a Dremel worked pretty well. A bigger cup brush in a drill didn't. Got it closer to how it should have been in the first place. It was brown and dull before with obvious rust spots in places.

I'll probably wash the outside again with soap and water because brushing left behind a lot of dust.
I bought a can of Duplicolor engine enamel. Is one can enough? Also got some Duplicolor engine enamel primer, which the instructions say to use first, but the instructions on the primer are the same as the paint. WTF? Do you prime a coat or two, then do 2-3 coats of paint, all within an hour?
I took out the oil galley plugs and cleaned the passages using gun cleaning rods, bore brushes and solvent. There weren't any huge chunks or blockages, but enough crud that it was well worth the effort.
I washed the block with soapy water, scrubbing inside and out as best I quickly could. Hosed it off good and blew dry with compressed air. I wiped down critical surfaces with WD-40. Didn't get very much extra flash rusting on the outside from washing -- not noticeably more than was there before.
Before washing I cleaned the freeze plug holes with sandpaper. Still had some gunk remaining, so I hit them with a wire brush in a Dremel. That cleaned them up nicely. Wiped out residue with brake cleaner.
This was my first time installing freeze plugs. I smeared a very thin coat of gray Permatex around the outside of the plug and used the biggest socket I had that wasn't too big, in this case a 24mm deep impact socket (slightly larger would have been better). They required a fair amount of persuasion to go in. A normal claw hammer wasn't enough. I used a 4 lb. sledge.
This doesn't look like much, but $%&! it hurt. Gotta be careful not to catch skin between hammer and socket.
The block was too rusty to suit me. I hit a few small areas with a wire brush in a Dremel, which kicked up rusty dust. I couldn't bring myself to paint over that, so I spent some time today wire wheeling the block. A steel cup brush in a Dremel worked pretty well. A bigger cup brush in a drill didn't. Got it closer to how it should have been in the first place. It was brown and dull before with obvious rust spots in places.
I'll probably wash the outside again with soap and water because brushing left behind a lot of dust.
I bought a can of Duplicolor engine enamel. Is one can enough? Also got some Duplicolor engine enamel primer, which the instructions say to use first, but the instructions on the primer are the same as the paint. WTF? Do you prime a coat or two, then do 2-3 coats of paint, all within an hour?

 11-24-2009, 05:33 PM
#115
YotaTech Milestone-Two Millionth Post
 11-24-2009, 05:51 PM
#116
Registered User
Thread Starter
Originally Posted by The84toyota
any suggestions on piston ring gap? great work on block dude
I'm guessing 7-8 cases have gone into this rebuild so far. Anyone need some boxes?
 11-25-2009, 08:46 PM
#119
Registered User
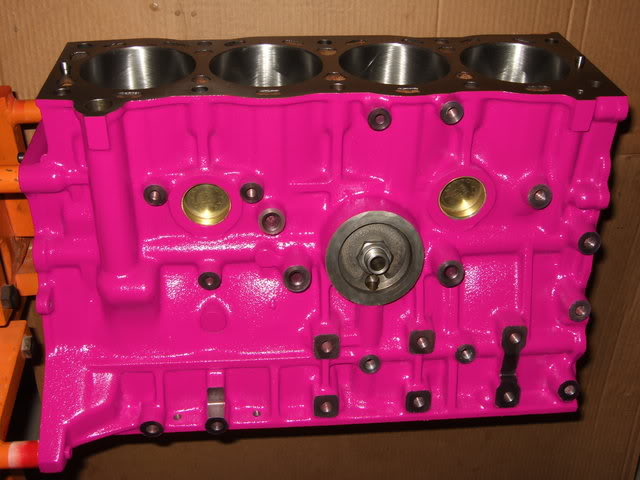
are we bein serious here......pink..really...lol
now if you're a girl..this would be nice lmao..but if not..a little weird lol but to each there own
of course now you can see any leaks realllyy quick LOL
shoulda went with like a HOT PINK
now if you're a girl..this would be nice lmao..but if not..a little weird lol but to each there own
of course now you can see any leaks realllyy quick LOL
shoulda went with like a HOT PINK
11-25-2009, 09:33 PM
#120
Registered User
Thread Starter
Just kidding. It's Ford Red.
Sure was a lot of taping. I counted 48 things I taped or plugged, not counting covering the top, front, back and bottom. Thought I'd have it knocked out in an hour. Not.
Maybe next week I'll look through my pictures and paint some of the flats around the bolt holes that aren't used. Today I thought figuring that out would take more time than taping everything. I was in a race, which I lost, to not run out of daylight.


